HAVERTYS Skye Base 300LP User manual

REV: 2022-09-23
Manual Part No. MMA08SFA5
Copyright © 2018. All Rights Reserved.
Ascion LLC.
Please take a moment to follow the below steps to ensure the correct set-up (or pairing) of your remote.
Step 1: Install batteries in your remote before use.
Step 2: Contact our customer service at 1-800-973-8374 or [email protected] if you need any additional
assistance.
Your base comes with a 20 Year Limited Warranty. For a Full Owners Manual, Warranty, and Troubleshooting information,
please visit our website at: https://reverie.com/support
*Image may not represent the product you purchased
Adjustable Low Prole Power Base
Skye Base 300LP
CONGRATULATIONS ON YOUR PURCHASE OF AN ADJUSTABLE POWER BASE!

2
Safety Precautions
WARNING! IMPORTANT SAFETY
INSTRUCTIONS. PLEASE READ THESE
INSTRUCTIONS THOROUGHLY BEFORE
USING THIS PRODUCT. SAVE THESE
INSTRUCTIONS!
When using an electrical furnishing basic
precautions should always be followed,
including the following:
READ ALL INSTRUCTIONS BEFORE
USING (THIS FURNISHING)
DANGER: To reduce the risk of electric
shock: Always unplug this furnishing from the
electrical outlet before cleaning.
WARNING:
To reduce the risk of burns, re, electric
shock, or injury to persons:
• Unplug from outlet before putting on or
taking off parts.
• Close supervision is necessary when
this furnishing is used by or near
children, invalids or disabled persons.
• Use this furnishing only for its
intended use as described in these
instructions. Do not use attachments not
recommended by the manufacturer.
• Never operate this furnishing if it has
a damaged cord or plug, or if it is not
working properly, dropped or damaged,
or dropped into the water, call Reverie
customer service.
• Keep the cord away from heated
surfaces.
• Never drop or insert any object into any
opening.
• Do not use outdoors.
• Do not operate where aerosol (spray)
products are being used or where
oxygen is being administered.
• To disconnect, turn all controls to the off
position, then remove plug from outlet.
WARNING: Risk of Injury: Keep children
away from under the head and foot of the
base when moving.
WARNING: Risk of electric shock:
Connect this furnishing to a properly
grounded outlet only.
GROUNDING INSTRUCTIONS:
This product must be grounded. If it should
malfunction or breakdown, grounding
provides a path of least resistance for electric
current to reduce the risk of electric shock.
This product is equipped with a cord having
an equipment-grounding conductor and a
grounding plug. The plug must be plugged
into an appropriate outlet that is properly
installed and grounded in accordance with all
local codes and ordinances.
Do not modify the plug provided with the
product. If it will not t the outlet, have
a proper outlet installed by a qualied
electrician.
DANGER:
Improper connection of the equipment-
grounding conductor can result in a risk
of electric shock. Check with a qualied
electrician or serviceman if you are in
doubt as to whether the product is properly
grounded.
FOR BEST RESULTS, YOUR POWER BASE
SHOULD BE PLUGGED INTO A SURGE
PROTECTOR (not included).
USER-SERVICEABLE PARTS:
This product is specically designed to have
no maintenance by you, the user. Therefore,
you are encouraged not to open any motors,
alter the wiring, adjust, modify or change the
structure of the product, as it will void the
warranty.
IMPORTANT SAFETY FEATURES:
Use this furnishing only for its intended use
as described in these instructions. Do not
use attachments not recommended by the
manufacturer. If there is an overload weight
condition on the head or foot mechanism, the
control unit will automatically stop all functions.
Once the excess weight is removed the control
unit will automatically allow all functions to
resume operation after 30 seconds. As with any
product that produces a vibrating motion, it is
possible that some pacemakers may interpret
this motion as a false sense of movement and
or exercise. This may or may not affect your
pacemaker. If you have any concerns, please
consult your physician. For more information
please contact customer service by calling 800-
973-8374.
WARNING!
DO NOT USE NEAR PEOPLE USING
OR WEARING MEDICAL DEVICES. FOR
HOUSEHOLD / RESIDENTIAL USE ONLY. DO
NOT USE OUTDOORS. This product conforms
to UL STD 962
SMALL CHILDREN AND PETS WARNING:
After your Power Base has been unboxed,
immediately dispose of packaging as it can
smother small children and pets. To avoid
injury, children and pets should not be
allowed to play on or under the power base.
Children should not operate this product
without adult supervision. Close supervision
is necessary when this furnishing is used
by, or near children, invalids, or disabled
persons.
SAVE THESE INSTRUCTIONS:
Your Power Base has been designed to
provide you with the reliable operation and
durability you expect. This product has been
inspected and tested prior to shipment.
PRODUCT RATINGS
The lift motor in your Power Base is NOT
designed for continuous use. Reliable
operation and full life expectancy will be
attained as long as the lift motor does not
operate more than two (2) minutes over an
eighteen (18) minute period, or approximately
10% duty cycle. Any attempt to circumvent
or exceed this rating will shorten the life
expectancy of this product and may void
the warranty. The recommended weight
restrictions for your Power Base is up to 850
lbs. total weight, including people and the
mattress for all sizes of power bases. Lift
speed will vary due to weight and mattress
conguration, as well as the mattress type.
The weight must be evenly distributed across
the power base. This Product is not designed
to support or lift 850 lbs of total weight in the
head or foot sections of your Power Base
alone, or in any unevenly distributed fashion.
Some mattresses are not designed for Power
Bases because they do not bend or ex well
when adjusted. When using such a mattress
with your Power Base the weight limits set
forth herein do not apply, as the bending of
the mattress requires signicant force and
puts signicant strain on the motors and the
Power Base itself.
For best performance, you should enter and
exit the Power Base while it is in the at or
fully lowered position.
DO NOT SIT ON THE HEAD OR FOOT
SECTIONS WHILE IN THE RAISED
POSITION.
INTENDED USAGE
The electric power base should be
installed with the head board brackets
and/or the head of the frame positioned
close to a wall.
IN-HOME USE AND HOSPITAL DISCLAIMER:
Your power base is strictly designed for in-home
use only. It is NOT designed for hospital use and
is NOT designed to meet hospital standards.
Do not use this base with TENT TYPE oxygen
therapy equipment or near explosive gases.
WARRANTY PRECAUTION:
Do not open control box, motors or wireless
remote controls (with the exception of the
battery compartment if equipped). The
warranty is void if these units are tampered
with. Any repair or replacement of power
base parts must be performed by an
authorized technician.
Note: Exceeding the recommended weight
restrictions could damage your power
base and void your warranty and using a
mattress on top of your power base that
is not designed for adjustability may also
void your warranty.
WARNING: PINCH POINT! Do not reach under
the base during operation.
This product is for use on a circuit having a
standard rating of 120 volts and is factory
equipped with a specic electric cord and plug
to permit connection to a proper electric circuit.
Make sure that the product is connected to an
outlet having the same conguration as the plug.
No adapter should be used with this product. If
the product must be reconnected for use on a
different type of electric circuit, the reconnection
should be made by qualied service personnel.
Unauthorized modications could void the
electrical portion of your warranty. Failure to
use a properly grounded outlet for this product
or modication of the plug will compromise this
important grounding safety feature and may
result in electrical shock, electrical re, or faulty
operation of the product.
POWER RATINGS:
INPUT: AC 100-240V - 50/60Hz, 1.5 Amp
OUTPUT: DC 29V-2.24A
WARNING: DO NOT USE RECHARGEABLE
BATTERIES IN THE CONTROL BOX OR
POWER SUPPLY FOR THE EMERGENCY
POWER DOWN FEATURE.
3
WARNING: Missing lift motor
installation step may cause
malfunction or damage to the power
base.
WARNING: Check with your platform
frame’s manufacturer to ensure that the
frame can support the additional weight
of the power base. Reverie will not be
responsible for damage caused to your
platform frame.
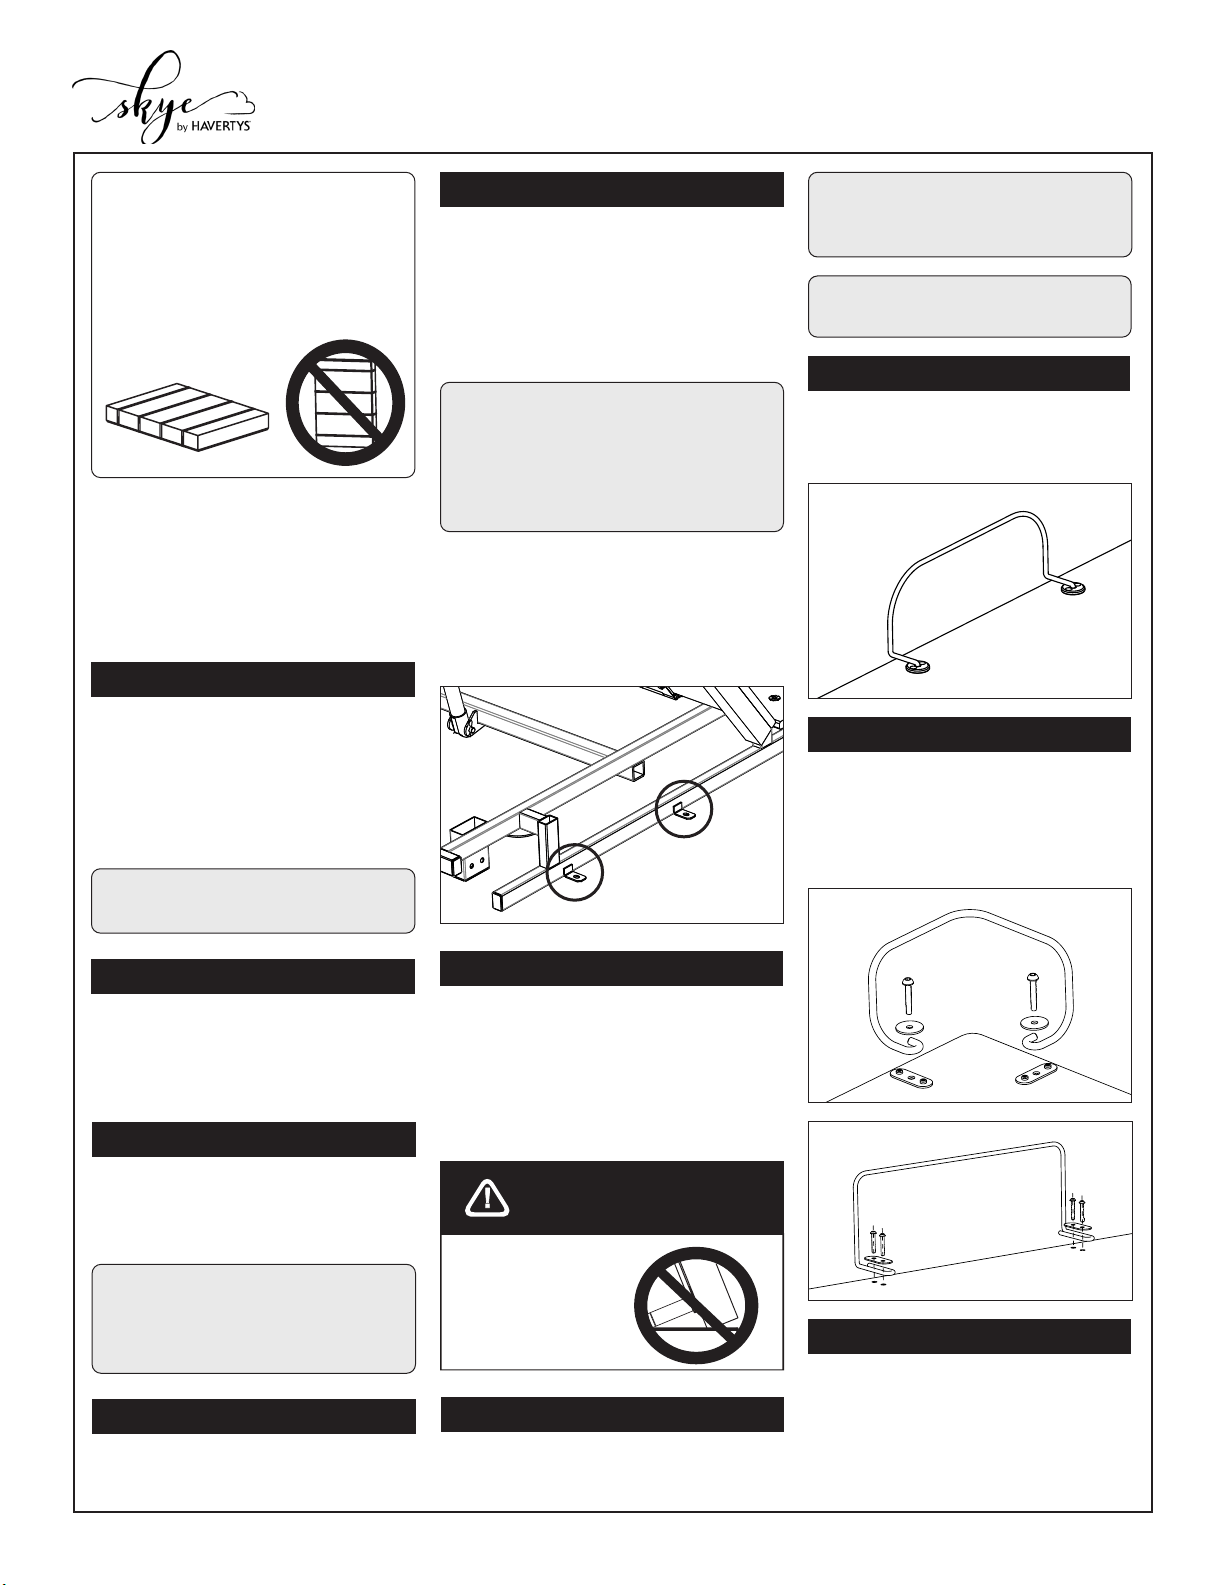
Package contents:
Remote Control
Mattress Retainer Bar
Power Adapter
Base Legs
Y-cable (optional for Tandem control)
IMPORTANT UNPACKING
INSTRUCTIONS
To avoid damage to the power base,
always open the carton while the
power base is laying in the FLAT
position on the oor.
OPEN FLAT
STEP 7A
If you have a tool free retainer bar,
Insert it into the two mount holes located
at the foot end of the power base.
STEP 1
STEP 5A
STEP 5B
STEP 3
STEP 2
STEP 4
STEP 8
STEP 6
If the power base is supposed to be used
on a platform or storage bed without legs,
carefully ip the base and place it on top
of the platform, making sure that none of
the cords are getting crushed between
the power base and the platform bed. (For
non-platform setup, skip to Step 5B.)
(Optional) To secure the power base on
the platform bed, there are 4 steel tabs (2
on each side of the head section) provided
as shown in the gure below. Install the
wood screws provided to secure the frame.
If the base is going to be used
independently, assemble the power base
legs. Screw them in a clockwise direction
into the threaded holes in the frame.
Carefully ip the power base over with 2
people, to the topside-up position.
Remove the securing fasteners on the
accessory components, and set them
aside from the undercarriage of the
base.
Install the loose end of the back lift
motor onto the steel frame with the pre-
installed Clevis Pin and Cotter Pin set.
Remove the zip ties securing the excess
cord from the motors of the power base.
Plug the power cord into a grounded
electrical outlet.
NOTE: An electrical surge protection
unit is recommended (not included)
ATTENTION!
Improper handling
DO NOT lean the
power base against
the installed legs to
ip it over.
WARNING: Packaging material may
smother small children and pets.
If you are installing a headboard,
proceed to follow the Headboard
Bracket Assembly Guide on our website.
If not, place your mattress on top of the
power base. Power base assembly is
now complete.
Carefully pull the folded power base
unit out of the shipping carton. Remove
and discard the plastic bag. Unfold the
base keeping the unit top side down. For
safety reasons, this should be performed
by 2 people.
Frame Assembly Instructions
STEP 7B
If you have a retainer bar that requires
hardware, use the retainer bolts and
retainer bar plates to fasten the Retainer
Bar to the power base. DO NOT use a
power screwdriver to tighten the bolts.
WARNING: Power cords must
not interfere with any power base
mechanisms.

4
Remote Pairing
Your remote is already paired
with your power base. Follow
the below instructions for
replacement remote pairing.
IF YOU HAVE A WIRELESS
REMOTE
How To Unpair a Remote
IF YOU HAVE A WIRED REMOTE
Your power base has an emergency
lowering feature in the event that
your power base is in the raised
position and has lost power due to a
power outage.
Emergency Power Down
Feature
Locate and remove the cover for the
9 volt batteries on the control box or
power supply box.
Press the “FLAT” button or the
individual lowering buttons.
Once the bed returns to the at
position, remove the batteries from
the control box.
Install the two (2) alkaline 9 volt
batteries and reinstall the battery
cover.
Press any button on the remote
control. When the control box light
turns solid, the remote should be
successfully paired.
Test and verify the remote is
correctly paired by activating
functions of the power base. You
have now completed the pairing
process.
To unpair an old remote in order to
pair a new one, simply repeat the
remote pairing process twice with
the new remote.
Place batteries into the remote
control (3 x AAA batteries).
Ensure the power base is plugged
into a functioning outlet.
NOTE: DO NOT raise the base
when powered with only backup
batteries. The batteries are only
intended to lower the base in
case of emergency.
Press and hold the pairing button on
the control box until the indication
light blinks.
STEP 1 STEP 1
STEP 2
STEP 2
STEP 3
STEP 3
STEP 4
STEP 4
STEP 5
STEP 1
STEP 2
STEP 3
STEP 4
STEP 5
STEP 6
STEP 7
Plug in the “A” output of the Y-Cable
into Base A control port.
Unplug both wired remote
controls from their lift motors and set
aside.
Plug in the “B” output of the Y-Cable
into Base B control port.
Remove and extend one of the
provided Y-Cables.
Plug one of the provided hardwired
remote controls into the “Control Input”
side of the Y-Cable.
Route the control cable to your
preferred side of the bed.
Make sure both Base A and Base B
are set up and positioned closely
side-by-side together. (Ignore this step
for Split Top Queen setup. For the
following steps, Base A/B will refer to
Side A/B).
BControl
Input
A
If you have a wired remote and want
to connect to 2 power bases that will
move in tandem as a single unit, follow
the below instructions. For reference,
bases will be refered to as “Base A”
and “Base B”, but are not actually
labeled as such in person.
Manufactured by Reverie®
For Warranty and Service:
1-800-973-8374
Please have your receipt ready and
available. Thank you and enjoy your
power base. www.reverie.com
Register Online. For easy registration
of your warranty visit
https://reverie.com/register-your-
warranty
Please prepare a digital copy of your
proof of purchase (invoice or sales
receipt) when registering online. You
may also be required to provide your
product’s serial number, which can be
found on the law tags attached to the
base.
WARNING: DO NOT USE
RECHARGEABLE BATTERIES
IN THE CONTROL BOX OR
POWER SUPPLY FOR THE
EMERGENCY POWER DOWN
FEATURE.
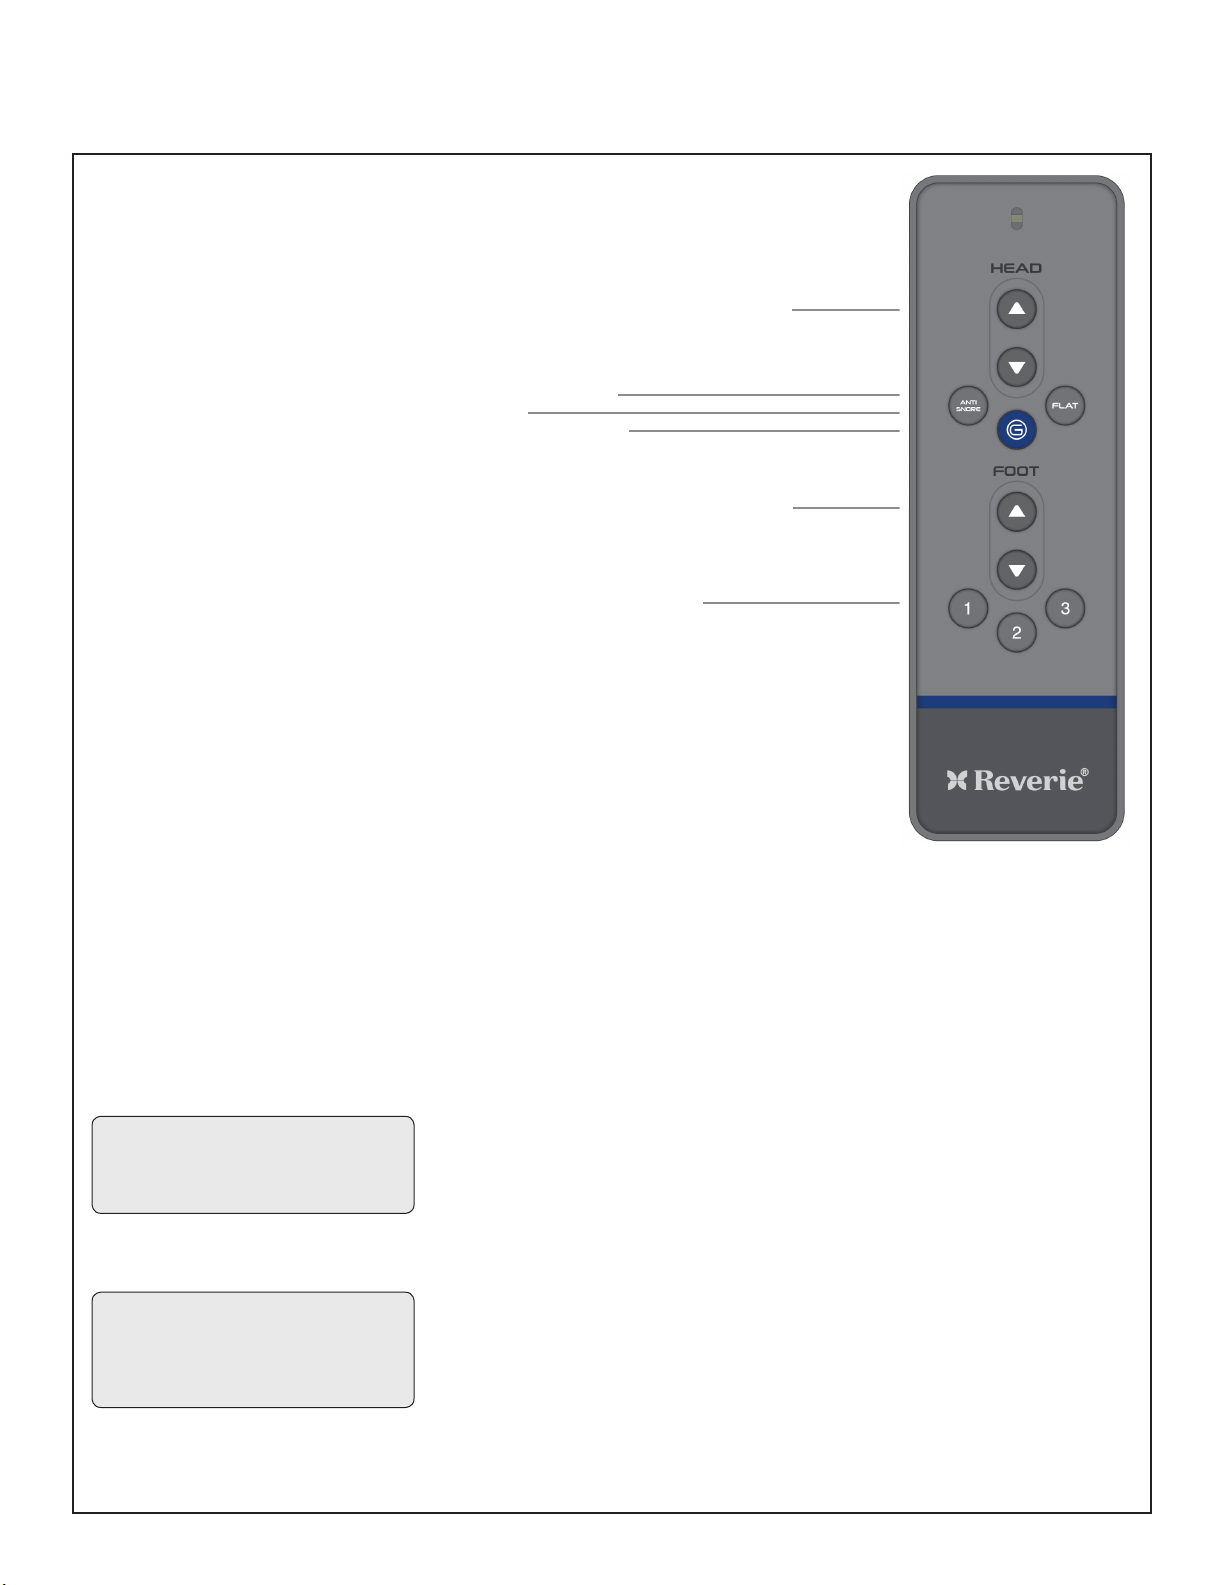
HEAD AND FOOT
ADJUSTMENTS (A,E)
Adjusts the head and foot sections
to the desired positions.
ANTI SNORE (B)
Raises the HEAD slightly for easier
breathing.
FLAT (C)
Returns both head and foot to the
at position.
ZERO GRAVITY (D)
Allows your legs to be lifted to a
position slightly above the chest,
which enables blood ow to easily
circulate back to the heart, thus
reducing stress and fatigue.
MEMORY POSITION PRESETS
(F)
You can store 2 personalized
memory positions. Press and hold
the Memory button for 5 seconds
until the LED light ashes 3 times to
store the setting. To recall a Memory
Position, press the corresponding
button.
NOTE: Any control button on the
remote will interrupt and stop the
FLAT, ZERO-G, Anti-Snore and
Memory Position presets.
NOTE: Do not hold the memory
position for more than 5 seconds
or the setting will overwrite.
Remote Control Operation Guide
A. RAISE & LOWER HEAD SECTION
B. ANTI - SNORE
C. FLAT
D. ZERO GRAVITY
E. RAISE & LOWER FOOT SECTION
F.MEMORY POSITION 1-3
REMOTE LOCKOUT FEATURE
(A,C)
We created the remote lockout feature
to help owners prevent unintended use
of the base.
Activating Remote Lockout
At the same time, press and hold
the HEAD UP and FLAT buttons for
3 seconds. The LED will ash twice
to indicate activation. Pressing any
buttons on the remote while in lockout
mode will result in no movement from
the power base.
Deactivating Remote Lockout
Repeat the same process, press and
hold the HEAD UP and FLAT buttons
at the same time for 3 seconds.
The LED will ash twice to indicate
deactivation. The remote and power
base will work normally.
Table of contents
Other HAVERTYS Indoor Furnishing manuals


Popular Indoor Furnishing manuals by other brands

Regency
Regency LWMS3015 Assembly instructions

Furniture of America
Furniture of America CM7751C Assembly instructions

Safavieh Furniture
Safavieh Furniture Estella CNS5731 manual

PLACES OF STYLE
PLACES OF STYLE Ovalfuss Assembly instruction

Trasman
Trasman 1138 Bo1 Assembly manual

Costway
Costway JV10856 manual


