Havit HV9101-ZB-5C User manual

Back side
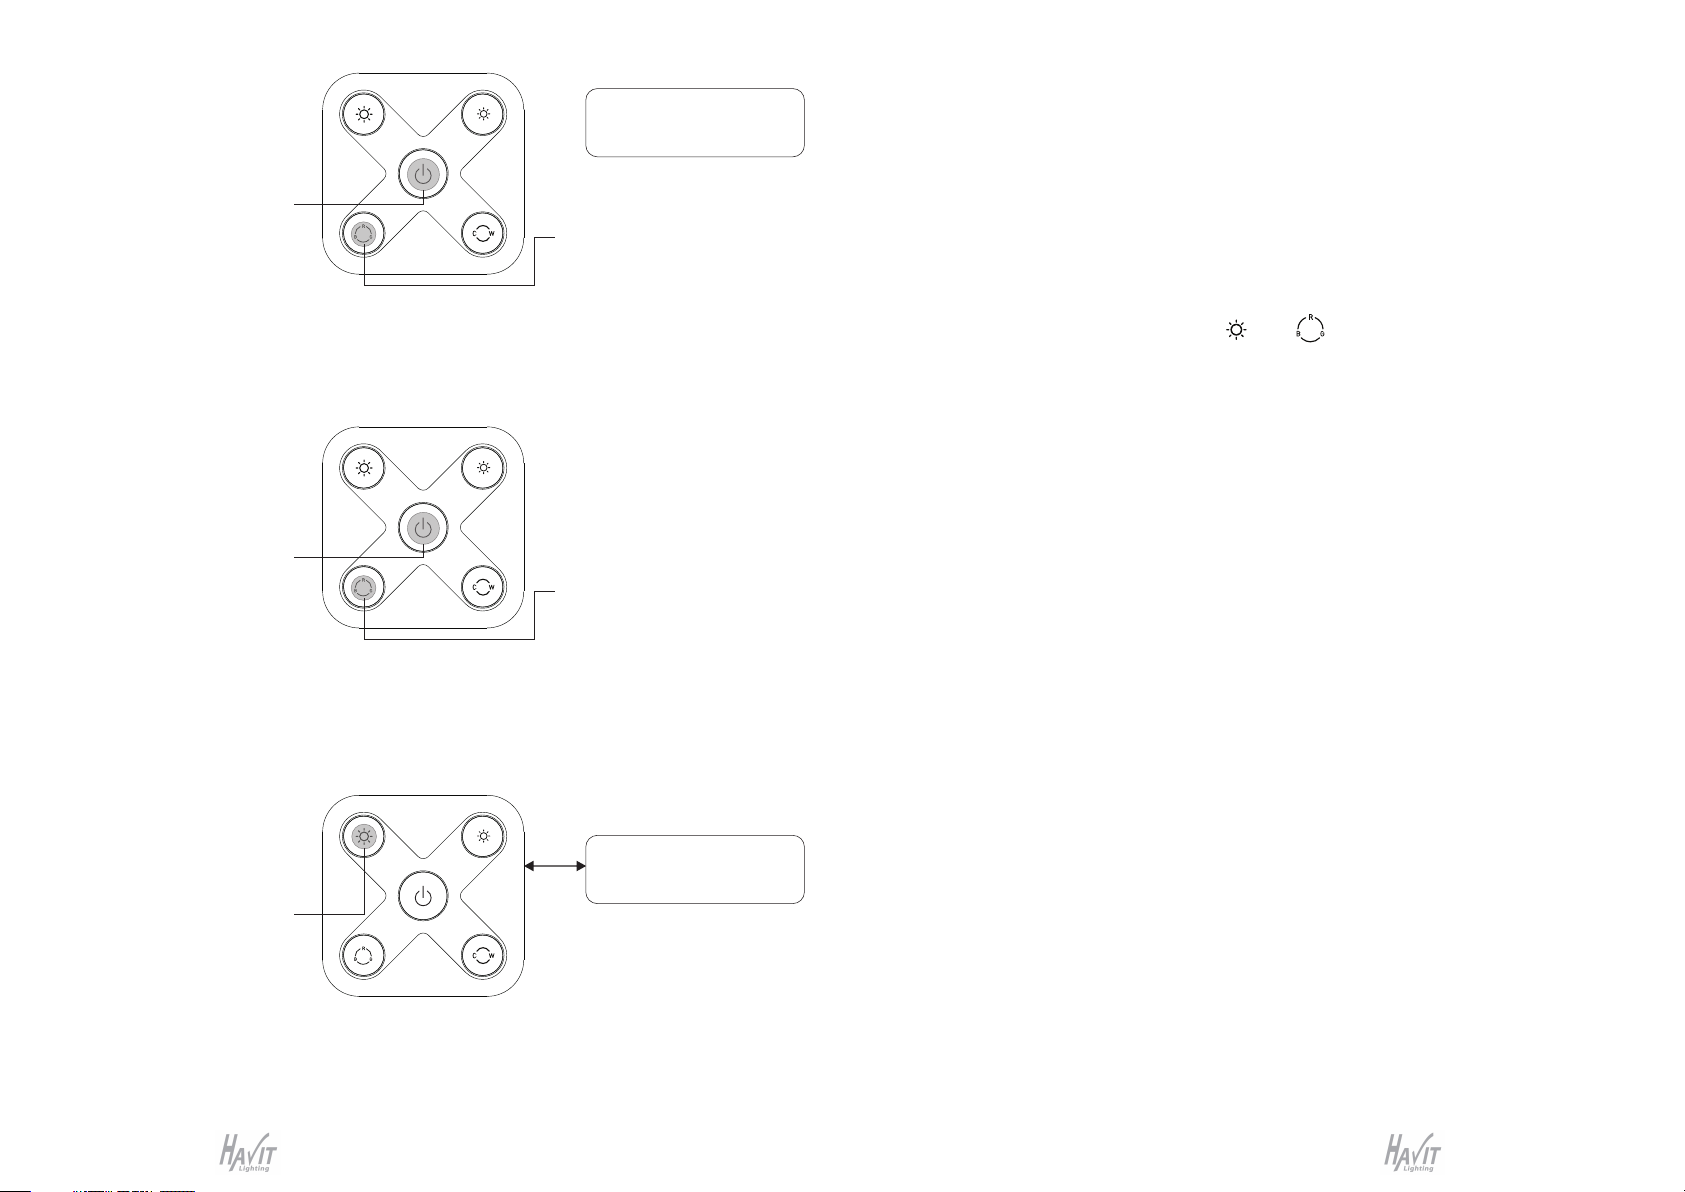
Press and hold down to
increase light intensity
Front side
CR2430 battery
Press and hold down to
decrease light intensity
Press and hold down to
cycle RGB colors, click
to get R, G, B one by one
Press and hold down to
adjust color temperature
between WW and CW,
click to get 100% WW,
100% CW one by one
ON/OFF button, click to turn ON/OFF all, press
and hold down to search and pair to ZigBee
network or factory reset the controller
Note: This remote supports
1 group for binding max. 30
lighting devices.
•This device contains a button lithium battery that shall be stored and disposed properly.
•DO NOT expose the device to moisture.
Safety & Warnings
Operation Voltage
Power Supply
Transmission Frequency
Transmission Range (free field)
Protection Type
Dimming Range
3VDC
3V(CR2430 battery)
2.4GHz
30m
IP20
0.1%-100%
Product Data
•RGB+CCT+DIM ZigBee remote controller based on
ZigBee 3.0
•Supports 1 group for binding max. 30 lighting devices
•Supports TouchLink to pair to a lighting device directly
•2.4 GHz global operation
•Long battery life mesh technology
•Transmission range up to 30m
•Compatible with ZigBee Gateway products
•Enables to bind and control universal DIM, CCT, RGB,
RGBW and RGB+CCT zigbee lighting devices
•With magnet on the back, easy to be absorbed on
metal surface
Operation
1.This ZigBee RGB+CCT remote is a wireless transmitter that communicates with a variety of ZigBee
compatible systems. This transmitter sends wireless radio signals that are used to remotely control a
compatible system.
2.This ZigBee remote supports 1 group for binding max. 30 lighting devices and enables to control both
RGB and CCT ZigBee lighting devices.
3. Zigbee Network Pairing through Coordinator or Hub (Added to a Zigbee Network)
Step 1: Remove the remote from
previous zigbee network if it has
already been added to it, otherwise
pairing will fail. Please refer to the
part "Factory Reset Manually".
Step 2: From your zigbee
controller or hub interface, choose
to add device or accessory and
enter Pairing mode as instructed
by the controller.
Step 3: Press and hold down until
LED indicator turns on.
Step 4: Immediately short press to
search nearby network, indicator
flashes every 1 second, 20 seconds
timeout if there is no network.
Indicator will then blink 5 times
quickly for successful pairing.
ZigBee Clusters Supported by This Remote Are As Follows:
Input clusters:
•Basic •Power Configuration •Identify •Diagnostics
Output clusters:
•Identify •On/off •Level control •Ota •Color control
HV9101-ZB-5C
RGB CCT DIM 3 in 1 Zigbee Remote Controller
Important: Read All Instructions Prior to Installation
Function introduction
www.havit.com.au www.havit.com.auwww.havit.com.au

4. TouchLink to a Zigbee Lighting Device
5. Removed from a Zigbee Network through Coordinator or Hub Interface
6. Factory Reset Manually
7. Remove a Touchlink Paired ZigBee Lighting Device
8. Factory Reset a Lighting Device (Touch Reset)
Note: the device shall be added to a network, the remote added to the same one or not added to any network.
Note: 1) After pairing successfully, the remote information will appear on the controller or hub interface.
2) No remote information will appear on the hub interface if pairing to Philips Hue Bridge.
Step 1: Set the zigbee lighting
device to start TouchLink
commissioning, please refer to
its manual to learn how.
From your ZigBee controller or hub
interface, choose to delete or reset
the remote as instructed, indicator
flashes 3 times quickly to indicate
successful removing.
Note: Make sure the device and remote already added to the same zigbee network.
Note: Each remote can bind max. 30 lighting devices.
ZigBee Lighting Device
< 10cm
Step 2: Bring the remote within 10cm
of the lighting device.
Step 3: Press and hold down
until LED indicator turns on.
Step 4: Immediately short press to
start TouchLink commissioning of the
remote. LED indicator flashes fast for
3S, then flash 6 times slowly to
indicate successful pairing to the
device and the light connected to the
device will blink twice.
Note: 1) Directly TouchLink (both not added to a ZigBee network), each remote can link with 30 devices.
2) TouchLink after both added to a ZigBee network, each remote can link with max. 30 devices.
3) For Hue Bridge & Amazon Echo Plus, add remote and device to network first then TouchLink.
4) After TouchLink, the remote can control the linked lighting devices.
9. Find and Bind a Zigbee Lighting Device
Step 1: Press and hold down until
LED indicator turns on.
Note: All configuration
parameters will be reset after
the remote is reset or removed
from the network.
Step 2: Immediately short press 5
times continuously, indicator
flashes 3 times quickly to indicate
successful reset.
Step 1: Set the Touchlink paired
zigbee device to start TouchLink
commissioning, please refer to
its manual to learn how.
ZigBee Lighting Device
< 10cm
Step 2: Bring the remote within 10cm
of the lighting device.
Step 3: Press and hold down
until LED indicator turns on.
Step 4: Immediately short press twice
to start TouchLink removing of the
remote. LED indicator flashes fast for
3S, then flash 6 times slowly to
indicate successful removing.
Step 1: Set the zigbee device to
start TouchLink commissioning,
refer to its manual. ZigBee Lighting Device
< 10cm
Step 2: Bring the remote within 10cm
of the lighting device.
Step 3: Press and hold down
until LED indicator turns on.
Step 4: Immediately short press 5
times to start Touch Reset of the
remote. LED indicator flashes fast for
3S, then flash 3 times slowly to
indicate successful reset.
Step 1: Start find and bind mode
on the Zigbee lighting device
(initiator node) and enable it to
find and bind target, refer to its
manual.
ZigBee Lighting Device
Step 2: Press and hold down
until LED indicator turns on.
Step 3: Short press to enable the
remote (target node) to find and bind
initiator.LED indicator flashes 4 times
for successful binding or twice if
binding fails.
www.havit.com.au www.havit.com.auwww.havit.com.au
10. Find and Unbind a Zigbee Lighting Device
11. Clear All Find and Bind Mode Paired Lighting Devices
12. Setup a Network & Add Devices to the Network (No Coordinator or Hub Required)
Step 5: Add more remotes to the network as you would like.
Step 6: Factory reset the lighting devices that you would like to add to the network, refer to their manuals.
Step 7: Touchlink to pair the added remotes and lighting devices you would like to add, the devices will be added
to the network through Touchlink, refer to their manuals.
14. How to Check Whether the Remote Belongs to a Network or not
Short press any button, indicator blinking means the remote has already been added to a network. No blinking
of indicator means the remote does not belong to any network.
13. OTA
The remote supports firmware updating through OTA, and will acquire new firmware from zigbee controller or
hub every 10 minutes automatically.
15. Battery Power Monitor Function
The remote will report battery power value to the coordinator under following situations:
•When powered on.
•When short pressing both brightness down button and button simultaneously.
•When operating the switch to send data packets (over 4 hours since last operation).
•When added to the network by a coordinator.
Step 3: Short press twice to enable
the remote (target node) to find and
unbind initiator. LED indicator
flashes 4 times for successful
unbinding or twice if unbinding fails.
Step 1: Start find and bind mode
on the Zigbee lighting device
(initiator node) and enable it to
find and bind target, refer to its
manual.
ZigBee Lighting Device
Step 2: Press and hold down
until LED indicator turns on.
Step 2: Short press 5 times
continuously to clear all bound
lighting devices . LED indicator
flashes 4 times for successful
unbinding.
Step 1: Press and hold down
until LED indicator turns on.
Step 1: Factory reset the remote
and the lighting device, refer to
their manuals.
ZigBee Lighting Device
< 10cm
Step 2: TouchLink the remote and
device to setup a network, refer to
their manuals.
Step 4: Set another remote into
network pairing mode and pair it to
the network, refer to its manual.
Step 3: Short press button to
enable the network to discover
and add devices, LED indicator
will flash twice. 180 seconds
timeout, repeat the operation.
www.havit.com.au www.havit.com.auwww.havit.com.au
Other Havit Remote Control manuals


