Hayter CODE102A User manual

Operator’s Manual
Register at www.hayter.co.uk
Original Instructions (EN)
BY APPOINTMENT TO
HER MAJESTY THE QUEEN
MANUFACTURERS OF HAYTER
HORTICULTURAL MACHINERY
TORO U.K. LIMITED, SPELLBROOK,
BISHOPS STORTFORD, HERTS
60V MAX Battery Charger Accessories
Model No. CODE102A - Serial No. 323000101 and Up
Model No. CODE104A - Serial No. 323000101 and Up
Model No. CODE106A - Serial No. 323000101 and Up
Model No. CODE107A - Serial No. 323000101 and Up
Model No. CODE120A - Serial No. 323000101 and Up
Model No. CODE121A - Serial No. 323000101 and Up
Form No. 3455-804 A
Original Instructions (EN)
Printed in China
All rights reserved
© 2023 - Hayter Limited
Spellbrook, Bishop’s Stortford,
Herts CM23 4BU
Register at
www.hayter.co.uk
Introduction
These battery packs and chargers are intended to be used by residential homeowners. These battery
packs are designed to be charged only by Hayter approved 60V lithium-ion battery chargers. These
chargers are designed to charge only Hayter approved 60V lithium-ion battery packs. They are not
designed to charge any other batteries. Using these products for purposes other than their intended
use could prove dangerous to you and bystanders.
Read this information carefully to learn how to operate and maintain your product properly and to
avoid injury and product damage. You are responsible for operating the product properly and safely.
Visit www.hayter.co.uk for more information, including safety tips, training materials, accessory
information, help finding a dealer, or to register your product.
Whenever you need service, genuine Hayter parts, or additional information, contact an Authorised
Service Dealer or Hayter Customer Service and have the model and serial numbers of your product
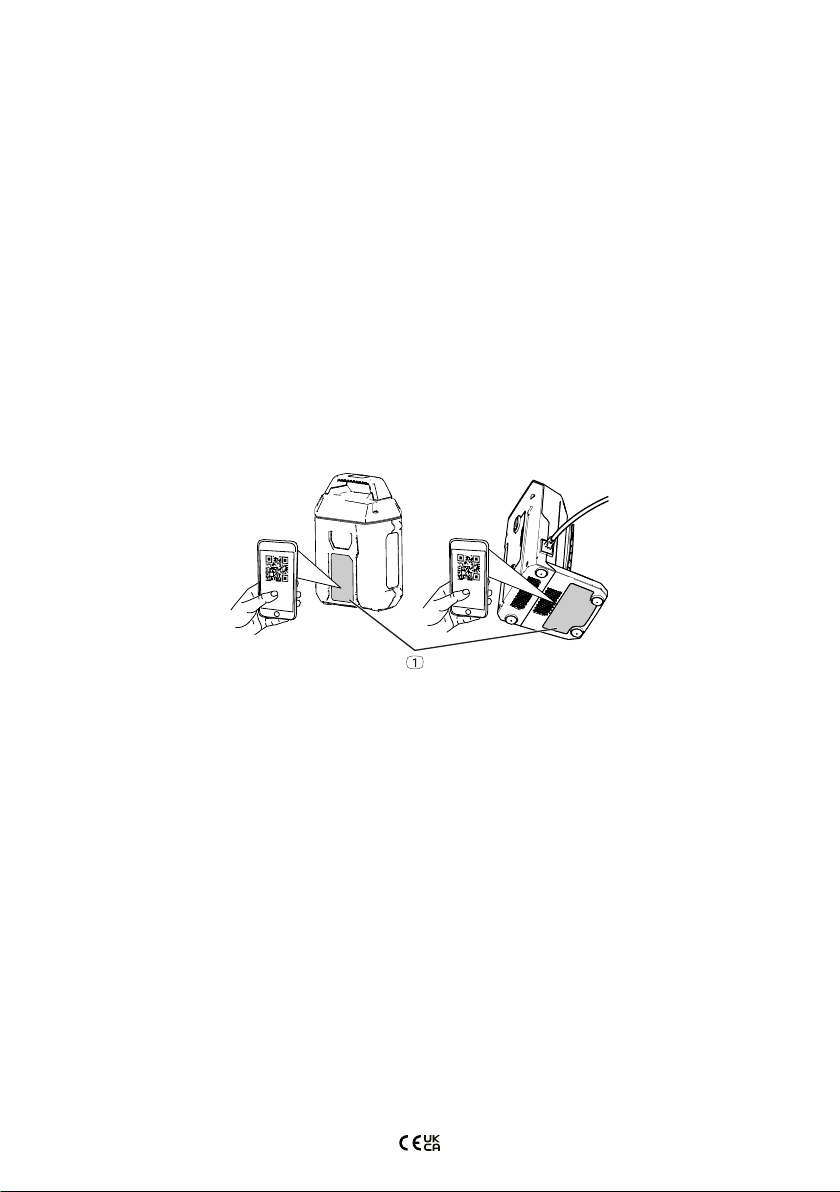
ready. Figure 1 identifies the location of the model and serial numbers on the product. Write the
numbers in the space provided.
Important: With your mobile device, you can scan the QR code on the serial number decal (if
equipped) to access warranty, parts, and other product information.
Figure 1
Model No. __________________________________
Serial No. __________________________________

3EN
Safety-Alert Symbol
The safety-alert symbol appears above information that alerts you to unsafe actions or situations and
is followed by the word DANGER, WARNING, or CAUTION.
Figure 2
Safety-alert symbol
The safety-alert symbol appears above information that alerts you to unsafe actions or situations and
is followed by the word DANGER, WARNING, or CAUTION.
DANGER indicates an imminently hazardous situation which, if not avoided, will result in death or
serious injury.
WARNING indicates a potentially hazardous situation which, if not avoided, could result in death or
serious injury.
CAUTION indicates a potentially hazardous situation which, if not avoided, may result in minor or
moderate injury.
This manual uses two other words to highlight information. Important calls attention to special
mechanical information and Note emphasises general information worthy of special attention.

4EN
Safety
IMPORTANT SAFETY INSTRUCTIONS
1. SAVE THESE INSTRUCTIONS—This manual contains important safety and operating instructions
for battery pack models CODE102A, CODE104A, CODE106A, and CODE107A, and battery
charger models CODE120A and CODE121A.
2. Before using the battery charger, read all the instructions and cautionary markings on the battery
charger, battery pack, and product using the battery pack.
3. CAUTION—To reduce risk of injury, charge battery pack models CODE102A, CODE104A,
CODE106A, and CODE107A with battery charger models CODE120A and CODE121A only. Other
brands of battery packs may burst, causing personal injury and damage.
4. WARNING—Plugging the battery charger into an outlet that is not 100 to 240 V can cause a fire
or electric shock. Do not plug the battery charger into an outlet other than 100 to 240 V. For a
different style of connection, use an attachment plug adapter of the proper configuration for the
power outlet if needed.
5. CAUTION—A mistreated battery pack may present a risk of fire or chemical burn. Do not
disassemble the battery pack. Do not heat the battery pack above 68°C (154°F) or incinerate it.
Replace the battery pack with a genuine Hayter battery pack only; using another type of battery
pack may cause a fire or explosion. Keep battery packs out of the reach of children and in the
original packaging until you are ready to use them.
Training
1. Do not allow people with reduced physical, sensory, or mental capabilities or without experience
and knowledge to use the battery charger unless they have received instruction or supervision on
using it safely and understand the hazards involved while using it.
2. Do not allow children to use or play with the battery pack or battery charger; local regulations
may restrict the age of the operator.
3. Use appliances only with specifically designated battery packs. Using other types of battery
packs may create a risk of injury and/or fire.
4. Do not use a damaged or modified battery pack or battery charger. It may exhibit unpredictable
behavior, resulting in fire, explosion, or risk of injury.
5. If the supply cord to the battery charger is damaged, contact an Authorised Service Dealer to
replace it.
Preparation
1. Use appliances only with specifically designated battery packs. Using other types of battery
packs may create a risk of injury and/or fire.
2. Do not use a damaged or modified battery pack or battery charger. It may exhibit unpredictable
behavior, resulting in fire, explosion, or risk of injury.
3. If the supply cord to the battery charger is damaged, contact an Authorised Service Dealer to
replace it.

5EN
Operation
1. Do not use non-rechargeable batteries.
2. Charge the battery pack with only the battery charger specified by Hayter. A charger suitable for 1
type of battery pack may create a risk of fire when used with another battery pack.
3. Charge the battery pack in a well-ventilated area only.
4. Do not expose a battery pack or battery charger to fire or to temperatures higher than 100°C
(212°F).
5. Follow all charging instructions and do not charge the battery pack outside of the temperature
range specified in the instructions. Otherwise, you may damage the battery pack and increase
the risk of fire.
6. Under abusive conditions, the battery pack may eject liquid; avoid contact. If you accidently come
into contact with the liquid, flush with water. If the liquid contacts your eyes, seek medical help.
Liquid ejected from the battery pack may cause irritation or burns.
Maintenance and Storage
1. Do not allow children to clean or maintain the battery charger without supervision.
2. When the battery pack is not in use, keep it away from metal objects such as paper clips, coins,
keys, nails, and screws that can make a connection from 1 terminal to another. Shorting the
battery terminals may cause burns or a fire.
3. Do not attempt to repair the battery pack or battery charger. Have an Authorised Service Dealer
perform service on the battery pack or battery charger using identical replacement parts to
ensure that the product is safely maintained.
4. Do not dispose of the battery in a fire. The cell may explode. Check with local councils for
possible special disposal instructions.
SAVE THESE INSTRUCTIONS
6EN
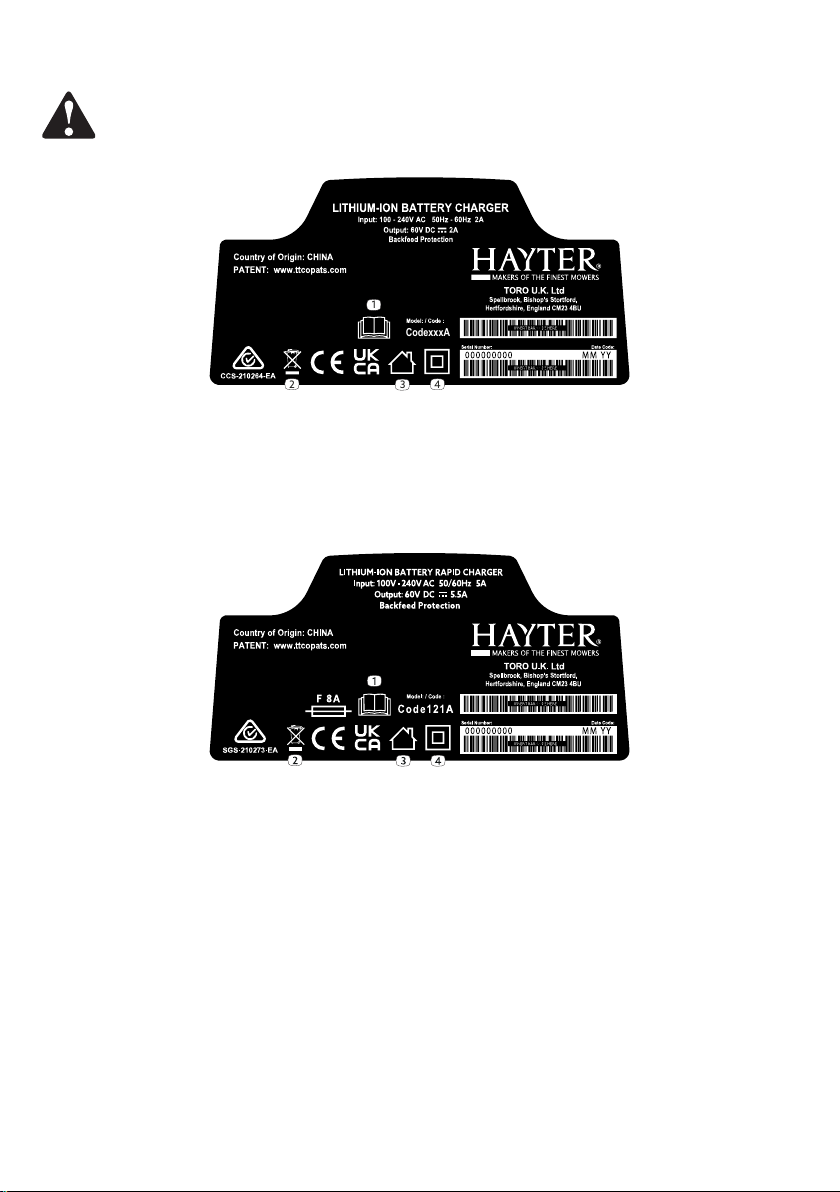
Safety and Instructional Decals
Safety decals and instructions are easily visible to the operator and are located near any area
of potential danger. Replace any decal that is damaged or missing.
CodexxxA
1
234
134-6761
1. Read the Operator’s Manual 3. For indoor use
2. Do not dispose improperly 4. Double insulated
134-6763
1. Read the Operator’s Manual 3. For indoor use
2. Do not dispose improperly 4. Double insulated

7EN
134-8079
12345
134-6757
1. Read the Operator’s
Manual.
4. Keep away from
open flames.
2. Recycle 5. Do not expose
to rain.
3. Contains lithium ions:
do not discard.
12345
134-6759
1. Read the Operator’s
Manual.
4. Keep away from
open flames.
2. Recycle 5. Do not expose
to rain.
3. Contains lithium ions:
do not discard.
1. Read the Operator’s
Manual.
4. Keep away from
open flames.
2. Recycle 5. Do not expose
to rain.
3. Contains lithium ions:
do not discard.
12345
134-6755
1. Read the Operator’s
Manual.
4. Keep away from
open flames.
2. Recycle 5. Do not expose
to rain.
3. Contains lithium ions:
do not discard.

8EN
1234
134-6762
1. The battery pack is
charging.
3. The battery pack is
over or under the
appropriate
temperature range.
2. The battery pack is
fully charged.
4. Battery pack
charging fault
1. Battery charge status
1
137-9461

9EN
Setup
Mounting the Battery Charger (Optional)
If desired, mount the battery charger securely on a wall using the wall-mount key holes on the back of
the charger. Mount it indoors (such as a garage or other dry place), near a power outlet, and out of the
reach of children.
Refer to Figure 3 for assistance in mounting the charger.
Slide the charger over the appropriately positioned hardware to secure the charger in place (hardware
not included).
101.6 mm
(4 inches)
Figure 3

10 EN
Product Overview
Figure 4
1. Battery pack cavity 5. LED indicators (current charge)
2. Battery pack venting areas 6. Handle
3. Battery pack terminals 7. Charger LED indicator light
4. Battery-charge-indicator button 8. Charger venting areas
Battery Charger
Model CODE120A CODE121A
Type 60V MAX Lithium-Ion Battery Charger 60V MAX Lithium-Ion Battery Rapid Charger
Input 100 to 240V AC 50/60Hz Max 2.0A 100 to 240V AC 50/60Hz Max 5.0A
Output 60V MAX DC 2.0A 60V MAX DC 5.5A
Battery Pack
Model CODE102A CODE104A CODE106A CODE107A
Battery pack capacity 2.5 Ah
135 Wh
4.0 Ah
216 Wh
6.0 Ah
324 Wh
7.5 Ah
405 Wh
Battery manufacturer rating = 60V maximum and 54V nominal. Actual voltage varies with load.
Appropriate Temperature Ranges
Charge battery pack at 5°C (41°F) to 40°C (104°F)*
Use battery pack at -20°C (-4°F) to 49°C (120°F)
Store battery pack/charger at 5°C (41°F) to 40°C (104°F)*
*Charging time will increase if you do not charge the battery within this range.
Store the tool, battery pack, and battery charger in an enclosed clean, dry area.

11 EN
Operation
Charging the Battery Pack
Important: The battery pack is not fully charged when you purchase it. Before using the tool for
the first time, place the battery pack in the charger and charge it until the LED display indicates the
battery pack is fully charged. Read all safety precautions.
Important: Charge the battery pack only in temperatures that are within the appropriate range; refer
to Specifications.
Note: At any time, press the battery-charge-indicator button on the battery pack to display the current
charge (LED indicators).
1. Ensure that the vents on the battery and charger are clear of any dust and debris.
Figure 5
2. Line up the cavity in the battery pack with the tongue on the charger Figure 5.
3. Slide the battery pack into the charger until it is fully seated Figure 5.
4. To remove the battery pack, slide the battery backward out of the charger.
5. Refer to the following table to interpret the LED indicator light on the battery charger.
Indicator light Indicates
Off No battery pack inserted
Green blinking Battery pack is charging
Green Battery pack is charged
Red Battery pack and/or battery charger is over or under the appropriate temperature range
Red blinking Battery pack charging fault*
*Refer to Troubleshooting for more information.
Important: The battery can be left on the charger for short periods between uses.
If the battery will not be used for longer periods, remove the battery from the charger; refer to
Storage.

12 EN
Maintenance
Maintenance and servicing are not required under normal conditions.
When you clean the surface of the equipment, wipe it only with a dry cloth.
Do not disassemble the equipment; if it is damaged, contact your Authorised Service Dealer.
Storage
Important: Store the tool, battery pack, and charger only in temperatures that are within the
appropriate range; refer to Specifications.
Important: If you are storing the battery pack for the off-season, charge it until 2 or 3 LED indicators
turn green on the battery. Do not store a fully charged or fully depleted battery. When you are ready
to use the machine again, charge the battery pack until the left indicator light turns green on the
charger or all 4 LED indicators turn green on the battery.
• Disconnect the product from the power supply (i.e., remove the battery pack) and check for
damage after use.
• Clean all foreign material from the product.
• Do not store the charger with the battery pack installed.
• When not in use, store the tool, battery pack, and battery charger out of the reach of children.
• Keep the tool, battery pack, and battery charger away from corrosive agents, such as garden
chemicals and de-icing salts.
• To reduce the risk of serious personal injury, do not store the battery pack outside or in vehicles.
• Store the tool, battery pack, and battery charger in an enclosed clean, dry area.
Preparing the Battery Pack for Recycling
Important: Upon removal, cover the terminals of the battery pack with heavy-duty adhesive tape. Do
not attempt to destroy or disassemble the battery pack or remove any of its components.
Contact your local council or your authorised Hayter distributor for more information on how to
responsibly recycle the battery.

13 EN
Troubleshooting
Perform only the steps described in these instructions. All further inspection, maintenance, and repair
work must be performed by an authorised service centre or a similarly qualified specialist if you cannot
solve the problem yourself.
Problem Possible Cause Corrective Action
The battery pack loses
charge quickly.
1. The battery pack is over or under
the appropriate temperature
range.
1. Move the battery pack to a
place where it is dry and the
temperature is between 5°C
(41°F) and 40°C (104°F).
The battery charger is not
working.
1. The battery charger is over
or under the appropriate
temperature range.
2. The outlet that the battery
charger is plugged into does not
have power.
1. Unplug the battery charger and
move it to a place where it is dry
and the temperature is between
5°C (41°F) and 40°C (104°F).
2. Contact your licensed electrician
to repair the outlet.
The LED indicator light on
the battery charger is red.
1. The battery charger and/or
battery pack is over or under the
appropriate temperature range.
1. Unplug the battery charger and
move the battery charger and
battery pack to a place where
it is dry and the temperature is
between 5°C (41°F) and 40°C
(104°F).
The LED indicator light on the
battery charger is blinking red.
1. There is an error in the
communication between the
battery pack and the charger.
2. The battery pack is weak.
1. Remove the battery pack from
the battery charger, unplug the
battery charger from the outlet,
and wait 10 seconds. Plug the
battery charger into the outlet
again and place the battery pack
on the battery charger. If the LED
indicator light on the battery
charger is still blinking red, repeat
this procedure again. If the LED
indicator light on the battery
charger is still blinking red after 2
attempts, properly dispose of the
battery pack at a battery recycling
facility.
2. Properly dispose of the battery
pack at a battery recycling facility.
The tool does not run or
does not run continuously.
1. There is moisture on the leads of
the battery pack.
2. The battery is not fully installed
into the tool.
1. Allow the battery pack to dry or
wipe it dry.
2. Remove and then replace the
battery into the tool making
sure that it is fully installed and
latched.

14 EN
Warranty
3 Year Warranty 60 Volt Battery – Residential Use
1 Year Warranty 60 Volt Battery – Commercial Use
Toro U.K. Limited warrants to the original purchaser that this 60-volt battery shall be free from defects
in material and workmanship, under normal, residential use, for a period of three years from the date
of purchase or, if used commercially, for a period of 1 year from the date of purchase.
Terms and Conditions
Toro U.K. Limited shall, at our option replace any part covered by warranty during the applicable
period.
This warranty does not apply to any unit that has been tampered with, altered, misused, abused, or
used for hire.
Making a Claim
To make a warranty claim, return the unit to a Hayter Authorised Service Dealer, along with proof of
purchase stating the serial number and date of purchase.
This warranty gives you specific legal rights and are in addition to any statutory rights to which you
may be entitled. Your statutory rights are not affected by this warranty.
If you need additional information concerning this written warranty, or assistance in obtaining
services:
UK (only)
Contact your seller or visit https://www.hayter.co.uk and select LOCATE DEALER to locate a Hayter
Authorised Service Dealer in your area, who will be able to assist.
For additional assistance regarding warranty terms and conditions you can write to Toro U.K. Limited,
Customer Care Team, Spellbrook, Bishop’s Stortford, Hertfordshire CM23 4BU, email customer.care@
hayter.co.uk, Tel Freephone (UK Only) 0800 616 298
Outside of UK
Visit https://www.toro.com and select WHERE TO BUY to locate a Toro service center in your area,
who will be able to assist.
For additional assistance regarding warranty terms and conditions you can write to Toro U.K. Limited,
Customer Care Team, Spellbrook, Bishop’s Stortford, Hertfordshire CM23 4BU or email customer.care@
hayter.co.uk.

15 EN
EEA/UK Privacy Notice
Our Use of Your Personal Information
Toro U.K. Limited, and its parent, The Toro Company, respect your privacy. When you purchase our
products, we may collect certain personal information about you, either directly from you or through
your local retail outlet. We use this information to fulfil contractual obligations - such as to register
your warranty, process your warranty claim or to contact you in the event of a product recall - and
for legitimate business purposes - such as to gauge customer satisfaction, improve our products
or provide you with product information which may be of interest. We may share your information
with The Toro Company, its subsidiaries or affiliates, or with our dealers, retailers or other business
partners in connection these activities. We may also disclose personal information when required by
law or in connection with the sale, purchase or merger of a business. We will never sell your personal
information to any other company for marketing purposes.
Retention of your Personal Information
We will keep your personal information as long as it is relevant for the above purposes and in
accordance with legal requirements. For more information about applicable retention periods please
contact legal@toro.com.
Our Commitment to Security
Your personal information may be processed in the US or another country which may have less strict
data protection laws than your country of residence. Whenever we transfer your information outside
of your country of residence, we will take legally required steps to ensure that appropriate safeguards
are in place to protect your information and to make sure it is treated securely.
Access and Correction
You may have the right to correct or review your personal data, or object to or restrict the processing
of your data. To do so, please contact us by email at legal@toro.com. If you have concerns about the
way in which Toro U.K. Limited. has handled your information, we encourage you to raise this directly
with us. Please note that European residents have the right to complain to your Data Protection
Authority.

This manual suits for next models
5
Table of contents
Other Hayter Batteries Charger manuals


