Hayward HLWLAN User manual

USE ONLY HAYWARD GENUINE REPLACEMENT PARTS
HLWLAN 802.11b/g/n
Transceiver Kit
Owner’s Manual
HLWLAN
Wireless Communications for OmniLogic
Hayward Pool Products
620 Division Street, Elizabeth NJ 07207
www.hayward.com
Contents
Introduction.......................1
Installation........................2
Conguration....................6
Operation..........................8
Troubleshooting.................9
092524 RevC

USE ONLY HAYWARD GENUINE REPLACEMENT PARTS
FCC Statement
This device complies with part 15 of the FCC rules. Operation is subject to the following two conditions:
(1) This device may not cause harmful interference, and (2) this device must accept any interference
received, including interference that may cause undesired operation.
Changes or modifications not expressly approved by Hayward could void the user’s authority to
operate this equipment.
NOTE:This equipment has been tested and found to comply with the limits for a Class B digital device,
pursuant to Part 15 of the FCC Rules. These limits are designed to provide reasonable protection
against harmful interference in a residential installation. This equipment generates, uses and can
radiate radio frequency energy and, if not installed and used in accordance with the instructions, may
cause harmful interference to radio communications. However, there is no guarantee that interference
will not occur in a particular installation. If this equipment does cause harmful interference to radio
or television reception, which can be determined by turning the equipment off and on, the user is
encouraged to try to correct the interference by one or more of the following measures:
-- Reorient or relocate the receiving antenna.
-- Increase the separation between the equipment and receiver.
-- Connect the equipment into an outlet on a circuit different from that to which the receiver is
connected.
-- Consult the dealer or an experienced radio / TV technician for help.
Industry Canada Statement
This Class B digital apparatus complies with Canadian ICES-003.
Cet appareil numérique de la classe B est conforme à la norme NMB-003 du Canada.
The term “IC” before the certification / registration number only signifies that the Industry Canada
technical specifications were met.
Radio Information
FCC ID: A8J-ENS200
IC: 10103A-ENS200

USE ONLY HAYWARD GENUINE REPLACEMENT PARTS
1
Introduction
The HLWLAN is a 802.11b/g/n Transceiver kit that can make a wireless connection from the Om-
niLogic up to 250ft to the home’s router/access point preventing the need to run ethernet cable for
web access. Connection to the web is necessary for remote access to the OmniLogic using web
enabled devices.
Compatibility
Refer to this manual when using OmniLogic controls operating with MSP version R1.4.3 and
greater. For earlier OmniLogic MSP revisions, refer to previous HLWLAN manual versions. To
determine your OmniLogic’s MSP version, select the “config” icon on the home screen and then
select “system info” (see diagram on page 8).
Survey the location near the OmniLogic to locate the best mounting location. The HLWLAN has
a 15ft ethernet cable that connects to the OmniLogic. When determining the best mounting
location for the HLWLAN, note that it can be mounted on the two provided screws or strapped
to an object using the two included zip ties. To help determine if the mounting location is in
range of the router/access point, test the connection of other devices (phone, tablet, laptop,
etc.) at that same location.
If a reliable wireless connection can’t be made in the intended location, consider moving the
router/access point closer to the OmniLogic or using a longer outdoor rated ethernet cable to
move the HLWLAN closer to the router/access point.
Before You Begin
The HLWLAN kit contains the following:
• HLWLAN 802.11b/g/n Transceiver
• Power Injector
• OmniLogic power supply cable for
Power over Ethernet (PoE) Injector
• 2 Ethernet Cables
• Miscellaneous mounting hardware
Installation of the HLWLAN requires that
you have an existing wireless home net-
work in range of the intended HLWLAN
mounting location. The HLWLAN has a
radio range of about 250ft. To connect
the HLWLAN to your home network, you
will need to know the home network’s
SSID, security type and password.
EnGenius
2ft ethernet cable
15 ft ethernet cable
PoE injector
PoE power cord
HLWLAN
mounting hardware

2
USE ONLY HAYWARD GENUINE REPLACEMENT PARTS
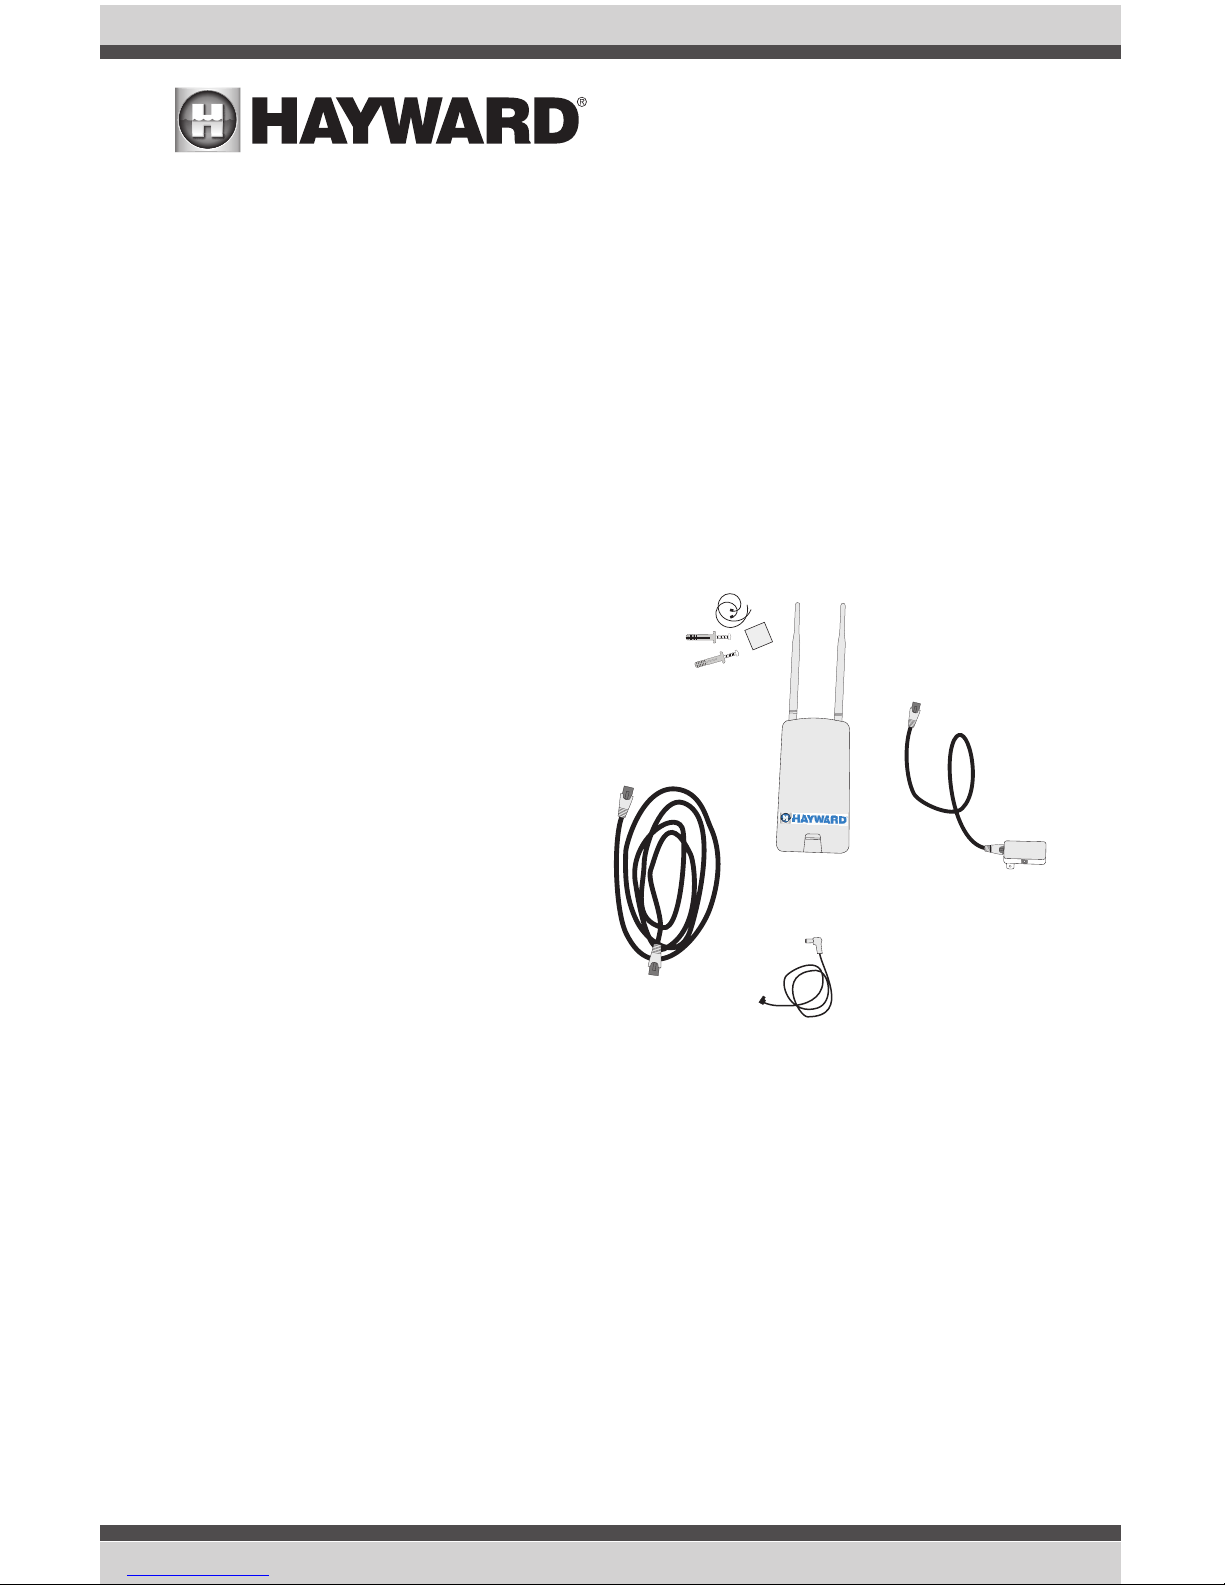
Router/Access Point Information
The HLWLAN cannot be configured without the following information. Before going any further with
the installation, fill in the information below.
Router or Access Point’s SSID (wireless network name - case sensitive)____________________
To find the SSID:
1) Ask the homeowner. Each wireless router or access point has a default SSID which may be in
use, or has been changed by the network administrator (homeowner).
2) If the homeowner doesn’t know, have them login to the router/access point and read the
information from the device. The SSID should be shown along with other router settings. The
router’s documentation or manual should show how to access administrative settings and find
the SSID.
3) If a wireless device is already connected to the home network (phone, tablet, laptop, etc.), the
device’s connection properties may show the SSID.
Router or Access Point’s Security Type_______________________________
To find the Security Type:
1) Ask the homeowner. The network administrator (homeowner) would have set up the security
type based on the desired security level and the type of devices that will be connecting to the
wireless network.
2) If the homeowner doesn’t know, have them login to the router/access point and read the se-
curity type from the device. This information should be shown along with other router settings.
The router’s documentation or manual will show how to access administrative settings and find
the security type.
3) If a wireless device is already connected to the home network (phone, tablet, laptop, etc.), the
device’s connection properties may show the security type that is in use.
Wireless Network Password (case sensitive) _______________________________
The wireless network password is not broadcast or typically saved in the router/access point’s
administrative settings. The network administrator (homeowner) would have set up a password
when initially setting up the wireless security type. If no security was selected, the network is Open
and there is no password.
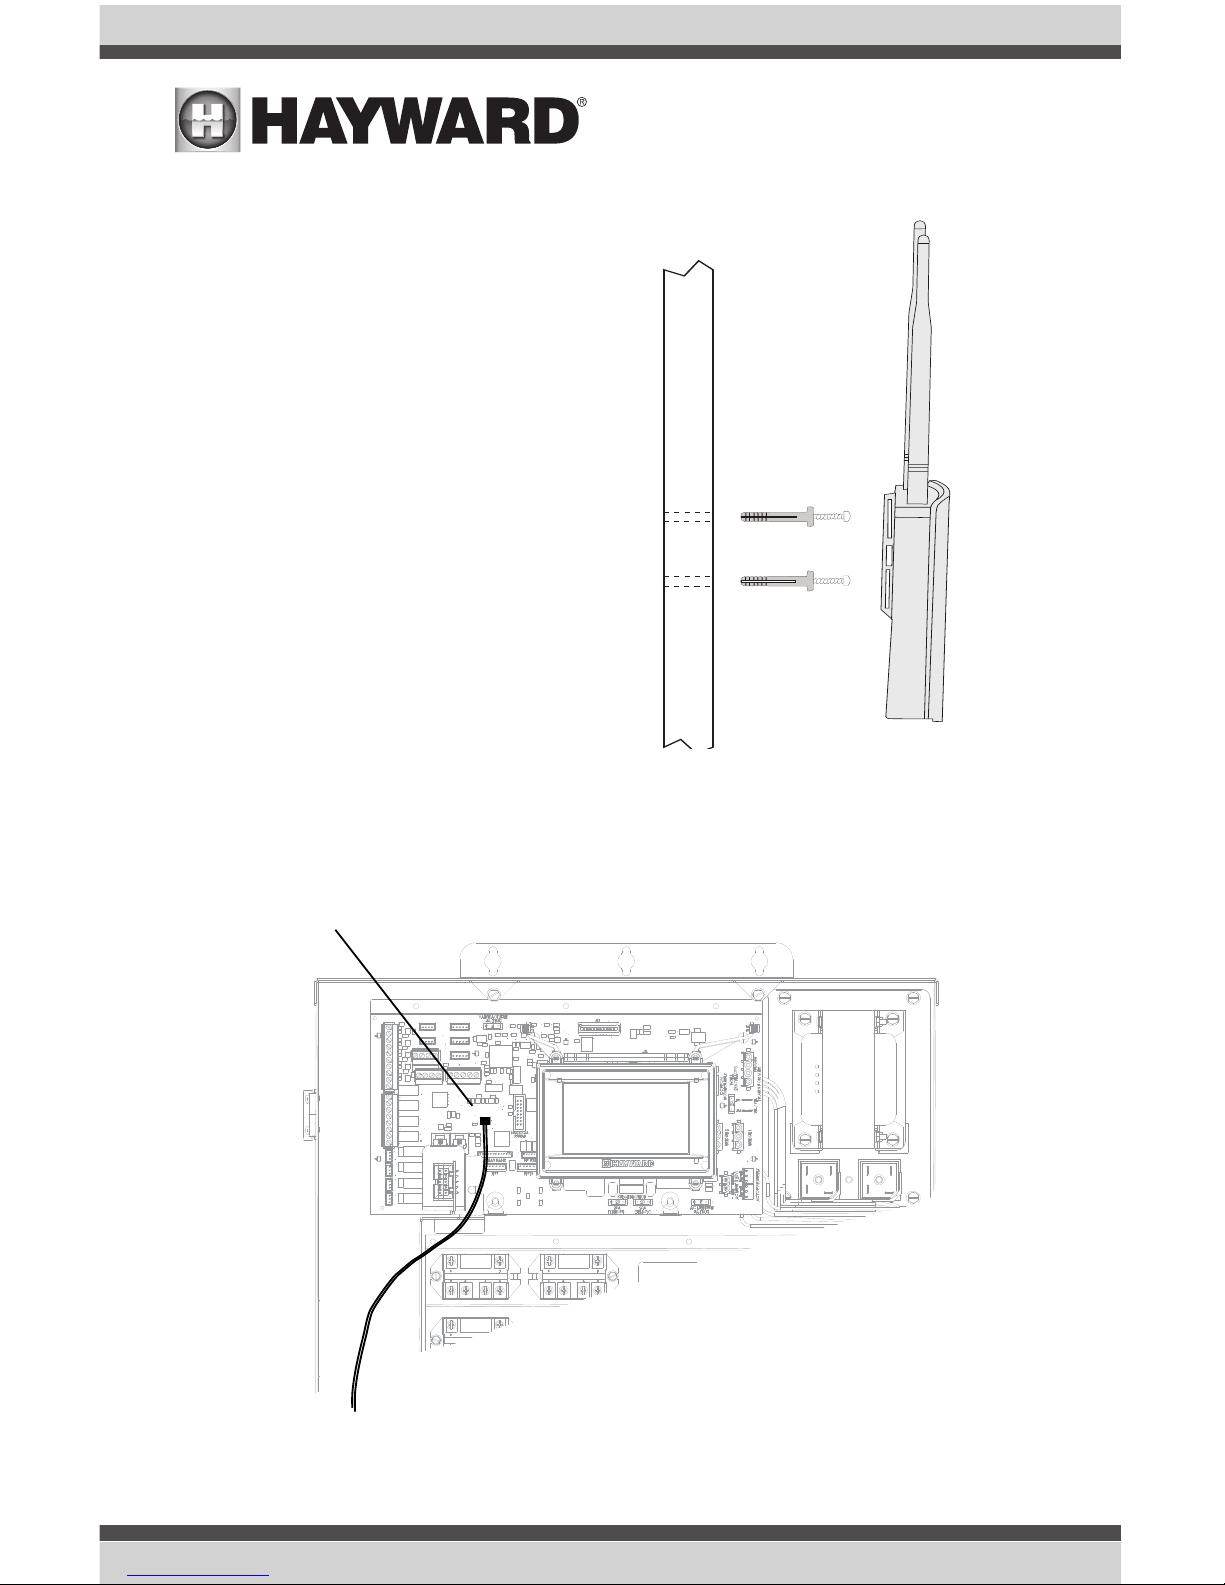
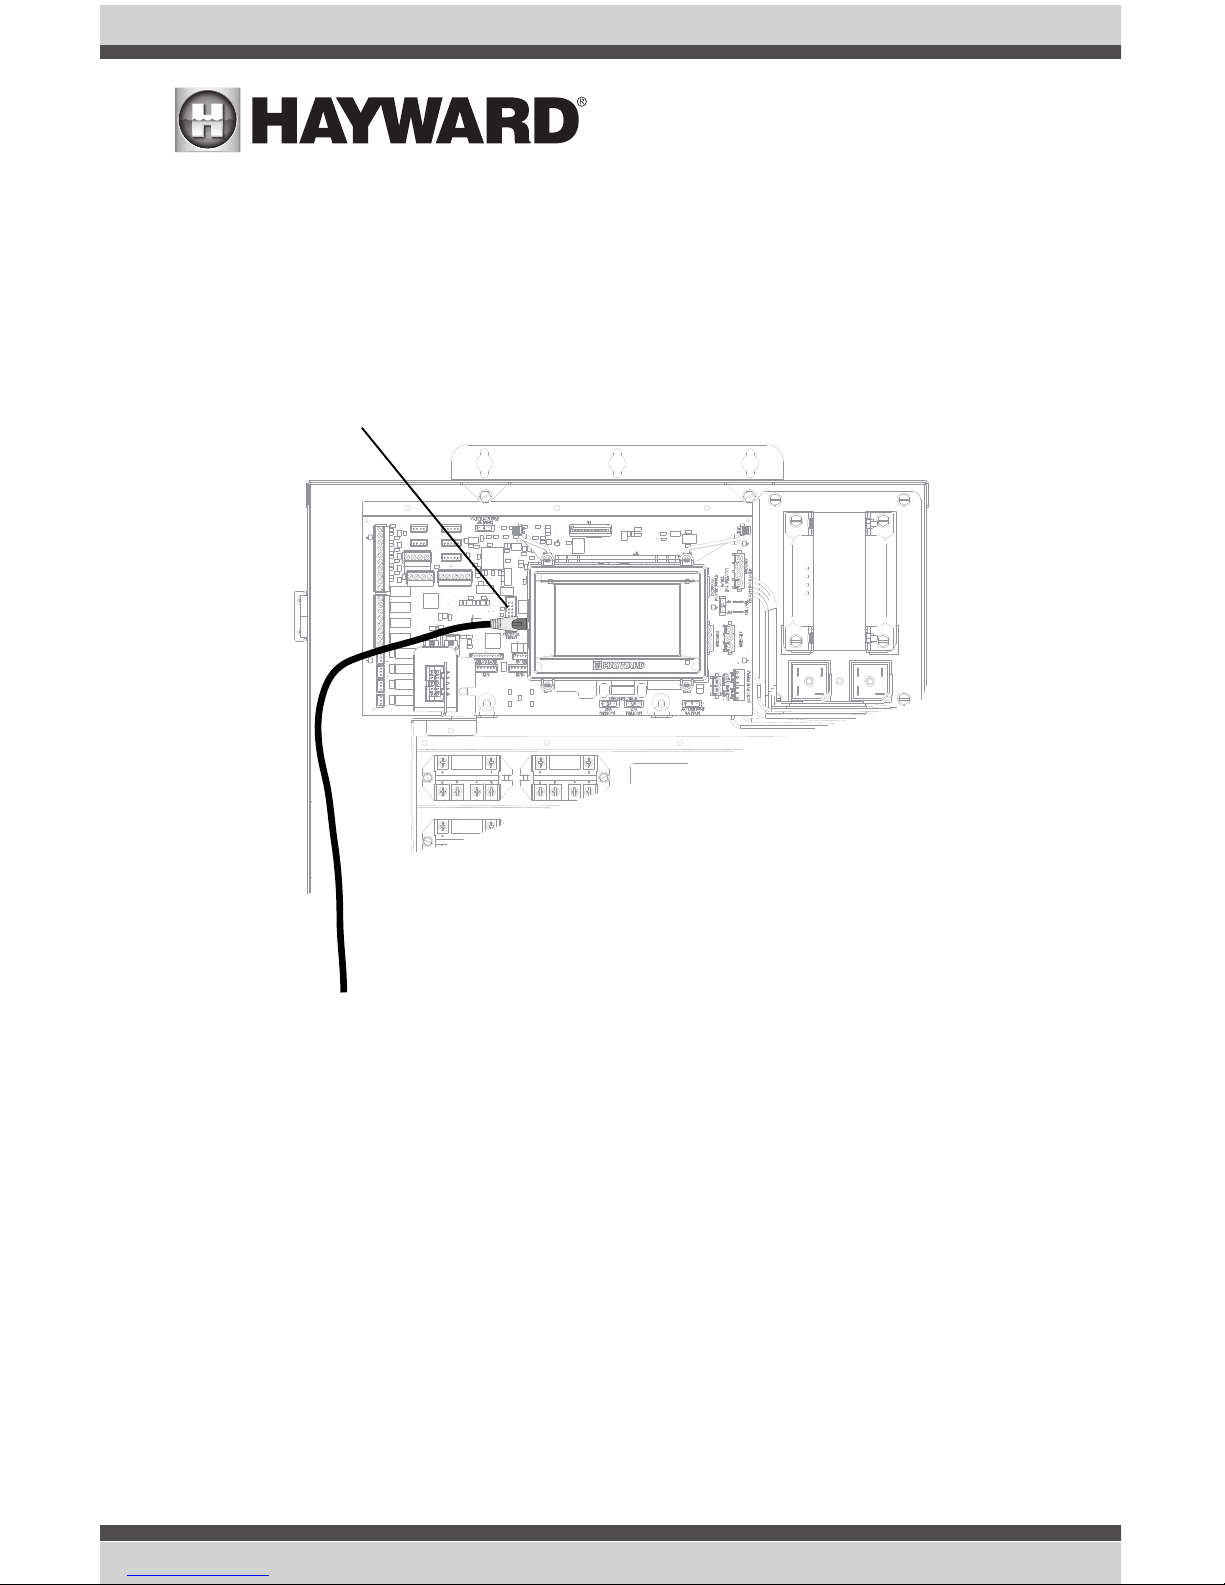
Installation
DANGER of Death, Injury or Property Damage if procedure not followed. This accessory
connects to the OmniLogic beneath the dead front panel. Dead front removal is required for this
installation. Power to the OmniLogic panel MUST be shut off before the dead front is removed. This
means a complete shutdown of power to the entire OmniLogic unit.

USE ONLY HAYWARD GENUINE REPLACEMENT PARTS
3
1) Depending on the mounting surface,
use either the included screws/
anchors or tie straps. A drilling tem-
plate is included when using screws.
Be sure that there are no major
obstacles between the HLWLAN and
the home’s router/access point.
Loosely mount the HLWLAN so that
you have visible access to the LED
indicators on the bottom back of
the unit. You will need to refer to
these indicators before permanently
fastening the HLWLAN.
2) Connect the Power Injector’s power cable to the
OmniLogic as shown above.
Attach PoE injector power cable
to connector labeled “HLWLAN Power”
HLWLAN
POWER

4
USE ONLY HAYWARD GENUINE REPLACEMENT PARTS
3) Connect one end of the 2ft ethernet cable to the
OmniLogic as shown.
Connect 2ft ethernet cable here

USE ONLY HAYWARD GENUINE REPLACEMENT PARTS
5
4) Position the Power Injector in a convenient location within the low voltage wiring compart-
ment of the OmniLogic. You can fasten the Power Injector with double sided tape or Velcro, if
desired. Connect the opposite end of the power supply cable. Connect the 2ft ethernet cable to
the Power Injector’s LAN port.
WARNING: The 2’ ethernet cable comes plugged into the LAN port on the PoE Injector.
DO NOT CHANGE THIS or you will damage the OmniLogic.
Connect one end of the 15ft outdoor ethernet cable to the Power Injector’s PoE port and the
other end to the port on the HLWLAN marked “LAN PoE”. To access this port, remove the HLW-
LAN’s bottom cover. Be sure to replace the cover when done.
After all connections are made, replace the OmniLogic dead front taking care that no wires are
pinched.
EnGenius
LAN PoE
PoE port
LAN port
15ft ethernet cable
Connect to
“LAN (PoE)” port
PoE injector
power cable

6
USE ONLY HAYWARD GENUINE REPLACEMENT PARTS
Configuration
With the HLWLAN now connected, power up the OmniLogic. Wait about 3-4 minutes for the Om-
niLogic to fully start. Verify that the HLWLAN is being powered and is connected to the OmniLogic
by looking at the PWR and LAN LED indicators on the backside near the ethernet connection. Both
LEDs should be lit.
After verifying that the HLWLAN is powered, it must now be configured to connect to the wireless
home network. From the OmniLogic’s Local Terminal touchscreen, select the “Wifi Bridge” screen
as shown below. Note that this cannot be performed from Remote Terminals.
POOL
configuration
service
shell command
firmware
wifi bridge
config wizard
system info
POOL
configuration
service
backup config
firmware
restore config
config wizard
display
system info
wired networking
favorites
config
heating
themes
º
F
daylight
features
alarm
lights
º
F

USE ONLY HAYWARD GENUINE REPLACEMENT PARTS
7
Wireless Bridge Configuration
The HLWLAN will now scan for available access points. Once it has finished, the SSID of all available
access points will be displayed on the screen as shown below. Touching the desired SSID will begin
the connection process. Depending on the security used by the router or access point, you may be
prompted for a password.
If prompted for a password, the keypad will automatically appear. Enter the password and touch the
check mark to move on. The HLWLAN will begin to automatically connect to the selected access
point. Be patient -- this may take a few minutes to complete. Once complete, verify that you have
connected to the home network by making sure that you have an entry next to “Local IP” in Protocol
Properties, as shown below. Note that your Local IP address will likely be different than the one
shown below. If any IP address is shown, the OmniLogic is connected to your home network. If “Not
assigned” is shown, the OmniLogic is not connected to the home network and you should refer to
Troubleshooting.
WIFI
connection
ssid security signal
00 Smith_Home WPA-PSK Excellent
Use to scroll though available
access points
Use to refresh the list of
available access points
Use to manually configure an
access point that does not
appear in the list
SYSTEM
configuration
protocol properties
Local IP
Netmask
Gateway
DNS1
DNS2
192,168.10.102
255.255.255.0
192.168.10.1
192.168.10.1
0.0.0.0
static dynamic
ON
POOL
configuration
service
firmware
restore config
config wizard
display
system info
wired networking
network
favorites
config
heating
themes
ºF
daylight
features
alarm
lights
ºF

8
USE ONLY HAYWARD GENUINE REPLACEMENT PARTS
Signal Strength
When connected to the home network, the WLAN LED indicator will be lit and one of the Signal
Strength LED indicators will be illuminated on the back of the HLWLAN. There are 3 LEDs indicating
increasing signal strength from left to right. Be sure that at least the left most LED is on steady. If it
is intermittently blinking, or not on at all, consider re-locating the HLWLAN or router/access point to
acquire a better connection.
After verifying an acceptable signal, secure the HLWLAN to the mounting surface.
Operation
After successfully installing the HLWLAN, you will need to setup a Hayward OmniLogic user account
in order to remotely access the OmniLogic through the web using a standard internet browser or
mobile app. Follow instructions below.
1) Using an ordinary web browser, go to www.haywardomnilogic.com. If you don’t already have
an account, select “Register New User” and set up a new account.
2) Log in to your account.
3) Register your OmniLogic. While filling out the form to register your OmniLogic, you’ll be asked
for an MSP System ID. This number can be found directly from the OmniLogic. To find your
unit’s MSP ID, follow the procedure below:
SYSTEM
configuration
msp id:3233
component HUA version
MSP
MP
Relays
EcoStar pump
EcoStar pump
0-0-0-0
1-65-0-2a-d4
3-10-0-0-1
10-0-0-0-4e
10-0-0-0-54
X.1.0.118-b14005
R.1.0.2
R.1.0.2
R.3.0.4
R.3.0.4
SYSTEM
configuration
1 / 2
config wizard
system info
backup config
restore config
display
network
web server
date/time
favorites
config
heating
themes
º
F
favorites
alarm
lights
º
F
daylight
WLAN
Minimum acceptable signal
MSP ID___________

USE ONLY HAYWARD GENUINE REPLACEMENT PARTS
9
After the MSP is accepted, the OmniLogic will be linked to your account. You’ll be able to access the
OmniLogic at any time from your browser by logging into your account at haywardomnilogic.com.
For mobile devices, an app must be downloaded from your device’s app store. Go to www.hayward.
com for more information on the availability and function of mobile apps.
Troubleshooting
1. The PWR and LAN LEDs are not lit.
This is an indication that the HLWLAN is not connected to the OmniLogic. Perform the following:
•Make sure that both ends of the ethernet cable are firmly connected; one side in the HLWLAN
and the other in the PoE Injector (see Installation Steps 3 and 4).
•Make sure that the PoE Injector cable is firmly inserted in the HLBASE Main Board (Installation
Step 2).
•Verify that the OmniLogic has power and that there is no break in the ethernet cable.
2. There is no “Local IP” address (page 7)
This is an indication that the HLWLAN is not connected to the home network.
• The HLWLAN may be mounted too far away from the home’s router/access point or there may
be too many obstructions between them. Using a Wifi capable phone, tablet or laptop, verify that
other mobile devices can connect from that same location as the HLWLAN.
• If other devices can connect, the most likely cause is an error in the configuration settings.
Reconnect the HLWLAN to the home’s access point by following the procedure on page 7.
• If other devices cannot connect to the wireless network, consider relocating your router/access
point or moving the HLWLAN closer using a longer outdoor rated ethernet cable.
3. Web enabled devices cannot connect to the OmniLogic
• Verify that you have an internet connection at your router/access point. Temporary outages
with Internet Service Providers (ISPs) are not uncommon and the OmniLogic will be offline until
service is restored.
• Have any changes been made to your home network? Any changes to your home network
(router replacement, SSID name change, changes in security settings, IP reservation, etc.) may
require you to repeat the configuration steps on page 7.
• Have you removed power from the OmniLogic or made changes that require it to reboot? If so,
give the HLWLAN some additional time to reconnect to the home network.
For further information or technical support, visit our website at www.hayward.com.

USE ONLY HAYWARD GENUINE REPLACEMENT PARTS
For further information or consumer
technical support, visit our website at
www.hayward.com
Hayward is a registered trademark and OmniLogic is
a trademark of Hayward Industries, Inc. © 2013 Hayward Industries, Inc.
All other trademarks not owned by Hayward are the property of their respective owners.
Hayward is not in any way affiliated with or endorsed by those third parties.
Table of contents
Other Hayward Transceiver manuals
Popular Transceiver manuals by other brands

BWI Eagle
BWI Eagle AIR-EAGLE SR PLUS 36-40100-AC Product information bulletin

Intek
Intek SL-02 owner's manual

CPS
CPS CP238 manual

Vertex Standard
Vertex Standard VX-410 Series Service manual

Advanced Wireless Communications
Advanced Wireless Communications HD-1000 Techical manual

THUNDERPOLE
THUNDERPOLE T-800 owner's manual