HBC HD-uDTA Parts list manual

HD-uDTA Setup Guide
What’s included in your install kit?
(888) 474-9995 • www.hbci.com
1 2 3
456
7 8 9
0
GUIDE
INFO
MENU
EXIT
PAGE
MUTE
TV CABLE
POWER
LAST
L
A
N
G
Remote
In order to operate the HD-
uDTA you must use the
remote control included
with this kit. Programming
instructions for the remote are
included in this guide.
Coaxial Cable
A 5-foot cable is provided in
your installation kit.
Note: For high-denition
viewing an HDTV and HDMI
cable are required. Please
contact your local ofce to
purchase an HDMI cable.
Power Cord
The power cord will need to be
plugged into a non-switched
outlet to operate your HD-
uDTA.
Velcro Squares
For out of site placement, use
the Velcro squares to stick the
HD-uDTA to your TV.
Note: HBC is not responsible
for any damage as a result
of use.
2 AA Batteries
2 AA batteries are included in
your installation kit.
CABLE IN TO TV CH 3/4 HDMI
+5V DC In
Power
Connect a coaxial cable to the
TO TV connector on the HD-
uDTA and the Cable/Antenna
IN on the TV.
Note: Each TV will need to be connected to an HBC
HD-uDTA or a HBC set-top box, but not both.
For high-denition viewing,
connect an HDMI cord to
the HDMI input on both your
HDTV and HD-uDTA
HD-uDTA
(High-Denition Digital Transport Adapter)
CABLE IN TO TV CH 3/4 HDMI
+5V DC In
Power
051717
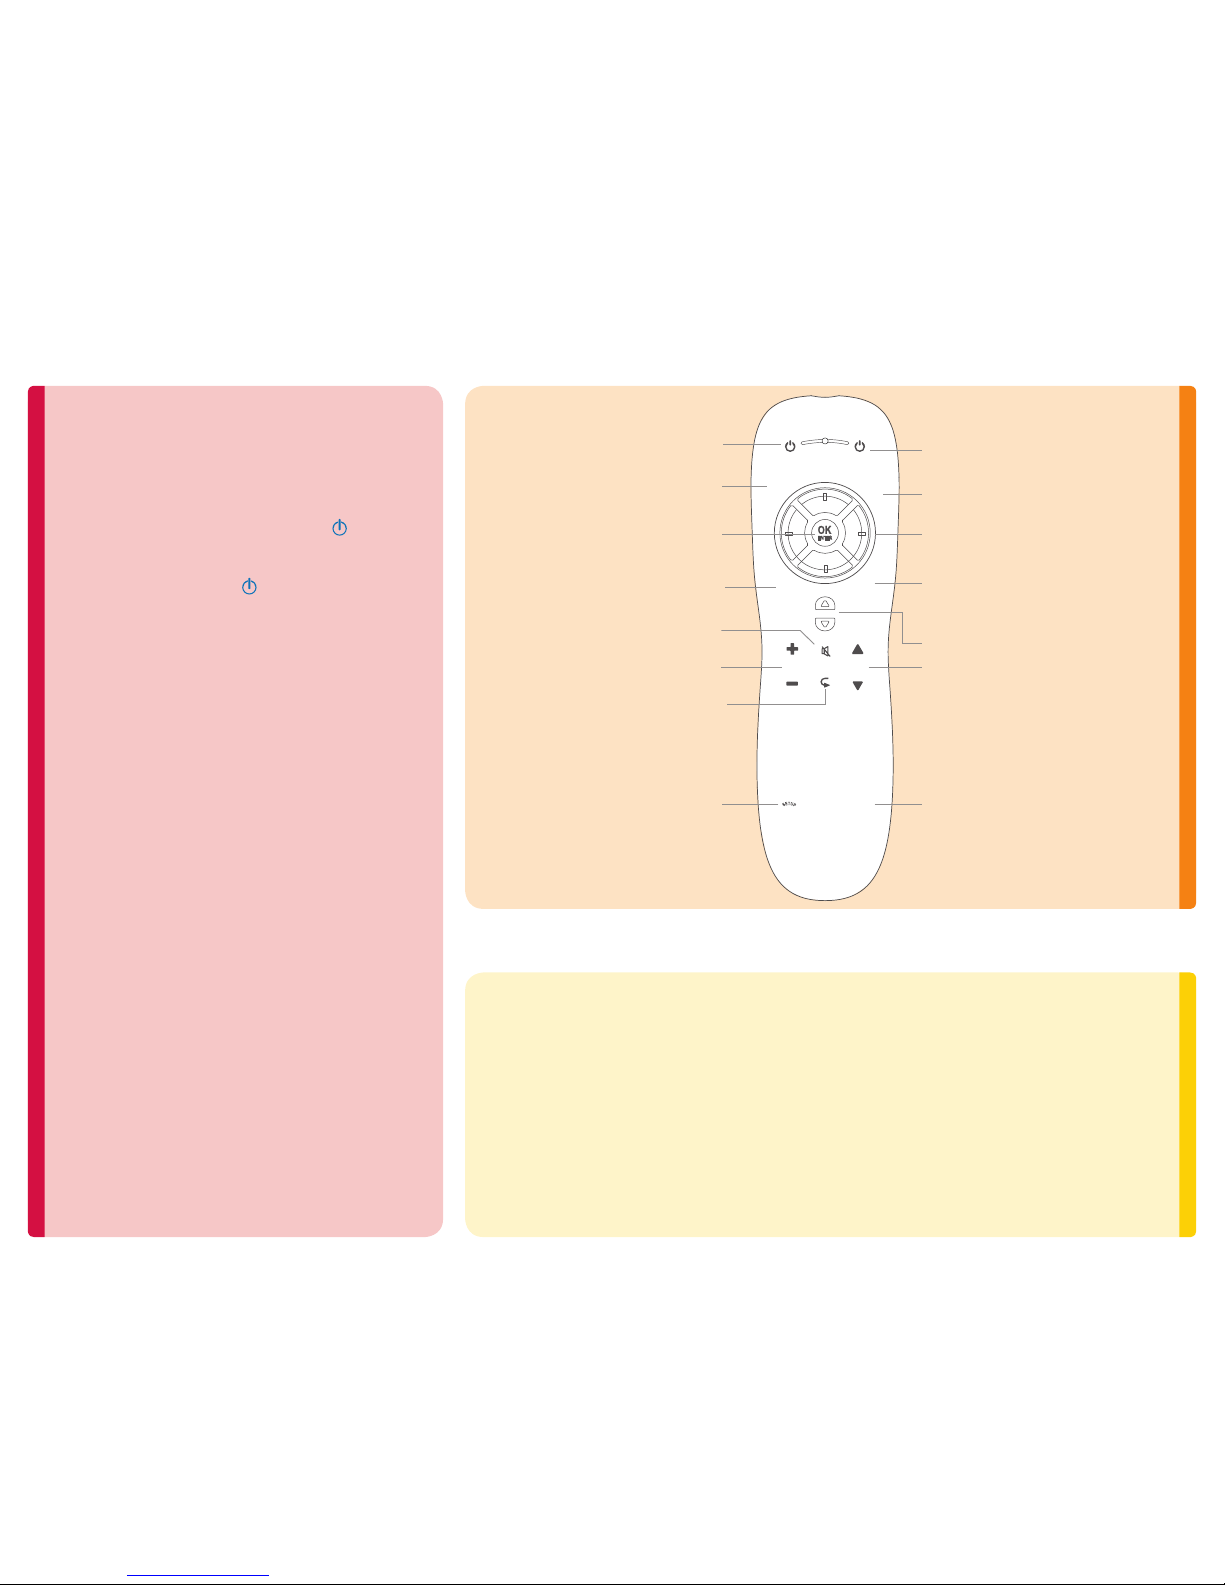
Using your Remote Control:Programming your HD-uDTA Remote:
Your remote control is simple to program, easy-to-use, and
can operate two (2) electronic devices, which include:
• HD-uDTA - Motorola HD (High-Denition) Universal
Digital Transport Adapter
• TV - Television
1. Turn on the TV by pressing the POWER button on
your television set.
2. On your remote, press SETUP until LED blinks twice.
3. Pressing the TV POWER , the LED should remain on.
4. Press the numbered button listed for your TV brand
(example: press the 6button for all Samsung TVs).
- 1 = Insignia/Dynex
- 2 = LG/Zenith
- 3 = Mitsubishi
- 4 = Panasonic
- 5 = Philips/Magnavox
- 6 = Samsung
- 7 = Sharp
- 8 = Sony
- 9 = Toshiba
- 0 = Vizio
5. Let go of the numbered key when your TV turns off and
setup is complete.
- Before you can use your remote control, it must be
programmed (setup) to operate your TV. Two (2) blinks
from the LED light means setup was a success, one (1)
long blink means setup was not successful. If the “Remote
Control User’s Guide” code book was not provided in your
installation kit or you no longer have it, please visit
www.hbci.com/support to download the “HBC Remote
Control Handbook.” If your TV screen is blank or you have
no sound, you may have not completed all of the installation
and activation steps. Please ensure each step of the
installation and activation has been completed. If problem(s)
still persist, please contact Wizards Technical Support at
(877) 457-9669 and press 2 on your phone’s keypad when
prompted.
Important Handling and Installation Instructions:
• Install the HD-uDTA away from heat sources such as radiators, heat registers, and stoves.
• Do not operate the HD-uDTA in extreme weather conditions.
• Do not place the HD-uDTA in an enclosed area where the cooling vents are blocked or
impede the ow of air through the ventilation openings.
• Position the HD-uDTA with at least 3 inches of space on all sides.
• Place the HD-uDTA on a at surface that is not prone to vibration or impact.
• Do not install the HD-uDTA in an area where condensation occurs.
1 2 3
456
7 8 9
0
GUIDE
INFO
MENU
EXIT
PAG E
MUTE
TV CABLE
POWER
LAST
L
A
N
G
Turns TV ON/OFF
Displays main MENU
Displays program GUIDE
Controls TV VOLUME
Used in the program guide
for PAGE navigation
Turns set-top box ON/OFF
Displays INFO for currently
selected program
EXITs current menu and
returns to current program
Returns to LAST channel
you were watching
HOLD for 3 seconds to enter SETUP
Channel UP/DOWN
Change or setup primary
audio language (SAP)
Used to navigate
on-screen guide
MUTEs TV VOLUME
Used to make a selection on
the on-screen guide
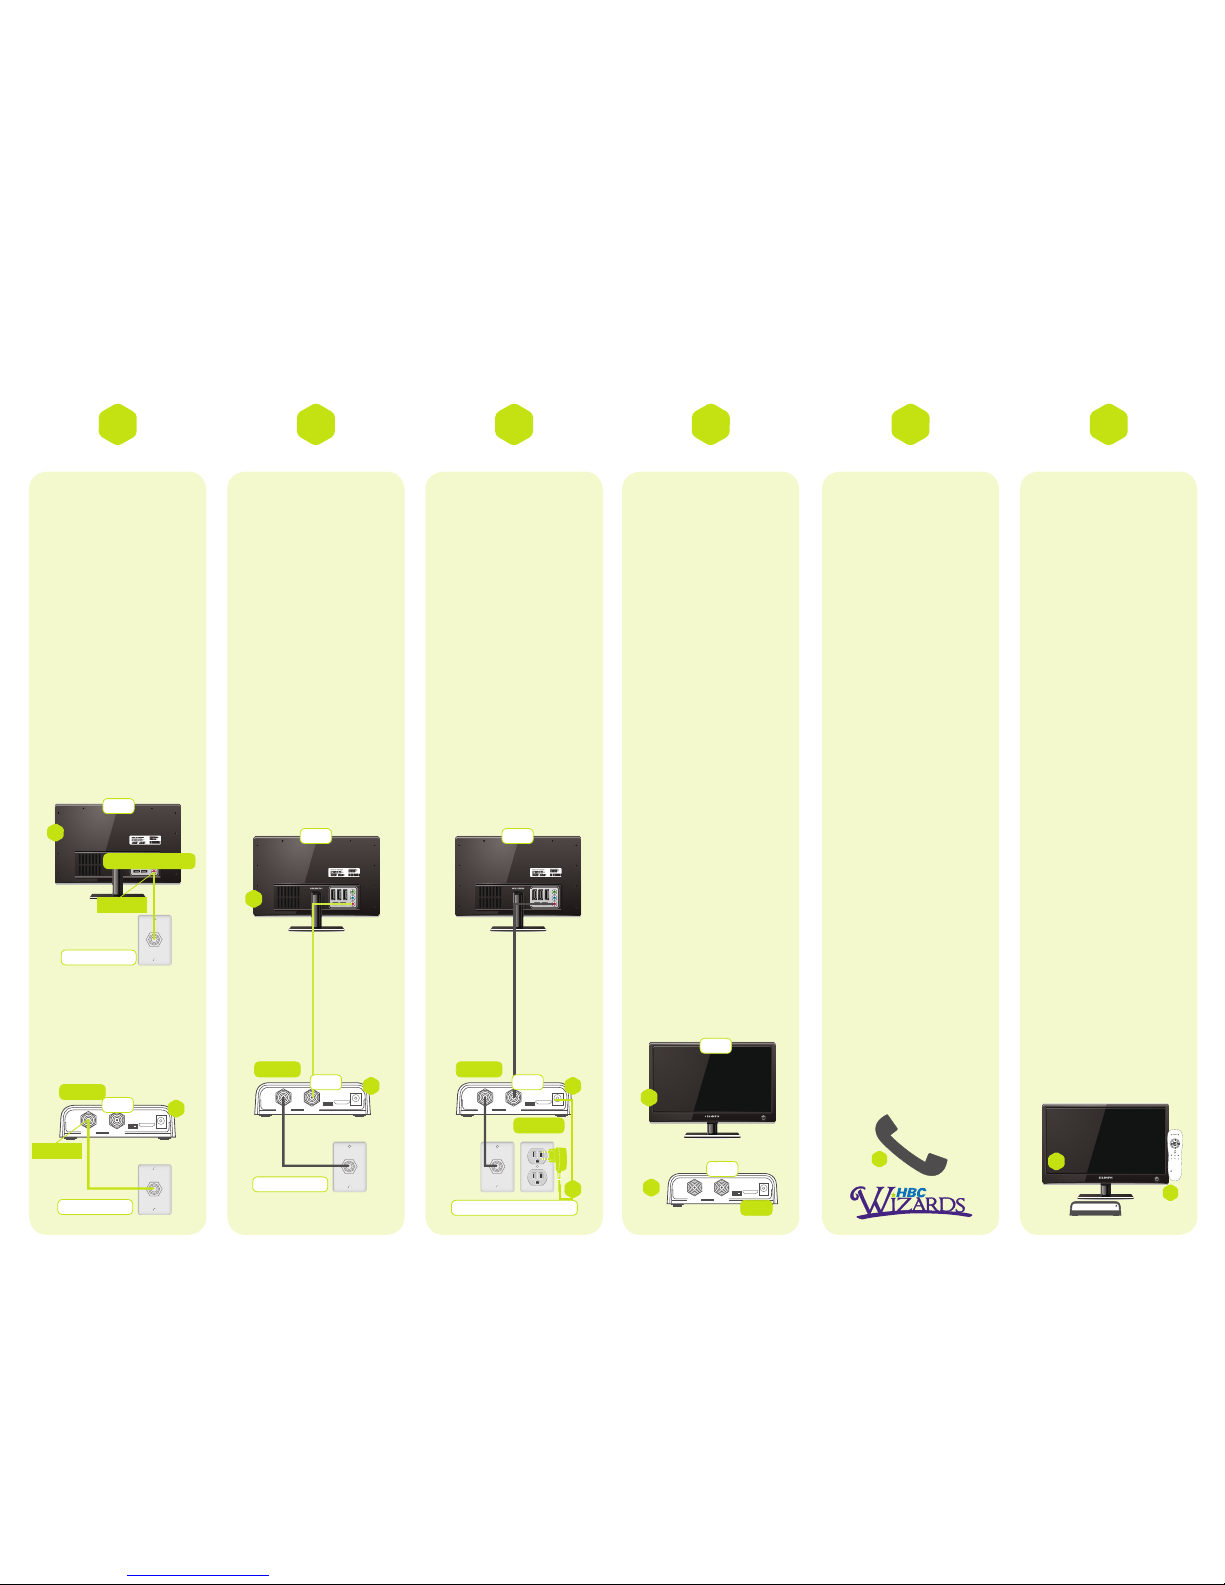
Connect the HD-
uDTA to your cable
service.
A) Locate the coaxial
cable that currently
runs from the cable
wall outlet to the back
of your TV. Leave
one end of the cable
connected to the wall,
but disconnect the other
end from the back of
your TV.
B) Connect the coaxial
cable from your wall
outlet to the input on the
back of the HD-uDTA
labeled CABLE IN.
Connect the HD-
uDTA to your TV.
A) Locate the supplied
coaxial cable provided
in your installation kit.
Connect one end of
the coaxial cable to the
input labeled TO TV on
the back of the HD-
uDTA.
B) Connect the other
end of the cable to the
input labeled ANT/
CABLE on the back of
your TV.
Turn on the HD-
uDTA.
A) Plug the round end
of the power cord into
the +5V DC IN input on
the back of the HD-
uDTA.
B) Plug the other end
into a non-switched
wall outlet. The HD-
uDTA will turn on
automatically.
Set the channel.
A) Turn on your TV and
tune it to channel 3 or 4.
B) Set the switch on the
back of the HD-uDTA to
CH 3 or CH 4.
Activate the HD-
uDTA.
A) If you received more
than one HD-uDTA from
HBC, you must connect
all of them before
calling to activate.
B) Ensure your HD-
uDTA remote control
has been programmed
for your TV.
Note: For more
information on
programming your
remote, please refer
to the section titled
“Programming Your
HD-uDTA Remote,”
located on the back of
this guide.
C) To complete your
activation please call
Wizards Technical
Support at
(877) 457-9669 and
press 2on your phone’s
keypad when prompted.
Conrm your
service.
A) After activating wait a
few minutes.
B) Make sure your TV is
turned on.
C) Conrm that the
HD-uDTA is connected
to the power outlet and
that the green light on
the front is solid (not
blinking).
D) Using the remote
control to operate
your HD-uDTA, scroll
through your channels
and make sure they are
all working.
Note: If the light
is blinking, or
your channels are
not showing up,
please refer to the
“Troubleshooting”
section of this guide.
Installation and Activation: TV
1 2 3 4 5 6
TV
A
CABLE/ANTENNA IN
Cable Wall Outlet
Disconnect
TV TV
B
CABLE IN TO TV CH 3/4 HDMI
+5V DC In
Power
Cable Wall Outlet
D TA B
Reconnect
CABLE IN
CABLE IN TO TV CH 3/4 HDMI
+5V DC In
Power
Cable Wall Outlet
A
CABLE IN
CABLE IN TO TV CH 3/4 HDMI
+5V DC In
Power
A
CABLE IN
D TA D TA
Cable Wall Outlet/Power Outlet
+5V DC IN
B
CABLE IN TO TV CH 3/4 HDMI
+5V DC In
Power
D TA
CH 3/4
B
A
Channel 3
TV
1 2 3
456
7 8 9
0
GUIDE
INFO
MENU
EXIT
PAGE
MUTE
TV CABLE
POWER
LAST
L
A
N
G
D
B
C
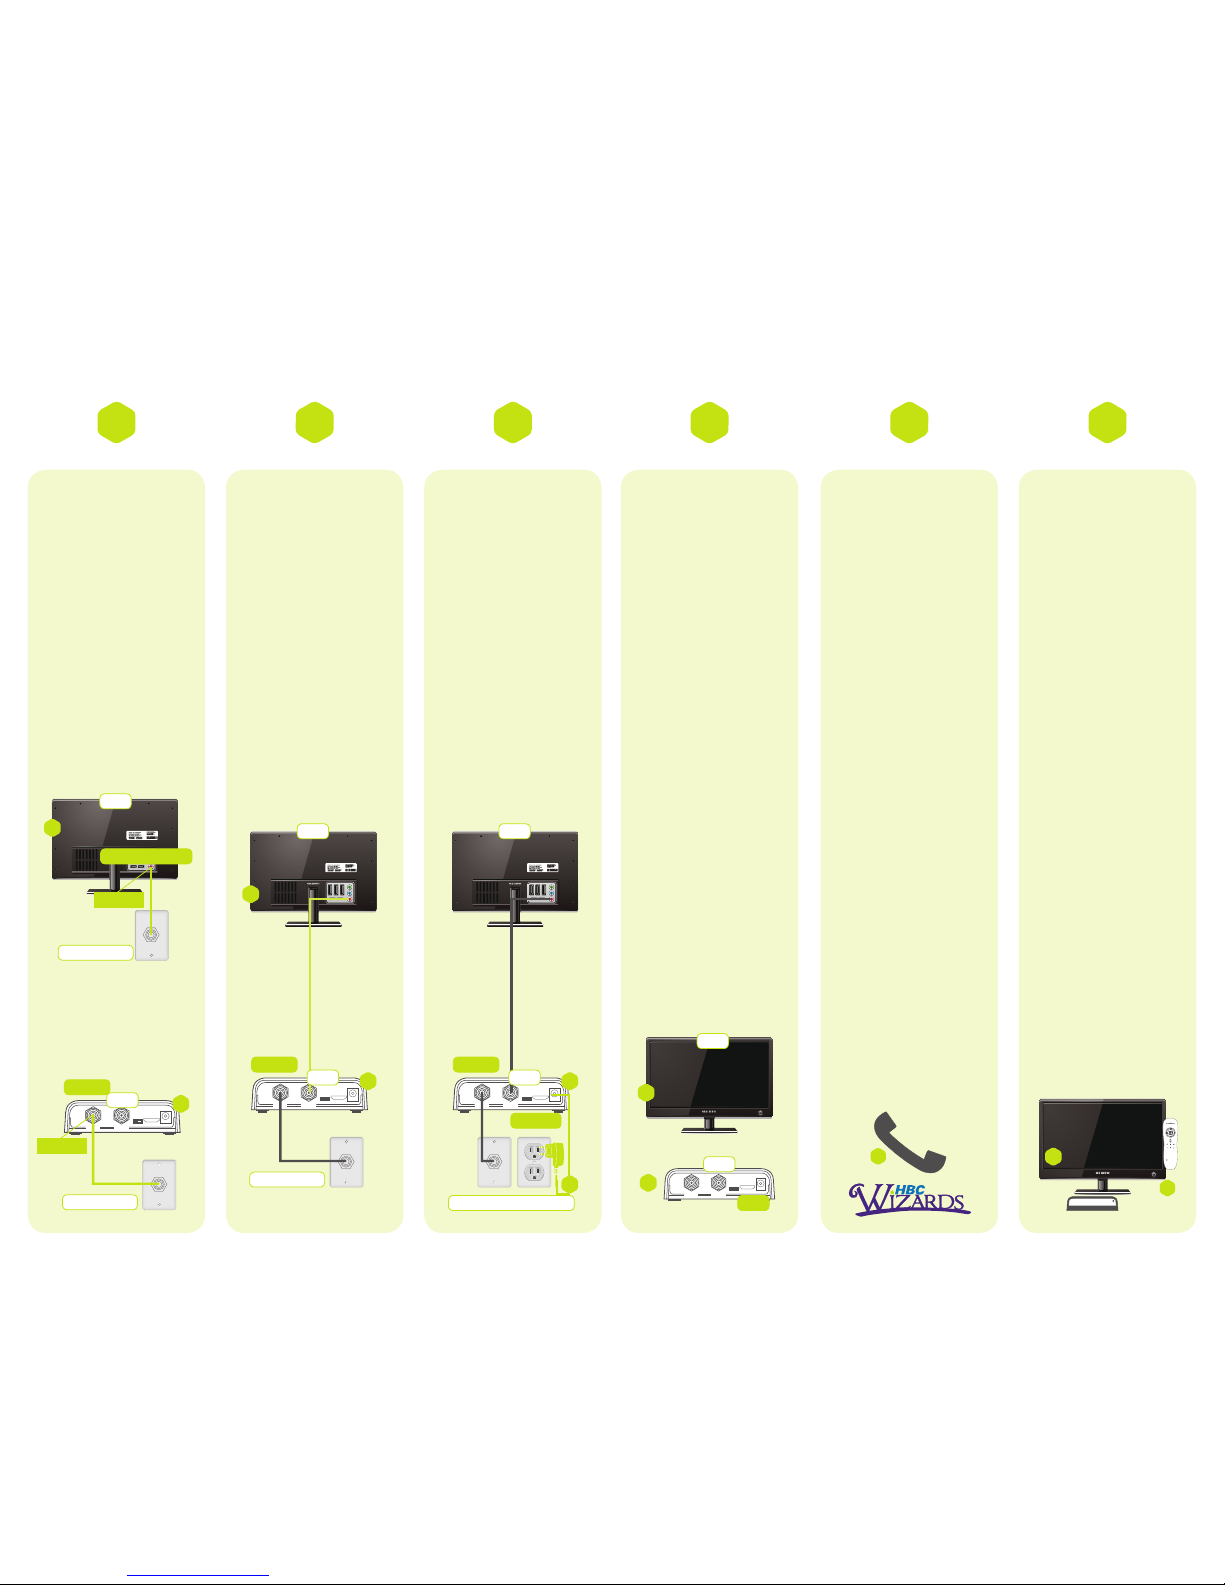
Connect the HD-
uDTA to your cable
service.
A) Locate the coaxial
cable that currently
runs from the cable
wall outlet to the back
of your HDTV. Leave
one end of the cable
connected to the wall,
but disconnect the other
end from the back of
your HDTV.
B) Connect the coaxial
cable from your wall
outlet to the input on the
back of the HD-uDTA
labeled CABLE IN.
Connect the HD-
uDTA to your TV.
A) Connect the HDMI
cable to the HDMI input
on the back of the HD-
uDTA.
B) Connect the other
end of the cable to the
HDMI input on the back
of your HDTV.
Turn on the HD-
uDTA.
A) Plug the round end
of the power cord into
the +5V DC IN input on
the back of the HD-
uDTA.
B) Plug the other end
into a non-switched
wall outlet. The HD-
uDTA will turn on
automatically.
Set the channel.
A) Tune to the HDMI
input that the HD-uDTA
is plugged in to.
Activate the HD-
uDTA.
A) If you received more
than one HD-uDTA from
HBC, you must connect
all of them before
calling to activate.
B) Ensure your HD-
uDTA remote control
has been programmed
for your HDTV.
Note: For more
information on
programming your
remote, please refer
to the section titled
“Programming Your
HD-uDTA Remote,”
located on the back of
this guide.
C) To complete your
activation please call
Wizards Technical
Support at
(877) 457-9669 and
press 2on your phone’s
keypad when prompted.
Conrm your
service.
A) After activating wait a
few minutes.
B) Make sure your
HDTV is turned on.
C) Conrm that the
HD-uDTA is connected
to the power outlet and
that the green light on
the front is solid (not
blinking).
D) Using the remote
control to operate
your HD-uDTA, scroll
through your channels
and make sure they are
all working.
Note: If the light
is blinking, or
your channels are
not showing up,
please refer to the
“Troubleshooting”
section of this guide.
Installation and Activation: HDTV
1 2 3 4 5 6
TV
A
CABLE/ANTENNA IN
Cable Wall Outlet
Disconnect
TV TV
B
CABLE IN TO TV CH 3/4 HDMI
+5V DC In
Power
Cable Wall Outlet
D TA B
Reconnect
CABLE IN
CABLE IN TO TV CH 3/4 HDMI
+5V DC In
Power
A
CABLE IN
D TA
Cable Wall Outlet/Power Outlet
+5V DC IN
B
CABLE IN TO TV CH 3/4 HDMI
+5V DC In
Power
D TA
HDMI
B
A
HDMI
TV
1 2 3
456
7 8 9
0
GUIDE
INFO
MENU
EXIT
PAGE
MUTE
TV CABLE
POWER
LAST
L
A
N
G
CABLE IN TO TV CH 3/4 HDMI
+5V DC In
Power
Cable Wall Outlet
A
CABLE IN
D TA
D
B
C


