HDanywhere MHUB4KPRO88 User manual

MHUB 4K PRO (8x8) Manual
Product Code: MHUB4KPRO88
12345 6
12 3 456
7 8
78
A
A B C d E F G H
Display IR (IN)
HUB IR (IN) source ir (OUT) AMP ir (OUT)
HUB CONTROL
RS232
IP
100-240V AC 50/60HZ
SOURCE INPUT
RS232
DigitaL Stereo
B
RS232
DigitaL Stereo
C
RS232
DigitaL Stereo
D
RS232
DigitaL Stereo
E
RS232
DigitaL Stereo
F
RS232
DigitaL Stereo
G
RS232
DigitaL Stereo
H
RS232
DigitaL Stereo
LAN
ALL ir (IN)
ABC D E F G H
OK
E
1234 5 678FG H

MHUB 4K (8x8) Manual
2
CONTENTS
Contents and introduction
Quick setup guide and system features
Central hub diagram
Display receivers and setting up IR control
Testing your IR setup
Operating your system
Troubleshooting and advanced features
Guarantee, Warranty information and contacting customer
support
2
3
4
5
7
8
YOUR
MHUB
This multiroom system with support
for the newest 4K devices with HDCP
2.2 encryption is the perfect addition
to your smart home. Watch any eight
entertainment devices in 4K ULTRA
HD on up to eight HDTVs and send
to your TVs for gaming and Smart TV
services.
MHUB 4K uses a single Cat 5/6
cable to deliver 4K Ultra HD up to
distances of 100m from the central
hub of the MHUB 4K to your HDTV’s.
Two-way discrete IR means you can
control your media device’s as usual
using your normal set top box
remote at each of the eight TVs.
This manual should contain
everything you need to get the
MHUB 4K (8x8) up and running.
1. x1 MHUB 4K (8x8) hub
2. x1 MHUB 4K (8x8) remote con-
trol
3. x1 IEC lead
4. x8 display receivers
5. x9 IR transmitters (TX)
6. x10 IR receivers (RX)
7. x2 2U rack mounting ears
8. x16 receiver mounting ears
9. x16 RS232 Phoenix connectors
IN THE BOX

MHUB 4K (8x8) Manual
3
QUICK SETUP
SYSTEM FEATURES
If you have installed an MHUB or other HDanywhere device before, this quick start guide will get you up and
running in the fastest time possible. If you have not installed one of our systems, we would recommend reading
the rest of this manual.
1.
devices.
2. Connect your HDMI sources to the HDMI
inputs on the central hub using appropriate
HDMI cables.
3. Connect a display such as a HDTV or HD Pro-
jector to the HDMI output port on the display
receiver using a HDMI cable. We recommend
that you use high-speed HDMI cables no
longer than 5 meters in length.
4. Now connect a single Cat5e/6 up to 100m in
length between the Cat output port of the ma-
trix and the cat input port of each of the eight
display receivers.
1. Uses single CAT-5e/6 cable to send uncom-
pressed video and audio over long distances
from upto eight source devices to upto eight
Displays
2. Supported video resolutions: 720p, 1080i ,3D
1080i (50Hz), 1080p (30Hz) , 1080p (60Hz) ,
4K (30Hz) 4:4:4, 4K (60Hz) 4:2:0 , UHD (30Hz)
4:4:4, UHD (30Hz) 4:4:4
3. Supported stereo or multichannel audio for-
mats including: Dolby Digital 2.0, Dolby Digi-
tal 5.1, Dolby Digital EX 6.1, Dolby Digital Plus
7.1, Dolby TrueHD 5.1, Dolby TrueHD 7.1,
DTS 5.1, DTS-HD Master 5.1, DTS-HD Master
7.1, DTS 96/24 5.1, DTS-ES Discrete 6.1, DTS-
ES Matrix 6.1, LPCM 2.0, LPCM 5.1, LPCM 6.1,
LPCM 7.1, PCM 2.0, Dolby Atmos
5. Plug in the power for the central hub.
6. Power on your HDMI source devices followed
by each display.
7. If you are connecting a nearby or “local”
display or AVR using the HDMI mirror ports.
Connect your display/AVR to this port with an
appropriate HDMI cable.
8. At this point the eight displays should show
the video and audio of the HDMI source devic-
es connected to the matrix.
4. x8 mirrored HDMI outputs for AVR integration
or additional displays
5. Two-way IR supported
6. IR passback allows you to select and control
what you watch from every room
7. Control is delivered via two-way RS232, TCP/
IP, IR and front panel buttons.
8. Stereo Audio breakout on each output via
3.5mm jack for stereo or Coaxial for surround
sound formats.
9. Multichannel to stereo downmix on the
3.5mm jack outputs
10. AVR IR for integrating IR control for an AVR in
addition to 8 source devices.

MHUB 4K (8x8) Manual
4
THE CENTRAL HUB (X1)
MHUB 4K (8X8) PRO CHASSIS (REAR)
13
4
14 15
16
138
5 6 7
11 12
910
2
MHUB 4K (8X8) PRO TOUCH PANEL (FRONT)
12345 6
12 3 456
7 8
78
A
A B C d E F G H
Display IR (IN)
HUB IR (IN) source ir (OUT) AMP ir (OUT)
HUB CONTROL
RS232
IP
100-240V AC 50/60HZ
SOURCE INPUT
RS232
DigitaL Stereo
B
RS232
DigitaL Stereo
C
RS232
DigitaL Stereo
D
RS232
DigitaL Stereo
E
RS232
DigitaL Stereo
F
RS232
DigitaL Stereo
G
RS232
DigitaL Stereo
H
RS232
DigitaL Stereo
LAN
ALL ir (IN)
ABC D E F G H
4
5
12 / 3
OK
E
1234 5 678FG H
MHUB 4K (8X8) PRO TOUCH PANEL (FRONT)
1. MHUB ON/OFF: Press and hold for 2 seconds to
2. Source Selector (1-8): Select which source you
want to switch to
3. LCD Panel: Displays MHUB system information
and switching status
4. Display Selector (A-H): Select which display you
want to ouput to
5. Menu and Navigation Control: Brings up EDID
and IP menu settings
MHUB 4K (8X8) PRO TOUCH PANEL (REAR)
1. “SOURCE INPUTS” [1-8]: Use to connect HDMI
source devices to the MHUB
2. “HDBASET” Outputs [A-H]: Connect your MHUB
receivers to these ports via a CAT cable
3. “HDMI” Outputs [A-H]: These ports provide a
mirror of the corresponding HDBASET output
4. “LAN” Port: If you wish to enable the ethernet
ports on your MHUB 4K Pro receivers, then
connect your router to this port via an ethernet
cable
5. Receiver RS232 port
6. “DIGITAL” audio port: Use this port to extract
multi-channel audio via a coaxial cable
7. “STEREO” audio port: Use this port to extract
down-mixed stereo audio via a 3.5mm jack cable
8. Earthing Point: Use to earth your MHUB
9. “HUB IR (IN)”: Connect an IR RX to this port to
control your MHUB via IR locally
10. “DISPLAY IR (IN)” [1-8]: Connect IR RXs to these
ports to control your displays via IR with a third
party control system
11. “ALL IR (IN)”: Connect an IR RX to this port to
send commands to all displays simultaneously
12. “SOURCE IR (OUT)” [1-8]: Connect IR TXs to these
ports to control your source devices via IR. The
“SOURCE IR” port number corresponds with the
source input number
13. “AMP IR (OUT)”: If you have an AVR in your
system, connect an IR TX to this port and place it
on the IR window of your AVR
14. “HUB CONTROL IP” Port: Connect the MHUB
system to your router via this port to enable
DASH features and IP control from the uControl
App
15. “HUB CONTROL RS232” Port: Use to integrate
your MHUB with a control system via RS232
16. DC input: Connect the supplied IEC lead to this
port to provide power to your matrix

MHUB 4K (8x8) Manual
5
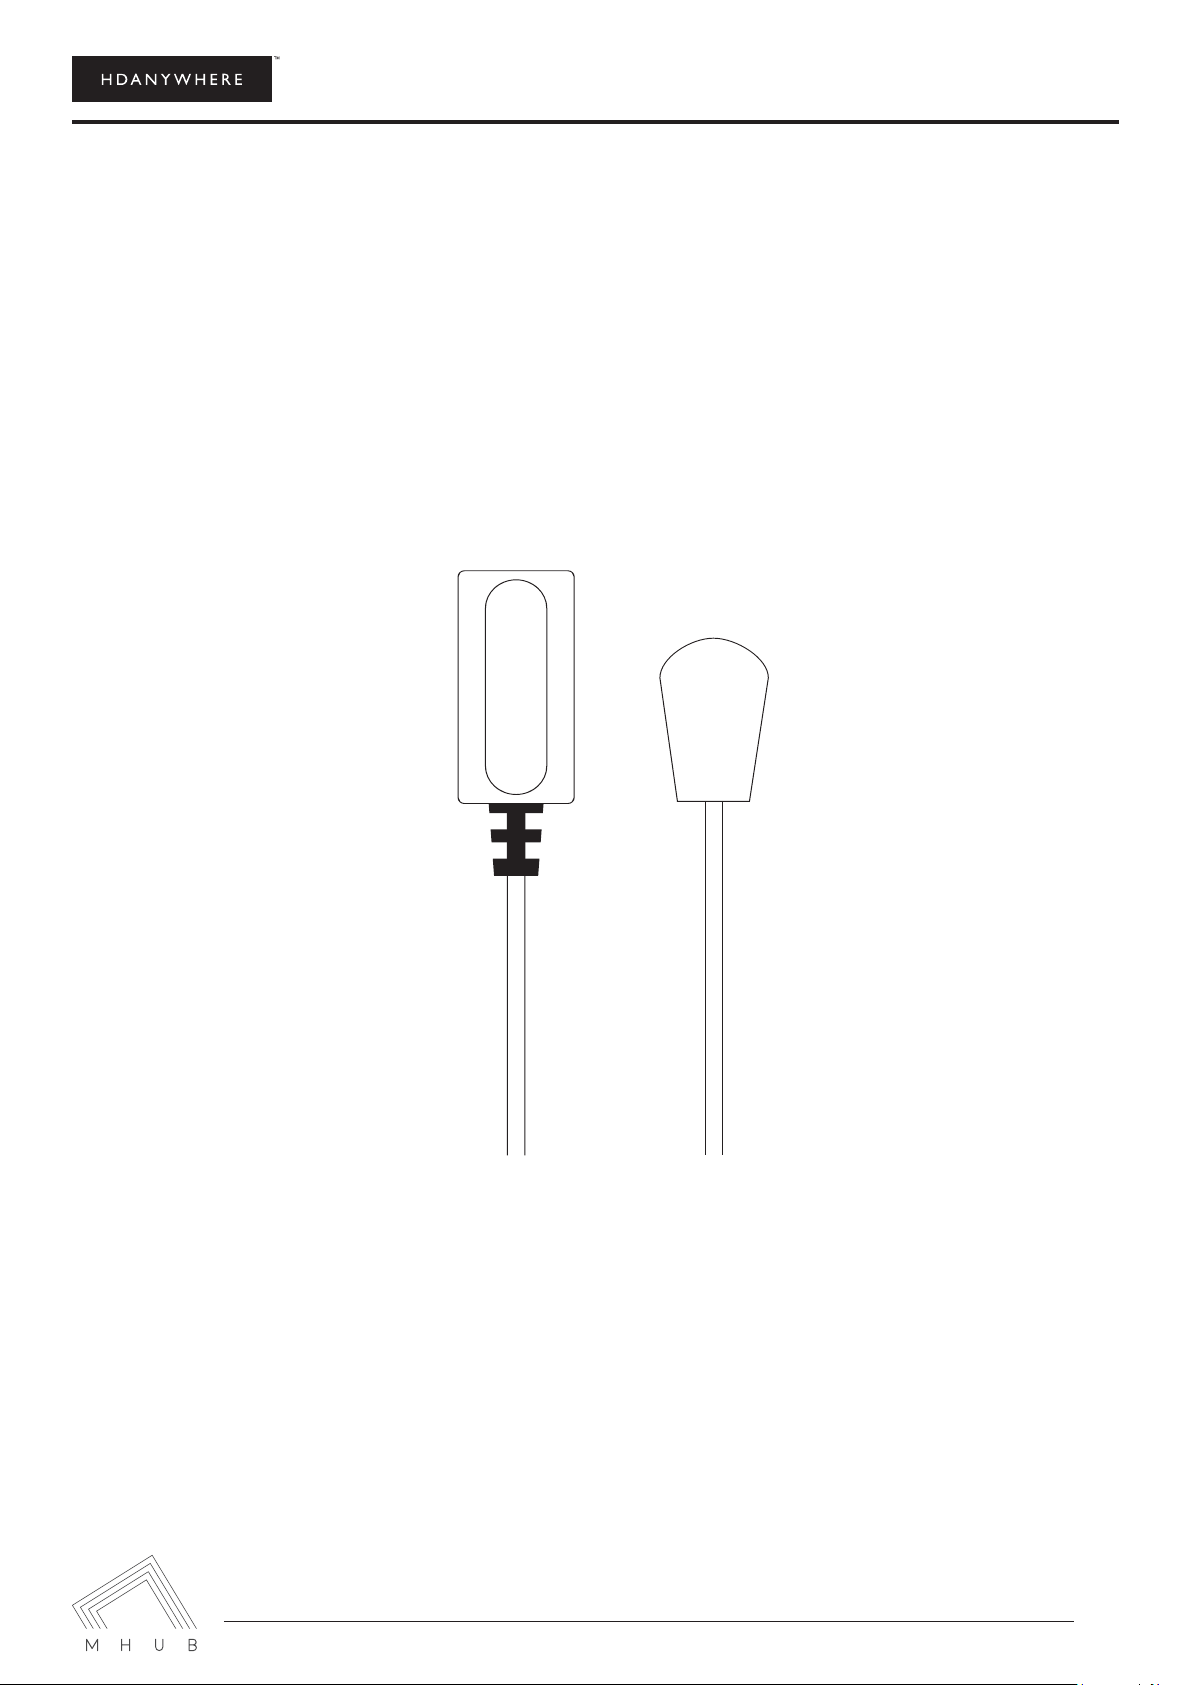
DISPLAY RECEIVERS (X8)
1. Optional DC input: Plug a 24V / 1A DC power supply into the unit if you are not using PoH
2. HDBASET: Connects back to the HDBASET output on the MHUB chassis
3. “IR IN”: Connect an IR RX to the ‘IR (IN)” port to send IR commands back to the MHUB chassis
4. “IR OUT”: Connect an IR TX to enable control of your display
5. “HDMI OUT”: Connect this to your local display using a HDMI cable
6. RS232 Port
7. Dual Ethernet Ports: Connect ethernet cables to these ports to provide a wired ethernet connection to
local devices
IN OUT
1 2 3 4 5 67
SETTING UP IR CONTROL
This will enable IR control to be sent from your display location back to your central hub to enable control of
your IR source devices.
SOURCE CONTROL VIA IR (BACKWARDS IR)
1. Plug IR transmitter TX into the numbered 3.5mm jack port labelled Source IR on the MHUB 4K 8x8 hub .
Make sure the number corresponds with the HDMI input the source device is connected to.
2. Place IR transmitter TX bud (small circular part) in front of the IR eye of the source (where you would nor-
mally point the remote to control the HDMI source device). Repeat these steps for each source device.
3. Plug IR receiver RX into the 3.5mm jack port labelled IR RX on the display receiver.
4. Place IR receiver at or near the display (position it close to where you would usually point your remote to
MHUB 4K (8x8) Manual
6
DISPLAY CONTROL VIA IR (FORWARDS IR)
1. Plug IR transmitter TX into the 3.5mm jack port labelled IR TX on the display receiver.
2. Place IR transmitter TX in front of the IR eye of the display (position it where you would usually point your
3. Plug IR receiver RX into the numbered 3.5mm jack port labelled Display IR on the central hub. Make sure
the number corresponds with the display you want to control
4. Place IR receiver in a visible uncovered position where it is able to receive remote signals.
IR RX
IR TX

MHUB 4K (8x8) Manual
7
TESTING YOUR IR SETUP
TEST BASIC OPERATION
The easiest way to verify your IR setup is to go to your display device connected to output 1 of the central hub.
Use the matrix remote to select source input 1 and then use the remote control for your chosen source 1 to
verify control. Do this for each of the other sources connected to the matrix. If you wish, you can then repeat
the process at each of the display locations you have connected to the system.
FORWARD IR PORTS
The MHUB 4K 8x8 has forward IR ports on the rear of the matrix. These allow IR signals to be sent from the
central hub to the individual TV receivers. This feature is for use when integrating with third party control sys-
tems. In normal use these ports are not used or required. For example, a third party smart home system such
as Control4, Crestron, AMX or RTI can send IR commands to control devices at the TV receiver location from the
location of the central hub.
WORKING WITH IDENTICAL SOURCE DEVICES
MHUB has discrete IR, so it is possible to have two or more identical source devices without IR clashes that re-
sult in the operation of all identical devices. When using two or more identical source devices, please take meas-
ures to avoid IR transmission leaks that could cause the other identical source devices to respond. You can take
measures to shield source devices from the IR being emitted by other source device IR TX emitters by locating
MHUB 4K (8x8) Manual
8
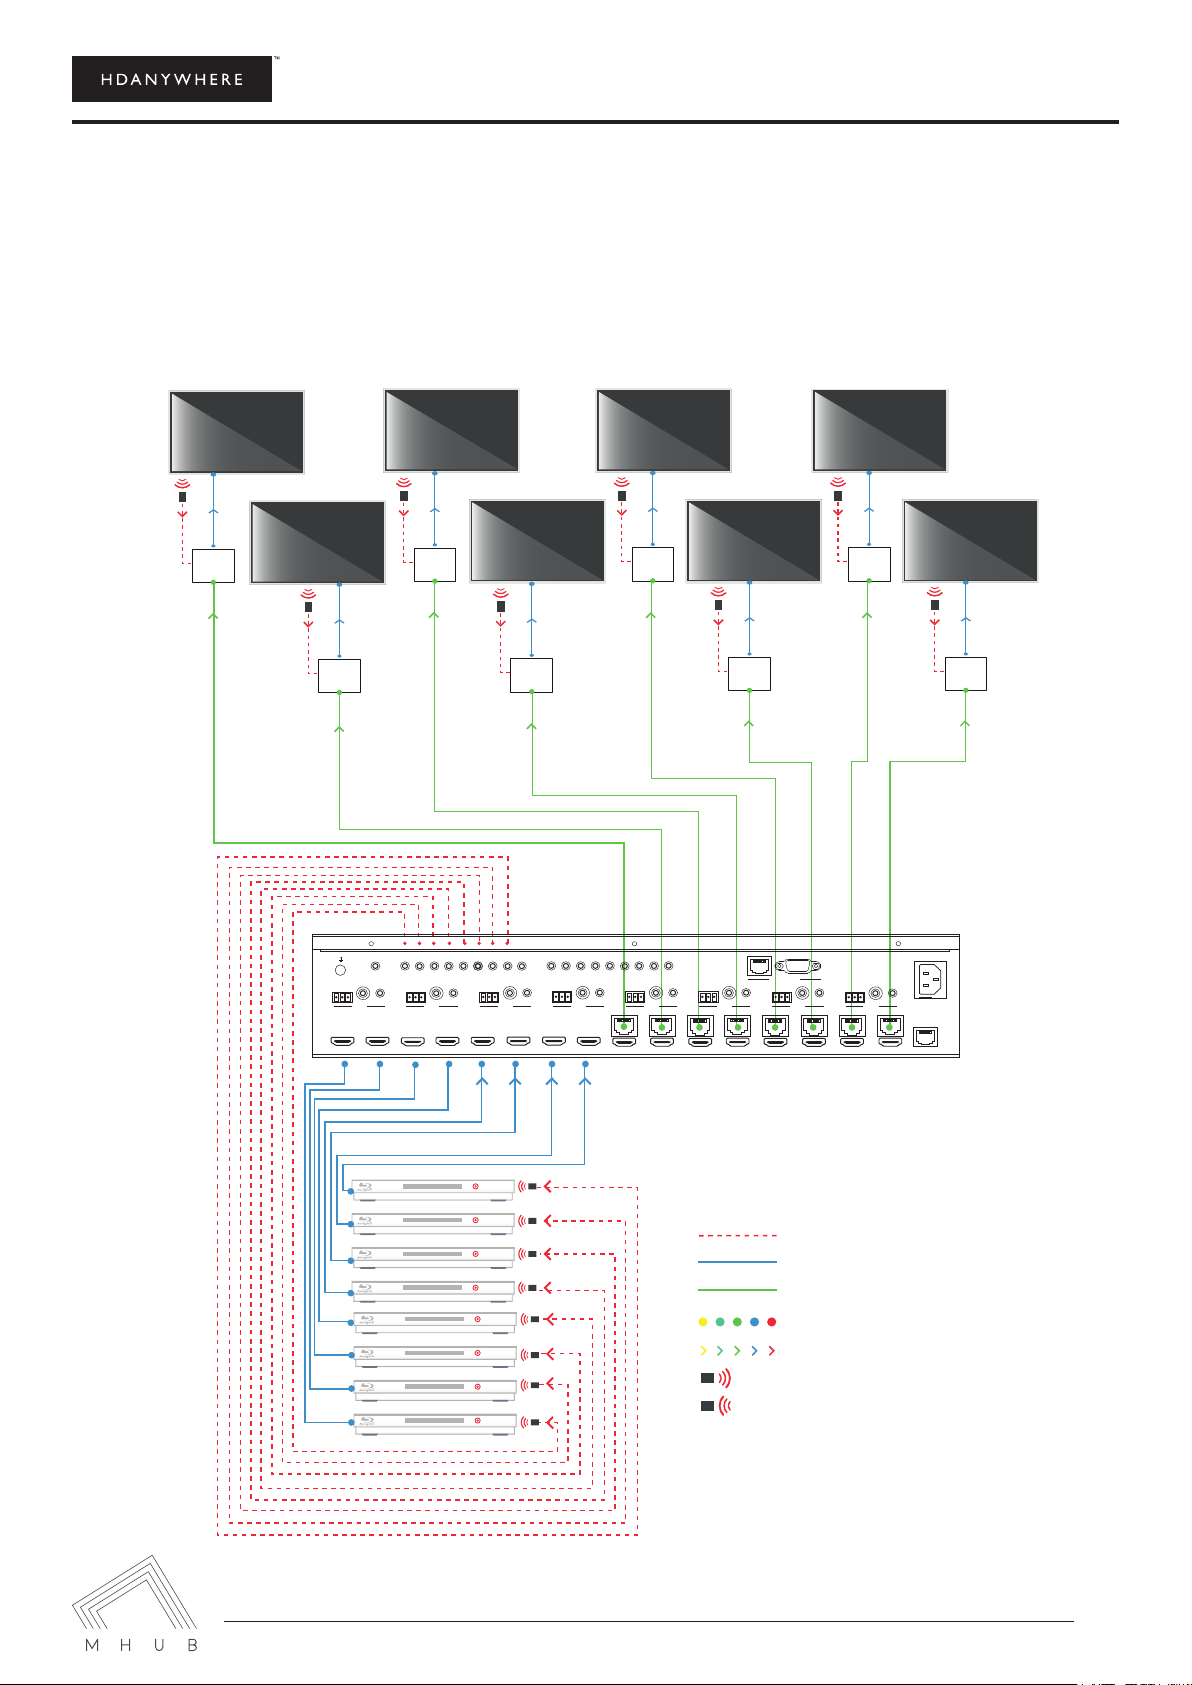
STANDARD WIRING DIAGRAM
This is a typical wiring diagram that shows how we would expect an MHUB 4K Pro (8x8) to be cabled. This
diagram features eight HDMI source devices (any combination of source devices) being sent to eight rooms. All
devices are being controlled via backwards IR.
IR cable
HDMI cable - 25m / 82ft Max
HDMI over cat cable - 50m / 164ft Max
Connection
Direction
IR Transmitter
IR Receiver
Key
RX
RX
RX RX
RX RX
RX
RX
12345 6
12 3 456
7 8
78
A
A B C d E F G H
Display IR (IN)
HUB IR (IN) source ir (OUT) AMP ir (OUT)
HUB CONTROL
RS232
IP
100-240V AC 50/60HZ
SOURCE INPUT
RS232
DigitaL Stereo
B
RS232
DigitaL Stereo
C
RS232
DigitaL Stereo
D
RS232
DigitaL Stereo
E
RS232
DigitaL Stereo
F
RS232
DigitaL Stereo
G
RS232
DigitaL Stereo
H
RS232
DigitaL Stereo
LAN
ALL ir (IN)
ABC D E F G H
MHUB 4K (8x8) Manual
9
OPERATING YOUR SYSTEM
MANUAL OPERATION
You can switch between sources manually by using the buttons on the front of the central hub. First press one
of the eight output buttons for the required output to be changed. Next select which input is to be routed to
that output by pressing one of the input buttons. There are two additional buttons labelled ‘ALL’ and ‘PTP’. If
you press the ‘ALL’ button then select an input, this will change all outputs to the selected input (i.e pressing ALL
then Input1 will set all outputs to Input1). Pressing the PTP button will match all outputs to all inputs (Output1
to Input1, Output2 to Input2, Output3 to Input3 etc).
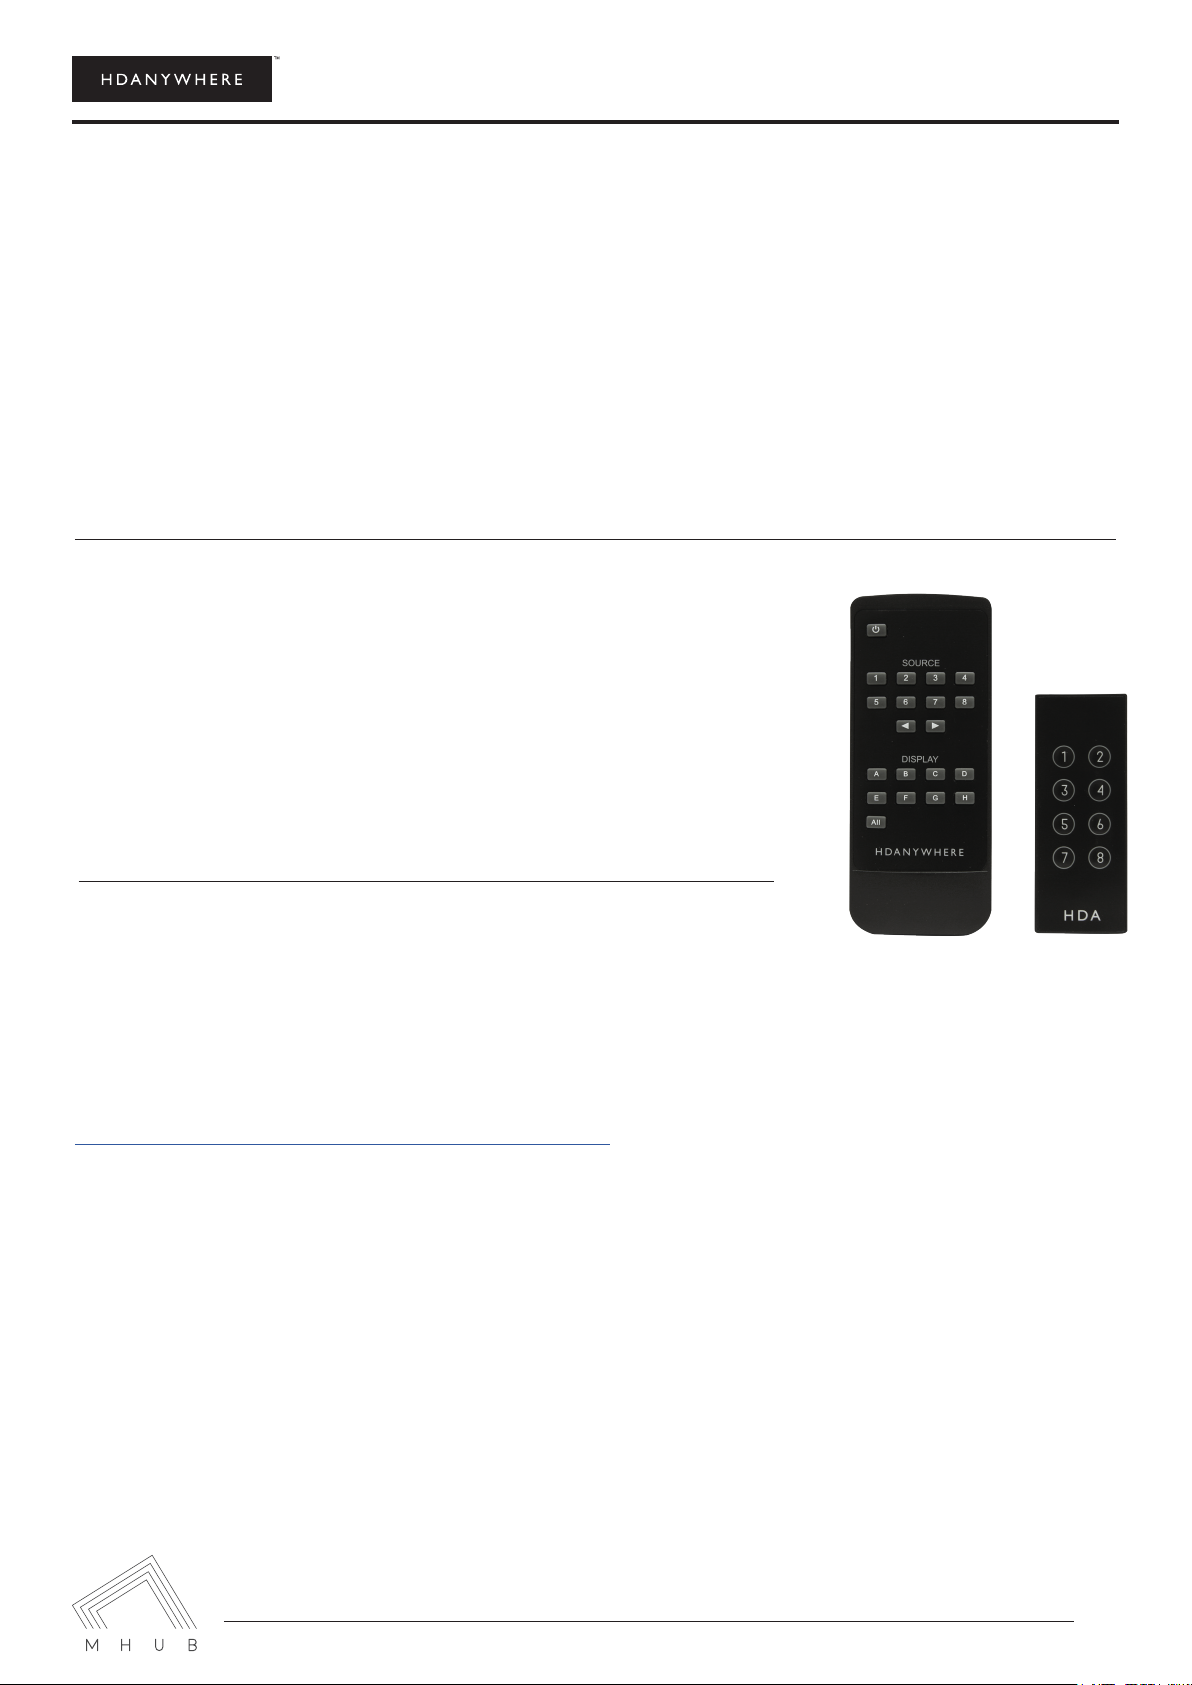
REMOTE OPERATION
The small remote control shown below is included with MHUB. This can
operate the system from directly in front of the matrix, via the IR receiver
window connected to the HUB EXT port and also via the IR RX cables con-
nected to TV Receivers. As with the buttons on the central hub, you would
select output then input.
INTEGRATING WITH A CONTROL
SYSTEM VIA IP OR RS232 PORT
For more information visit:
http://support.hdanywhere.com/products/multiroom-hd/
(Hold menu button to show IP addresses)

MHUB 4K (8x8) Manual
10
TROUBLESHOOTING
Should you encounter a problem when using your MHUB a soft power cycle or hard reset of the matrix should
resolve most issues.
TO PERFORM A HARD RESET:
Power down every device connected to the central hub: all input sources and all HDTVs. Now power down the
NO/INTERMITTENT PICTURE ON HDTV, BLOCKY IMAGES OR SPARKLES:
Find the fault: Drop the output resolution of the source device down to 1080i or 720p. If the picture appears
correctly on the HDTV this indicates a bandwidth issue with the Cat cable run. The available bandwidth is too
low for 1080p transmission. Check that the Cat cable is not bent, knotted, kinked or distorted in any way- this
would prevent the high frequency signals from traveling throughout the intended length.
connection.
THIS CAN BE CAUSED BY:
1.
2. Imperfect RJ45 connector termination
3. Use of wallplates or patch panels that cause too much bandwidth drop
4. Poor quality Cat cabling or internal cable strand breakages caused by poor production
5. Installation bending/strain/damage.
POSSIBLE FIXES:
Relocate cable run away from possible interference from power line (minimum 60cm)
Re-terminate RJ45 connectors or replace with better quality connectors
Remove wallplates and patch panels, replacing with direct cable runs and brush plates.
Upgrade to better quality Cat5e/6/7 cable.

MHUB 4K (8x8) Manual
11
SPECIFICATION
Frequency bandwidth
10.2Gbps
Central hub input/output ports
x8 HDMI inputs
x8 HDMI mirrored outputs
x8 Cat 5e/6 outputs
Display receiver input/output ports
x1 HDMI
x1 Cat 5e/6
x1 IR Transmitter
x1 IR Receiver
x1 Ethernet
x1 RS232
Power supply
IEC Lead (DC 24)
ESD Protection Human Body Model
± 8kV (air-gap discharge) ± 4kV (contact discharge)
Dimensions (mm) (Width x Depth x Height)
Central hub (440 × 200 × 45)
Display receiver (100 x 100 x 24)
Weight (g)
Central hub (750g)
Display receiver (150g) x8
Operating temperature
0°C ~ 40°C / 32°F ~ 104°F
Storage temperature
-20°C ~ 60°C / -4°F ~ 140°F
Relative humidity
20 ~ 90% RH (Non-condensing)
Maximum power consumption
Central hub (50W)
responsible for discrepancies.

MHUB 4K (8x8) Manual
12
THREE-YEAR REPLACEMENT WARRANTY &
GUARANTEE
Warranty coverage period is three years from proof of purchase date for all new PRO hardware/electronics
products purchased on or after August 1, 2016. The coverage period can be extended to four years by the
end-user via registering the product with HDA Cloud. This registration must take place within 30-days of the
purchase date.
HDA’s Limited Product Warranty Period begins on the date of purchase. The date contained on the sale invoice
original installation company or end-user registered on HDA Cloud and is non-transferrable to any subsequent
purchaser(s) or owner(s) of these products. Proof of purchase will be required to verify eligibility.
For more information visit:
http:// hdanywhere.com/legal/
www.hdanywhere.co.uk
Table of contents
Popular Home Automation manuals by other brands


Eaton
Eaton xComfort CRCA-00/02 Assembly instructions

QUBINO
QUBINO Flush Shutter user manual

Zebronics
Zebronics ZEB SP116 user manual

LightwaveRF
LightwaveRF Megaman Connect Series instruction manual

Johnson Controls Unitary Products
Johnson Controls Unitary Products S1-TTSCC Zoning User's Information Manual

Iluv
Iluv Smart WiFi Plug quick start guide


