Heartland 9730 User manual

Model 9730
CONVECTION SELF CLEAN AND HALF WALL OVEN
ATTENTIONINSTALLER:Leavethismanualwithappliance
Manual#9716
0042605
INSTALLATION
AND
OPERATING
INSTRUCTIONS
Save these
instructions
for future use
The oven door thermometer
does not sense temperature. It is
for aesthetics only and is
nonfunctional.
Note: Please read these instructions
thoroughlybeforeattemptingtoinstall
this unit. Failure to follow installation
instructionswillresultincostlyservice
calls.
NOTE: Clock must be set or your
oven will not function!
© 2005HEARTLANDAPPLIANCESINC.
1050 Fountain St N.
Cambridge,Ontario,
Canada N3H-4R7
Business(519)650-5501
Fax(519)650-3773
TollFreePhone:1-800-361-1517
TollFreeFax:1-800-327-5609
®
CUS

PLACEOFPURCHASE______________________________
DATEOFPURCHASE_______________________________
SERIALNUMBER__________________________________
MODELNUMBER__________________________________
ENTIRE PRODUCT – LIMITED ONE YEAR WARRANTY
HEARTLANDwarrantsthereplacementorrepairofallparts,ofthisappliancewhichprovetobedefectiveinmaterial
orworkmanship,withtheexceptionofthepaintedorporcelainenamelfinishorplatedsurfaces,foroneyearfromthe
dateoforiginalpurchase.SuchpartswillberepairedorreplacedattheoptionofHeartlandwithoutcharge,subjectto
the terms and conditions set out below.
Thewarrantyperiodagainstdefectsinthepaintedorporcelainenamelfinish,orplatedsurfaces,is90daysfromdate
of original purchase. The warranty does not include replacement of oven lamps or filters.
OVEN ELEMENTS - LIMITED SECOND THROUGH THIRD YEAR WARRANTY
HEARTLANDwarrantstheovenheatingelementsagainstdefectsinmaterialorworkmanshipforanadditionaltwo
years.ThesepartswillberepairedorreplacedattheoptionofHeartlandwithoutcharge,butyoupayforlabourand
transportation subject to the terms and conditions set out below.
TERMS AND CONDITIONS
1. Thiswarrantyappliesonlyforsinglefamilydomesticusewhentheappliancehasbeenproperlyinstalledaccording
totheinstructionssuppliedbyHeartlandandisconnectedtoanadequateandproperutilityservice.Damagedue
tofaultyinstallation,improperusageandcare,abuse,accident,fire,flood,actsofGod,commercial,business
or rental use, and alteration, or the removal or defacing of the serial plate, cancels all obligations of this
warranty.ServiceduringthiswarrantymustbeperformedbyafactoryAuthorizedServicePerson.
2. Warranty applies to product only in the country in which it was purchased.
3. HeartlandisnotliableforanyclaimsordamagesresultingfromanyfailureoftheCookstoveorfromservicedelays
beyondtheirreasonablecontrol.
4. Toobtainwarrantyservice,theoriginalpurchasermustpresenttheoriginalBillofSale,ModelandSerialnumber.
Componentsrepairedorreplacedarewarrantedthroughtheremainderoftheoriginalwarrantyperiodonly.
5. Thewarrantydoesnotcoverexpenseinvolvedinmakingthisappliancereadilyaccessibleforservicing.
6. Thiswarranty gives youspecific legal rights.Additional warranty rightsmay be providedby law insome areas.
7.Adjustmentssuchascalibrations,levelling,tighteningoffasteners,orutilityconnectionsnormallyassociatedwith
originalinstallation are the responsibilityof the dealer orinstaller and not thatof the Company.
TOENSUREPROMPTWARRANTYSERVICE,SENDINYOURWARRANTYCARDWITHIN10DAYSOFPURCHASE.
Iffurtherhelp is needed concerningthiswarranty, contact:
CustomerService
1050 Fountain St N.
Cambridge,Ontario,
Canada N3H-4R7
Electric Self Clean Model 9730
CONSUMER WARRANTY
Business(519)650-5775
Fax(519)650-3773
TollFreeTelephone1-800-361-1517
TollFreeFax1-800-327-5609

1
THE OVEN THERMOMETER DOES NOT SENSE TEMPERATURE
The thermometer on the oven door is for aesthetics only and is
nonfunctional.
1. Installation ................................... 3
2.Unpacking........................................................3
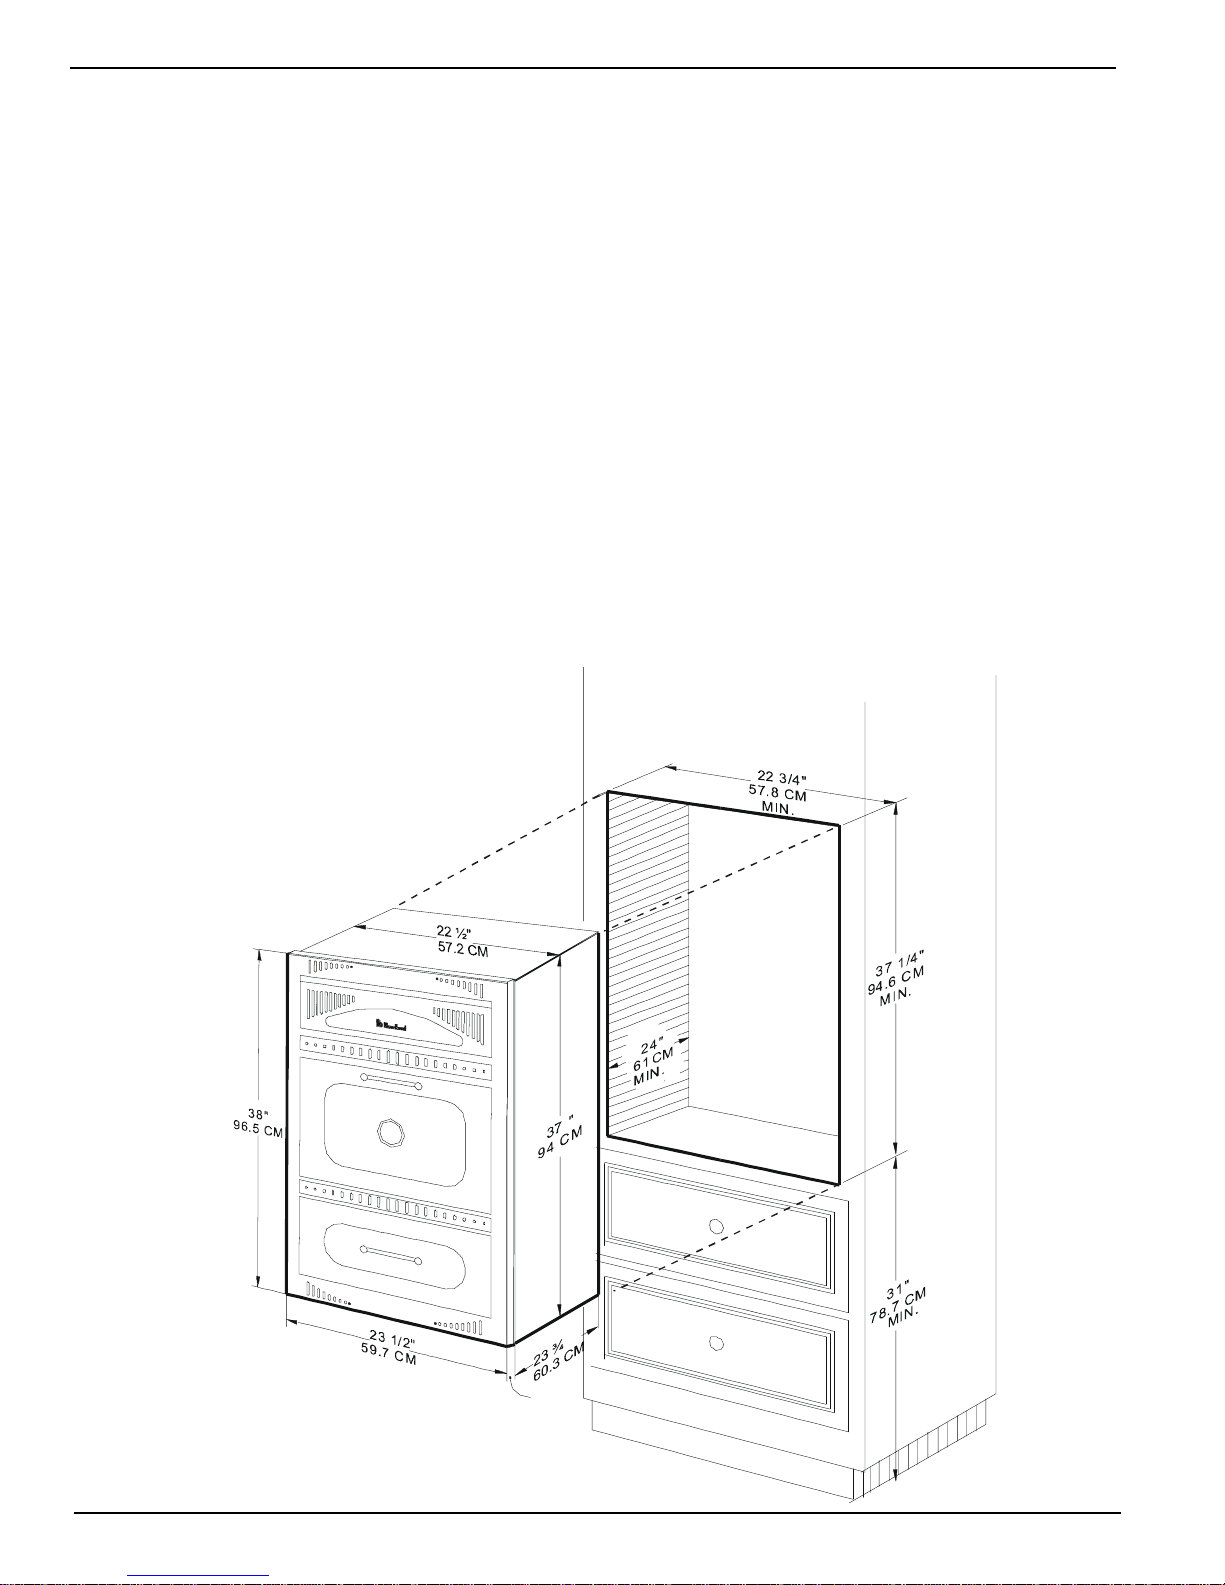
3. Prepare for Installation ....................................4
4.BeginningInstallation.......................................5
5.FinalInstallation...............................................6
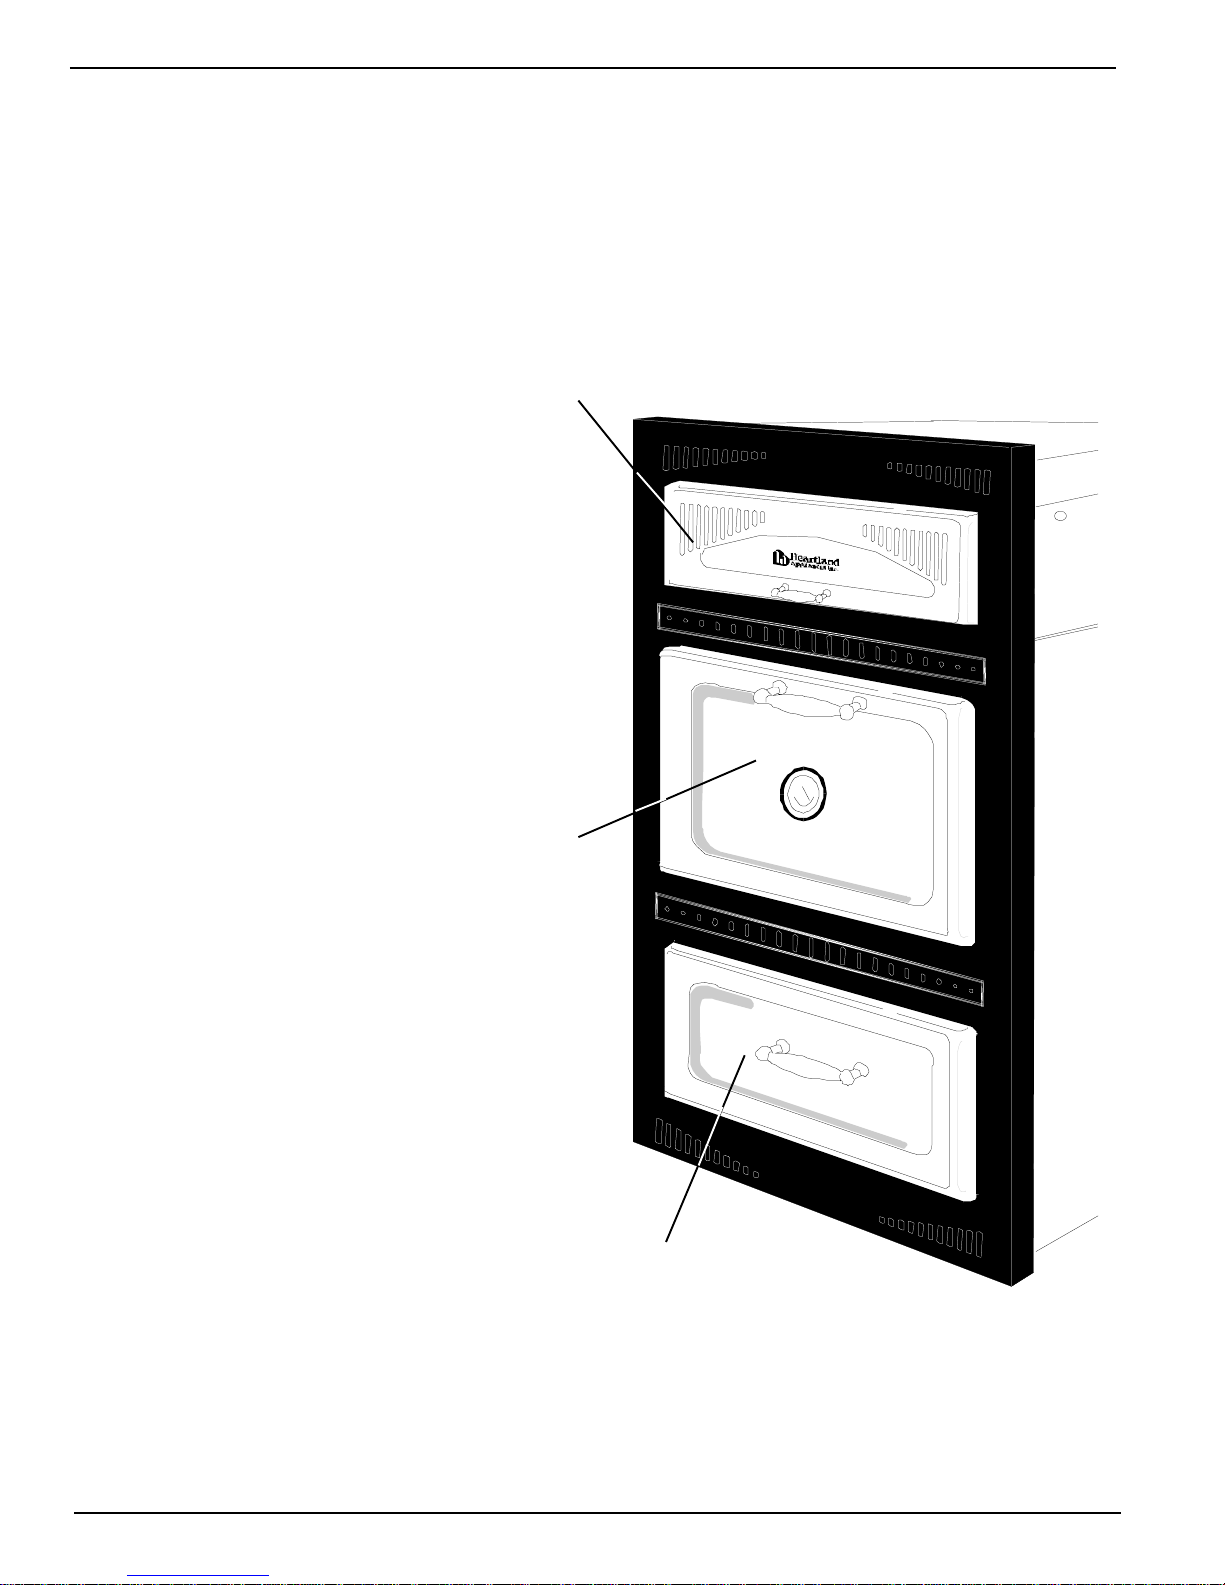
8. Features ....................................... 7
8. Dual Oven Control Panel Features .................7
9. Dual Oven Features........................................8
10. Important Safety Instructions . 9
11. Oven Safety ..................................................9
12. Self Clean Oven Safety .................................9
14. Operation .................................10
15. Before You Start..........................................10
16. Getting to Know Your Oven.........................10
17. Oven Bake Broil Control..............................11
18. Clock / Timer Function ...............................12
19. Time of Day Setting.....................................12
20.MinuteMinder ..............................................12
21. Time Bake...................................................13
22. How to Self Clean........................................14
23. Time Delay Self Clean ................................15
24. How to Select Cooking Methods .................17
25. Standard Cooking........................................17
26. Standard Broiling.........................................17
27. Convection ..................................................18
28. Convection Cooking ....................................18
28. Convection Roasting...................................18
29. Roasting Times and Temperature Guide....19
31. Broiling Tips ................................................20
31. BroilingGuide ..............................................21
32. Baking Times and Temperature Guide .......22
33. Poultry Times and Temperature Guide.......23
34. Care and Cleaning..................24
35. Porcelain .....................................................24
36. Nickel Trim ..................................................24
37. Convection Fan Filter ..................................24
38. Oven Light Replacement.............................24
39. Standard Oven Cleaning .............................25
40. Self Clean Oven Cleaning ...........................26
41. The Broiler Pan ...........................................26
42. Main Oven Door Removal ...........................27
43. Lower Oven Door Removal.........................28
44. Interior Oven Rack Removal .......................29
45. Rack Supports Removal ............................ 29
46. Range Problem Solver ................................30
47. Oven Thermostat ........................................30
48. If you still require help— ..............................30
49. Parts Chart / List .....................31
50. Wiring Diagrams .........................................32
51. Products ..................................33
Contents

2
PLEASE READTHESE IMPORTANTSAFETY
POINTS
PROPER INSTALLATION - BE SURE YOUR APPLIANCE IS PROPERLY INSTALLED AND
GROUNDED BY A QUALIFIED TECHNICIAN.
FORYOURSAFETY...DONOTSTOREORUSEGASOLINEOROTHERFLAMMABLEVAPOURS
OR LIQUIDS IN THE VICINITY OF THIS APPLIANCE.
1. Donotleavechildrenalone.Childrenshouldnotbeleftaloneorunattendedinareawhereapplianceisinuse. Theyshould
never be allowed to sit or stand on any part of the appliance.
2. Wearproperapparel.Loosefittingorhanginggarmentsshouldneverbewornwhileusingtheappliance.
3. Userservicing;donotrepairorreplaceanypartoftheapplianceunlessspecificallyrecommendedinthemanual. All
otherservicingshouldbereferredtoaqualifiedtechnician.
4. Useonlydrypotholders-Moistordamppotholdersonhotsurfacesmayresultinburnsfromsteam. Donotletpotholder
touch hot heating elements. Do not use a towel or other bulky cloth.
5. Do not use the oven as a heater.
6. Donot heat unopened glass or metal containers in the oven.
7. Greaseaccumulation is the cause ofmany cookingfires. Clean the oven regularly.
8. Do Not Use Water on Grease Fires - Smother fire or flame or use dry chemical or foam-type extinguisher.
9. Avoidtheuseofaerosolcontainersneartheoven.
10. Never place pans, cookie sheets or roasters directly on the oven bottom. Use the rack in its lowest position.
Do not use aluminium foil.
11. Allow at least 1" of space all around pots, pans or cookie sheets in the oven to permit convection air flow.
To fully enjoy your new oven, it is important that you read this manual thoroughly.

3
Caution:Do not set this edgeonthetableorthefloor,as
porcelaincoating will chip. Alwaysplace over anedge
Unpacking
1. Withunitsittingonthefloor,cutbanding,andremovewoodencrating. Cutplasticwrapand
removefoampacking.
2. Havesomeoneontheleftandtherightsideoftheunitliftingitupfromthebottom,remove
allpackagingmaterialsaroundandundertheunit.
3. Setunitonatableorsomeothersupportingplatform,sothatthefaceoftheunitoverhangsbut
isnot supportinganyweight. Be sure todothis orthe porcelainfrontmaychip!
Installation
Installation

4
You must have a qualified electrician
connectthenewoventoensurethatall
electricalcodesandrulesareobserved.
CAUTION- Children climbing on oven to reach items could be seriously injured therefore,
do not store items of interest to children in cabinet above the oven.
Thisillustration showsthe sizeof enclosurerequired forthe applianceand thedimensions ofthe
appliance.Dimensions areshown ininch measurementand metriccentimeter measurement.For
bestcooking resultsyour ovenmust belevel. Thiscan bechecked atthefinalinstallationstagewitha
carpenterslevel acrossthe topof theappliancefront.Iflevelling isrequired, shimthe ovenbetween
thebottom ofthe cabinetopening andtheovenbottom.Pleasenotethat thepower supplybox must
bemounted inthecupboard below,modifications tothecupboard maybe required.
Prepare for Installation
Pleasenote:Thewallovenfacewillmeetyourcabinetfacingresultinginsomeheattransferto
thecabinetfacing. Ifyourcabinetshaveaplasticcoatingorveneercheckwiththemanufacturer
to ensure it was applied with a (300°F) heat resistant adhesive. If the plastic coating and the
adhesivearenot heat resistant, itispossible that the coatingwilldeform or become detached,
particularlyalong the edgesthat meet thewall oven.
Installation
1 ½"
3.81 CM

5
Mount clips here
(seepage6)
Installation
Beginning installation
1. Oncethelocationoftheunithasbeendeterminedconstructanenclosurewithdimensionsas
shownonpage4. Besure totakeyourtime andmeasureaccurately.
2. Atthispointyouwillhavetocreatetheopeningforthepowersupplybox.Thepowersupply
box(includedwiththeunit)mustbemountedinthecupboardundertheapplianceopening.The
powersupplyboxcomeswith36"cableandcanbemountedanywherewithinthelengthofthe
cable. At the rear of the opening and 16 1/4" from the left side, cut a slot 5 1/2" x 2 1/2" (see
illustrationbelow).Ensure thatyoucaneasilyslidethesupplyboxthroughit.(Thepower
supplyboxispermanentlyattachedtotheapplianceandismounted aftertheapplianceis
installed.)
3. Screwthe anchorclipsto thetop ofthecabinet openingas shownon page 6. Theseclips will
latersecuretheunittothecabinetandmustbeinstalled.Findthecentreoftheopeningand
mounttheclips73/16"oneachsideofthecentrepoint,andextendingfromtheopening
approximately5/8".

6
Final installation
Note: It is recommended to have two people for lifting the oven.
1. Lifttheunituptotheopeningandguidethesupplyboxthroughtheslotintothelowercupboard
atthebackoftheopening.Thepowersupplyboxandcablemustbefullyinsertedintothelower
cupboardor theappliance willnotinstallcompletelyintotheenclosure.
2. Slidetheunitintoplace andcheckthat theunitislevelby placingaspirit levelacross thetop
ofappliancefront.Iflevellingisrequired,shimtheunitbetweenthebaseandthebottomopening.
3. Afterunithasbeenlevelled,securetheunittothecupboardwithtwoscrewsalongthetop,into
thetwoanchorclipsinstalledpreviously.(seebelowandpage5illustration )
4. Removecoverofthepowersupplyboxandfastenthesupplyboxtothebackofthecupboard
belowwithfour wood screws(See page 5).
5. Theunitcannowbewiredintothepowersourcebyaqualifiedelectrician.
6. Beforeturningtheunitonpleaseread“BeforeyouStart”undertheOperationsectiononpage
10.
Note:
Theovenfaceshouldnotgoinsidetheopening.Followingthesedirectionstheface-platewill
overlap thecabinetby1/4"top andbottom andon thesides.The flangewill extend1 1/2"off
thefaceofthecabinetwhenmounted.
Anchor clips
Screw unit to anchor clips
installedincabinetopening
Installation

7
BCD EFLower oven
symbol
A
Features
Dual Oven Control Panel Features
#9730 Self Clean
A) DigitalTimer-Withminuteminderandautomaticstopandstartcookingandselfcleanfunctions.
B) Selfcleanovenresetbutton(selfcleanonly)
C) RockerSwitch,controlsselfcleanfunction(seepage14)
D) Ovenlighton/offswitch.Uppositionis"Off"
E) MainOvenTemperatureControlinFahrenheitandCelsiuswith-
bake indicator
broil indicator
F) On/offswitch- Controlsconvectionfanforregularbaking/broilingandconvectionbaking/
broiling. Up position is "Off"
Lower Oven Controls:
G) LowerOvenTemperatureControl-
bake indicator
broil indicator
H) Ovenlighton/offswitch.Uppositionis"Off"
I) ControlPaneldoor Cover:
Main oven
symbol G H
Features
PREHEAT

8
K) LowerOven:
-for regularbaking andbroiling
- 2 position racking.
-1.5cubic feet ofenergy efficientbakingarea
(.04cubicmeters)
L) Agreasefilteris includedthat may befitted onto
thefanshieldtolimitgreasebuild-upwhenroasting
orbroilingmeatsinanuncoveredvesselin
convectionmode.
doorslidesupintotheunittorevealcontrol
panelwithtimer,lightswitches,ovenindicators
andcontrols.Alsohousesselfcleancontrol.
J) MainOven:
- baking,broiling
- timed baking, broiling
- convectionbaking,broiling
- timedconvectionbaking,
boiling
- 4 position racking
- 2.7cubicfeet ofenergy
efficient baking area (.07
cubicmeters)
- selfcleanfeature
Dual Oven Features
Features

9
Important Safety Instructions
Oven Safety
DONOTTOUCHHEATINGELEMENTSORINTERIORSURFACESOFOVEN-Heatingelementsmaybehoteventhough
they are dark in color. Interior surfaces of an oven become hot enough to cause burns.
Duringandafteruse,donottouch,orletclothingorotherflammablematerialscontactheatingelementsorinteriorsurfaces
ofoven until they have had sufficient time to cool.
Othersurfacesoftheappliancemaybecomehotenoughtocauseburns.Forexample,ovenventopeningsurfacesnear
theseopeningsand oven doors.Donot set cooking utensilsdirectly on oven floor!
Note: Intheloweroventhebakeelementiscontainedundertheovenfloor. Thisfacilitateseasiercleaningandmoreusable
spaceintheoven.
1. Usecare when opening door -lethotairorsteamescapebeforeremovingorreplacingfood.
2. Do not heat unopened food containers - build-up of pressure may cause container to burst and result in injury.
3. Keep oven vent ducts clear of obstruction. See illustration below
4. Placementofovenracks-alwaysplaceovenracksindesiredlocationwhileoveniscool.Ifrackmustbemovedwhile
oven is hot, do not let pot holder contact hot heating element in oven.
Self Clean Safety Instructions
Read the instructions below and the appropriate timer instructions before attempting to operate. Do not leave
food or cooking utensils, etc, in the oven during self-cleaning mode of operation.
Donottouchheatingelementsorinteriorsurfacesofoven—heatingelementsmaybehoteventhoughtheyaredark
incolour.Interiorsurfacesofanovenbecomehotenoughtocause
burns.
During and after use, do not touch, or let clothing or other
flammable materials to contact heating elements or interior
surfaces of oven until they have had sufficient time to cool.
Other surfaces of the appliance may become hot enough to
cause burns—among these surfaces are, for example, oven
ventopenings,ovendoorsandsurfacesneartheseopenings.
1. Remove utensils and cookware from the oven. Oven
racksandracksupportsshouldberemovedfromtheoven.
Racksandsupportsleftintheovenduringselfcleanwill
become discoloured, but it will not
affecttheprotectivecoating.
2. DO NOT clean the gasket. The
door gasket is essential for a good
seal. Care should be taken not to
rub,damageormove the gasket.
3. Never use a commercial oven
cleaner in a self cleaning oven. This will damage the finish.
4.Makesuretheconvectionfanandovenlightisoff.Theconvection
fan and light switch must be turned off at the control panel.
Vents must be
kept clear of
obstructions
Safety

10
Operation
Before You Start
1. Removetheovenracksandovenracksupportsandcleanwithsoapandwater. (seeovenrack
andsupportremovalpg.29).
2. Unwrapbroilerpanandcleanwithsoapandwater.
3. Cleanbothovenswithsoapandwater,makingsurethat all adhesiveshavebeenremoved.
4. Settheclock to the correcttime of day.Seepage 12 forinstructions on howtoset the
clock. Please note that the clock must be set for the main oven to work.
5. Installgreasefilteronfanbaffle,byhookingthefilterontothegrillofthefanbaffle. Thisfilter
isnotrequiredforregularbakingorbroiling,butshouldbeonwhenopenvesselconvection
broilingorconvectionbroiling.
Getting to Know Your Oven
Themainovenfeaturesmultilevelregularbaking/broilingintimedoruntimedmodes. Forenergyefficient
batchbaking,chooseconvectionbaking,whichallowsyoutobakeonmultilevelssimultaneously. For
traditionalbakingtheconvectionfeatureshouldbeOFF.
Thelowerovenalsofeaturesmultilevelbaking/broiling,thebakeelementishiddenbeneaththefloorof
theoven,socleanupsarefastandeasy.Pleasenotethatthelowerovenisdisabledandwillnotfunction
duringtheselfcleanmodeofoperation
TheOVENLIGHTSareactivatedby switcheslocatedonthecontrolpanel.Yourovenhasatemperature
range of 150° F TO 550° F 66°C to 290°C). The oven Cycling Light glows until the oven reaches the
selectedtemperature,thencyclesoffandonduringcooking. Seepages19and22 forrecommended
bakingandroastingtimesandtemperatures.
Note:Donotengagetheselfcleanovendoorlatchwhennotinselfcleanmode,asitispossibletheovendoorsafetyinterlock
willactivateat highoventemperatures.
Operation

11
Bake - Broil Controls
Oven Bake/ Broil Control
Main Oven Set knob at this indicator when
using self clean function
Operation
Oven Bake/ Broil Control
Lower Oven
Baking
MainOven:Tobake,pushdownandturntheovencontrolcounterclockwisetoanydesiredtemperature.
Whenbakingisselected,theindicatorunderthebakesymbollightsup,andthebakeelementwillactivate.
Aftertheovenhasreachedthetemperatureyouhaveselected,theelementwillcycleonandofftomaintain
temperatures.
LowerOven:Tobakepushdownandturntheovencontrolcounterclockwisetoanydesiredtemperature.
Whenbakingisselectedtheindicatorunderthissymbollightsup.Selectpreheatforapproximately6
minutes,togettheovenuptotemperaturequickly,thenselectdesiredtemperature.Donotplacefood
in the oven when preheating with the broil. After the oven has reached the temperature you have
selected,theelementwillcycleonandofftomaintainthetemperature.
Thetemperatureis infinitelyvariablebetween temperatures 150°Fand 550°F(65°C and290°C.)
Broiling
Toactivatebroil(topelement),turnovencontroltobroil(endstopposition).Whenbroilingisselected,the
indicatorunderthissymbollightsup.Tode-selectbroiling,turntheovencontrolknobtoatemperature
setting,whichresetsthecontroltobakingmode.
Forlowerovenonly:setknobat
this indicator to preheat the
oven.

12
Operation
Duration of bake or S/C time
"Auto" indicates auto
activatetimerinoperation
Bell symbol indicates minute
minderinoperation
Minuteminder
Endbakeor S/C time Initiate/Cancel
Setup
Cookingsymbol
indicates oven is in
auto shut off time
bakemode
Time of Day Setting
NOTE: Clock must be set or your main oven will not function!
1. To set the time of day:
a) the clock read-out will be flashing "0:00"and "
AUTO
" alternately.( at first time set up or after a power failure)
b) press " " and " " buttons simultaneously to activate the clock time adjustment.The display will stop flashing
except for the ""
AUTO
" symbol. You will have 3 seconds to start the next step.
c)tap" "toadvancetime,or" "to decrease time, the display will begin at "12.00".Pressandholdtoadvancetime
quickly. Set to the correct time of day (the clock is based on a 12 hr cycle).
d) once the time of day has been entered, the "
AUTO
" symbol will stop flashing , the clock is set and the appliance is
ready to use.
e)timeofdaymaybeadjustedatanypointbypressingthe" "and" "buttonsandthenpressing" "or" "setting
buttons.
MinuteMinder
1. To set timer: (the minute minder can be at any time even when in timer modes)
a) press “ “ the minute minder button.
b) Set the timer in minutes using the " " and “ “ setting buttons.
c) The timer activates 5 seconds after the setting buttons are released, and returns to dime of day mode.
d) whent the set time has been reached the timer will sound, 2 distinct beeps.
e) to see time remeining on timer press “ “ at any time.
Adjust setting down
Adjust setting up
A
U
T
O
TIMER
STOP
Clock / Timer Setting
For both 9720 and 9730 models

13
Operation
2. To cancel minute minder operation:
a) press “ “.
b) press “ “ setting button and set to zero.
c) then press “ “ cancel button and the display will return to time of day mode.
TimeBake (formainovenonly)
1. To set time bake:
a)ifconvectionisdesiredactivatethe convectionfanrockerswitchmarked" "on thecontrolpanelbelowthetimer.
b) press the “ “ bake duration button.
c) use the " " and “ “ to set the length of time you want the oven to be in operation. (The " " and “ “ setting
adjust buttons work in 1 minute intervals). The oven will now turn off after the time entered has elapsed.
d) to have the oven turn on at a specific time, next, press the “ STOP “ end bake time button.
e) use the " " and “ “ to set the actual time of the day you want the oven to shut off. After 5 seconds the display
will return to time of day mode. The
"AUTO"
indicatorwill lightup, showing thetimer isin operation,and the“
“ symbol will shut off, indicating the oven is off until the timer activates the oven.
f) set Temperature Dial to desired cooking temperature. The timer calculates the start time by subtracting the cook time
from the time of day you want the oven to shut off.
g) when the bake cycle begins, the “ “ symbol will light up showing that the oven is in operation.
h) whenthetime bake cycle iscomplete,the
"AUTO"
indicatorwillflash,the“ “willshutoffindicatingtheoven
is off and the timer will sound (4 distinct beeps).
i) the timer will sound until the “ “cancel button is depressed. The
"AUTO"
indicator will flash and the oven will
not work until the and the “ “ button is depressed a second time. Remember the turn off your oven control.
2. To cancel time bake:
a) anytime during the time bake cycle depress the “ “ bake duration button and set the time to zero, and depress
the “ “ cancel button to return to time of day mode.
b) the minute minder can still be used during the time bake cycle.

14
A
U
T
O
TIMER
STOP
How to Self Clean
display will show time,
1:30 to start, adjustable
to 3:00 hours maximum
selfclean rocker switch
must be set to "on"
position
press "+" to increase
self clean time
"P 1.30" and "AUTO
lights up when self
clean is activated
pressbakebuttontoset
self clean mode
Figure A - self clean control panel layout
latch in open position
(non self clean mode)
latch in locked position
(self clean mode)
Figure B - self clean latch positions
Operation
How to Self Clean
Therecommendedselfcleantimeis3hours. Thecyclecanbesethowever, anywherefrom1hour30
minutesforlightsoiling,to3hoursmaximumforheavysoiling.Pleasenotethatthelowerovenisdisabled
andwillnotfunctionduringtheselfcleanmodeofoperation.
Be sure the self clean safety
instructionshavebeenfollowed.
1.Locktheovendoor bypushing
theselfcleandoorlatchfullyto
the right. (see fig. B)
2. The clock will display "P1.30"
which indicatesonehourthirty
minutes of self clean time. As
well " " and "AUTO"
symbolwilllightup,indicating
theselfcleancycleisactive.
3.Pressbake" "buttononthe
clock
4.Tapthe" "buttonforadditionalselfclean timeinoneminuteincrements.Pressandholdtoadvance
quicklyto3:00hourmaximum.3hoursisrecommendedformaximumcleaning.

15
550
500
450
400
350
300
250
200
150
290
260
230
205
175
150
120
95
65
0
.
self clean indicator knob position
indicator
Figure c Oven thermostat knob position for self clean.
Operation
5.Turntheoventhermostatcontrolknobclockwiseuntil
itcannolongerbeturned(seefigc).Bakeindicator
willcomeon.
6. Your oven is now in the self clean mode and will
operateinselfcleanmodeforthetimeyouhaveset.
7.At the endof the cyclethe oven willshut off andthe
clock will flash "P0.00" and the symbol "AUTO"
alternately.
8.Turnthethermostatcontrolknobto“0”.Theclockwill
flashuntilthetheovenisunlocked.
9.Thesafetyinterlockisactiveuntiltheovenhascooledtoasafetemperature(approximately1hour)You
willnotbe abletounlockthe ovendoorduringthis cooldownperiod.Pleasedonotattempt toopen
doorwhilelocked,ordamagetolockingmechanism mayoccur.
Caution:Evenaftertheovendoorlockhasreleasedtheovenmaystillbetoohottotouch.
Usecautiontoavoidburns.
10.Whentheovenhassufficientlycooled,wipeawaytheremaininggreyashwithadampcloth.
DANGER:Ifalargeamountofsmoke comesoutoftheovenventit isprobablybecauseyou
haveleftsomethingintheovenorthewarmingdrawer. Turnofftheoventhermostatcontrol.
Allowtheoventocoolandusecautionwhenremovinganyutensilsordebris,toavoidburns.
Note:Self clean modemay becancelled at any time... byturning theoventhermostat control
backto"0".Unlatchtheselfcleandoorlatch.
Remember,thesafetyinterlockisactive untiltheoven hascooledto asafetemperature -do
notattempttoforceopen.
Time Delay Self Clean
To set TIME DELAY self clean
1.Lockthe ovendoorby pushingtheselfcleandoorlatchfully totheright. (seefig.B)
2.Theclockwilldisplay "P1.30" which indicatesonehourthirtyminutesofselfcleantime.Aswell" "
and"AUTO"symbolwilllightup,indicatingtheselfcleancycleisactive.
3. Press bake " " button on the clock
4.Tapthe" "buttonforadditionalselfclean timeinoneminuteincrements.Pressandholdtoadvance
quicklyto3:00hourmaximum.3hoursisrecommendedformaximumcleaning.

16
Operation
5. Next,pressthe" STOP "endtimebutton, thedisplaywill changetoshow thetimeof
day.
6. Use the " " or " " to set the actual time of the day you want the oven to shut
off.After5secondsthedisplaywillchangetoshowselfcleantimeremaining,the
"AUTO"
indicatorwill remainlit,andthe" " symbolwillshutoffshowing theoven
isnotin operation and delaytimer is active.
7. Turntheoventhermostatcontrolknob,totheselfcleanposition.(seefigC,
previouspage)
8. Yourovenisnowinthedelayselfcleanmodeandwilloperateforthetimeyouhave
set.
9. Whentheselfclean cycle begins,the" "symbol willlightup showingthatthe
ovenisinoperationand willbeinthe selfcleancycleforthelengthoftimeonthe
display.
10. Attheendofthecyclethe ovenwill shutoffandtheclockwillflash"P0.00"andthe
symbol"AUTO"alternately.
11.Turnthethermostatcontrolknobto“0”.Theclockwillflashuntilthetheovenis
unlocked.
12.Thesafetyinterlockisactiveuntiltheovenhascooled (approximately1hour)You
willnot beable tounlock theoven doorduring thiscool downperiod. Pleasedo not
attemptto opendoorwhile lockedor damagetothe lockingmechanism mayoccur.
Caution: Evenafter theoven doorlockhasreleasedthe ovenmay stillbe toohotto
touch.Usecautiontoavoidburns.
13.Whentheovenhassufficientlycooledwipeawaytheremaininggreyashwitha
dampcloth.
DANGER:if a largeamount ofsmoke comes outof theoven vent itis probably
becauseyouhaveleftsomethingintheovenorthestoragedrawer. Turnofftheoven
thermostatcontrol. Allowtheoventocoolandusecautionwhenremovinganyutensils
ordebris, toavoidburns.
To cancel time delay self clean:
Turntheoventhermostatcontrolknob,tothe"0"position.

17
How to Select Cooking Methods
for "Main and Lower" Ovens
Standard Cooking
Tobake,turntheovencontroltoanydesiredtemperaturebetween150°Fto500°F(66°C-290°C).
When baking is selected, the indicator below this symbol lights up, and the bake element will
activate.Preheattheoveniftherecipecallsforit,approximately5-10minutes.Aftertheovenhas
reachedthe temperatureyou haveselected,thebakeelement willcycle onand offtomaintain
temperatures. Donotrotatecontrolpast500°F(290°C)forbakeasthisisthebroilpositionand
onlytopelementwillcomeon.
Standard Cooking / Baking
This is the traditional “radiant heat” style of
cooking. Youmaychoosethismethodofcooking
foryourtriedandtruerecipes. Aswithallradiant
style ovens, it will be necessary to preheat the
oven,especially for bakedgoods. Usually your
recipe will state whether or not preheating is
required. When roasting meats from frozen to
finish,usuallypreheatingisnotrequired.However
allow1/3to1/2morecookingtimedependingon
thesize of thecut. To assure desireddegree of
doneness, use a meat thermometer for meats
andpoultry.
Standard Broiling
Toactivatebroil(topelement),turnovencontrolto
broilsymbol" " ontheknob.Whenbroilingis
selected,theindicatorunderthissymbollightsup.
At this setting the broil element comes on and
stayson.Tode-selectbroiling,turntheovencontrolknobtoatemperaturesetting,whichresets
thecontroltobakingmode. Whenbroiling,theovendoorshouldbecompletelyclosed,andthe
greasefilterinstalled.
Standard Broiling
Thismethodofcookingisusedtotransferhighheatoverashortperiodoftimetofoodplacedin
close proximity to the broiler element. Usually used to brown the surface of food, such as
meringues,steaksandroasts.
Placemeatonthebroilerpan(addwatertothebottomofthepantoreducesmoking).Placethe
broilerpanonthethirdorfourthrackinthemainoven,andfirstorsecondrackintheloweroven,
dependingonthefoodandyourpersonaltastes.
Radiant Heat Pattern
Diagram shows how heat is radiated from the
elements,during the cooking process
Operation

18
Convection - These convection selections are for “Main Oven" only.
Whentherockerswitchinthecontrolpanelissettothissymbol,theconvectionfanwillbeactivated.
Theconvectionfancanbeoperatedinthreemodes.
1) convectionbaking.
2) convectionbroiling.
3) convectiondrying.
Convection Baking - select a temperature on
theovencontrolandthenselect" "abovethe
rockerswitch. Ovenisnowin"ConvectionBake
Mode".
ConvectionBroiling-select"broil"ontheoven
control and select " " above t h e
rocker switch. The oven door should remain
completelyclosedwhileinConvectionBroil
Mode.
ConvectionDrying-leavetemperaturecontrol
at"0" andselect " "abovethe rockerswitch.
Theconvectionfanhasbeenactivatedandoven
isnow readyto dryspicesor fruits.
For time bake, when the rocker switch is set to
thissymbol " "andthetimerandtemperature
controlsareset, thefanwillthenautomaticallyactivatewhentheselectedtimehasbeenreached. For
more detail on "Time Bake" see page 13.
Convection Cooking
ConvectionCooking-Convectionmeansconveying.
Soinconvectioncooking,theheatisconveyedbymovingairbymeansofafan.Thecirculatinghotair
penetrates food faster than motionless air in a standard oven. Thus you can cook at a lower
temperature,thereforereducingamountsofenergyusedandsometimescookinashortertime.
Convection Roasting
Thismethodofcookingusesbothhotairandradiantheat,andissimilartorotisseriecooking,where
highheatisappliedquicklyandevenlyaroundthemeat,butinsteadofrotating,hotaircirculatesaround
themeat. Placethecutofmeatdirectlyonthethirdovenrackpositionwiththebroilerpanontherack
belowtocatchanydrippings. Poultryshouldbeplacedbreastdownforthefirsthalfofthecyclethen
turnedover,thiskeepsthebreastmoist. Othermeatsshouldbeplacedontherack,fatsideup,and
usuallydonotrequireturning.
Operation
Convection Air Pattern
Diagramshowshowheatiscirculatedfromthe
convection fan,distributingheatevenlyaround
thefood,during the cooking process
Table of contents
Other Heartland Oven manuals
Popular Oven manuals by other brands

Hotpoint
Hotpoint RJ742GJ How to get the best

Ariston
Ariston FA3 844 H IX A AUS Daily reference guide

VERDER
VERDER CARBOLITE GERO LGP 6/2160 Installation, operation and maintenance instructions

Cuisinart
Cuisinart TOA-28C INSTRUCTION AND RECIPE BOOKLET

KitchenAid
KitchenAid KEBC147VWH - 24" Single Wall Oven parts manual

Lenoxx
Lenoxx Healthy Choice EO425R instruction manual