Heartland Artisan 5210 User manual

Toll Free Phone 1-800-223-3900 Fax 1-616-754-9690
Installation and Operating Instructions For
Models:
5210 48" Gas Top / Electric Convection Self Clean Range
4210 30" Gas Top / Electric Convection Self Clean Range
Save these instructions
for future use
Note: Please read these instructions thoroughly before attempting to install this unit.
Model
5210
NOTE: Clock must be
set or your main oven
will not function!
Model
4210
ATTENTION INSTALLER: Leave this manual with appliance
The oven door thermometer does not sense
temperature. It is for aesthetics only and is
nonfunctional.
© 2010 AGA MARVEL
WARNING: Improper installation,
adjustment, alteration, service or
maintenance can cause injury or
property damage. Refer to this manual.
Forassistanceoradditionalinformation,
agency, manufacturer (dealer). Please
read these instructions thoroughly
before attempting to install this unit.
Failureto followinstallationinstructions
will result in costly service calls.
Manual #5716.102612
CERTIFIED
C US
CERTIFIED
C US
CERTIFIED
C US
CERTIFIED
C US
1260 E. VanDeinse, Greenville , MI 48838

!
• ALL RANGES CAN
TIP
• INJURY TO
PERSONS COULD
RESULT
• SEE INSTALLATION
INSTRUCTIONS
WARNING
—FOR YOUR SAFETY—
DO NOT STORE OR USE GASOLINE OR OTHER FLAMMABLE VAPOURS OR LIQUIDS
IN THE VICINITY OF THIS APPLIANCE.
* Do not use the range as a heater.
* Do not heat unopened glass or metal containers in the oven.
.
* Avoid the use of aerosol containers near the range.
* Never place pans, cookie sheets or roasters directly on the oven bottom -use the rack in its lowest position.
* Do not cover the entire bottom of the oven with aluminium foil. Allow at least 1" of space all around pots, pans
To move range for service or
cleaning
WARNING
Range body rests on base.
When moving, move by base
only.
1. Disconnect electrical power.
2.
range.
3.
under front legs and slowly pull out to gain
access to rear.
4. To reinstall, reverse these instructions.
The use of a gas cooking appliance results in the
production of heat and moisture in the room in which it is
installed. Ensure that the kitchen is well ventilated: keep
natural ventilation holes open or install a mechanical
device (mechanical extractor hood).
Prolonged intensive use of the appliance
may call for additional ventilation, for
example opening of a window, or more
effectiveventilation,for exampleincreasing
the level of mechanical ventilation where
present.
WARNING: If the information in this manual is
resultcausing propertydamage, personal injury
or death.
vapours and liquids in the vicinity of this or any
other appliance.
WHAT TO DO IF YOU SMELL GAS
• Do not try to light any appliance.
• Do not touch any electrical switch; do not use
any phone in your building.
• Immediately call your gas supplier from a
neighbour’s phone. Follow the gas supplier’s
instructions.
• If you cannot reach your gas supplier, call the
Installation and service must be performed by
supplier.

Gas Top/Electric Convection Self Clean Models 4210/5210
CONSUMER WARRANTY
ENTIRE PRODUCT – LIMITED ONE YEAR WARRANTY
date of original purchase.
OVEN & WARMING DRAWER ELEMENTS - LIMITED SECOND THROUGH THIRD YEAR
WARRANTY
HEARTLAND warrants the oven heating elements against defects in material or workmanship for an additional
two years. These parts will be repaired or replaced at the option of Heartland without charge, but you pay for
labour and transportation subject to the terms and conditions set out below.
TERMS AND CONDITIONS
1. This warranty applies only for single family domestic use when the Cookstove has been properly installed
according to the instructions supplied by Heartland and is connected to an adequate and proper utility
service. acts of God,
commercial, business or rental use, and alteration, or the removal or defacing of the serial plate, cancels all
obligations of this warranty. Service during this warranty must be performed by a factory authorized service
person.
2. Warranty applies to product only in the country in which it was purchased.
3. Heartland is not liable for any claims or damages resulting from any failure of the Cookstove or from service
delays beyond their reasonable control.
4. To obtain warranty service, the original purchaser must present the original Bill of Sale, Model and Serial
number. Components repaired or replaced are warranted through the remainder of the original warranty
period only.
5. The warranty does not cover expense involved in making this appliance readily accessible for servicing.
6.
areas.
7. Adjustments such as calibrations, levelling, tightening of fasteners, or utility connections normally associated
with original installation are the responsibility of the dealer or installer and not that of the Company..
TO ENSURE PROMPT WARRANTY SERVICE, SEND IN YOUR WARRANTY CARD WITHIN 10 DAYS OF
PURCHASE.
If further help is needed concerning this warranty, contact:
PLACE OF PURCHASE______________________________
DATE OF PURCHASE_______________________________
SERIAL NUMBER__________________________________
MODEL NUMBER__________________________________
Customer Service
some
8. If the product is installed outside the normal service area, any cost of transportation expenses [tolls, ferry trip
changes, or mileage expenses, etc.] involved in the repair of the product, or the replacement of a defective
part, shall be borne by the customer [owner].
AGA MARVEL warrants the replacement or repair of all parts, of this appliance which prove to be defective in material
date of original purchase. Such parts will be repaired or replaced at the option of Heartland without charge, subject to
the terms and conditions set out below.
AGA MARVEL
1260 E. VanDeinse St.
Greenville, MI 48838
Fax (616) 754-9690
Toll Free Telephone 1-800-223-3900

TABLE OF CONTENTS
Description .................................................. Page
1. Assembly and Installation ....................................... 1
2. Closet Assembly ...................................................2-4
3. Positioning the Range............................................. 5
4. Installation Clearances............................................ 5
5. Exhaust Hood ......................................................... 6
6. Ventless Installation ................................................ 6
7. Vented Installation .................................................. 7
8. Important Safety Instructions .................................. 8
9. Oven Safety ............................................................ 8
10. Exhaust Hood Safety ........................................... 9
11. Self Clean Oven Safety Instructions .................. 9
12.Features (Cooktop and Range) with Layout .......10
13.Features (Warming Drawer & Storage)................11
14. Clock Control Panel .......................................... 11
15. Control Panel Layout .......................................... 12
16. Top Burner Operation.......................................... 13
17. Power Failure Operation .................................... 14
18. Warming Drawer Control Operation.................... 15
19. Oven Bake Broil Control ..................................... 16
20. Oven Operation................................................... 17
21. How to Select Cooking Methods......................... 18
22. Clock / Timer Function ........................................ 19
23. Time of Day Setting............................................. 19
24. Minute Minder ................................................... 19
25. Time Bake ........................................................ 20
26. Standard & Convection Cooking Guidelines ..... 21
27. Meat Roasting Guide .......................................... 22
28. Poultry Roasting Guide ....................................... 22
29. Broiling Guide ..................................................... 23
Description................................................... Page
30. Baking Cooking Guide......................................... 23
31. Porcelain Care & Cleaning.................................. 24
32. Standard Oven & Warming Drawer Cleaning ..... 24
33. Self Clean Oven Cleaning................................... 24
34. How to Self Clean ............................................... 26
35. Time Delay Self Clean ........................................ 27
36. Cancel Time Delay Self Clean ............................ 28
37. Nickel Trim .......................................................... 29
38. Exhaust Hood ..................................................... 29
39. Convection Fan Filter.......................................... 29
40. Surface Burners Care & Cleaning....................... 30
41. Oven & Cabinet Light Replacement.................... 30
42. Interior Oven Racks ............................................ 31
43. Rack Supports Removal ................................... 31
44. Oven Door Removal ........................................... 32
45. Warming Drawer Removal.................................. 33
46. The Broiler Pan ................................................... 33
47. Setup & Trouble Shooting................................... 34
48. Oven Thermostat ................................................ 35
49. If you still require help— ................................... 35
50. Gas Trouble Shooting Guide............................... 36
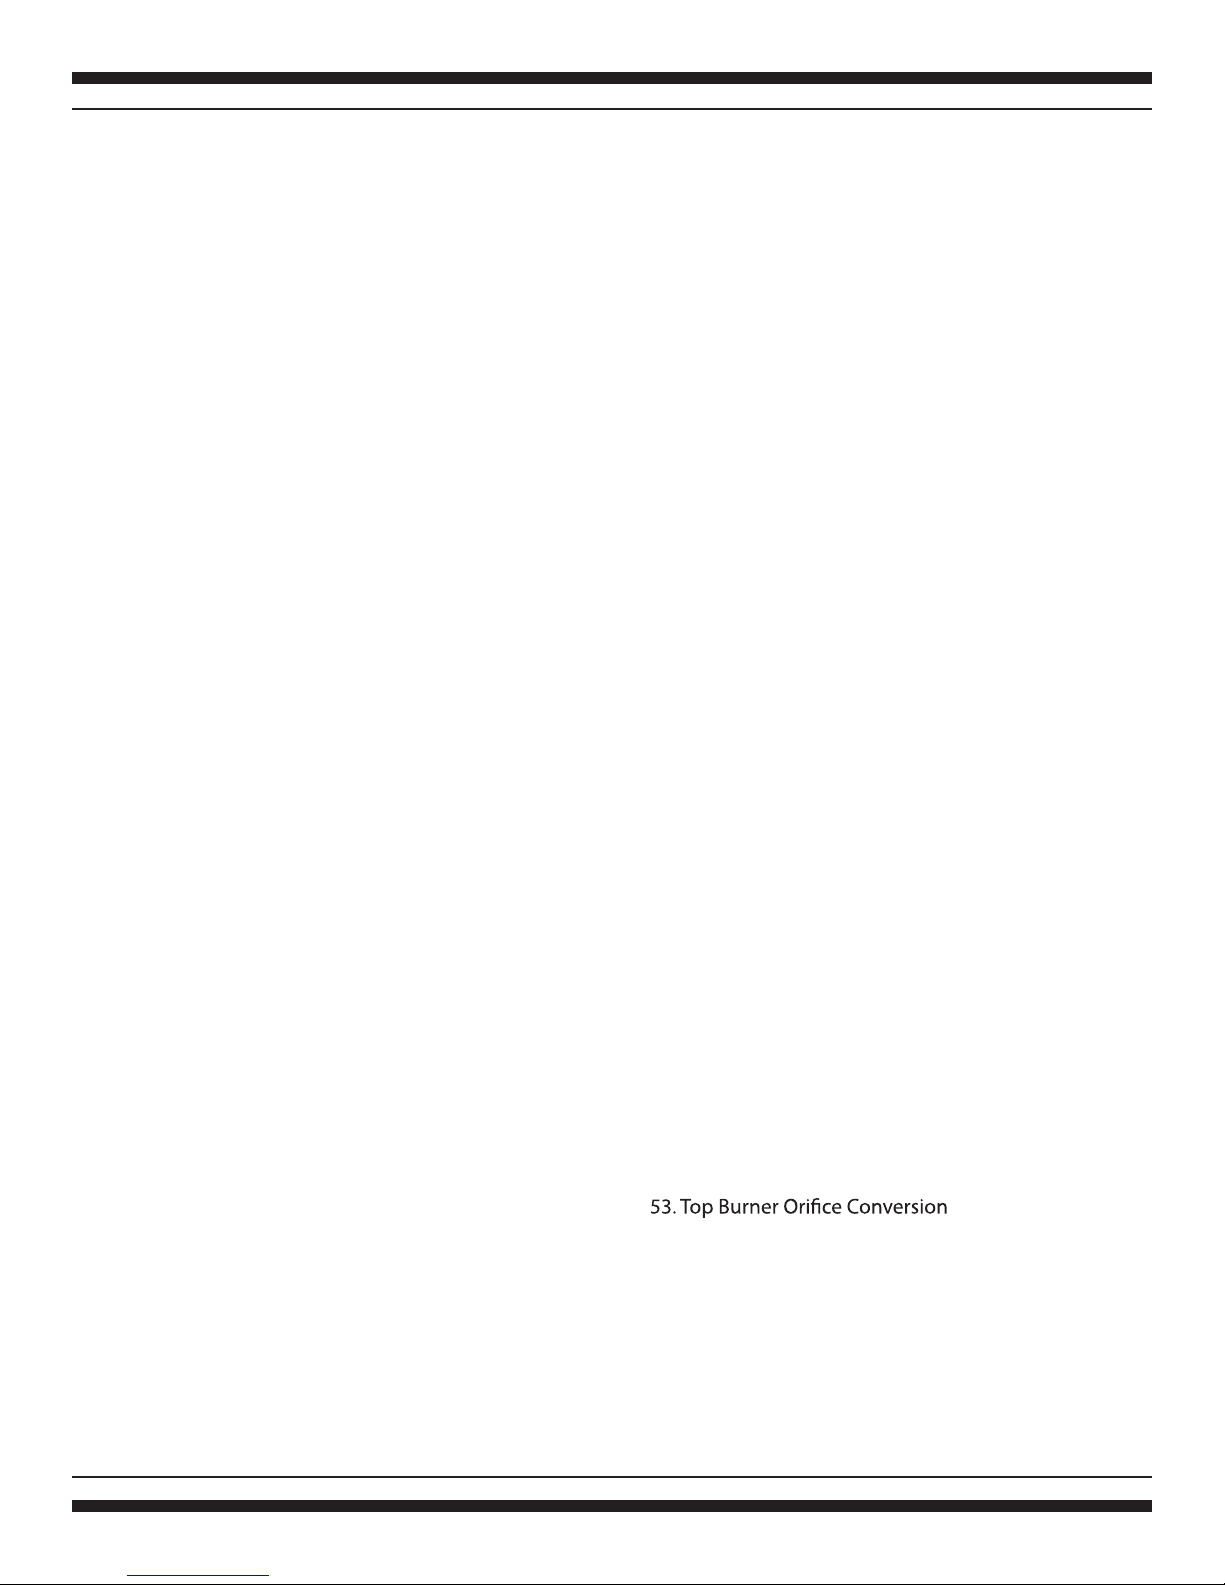
51. Conversion Kit Information.................................. 37
.......................... 37
........................... 38
54. Parts Diagram ..................................................... 39
55. Parts List ............................................................. 40
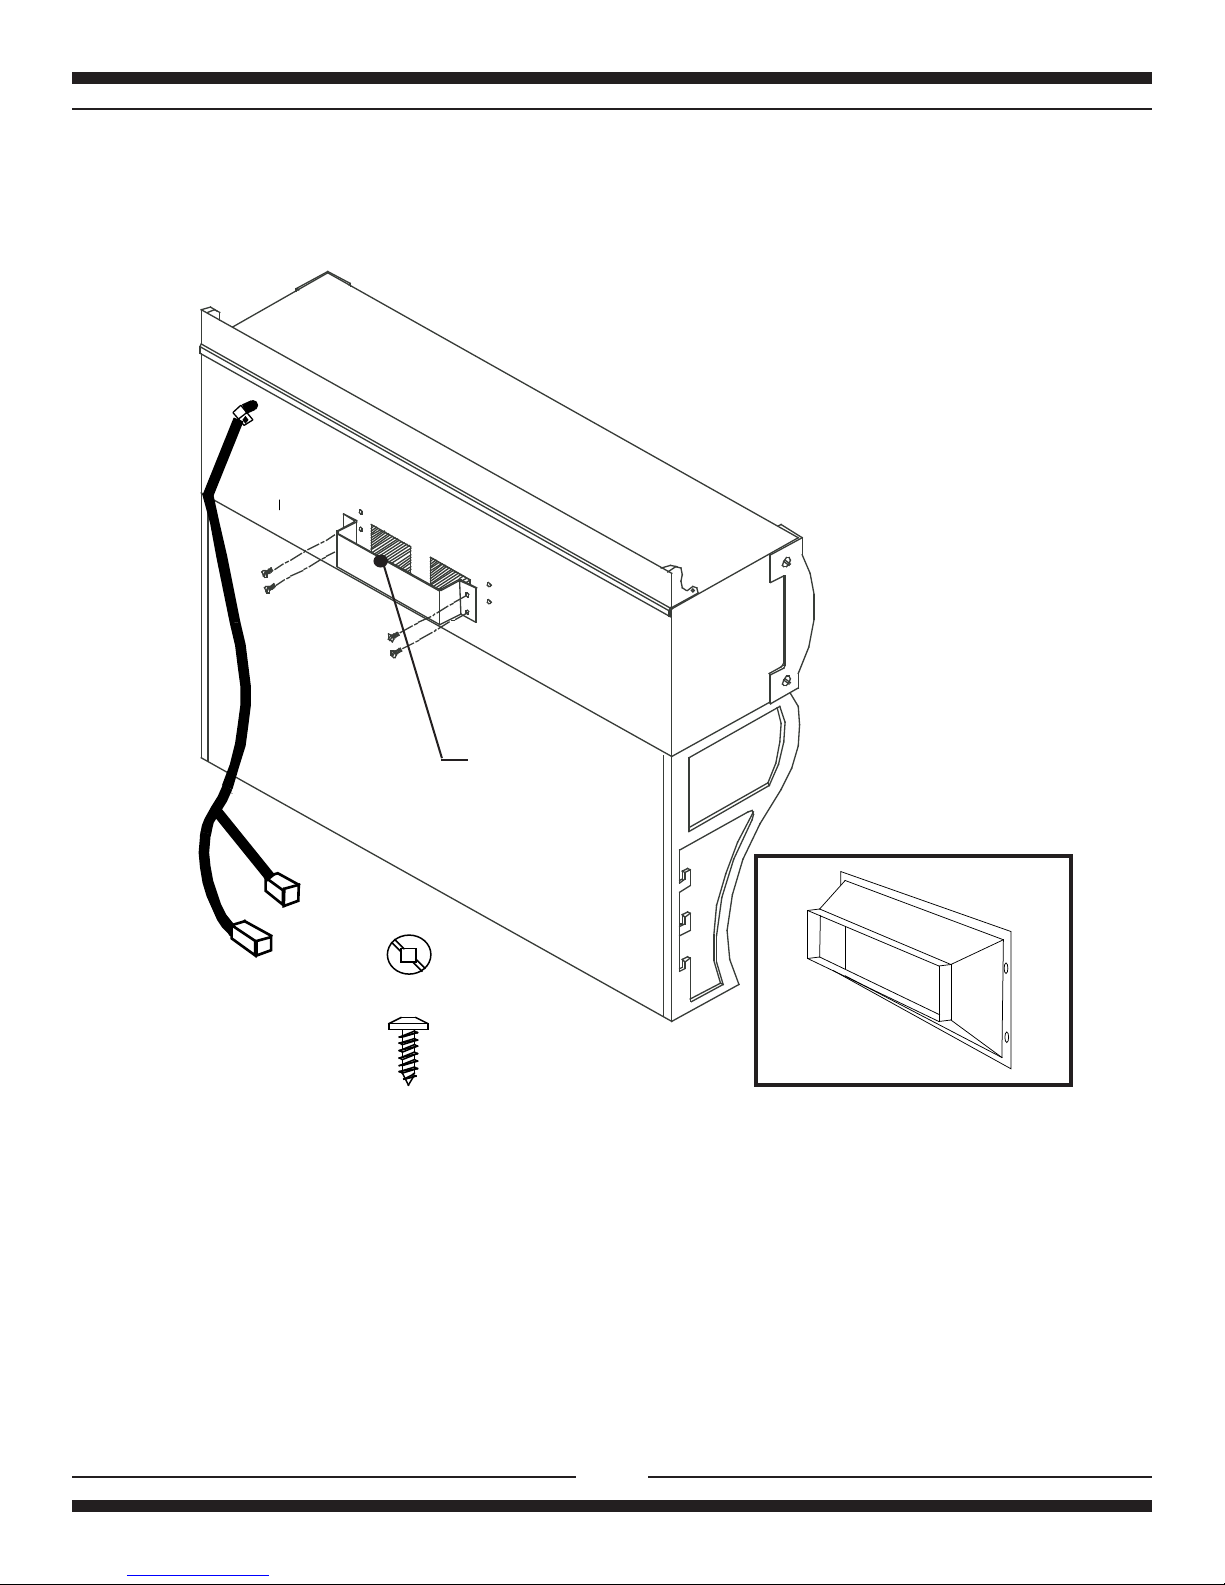
52. Pressure Regulator Conversion

1
Note:
shipping damage, inform your dealer immediately!
Caution when unpacking:
Lift the range by the bottom skirt, do not lift by nickel trim.
Unpacking:
Note: to avoid injury, please wear safety equipement, glasses and gloves, while you are unpacking your new range.
1) Unscrew the 12 screws that hold the crate onto the skid. There are 12 along the bottom and 4 along the top.
2) After the screws have been removed, carefully lift the crate over the stove and set it aside.
3) Next with a pair of tin sips cut the metal banding that holds the stove into place.Caution metal banding is under
tension!
4) Carefully remove the metal banding, the 2 boards that where under the banding and the cardbord cap and
styrofoam.
5) You are now ready to remove the range from the skid.
For 30" units have one person at each end stand beside the skid and carefully lift the range by the bottom skirt, and a
not your back!
For 48" units units have one person at each end and one side, stand beside the skid and carefully lift the range by the
bending your knee's not your back!
6) Finish unpacking the range removing packing tape around the doors and in the oven.
Both 30" and 48" Ranges consist of two main parts: The Range Body, and
The Cabinet / Exhaust Hood
Tools required for assembly: - Phillips/Robertson Screwdriver
- 5/16" ( 8 mm) wrench or crescent wrench
Assembly and Installation
To fully enjoy your new range, it is important that you read this booklet thoroughly.
1/8"- 1/4"
Figure 1
observed except when range is equipped with a cord and plug
approximately 1/8"-1/4". Adjusting levelling bolts in too far will
Gliders:
This manual suits for next models
1
Table of contents
Languages:
Other Heartland Range manuals

Heartland
Heartland Toledo XT Instruction Manual

Heartland
Heartland Classic 6200 User manual

Heartland
Heartland 7200 User manual

Heartland
Heartland 9200 User manual

Heartland
Heartland 5210? 4210 User manual

Heartland
Heartland 7200 User manual

Heartland
Heartland 6210 48" User manual

Heartland
Heartland 9200/7200 User manual
Popular Range manuals by other brands

Maytag
Maytag MGR5875QDW - 30 Inch Gas Range Use and care guide

Frigidaire
Frigidaire FFGF3024SS use & care

Capital
Capital Precision Series GCR484W Specifications

Officine Gullo
Officine Gullo GGS8P Installation and use instruction

LG
LG LSD4913 Series owner's manual

Kenmore
Kenmore 4101 - Elite 30 in. Slide-In Electric Range installation instructions