Heatsail DOME User manual

suMmer
Nights
sHould last
foReVEr
outdoor light & heating
Do not throw away this manual, as it contains your device’s serial number!
EN / NL / FR / DE
U S E R M A N U A L

U S E R M A N U A L
D O M E P E N D A N T
Operating, maintenance and installation guide.
! PLEASE NOTE !
Please read through these instructions carefully before using the device!
Do not throw away this manual, as it contains your device’s serial number!
English
4 5Heatsail DOME® User manual
English
English
General
is user manual is inextricably connected to the DOME® and must always be kept by the user or
by another authorised responsible person.
Please read through this user manual carefully. It contains essential information regarding the
safety, operation, cleaning and maintenance of the DOME®. Heatsail will not be held responsible
for injury and/or damage to people, animals and subjects resulting from non-compliance with
the instructions in this user manual.
Heatsail reserves the right to make changes to the product, the technical features and the user man-
ual at any time and without the need for prior notice.
If you decide to sell the DOME®, transfer it to another user or leave it behind with a house move,
this manual must be made available to the new user.
We would like to wish you plenty of warm and pleasant evenings with our DOME®!
e HEATSAIL team.
!Do not throw away this manual, as it contains your device’s serial number.
Thank you for
purchasing the DOME®!
1. Electrical safety procedures & requirements
e use of the DOME® requires an electrical installation with reliable safety grounding. e in-
stallation’s electrical safety can only be guaranteed if the device has been correctly connected to an
earthing system built in accordance with the safety instructions. A preliminary inspection is ab-
solutely essential. In the event of any uncertainty, a careful inspection must be made by a qualied
and authorised technician. Heatsail will not be held responsible for injury and/or damage resulting
from an ungrounded installation.
e installation of the DOME®’s electrical components requires a mains connection of 230V-50/60Hz
(16 Amp fuse EN 30 mA RCD): the connection must be properly implemented in accordance with
the applicable IEC-CEI standards. Please note: statutory and other regulations may apply locally.
e electrical power supply will need to be interrupted before the connection or other work on the
electrical components can be carried-out and everyone must satisfy themselves that the power can’t
be switched on again accidentally.
e use of adapters, power strips and extension leads may not be used for the DOME®’s electrical
supply. A switch must be installed between the DOME® and the fuse box at all times. Non-com-
pliance with these instructions may compromise the safety of the device. Heatsail will not be held
liable for any damage resulting from this.
2. Safety
A compulsory minimum clear height of 1.8 meters must be observed for the DOME®,
measured between the ground and bottom of the lowest heating element.
Children below the age of 3 must be kept away from the DOME® unless under full-time supervi-
sion.
Children aged between 3 and 8 can only operate the DOME® providing this has been placed in its
normal operating position and providing they have been given clear instructions regarding the
DOME®’s safe use and that they are capable of properly assessing any risks. ey are not permitted
to push and pull the plug in and out, or to clean the DOME® and carry out maintenance activities.
e DOME® must be kept out of reach of anyone incapable of assessing the risks which can arise
from the (improper) use of electrical equipment.
CAUTION – The heat can rise to extremely high temperatures and can cause
burns. The DOME® should never be touched as soon as it has been switched on.

6 7Heatsail DOME® User manual
English
English
Particular attention should be paid when children and vulnerable people are present.
e DOME® will remain hot for a considerable period of time aer it has been switched o. Do not
touch the DOME® for a period of 30 minutes aer it has been switched o. Please note! Caution
should be exercised at all times. e grill does not oer protection against the heat.
e DOME® must never be used when the glass is damaged.
e DOME® may not be used with a timer or any device which can automatically switch on the
heating, as there is a risk of re if the DOME® has been incorrectly positioned.
Never use the DOME® in the immediate vicinity of a bath, Jacuzzi, shower, swimming pool or
conservatory.
Never position the DOME® close to curtains, canopies or other ammable materials. Never cover it
up without pulling the plug from the socket!
e DOME® must never be touched with naked, wet or moist body parts.
e DOME® is made up of 6 high radiance ceramic heating elements, mounted in a certain di-
rection on a reective plate. As soon as the ceramic elements begin to heat up, the full operating
temperature will be reached within a time span of 10 minutes. Please note: there is no noticeable
glow in the infrared area.
Never use the DOME® to light anything. e ceramic elements are fragile and must be handled with
due care. e same also applies to the glass casing.
Heatsail will not be held responsible for damage resulting from non-compliance with the instruc-
tions regarding use and maintenance.
3. Maintenance
3.1 Cleaning
Your DOME® must be cleaned on a monthly basis.
e electrical supply must be disconnected via the installation’s mains switch or by disconnecting
the plug before cleaning activities can commence. Cleaning may only be done with a dry and so
cloth. Do not use any abrasive cloths. Do not use detergents. Using a high pressure and/or steam
cleaner is prohibited. Cleaning is only permitted once the DOME® has completely cooled down.
Non-compliance with these rules may compromise the safety of the device. Heatsail will not be held
responsible for damage resulting from non-compliance with the instructions regarding cleaning.
3.2 Replacing the bulb
Your DOME® is supplied with a R7S 230V/120 Watt (78mm) halogen bulb as standard. e maxi-
mum permitted output power is 120 Watt.
e electrical supply must be disconnected via the installation’s mains switch or by disconnecting
the plug before the bulb can be replaced.
You can replace the bulb by carefully sliding the glass upwards. Use tools like a screwdriver to hold
the glass up. e bulb is held in place by a spring. Take the bulb out by rst pushing it to the le or
right and thereby releasing it from its socket. Subsequently insert another bulb. Please be careful
never to touch the halogen bulb with your own bare ngers, as this will signicantly reduce the
bulb’s life.
3.3 Inspection
e DOME® must be subjected to an annual inspection.
e user is not authorised to carry out his own inspections and repairs. Inspection of the DOME®
must exclusively be carried out by qualied and authorised technicians, in accordance with Heat-
sail’s applicable standards and regulations. Qualied people are understood to mean: people who
have completed a technical training course for the installation of outdoor heating and who are
familiar with the applicable electricity laws and regulations.
e electrical supply must be disconnected via the installation’s mains switch or by disconnecting
the plug before any work can be carried out.
• All repairs must be requested via Heatsail.
• A repair is only valid when original parts have been used.
• e entire control panel should be returned in case of a defective cable, once written approval
has been provided by Heatsail.

8 9Heatsail DOME® User manual
English
English
Heatsail will not be held responsible for damage resulting from non-compliance with the instruc-
tions regarding maintenance.
4. Guarantee conditions
4.1 Guarantee
e original invoice will serve as your proof of guarantee for the legal two year guarantee. is
guarantee does not aect the buyer’s rights by virtue of the national legislation regarding the sale
of consumer goods.
is guarantee is only valid if the DOME®’s installation and maintenance have been carried out in
accordance with the applicable standards and regulations and instructions for the installation, use,
maintenance and cleaning of the product, by qualied people who satisfy the legal requirements.
e guarantee term will commence from the date the goods were delivered.
Any replacement or repair will principally be done for free, but the shipping costs will be at the
buyer’s expense, unless agreed otherwise. Any defective goods will be sent to Heatsail by the buyer,
once Heatsail has granted its written permission to do so. Heatsail will not award any compensation
for any direct or indirect damage resulting from, or relating to, using the product.
No compensation will be awarded for the period during which the product isn’t working.
e replaced parts will be guaranteed for the remainder of the guarantee period, from the date the
goods are delivered.
4.2 Guarantee exclusions
• e conditions for activating the guarantee were not met.
• e parts appear to be defective as a result of negligence or inappropriate use or incorrect
maintenance.
• e installation has not been carried out in accordance with the legal standards and not in
accordance with the instructions provided in the user manual.
• Any damage caused as a result of weather conditions, chemical and electrochemical reactions,
improper use, natural disasters, electrical discharge, re, a defective electrical installation,
modications or mishandling to packaging, the handle and the electrical wiring.
• Any damage caused by transport.
We recommend you thoroughly check the goods upon receipt, allowing you to instantly notify the
seller of any possible damage and to record any such damage on the transport document and the
courier’s copy. For example:
• Physical damage aer the installation, including glass breakage, scratches on the DOME® and
accessories.
• Tinkering with the DOME® and/or other causes which can’t be attributed to the product’s
manufacture.
• e use of non-original replacement parts.
• Damage caused through normal wear and tear.
4.3 What to do in case of a fault?
In case of a fault, you must contact Heatsail immediately, and no later than two months aer the
fault was rst found, for a repair or replacement. e guarantee can only be initiated aer written
permission has been granted.
Heatsail declines any form of liability for any possible damage and/or injury which has been either
directly or indirectly caused to people, animals or objects as a result of non-compliance with the
instructions in the user manual and which specically concern the warnings in relation to the in-
stallation, use and maintenance of the device.
5. Applicable law – competent court
e general terms and conditions and the agreement are governed by Belgian law. e courts of
the judicial district of Antwerp shall have exclusive jurisdiction to settle any dispute arising from
the agreement.
6. Visual installation & connection diagrams
7. Operation
8. Troubleshooting

10 11Heatsail DOME® User manual
English
English
6. Visual installation
Open the box and follow these instruction guidelines for a quick installation.
6.1 If you have bought the Dome with suspension rod goto page 12, otherwise continue:
1
Never hold the Dome by the
power cable. e internal
connections might become
loose and you will have to
return the Dome.
1.
2.
3.
Unscrew the cap with a few turns,
but leave it on. It has a build in
gripper. By pushing the cap down
you can adjust steel cable and
the the height of the the Dome.
Minimum required height is 1.8
m. above the ground,
maximum height 2m. Fix the cap
again when done.
You can cut the cable when too long.
Leave a few centimeters for safety.
e other side of the cable has
a loop so you can easily hang
the Dome to dierent kind of
ceilings.
Never hang the Dome closer than
25cm from the ceiling, walls or
other surroundings.
Connecting the control box:
e control box is a black case you can easily x against the wall or ceiling.
It has the advantage of a remote that lets you control the light and its intensity, and switches the
heating in 2 levels. e control box has an IP43 rating, if you use the box in the open you will
need to order an extra joint to make the box IP65. e joint will t in the lid. e lid closes with 6
delivered screws.
BEWARE: Because o European law it is forbidden to rely on an electronic means to switch
heaters on and o, so you will need to install a separate power switch further down the circuit.
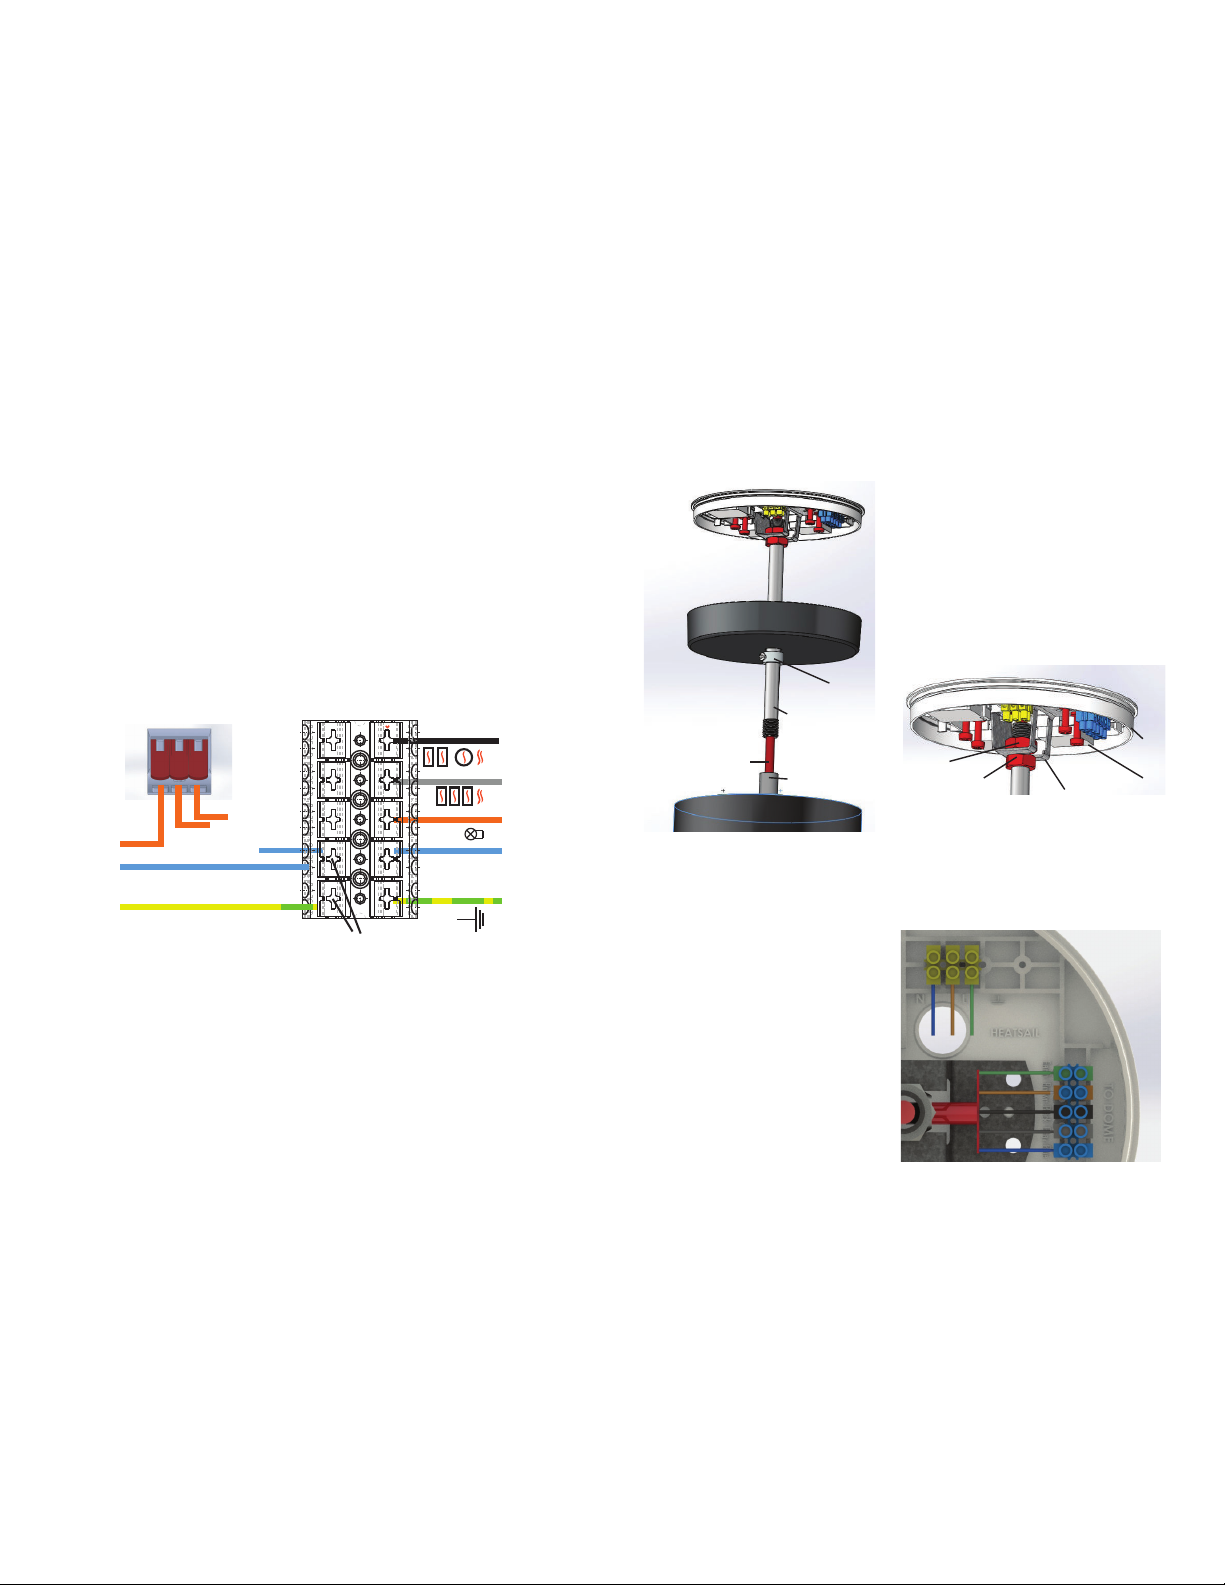
The connection of the control box for the Pendant version is as follows:
N
Power
Dome
Open
and
insert
brown wire
push rmly to insert cables
PUSH FIRMLY WITH A SCREWDRIVER ON THE CONNECTOR BLOCK,
THE WIRES SHOULD BE WELL INSERTED!
12 13Heatsail DOME® User manual
English
English
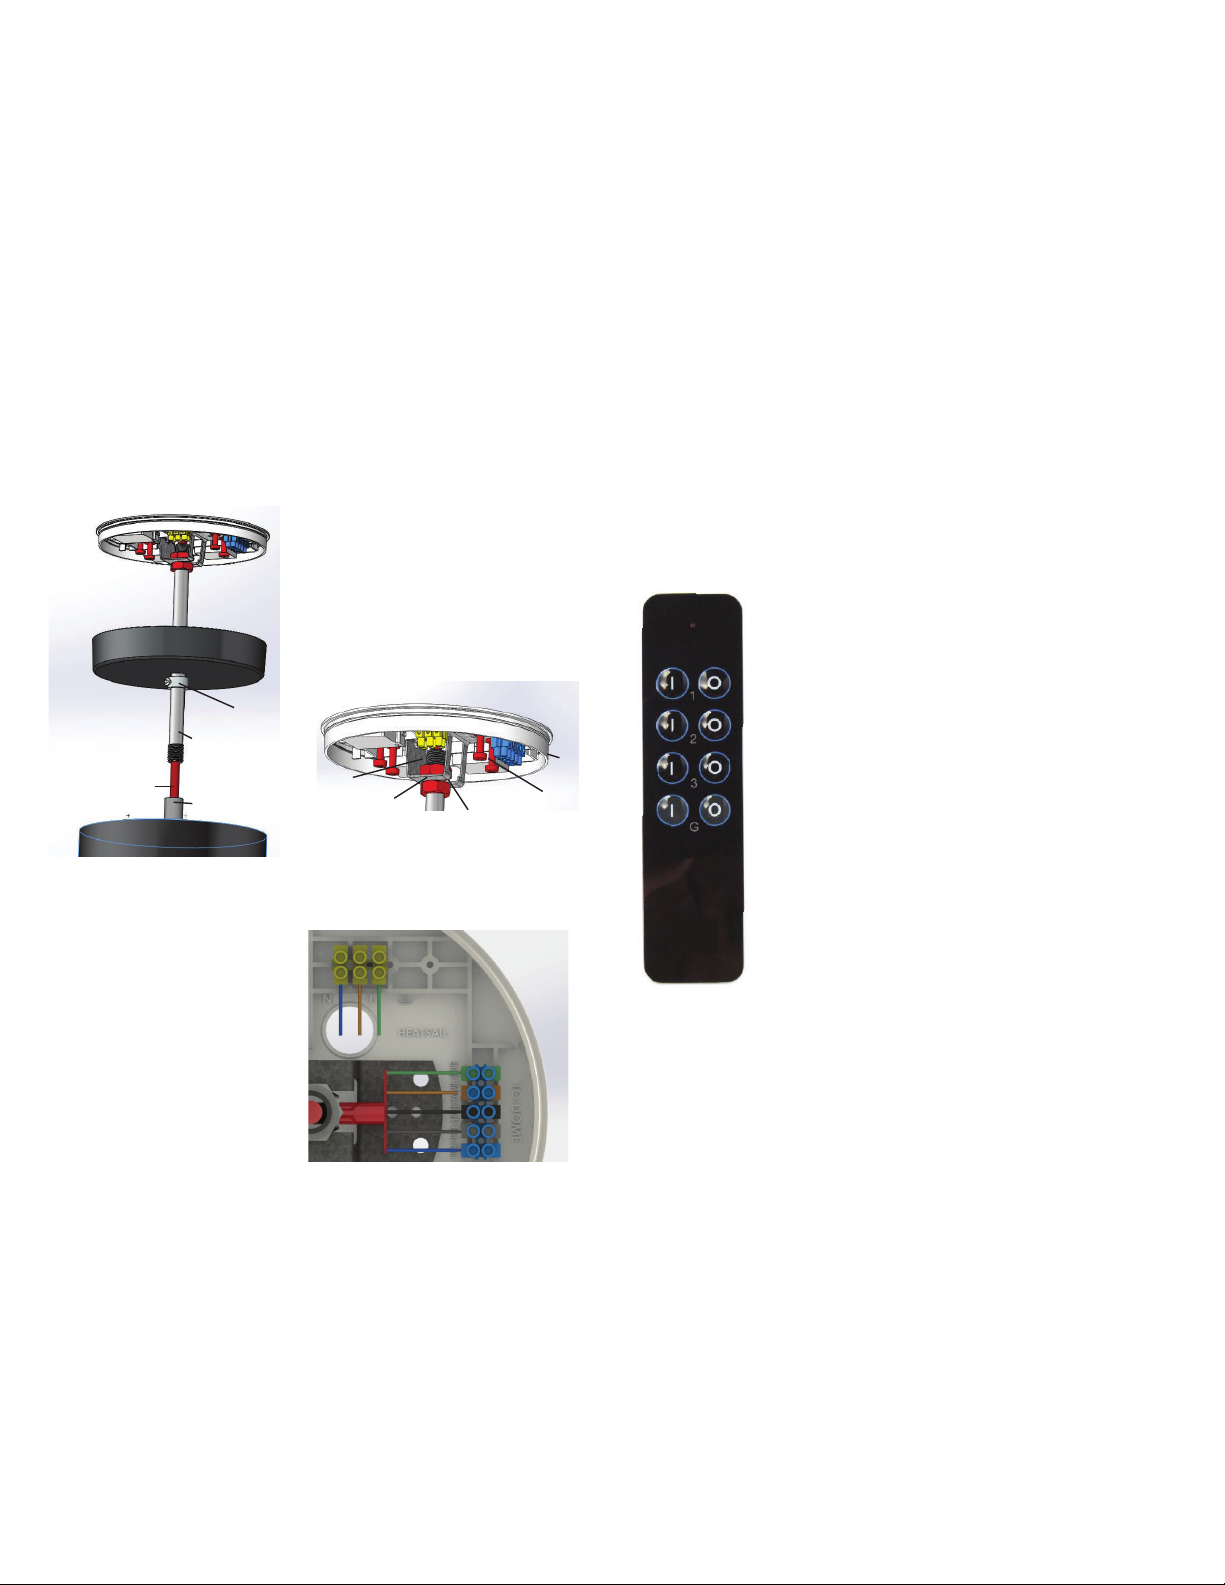
6.2 If you have bought the Dome with suspension rod:
Never li the Dome by the power cable. e inter-
nal connections might become loose and you will
have to return the Dome.
e suspension rod (2) is made to order when you
did give the height of the oor to ceiling with your
order. Take it out of the box and put the cable (1) of
the Dome through it. en while holding the cable
stil, screw the rod onto the Dome (3)
Slide the ring (4) and cover (5) over the rod.
Now x the Top plate (6) to the ceiling with 4
screws (7). Put the the two nuts (8&9) on the rod,
but leave around 1cm open between them. Now
li the complete Dome up and hang the Dome on
the bracket with one nut below and one on top
(10) Tighten the upper nut rmly.
2
13
4
5
6
79 8 10
Now tighten the two nuts rmly.
Electric connection:
Finally connect the cable coming from
the Dome to the connection box. Match
the wire colors by the wires already con-
nected to the connection block. (11)
Now connect the power in to the 3 pin
connector block, respecting the colors of
the wires already connected. (12)
11
12
7. Operation
When you switch on the Dome, it takes up to 30 minutes before the Dome reaches it full tempera-
ture. Also when switch o, it may take up to 40 minutes before the Dome has completely cooled
down.
If you have purchased the control box, the remote buttons work as follows:
BUTTON 1 (LIGHT) : Press 1 to switch on, 0 to switch o.
Hold ‘1’ to dim, press 1 again to stop dimming. e system will
BUTTON 2 (HEATER 1) : Press 1 to switch on, 0 to switch o.
BUTTON 3 (HEATER 2) : Press 1 to switch on, 0 to switch o.
BUTTON G: Not used
Enjoy your DOME Heater!

14 15Heatsail DOME® User manual
English
English
8. Troubleshooting
1) e light does not work:
Switch of power. Li the glass of the the Dome upwards. put something underneath
to keep it upwards. Now you have access to the halogen bulb. Verify it is well inserted
and not broken. If you need to change the bulb replace it with a standard
R7S 78mm, 120W.
Use a cloth or gloves to replace the bulb, touching it with hands shortens the life
considerably.
If the problem is not solved, verify that the blue and brown wires are well inserted in
the connection block. See picture on p12.
If still not working try to reprogram the remote. (see next page)
2) No heat. (none of the heating elements is working) Most probably there is no power.
Verify all wires are well connected. (See P12)
3) Heater is only partly working.
(either 3 side elements, or 2 side elements and bottom element)
• Black or Grey wire not well connected. See P12
• Open control box, verify that the module makes a clicking sound
when switching on or o. If on, there shoud be a small red light on the
module.
• If no ‘click’, try to reprogram the module, see next page. ere are 3
modules in the control box, 2 are exactly the same and responsible for
heater 1 and 2.
4) Nothing works.
• Verify all wires are well connected and inserted in the connector block.
See P.12
• Try to reprogram the remote (see next page)
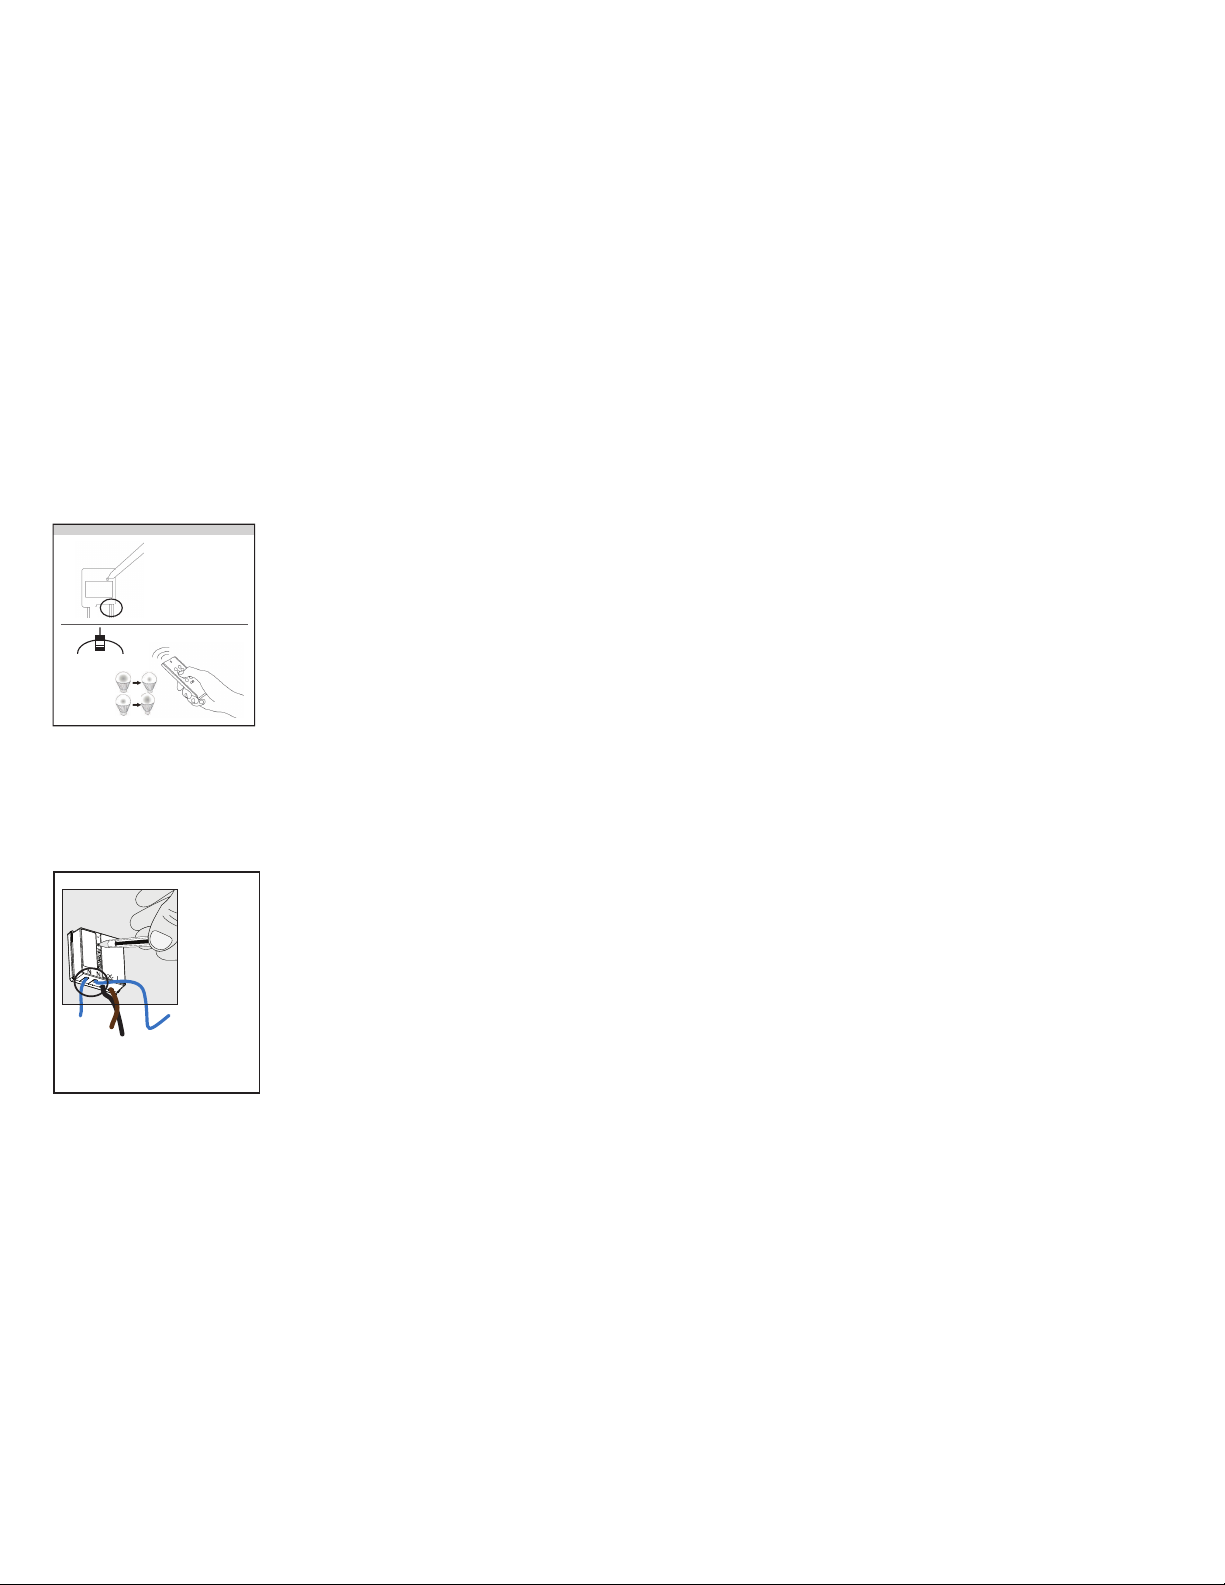
Reprogramming the remote
Open the control box and locate the dimmer module.
It has 2 white wires cut-off.
(1) Switch on the mains power
(2) Beware of any exposed wiring
(3) e LED indicator on the receiver will be permanently lit when
there is power.
! If there is no lit LED indicator, either the light is disconnected
or bulb is broken!
Register transmitters with the recipient
(1) Press on the connect button for 1 second with a pen. e search mode
will be active for 15 seconds and the LED indicator on the receiver will
ash slowly.
(2) Send an on-signal by pressing the ‘1 - ON’ button on the remote whilst
the search mode is active in order to store the applicable transmission code
in the receiver’s memory. is will normally be the button at the top le.
You can also choose a dierent button.
(3) e connected lights will switch on/o 2x to conrm the code has been
stored.
Repeat this procedure to register several remotes, if so required. e re-
ceiver can store 6 dierent transmission codes in its memory. e memory
will be retained if you install the receiver somewhere else or if the power
goes o.
1°
2°
OFF:
ON:
Dimmer has 2 white
wires cut o
Press with ball
point to reprogram
Reprogram the light
Open the control box and locate the heater switches.
They have 2 blue wires each
(1) Switch on the mains power
(2) Beware of any exposed wiring
Register remotes with the switches
(1) Press on the connect button for 1 second with a pen. e search mode
will be active for 15 seconds and the LED indicator on the receiver will
ash slowly.
(2) Send an on-signal by pressing the ‘2 - ON’ for heater 1 and ‘3 - ON’
button for heater 2 on the remote whilst the search mode is active in order
to store the applicable transmission code in the receiver’s memory. is
will normally be the button at the top le. You can also choose a dierent
button.
e led light on the module wil switch on to conrm the code has been
stored.
Repeat this procedure to register several remotes, if so required. e re-
ceiver can store 6 dierent transmission codes in its memory. e memory
will be retained if you install the receiver somewhere else or if the power
goes o.
heater switch
has 2 blue wires
Reprogram the Heater modules
17Gebruikershandleiding
Nederlands
Nederlands
GEBRUIKERSHANDLEIDING
Bedienings-, onderhouds-, installatiehandleiding.
! OPGELET !
Lees de handleiding aandachting alvorens het apparaat te gebruiken!
Gooi deze handleiding niet weg, ze bevat het serienummer van uw toestel!
Algemeen
Deze gebruiksaanwijzing is onlosmakelijk verbonden met de DOME en dient altijd bewaard te
worden door de gebruiker of door de bevoegde verantwoordelijke.
Lees de gebruiksaanwijzing aandachtig door. Ze bevat essentiële informatie over veiligheid,
gebruik, reiniging en onderhoud van de Dome. Heatsail kan niet aansprakelijk worden
gesteld voor schade aan personen, dieren en voorwerpen die het gevolg is van niet-naleving
van de voorschriften in de gebruiksaanwijzing.
Heatsail behoudt zich het recht voor om op ieder moment en zonder voorafgaande mededeling
eventuele wijzigingen aan te brengen aan het product, de technische kenmerken en de gebruik-
saanwijzing.
Indien u de DOME doorverkoopt, overdraagt aan een andere gebruiker of achterlaat bij een verhu-
is, dient de handleiding ter beschikking te worden gesteld van de nieuwe gebruiker.
Wij wensen U veel warme en aangename avonden met onze DOME!
Het HEATSAIL team.
!Gooi deze handleiding niet weg, ze bevat het serienummer van uw toestel.
Wij danken u voor
uw aankoop van DOME®!

18 19Heatsail DOME® Gebruikershandleiding
Nederlands
Nederlands
1. Elektrische veiligheidsvoorschriften & vereisten
Het gebruik van de DOME vereist een elektrische installatie met deugdelijke veilighe-
idsaarding. De elektrische veiligheid van de installatie is slechts verzekerd indien de instal-
latie correct is aangesloten op een aardingssysteem dat volgens de veiligheidsvoorschriften is
gebouwd. Een voorafgaande controle is noodzakelijk. In geval van twijfel, dient een nauwkeurige
controle te worden verricht door gekwaliceerde en geautoriseerde personen. Heatsail is niet ver-
antwoordelijk voor schade die het gevolg is van een niet geaarde installatie.
De installatie van elektrische onderdelen van de DOME vergt een netaansluiting van 230V-50/60Hz
(zekering 16 Amp EN 30 mA verliesstroomschakelaar): de aansluiting dient naar behoren te worden
uitgevoerd in overeenstemming met de geldende IEC-CEI-normen.
Let op: lokaal kunnen wettelijke en andere voorschrien gelden.
Alvorens de verbinding of andere werkzaamheden aan de elektrische onderdelen te realiseren moet
de elektrische stroomtoevoer worden onderbroken en moet men zich ervan vergewissen dat de
stroom niet per ongeluk opnieuw ingeschakeld kan worden.
Voor de stroomvoorziening van de DOME op het elektrische net, is het gebruik van verloopstek-
kers, stekkerdozen en verlengsnoeren niet toegestaan. Er moet steeds een schakelaar geïnstalleerd
worden tussen de DOME en de zekeringskast. Niet-naleving van deze voorschrien kan de veil-
igheid van het apparaat in gevaar brengen. Heatsail kan niet aansprakelijk worden gesteld voor de
schade die hieruit voortvloeit.
2. Veiligheid
De verplichte minimum vrije hoogte van de Dome bedraagt 1.8 meter, gemeten tussen de
grond en de onderkant van het onderste verwarmingselement.
Kinderen jonger dan 3 jaar moeten weg gehouden worden van de Dome tenzij onder voltijdse
supervisie.
Kinderen tussen 3 en 8 jaar zullen de Dome enkel mogen bedienen onder voorbehoud dat
deze geplaatst is in zijn normale werkingspositie en zij duidelijk richtlijnen hebben ontvangen
omtrent het veilig gebruik van de DOME en de risico’s goed kunnen inschatten. Het is hen niet
toegestaan de stekker in en uit te trekken of de DOME te reingen en onderhoudshandelingen
te verrichten.
De DOME buiten het bereik houden van elke persoon die niet in staat is de gevaren in te schatten
die kunnen ontstaan door het (oneigenlijk) gebruik van elektrische apparaten.
OPGELET - De verwarming loopt op tot zeer hoge temperaturen en kan brand-
wonden veroorzaken. De DOME mag in geen enkel geval aangeraakt worden zodra
hij ingeschakeld wordt.
Bijzondere attentie moet gegeven worden wanneer kinderen en kwetsbare per-
sonen aanwezig zijn.
Na uitschakeling blij de DOME nog warm voor een aanzienlijke periode. Raak de DOME niet aan
gedurende een periode van 30 minuten na uitschakeling. Let op! Voorzichtigheid blij geboden. De
grille biedt geen bescherming tegen de hitte.
De Dome nooit gebruiken wanneer het glas beschadigd is.
De Dome niet gebruiken met een timer of eender welk ander toestel dat de verwarming automa-
tisch kan aanschakelen, aangezien er risico op brand is als de Dome verkeerd gepositioneerd staat.
Gebruik de Dome nooit in de onmiddelijke omgeving van een bad, jacuzzi, douche, zwembad of
serre.
Zet de Dome nooit dicht bij gordijnen, overkappingen of andere brandbare materialen. Dek hem
nooit af zonder de stekker uit het stopcontact te trekken!
Het is verboden de DOME met blote, natte of vochtige lichaamsdelen aan te raken.
De DOME bestaat uit 6 hoog stralende keramische verwarmingselementen gemonteerd in een
bepaalde richting op een reecterende plaat. Van zodra de keramische elementen beginnen op te
warmen, wordt de volledige bedrijfstemperatuur bereikt binnen een tijdspanne van 10 minuten.
Let op: er is geen merkbare gloed in het infrarood gebied.
Gebruik de DOME nooit om wat dan ook aan te steken De keramische elementen zijn breek-
baar en dienen met de nodige voorzichtigheid behandeld worden. Dit geldt eveneens voor het
glazen omhulsel.
Heatsail is niet verantwoordelijk voor schade die het gevolg is van het niet naleven van de
voorschrien betreende gebruik en onderhoud.
3. Onderhoud
3.1 Reiniging

20 21Heatsail DOME® Gebruikershandleiding
Nederlands
Nederlands
Uw DOME maandelijks reinigen.
Alvorens deze te reinigen, moet de stroomvoorziening losgekoppeld worden via de hoofdschake-
laar van de installatie of via het loskoppelen van de stekker. Reiniging enkel toegelaten met een
droge en zachte doek. Gebruik geen schurende doeken. Gebruik geen reinigingsmiddelen. Het
gebruik van hoge druk- en/of stoomreiniger is verboden. Reiniging enkel toegelaten indien de
DOME volledig is afgekoeld.
Niet-naleving van deze voorschrien kan de veiligheid van het toestel in gevaar brengen. Heatsail
is niet verantwoordelijk voor schade die het gevolg is van het niet naleven van de voorschrien
betreende reiniging.
3.2 Vervangen van de lamp
Uw Dome wordt standaard geleverd met een R7S halogeenlamp van 230V/120 Watt (78mm). Het
maximum toegelaten vermogen is 120 Watt.
Alvorens deze lamp te vervangen, moet de stroomvoorziening losgekoppeld worden via de hoofd-
schakelaar van de installatie of via het loskoppelen van de stekker.
U kunt de lamp vervangen door voorzichtig het glas naar boven te schuiven. Gebruik gereedschap,
bv een schroevendraaier om dit glas naar boven te houden. De lamp wordt vastgehouden in zijn
houder door een veertje. Neem de lamp eruit door ze eerst naar links of rechts te duwen zodat ze
vrij komt uit de houder. Steek er vervolgens een andere in. Let op dat u de halogeen lamp zelf nooit
aanraakt met uw blote vingers, dit verkort de levensduur van de lamp aanzienlijk.
3.3 Inspectie
De DOME dient jaarlijks aan een inspectie te worden onderworpen.
De gebruiker is niet bevoegd eigenhandig inspectie en herstellingen uit te voeren. Inspectie van
de DOME dient uitsluitend verricht te worden door gekwaliceerde en geautoriseerde personen,
conform de geldende normen en voorschrien van Heatsail. Met gekwaliceerde personen be-
doelt men: personen die een technische opleiding hebben genoten voor het plaatsen van buiten-
verwarming en vertrouwd zijn met de geldende elektriciteitswetten.
Alvorens werken te verrichten aan de DOME, moet de stroomvoorziening losgekoppeld worden
via de hoofdschakelaar van de installatie of via het loskoppelen van de stekker.
• Elke reparatie dient te worden aangevraagd via Heatsail.
• Een reparatie is slechts geldig indien originele onderdelen worden gebruikt.
• Bij een defecte kabel de hele besturing terugsturen na schrielijke toestemming van Heatsail.
Heatsail is niet verantwoordelijk voor schade die het gevolg is van het niet naleven van de
voorschrien betreende het onderhoud.
4. Garantievoorwaarden
4.1 Garantie
De originele factuur geldt als garantiebewijs voor de wettelijke garantie van 2 jaar. Deze garan-
tie laat de rechten van de koper krachtens nationale wetgeving inzake verkoop van consumptie-
goederen, onverlet.
Deze garantie is slechts geldig indien de installatie en het onderhoud van de DOME is verricht
conform de geldende normen en voorschriften en de handleiding voor installatie, gebruik,
onderhoud en reiniging van het product, door gekwalificeerde personen die voldoen aan de
wettelijke eisen.
De garantietermijn begint te lopen vanaf de datum van levering van de goederen.
De vervanging of reparatie gebeurt in principe gratis, de verzendkosten zijn ten laste van de koper
tenzij anders overeengekomen. Defecte goederen worden na schrielijke toestemming van Heatsail
door de koper opgestuurd naar Heatsail. Heatsail kent geen vergoeding toe voor rechtstreekse of
onrechtstreekse schade voorkomend uit of verband houdende met het gebruik van het product.
Voor de periode tijdens de welke het product niet werkt, wordt geen vergoeding toegekend.
De vervangen onderdelen worden gegarandeerd gedurende de resterende garantieperiode va-
naf de datum van levering van de goederen.
4.2 Uitsluiting van garantie
• De voorwaarden voor activering van de garantie zijn niet nageleefd.
• De onderdelen blijken defect te zijn door slordigheid of nalatigheid bij het gebruik of door
verkeerd onderhoud.
• De installatie is niet conform de wettelijke normen verricht en niet conform de voorschrien
in de gebruiksaanwijzing.

22 23Heatsail DOME® Gebruikershandleiding
Nederlands
Nederlands
• Schade veroorzaakt door weersomstandigheden, chemische en elektrochemische inwerking,
oneigenlijk gebruik, natuurrampen, elektrische ontlading, brand, een defecte elektrische in-
stallatie, wijzigingen of het zelf schade aan pakkingen, de handgreep en de elektrische be-
drading.
• Alle schade veroorzaakt door vervoer.
Wij bevelen u daarom aan om de goederen bij ontvangst nauwkeurig te controleren en om eventu-
ele schade onmiddellijk te melden aan de verkoper en aan te geven op het vervoerdocument en op
de kopie voor de vervoerder. Zoals ondermeer:
• Fysische schade na installatie zoals glasbreuk, krassen e.d. op de DOME en toebehoren.
• Sleutelen aan de DOME en/of andere oorzaken die niet aan de vervaardiging van het product
te wijten zijn.
• Het gebruik van niet originele vervangstukken.
• Schade veroorzaakt door normale slijtage.
4.3 Wat te doen bij defect?
Bij defect wendt u zich onmiddellijk en niet later dan twee maanden na het defect tot Heatsail voor
een reparatie of een vervanging. Enkel na schrielijke toestemming kan de garantiebehandeling in
werking worden gesteld.
Heatsail wijst elke vorm van aansprakelijkheid af voor eventuele schade die direct of indirect aan
personen, dieren of voorwerpen wordt berokkend door het niet nakomen van de voorschrien
in de gebruiksaanwijzing en die vooral de waarschuwingen betreende de installatie, gebruik en
onderhoud van het apparaat betreen.
5. Toepasselijk recht – bevoegde rechtbank
De algemene voorwaarden en de overeenkomst worden beheerst door het Belgisch recht.
De recht banken van het gerechtelijk arrondissement Antwerpen zijn uitsluitend bevoegd om ken-
nis te nemen van elk geschil dat voortvloeit uit de overeenkomst.
6. Visuele installatie & aansluitingsschema
7. Bediening
8. Probleemoplossingen
6. Visuele installatie en aansluitingen
Indien u de Dome met ophangstang hebt gekocht, ga dan door naar pagina 25.
1
Neem de Dome nooit vast bij de
stroomkabel. De interne aansluitin-
gen zouden kunnen losraken en uw
Dome onbruikbaar maken
1.
2.
3.
Draai deze schroef een slag los.
Door de kap naar beneden te
duwen is het mogelijk de stalen
kabel van lengte aan te passen en
de hoogte van de Dome te regelen.
Minimum hoogte is 1.8 m. boven
de grond, en maximum hoogte is
2m. Draai de schroef terug vast.
U kan de staalkabel anippen
wanneer hij te lang is. laat een paar
centimeter als veiligheid
Het andere eind van de kabel
hee een lus, wat een eenvoudige
ophanging mogelijk maakt.
Hang de Dome nooit minder dan
25cm van het plafond of andere
brandbare oppervlakten.
24 25Heatsail DOME® Gebruikershandleiding
Nederlands
Nederlands
Aansluiting met Dome Besturing:
De besturing is een zwarte doos die eenvoudig tegen de wand of plafond te bevestigen is.
Door middel van deze besturing kan met met een afstandbediening de verlichting schakelen en
dimmen, en de verwarming in 2 standen aan- en uitschakelen.
Deze aansluitdoos voldoet aan IP43 , Voor IP65 (in openlucht) dient u een aparte dichting te
bestellen.
OPGELET: De Europese wetgeving erbiedt het van enkele electronische schakelaars te
gebruiken om verwarming aan en uit te schakelen, u zal dus nog een extra schakelaar ervoor
moeten installeren om er zeker van te zijn dat de stroomtoevoer 100% kan onderbroken
worden.
De aansluitingen van de besturing zijn als volgt:
N
Power
Dome
Open
and
insert
brown wire
push rmly to insert cables
DE CONTACTEN OP HET AANSLUITBLOK MOETEN STEVIG MET EEN
SCHROEVENDRAAIER INGEDUWD WORDEN ZODAT DE DRADEN VER
GENOEG IN DE KLEMMEN GESTOKEN KUNNEN WORDEN!
6.2 Installatie Dome met ophangstang
Neem de Dome nooit vast bij de stroomkabel. De
interne aansluitingen zouden kunnen losraken en
uw Dome onbruikbaar maken.
De ophangstang (2) is op maat gemaakt nadat u de
maat van vloer tot plafond hebt doorgegeven bij
uw bestelling. Neem deze uit de doos en steek de
stroomkabel van de Dome (1) erdoor. Hou de draad
tegen en draai de stang op de Dome. (3)
Schuif de ring (4) en het deksel (5) over de stang.
Schroef de plafondplaat (6) vast met 4 vijzen (7).
Schroef de 2 moeren (8&9) op de stang maar laat
ongeveer 10mm ertussen. Til de complete dome
op en hang hem door de opening van de beugel
(10), zodat 1 moer aan de bovenkant zit en één
eronder. Draai nu beide moeren stevig vast.
2
13
4
5
6
79 8 10
Electrische aansluiting:
Sluit de kabel van de Dome aan op de
klem (11). Sluit ze aan kleur op kleur
met de draden die al in de klem zijn
aangesloten.
Sluit uiteindelijk de stroom aan op de
kleinere klem (12). 11
12

26 27Heatsail DOME® Gebruikershandleiding
Nederlands
Nederlands
7. Bediening
Wanneer u de Dome opzet, kan het tot een half uur duren alvorens deze zijn volle warmte bereikt
hee. Ook duurt het tot 40 minuten alvorens het systeem afgekoeld is tot veilige waarden.
Indien u een besturing hee aangescha, werkt deze als volgt:
Knop 1 (Verlichting) : Druk 1 voor aan, 0 voor uit.
Houd ‘1’ ingedrukt om het dimmen te starten, druk terug op 1
wanneer het gewenste niveau bereikt is om dit vast te zetten
Knop 2 (Verwarming 1) : Druk 1 voor aan, 0 voor uit
Knop ‘G’: Niet gebruikt
Geniet van uw zomernachten!
Knop 3 (Verwarming 2 : Druk 1 voor aan, 0 voor uit
8. Probleemoplossingen
1) De verlichting werkt niet:
Schakel de stroom uit. Hef het glas van de Dome naar boven, en ondersteun het glas
door er iets onder te zetten. U kan nu veilig aan het halogeen lampje.
Controleer of dit goed in zijn houder zit en niet stuk is. Indien dit moet vervangen
worden gebruik een standaard R7S lamp, 120 Watt, 78mm.
Gebruik een doek of handschoenen om het lampje aan te raken, anders ver
kort u de levensduur ervan aanzienlijk.
Als het probleem niet opgelost is, controleer dan of de blauwe en bruine draad van de
Dome goed in het aansluitblok zitten. zie guur op P 24 of 25.
Indien nog steeds niet opgelost, probeer dan de afstandbediening opnieuw te pro
grammeren. (zie volgende pagina)
2) Geen verwarming.
Geen van de elementen wordt warm. Waarschijnlijk stroomprobleem.
Verieer alle aansluitingen, zie guur P 24 of 25.
3) Verwarming werkt gedeeltelijk
(enkel 2 rechthoekige elementen en het ronde element vanonder of enkel 3
rechthoekige elementen)
• Zwarte of grijze draad zit niet goed in zie P 24 of 25
• Open de besturing, en controleer of de modules een ‘klik’ geluid maken
wanneer ze in- of uitgeschakeld worden. Bij aan dient er een klein led
lampje te branden op de module.
• Wanneer er geen ‘klik’ geluid is, probeer dan de afstandbediening
opnieuw te programmeren, zie volgende pagina.
Er zijn 2 modules, respectievelijk voor heater 1 en 2
4) Niets werkt.
- Verieer alle aansluitingen, zie guur P 24 of 25.
- Probeer de afstandbediening opnieuw te programmeren.
(zie volgende pagina)
28 29Heatsail DOME® Gebruikershandleiding
Nederlands
Nederlands
Herprogrammeren Afstandbediening
Open de besturing en localiseer de dimmer module.
Deze is herkenbaar aan 2 afgeknipte witte draden.
zie tekening
1°
2°
OFF:
ON:
Dimmer has 2 white
wires cut o
Press with ball
point to reprogram
herprogrammeren verlichting
Open de besturing en localiseer de verwarmings-
modules. Deze zijn herkenbaar aan 2 blauwe dra-
den. zie tekening
(1) Druk 1 seconde op de verbindknop. De zoekmode zal 15 secon-
den actief zijn en de LED indicator op de ontvanger zal langzaam
knipperen.
(2) Stuur terwijl de zoekmethode actief is een aan-signaal met een
zender om de desbetreende zendcode in het geheugen van de
ontvanger op te slaan. Normaal is dit de knop ‘2’ links boven voor
verwarming 1 en knop ‘3’ voor verwarming 2.
U kan ook een andere knop kiezen.
(3) Het ledlampje zal continu beginnen branden om te bevestigen dat
de code is opgeslagen
Herhaal deze procedure om meerdere afstandbedieningen aan te
melden, indien gewenst. De ontvanger kan 6 verschillende zendcodes
in het geheugen opslaan. Het geheugen blij behouden als de ontvan-
ger ergens anders geïnstalleerd wordt of als de stroom uit valt.
heater switch
has 2 blue wires
Herprogrammeren
verwarmingsmodules
(1) Schakel de lichtnetspanning in
(2) Pas op voor blootliggende bedrading
(3) De LED indicator op de ontvanger zal continu branden als er
spanning op staat
Afstandbediening aanmelden bij de ontvanger
(1) Druk 1 seconde op de verbindknop. De zoekmode zal 15 secon-
den actief zijn en de LED indicator op de ontvanger zal langzaam
knipperen.
(2) Stuur terwijl de zoekmethode actief is een aan-signaal met een
zender om de desbetreende zendcode in het geheugen van de ont-
vanger op te slaan. Normaal is dit de knop ‘1’ links boven. U kan ook
een andere knop kiezen.
(3) De aangesloten verlichting zal 2x aan/uit schakelen om te bevesti-
gen dat de code is opgeslagen.
Herhaal deze procedure om meerdere afstandbedieningen aan te
melden, indien gewenst. De ontvanger kan 6 verschillende zendcodes
in het geheugen opslaan. Het geheugen blij behouden als de ontvan-
ger ergens anders geïnstalleerd wordt of als de stroom uit valt.

31Manuel d’utilisation
Français
França is
Français
MANUEL D’UTILISATION
Manuel d’utilisation, d’entretien et d’installation.
! ATTENTION !
Lire attentivement le manuel avant d’utiliser l’appareil !
Ne jetez pas le manuel, il contient le numéro de série de votre appareil !
Généralités
Le présent manuel d’utilisation est indissociablement lié au DOME® et doit toujours être conservé
par l’utilisateur ou par le responsable compétent.
Lisez minutieusement les consignes d’utilisation. Elles contiennent des informations essentielles
sur la sécurité, l’utilisation, le nettoyage et l’entretien du DOME®. Heatsail ne peut pas être tenu
responsable en cas de dommages causés à des personnes, des animaux et des objets qui seraient dus
au non-respect des consignes gurant dans le manuel d’utilisation.
Heatsail se réserve le droit d’apporter, à tout moment et sans information préalable, des modica-
tions au produit, aux caractéristiques techniques ainsi qu’au manuel d’utilisation.
Si vous revendez le DOME®, si vous le cédez à un autre utilisateur ou le laissez sur place lorsque
vous déménagez, le manuel doit être laissé à disposition du nouvel utilisateur.
Nous vous souhaitons de longues soirées chaudes et agréables avec notre DOME®!
L’équipe HEATSAIL.
!Ne jetez pas ce manuel, il contient le numéro de série de votre appareil.
Nous vous remercions
pour votre achat de DOME® !

32 33Heatsail DOME® Manuel d’utilisation
Français
Français
1. Consignes de sécurité électrique & conditions d‘utilisation
L’utilisation du DOME® nécessite une installation électrique avec une mise à la terre correcte. La
sécurité électrique de l’installation ne peut être assurée que si l’installation est correctement rac-
cordée à un système de mise à la terre réalisé conformément aux consignes de sécurité. Un contrôle
préalable est indispensable. En cas de doute, un contrôle minutieux doit être eectué par des per-
sonnes qualiées et autorisées. Heatsail décline toute responsabilité en cas de dommages dus à une
installation non reliée à la terre.
L’installation des éléments électriques du DOME® nécessite un raccordement à un réseau de
230V-50/60Hz (fusible de 16 Amp EN 30 mA sur disjoncteur) : le raccordement doit être réalisé
correctement, conformément aux normes IEC-CEI en vigueur.
Attention : des prescriptions légales ou autres peuvent s’appliquer localement.
Avant de réaliser les connexions ou d’autres travaux aux parties électriques, l’alimentation élec-
trique doit être interrompue et il convient de s’assurer que le courant ne peut pas de nouveau être
branché par accident.
Pour l’alimentation électrique du DOME®, l’utilisation d’adaptateurs, de multiprises et de rallonges
n’est pas autorisée. Un interrupteur doit toujours être installé entre le DOME® et le disjoncteur. Le
non-respect de ces consignes peut nuire à la sécurité de l’appareil. Heatsail ne peut pas être tenu
responsable des dommages qui en découleraient.
2. Sécurité
La hauteur minimale d’espace libre du DOME® est de 1,8 mètre, mesurée à partir du sol
jusqu’au-dessous de l’élément chauant inférieur.
Les enfants de moins de 3 ans doivent être maintenus éloignés du DOME®, sauf sous la surveillance
continue d’un adulte.
Les enfants de 3 à 8 ans pourront utiliser le DOME® à condition qu’il soit placé dans sa position de
fonctionnement normale et qu’ils aient reçu des consignes claires concernant l’utilisation en toute
sécurité du DOME® et qu’ils sachent bien évaluer les dangers. Il leur est interdit de brancher ou
débrancher la prise de courant et de nettoyer le DOME® ou d’eectuer des tâches d’entretien.
Le DOME® doit être maintenu hors de portée de toute personne n’étant pas à même d’évaluer les
dangers qui peuvent survenir par une (mauvaise) utilisation d’appareils électriques.
ATTENTION – Le chauffage monte à des températures très élevées et peut pro-
voquer des brûlures. Le DOME® ne peut en aucun cas être touché dès l’instant
où il est mis en route.
Il convient de faire particulièrement attention lorsque des enfants et des per-
sonnes vulnérables sont présents.
Après l’arrêt, le DOME® reste chaud pendant une durée relativement longue. Ne touchez pas le
DOME® pendant une période de 30 minutes suivant l’arrêt. Attention ! La prudence reste de mise.
La grille n’ore pas de protection contre la chaleur.
Ne jamais utiliser le DOME® lorsque la vitre est endommagée.
Ne pas utiliser le DOME® avec un minuteur ou un quelconque autre appareil qui permet de mettre
l’appareil en route automatiquement, étant donné le risque d’incendie qui existe lorsque le DOME®
est mal positionné.
N’utilisez jamais le DOME® à proximité immédiate d’un bain, d’un jacuzzi, d’une douche, d’une
piscine ou d’une serre.
Ne placez jamais le DOME® à proximité de rideaux, verrières ou autres éléments inammables. Ne
le recouvrez jamais sans l’avoir préalablement débranché !
Il est interdit de toucher le DOME® avec des parties du corps nues, mouillées ou humides.
Le DOME® est composé de six éléments chauants rayonnants en céramique montés dans un sens
déterminé sur une plaque rééchissante. Dès que les éléments céramiques commencent à chauer,
la température de service est atteinte dans un délai de 10 minutes. Attention : il n’y a pas d’éclat
visible dans la zone à infrarouge.
N’utilisez jamais le DOME® pour allumer quoi que ce soit. Les éléments en céramique sont fragiles
et doivent être traités avec la prudence nécessaire. Cela vaut également pour les globes en verre.
Heatsail décline toute responsabilité en cas de dommages dus au non-respect des consignes rela-
tives à l’utilisation et à l’entretien.
3. Entretien
3.1 Nettoyage

34 35Heatsail DOME® Manuel d’utilisation
Français
Français
Nettoyage mensuel de votre DOME®.
Avant de le nettoyer, l’appareil doit être débranché du disjoncteur de l’installation ou la prise doit
être retirée. L’appareil peut uniquement être nettoyé avec un chion doux et sec. N’utilisez pas de
chions abrasifs. N’utilisez pas de détergent. Il est interdit d’utiliser un nettoyeur haute pression
et/ou à vapeur. Le nettoyage ne peut être eectué que lorsque le DOME® a entièrement refroidi.
Le non-respect de ces consignes peut nuire à la sécurité de l’appareil. Heatsail décline toute respons-
abilité en cas de dommages dus au non-respect des consignes relatives au nettoyage.
3.2 Remplacement de l’ampoule
Votre DOME® est livré de manière standard avec une lampe halogène R7S de 230V/120 Watts
(78mm). La puissance maximale autorisée est de 120 Watts.
Avant de remplacer cette ampoule, l’appareil doit être débranché du disjoncteur principal de l’in-
stallation ou la prise de courant doit être retirée.
Vous pouvez remplacer l’ampoule en glissant prudemment le verre vers le haut. Utilisez un outil,
par exemple un tournevis, pour maintenir le verre en position haute. L’ampoule est maintenue en
place dans son support par un petit ressort. Retirez l’ampoule en la poussant d’abord vers la droite
ou vers la gauche de façon à l’extraire de son support. Remplacez-la par une nouvelle. Faites atten-
tion à ne jamais toucher l’ampoule à mains nues, car cela réduit considérablement la durée de vie
de l’ampoule.
3.3 Inspection
Le DOME® doit être soumis à une inspection annuelle.
L’utilisateur n’est pas autorisé à eectuer lui-même l’inspection ou des réparations. L’inspection du
DOME® doit exclusivement être eectuée par des personnes qualiées et autorisées, conformément
aux normes en vigueur et aux consignes de Heatsail. Par personnes qualiées, on entend : des per-
sonnes qui ont reçu une formation technique pour l’installation de chauages extérieurs et qui sont
familiarisées avec les lois applicables en matière d’électricité.
Avant d’eectuer des travaux au DOME®, l’appareil doit être débranché du disjoncteur principal de
l’installation ou la prise de courant doit être retirée.
• Toute réparation doit être demandée par le biais de Heatsail.
• Une réparation ne sera valable que si des pièces d’origine sont utilisées.
• En cas de câble défectueux, veuillez renvoyer tout le système de commande après autorisation
écrite de Heatsail.
Heatsail décline toute responsabilité en cas de dommages dus au non-respect des consignes rela-
tives à l’entretien.
4. Conditions de garantie
4.1 Garantie
La facture originale vaut comme preuve de garantie pour la garantie légale de 2 ans. Cette garantie
n’annule pas les droits dont bénécie l’acheteur en vertu de la législation nationale en matière de
vente de biens de consommation.
Cette garantie est uniquement valable si l’installation et l’entretien du DOME® sont réalisés con-
formément aux normes et directives en vigueur ainsi qu’au manuel d’installation, d’utilisation,
d’entretien et de nettoyage du produit réalisés par des personnes qualiées répondant aux exi-
gences légales.
Le délai de garantie débute à la date de livraison des marchandises.
En principe, le remplacement ou la réparation sont gratuits, les frais d’expédition étant à la charge
de l’acheteur, sauf s’il en a été convenu autrement. Les marchandises défectueuses seront ren-
voyées par l’acheteur, après accord écrit de Heatsail, à ce dernier. Heatsail ne verse pas de dédom-
magement pour des dommages directs ou indirects causés par ou en rapport avec l’utilisation du
produit.
Aucune indemnisation ne sera versée pour la période pendant laquelle le produit ne fonctionne
pas.
Les pièces remplacées seront garanties pendant la durée de la période de garantie restante à partir
de la livraison des marchandises.
4.2 Exclusion de garantie
• Les conditions d’activation de la garantie n’ont pas été respectées.
• Les pièces semblent défectueuses suite à un manque de soin ou une négligence dans l’utilisa-
tion ou un mauvais entretien.

36 37Heatsail DOME® Manuel d’utilisation
Français
Français
• L’installation n’est pas conforme aux normes légales ni aux consignes gurant dans le manuel
d’utilisation.
• Les dommages causés par les conditions météorologiques, une action chimique ou électro-
chimique, une mauvaise utilisation, des catastrophes naturelles, une décharge électrique, un
incendie, une installation électrique défectueuse, des modications ou des dommages causés
aux garnitures, à la poignée ou au câblage électrique.
• Tous les dommages dus au transport.
C’est pourquoi nous vous recommandons de vérier minutieusement les produits à la réception
an de signaler immédiatement tout dommage au vendeur et de l’indiquer sur le document de
transport et sur la copie pour le transporteur. Comme notamment :
• Des dommages physiques après l’installation, comme un bris de glace, des gries, etc. présents
sur le DOME® et les accessoires.
• Les bricolages réalisés sur le DOME® et/ou autres causes qui ne seraient pas dues à la fabrica-
tion du produit.
• L’utilisation de pièces de rechange qui ne sont pas d’origine.
• Les dommages dus à une usure normale
4.3 Que faire en cas de panne ?
En cas de panne, vous devez vous adresser immédiatement, et dans tous les cas dans les deux mois
qui suivent, à Heatsail en vue d’une réparation ou d’un remplacement. La garantie ne pourra être
activée qu’après autorisation écrite.
Heatsail décline toute forme de responsabilité pour d’éventuels dommages qui seraient causés di-
rectement ou indirectement à des personnes, des animaux ou des objets suite au non-respect des
consignes gurant dans le manuel d’utilisation et surtout les avertissements concernant l’installa-
tion, l’utilisation et l’entretien de l’appareil.
5. Droit applicable – tribunal compétent
Les conditions générales et le contrat sont régis par le droit belge. Seuls les tribunaux de
l’arrondissement judiciaire d’Anvers sont compétents pour prendre connaissance de tout diérend
découlant du contrat.
6. Installation illustrée et schémas de connexion
7. FAQ
6. Installation illustrée et schémas de connexion
Système avec cable.
1
Ne tenez jamais le Dome par le câble
d’alimentation. Les connexions
internes pourraient se désserrer et
endommager le Dome.
1.
2. Désserrez les vis, mais ne les
enlevez pas entièrement. En
poussant la coupole vers le bas,
vous pourrez ajuster la longueur
du câble en acier et régler ainsi
la hauteur du Dome. La hauteur
minimale est de 1.8m au dessus
du sol, la hauteur maximale est de
2m. Resserrez les vis.
Vous pouvez couper le câble s’il serait
trop long, mais prenez soin à garder
quelques centimètres pour la sécurité.
A l’autre extrémité du câble, il y a
une boucle pour la suspension.
Respectez toujours une distance
d’au moins 25cm. entre le Dome
et le plafond ou autres surfaces.
3.
3.

38 39Heatsail DOME® Manuel d’utilisation
Français
Français
N
Power
Dome
Open
and
insert
brown wire
push rmly to insert cables
Veillez à ce que les contacts sur le boîtier soient bien
enfoncés à l’aide d’un tournevis pour que les fils puissent
être suffisamment enfoncés dans les pinces !
Le système de pilotage consiste en un boîtier noir qui s’installe facilement sur le mur ou au
plafond.
Ce système permet d’utiliser une télécommande pour allumer, éteindre et régler la lumière
et pour brancher le chauage en 2 positions.
Le système de pilotage est conforme aux normes IP43. Pour utilisation en plein air (IP65),
il est impératif de commander un kit d’étanchéité.
ATTENTION : La loi européenne nous interdit l’utilisation de commutateurs élec-
troniques individuels pour brancher et débrancher le chauage. Il vous faudra donc
installer un commutateur individuel pour assurer l’interruption totale du courant.
Ci-dessous les connexions du système de pilotage :
Le système de pilotage
6.2 Installation Dome avec tige de suspension
Ne prenez jamais le Dôme par le câble
d’alimentation. Les connexions internes pourrai-
rent se desserrer et, par consequent, rendre votre
dôme inutilisable.
La tige de suspension (2) est faite sur mesure,
à base de la distance entre le sol et le plafond
que nous vous demandons lors de votre com-
mande. Sortez-la de la boîte et passez-y le câble
d’alimentation du Dôme (1). Vissez la tige sur le
Dôme tout en tenant le câble.
Glissez l’anneau (4) et le couvercle (5) par-dessus
la tige.
Vissez la plaque plafonnière (6) à l’aide de 4 vis (7).
Vissez les deux écrous (8 et 9) sur la tige, tout en
laissant environ 10 mm entre les deux. Soulevez
l’ensemble du Dôme et placez-le dans l’ouverture
du support, de sorte que le premier écrou est situé
en haut et le second en dessous.
2
13
4
5
6
7
9
8 10
Enn, serrez bien fort les deux écrous.
(8&9)
Connexion électrique:
Connectez le câble du Dome dans le
domino électrique (11). Accordez les
couleurs aux ls qui sont déjà montés
dans le domino. Pour nir, branchez
l’alimentation au plus petit domino (12).
11
12
Other manuals for DOME
4
Table of contents
Languages:
Other Heatsail Heater manuals


Popular Heater manuals by other brands

Bionaire
Bionaire BFH3342 Series Instruction leaflet

Thermo
Thermo EVN -NAVARE Assembly instructions

BN Thermic
BN Thermic CH2-30L instructions

Sherwood Industries
Sherwood Industries Enviro M55-FS-2 manual

azalp
azalp KUBIC COMBI KKV50SE Instructions for installation and use

Waters
Waters ACQUITY Arc System Overview and maintenance guide


