hecht 9161 Service manual
CZ – Gratulujeme Vám
k nákupu výrobku
značky HECHT. Před
prvním uvedením
do provozu si prosím
pozorně přečtěte tento
návod k obsluze!
SK – Gratulujeme Vám
k nákupu výrobku značky
HECHT. Pred prvým uvedením
do prevádzky si prosím
pozorne prečítajte návod na
obsluhu!
GB – Congratulations
on your purchase of the
product brand HECHT. Before
the first operation, please
read the owner‘s manual
carefully!
PL –
Gratulujemy
zakupu produktu marki
HECHT. Przed pierwszym
użyciem należy dokładnie
przeczytać instrukcję
obsługi!
PÙVODNÍ NÁVOD K POUŽITÍ: SNÌHOVÁ FRÉZA
PÔVODNÝ NÁVOD NA POUŽITIE: SNEHOVÁ FRÉZA
ORIGINAL INSTRUCTIONS FOR USE:
SNOW THROWER
INSTRUKCJA
U¯YTKOWANIA:
ODSNIE¯ARKA

2 / 52
GB
PL
CZ
SK
CZ Tento návod obsahuje důležité informace o bezpečnosti, montáži, provozu, údržbě,
uskladnění a řešení případných problémů, proto jej dobře uschovejte pro možnost
vyhledání informací v budoucnu a pro další uživatele. Vzhledem k stálému vývoji a přizpůsobování
nejnovějším náročným normám EU mohou být na výrobcích prováděny technické a optické
změny bez předchozího upozornění. Fotografie použité v manuálu jsou pouze ilustrační a nemusí
se přesně shodovat s dodaným výrobkem. Nelze uplatňovat jakékoli právní nároky související
s tímto návodem k obsluze. V případě nejasností kontaktujte dovozce nebo prodejce.
SK Tento návod obsahuje dôležité informácie o bezpečnosti, montáži, prevádzke, údržbe,
uskladnení a riešení prípadných problémov preto ho dobre uschovajte pre možnosť
vyhľadania informácií v budúcnosti a pre ďalších užívateľov. Vzhľadom k stálemu technickému
vývoju a prispôsobovaniu najnovším náročným normám EÚ môžu byť robené technické a optické
zmeny bez predchádzajúceho upozornenia. Fotografie použité v manuáli sú len ilustračné
a nemusia sa presne zhodovať s dodaným výrobkom. Nie je možné uplatňovať akékoľvek právne
nároky súvisiace s týmto návodom k obsluhe. V prípade nejasností kontaktujte dovozcu alebo
predajcu.
GB This manual contains important information about safety, installation, operation,
maintenance, storage, and troubleshooting. The instructions in a safe place to be able to
find information in the future or for other users. Given the constant technological development
and adaptation to the latest exacting standards of the EU technical and design changes may be
carried out without prior notice. Photographs are for illustrative purposes only, and may not
exactly match the product itself. It is not possible to exercise any legal claims associated with this
operator’s manual. In case of doubt, contact the importer or retailer.
PL Niniejsza instrukcja obsługi zawiera ważne informacje dotyczące bezpieczeństwa, monta-
żu, eksploatacji, konserwacji i przechowywania, rozwiązania ewentualnych problemów,
dlatego należy ją dobrze zachować, dla możliwość odszukania potrzebnych informacji w przys-
złości oraz dla innych użytkowników. W związku z ciągłym rozwojem i dostosowaniem według
najnowszych standardów wymogów UE na produktach mogą być przeprowadzane zmiany
techniczne i optycznych bez uprzedzenia. Fotografie wykorzystane w instrukcji mają charakter
poglądowy i nie muszą się dokładnie zgadzać z dostarczonym produktem. Dlatego nie można
wznosić jakichkolwiek roszczeń związanych z niniejszą instrukcją obsługi. W razie wątpliwości
skontaktuj się ze sprzedawcą lub importerem.

3 / 52
GB
PL
CZ
SK
ČESKY
POPIS ČÁSTÍ ..............................................................................................................................................4
OBRAZOVÁ PŘÍLOHA ................................................................................................................................5
BEZPEČNOSTNÍ SYMBOLY ........................................................................................................................8
TECHNICKÉ ÚDAJE ..................................................................................................................................10
NÁVOD K POUŽITÍ ..................................................................................................................................11
ES PROHLÁŠENÍ O SHODĚ - HECHT 9161 ...............................................................................................47
ES PROHLÁŠENÍ O SHODĚ - HECHT 9162 ...............................................................................................49
POZNÁMKY .............................................................................................................................................51
SLOVENSKY
POPIS ČASTÍ ..............................................................................................................................................4
OBRAZOVÁ PRÍLOHA ................................................................................................................................5
BEZPEČNOSTNÉ SYMBOLY .......................................................................................................................8
TECHNICKÉ ÚDAJE ..................................................................................................................................10
NÁVOD NA POUŽITIE ..............................................................................................................................21
ES VYHLÁSENIE O ZHODE - HECHT 9161 ...............................................................................................47
ES VYHLÁSENIE O ZHODE - HECHT 9162 ...............................................................................................49
POZNÁMKY .............................................................................................................................................51
ENGLISH
PARTS DESCRIPTION .................................................................................................................................4
ILLUSTRATED GUIDE .................................................................................................................................5
SYMBOLS MARKED ON THE PRODUCT ...................................................................................................8
TECHNICAL DATA ....................................................................................................................................10
INSTRUCTIONS FOR USE .........................................................................................................................30
EC DECLARATION OF CONFORMITY - HECHT 9161 ...............................................................................47
EC DECLARATION OF CONFORMITY - HECHT 9162 ...............................................................................49
NOTES .....................................................................................................................................................51
POLSKI
OPIS CZĘŚCI .........................................................................................................................................................4
ZDJĘCIE ZAŁĄCZNIK ...........................................................................................................................................5
ZNAKI BEZPIECZEŃSTWA ..................................................................................................................................8
DANE TECHNICZNE ...........................................................................................................................................10
INSTRUKCJA OBSŁUGI ......................................................................................................................................39
DEKLARACJA ZGODNOŚCI WE - HECHT 9161 ..............................................................................................47
DEKLARACJA ZGODNOŚCI WE - HECHT 9162 ..............................................................................................49
UWAGI ................................................................................................................................................................51
4 / 52
GB
PL
CZ
SK
11
2
3
4
5
6
7
8
9
10 11
12
14
13
15
16
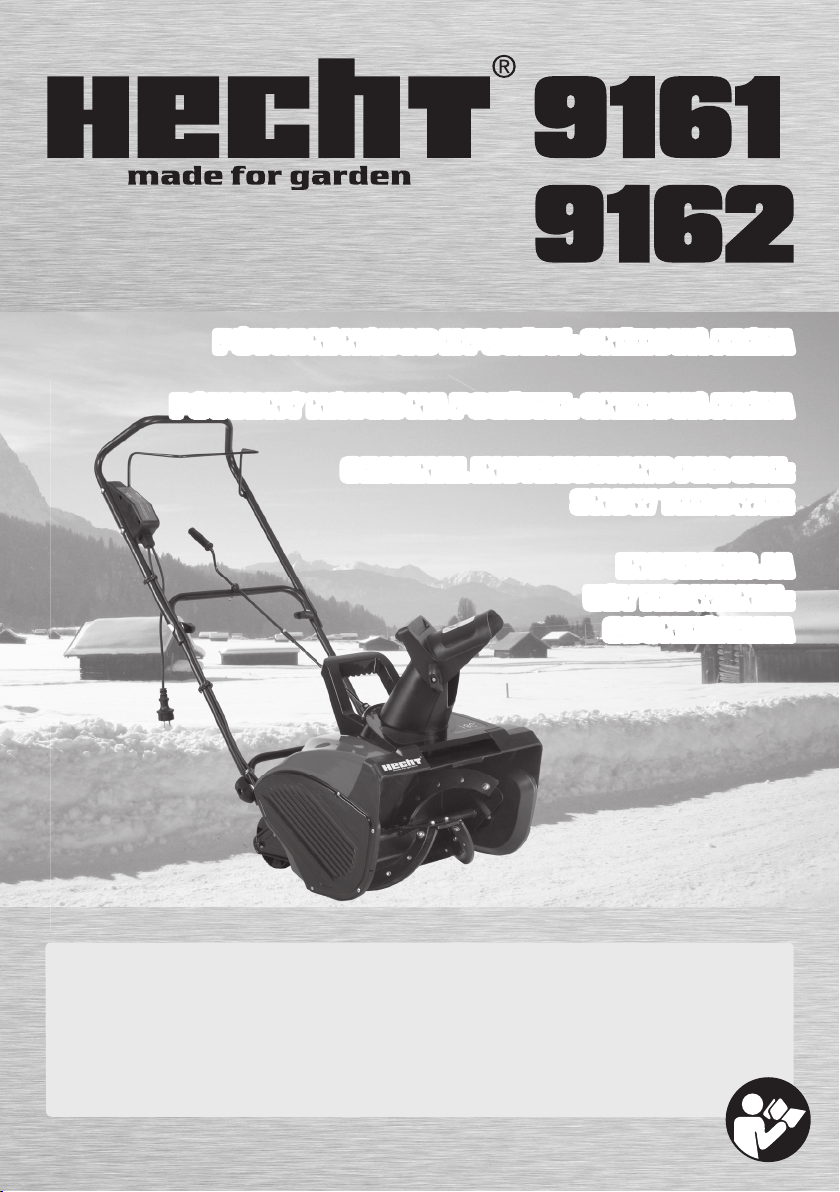
1. Horní díl rukojeti Horný diel rukoväti Upper frame Górna część uchwytu
2. Madlo spínače - vypínače Madlo spínača - vypínača Handle bar Uchwyt przełącznika -
wyłącznika
3. Klika výhozového komínu Kľučka vyhadzovacieho
komína
Upper chute crank Uchwyt komina wyrzuto-
wego
4. Šroub rukojeti Skrutka rukoväti Joint fixing T-bolt and
knob
Pokrętło uchwytu
5. Dolní část kliky výhozové-
ho komínu
Dolná časť kľučky vyhad-
zovacieho komína
Lower chute crank Dolna część uchwytu
komina wyrzutowego
6. Madlo Madlo Handle Uchwyt
7. Prostřední díl rukojeti Prostredný diel rukoväti Middle frame Środkowa część uchwytu
8. Horní kryt Horní kryt Top cover Pokrywa górna
9. Boční kryt Bočný kryt Side cover Pokrywa boczna
10. Kola Kolesá Wheels Koła
11. Šnek Šnek Auger Ślimak
OPIS CZĘśCIPArtS DESCrIPtIONPOPIS ČAStÍPOPIS ČÁStÍPOPIS ČÁStÍ / POPIS ČAStÍ / PArtS DESCrIPtION / OPIS
CZĘśCI
5 / 52
GB
PL
CZ
SK
12. Výhozový komín Vyhadzovací komín Discharge chute Komin wyrzutowy
13. Šroub nastavení vzdále-
nosti výhozu
Skrutka nastavenia vzdia-
lenosti vyhadzovania
Chute deflector knobs Pokrętło ustawiania odle-
głości wyrzutu
14. Horní výhoz Horné vyhadzovanie Chute deflector Górny wyrzut
15. Bezpečnostní klíč Bezpečnostný kľúč Switch key Klucz zabezpieczający
16. Pojistka spínače Poistka spínača Press Button Wyłączniki bezpieczeńst-
wa
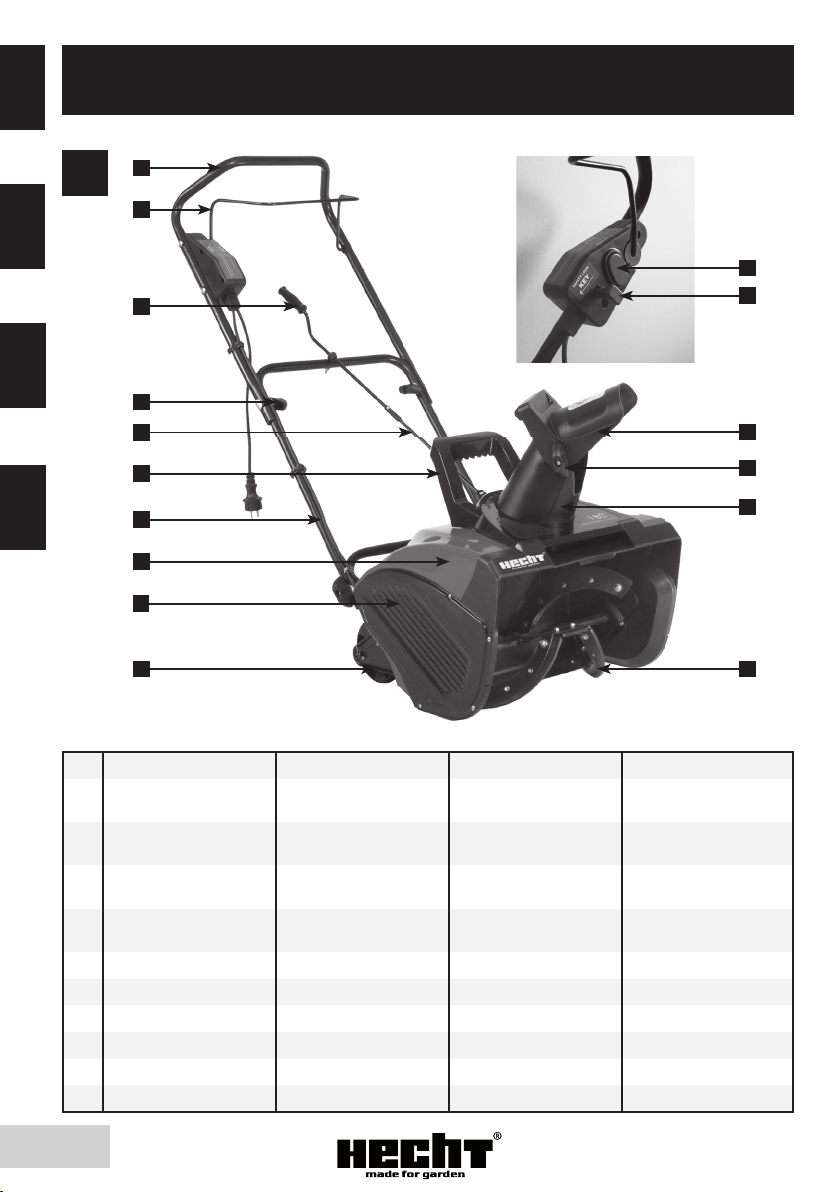
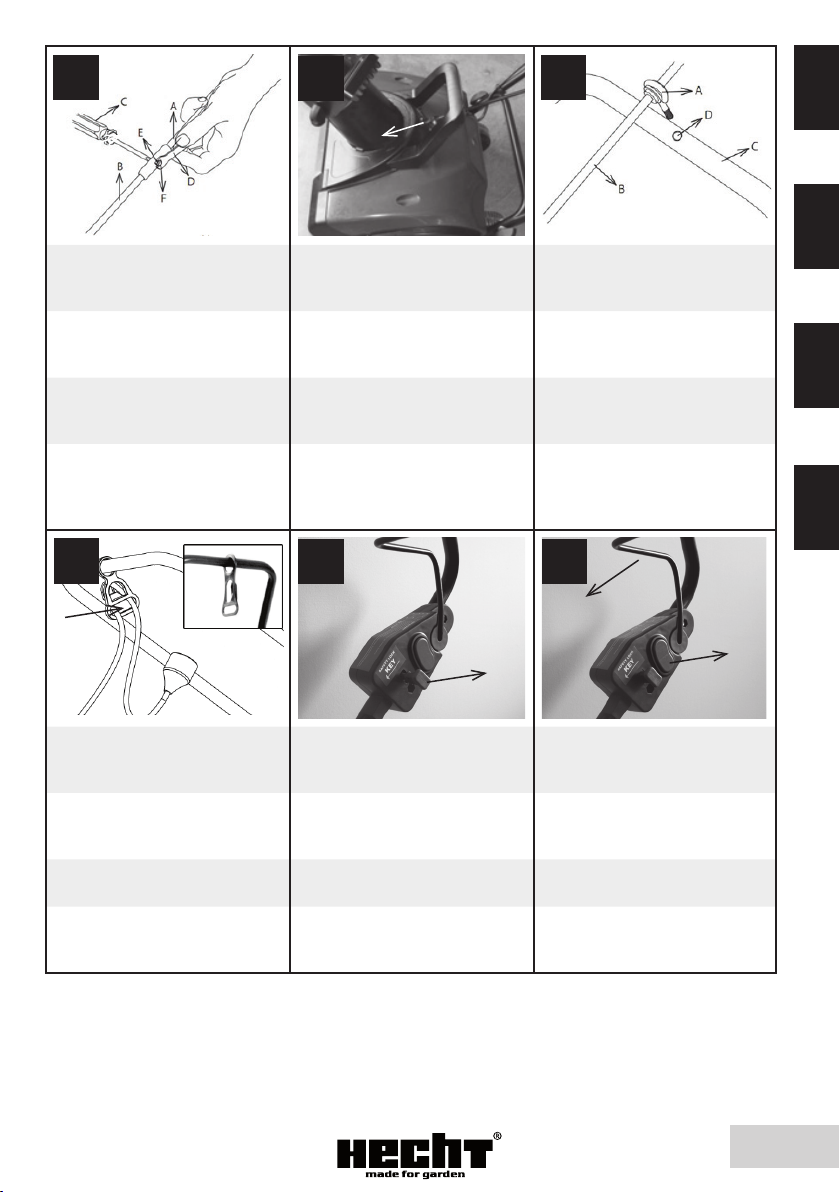
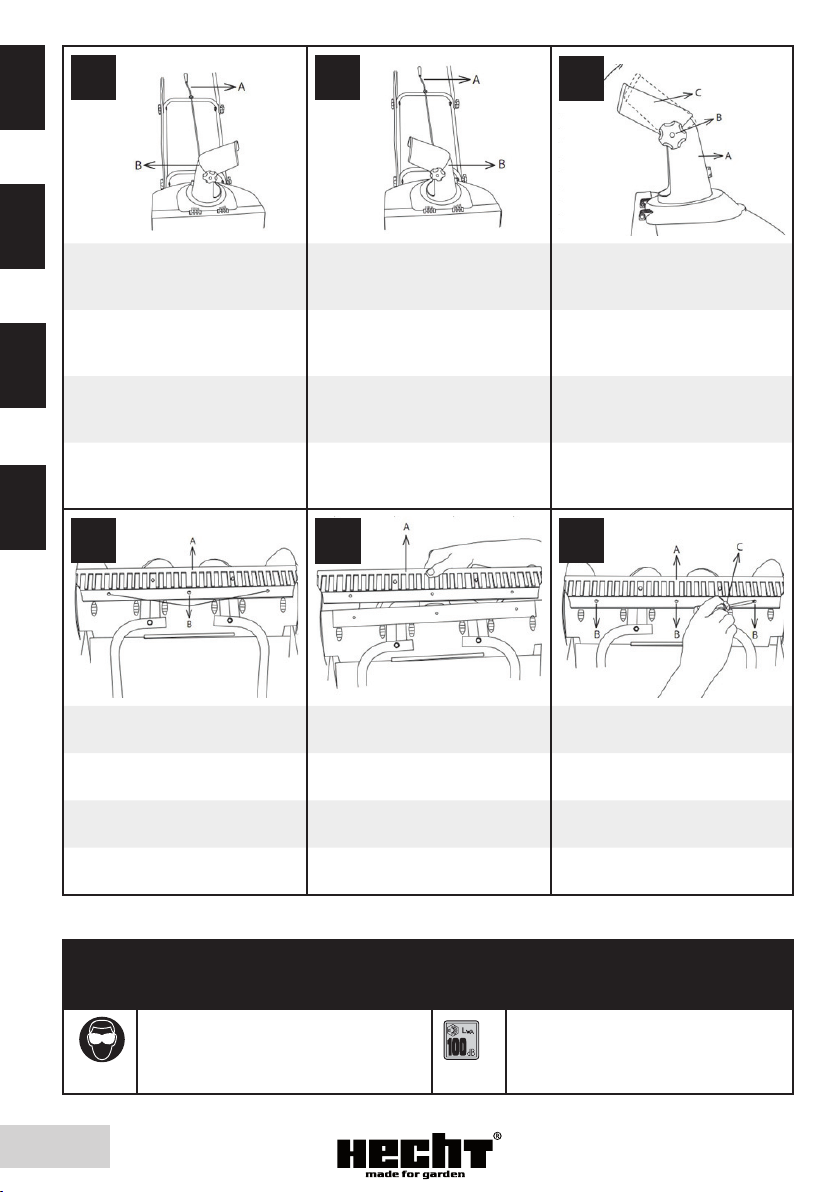
234
A=Horní díl rukojeti, B=Prostřední
díl rukojeti, C=Spodní díl rukojeti
A=Prostřední díl rukojeti,
B=Spodní díl rukojeti
A=Spojovací šroub, B=Podložka
A=Horný diel rukoväti,
B=Prostredný diel rukoväti,
C=Spodný diel rukoväti
A=Prostredný diel rukoväti,
B=Spodný diel rukoväti
A=Spojovacia skrutka,
B=Podložka
A=Upper frame, B=Middle frame,
C=Lower frame
A=Middle frame, B=Lower frame A=Joint fixing T-bolt, B=Washers
A=Górna część uchwytu,
B=Środkowa część uchwytu,
C=Dolna część uchwytu
A=Środkowa część uchwytu,
B=Dolna część uchwytu
A=Śruba łącząca, B=Podkładka
567
A=Matice spojovacího šroubu,
B=Podložka
A=Horní díl rukojeti, B=Prostřední
díl rukojeti
A=Spojovací šroub, B=Podložka
A=Matica spojovacej skrutky,
B=Podložka
A=Horný diel rukoväti,
B=Prostredný diel rukoväti
A=Spojovacia skrutka,
B=Podložka
A=Joint fixing knob, B=Washers A=Upper frame, B=Middle frame A=Joint fixing T-bolt, B=Washers
A=Pokrętło śruby łączącej,
B=Podkładka
A=Górna część uchwytu,
B=Środkowa część uchwytu
A=Śruba łącząca, B=Podkładka
ZDJĘCIE ZAŁĄCZNIKILLuStrAtED GuIDEOBrAZOVÁ PrÍLOHAOBrAZOVÁ PŘÍLOHAOBrAZOVÁ PŘÍLOHA / OBrAZOVÁ PrÍLOHA / ILLuStrAtED
GuIDE / ZDJĘCIE ZAŁĄCZNIK
6 / 52
GB
PL
CZ
SK
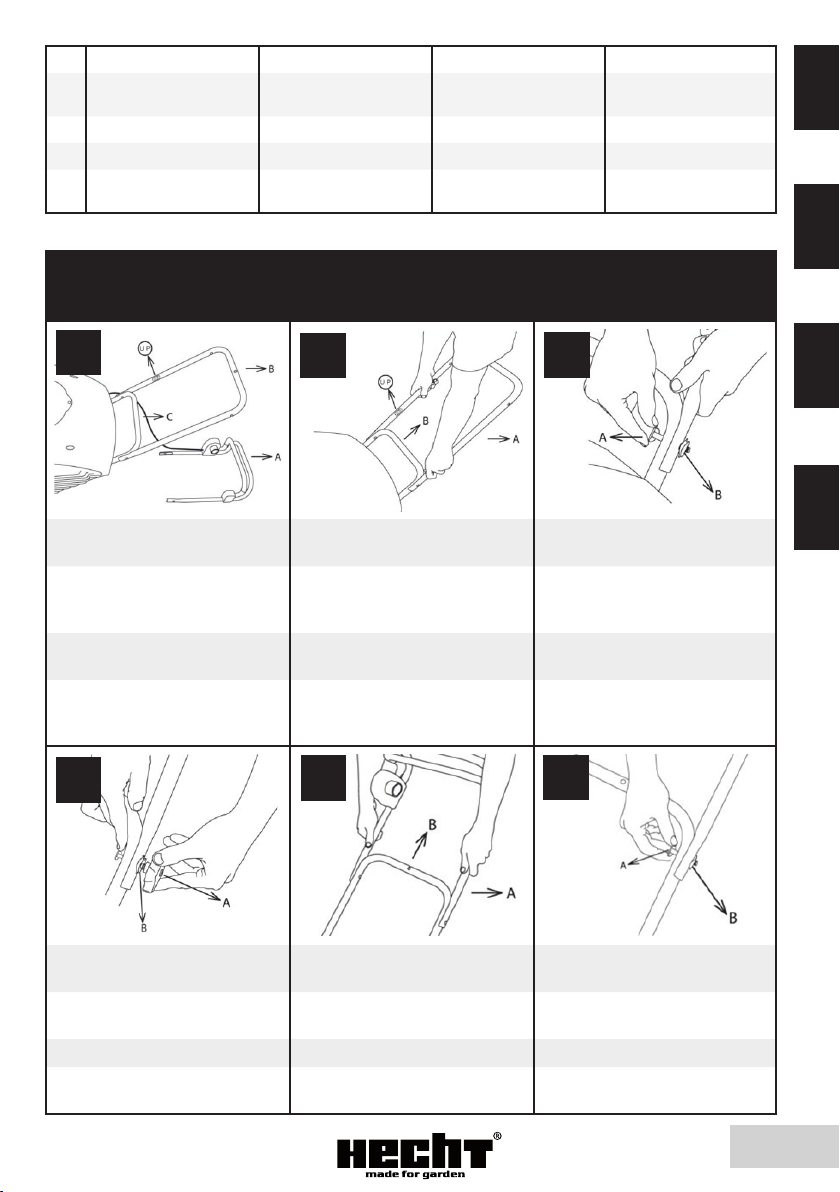
8910
A
B
C
A=Matice spojovacího šroubu,
B=Podložka
A=Kabelová svorka A=Horní výhoz, B=Výhozový
komín, C=Šroub nastavení dálky
výhozu
A=Matica spojovacej skrutky,
B=Podložka
A=Káblová svorka
A=Horné vyhadzovanie,
B=Vyhadzovací komín, C=Skrutka
nastavenia diaľky vyhadzovania
A=Joint fixing knob, B=Washers A=Cable clip A=Chute deflector, B=Discharge
chute, C=Chute deflector knob
A=Pokrętło śruby łączącej,
B=Podkładka
A=Zacisk na przewód A=Górny wyrzut, B=Komin
wyrzutowy, C=Śruba
nastawienia odległości
wyrzutu
11
A
12 13
A=Horní výhoz A=Klika výhozového komínu,
B=Oko šroubu, C=Šroub,
D=Matice
A=Klika výhozového komínu,
B=Spodní díl kliky výhozového
komínu, C=Šroub
A=Horné vyhadzovanie A=Klika výhozového komína,
B=Oko skrutky, C=Skrutka,
D=Matica
A=Klika výhozového komína,
B=Spodný diel kliky výhozového
komína, C=Skrutka
A=Chute deflector A=Upper chute crank, B=Eye bolt
with rubber grommet, C=Screw,
D=Nut
A=Upper chute crank, B=Lower
chute crank, C=Screw
A=Górny wyrzut A=Uchwyt komina wyrzutowego,
B=Śruba z oczkiem, C=Śruba,
D=Nakrętka
A=Uchwyt komina wyrzutowego,
B=Dolna część uchwytu komina
wyrzutowego, C=Śruba
7 / 52
GB
PL
CZ
SK
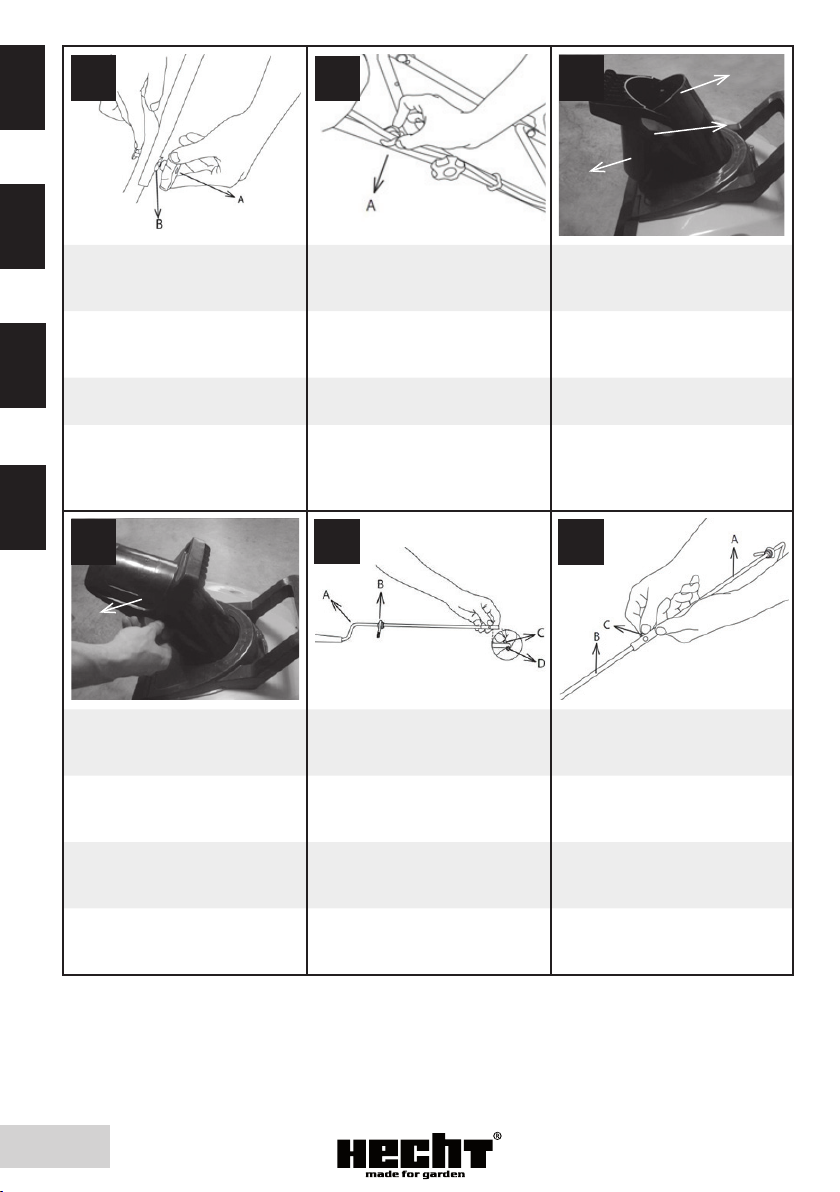
14 15
A
16
A=Horní díl kliky, B=Spodní
díl kliky, C=Šroubovák, D=Klíč,
E=Matice, F=Šroub
A=Nasaďte kliku výhozového
komínu do základny
A=Oko šroubu, B=Klika
výhozového komínu, C=Střední
díl rukojeti, D=Středový otvor
A=Horný diel kliky, B=Spodný
diel kliky, C=Skrutkovač, D=Kľúč,
E=Matica, F=Skrutka
A=Nasaďte kliku výhozového
komína do základne
A=Oko skrutky, B=Klika
výhozového komína, C=Stredný
diel rukoväti, D=Stredový otvor
A=Upper chute crank, B=Lower
chute crank, C=Screwdriver,
D=Wrench, E=Nut, F=Screw
A=Slide into chute base hole A= Eye bolt with rubber
grommet, B=Upper chute crank,
C=Middle frame, D=Center hole
A=Górna część uchwytu,
B=Uchwyt dolny, C=Wkrętak,
D=Klucz, E=Nakrętka, F=Śruba
A=Umieść uchwyt do podstawy
komina wyrzutowego
A=Śruba z oczkiem, B=Uchwyt
komina wyrzutowego,
C=Środkowa część uchwytu,
D=Otwór centralny
17
A
18
A
19
A
B
A=Odlehčení tahu kabelu A=Zasuňte bezpečnostní klíč A=Stiskněte pojistku spínače,
B=Druhou rukou přitáhněte za
madlo směrem k rukojeti
A=Odľahčenie ťahu kábla A=Zasuňte bezpečnostný kľúč A=Stlačte poistku spínača,
B=Druhou rukou pritiahnite za
držadlo smerom k rukoväti
A=secure the extension cable
with the cable grip
A=Insert the ignition key A=Press the switch button,
B=Pull the handle bar backward
A=Zawieszka na przewód A=Włożyć klucz bezpieczeństwa A=Naciśnij przełącznik, B=Drugą
ręką należy pociągnąć za uchwyt
w kierunku rękojeści
8 / 52
GB
PL
CZ
SK
ZNAKI BEZPIECZEŃStWA SYMBOLS MArKED ON tHE PrODuCtBEZPEČNOStNÉ SYMBOLYBEZPEČNOStNÍ SYMBOLY
BEZPEČNOStNÍ SYMBOLY / BEZPEČNOStNÉ SYMBOLY / SYMBOLS
MArKED ON tHE PrODuCt / ZNAKI BEZPIECZEŃStWA
1. 2. 3. 4. 5. 6. 7. 8. 9. 10.
11. 12.
21. 22. 23.
13. 14. 15. 16. 17. 18. 19. 20.
Používejte ochranu očí!
Používajte ochranu očí!
Use eye protection.
Nosić okulary ochronne!
1. 2. 3. 4. 5. 6. 7. 8. 9. 10.
11. 12.
21. 22. 23.
13. 14. 15. 16. 17. 18. 19. 20.
Údaj o hladině hluku Lwa v dB.
Údaj o hladine akustického výkonu Lwa v dB.
LWA Data Lwa noise level in dB.
Wskazanie LWA poziom hałasu w dB.
20 21 22
A=Klika výhozového komínu,
B=Výhozový komín
A=Klika výhozového komínu,
B=Výhozový komín
A=Výhozový komín, B=Šroub
nastavení vzdálenosti výhozu,
C=Horní výhoz
A=Klika výhozového komína,
B=Výhozový komín
A=Klika výhozového komína,
B=Výhozový komín
A=Výhozový komín, B=Skrutka
nastavenie vzdialenosti vyhadzovaní,
C=Horné vyhadzovanie
A=Chute crank, B=Discharge
chute
A=Chute crank, B=Discharge
chute
A=Discharge chute, B=Chute
deflector knob, C=Chute
deflector
A=Uchwyt komina wyrzutowego,
B=Komin wyrzutowy
A=Uchwyt komina wyrzutowego,
B=Komin wyrzutowy
A=Komin wyrzutowy,
B=Śruba nastawiania komina
wyrzutowego, C=Górny wyrzut
23 24 25
A=Škrabka, B=Šroub A=Sejmutí škrabky A=Škrabka, B=Šroub,
C=Šroubovák
A=Škrabka, B=Skrutka A=Odobratie škrabky A=Škrabka, B=Skrutka,
C=Skrutkovač
A=Scraper, B=Screw A=Scraper removal A=Scraper, B=Screw,
C=Screwdriver
A=Skrobak, B=Śruba A=Zdejmowanie skrobaka A=Skrobak, B=Śruba,
C=Śrubokręt

9 / 52
GB
PL
CZ
SK
1. 2. 3. 4. 5. 6. 7. 8. 9. 10.
11. 12.
21. 22. 23.
13. 14. 15. 16. 17. 18. 19. 20.
Následující varovné symboly připomínají
preventivní bezpečnostní zásady, které
je nutno při provozu frézy dodržovat.
Nasledujúce varovné symboly pripomínajú
preventívne bezpečnostné zásady, ktoré je
nutne pri prevádzke frézy dodržovať.
The following warning symbols are to remind
you of the safety precautions you should take
when operating the snow thrower.
Następujące symbole ostrzegawcze
przypominają zasady ostrożności, których
należy przestrzegać podczas pracy z
odśnieżarką.
1. 2. 3. 4. 5. 6. 7. 8. 9. 10.
11. 12.
21. 22. 23.
13. 14. 15. 16. 17. 18. 19. 20.
Udržujte nohy v bezpečné vzdálenosti od
pohybujících se částí stroje. Pohybující se
části Vás mohou zranit.
Udržujte nohy v bezpečnej vzdialenosti od
pohybujúcich sa častí stroja. Pohybujúce sa
časti Vás môžu zraniť.
Keep foot way from the moving parts of the
snow thrower. The rotating parts will hurt
you.
Trzymaj nogi z dala od części ruchomych.
Ruchome części mogą spowodować
obrażenia.
1. 2. 3. 4. 5. 6. 7. 8. 9. 10.
11. 12.
21. 22. 23.
13. 14. 15. 16. 17. 18. 19. 20.
Čtěte návod na použití.
Čítajte návod na obsluhu.
Read the manual instruction manual.
Zapoznaj się z instrukcją obsługi.
1. 2. 3. 4. 5. 6. 7. 8. 9. 10.
11. 12.
21. 22. 23.
13. 14. 15. 16. 17. 18. 19. 20.
Pohybující se části Vás mohou zranit!
Pohybujúce sa časti Vás môžu zraniť!
The rotating parts will hurt you!
Ruchome części mogą cię zranić!
1. 2. 3. 4. 5. 6. 7. 8. 9. 10.
11. 12.
21. 22. 23.
13. 14. 15. 16. 17. 18. 19. 20.
Pozor! Nebezpečné napětí!
Pozor! Nebezpečné napätie!
Attention! Dangerous voltage!
Uwaga! Niebezpieczne napięcie!
1. 2. 3. 4. 5. 6. 7. 8. 9. 10.
11. 12.
21. 22. 23.
13. 14. 15. 16. 17. 18. 19. 20.
Stroj má ochrannou el. izolaci.
Stroj má ochrannú el. izoláciu.
The machine has a protective isolation.
Urządzenie posiada ochronną izolację
elektryczną .
1. 2. 3. 4. 5. 6. 7. 8. 9. 10.
11. 12.
21. 22. 23.
13. 14. 15. 16. 17. 18. 19. 20.
Držte se stranou pracovní plochy. Odletující
sníh Vás může poranit.
Držte sa stranou od pracovnej plochy.
Odletujúci sneh Vás môže poraniť.
Always keep away from the working area. The
throwing snow may hurt you.
Trzymać się po stronie pulpitu. Odrzucany
śnieg może spowodować obrażenia.
1. 2. 3. 4. 5. 6. 7. 8. 9. 10.
11. 12.
21. 22. 23.
13. 14. 15. 16. 17. 18. 19. 20.
Udržujte napájecí přívod mimo pracovní
dosah stroje.
Udržujte napájací prívod mimo pracovný
dosah stroje.
Keep the power cord from the machine
working area.
Trzymaj przewód zasilający z dala od części
ruchomych urządzenia.
1. 2. 3. 4. 5. 6. 7. 8. 9. 10.
11. 12.
21. 22. 23.
13. 14. 15. 16. 17. 18. 19. 20.
Výrobek odpovídá příslušným standartům EU.
Výrobok zodpovedá príslušným štandardom
EU.
Product conforms to relevant EU standards.
Produkt jest zgodny z normami UE.
1. 2. 3. 4. 5. 6. 7. 8. 9. 10.
11. 12.
21. 22. 23.
13. 14. 15. 16. 17. 18. 19. 20.
Přístroje nepatří do domovního odpadu.
Elektrické prístroje nepatria do domového
odpadu.
Electrical appliances are not household
waste.
Urządzenie nie jest odpadem komunalnym.
1. 2. 3. 4. 5. 6. 7. 8. 9. 10.
11. 12.
21. 22. 23.
13. 14. 15. 16. 17. 18. 19. 20.
Udržujte osoby a domácí zvířata v bezpečné
vzdálenosti.
Udržujte osoby a domáce zvieratá v bezpečnej
vzdialenosti.
Keep other people and domestic animals at
a safe distance.
Trzymaj ludzi i zwierzęta w bezpiecznej
odległości.
1. 2. 3. 4. 5. 6. 7. 8. 9. 10.
11. 12.
21. 22. 23.
13. 14. 15. 16. 17. 18. 19. 20.
POZOR: před započetím údržby zkontrolujte,
zda se již pohyblivé ústrojí stroje přestalo
otáčet!
POZOR: pred začatím údržby skontrolujte,
či sa pohyblivé ústrojenstvo stroja prestalo
otáčať!
CAUTION: Before beginning the
maintenance check is already moving
mechanism of the machine stop spinning.
OSTRZEŻENIE: Przed rozpoczęciem prac
konserwacyjnych, sprawdź czy wszystkie
ruchome części urządzenia zatrzymały się!
1. 2. 3. 4. 5. 6. 7. 8. 9. 10.
11. 12.
21. 22. 23.
13. 14. 15. 16. 17. 18. 19. 20.
Připojení na elektrickou síť.
Pripojenie na el. sieť.
Connecting to the mains.
Podłączenie do sieci elektrycznej.
1. 2. 3. 4. 5. 6. 7. 8. 9. 10.
11. 12.
21. 22. 23.
13. 14. 15. 16. 17. 18. 19. 20.
Příkon motoru.
Príkon motora.
Motor power input.
Moc Silnika
1. 2. 3. 4. 5. 6. 7. 8. 9. 10.
11. 12.
21. 22. 23.
13. 14. 15. 16. 17. 18. 19. 20.
Pracovní záběr.
Pracovný záber.
Working Width
Szerokość robocza.
1. 2. 3. 4. 5. 6. 7. 8. 9. 10.
11. 12.
21. 22. 23.
13. 14. 15. 16. 17. 18. 19. 20.
Váha.
Váha.
Weight.
Waga.
10 / 52
GB
PL
CZ
SK
DANE tECHNICZNEtECHNICAL DAtAtECHNICKÉ úDAJEtECHNICKÉ úDAJEtECHNICKÉ úDAJE / tECHNICKÉ úDAJE / tECHNICAL DAtA /
DANE tECHNICZNE
1. 2. 3. 4. 5. 6. 7. 8. 9. 10.
11. 12.
21. 22. 23.
13. 14. 15. 16. 17. 18. 19. 20.
Uchovávejte kabel v dostatečné vzdálenosti
od zdrojů tepla, oleje, rozpouštědel a ostrých
hran. Pokud dojde k poškození nebo zamotání
kabelu, okamžitě ho odpojte od elektrické sítě.
Uchovávajte kábel v dostatočnej vzdialenosti
od zdrojov tepla, oleja, rozpúšťadiel a ostrých
hrán. Pokiaľ dôjde k poškodeniu alebo
zamotaniu kábla, okamžite ho odpojte od
elektrickej siete.
Always keep the cable away from the heat
sources, oils or sharp edges. Remove plug
from the mains immediately if cable is
damaged or entangled.
Trzymaj przewód z dala od źródła ciepła,
oleju, rozpuszczalników i ostrych krawędzi.
Jeżeli dojdzie do uszkodzenia lub splątania
przewodu, należy natychmiast odłączyć
zasilanie.
1. 2. 3. 4. 5. 6. 7. 8. 9. 10.
11. 12.
21. 22. 23.
13. 14. 15. 16. 17. 18. 19. 20.
Přístroj vždy odpojte od elektrické sítě před
čištěním, kontrolou, opravou, pokud je
poškozený, nebo pokud se elektrický kabel
zamotá.
Prístroj vždy odpojte od elektrickej siete
pred čistením, kontrolou, opravou, pokiaľ je
poškodený, alebo pokiaľ sa elektrický kábel
zamotá.
Always disconnect the machine from the
power mains before cleaning inspecting,
repairing or when it is damaged or tangled.
Urządzenie należy zawsze odłączyć
od zasilania przed przystąpieniem do
czyszczenia, kontroli, naprawy, jeśli jest
uszkodzony lub splątany przewód zasilający.
1. 2. 3. 4. 5. 6. 7. 8. 9. 10.
11. 12.
21. 22. 23.
13. 14. 15. 16. 17. 18. 19. 20.
Udržujte ruce v bezpečné vzdálenosti od
pohybujících se částí stroje.
Udržujte ruky v bezpečnej vzdialenosti od
pohybujúcich sa častí stroja.
Keep hands away from the moving parts of
the snow thrower.
Trzymaj ręce z dala od części ruchomych.
1. 2. 3. 4. 5. 6. 7. 8. 9. 10.
11. 12.
21. 22. 23.
13. 14. 15. 16. 17. 18. 19. 20.
Nepoužívejte tento přístroj v dešti, ani
nenechávejte venku, pokud prší.
Nepoužívajte tento prístroj v daždi, ani
nenechávajte vonku, pokiaľ prší.
Do not use this product in the rain or leave
outdoors while it is raining.
Nie używaj ani nie pozostawiaj tego
urządzenia na deszczu.
1. 2. 3. 4. 5. 6. 7. 8. 9. 10.
11. 12.
21. 22. 23.
13. 14. 15. 16. 17. 18. 19. 20.
POZOR: rotující části!
POZOR: rotujúce časti!
CAUTION: a rotating parts!
OSTRZEŻENIE: wirujące części!
Napětí
Napätie
Rated Voltage
Napięcie
230 V ˜ 50 Hz Výška záběru
Výška záberu
Intake height
Wysokość wlotu
cca 23 cm
Příkon
Príkon
Input Power
Moc
1600 W Pracovní šířka záběru
Pracovná šírka záberu
Working width
Szerokość robocza
cca 40 cm
Kapacita odhazování
Kapacita odhadzovania
Plowing Capacity
Powierzchnia
odśnieżania
max. 200 m2/hod.
max. 200 m2/hod.
max. 200 m2/hour
max. 200 m2/godz.
Celková šířka záběru
Celková šírka záberu
Overall frame width
Szerokość ramy
cca 45 cm
Otáčky šneku
Otáčky závitovky
Screw speed
Wkręcić prędkości
2100 ot./min.
2100 ot./min.
2100 rev./min.
2100 obr./min.
Hmotnost
Hmotnosť
Weight
Waga
14,2 kg

30 / 52
GB
INStruCtIONS FOr uSE
Read all instructions before using this product. The instructions in a safe place to be
able to find information in the future or for other users. Please familiarize yourself
with the following information to prevent damage to your machine and injury to the
operator, property damage, or death.
i WARNING! This machine is not intended for use by persons (including children)
with reduced physical, sensory or mental capabilities, or lack of experience and
knowledge, unless they have been given supervision or instruction concerning
use of the machine by a person responsible for their safety.
Notes on types of warnings in the manual:
i WARNING! This mark indicates instructions which must be followed in order to
prevent accidents which could lead to serious bodily injury or death and / or it
leads to mechanical failure, breakdown, or damage.
J NOTE This mark indicates hints of directions useful in the use of the product.
CONtENt
SPECIFIED CONDITIONS OF USE ............................................................................................ 31
SAFETY INSTRUCTIONS .......................................................................................................... 31
Work area ........................................................................................................................................... 31
Electrical safety ................................................................................................................................... 31
Personal safety .................................................................................................................................... 31
Power tools use and care .................................................................................................................... 32
Service ................................................................................................................................................ 32
Additional safety rules for snow thrower ............................................................................................. 32
ASSEMBLY .............................................................................................................................. 34
Upper, middle and lower frame assembly ............................................................................................ 34
Discharge chute and chute crank assembly .......................................................................................... 35
OPERATION............................................................................................................................. 35
How to use a snow blower.................................................................................................................. 35
Extension Cable .................................................................................................................................. 35
Powering ON and OFF ......................................................................................................................... 35
Changing snow exit direction .............................................................................................................. 36
MAINTENANCE ...................................................................................................................... 36
Replacing the scraper .......................................................................................................................... 37
CLEANING .............................................................................................................................. 37
Cleaning the product .......................................................................................................................... 37
STORAGE AND TRANSPORT................................................................................................... 37
Transport ............................................................................................................................................ 37
TROUBLESHOOTING ............................................................................................................... 37
SERVICE AND SPARE PARTS .................................................................................................. 38
ENVIRONMENTAL PROTECTION ............................................................................................. 38
GUARANTEE OF THE MACHINE ............................................................................................. 38
KONSERWACJA ...................................................................................................................... 44

31 / 52
GB
SPECIFIED CONDItIONS OF uSE
This appliance is approved solely for use in accordance with description and safety
instructions specified in this user´s manual.
This device is intended for clearing an adequate layer of snow on a flat surface free of rocks and
similar obstacles. Any other use is not as intended. Improver use is not covered by the warranty
and the manufacturer will reject any liability. The user is liable for all damage caused to third
parties and their property. Unauthorized modifications made to mower rule out any liability on
the part of the manufacturer for damage resulting therefrom.
Please note that our equipment has not been designed for use in commercial, trade or industrial
applications. Our warranty will be voided if the machine is used in commercial, trade or industrial
businesses or for equivalent purposes.
J CAUTION Do not overload machine – use it only within the performance range it
was designed for.
SAFEtY INStruCtIONS
GENERAL SAFETY INSTRUCTIONS
i Warning: Read all instructions. Failure to follow all instructions listed below may
result in electric shock, fire and/or serious personal injury. The term “power tool”
in all of the warnings listed below refers to your mains-operated (corded) power
tool or battery-operated (cordless) power tool.
Save these instructions!
WOrK ArEA
a) Keep work area clean and well lit. Cluttered and dark areas invite accidents.
b) Do not operate power tools in explosive atmosphere, such as in the presence of flammable
liquids, gases, or dust. Power tools create sparks which may ignite the dust or fumes.
c) Keep children and bystanders away while operating a power tool. Distractions can cause you
to lose control.
ELECtrICAL SAFEtY
a) Power tool plugs must match the outlet. Never modify the plug in any way. Do not use any
adapter plugs with earthed (grounded) power tools. Unmodified plugs and matching outlets
will reduce risk of electric shock.
b) Avoid body contact with earthed or grounded surfaces such as pipes, radiators, ranges, and
refrigerators. There is an increased risk of electric shock if your body is earthed or grounded.
c) Do not expose power tools to rain or wet conditions. Water entering a power tool will increase
the risk of electric shock.
d) Do not abuse the cord. Never use the cord for carrying, pulling or unplugging the power tool.
Keep cord away from heat, oil, sharp edges or moving parts. Damaged or entangled cords
increase the risk of electric shock.
e) When operating a power tool outdoors, use an extension cord suitable for outdoor use. Use
of a cord suitable for outdoor use reduces the risk of electric shock. .
PErSONAL SAFEtY
a) Stay alert, watch what you are doing and use common sense when operating a power tool.

32 / 52
GB
Do not use a power tool while you are tired or under the influence of drugs, alcohol, or
medication. A moment of inattention while operating power tools may result in serious
personal injury.
b) Use safety equipment. Always wear eye protection. Safety equipment such as a dust mask,
non-skid safety shoes, hard hat, or hearing protection used for appropriate conditions will
reduce personal injuries.
c) Avoid accidental starting. Ensure the switch is in the off-position before plugging in. Carrying
power tools with your finger on the switch or plugging in power tools that have the switch
on invites accidents.
d) Remove any adjusting key or wrench before turning the tool on. A wrench or a key that is left
attached to a rotating part of the power tool may result in personal injury.
e) Do not overreach. Keep proper footing and balance at all times. This enables better control
of the power tool in unexpected situations.
f) Dress properly. Do not wear loose clothing or jewellery. Keep your hair, clothing, and gloves
away from moving parts. Loose clothes, jewellery or long hair can be caught in moving parts.
g) If devices are provided for the connection of dust extraction and collection facilities, ensure
that these are connected and properly used. Use of these devices can reduce dust-related
hazards.
POWEr tOOLS uSE AND CArE
a) Do not force the power tool. Use the correct power tool for your application. The correct
power tool will do the job better and safer at the rate from which it was designed.
b) Do not use the power tool if the switch does not turn it on and off. Any power tool that can
not be controlled with the switch is dangerous and must be repaired.
c) Disconnect the plug from the power source before making any adjustments, changing
accessories, or storing power tools. Such preventive safety measures reduce the risk of starting
the power tool accidentally.
d) Store idle power tools out of the reach of children and do not allow persons unfamiliar with
the power tool or these instructions to operate the power tool. Power tools are dangerous in
the hands of untrained users.
e) Maintain power tools. Check for misalignment or binding of moving parts, breakage of parts,
and any other conditions that may affect the power tools operation. If damaged, have the
power tool repaired before use. Many accidents are caused by poorly maintained power tools.
f) Keep cutting tools sharp and clean. Properly maintained cutting tools with sharp cutting edges
are less likely to bind and are easier to control.
g) Use the power tool, accessories and tool bits etc., in accordance with these instructions and
in the manner intended for the particular type of power tool, taking into account the working
conditions and the work to be performed. Use of the power tool for operations different from
intended could result in a hazardous situation.
SErVICE
a) Have your power tools serviced by a qualified repair person using only identical replacement
parts. This will ensure that the safety of the power tools in maintained.
ADDItIONAL SAFEtY ruLES FOr SNOW tHrOWEr
• Know your tool. Read owner’s manual carefully. Learn its applications and limitations as well as
the specific potential hazards related to this tool.
• Do not operate this unit when tired, ill or under the influence of alcohol, drugs, or medication.
• All guards and safety attachments must be installed properly before using the unit.
• Inspect the unit before use. Ensure the parts are installed correctly and secure.

33 / 52
GB
• Clear the area to be plowed before each use. Remove all objects such as rocks, broken glass,
nails, wire, or string which can be thrown or become entangled in this tool.
• Keep the are of operation clear of all persons, particularly children and animals.
• Avoid dangerous environment. Don’t use power tools in damp or wet locations or expose to
rain. Keep work area well lit.
• Keep work area clean. Cluttered areas and benches invite accidents.
• Be cautious to avoid electric shock. When using the machine keep your body away from
different ground terminal of power (e.g. upper and lower water pipes, outer frame of heating
equipment, microwave oven, or in a place that is locked.
• The machine should be stored carefully and safely in a dry environment when not used, far
from the reach of children, or in a place that is locked.
• Please do not use the machine in any purposes other than it is designed for, otherwise, it may
cause mechanical defaults or serious damage or injuries.
• Special care should be drawn to the following issues when using this machine: operation
methods, procedures, surroundings, and environment states, etc.
• When using this machine, the user should be cautious about the nearby status or changes: The
user should constantly observe the position and movement of other people, nearby window,
vehicles, obstacles, etc. Exercise caution to find any small piece of rocks or other articles in the
snow to avoid them from flying out and causing personal injury.
• In case of following conditions, please turn off the machine and pull out the power plug:
• When not used, being repaired, replaced of some parts, being cleaned and checked as well
as any other conditions in which dangerous factors exist. If cord is damaged in manner while
plugged in, pull extension cord from wall receptacle.
• Never carry snow thrower by cord yank it to disconnect from receptacle.
• Do not use hands to unclog chute. Stop motor before removing Debris. Do not walk in front
of running machine. Do not direct discharge at bystander.
• When using the machine the user must keep correct postures. Heels should be placed firmly
on the ground, while the hands hold the handles firmly.(Pic )
• Before using the machine, the user should have a careful inspection of the main machine.
Carefully check the different parts of the machine before starting, solving any problem
immediately. If you find any abnormal condition, please don’t use the machine before repairing.
• If you find the main power cable or the extension cable damaged, please pull out the plug from
the socket and disconnect the power immediately. Repair the cable for replace it if necessary.
When adding the lubricant or replacing any parts, you must strictly observe the instructions
and procedures described in this User Manual.
• Special care should be paid to any rubber parts, since these parts may increase the engine load
and decrease its mechanical power if damaged.
• When you examine, service clean the machine or replace parts, you must turn off the power
switch and disconnect the power cable. Any such operation should be performed after
revolving part inside the machine stops completely.
• The first time you use the machine or after replacing some parts, you should perform a test
running and ensure no abnormal conditions exist to avoid any potential damages or incidents.
• Do not move or transport the machine when the plug is connected into the power socket and
the switch is turned on.
• When using the machine you must respect local laws and regulations regarding noise control
and environment protection. To avoid any noise disturbance to other people, you should
carefully decide operation time and consider the surrounding conditions.
• When the machine is running, be cautious to prevent your hands, feet or head from moving
near to the revolving part or the snow exit of the machine.

34 / 52
GB
• In case you fall or collide with the machine, please check the main machine and parts for any
damages or cracks.
• When stepping backwards, be cautious about any obstacles beneath your feet or behind you
to avoid falling.
• When using the machine, if you notice the machine running in an unstable state or hear
abnormal sound from the engine, please stop the machine and disconnect the power
immediately and contact your original distributor.
• When operating the machine, while taking care of your safety, you should also be cautious to
avoid any harm to other people. Call nearby passengers’ attention to avoid potential personal
injury.
• Use for snow removal only.
• Please do not take back and store the machine while it is still connected to the power source.
It may cause damage and injury.
• Keep the plug clear from water.
• To prevent electric shock use only with an extension cord suitable for outdoor use.( Does not
apply to battery-operated Snow Thrower)
• Keep hands away from moving parts. Shut off engine before unclogging discharge chute.
• Dress properly. Do not wear loose clothing or jewellery. They can be caught in moving parts.
Rubber gloves and non-skid footwear are recommended when working outdoors. The user
should wear a protective helmet to avoid your hair from getting in contact with any revolving
part of the machine.
• Keep children and visitors away. Visitors should wear safety glasses and be kept a safe distance
from work area. Do not let visitors contact too or extension cord.
• Use right tool. Don’t force small tool or attachment to do the job of a heavy duty tool. Don’t
use tool for purpose not intended.
• Do not force unit. It will do the job better and with less likelihood of injury at a rate for which
it was designed.
• Always wear safety glasses. Everyday eyeglasses have only impact resistance lenses. They are
not safety glasses.
• Keep hands, face and feet at a distance from all moving parts. Do not touch or try to stop the
machine when they are rotating. Do not operate without guards in place.
ASSEMBLY
Remove the snow blower and all other items from box
Check all items for shipping damage. If you find any damage or any parts are missing,promptly
inform the dealer where you bought the Snow Blower. The Snow Blower comes with below
accessories:
The snow blower is to be assembled before Operation. To assemble the snow blower, following
the instructions below.
uPPEr, MIDDLE AND LOWEr FrAME ASSEMBLY
Fig. 2 - 9
1. Loosen and remove the four sets of joint fixing T-bolts, washers, and joint fixing knobs to
separate the upper frame from the lower frame.
2. Hold the middle frame so that the screw holes align with the holes on the lower frame. Insert
the T-bolt with washer into the holes on each side and use the joint fixing knobs to secure
the connection on both sides. The joint fixing bolts and washers should be inserted inside
the frame of the unit so that the joint fixing knobs are fastened to the outside of the frame.

35 / 52
GB
Note: Do not over-tighten the knobs.
3. Connect the upper frame with the middle frame in the same way as described in step 2. Use
the joint fixing T-bolts, washers and knobs to secure the connection on both sides.
4. Locate the cable clips in the parts bag. Secure the power cord to the frame of the unit by
clipping them onto the frame at evenly spaced intervals.
DISCHArGE CHutE AND CHutE CrANK ASSEMBLY
Fig. 10 - 16
1. Lift the chute deflector so that it snaps and locks securely onto the discharge chute.
2. Raise or lower the chute deflector to the desired height of the snow stream and tighten the
chute deflector knobs.
Note: Do not overtighten the chute deflector knobs
3. Locate the low and upper chute crank in the parts bag. Loosen the screw and nut located on
the upper chute crank with screwdriver and wrench.
Note: You may be able to unfasten the screw and nut by hand.
4. Slide the upper chute into the lower chute crank, aligning the screw holes. Tighten the screw
into the aligning holes using a screwdriver. Fasten the unit with wrench.
5. Slide the lower crank into the chute base hole.
6. Remove the washer and nut from the eye bolt with rubber grommet found on the upper
chute crank. Position the chute crank so that the eye bole with rubber grommet inserts into
the center hole of the middle frame. Secure with washer and nut.
OPErAtION
HOW tO uSE A SNOW BLOWEr
Note: Before using the machine, please make sure the power source you will use is in accordance
with the specifications shown in this manual. Before inserting the plug into the socket, make
sure the machine’s roll shaft and the snow thrower’s rubber plates are all fixed firmly with screws,
and the rubber plates are facing to the correct direction. Perform a test run to ensure that the
rotor turns feely.
ExtENSION CABLE
Fig. 17
• It is imperative to secure the extension cable with the cable grip as shown in.
• For safe and efficient use of your snow thrower, use only a CE-rated extension cord recommended
for outdoor use.
• Use only one extension cord. Make sure extension cord is the right size or rating for the tool
you‘re using. Limit length to 40 m or less. Only use a cord of 1,5 mm2 guage or larger diameter.
• Always unwind any extension cords fully.
• Protect your extension cord from sharp objects, excessive heat and damp or wet locations.
POWErING ON AND OFF
Fig. 18 - 19
1. Release the handle bar, insert the ignition key into his position.
2. Press the switch button at the side.
3. Then pull the handle bar backward, and catch hold of the handle bar firmly with both hands
and the machine is started.

36 / 52
GB
The machine can only be started with pressing the knob first and followed by squeezing
handle bar backward. Reverse operation cannot start the machine.
4. To power off, release your grip on the handle bar.
CHANGING SNOW ExIt DIrECtION
Fig. 20 - 22
WARNING: Never direct the snow discharge chute at the operator, at bystanders, at vehicles
or at nearby windows. The discharged snow and foreign objects accidentally picked up
by the snow thrower can cause serious damage and personal injury. Always orient the
discharge chute in the opposite direction from where you, bystanders, surrounding vehicles,
or windows are located
1. The discharge chute can be adjusted 180 degrees by rotating the chute crank. Rotate the
chute control crank clockwise to move the discharge chute to the left; counterclockwise to
move the chute to the right.
2. The chute deflector on the top of the discharge chute controls the height of the snow
stream. Loosen both chute deflector knobs to raise or lower the deflector to the desired
height of snow you wish to throw. Tighten the knobs to secure the deflector.
Note: Do not overtighten the chute deflector knobs.
WARNING: Make sure that the chute deflector snaps and locks completely onto the discharge
chute. An opening between the discharge chute and the chute deflector may allow foreign
objects to be picked up by the snow thrower and thrown in the direction of the operator
causing serious boldly injury. l Do not advance the chute deflector too far forward causing
an opening to appear between the deflector and discharge chute. l Do not overtighten the
knobs on the chute deflector.
MAINtENANCE
WARNING: Make sure to turn off the switch and disconnect the extension cord before
performing any maintenance task on your snow thrower.
• Do not attempt to repair the machine unless you have the proper tools and instructions for
disassembly and repair of the machine.
• Check the shear bolts and other bolts at frequent intervals for proper tightness to ensure that
the equipment is in safe working condition.
• After each snow removal session, run the snow thrower for a few minutes to prevent the
collector/impeller from freezing. Shut off the motor, wait for all revolving parts to stop
completely, and wipe residual ice and snow off the unit. Rotate the chute crank several times
to remove any excess snow.
Lubrication
Lubrication is not necessary and may damage the unit. The snow thrower is lubricated for lifetime
use at the factory before shipment.
Replacing the Rubber Plates
We recommend professional assembly and installation for replacing the Rubber Plates.

37 / 52
GB
rEPLACING tHE SCrAPEr
Fig. 23 - 25
WARNING: Make sure to turn off the switch and disconnect the extension cord before
performing any maintenance task on your snow thrower.
1. The scraper is located at the base of the snow thrower beneath the rotor housing.
2. Detach the worn scraper from the snow thrower by removing the 3 screws that hold it in
place.
3. Install the new scraper and fasten it securely to the snow thrower with 3 screws.
CLEANING
i Risk of injury! Switch off the product and disconnect the mains plug before
all cleaning and maintenance work. Wait till all moving parts are completely
stopped.
CLEANING tHE PrODuCt
• Careful handling and regular cleaning ensure that the product remains functional and efficient
for a long time.
• Brush off coarse dirt.
• Wipe down the product with a slightly damp cloth.
• Never spray the product with water or expose it to water.
• Never use detergents or solvents for cleaning. This can cause irreparable damage to the
product. The plastic parts can be eaten away by chemicals.
StOrAGE AND trANSPOrt
i Risk of injury! Make sure that unauthorized persons do not have access to the
product!
• Thaw device before storing and allow it to dry completely.
• Store the product in a dry place.
trANSPOrt
• Secure the product to prevent slippage.
• Use the original packaging to ship whenever possible.
trOuBLESHOOtING
i Risk of injury! Improper repairs can result in the product functioning unsafely. This
endangers yourself and your environment.
Malfunctions are often caused by minor faults. You can easily remedy most of these yourself.
Please consult the following table before contacting authorized service center. You will save
yourself a lot of trouble and possibly money too.
Fault/malfunction Cause Remedy
Motor not running. No mains voltage? Check cable, plug, socket and
fuse.
Cable faulty? Contact authorized service center.

38 / 52
GB
Device does not clear any
snow.
Screw or discharge chute
clogged? See Rectify clogging
V-Belts loose or torn out? Contact authorized service center.
Excessive vibration. Loose parts or damaged screws? Contact authorized service center.
If you are unable to remedy the fault yourself, please contact authorized service center. Please
be aware that any improper repairs will also invalidate the warranty and additional costs may be
incurred.
SErVICE AND SPArE PArtS
• Have your petrol tool serviced by a authorized service using only original replacement parts.
This will ensure that the safety of the petrol tool is maintained.
• Whether you need technical advice, repair, or genuine factory replacement parts, contact the
WERCO authorized service nearest you. Information on service locations, visit www.hecht.cz.
• When ordering spare parts, please quote the part number, this can be found at
www.hecht.cz
ENVIrONMENtAL PrOtECtION
Dispose your device, accessories and packaging in accordance with the requirements
of environmental protection into the recycling collection center. This machine does
not belong to the household waste. Save the enviroment and take this device to
designated collection points where it will be received for free. For more information
please contact yout local authority or nearest collection point. Improper disposal may be punished
according to national regulations.
GuArANtEE OF tHE MACHINE
• For the machine is granted guarantee for 24 months. For company, commercial, comunal
or other than private use and for replacement machines, obtained by replacement of defect
machines for new one, is valid reduced guarantee time 12 months according to legal
regulations.
• Damages which were caused by natural wear, overloading or incorrect operation are excluded
from the guarantee. Parts which underlie natural wear are excluded from the guarantee as
well.
• The necessary condition for providing warranty is keeping and following all instructions for
operation, control, cleaning, storing and maintenance of the machine.
• Damages which were caused by material defect or production mistakes will be settled free
of charge by replacement delivery or guarantee repair. The necessary condition for providing
warranty is delivery of completely assembled machine to our service center inclusive purchase
document.
• Cleaning, maintaining, checking and adjusting of the machine are not considered as guarantee
procedures and are paid duties.
• Repairs which do not relate to guarantee you can let make by our service center. Our technical
service center is ready to prepare for you preliminary repair costs estimate. We take over to
repair only such machines which are delivered with pre-paid transport costs and sufficiently
packed.
• In case of justified warranty contact our technical center. There you obtain further information
about execution of your complaint.
• Dispose of your electrical appliances do a free of charge.
47 / 52
GB
PL
CZ
SK
Společnost Spoločnosť Company Spółka
Werco spol. s r.o.
Za mlýnem 25/1562,
147 00 Praha 4
Czech Republic
IČO 61461661
Vydáváme na vlastní
zodpovědnost toto
prohlášení
Vydávame na vlastnú
zodpovednosť toto
vyhlásenie
Declare on our own
responsibility
Wydajemy na własną
odpowiedzialność tę
deklarację
Název: Sněhová fréza Názov: Snehová fréza Name: Snow thrower Nazwa: Odsnieżarka
Typ Typ Type Typ HECHT 9161
Předpisy, s nimiž byla
posouzena shoda
Predpisy, na základe
ktorých bola
posúdená zhoda
The rules, according
to what was issued
in this declaration
Przepisy, z którymi
wyrób pozostaje
zgodny
Toto prohlášení
o shodě bylo vydáno
na základě certifikátů
společnosti
Toto vyhlásenie
o zhode bolo
vydané na základe
certifikátu a meracích
protokolov
spoločnosti
This declaration was
issued on the basis
of certificate of
Niniejsza deklaracja
zgodności została
wydana na
podstawie certyfikatu
Intertek Testing Services
Shanghai, China
Číslo certifikátů
a měřících protokolů
Číslo certifikátov
a meracích
protokolov
Number of
certificates and
protocols
Numer certyfikatu
oraz protokołów
pomiarowych
„SH10061288-V2
SH10061288-V1
SH10061290-V1
SH10061290-001
SH10061289-001“
Toto prohlášení
o shodě je
vydáno v souladu
s direktivou
Toto vyhlásenie
o zhode je vydané
v súlade s direktívou
This declaration is
issued in conformity
with the following
directives
Niniejsza deklaracja
zgodności wydana
zgodnie z dyrektywą
„2004/108/EC
2006/95/EC
2006/42/EC
2000/14/EC - 2005/88/EC“
Na zaručení shody se
používají následující
harmonizované
normy, jako i národní
normy a ustanovení
Na zaručenie
zhody sa používajú
nasledujúce
harmonizované
normy, ako aj
národne normy
a ustanovenia
The following
harmonised
norms are used
for guarantee
of conformity,
together with the
national norms and
regulations
Zapewnienia
zgodności, z
następującymi
normami
zharmonizowanymi,
a także krajowe
normy i przepisy
„EN 60335-1+A11+A1
+A12+A2+A13+A14
EN 62233
ISO/DIS 8437
EN 55014-1
EN 55014-2+A+A2
EN 61000-3-2
EN 61000-3-11“
Garantovaná hladina
akustického výkonu Garantovaná hladina
akustického výkonu Guaranteed noise
power level
Gwarantowany
poziom mocy
akustycznej LWA = 100 dB (A)
Naměřená hladina
akustického tlaku
v místě obsluhy
Nameraná hladina
akustického tlaku
v mieste obsluhy
Measured noise
pressure level at the
place of operation
Zmierzony
poziom ciśnienia
akustycznego na
operatora
LPA = 78,54 dB (A) K = 2
dB (A)
Přepočítaná
a naměřená hladina
akustického výkonu
Prepočítaná
a nameraná hladina
akustického výkonu
Measured
recalculated noise
power level
Przeliczony i
mierzony poziom
mocy akustycznej LWA= 98,45 dB (A)
CZ SK GB PL
DEKLArACJA ZGODNOśCI WE - HECHt 9161EC DECLArAtION OF CONFOrMItY - HECHt 9161ES VYHLÁSENIE O ZHODE - HECHt 9161ES PrOHLÁšENÍ O SHODě - HECHt 9161
ES PrOHLÁšENÍ O SHODě / ES VYHLÁSENIE O ZHODE / EC
DECLArAtION OF CONFOrMItY / DEKLArACJA ZGODNOśCI WE
This manual suits for next models
1
Table of contents
Other hecht Snow Blower manuals


