Heiniger EasyGrinder User manual
Edition/Index: EASYGRINDER/B 03-11
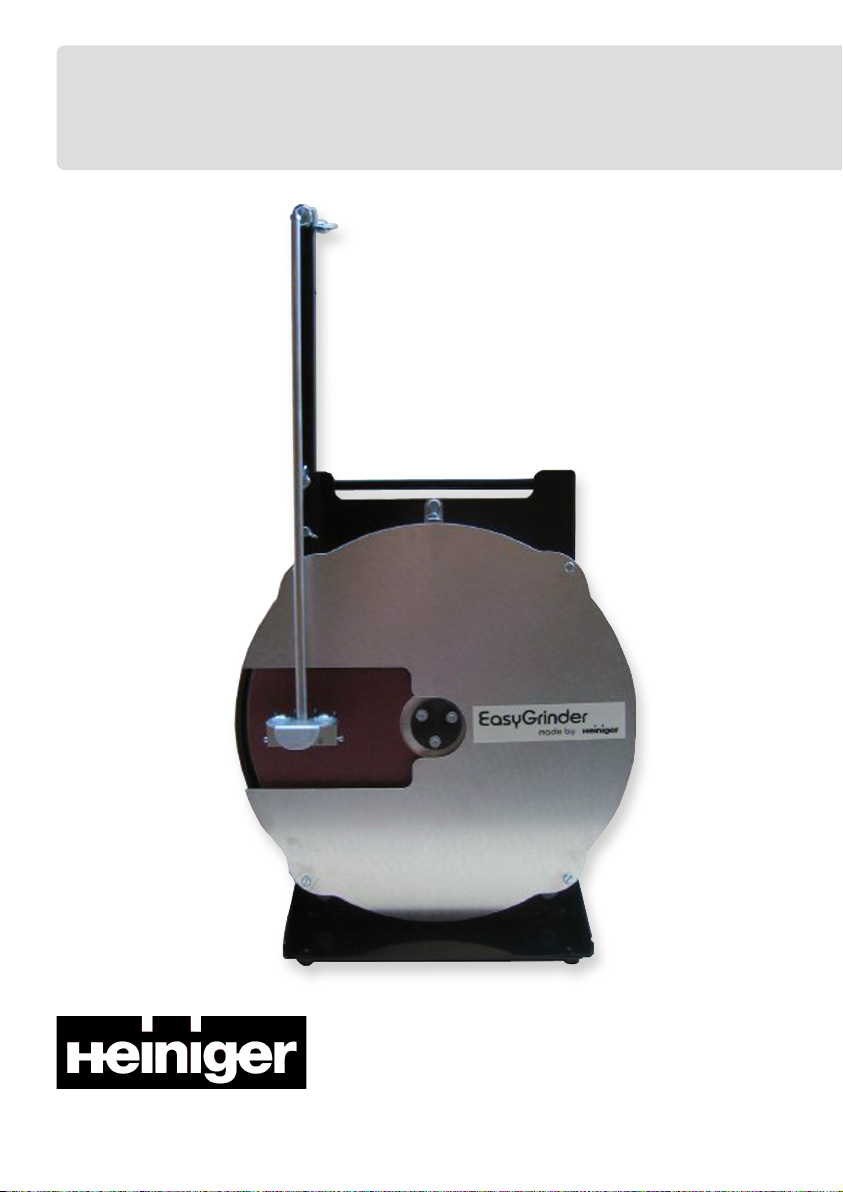
EasyGrinder
Grinder for combs and cutters
for sheepshearing
Instruction manual
swiss made

2 Instruction manual / EasyGrinder
Contents
1 Generalities
1.1 Rating plate
1.2 Intended use
1.3 Guarantee conditions
1.4 Customer service
1.5 Limitation of liability
1.6 Information symbols
2 Safety
2.1 Persons
2.2 Power supply
2.3 Protective equipment
2.4 Further measures for avoiding accidents
2.5 Children
3 Specifications and spare parts
3.1 Specifications
3.2 Spare parts list
4 Transport and accepting delivery
5 Assembly and function
5.1 Assembly
5.2 Disc guard
5.3 Disc and pendulum
5.4 Fitting the disc on the motor
6 Operation
6.1 Grinding combs
6.2 When is the comb sharp?
6.3 Grinding cutters
6.4 When is the cutter sharp?
7 Emery setting procedure
8 Maintenance
9 Trouble shooting
10 Disposal and material groups
11 Illustration spare parts

Instruction manual / EasyGrinder 3
1 Generalities
1.1 Rating plate
230-240Volt/50Hz 120Volt/60Hz
1.2 Intended use
The Heiniger EasyGrinder is designed for grinding combs for sheep, goats and
camelids. Any other use is expressly prohibited.This guide is for the safe and efficient
handling with the machine. Read these instructions carefully before beginning
any work. Basic condition for safe working is the adherence to all indicated safety
references and procedural instructions in this guide. As mandatory limitation of use,
the data given in 3.1 Specifications is valid. If you hand on the equipment to other
persons, provide them with this manual.
1.3 Guarantee conditions
Your EasyGrinder has been manufactured by Heiniger, the leading manufacturer of
shearing and clipping equipment. Heiniger stands for quality for more than 60 years.
Your EasyGrinder is exclusively conceived for grinding combs and cutters for sheep
shearing. With just a little care and attention, the EasyGrinder will give you many
years of excellent services. The guarantee conditions are included in the general
terms and conditions of the manufacturer; for more information on warranty terms
and conditions of your Heiniger grinder please contact your local distributor. Claim
any damage as soon as possible. Compensation only may be claimed within the valid
guarantee periods.
1.4 Customer service
For technical information, our customer service and our authorised service centres
are at your disposal.
Comment us your experience. Our staff is interested in new information and
experience resulting from the operation which could be useful for the improvement
of our products.
1.5 Limitation of liability
All data and information in this instruction manual were arranged in consideration of
the current standards and regulations and state of the art as well as our realizations

4 Instruction manual / EasyGrinder
and experiences of many years.
The manufacturer assumes no liability for disadvantages due to:
▪Non-observance of the instruction manual
▪Operation of the equipment for not intended use
▪Employment of not instructed personal
▪Normal wear and consequential damages
▪Technical modifications
▪Use of not approved spare parts
▪Maintenance work by not authorised service centres
Whilst all care is taken during manufacture and by our agents to ensure your
grinder arrives in perfect working order and condition, damage occurring
during transit or faulty operation will not be covered by our warranty. Damage
is likewise not covered due to inappropriate operation, missing care, accidents.
1.6 Information symbols
WARNING
Danger of injury or death.
ATTENTION !
Danger of injury or death.
NOTE
Tips and informations.
2 Safety
2.1 Persons
The non-observance of the instructions and safety regulations mentioned in this
manual can cause operating malfunctions or serious injury to persons. The safe
operation of the machine only places minimal requirements on the operating
personnel. It is, however, essential that these are observed and complied with.
▪The operator shall be able to demonstrate an understanding of the controls and
the
hazards associated with the equipment.
▪The operator must have read and understood the manual or have been
instructed
in the operation of the grinder by a skilled person and have had the potential
dangers pointed out to him.
▪Unauthorised persons are not permitted to use the grinder and the pendulum.
▪Unauthorised persons are not permitted in the vicinity of the grinder of
pendulum
when it is operated or maintenance is being carried out.
Operation of the equipment is only permitted by personal expected to do their work
reliably. Persons, whose reactivity is affected by drugs, alcohol or pharmaceuticals
are not perwithted to operate the equipment.

Instruction manual / EasyGrinder 5
2.2 Power supply
The voltage specified on the rating plate and in this manual and that of the local
power supply must match.The grinder may only be connected to an AC power supply.
In the event that the grinder is operated from a generator, the supply voltage must
not exceed that specified on the makers sticker. Never plug the grinder into damaged
sockets. Observe the relevant regulations applicable in your country. Completely
unroll the power cable before plugging in.
2.3 Protective equipment
Safety glasses for the eyes, ear plugs, gloves and antislip shoes for protection against
slipping on slippery underground.
2.4 Further measures for avoiding accidents
▪The operating instructions must be kept safely and accessible at all times.
▪Never use the grinder on an unsafe or unstable stand, pedestal or bench.
▪These disc guard must remain in place at all times unless performing
maintenance, in which case the grinder must be unplugged from the power
source.
▪Wear suitable wortk clothes. Never use the grinder and pendulum with loose
fitting clothing, open long hair, or anything else that could reach the moving
disc.
▪Always ensure adequate working room around the grinder.
▪Never leave the grinder unsupervised when in operation or connected to the
power.
▪Avoid kinks and tight coils in the cable when storing, this can damage the cable.
▪Store the grinder in a dry inside area when not in use.
▪Never use the grinder or any part of a grinder, i.e. discs, pendulum when it is
worn or damaged.
Any damage or failure to the grinder which may constitute a risk to the health and
safety of any person shall be immediately reported by the operator to the owner/
manager who shall take appropriate measure.
Examples of the type of damage, which would constitute such a risk include:
▪Frayed or damage insulation on electrical wiring.
▪Failure or wear of any control or component, i.e. switch, discs, disc guard or
pendulum.
▪Damaged or loose fasteners, nuts, bolts, screws, etc.
▪Incorrectly or badly set emeries.
2.5 Children
WARNING!
Never leave the equipment unsupervised and use it very carefully when children or
persons who cannot judge the dangers are nearby.

6 Instruction manual / EasyGrinder
3 Specifications and spare parts
3.1 Specifications
3.2 Spare parts list (Illustration at the end of the manual)
3.2 Liste Ersatzteile (Illustration am Schluss der Anleitung)
Designation Grinder for combs for sheep, goats and camelids
Type EasyGrinder
RPM see rating plate
Voltage see rating plate
Rating 0.37 kW
Power input see rating plate
Frequency see rating plate
Dimensions Hight 740 mm with / 475 mm without cross arm
Width 400 mm / Depth 320 mm
Disc Ø 370 mm
Weight 23 kg
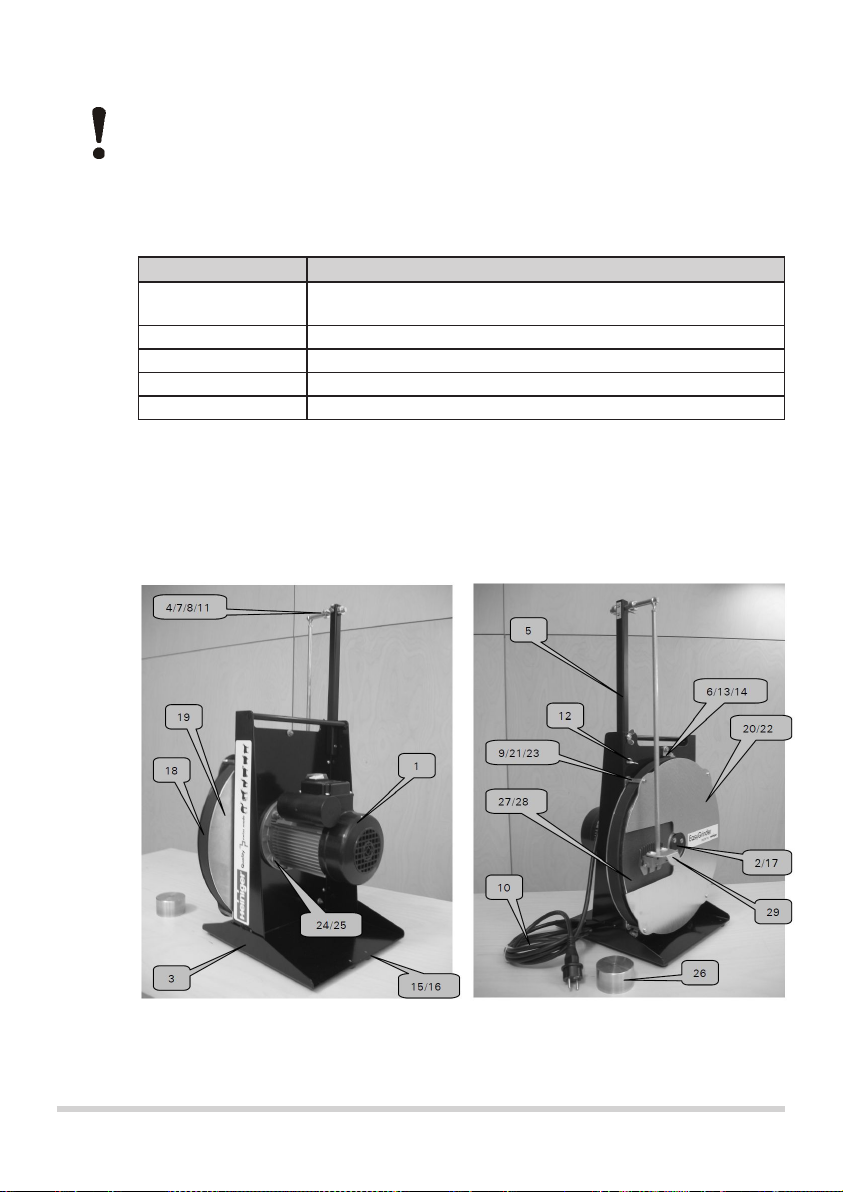
POS DESCRIPTION TOTAL
Spare parts to EasyGrinder
1 Motor to EasyGrinder with switch and flange 1
2 Fixation flange 1
3 Support EasyGrinder 1
4 Pendulum hook 1
5 Pendulum upright 1
6 Mounting bracket 3
7 Collar Ø10 2
8 Threaded pin M 5 X 8 2
9 Washer Ø 5.3/15/1.5 stainless 4
10 Cable ONE/EVO with plug 1
10a Converter SCHUKO/GB-plug 5A 1
11 Wing screw M6X8 1
12 Wing screw M6X25 2
13 Hexagonal screw Verbus Ripp M6x16 6
14 Hexagonal rip nut M6 6
15 Rubber foot Ø22/4x10 4
16 Cup screw M4x8 4
17 Countersunk head screw with ISK M6x30 3

Instruction manual / EasyGrinder 7
POS DESCRIPTION TOTAL
Spare parts to EasyGrinder
18 Guard ring 1
19 Cover behind 2
20 Guard cover 1
21 LS-screswTORX M5 x 16 KAFLOK 4
22 PH-screw M5x10 4
23 Spacer hexagonal M5x35 4
24 Hexagonal screw Verbus Ripp M8x25 4
25 Hexagonal rip nut M8 4
26 Centerin bush complete 1
27 Grinding disc Ø370 1
28 Emery paper self-adhesive medium 1
29 EasyPendulum 1
Spare parts to EasyPendulum
Intermediate pipe 1
Handle 1
Base body with magnet 1
Ring screw M6x20 1
Hexagonal nut M6 1
LS screwTORX M6 x 30 KAFLOK 1
Cylinder pin Ø3x30 h6 2
Cylinder pin with ISK M3x16 2
Plastic disc Ø6.4/18x1.6 4
Countersunk head scresTORX M4 x 12 2
Disc to countersunk head screw M4 2
4 Transport and accepting delivery
Check the delivery on receipt immediately on completeness and damage in transit.
The grinder is supplied in a case without the fitted disc. It is essential that the disc is
protected in transit. If the grinder is not transported in the case, ensure that it cannot
tip or slide.
All units are transported at the owner's risk. Before accepting delivery, thoroughly
inspect the Grinder for damage. If any has occurred you should note the nature
and extent of the damage in view of any insurance claim you may wish to make.
The following areas should be checked carefully:
▪Disc guard; it should be located securely in place
▪Electrical components, disc and emery, pendulum

8 Instruction manual / EasyGrinder
5 Assembly and function
5.1 Assembly
1 Grinding disc with emery papier, 1 EasyPendulum, 1 safety glasses, ear plugs,
1 allen key, 1 instruction manual.
The actual scope of delivery can differ from specially designed models, from
additional ordering options or due to the latest state of the art from the here described
annotations and illustrations.
The EasyGrinder is dispatched fully assembled, however it must be set up before
being used for grinding, for full setup instructions refer to chapter 6 Operation.
5.2 Disc guard
The EasyGrinder is fitted with a guard enclosing the disc to protect the user during
use. It is necessary to remove the outer part of the guard to remove or to change the
emery papier.The guard is secured with four screws. When refitting the guard, always
use all four screws, tightened securely.
5.3 Disc and pendulum
The special light weight aluminium alloy discs and pendulum are precision tools
and will ensure the best possible edge on your gear and will give you years of great
service provided that you treat them with care. It is important that the disc is not
damaged or neglected, this can make it unusable.
ATTENTION !
The discs may be hazardous if used in a damaged condition. If the disc becomes
damaged it must be replaced. Just use original emery paper and discs of Heiniger.
The grinding disc is not fixed at delivery und must be fitted correctly onto the motor.
The disc must be protected at any time of crushes, hits and falling. Do not use to
much force to take off the disc and emery paper of the grinder.
5.4 Fitting the disc on the motor
Unplug the grinder from power before proceeding.The disc must be free of dirt, dust
or any other foreign matter.
Slide the disc onto the shaft of the motor. Fit the disc washer and nut on the shaft with
the enclosed spanner.
NOTE
The discs fitted to the grinder have been individually checked for balance.
It must be noted that it is possible for the emery to throw the balance off (see 9,
Troubleshooting).

Instruction manual / EasyGrinder 9
6 Operation
Grinder setup, grinding technique and using the grinding pendulum.
NOTE
Do not start the grinder before have read and understood this instruction manual
completely. Ensure the disc is fitted and tightened. Ensure that the switch is in the
OFF position before connecting the grinder to a power source. Do not start the grinder
before having fit the disc guard and first put the safety glasses and ear protection. Do
not attempt to grind until the grinder is at full speed.
ATTENTION !
Always ensure that the disc guard is securely fitted before setting up and using the
grinder. Ensure the emeries are stuck to the disc and have no air bubbles between
the emery and disc. When the grinder is running do not allow anything to come into
contact with any part of the discs.
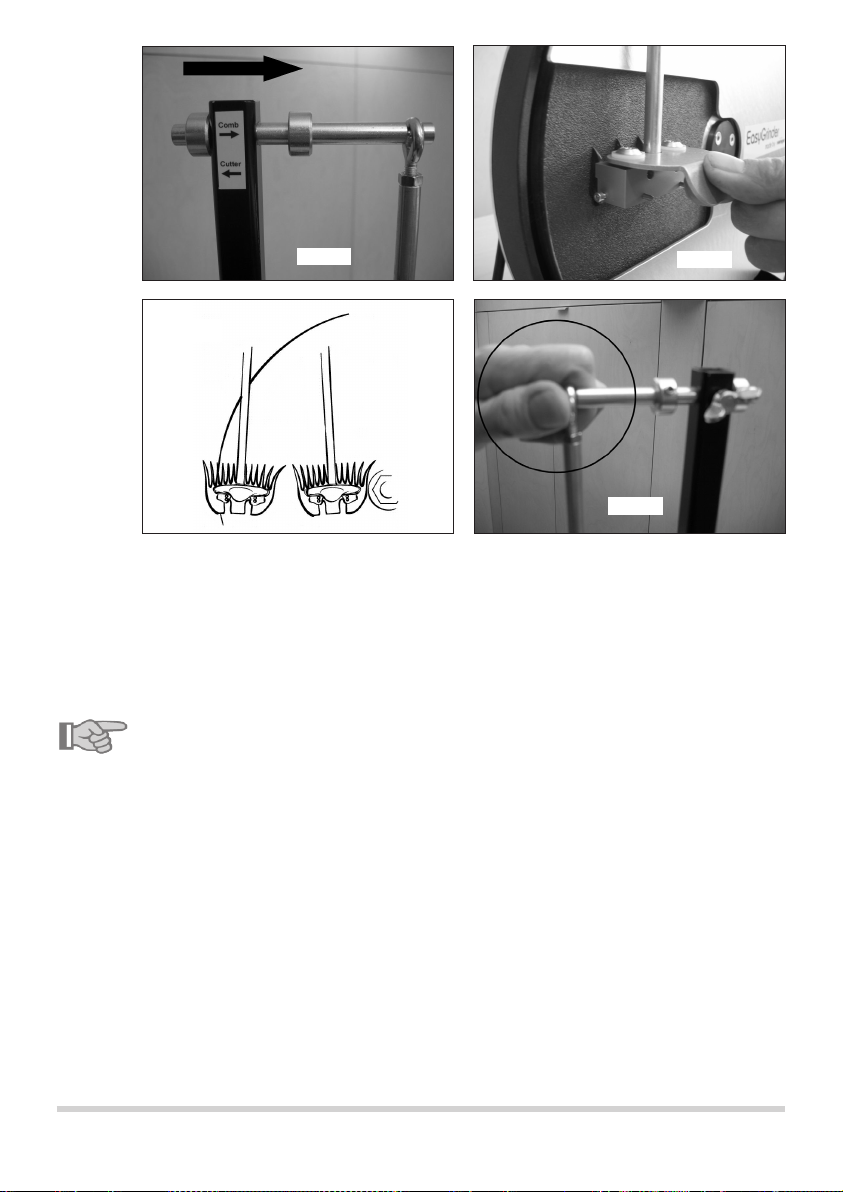
6.1 Grinding combs (fig. 1 - 4)
The grinder must be switched off. Hang the pendulum with placed comb on the
pendulum hook. Move the pendulum upright away from the disc according to the mark
«Comb» (fig. 1). Move the pendulum upright towards disc until the comb is placed on
the disc. The adjustment is correct when the heel of the comb touches first the disc
and between the top of the comb and the disc is a distance of 1.5 mm (thickness of a
match) (fig. 2).
Holding your pendulum with the knuckle of your index finger directly under your
thumb, land your comb onto the rotating disc. Move the comb immediately from side
to side by firm and even pressure, about 2 - 3 times (fig. 2). Move the comb as far to
the outer edge of the disc as three teeth are off the edge. Then return the comb to
the motor shaft by a even movement, without any pressure unilateral, until the comb
touches the fixation flange (fig. 3). To finish the grinding (when the comb is sharp),
move the comb as far to the outer edge of the disc as the comb just rests with all the
teeth. Finish the grinding by a little bit stronger pressure, and take the comb off the
disc by a even and continuous backward movement.
NOTE
▪Always hold the upper part of the pendulum at the pendulum hook with your spare
hand (fig. 4)
▪Use the whole width of the emery paper.
▪Always take 3 teeth off the edge of the disc (fig. 3)
▪Use very firm even pressure during the whole grinding.
10 Instruction manual / EasyGrinder
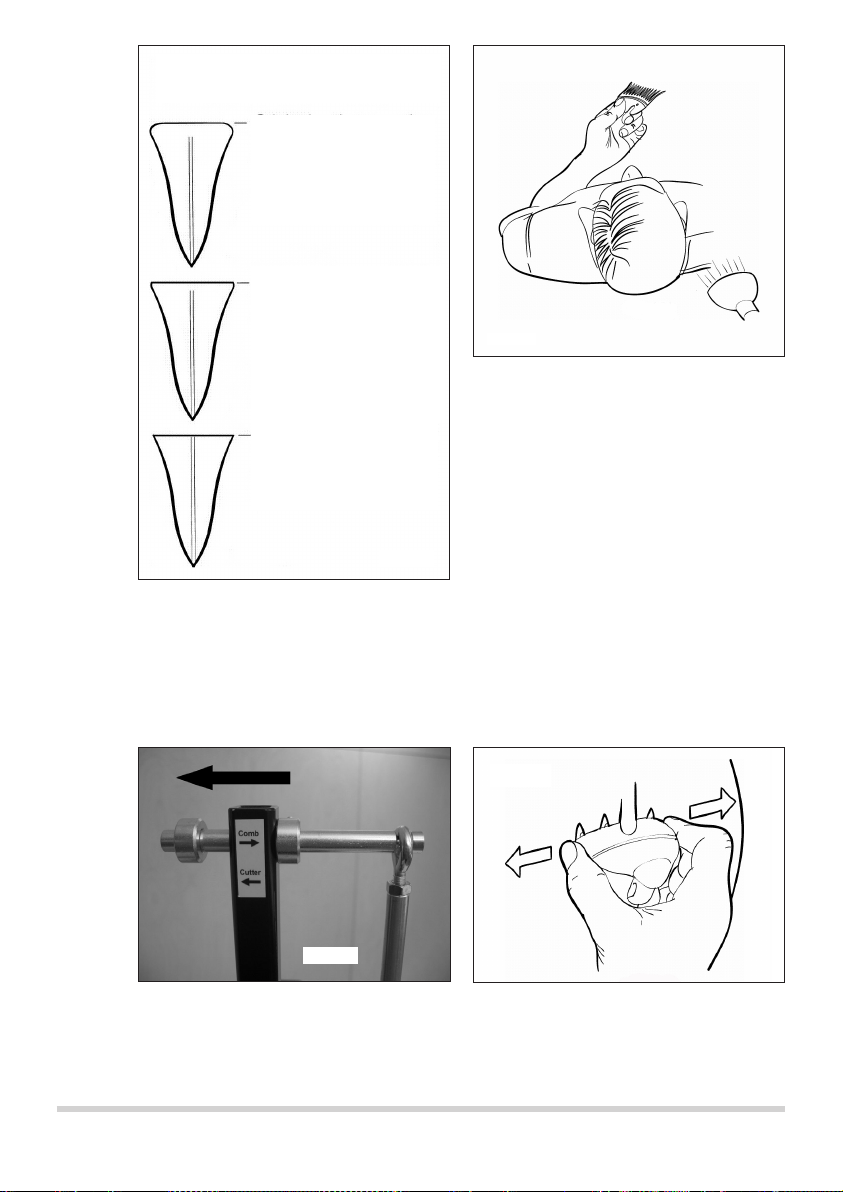
6.2 When is the comb sharp?
The whole surface of the comb must be ground, especially where the cutter has been
cutting on the teeth. With good light, look carefully at the cutting edges of the tooth
once you have ground because these are blunt edges (fig. 6).The light will shine on a
rounded/blunt edge but will not shine on a sharp edge.
NOTE
You must grind your combs until the blunt edge is sharp (fig. 5). If in doubt, grind it
again.
fig. 1 fig. 2
fig. 4
fig. 3
Instruction manual / EasyGrinder 11
6.3 Grinding cutters
The grinder must be switched off. Hang the pendulum with placed cutter on the
pendulum hook. Move the pendulum hook towards the disc according to the mark
«Cutter»(fig. 7).
Move the cutter several times over the disc with the grinding movement (fig. 8). If the
pendulum hook is too far inside, the cutter will rub on the upper side (fig. 9). If the
Cross section viewed from the
front or tip of a comb tooth
Original sharp edge
worn round with use.
Level after grinding, but
not ground enough to
create a new sharp edge.
When viewed from the
side of the comb this
edge will appear as a
shiny or silver line.
Correct amount of
grinding to create
a sharp edge.
fig. 5
fig. 6
fig. 7
fig. 8
12 Instruction manual / EasyGrinder
pendulum hook ist to far outside, the cutter will rub on the heel (fig. 10). Adjust the
pendulum hook until the cutter rubs on both sides, above and on the heel (fig.11).
Holding the pendulum with the knuckle of your index finger directly under your
thumb, land your cutter on the rotating disc. Move the cutter immediately from side
to side by firm and even pressure, about 2 - 3 times. Move the comb as far to the outer
edge of the disc as about 2 - 5 mm of the cutter are over the edge. Then return the
comb to the motor shaft by a even movement, without any pressure unilateral, until
the comb touches the fixation flange (fig. 8). To finish the grinding (when the cutter
is sharp), move the cutter up to 25 mm to the outer edge of the disc. In this position
keep the pressure on the cutter for one or two seconds . Finish the grinding by a
little bit stronger pressure, and take the cutter off the disc by a even and continuous
backward movement.
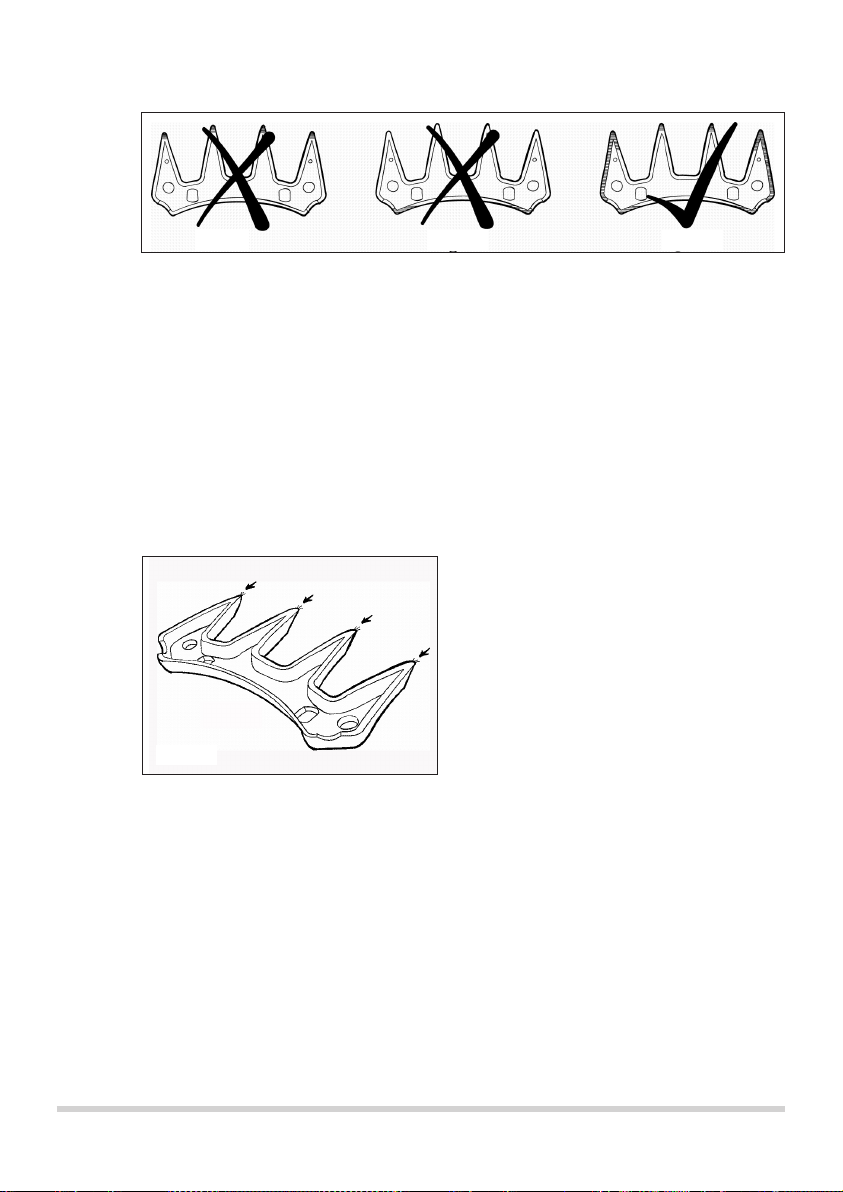
6.4 When is the cutter sharp?
Check that you have a slight burr on the
four tips of your cutter that move up or
down when you touch them (fig. 12),
check that the whole surface of the cutter
is ground and there are no dull patches. If
in doubt, grind it again.
fig. 9 fig. 10 fig. 11
fig. 12

Instruction manual / EasyGrinder 13
7 Emery setting procedure
1. Take off the disc guard.
2. Remove the used up or damaged emery paper carefully and without any
aggressive equipment off the disc.
3. Clean the disc of glue and other contamination.
NOTE: Do not use any form of petroleum based solvents when cleaning discs.
4. Ensure disc is dry and completely free from any foreign matter. If necessary clean
disc only with warm soapy water and a scrubbing brush, allow to dry.
5. Place the centering bush on the fixation flange of the disc.
6. Take a new original Heiniger emery paper and take off the protective film.
7. Put the new emery papier by the glue side inside, on the fitted centering bush,
on the cleaned grinding disc.
8. Pat the emery papier firmly with the flat hand evenly on the disc.
NOTE: No adhesion of the disc at under 5° Celsius and when the emery paper
has been stored at frost temperature.
9. Control the whole surface of the emery paper for bubbles and consistency of
the adhesion.Therefore, pat the surface with the back of the finger and observe
the sound for irregularities.
NOTE:Treat the disc and emery paper very carefully.
10. The disc is now ready to grind.
8 Maintenance
Use only genuine replacement parts. All parts are available through Heiniger dealers.
Use only qualified personnel for electrical repairs. Always contact an authorized
service centre if you are unsure how to rectify a problem or in case of any malfunctions
not being contained in this manual. Only perform maintenance when the grinder is
disconnected from the power.
Motor
Failure to keep the motor dust free may reduce the cooling ability of the motor and
cause it to cut out due to overheating. Periodically check the condition of the power
cord, replace if worn or damaged.
Rubber feet
Ensure that feet are fitted and secure; failure to do so may lead to the grinder
becoming dangerously unstable.
Switch
Replace damaged switches immediately.
Pendulum hook
If the pendulum hook is damaged replace it before the grinder is used.
Pendulum upright
Control the pendulum upright everytime before use for fixed fitting.

14 Instruction manual / EasyGrinder
Disc guard
The grinder is fitted with a guard that enclose the disc; these guards are integral
to the safe use of the grinder. It must fit the grinder correctly and securely. In the
event of damage they must be repaired or replaced before the grinder is used.
Grinding disc
Keep the surface of the disc dry and free of dirt, grease and damages.
Pendulum
Remove periodically the grinding dust and keep the supporting surface clean. Protect
the pendulum from dirt and damages. Replace a damaged pendulum before use of
the grinder.
9 Trouble shooting
For all electrical faults qualified persons only may undertake fault finding and
repairs.
Problem Cause Solution
Motor
doesn't start
No power Check the plug is correctly
connected to the socket. Check
that power is available at the
socket. Call an electrician.
Grinder
vibrates
Disc out of balance:
1. Bad quality or used emery
2. Disc has residues or dirt on the
adhesive surface
3. Disc buckled
4. Motor shaft deformed
1. Replace emery
2. Take off the emery and clean
the surfaces. Stick new emery.
3. Replace disc
4. Replace motor
Emeries
won't stick
to discs
1. Wrong emery used
2. Processing temperature under
5°C.
3. Dirty surface
(grease, oil, dirt, old glue, etc.)
1. Use only original Heiniger
emery paper.
2. Augment processing
temperature.
3. Clean the disc with hot soap
water or nitro-dilution.
Instruction manual / EasyGrinder 15
10 Disposal and material groups
ATTENTION !
Environmental damages when disposing incorrectly!
Electronic waste, batteries, lubricants and other additives are subject to the treatment
of hazardous waste and only may be disposed by specialised centres!
Please be aware of the relevant regulations applicable in your country when disposing
of discarded parts.
Material Contained in position (see 11, Illustration spare parts)
Iron/steel 1, 2, 3, 4, 5, 6, 7, 8, 9, 11, 12, 13, 14, 16, 17,
18, 21, 22, 23, 24, 25, 26, 29
Aluminium 1, 19, 20, 26, 27, 29
Copper 1, 10
Polyethylene 1, 10
Rubber 10, 15
11 Illustration spare parts

We reserve the right to make technical changes and improvements without notice.
In case of claim, please return your Heiniger machine with the instruction manual and the
warranty card at the end directly to your local distributor. Please do not cut off the warranty
card from the instruction manual, or do not send it directly to Heiniger.
warranty
Item
Serial no.
Date of purchase
Stamp and signature
Heiniger Australia
Perth Head Office
46 Miguel Road
Bibra Lake WA 6163
Heiniger NZ
1B Chinook Place
Hornby
Christchurch
Heiniger AG
Industrieweg 8
Herzogenbuchsee
Switzerland
Table of contents
Other Heiniger Grinder manuals


