Oregon 109179 User manual

INSTRUCTIONMANUAL
HYDRAULIC BENCH-MOUNTED GRINDER
P/N 109179
FOR ASSEMBLY SET-UP
AND OPERATIONAL USE
This manual
contains
important
information
on assembly,
operation,
maintenance,
and safety.
Please read
carefully.
This Grinder
meets or
exceeds all
applicable
industry
standards.
English
French
Spanish

A grinding wheel that has been
improperly installed may crack and
disintegrate during operation resulting
in severe injury to the operator.
A damaged grinding wheel may
disintegrate during use due to high-
speed operation of the unit. This can
cause wheel fragments to eject at very
high rates of speed.
Always maintain proper grinding wheel
maintenance, check for visible cracks
and perform a “ring test.” (A good
grinding wheel will sound a clear musical
tone when tapped gently with a metal tool
like an Allen wrench.) See Fig 4, page 6.
Do not force a grinding wheel onto the
machine or alter the size of the mounting
hole. Do not use a wheel that does not fit
exactly. We recommend use of Oregon®
grinding wheels only.
Make sure the mounting-flange nut is
serviceable and not damaged in any way.
If grinding wheel vibration should occur
when the grinder is started, or running,
remove and inspect the mounting flange
and the grinding wheel.
To avoid possible grinding-wheel failure,
always allow a new grinding wheel to run
at operating speed for at least one minute
before grinding or dressing.
The hazard of kickback resulting in serious
injury to operator is increased if cutting
chain guard drive links or guard tie straps
have been reversed, removed, or filed
down. To avoid injury Do not use a cutting
chain that has been altered in any way.
Cutting chain depth gauges not properly
filed can substantially increase the risk of
kickback and injury. To reduce likelihood
of injury, always file depth gauges to
original profile.
Dressing the grinding wheel places the
fingers of the operator in close proximity
to the grinding wheel. Contact with a
rapidly turning wheel may result in injury.
Wear gloves.
Always work cautiously, maintain a strong
grip on the dressing brick, and watch
what you are doing at all times.
Do not use the side of the grinding wheel
for grinding.
OWNER’S INFORMATION AND RESPONSIBILITY
SAFETY SYMBOLS AND WARNINGS
The following symbols are used to draw special attention to operator and/or
bystanders to help prevent possible injury. Also designed to help prevent
mechanical failure or damage to the machine and/or product.
INSTALLING/DRESSING THE GRINDING WHEEL
There is the risk of severe personal injury
from high speed ejection of material.
Read and follow all instructions in this
manual. Wear eye and hand protection.
Wear eye protectionWear hand protection

TABLE OF CONTENTS
▲Introduction 2-5
Safety Rules and Precautions 2-3
Parts Included for Assembly 4
Grounding Instructions 5
▲Assembly Instructions 6-7
Mounting-Base Unit to Bench or Wall 6
Selecting and Mounting the Grinding Wheel 6
Dressing the Grinding Wheel 7
▲Operating Instructions 8-12
Inspecting the Chain 8
Parts of a Cutter 8
How a Cutter Works 8
Grinding for Bench or Wall-Mounted Workstations 9
Chain Setup 9-10
Setting Vise for Top-Plate Angle 9
Setting the Chain Stop 10
Setting Grind Depth 10
Grinding Cutters 10-11
Setting the Depth Gauge 11
Dressing the Wheel for Depth Gauges 11
Servicing the Hydraulic System 12
▲Chain Grinding Chart 13
▲Grinder Replacement 14
Part Numbers And
Exploded View

INTRODUCTION
1. Keep children away. All bystanders should be
kept at a safe distance from work areas.
2. Wear proper apparel. Never wear loose
clothing, neckties, bracelets, rings or any other
jewelry that could come into contact or get
caught in the grinding wheel or any other moving
parts. Non-slip footwear is recommended. Wear
protective hair covering to contain long hair.
3. Always use safety glasses or face
screen. Always wear gloves and protec-
tive eyewear while operating the grinder and while
profiling the wheel using the dressing stone.
Also use face or dust mask if cutting operation is
dusty. Everyday eyeglasses do not have impact
resistant lenses, they are not safety glasses.
4. Never stop the wheel with your hands. Never
attempt to stop the rotation of the grinding wheel
with your hands.
5. Disconnect tools before servicing. Make
sure the plug is disconnected when fitting or
changing the grinding wheel and during any
other maintenance operation or transport.
6. Keep guards in place and in good working
order. Never start the grinder without the wheel
guards in place.
7. Remove adjusting keys and wrenches.
Always make sure that keys and adjusting wrench-
es are removed before turning the grinder to the
“on” position.
8. Operate the grinder within its indicated
design specification. It will do the job better and
safer at the rate for which it was designed. Your
grinder has a plate indicating:
Size of arbor.
No-load speed in revolutions per minute.
Proper grinding wheel. Table 2, page 13.
Also, make sure that the voltage and
frequency indicated on the plate applied to
the grinder correspond to those of the
power outlet.
9. Reduce the risk of unintentional starting.
Always make sure that the start-up switch is in
the off position before connecting the plug to
the outlet.
10. Never use cables, plugs or extension cords
that are defective or non-standard.
11. Remove the plug from the outlet immediately
if the power cable/cord is damaged or cut. For
cable/cord repair or replacement, contact your
authorized dealer or service center. Note: The
power supply cable/cord comes complete with
terminals and circuit protection. Connecting the
power supply cable/cord terminals directly into the
switch completes the electrical system for the
grinder. The final electrical connection to the outlet
should be made in such a way as to prevent
damage by individuals or passing vehicles that
could endanger both them and the operator.
TO AVOID PERSONAL INJURY TO YOU AND TO BYSTANDERS,
READ AND FOLLOW THESE SAFETY RULES.
Keep this manual for future reference.
To ensure the correct use of the grinder and
to prevent accidents, do not start working
without having read this manual carefully.
This manual explains how the various
components work and provides instructions
for carrying out the necessary checks and
maintenance operations.
SAFETY RULES AND PRECAUTIONS
The use of accessories or attachments not recommended by the
manufacturer may result in a risk of injury to the operators or bystanders!
2

INTRODUCTION
12. Keep work area clean. Cluttered areas and
benches invite accidents. Make sure that the working
area of the grinding wheel is free of tools or other
objects before starting up the grinder. Frequently
clean grinding dust from beneath the grinder.
13. Don’t use in a dangerous environment.
Don’t use power tools in damp or wet locations,
or expose them to rain. Be sure to keep the work
area well lighted.
14. Check the position of the power cord during
operation, making sure that it remains outside the
range of action of the grinding wheel and is not
under tension. Never operate in the vicinity of
other electrical cables/cords.
15. Make workshop child proof with padlocks and
master switches. Also, do not allow anyone but
the operator to touch the power cord or remain in
the close vicinity of the grinder while operating.
16. Always keep the hand-grips clean and dry.
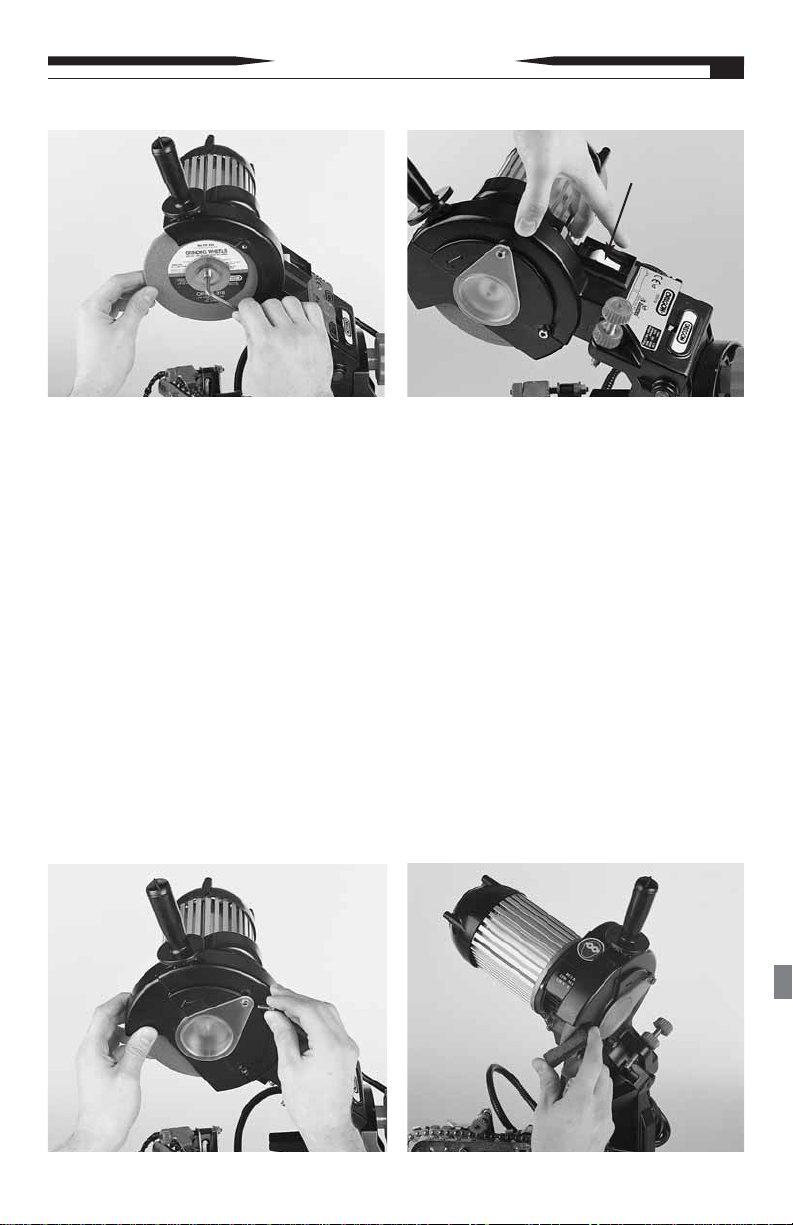
17. Before starting the grinder, make sure that the
grinding wheel is correctly secured and positioned
in the up, rest position. Do not over-tighten the
wheel mounting flange nut.
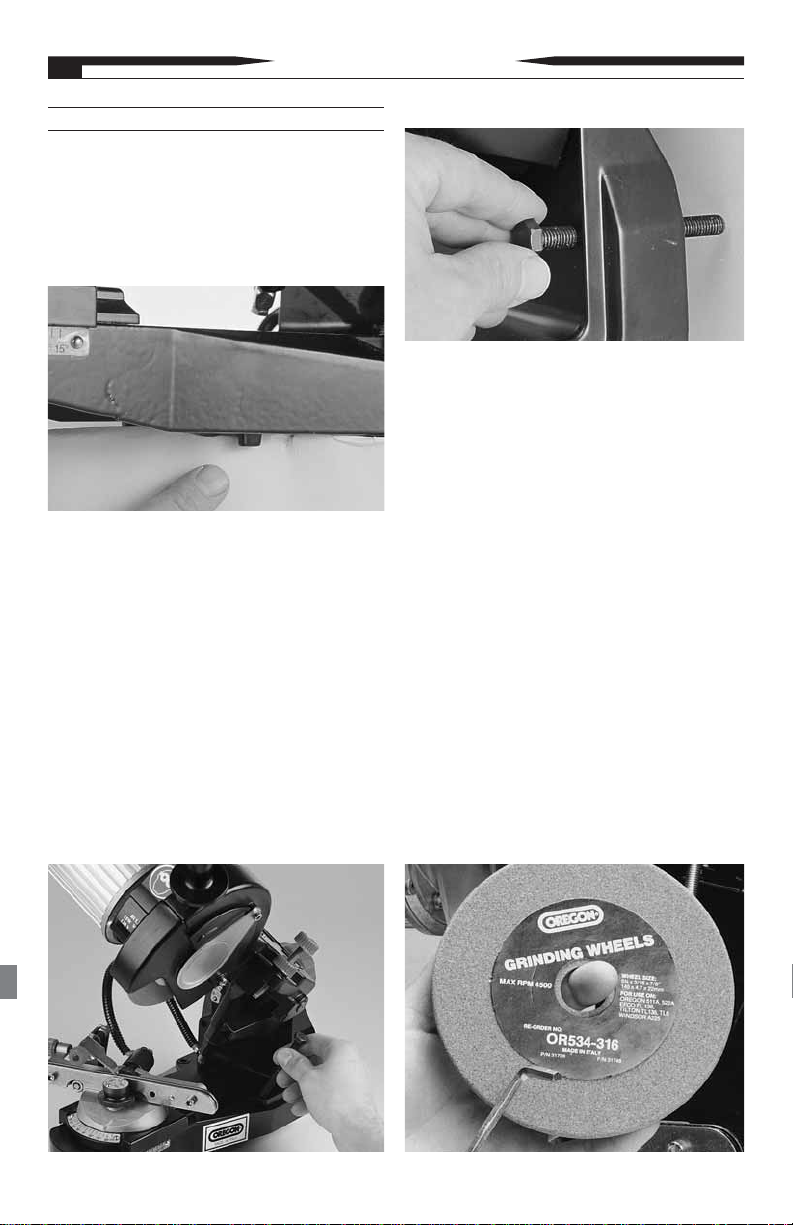
18. Secure work. Make sure that the grinder is
secured as shown in Figures 1-3, page 6. Use the
vise to hold the chain. It frees both hands for mov-
ing the grind head/wheel down to grind the chain.
19. Don’t overreach. Keep proper footing and
balance at all times.
20. Never stand on an unstable platform.
Always work in a stable and safe position. Serious
injury could occur if the grinder is tipped or if the
cutting tool is unintentionally contacted.
21. Check for damaged parts. Before using the
grinder, check to make sure that all the devices,
those for safety and others, are in good working
order and free from any obvious damage that could
affect performance and safety/reliability during use.
22. Use recommended accessories. Consult the
owner’s manual for recommended accessories.
The use of improper accessories may cause risk
of injury. Use only flanges furnished with the
grinder. To guarantee the efficient and consistent
operation of your grinder, remember that any
worn or broken parts must be replaced using only
original spare parts.
23. Use only recommended grinding wheels, as
specified on page 13, table 2.
24. Check your grinder. Never work with a
damaged, poorly repaired, incorrectly fitted, or
modified grinder. Do not remove, damage, or
disable any safety devices.
25. Always use the right tool for the job. Never
use the grinder to cut or grind objects other than
saw chains. Don’t force grinder or attachment to
do a job for which it was not designed.
26. Maintain tools with care. Keep tools sharp
and clean for best and safest performance.
Follow instructions for lubricating and changing
accessories.
27. Never let your grinder be exposed to rain or
dampness.
28. Never use the grinder in an explosive or
flammable atmosphere.
29. Always consult your dealer for any clarification
or important maintenance or repair operation.
30. Never jerk the cable to disconnect it from the
outlet. Keep the cable/cord away from heat, oil,
and sharp objects.
31. Use proper extension cord. Make sure your
extension cord is in good condition. When using
an extension cord, be sure to use one heavy
enough to carry the current you will need to
perform your grinding operation. An undersized
cord will cause a drop in line voltage resulting in
loss of power and overheating. Table 1, page 8,
shows the correct size to use depending on cord
length and nameplate ampere rating. If in doubt,
use the next heavier gauge. The smaller the gauge
number, the heavier the cord.
3

INTRODUCTION
Refer to this page when following assembly instructions which call out a specific name
and part number.
1.Grinding wheels 1/8",3/16",1/4"
2.Large washers
3.Mounting bolts
4.Dressing brick
5.Allen wrenches
6.Template (not shown)
PARTS INCLUDED FOR ASSEMBLY
5
4
3
2
1
4
Note: For Replacement parts of hydraulic bench mounted grinders, see the exploded
view descriptions on page 14.
These parts are included to complete the assembly of the OREGON®
HYDRAULIC BENCH-MOUNTED GRINDER.

INTRODUCTION
The grinder must be used only in a place that is protected from dust and
dampness, that is well-lighted, out of the reach of children, and away from
gases or other flammable or explosive liquids.The grinder must be
situated near a normal electrical outlet equipped with earth (grounded).
** Avoid using dangerous extension cords (See table 1, page 8).
**Grounding Instructions.
1.
In the event of malfunction or breakdown,
grounding provides a path of least resistance
for electric current to reduce the risk of electric
shock. This grinder is equipped with an electric
cord having an equipment-grounding conductor
and a grounding plug. The plug must be
plugged into a matching outlet that is properly
installed and grounded in accordance with all
local codes and ordinances.
Do not modify the plug provided–if it will not
fit the outlet, have the proper outlet installed
by a qualified electrician.
Improper connection of the equipment-
grounding conductor can result in a risk of
electric shock. The conductor with insulation
having an outer surface that is green with or
without yellow stripes is the equipment-
grounding conductor. If repair or replacement
of the electric cord or plug is necessary, do
not connect the equipment-grounding
conductor to a live terminal. Check with a
qualified electrician or service personnel if
the grounding instructions are not com-
pletely understood, or if in doubt as to
whether the tool is properly grounded.
Use only three-wire extension cords that have
three-prong grounding plugs and three-pole
receptacles that accept the grinder’s plug.
Repair or replace a damaged or worn cord
immediately.
2. Grounded, cord-connected tools intended for
use on a supply circuit having a nominal
rating less than 150 volts:
This grinder is intended for use on a circuit that
has an outlet that looks like the one illustrated
in Figure A. The grinder has a grounding plug
that looks like the plug illustrated in Figure B.
A temporary adapter, which looks like the
adapter shown in Figure C, can be used if
the wall outlet to be used does not have a
three-prong configuration.
5

ASSEMBLY INSTRUCTIONS
Assembly/Setup
A. Mount Grinder to a Bench or Wall:
1. For correct bench positioning, use the
notch on the base of the grinder.
(see Figure 1).
2. Mount the unit on a bench or worktop
using nuts and bolts (see Figure 2).
3. To mount the unit to a workshop wall, use
three 8mm expansion bolts (not provided)
(see Figure 3).
Note: For wall mounting, the position
adjustment knob, at the back of the unit,
will need to be replaced with a large nut
(not provided).
4. The machine must be connected to a 120V
10A socket and the socket must be correctly
grounded and fitted with a 10A fuse.
B. Selecting and Mounting the Grinding
Wheel:
1. For the appropriate size grinding wheel
see table 2 on page 13.
2. Make sure that the grinding wheel is in
perfect condition. Hang the wheel by the
center hole and tap it lightly with a metal
object on one side near the perimeter. If a
flat tone is heard it may be cracked or
broken. Do not use! (see Figure 4).
3.Position the desired grinding wheel inside
the shield guard assembly onto the motor
flange and insert arbor bolt, with washer,
through the wheel center hole into motor
shaft. Tighten the arbor bolt, with the large
5.5mm Allen wrench (provided with this
unit), to a snug fit (see Figure 5). Do not
over-tighten this bolt, as doing so may cause
damage to the wheel, rendering it unusable.
4.Install the wheel guard (see Figure 6).
Figure 3
6
Figure 2
Figure 1
Figure 4

C. Dressing The Grinding Wheel:
1. Set the motor/head to the 90-degree position.
2. With the grinder in the “OFF” position
(white switch, Figure 7), check the profile
of the wheel using the special template
(provided with this unit). If the wheel
profile is not correct according to the
template, the wheel will need to be
dressed until it does fit the proper profile.
3.Connect the plug correctly to a serviceable
electrical outlet, then turn the grinder to the
“ON” position (white switch, see Figure 7).
4. From a safe distance at the side of the unit,
observe the grinding wheel as it turns to
make sure it does not oscillate either laterally
or transversally. If wheel turns in a true and
even rotation, allow wheel to turn for one
minute before wheel is dressed.
Note: If the wheel does not run true, turn
the unit off, troubleshoot and correct the
problem before proceeding.
5. Begin dressing the full radius of the wheel
with the use of the dressing brick provided
with this unit (see Figure 8). For best results
use quick, light strokes with the brick to form
the desired profile.
6. Turn the unit off and use the special orange
template to re-check the profile of the wheel.
Note: If necessary, turn electrical power on
and repeat steps 5 and 6 until desired profile
of the wheel is obtained.
Replace the wheel if necessary.
ASSEMBLY INSTRUCTIONS 7
Figure 5 Figure 7
Figure 6
ON/OFF
Figure 8

OPERATING INSTRUCTIONS
Volts Cord length Amps Gauge needed Amps Gauge needed
115/120V 25 ft 0 - 6 18 10 - 12 16
6 - 10 18 12 - 16 14
115/120V 50 ft 0 - 6 18 10 - 12 16
6 - 10 18 12 - 16 14
115/120V 100 ft 0 - 6 16 10 - 12 14
6 - 10 14 12 - 16 not recommended
115/120V 150 ft 0 - 6 14 10 - 12 12
6 - 10 12 12 - 16 not recommended
220/240V 50 ft 0 - 6 16 10 - 12 16
6 - 10 16 12 - 16 12
220/240V 100 ft 0 - 6 16 10 - 12 16
6 - 10 16 12 - 16 12
220/240V 200 ft 0 - 6 16 10 - 12 14
6 - 10 14 12 - 16 not recommended
220/240V 300 ft 0 - 6 14 10 - 12 12
6 - 10 12 12 - 16 not recommended
Table 1
Inspecting the Chain
Always inspect an incoming cutting chain and review any
problems with owner or user. Always check for proper
installation of tie straps and/or reversed drive links.
How a Cutter Works
A. Depth gauge
(controls bite of
the cutter).
B. Working corner
(slices the cross
grain – does most
the work).
C. Top plate edge (lifts out chips after cross grain
has been cut).
D. + E. Heel and toe (support cutter while working).
Top Plate
Side Plate
Rivet Hole
D. Heel
E.Toe
C.Top Plate
Edge B.Working Corner
A. Depth
Gauge
Parts of a Cutter
Gullet
Note: For proper side plate angle,
do not grind the gullet deeper
than where the grinding wheels’
radius meets the flat of the wheel.
(see Illustration).
8
Grinding A Chain

OPERATING INSTRUCTIONS
Grinding A Chain (cont.)
There is risk of serious
personal injury for chain-
saw operators or bystanders from improperly
sharpened saw chain. Read and follow all
manufacturer’s instructions for your saw chain.
Immediately unplug the
power cord if the motor
does not turn the wheel when the grinder power
switch is in the “on” position. Refer to page 5:
**Grounding Instructions.
1. For best results it is recommended that the
chain be clean before grinding.
2. Always wear approved eye protection
during all steps of the grind operation and
when the grinding wheel is in motion.
3. Grind all cutters of the same type (left or
right) before positioning the grinding wheel
to the opposite side.
4. When changing the grind position, make
sure the unit is turned to the “off” position
(white switch, see Figure 7, page 7) and the
wheel has come to a full stop before making
any adjustments.
5. To avoid overloading the motor and to
prevent damage to the saw chain, remove
only the minimum amount of material nec-
essary and do not grind any one tooth for
too long a period.
6. Do not use cooling liquids while grinding.
7. Replace worn grinding wheels when the
diameter of the wheel reaches 70mm (2.8”).
D. Grinding for Bench or Wall Mounted
Workstations:
Note: All adjustments must be made prior
to applying power to the unit.
1. Position the saw chain to be ground onto
the vise (see Figure 9).
2. Setting top-plate cutting angle. Set grinder
head angle to correct degree (see table 2,
page 13 for correct degree setting of
different chain types). Adjustment is made
by loosening knob (# 20 from exploded
view on page 14) at the back end of the
grinder and rotating the grinder head to the
desired angle. (see Figure 10).
3. Setting Vise for top-plate angle. Rotate
the vise into an appropriate
position to grind left or right cutters (see
table 2, page 13) using the degree marking
plate that is mounted forward of the vise
assembly (see Figure 11, page 10).
Figure 9
9
#20
Figure 10
Chain
Direction

4. Setting vise-tilt angle. For saw chains
that require down-angle grinds, set the
desired angle by loosening the large
adjustment knob on the bottom side of
the grinder vise assembly. Then move
the positioning table to the left (forward)
for right-hand cutters, or to the right
(back) for left-hand cutters, to the
desired degree setting. Once the degree
mark is aligned, retighten the large
adjustment knob (see Figure 11).
5. Set the chain stop. Using the cutting chain
stop centering knob, center the chain stop
behind the cutter as shown (see Figure 12).
Make final adjustments to the chain stop by
adjusting the knob at the back of the chain
stop support.
6. Set grind depth. Lower the grind head
into the grind position and adjust depth
adjustment knob (see Figure 13) by
loosening the jam nut and turning the
adjustment knob clockwise or counterclock-
wise until the desired depth is obtained.
Once the final stop adjustment has been
achieved, tighten the jam nut to maintain the
proper depth adjustment during the grind
operation.
Note: This grinder is equipped with a
closed hydraulic system that activates the
closing function for the holding vise
assembly when the grind head is lowered
to the grind position. It is spring loaded to
the open/pressure relieved position as the
grind head is raised to the up/rest position.
7. After all adjustments have been made,
position the cutter to be ground in grind
position on the vise. Then set the vise-
adjustment cam to the desired thickness for
the gauge of chain that is to be ground (see
Figure 14).
8. Turn the unit on by pressing the on-switch
located on the backside of the motor (the
white switch, see Figure 7, page 7).
Note: During the grind operation, when
lowering the grind head into the grind
position, lightly hold the saw chain at the
left (entry) end of the vise to prevent
chain creeping forward when the grind
head is raised.
OPERATING INSTRUCTIONS
Figure 13
Figure 14
10
Figure 12
Step 3 Step 4
Figure 11

9. Lower the grind head/wheel into the grind
position and grind all right-hand cutters,
rotate vise and grind all left-hand cutters
(see Figure 15).
Note: Use several light downward motions
when grinding to prevent burning of the
cutter during grind.
10. Once all cutters of the same side (left or
right) have been ground, repeat steps 2 - 9
in section D, on opposite side cutters.
11. After grind is complete, allow the grind
head/wheel to raise to the upper rest
position.
Note: Always inspect unit after use for any
damaged, broken or missing parts.
(Replace any parts necessary)
E. Setting the Depth Gauge:
1. To set the depth gauge the grinder head
angle should be set to 60°. Set vise angle to
0° and install 1/4" wheel (see Figure 10, page
9 & Figure 11, page 10).
2.
To dress the wheel for depth gauges, place
dressing brick on top of chain vise (see Figure
16) so it is pushed against the chain stop.
Hold the brick firmly in position with two fin-
gers being careful to stay clear of the rotating
wheel as it comes into contact with the dress-
ing brick. Turn the power switch to the on
position and lower the rotating wheel onto the
dressing brick. Grind the contact surface of
the grinding wheel parallel to that of the vise
plate top surface (see Figure 16). Once this
flat parallel profile is obtained, turn the power
switch on the unit to the off position and
remove the dressing brink from the vise.
Note: When dressing the grinding wheel,
use intermittent strokes. Using steady
pressure on dressing brick can cause it to
burn and shorten the life of the brick.
3.
Setting the chain stop.
Position the cutter’s
depth gauge so that it is centered under the
grinding wheel. Use chain-stop adjusting
knob to obtain this setting (see Figure 12,
page 10).
4. Place an Oregon®Gaugit (depth gauge
setting tool, not included) on the chain in
the vise over the depth gauge portion of the
cutter (see Figure 17). Use table 2, page 13
for correct depth gauge.
OPERATING INSTRUCTIONS
Figure 16
11
Figure 15
Figure 17

5. With an Oregon®flat file (P/N 12211, not
included), file the first depth gauge
(see Figure 18).
6. Remove the gaugit and lower the grinding
wheel so that it touches the portion of the
depth gauge that has just been hand filed
(See Figure 19).
7. Set the depth-adjustment knob and lock
into place. This has just set the depth of
grind for the rest of the depth gauges
(see Figure 20).
8. Turn the power switch to the on position
and grind all depth gauges.
Service The Hydraulic System
Note: Periodically, it is necessary to refill
the hydraulic system with oil due to static
leakage. The steps for servicing the
hydraulic system are as follows:
1. Raise the grind head to the up/rest position.
2.Unscrew the screw located on the piston
near the vise (see figure 21).
3. Keeping the grind head in the up position,
service the system by pumping clean
hydraulic fluid, with the use of an oil can,
into the piston screw hole until fluid begins
to overflow (see figure 22).
4. Reinstall the service port screw and washer
without tightening the screw.
5. Lower the grind head slowly to bleed off
any trapped air from the system.
6. Securely tighten the service port screw.
OPERATING INSTRUCTIONS
12
Figure 20
Figure 19
Figure 21
Figure 22
Figure 18
Note: On newer models, the service
and bleed port is on the back end of
the restricter valve. Remove screw to
service. Loosen screw to bleed out air
from system.

GRINDING CHART 13
GRINDING GRINDING FILE DEPTH VISE TOP PLATE TOP PLATE SIDE
CHAIN WHEEL WHEEL FILE GUIDE DEPTH GAUGE TILT GRINDING CUTTING PLATE
TYPE WIDTH P/N SIZE P/N GAUGE P/N ANGLE ANGLE ANGLE ANGLE
Oregon®Chain
Part Number
11BC 5/16" OR534-516 5/16" .060" 26800 90° 35° 60° 85°
11H 5/16" OR534-516 5/16" 107617 .070" 107529 90° 30° 50° 80°
16H 3/16" OR534-316 7/32" 31686 .050" 38850 10° 35° 60° 80°
18H 3/16" OR534-316 7/32" 31686 .050" 38850 10° 35° 60° 80°
20, 21, 22BP 3/16" OR534-316 3/16" 31690 .025" 31941 10° 30° 60° 85°
20, 21, 22JP, LP 3/16" OR534-316 3/16" 31690 .025" 31941 10° 25° 60° 60°
25AP 1/8" OR534-18 5/32" 37534 .025" 31941 10° 30° 60° 85°
27, 27A, 27P 3/16" OR534-316 7/32" 31686 .030" 22291 10° 35° 60° 85°
27R, RA 3/16" OR534-316 7/32" .030" 22291 10° 10°/15° 50° 75°
33, 34, 35LG, SL 1/8" OR534-18 4.5mm* 31692* .025" 31941 10° 25° 60° 60°
58L, 59L, LG, 59J, JG 3/16" OR534-316 7/32" 31686 .025" 31941 10° 25° 60° 60°
72, 73, 75, V 3/16" OR534-316 7/32" 31686 .025" 31941 10° 25° 60° 60°
72AP, 72, 73, 75, DP 3/16" OR534-316 7/32" 31686 .025" 31941 90° 35° 60° 85°
72, 73, 75JG, JP, LG, LP 3/16" OR534-316 7/32" 31686 .025" 31941 10° 25° 60° 60°
72, 73, 75RD 3/16" OR534-316 7/32" .025" 31941 10° 10°/15° 50° 75°
90, JG, SG 1/8" OR534-18 4.5mm 31692* .025" 31941 90° 30° 50° 75°
91, VG, VJ, VS 1/8" OR534-18 5/32" 37534 .025" 31941 90° 30° 60° 80°
95R 3/16" OR534-316 3/16" .030" 22291 90° 5° 50° 75°
95VP 3/16" OR534-316 3/16" 31690 .025" 31941 10° 30° 60° 80°
*Optional file size 5/32" (4.00mm) file and P/N 37534. For depth-gauge, use Oregon®flat file P/N 12211.
Table 2

EXPLODED VIEWS
14
Hydraulic Bench-Mounted Grinder
315 14
16
13
18
20
19
23
28 29
30
27 26
25
12
1
6
8
8
7
22
4
21
2
11
9
17
10
24 33
31
32
5
Item No. Part No. Description
1 105538 Handle Kit
2 105654 Shield Kit
3 107637 Vise Plate
4 35610 Chain Vise Spacer
5 112055 Replaceable Lightbulb (115v)
6 108925 Motor Flange Inner
7 108926 Motor Flange Outer
8 108924 Motor Flange Kit
(Inner And Outer)
9 108199 Socket Cover
10 109879 Power Switch, 115v
11 108196a Light Socket W/Wires
12 108195 Motor Electric 115 Vt.
With Wires
13 35606 Chain Stop Spring
14 35599 Chain Stop Holder
15 32677 Chain Stop
16 35608 Bushing
17 109243 Knob Kit, Height Adjustment
Item No. Part No. Description
18 109244 Adjustment Screw,
Chain Position Stop
19 109245 Vise Cradle Adjustment Knob
20 109246 Position Adjustment Knob
Motor Support Arm
21 109247 Adjustable Cam, Vise Position
22 109248 Metal Shield, Wheel Housing
23 109249 Cylinder Hydraulic Reservoir
24 109250 Reservoir Support Bracket
25 109251 Swivel Fitting, Hydraulic
26 109252 Washer/Seal
27 109253 Bolt, Swivel Attachment
28 109254 Hydraulic System Line
29 109255 Flex Shield, Hydraulic Line
30 109256 Hydraulic Actuator,
Vise Positioning
31 111217 Complete Hydraulic Line Ass'y
32 110703 Motor Mount Arm Spring
33 110595 Restrictor Valve

11
MANUEL D’INSTRUCTION
MEULEUSE HYDRAULIQUE D'ÉTABLI
ASSEMBLAGE, RÉGLAGE
ET UTILISATION
Ce manuel contient
d'importantes infor-
mations concernant
l'assemblage, l'en-
tretien et l’utilisa-
tion de la meuleuse
ainsi que la sécu-
rité de l'utilisateur.
Veuillez le lire
attentivement.
La qualité de cette
meuleuse satisfait à
toutes les normes
de l'industrie qui
s'appliquent ou les
dépasse.
Anglais
Français
Espagnol
RÉF 109179

INFORMATION À L’INTENTION DE L’ACQUÉREUR ET AVIS DE RESPONSABILITÉ
SYMBOLES DE SÉCURITÉ ET MISES EN GARDE
Les symboles suivants servent à aviser l'utilisateur et les personnes de son
entourage d'un danger de blessures potentielles. Utilisé aussi pour diminuer
les risques de problèmes mécaniques et de dommages à la machine et/ou
au produit.
MONTAGE ET AVIVAGE DE LA MEULE
L’éjection à haute vitesse de matériaux par la meule
peut causer des blessures graves. Lire attentivement
ce manuel et suivre ses instructions à la lettre.
Porter des lunettes de sécurité et des gants.
Une meule mal installée peut se fissurer
et se désintégrer durant l’utilisation
exposant ainsi l’utilisateur à un risque de
blessures graves.
L’utilisation d’une meule endommagée
exposerait l’utilisateur à un risque élevé
d’éclatement du disque en raison de la
haute vitesse de rotation de l’appareil. En
cas d’éclatement, les fragments de la meule
seraient éjectés à très grande vitesse.
Les meules doivent être soigneusement
entretenues et examinées ; contrôler qu’il
n’y a pas de fissures apparentes, et « sonner
» la meule avant utilisation. (Une meule non
fissurée rend un son clair lorsque frappée
délicatement à l'aide d'un outil métallique
comme une clé Allen.) Voir figure 4,page 22.
Ne pas tenter de monter la meule en la forçant
ni d’en modifier le trou de montage. Ne jamais
utiliser une meule qui ne peut être montée de
façon bien adaptée. Nous recommandons l'u-
tilisation exclusive de meules OregonMD
.
Pour l’opération d’avivage, l’utilisateur doit
placer ses doigts très près de la meule. Tout
contact avec la meule en rotation à haute
vitesse peut causer des blessures.
Travailler toujours prudemment, conserver une
prise ferme sur le bloc d’avivage et demeurer
attentif à l’opération à tout moment.
S’assurer que l’écrou de la bride de montage
est utilisable et non endommagé. En cas de
vibration de la meule en cours de rotation
ou au démarrage, arrêter l’appareil, démonter
et inspecter la bride de montage ainsi que
la meule. Porter des gants.
Pour éviter d’endommager une meule neuve,
la laisser tourner toujours durant au moins
une minute à vitesse de fonctionnement avant
le meulage ou l’avivage initial.
Ne pas utiliser le flanc de la meule pour
le meulage.
Des jauges de profondeur de chaîne qui sont
mal limées ou meulées augmentent consi-
dérablement les risques d’effets de rebond et de
blessures. Pour réduire les risques de blessure,
limer/meuler toujours les jauges de profondeur
en respectant leur profil d’origine.
Porter des lunettes de sécuritéPorter des gants protecteurs

TABLE DES MATIÈRES
▲Introduction 18-21
Règles et mesures de sécurité 18-19
Nomenclature des pièces fournies pour l'assemblage 20
Instructions de mise à la terre 21
▲Instructions De Montage 22-23
Montage de la meuleuse sur établi ou montage mural 22
Sélection et montage de la meule 22
Avivage de la meule 23
▲Mode D’emploi 24-29
Inspection de la chaîne 24
Parties du couteau 24
Comment fonctionne un couteau de chaîne 24
Meulage pour les installations montées sur
établi ou mur : 25
Mise en place de la chaîne 25-26
Réglage de l'étau pour l'angle d'attaque du
couteau supérieur 25
Réglage de la butée de chaîne 26
Réglage de la profondeur de meulage 26
Affûtage des couteaux 26-27
Réglage de la profondeur de jauge 27
Avivage de la meule pour les jauges de profondeur 27
Appoint du circuit hydraulique 29
▲Tableau De Meulage 30
▲Références des pièces 31
de rechange
Numéros de référence
des pièces et vue éclatée
de la meuleuse

INTRODUCTION
1. Tenir les enfants à l’écart. Tenir l’entourage à bonne
distance des zones de travail.
2. Porter des vêtements de travail appropriés. Ne
jamais porter de vêtements amples, de cravates, de
bracelets, de bagues ou tout autre article de bijouterie
pouvant entrer en contact avec la meule ou autres
pièces mobiles ou s’y prendre. Il est recommandé de
porter des chaussures à semelle anti-dérapante. Toute
personne aux cheveux longs doit couvrir ses cheveux
pour les contenir.
3. Porter toujours des lunettes de sécurité ou
un écran facial. Porter toujours des gants et un
dispositif de protection des yeux pendant l’utilisa-
tion de la meuleuse et le profilage de la meule à l’aide du
bloc d’avivage. Si l’opération de coupe produit de la pous-
sière, porter un masque facial ou antipoussières. Les
lunettes ordinaires ne comportent pas de verres résistant
aux chocs : ce ne sont pas des lunettes de sécurité !
4. Ne jamais arrêter la meule avec les mains. Ne
jamais essayer d’arrêter la rotation de la meule avec
les mains.
5. Débrancher les outils avant toute intervention
d’entretien. S’assurer que la prise de l’appareil est
débranchée avant de régler ou de modifier la meule et
pendant tout travail d’entretien ou tout transport.
6. Maintenir les écrans protecteurs en place et en bon
état. Ne jamais mettre la meuleuse en marche si ses
écrans protecteurs ne sont pas en place.
7. Retirer les clés et les outils de réglage.
S’assurer toujours que les clés et outils de réglage ont
été retirés avant de mettre la meuleuse en position de
marche (« ON »).
8. Utiliser la meuleuse selon ses spécifications
indiquées. Elle accomplira un travail de meilleure qualité,
en présentant moins de risques de blessures, à la
cadence nominale pour laquelle elle a été conçue.
Chaque meuleuse comporte une plaque signalétique
indiquant les spécifications suivantes :
Dimension de l’arbre.
Vitesse à vide, en tr/min.
Type de meule approprié. Tableau 2, page 30.
S’assurer également que la tension et la fréquence
de la meuleuse indiquées sur la plaque signalé
tique de l’appareil correspondent à celles de la
prise de courant.
9. Réduire les risques de démarrage involontaire.
Toujours s’assurer que le commutateur de démarrage
est en position d’arrêt (« OFF ») avant de brancher la
fiche dans la prise de courant.
10. Ne jamais utiliser de câbles, de fiches ou de cor-
dons de rallonge qui sont défectueux ou non standard.
11. Retirer immédiatement la fiche de la prise si le
câble d’alimentation/cordon de rallonge est endommagé
ou coupé. S’il faut le réparer ou le remplacer, contacter le
concessionnaire ou le centre de service agréé.
Remarque: Le câble/cordon d’alimentation est livré avec
têtes de câble et protection de circuit. Le système
électrique de la meuleuse est complet une fois les têtes
du câble/cordon d’alimentation branchées directement
dans l’interrupteur. Brancher le câble à la prise de courant
de manière à ce qu’il ne puisse pas être endommagé par
des personnes ou des véhicules passants ni poser de
dangers pour ceux-ci et pour l’utilisateur.
Conserver ce manuel à titre de référence.
Prière de lire ce manuel attentivement avant
d’entreprendre l’utilisation de la meuleuse afin
d’assurer une utilisation correcte de l’appareil
et d’éviter des accidents.
Ce manuel explique le fonctionnement des
différents composants et indique comment
effectuer les opérations de contrôle et
d’entretien nécessaires.
RÈGLES ET MESURES DE SÉCURITÉ
L’utilisation d’un accessoire non recommandé par le fabricant peut
créer un risque de blessures pour l’utilisateur ou son entourage !
18
POUR ÉVITER DE CAUSER DES BLESSURES À
L'OPÉRATEUR ET AUX AUTRES PERSONNES, PRENDRE SOIN
DE LIRE ET RESPECTER CES RÈGLES DE SÉCURITÉ.
Other manuals for 109179
1
Table of contents
Languages:
Other Oregon Grinder manuals

Oregon
Oregon 730-120 User guide

Oregon
Oregon Dura Max 511A User manual

Oregon
Oregon 590181 User manual

Oregon
Oregon 88-102 User manual

Oregon
Oregon 530-120H User guide

Oregon
Oregon 510A User manual

Oregon
Oregon 410-230 User manual

Oregon
Oregon 88-025 User manual

Oregon
Oregon 710-120 User guide

Oregon
Oregon 410-120 User guide

Oregon
Oregon 511AX User manual

Oregon
Oregon Dura Max 511A Manual

Oregon
Oregon Mini Grinder User manual

Oregon
Oregon 109179 User manual

Oregon
Oregon 720-120 User guide

Oregon
Oregon 760 User manual

Oregon
Oregon 511AX User manual

Oregon
Oregon 310-230 User guide

Oregon
Oregon 310-120 User guide

Oregon
Oregon 510A User manual