Heinzmann Classic User manual

F 13 001 - d&e / 03-13 Montagehinweise Drehgriff, analog / Mounting instructions twist grip, analogue 870-90-038-0X
Tel.: +49 7673 8208 - 0
Fax: +49 7673 8208 - 188
E-Mail: info@heinzmann.de
HEINZMANN GmbH & Co. KG
Am Haselbach 1
D-79677 Schönau / Germany
Drehgriff analog, Montagehinweise
Bestandteile:
- Drehgriff mit integriertem Kabel und Stecker
Benötigte Werkzeuge und Hilfsmittel:
- Kreuzschlitzschraubendreher PH2
- Innensechskantschlüssel 4 mm
- Kabelbinder oder Spiralkabel
Montageschritte:
• Vorhandenen Griff vom Fahrradlenker entfernen.
Ggf. Schalthebel für die Gangschaltung von der rechten auf die
linke Seite des Fahrradlenkers umbauen
• Prüfen, ob der Drehgriff sich betätigen lässt und ob er sich auto-
matisch zurückstellt.
• Vorderteil des Gehäuses vom Drehgriff abschrauben und das
Gehäuse vorsichtig öffnen.
ACHTUNG!
Dabei beachten, dass die elektrischen Leitungen
nicht abreißen!
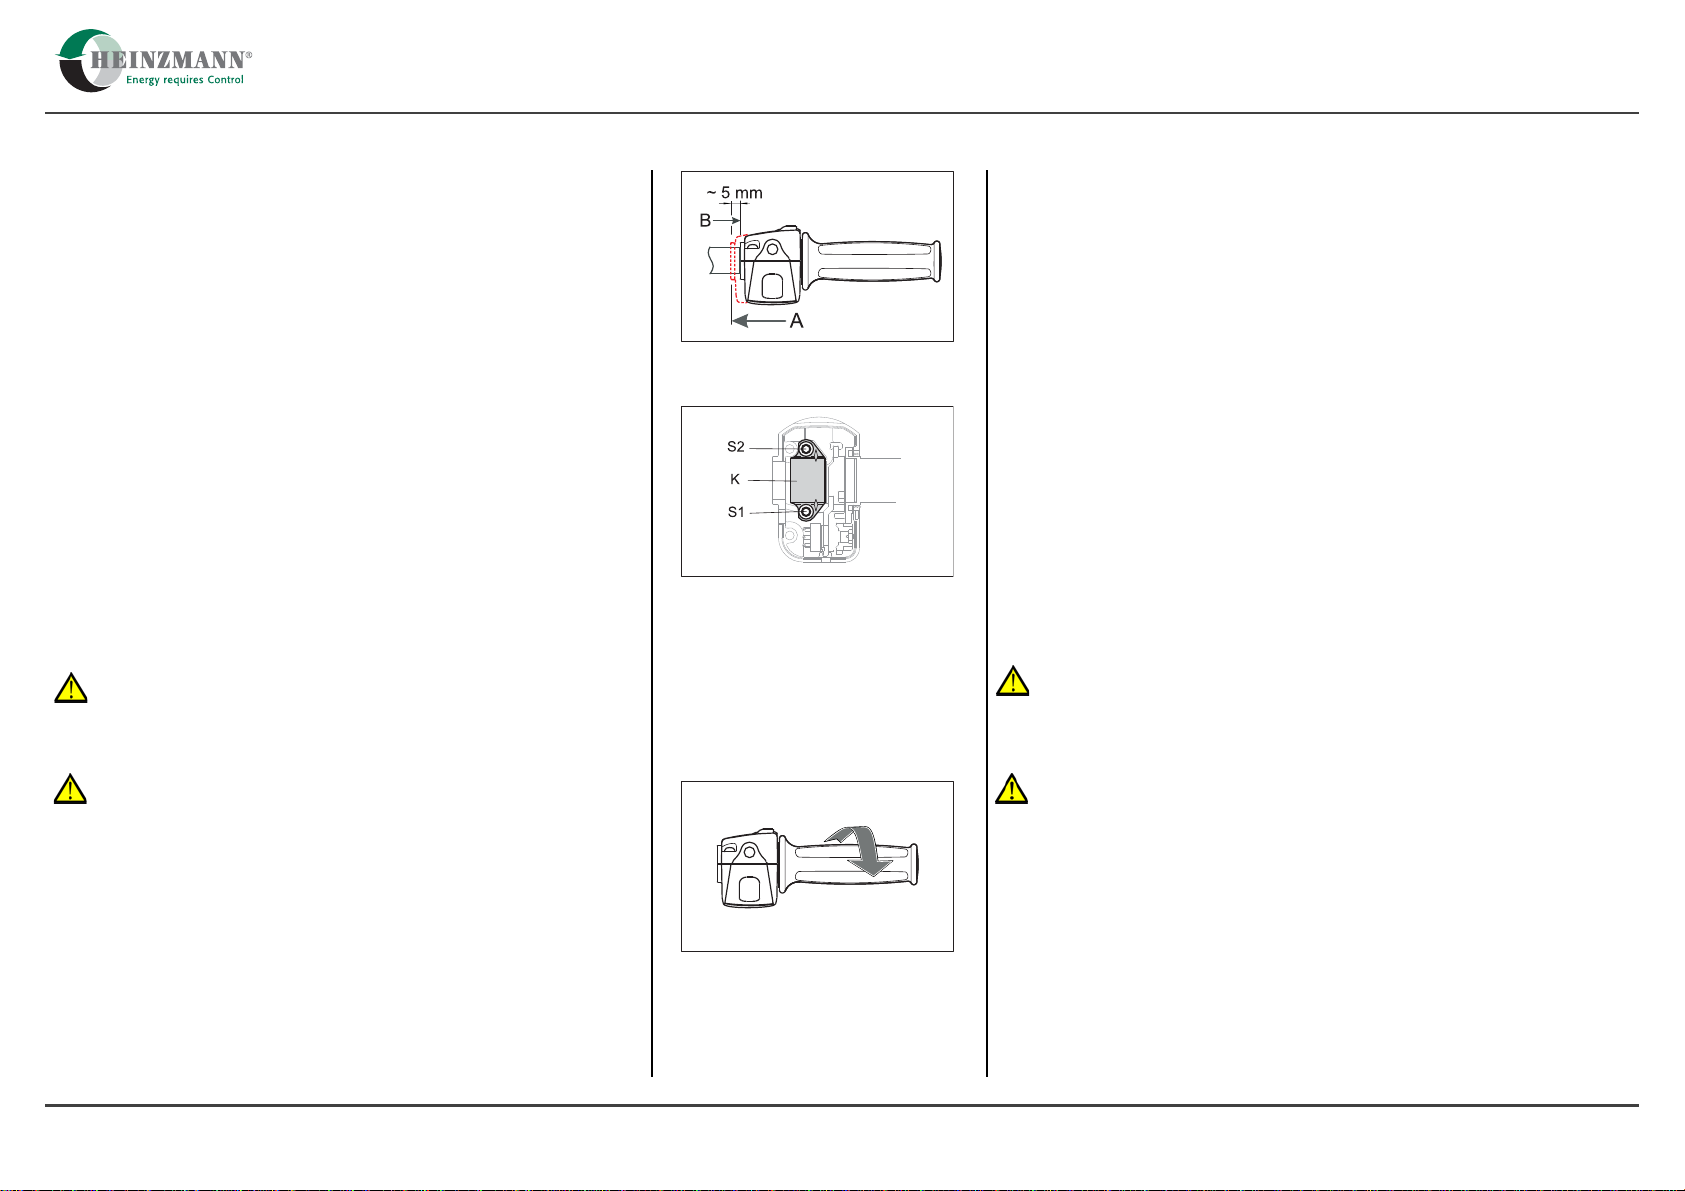
• Befestigungsschrauben
S1
und
S2
der Klemmschelle
K
im Dreh-
griff lösen, Klemmschelle aber nicht entfernen.
Fitting the twist grip analoque
Components:
- Twist grip with integrated cable and plug
Required tools and auxiliaries:
- Crosstip screwdriver PH2
- Allen key 4 mm
- Cable ties or coiled cable
Sequence of steps:
• Remove the present handlebar grip. If necessary move the gear se-
lection lever from the right-hand end to the left-hand end of the hand-
lebar.
• Check if grip can be twisted and also check its automatic return to
start position.
• Now unscrew front part of twist grip housing and take it off carefully.
CAUTION!
Be sure not to tear off open wires of the grip!
• Loosen attachment screws
S1
and
S2
of clamp
K
inside twist grip
but do not dismount clamp.
F 13 001 - d&e / 03-13 Montagehinweise Drehgriff, analog / Mounting instructions twist grip, analogue 870-90-038-0X
Tel.: +49 7673 8208 - 0
Fax: +49 7673 8208 - 188
E-Mail: info@heinzmann.de
HEINZMANN GmbH & Co. KG
Am Haselbach 1
D-79677 Schönau / Germany
• Drehgriff bis zum Anschlag auf das rechte Lenkerende schieben
(
A
). Den Drehgriff danach wieder ca. 5 mm vom Anschlag zu-
rückziehen (
B
). Wenn der Drehgriff zu weit aufgeschoben wird,
kann er klemmen und die automatische Rückstellung kann be-
hindert werden!
• Die Befestigungsschrauben der Klemmschelle zunächst nur
leicht anziehen, sodass der Drehgriff sich noch verschieben
lässt. Drehgriff nun am Lenker nach Wunsch ausrichten.
• Nun zuerst Befestigungsschraube
S1
und danach Befestigungs-
schraube
S2
endgültig festziehen
(Anzugsmoment
3,25
±
0,25
Nm).
• Unterteil des Gehäuses wieder aufsetzen und mit Schrauben be-
festigen (Anzugsmoment
2,25
±
0,25
Nm).
ACHTUNG!
Dabei beachten, dass die innen freiliegenden Leitungen
nicht eingeklemmt oder beschädigt werden!
ACHTUNG!
Automatische Rückstellung des Drehgriffes prüfen!
Der Drehgriff muss sich sofort in seine Grundstellung zurück-
drehen. Sollte dies nicht der Fall sein,Drehgriff demontieren und
mögliche Ursache suchen. Z.B.:
- Kabel eingeklemmt
- Drehgriff zu weit auf Lenkerende geschoben
• Drehgriffkabel mit Kabelbindern oderSpiralkabel am Brems- und
Schaltzug befestigen. Dabei auf genügend Lenkeinschlag-
reserve achten.
• Now push twist grip onto the right-hand end of the handlebar as far
as it will go (
A
).
Now pull back the twist grip off by approx. 5 mm (
B
).
If the twist grip is pushed on too farit can stick and obstruct the grip's
automatic return!
• Tighten attachment screws
S1
and
S2
of clamp
K
provisionally, so
that the twist grip can still be shifted.
Set twist grips position and orientation as requested.
• Now first tighten attachment screw
S1
finally.
After this finally tighten attachment screw
S2
.
(Tightening torque:
3,25
±
0,25
Nm).
• Attach lower part of twist grip housing and fix it with screws again.
CAUTION!
Be sure not to jam or damage open wires inside the twist grip
housing!
CAUTION!
Check the twist grip’s automatic return to start position!
The twist grip must return immediately to its start position.If the twist
grip does not work likewise remove it and try to find cause.
Possible reasons might be e.g.:
- jamed wire
- grip is pushed on handlebar too far
• Tie the twist grip cable and the brake and gear cables together with
cable ties or coiled cable. Make sure that the cables do not restrict
handlebar lock-to-lock movement.


