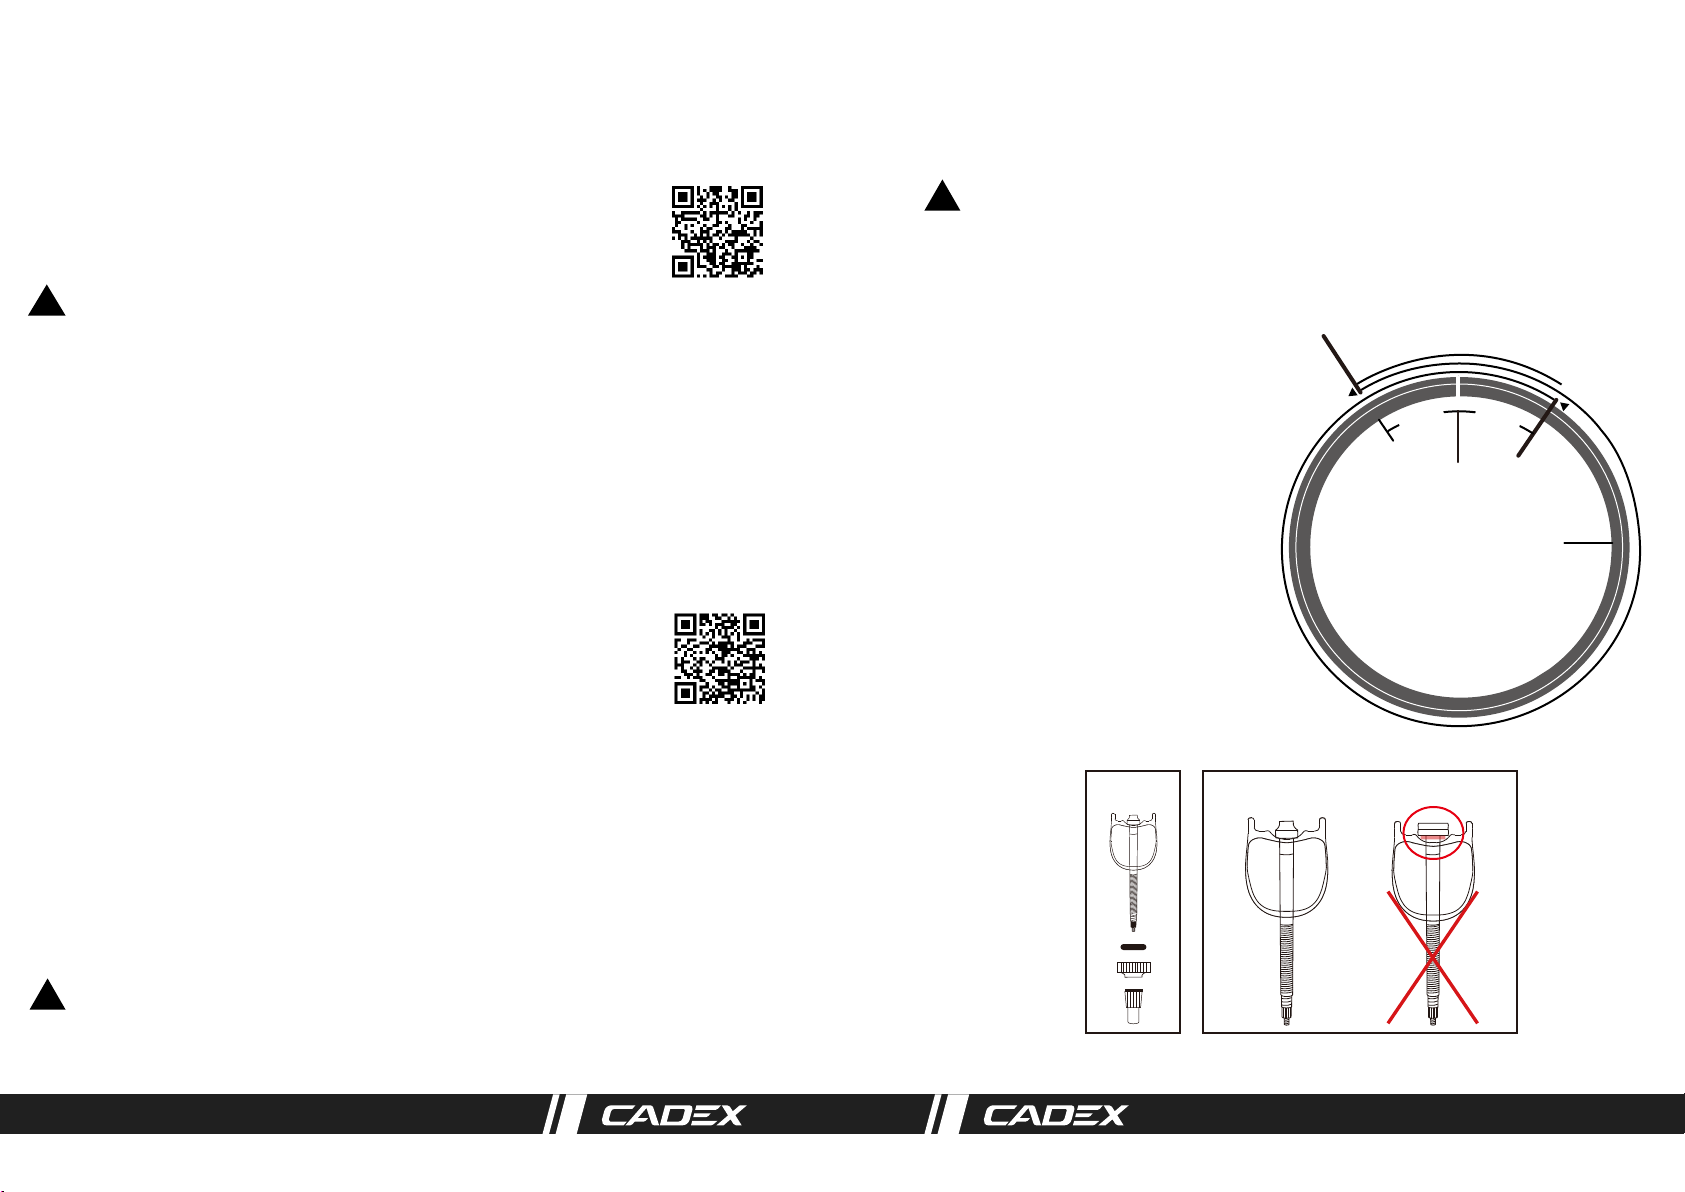
Cadex Tubeless WheelSystems User manual


Thank you for selecting CADEX WheelSystems, a highly engineered and innovative bicycle wheel solution
which will help youachieve your performance goals. Following the instructions below will ensure that
you get the most performance from your equipment and that it will continue toperform at the highest
level. If youhave any questions about anything covered in this manual, please contact your authorized
CADEX retailer.
IMPORTANT:
This manual contains important safety, performance and service information. Make sure
you are familiar with the information provided in the manual prior to installing your new
wheels or before going on your first ride and keep it for future reference.
For further information, please visit: www.cadex-cycling.com
。Compliancewith the following instructions concerning assembly, handling, maintenance and care of
your CADEX wheels is essential toprovide proper and safe operation. Disregarding these instructions
can lead to accidents resulting in serious injuries or even death.
。CADEX WheelSystems are designed and intended for use on a bicycle. The wheel or its components
should not be used for any other applications or asa tool or toy, or inany manner other than that
described in this user’s manual. Otherwise, it isat the user’s own risk. If you are not sure about the
intended use ofyour WheelSystem, please consult your local authorized CADEX retailer for the intended
use of the WheelSystem.
。Use CADEX or Giant Tubeless tire products that meet the ETRTO dimension standards to be compatible
with CADEX tubeless WheelSystem.
。The tubular tire needs to use the proper size for CADEX tubular WheelSystems.
。CADEX tubeless tires are always the best match for CADEX Tubeless WheelSystems. Should you
chooseto use a non-CADEX tire, we have created a CADEX approved list of tires that we have tested
to be 100% compatible with CADEX rims. To ensure your safety and to maintain your
CADEX limited warranty,use only thetires listed on theCADEX Approved Tire List.
If necessary, you may use an innertube on aCADEX tubeless rim, so long as thetire
you are using is on the CADEX Approved Tire List.
The CADEX Approved Tire List can be found on
www.cadex-cycling.com/global/cadexapproved.
。Using brake pads or tiresthat are not compatible or recommended by CADEX mayresult indamage to
your WheelSystem andvoid the warranty.
。For CADEX Tubular WheelSystems, please refer tothe tire manufacturer’s instructions for tubular tire
installation.
!WARNING
!
!WARNING
BEFORE RIDING
。Ensure that the wheels are compatible withall other parts such as type of brake, skewers, cassette,
tire, valveand rim tape. Additionally, ensure that the wheelsare properlyinstalled prior to
your first ride.
。If you encounter difficulties or are uncertainabout anything identified in this user’s manual, please
contact your local authorized CADEX retailer.
If the wheel is notinstalled correctly or isimproperlymaintained, it maybe dangerous and cause
accidents with serious injury.
ASSEMBLY A
Using CADEX Tubeless WheelSystems with
tubeless tires:
CAUTION:
When installing CADEX Tubeless WheelSystem (including rim tape, tubeless valve,
tubeless sealant, and tubeless tire), please refer to the set up instructions issued by CADEX orconsult
your local authorized CADEX retailer.
1. When installing a tubeless tire on your CADEX
Tubeless WheelSystem, use it in combination
withthe CADEX tubeless rim tape, tubeless valves,
tubeless sealant and tubelesstire. If your wheels
are tobe used with rim brakes, we recommend
the use of CADEX heat resistant tubeless rim tape.
If you have question, pleasecontactyour
authorized CADEX retailer.
END Overlap
Valve
Start
Rim
Figure 1
15cm
15cm
2. When installing the rim tape, Ensure the tape
is set in the center of the rim bed, covers the
entire width of the tire well and makesure
that the tape overlaps 15cm on both sides of
the valve hole (see Figure 1).
3. For the installation of the tubeless valve, please
see Figure 2 and Figure 3.
Ensure that the provided O-ring seal is positioned
correctly between lock-ring and rim (see Figure 2)
Attach the lock-ring tothe valve and tighten it finger tight.
Do not use any kind of tools to tighten the valve lock-ring.
01 02
Figure 2Figure 3

Step 2:
Start from the opposite side of valve, insert the other side of the tire
bead in the center channel of the rim bed (see Figure 4 below).
Make sure to work toward the valve as shown in figure below.
Ensure the beads of both sides of the tire all around the rim are in
the center channel of the rim bed to finish the installation.
(Use of Giant tire installation tool and lubricant may reduce the
resistance of installation. Giant Tubeless System installation tool
and lubricant can be purchased from your local authorized
Giant retailer.)
。The use of a tubeless tire with CADEX Tubeless WheelSystem without CADEX or Giant recommended
tubeless rim tape and tubeless valves can result in inflation failure.
。We strongly recommend against the use of tire levers when installing the tubeless tire as this may
cause structural damage to the tire and/or rim, resulting in inflation failure or sudden loss of air
pressure
。Use of a tubeless tire with a CADEX Tubeless WheelSystem without tire sealant may result in poor air
retention and/or lead to sudden air loss in the event of a puncture
。To achieve the puncture sealing performance, use only Giant sealant. Using non-Giant sealant
may result in corrosion (tire, rim, and rim tape) or sticky tire and rim, which may lead to abnormal
disassembly.
!WARNING
4. For the installation of tubeless tires, please see “ASSEMBLY B, How to install tubeless tires on
CADEX Tubeless WheelSystem.”
5. For filling the sealant, please see “ASSEMBLY C, How to fill sealant into CADEX Tubeless WheelSystem.”
6. To achieve the best cycling performance, we strongly recommend the use of CADEX or Giant Tubeless
System products (rim tape, tubeless valves, tubeless sealant, and tubeless tires) in combination with
your CADEX Tubeless WheelSystem. CADEX or Giant Tubeless System products can be purchased from
your local authorized Giant or CADEX retailer.
ASSEMBLY B
How to install tubeless tire on
CADEX Tubeless WheelSystem:
Step 1:
Start from the opposite side of the valve, insert one side of the tire
bead in the center channel of the rim bed
(see Figure 4 below, center channel of the whole rim).
!
CAUTION:
Tire levers which have a sharp edge and/or are made of a metallic material may damage the rim.
To prevent rim damage we recommend only using Giant tire installation tool or the CADEX tire levers
which are delivered with the CADEX wheelsystem.
Valve
Opposite side of valve
03 04
Figure 4

IMPORTANT:
Braking with carbon rims at slow speed may cause a shuddering sensation.
Only use CADEX brake pads for carbon rims to ensure best braking performance. Other pads may not
provide sufficient braking performance and could overheat the rim, causing the carbon fibers to delaminate.
Failure to follow may lead to personal injury and void of your warranty. Consult an authorized CADEX dealer
for recommended brake pads.
!WARNING
!
CAUTION:
1. Check the compatibility of the brakes, especially the brake interface of the frame, fork and wheel.
Mount the brake set and its components to the manufacturer’s recommendations.
2. When mounting and adjusting rim brake pads, ensure to position the pads at least 3mm from the
rim edge (Figure 11).
Mounting closer to the rim edge may result in overheating during continuous braking or
damage to the carbon fiber.
!
CAUTION:
。Rims for disc brake wheels are designed to be used with disc brakes only. Do not use rim brakes on
a disc brake wheel.
。Rims damaged by using non-CADEX exclusive brake pads are not covered by the product warranty.
。A rim will wear out with normal use. Check rims before and after each ride for signs of excessive
wear and have the rim replaced as soon as it exhibits any signs that it is worn out or damaged.
。Always brake with both brakes at the same time. Avoid continuous hard braking, this can overheat
the rim and may lead to tire failure.
。Braking power is also reduced if the rim is wet or if you have new wheels or new brake pads. Adjust
your manner of riding accordingly.
。Consult your local authorized CADEX retailer for any questions on this section.
Brakes:ASSEMBLY C
How to add sealant to a
Tubeless CADEX WheelSystem:
Step1:Remove valve core from valve body by using the provided tool. (Figure 5)
Step2:Shake the bottle well to distribute particles throughout the sealant. (Figure 6)
Step3:Using either the Giant Check and Refill Syringe or the bottle nipple, fill sealant through the
open valve body. Depending on tire size the volume should be between 30~60 ml per wheel. (Figure 7)
Step4:Reinstall the valve core to valve body by using the provided tool. Ensure the valve core and
lock ring are firmly tightened. (Figure 8)
Step5:Re-inflate the tire to the 7.5 BAR (110 PSI) pressure. (Figure 9)
Step6:Gently shake and spin the WheelSystem to distribute the sealant throughout the inside
cavity of the tire and coat the entire inner surface to achieve the best performance. (Figures 10.1-10.4)
Step7:Install the WheelSystem according to the wheel and/or bicycle owner's manual, inflate the tire
to recommended riding pressure, close the valve and go for a ride.
5
8 9
6 7
10-2 10-3 10-4
10-1
05 06
Incorrect adjustment of the brake pads will void the warranty.
3. The installation of center lock type disc
brake rotor is shown in Figure 12.
Please follow the disc brake manufacturer’s
instruction for rotor installation.
Center lock mount
Figure 12
Torque : 40 Nm
Rotor fixing lock
Rotor
Figure 11

!WARNING
!
CAUTION:
Figure 13
!
CAUTION:
Use caution when attached the bike toa car rack asthe the unpredictable
high forces of the retention devices may cause damage tothe wheels
MAINTENANCE& CARE
1. Load limit of your product (the weight of rider +bike +luggage)
。WheelSystems for road bike: 285 lbs. / 129kg
07 08
2. Storing your WheelSystems
。Carbon WheelSystems may be damaged by improper storing. Do not
hang the bike by the wheel while displaying or storage.(Figure 13)
3. Contact your authorized CADEX retailer for all wheel service needs.
Have the spoke tension and the wheel trueness checked regularly.
Spoke tension that is too high or too low can cause high operating
loads of the wheel components and could lead toa premature failure
caused by material fatigue.
4. Check the wheels before and after every ride for any damage.
Do not ride the wheels under any circumstances if there is any damage
to the rim orother components of the wheels.
For example: deformation of the braking surface, cracks inthe rim,
broken spokes, andlooseness or playinthe bearings.
If this is the case, contactyour authorized CADEXretailer to resolve
the problem.
5. Get your bikechecked by authorized CADEX retailer after everyaccident that mayresult in
damage to your WheelSystems.
6. CLEANING:
A. Wheels must be cleaned frequently with a soft spongeandneutral cleaner (such as mild soap and water).
Do not use solvents (e.g. acetone, mineral spirits, etc.).
B. Hub: The front and rear hub must be maintained at least once a year. If used regularly under extreme
conditions(e.g. strong rain, mud, transport inrain, etc.) the driver body should be maintained more
frequently. Frequent maintenanceof the hubs guarantees a longer life span and optimal performance
over time. Use of high-pressure water or strong cleaner mayinject external contaminants into the hub
and should be avoided. Do not use strong solvents. (e.g. acetone, mineral spirits, etc.).
C. Sealant: to retain proper air tightness and puncture repair functionality, follow below mentioned
maintenance frequency:
•Every 2 months:check and refill sealant as necessary
•Once per year: Removeoldor dry sealant and use only a cloth rag to wipe the inside of the tire.
Improper maintenance may result infailure of sealant functionalities.
。Before riding your bicycle, check the tire pressure and clean all contaminants and brake pad residue
(grit, dirt, oil, etc.) from the tires, brake pad and braking surface (particularly any traces ofoil orgrease)
and check the wear of the brake pads, brake surface of the rim before every ride. Replace worn out
brake pads with new ones to maintain optimum braking effect.
。If you use CADEX Tubeless WheelSystems with tubelesstires, check your tire after riding your bicycle.
If tire damage exists which the sealant cannot seal, your tire structure is damaged, replace your tire.
To avoid damage to your carbon products, do not store or transport the product in a manner that the
product is exposed to constant high temperatures. Excessive heat can damage the resin that joins the
carbon fibers. Keep product is a minimum of 45cm(18 inches) away from any constant source ofheat,
for example car exhaust, heaters, open fire, etc.
Do not exceed 150°F (65°C) exposure to your carbon products.
CADEX LIMITED WARRANTY
• Giant Manufacturing Co., Ltd. or its affiliated company which is registered in the country where you
purchased your CADEX WheelSystem (“CADEX”) warrants it’s CADEX WheelSystems (“Product”) for a
period of two (2) years from the date of purchase for the original owner only.
•Online registration of your CADEX WheelSystem within 8 weeks of the purchase date makes you
eligible for the CADEX Incident Replacement Program.
Please see https://www.CADEX-cycling.comfor further information.
This warrantyapplies only to this product when purchased new from an Authorized CADEX dealer and
assembled by that dealer at the time of purchase.
LIMITED REMEDY
Unless otherwise provided, the sole remedy under the above warranty, or any implied warranty, is
limited to the replacement of defective parts with those of equal or greater value at the sole discretion
of CADEX.
This warrantyextends from the date of purchase, applies only to the original owner, and is not
transferable. In no event shall CADEX be responsible for any direct, incidental or consequential
damages, including, without limitation, damages for personal injury, property damage, or economic
losses, whether based on contract, warranty, negligence, product liability, or any other theory.
EXCLUSIONS
The above warranty, or any implied warranty, does not cover:
。Normal wear and tear on parts in situations where there areno assembly or material defects.
。Consumable components including tires, rim tapes, spokes, brake pads,bearings, and
tubeless tire sealant.
。Damage while using non-approved brake padsor tireson your product.
。Products serviced byother than an authorized CADEX dealer.
。Modifications of the product from its original condition.
。Use of product in abnormal, competition and/or commercial activities or for purposes other than
those for which this product was designed.

09
。Damage caused by failing to follow this manual.
。Paint, finish and decal damage resulting from taking part in competitions, jumping, downhill and/or
training for such activities or events or as a result of exposing the product to, or operating Product in,
severe conditions or climates.
。Labor charges for partreplacement or changeover.
Except as is provided by this warranty and subject to all additional warranties , Giant, CADEX or their employees
and agents shall not be liable for anyloss or damage whatsoever(including incidental and consequential loss or
damage caused by negligence or default) arising from or concerningany CADEX product.
Giant and CADEX make no otherwarranties, express or implied. All implied warranties, including the warranties of
merchantability and fitness for a particularpurpose are limited in duration to that of the express
warrantiesstated above.
Anyclaim against this warranty must be made throughan Authorized CADEX Dealer. The purchase
receipt or other proof of the date of purchase is required before a warranty claim may be processed.
Claims made outside the country of purchase may be subject to fees and additional restrictions.
Warranty duration and details may differ by country. This warranty gives you specific lega l rights,
and you may also have other rights which may vary from place to place.
THIS WARRANTY DOES NOT AFFECT YOUR STATUTORY RIGHTS.
Additions for Australia
In relation to goods sold in Australia, the following terms form part of this CADEX warranty in addition to the
termsset out above. To the extent of any inconsistency between the below terms and the terms of the
warranty setout above, the below terms will prevail.
Our goods come with guarantees that cannot be excluded under the Australian Consumer Law. You are
entitled to a replacement or refund for a major failure and for compensation for any other reasonably
foreseeable loss or damage. You are also entitled to have the goods repaired or replaced if the goods fail
to be of acceptable quality and the failure does not amount to a major failure. ThisCADEX warranty does
not exclude, restrict or modify any such statutory right or remedies.
The Remedyand Exclusions outlined above operate in addition to all rights and remedies to which you may be
entitled under the Australian Consumer Law and any other relevant legislation and are not intended to exclude,
restrict or modify any such rights or remedies.
Any claim under this additional CADEXwarranty must be made in person through an Authorized CADEXDealer
or distributor. Any cost incurred by you in making a claim under this warrantywill be borne by you. Except as
is provided by this warrantyand subject to any rights or remedies to which you may be entitled under the
Australian Consumer Law or other relevant law in relation to the goods to which this warranty relates, CADEX
and its employees and agents shall not be liable for any other loss or damage whatsoever (including incidental
and consequential loss or damage caused by negligence or default) arising from or concerning any Giant
bicycle.
The benefits given to you by this CADEX warranty are in addition to other rights and remediesyou may have
under a law in relation to the goods to which this CADEX warranty relates. This CADEX warranty does not
exclude, restrict or modify any such statutoryrights or remedies.
The additions of the CADEXwarrantyare given by:
Name: Giant Bicycle Co. Pty Ltd
Company address: Unit 7, 3-5 Gilda Court, Mulgrave, Victoria, Australia
Company telephone number: (03)8541-4800
Company email address: info@giantbikes.com.au
Table of contents
Popular Bicycle Accessories manuals by other brands

CAMPAGNOLO
CAMPAGNOLO UT-CN400 quick start guide

KTM Power Parts
KTM Power Parts USD 48 quick start guide

Marzocchi
Marzocchi Drop-Off SL 2006 Technical instructions

TRIOBIKE
TRIOBIKE MID DRIVE SYSTEM Setup manual

Rixen & Kaul
Rixen & Kaul TabletBag Duratex S quick start guide

Formula
Formula Linea operating manual