Hekatron Genius Plus User manual

Operating manual
Smoke alarm
Genius Plus
Genius Plus X

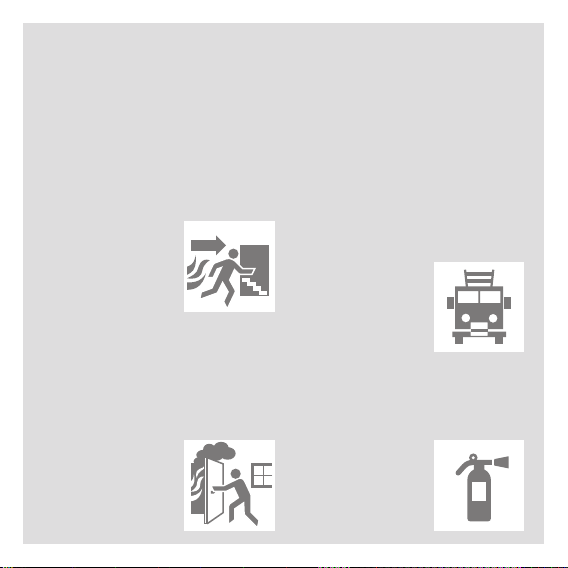
Behaviour in the event of re
1. Rescue people
fWarn the people living with you.
fI
mmediately leave the room /
the building and close all doors
on your way out to prevent a
rapid spread of
smoke and re.
fStay close to the
oor if there is
dense smoke.
fEnsure that all persons have left
the room / the building.
fIf, for whatever reason, you are
unable to leave the room / the
building, close
all doors, seal
all cracks and
slots and try to attract someone’s
attention at the window.
2. Call the re brigade
fWait until you are
in a safe place
before you call the
re brigade.
3. Extinguish the re
fOnly attempt to extinguish the
re yourself if this
does not put you
in any danger.

4| Contents
Contents
1. Introduction 6
2. Intended use 7
3. Safety 8
4. Product description 10
4.1 Functional principle 11
4.2 Features 11
4.3 Conformity 12
5. Project planning 13
6. Assembly position 14
6.1 Standard case 14
6.2 Special cases 15
7. Assembly 18
7.1 Screw/dowel assembly with 1 screw 19
7.2 Screw/dowel assembly with 2 screws 19
7.3 Assembly with adhesive pad 20

6| Introduction
1. Introduction
This document is a translation
of the original German
operating manual.
This manual applies to the smoke
alarms Genius Plus and Genius
Plus X. To the Genius Plus X with
radio networking, however, the
“StandardX radio module” operating
manual shall apply additionally. The
latter includes all relevant information
on the radio network.
This manual is available for download
as a PDF le on our website
www.hekatron-brandschutz.de.
Our website also contains further
information as well as interesting
FAQs on re protection. Please note,
however, that our website is only
available in German.
Additionally, there are various
tutorials available for the assembly
and commissioning of the Genius
Plus X with the Standard X radio
module:
www.hekatron-brandschutz.de/
genius-video
This manual uses the following
symbols and signal words:
i
Symbol/
signal word Meaning
CAUTION Warning which could lead
to material damage or
functional defects if it is
not observed
iReference to additional
information
fInstruction
ÖResult of an action
List

Intended use | 7
2. Intended use
The smoke alarm serves to give
people an early warning about
smouldering res and open res
with smoke formation. Thesmoke
alarm can neither prevent nor
extinguish res.
The smoke alarm may be
installed in residential buildings,
apartments and rooms with similar
purposes.
The smoke alarm can be operated
as a stand-alone smoke alarm
(Genius Plus) or as a smoke
alarm with radio networking
(GeniusPlus X).
Improper use
The smoke alarm may not be
installed in outdoor areas.
The smoke alarm may not be
used for forwarding alarms (e.g.
to the re brigade). For this
purpose, a re alarm control panel
in accordance with the national
directives and regulations is to
be used.
If the smoke alarm is used
improperly, Hekatron Vertriebs
GmbH shall not assume any liability
for the resulting damage.

8| Safety
3. Safety
If the safety and operating
instructions are not observed,
noliability and warranty claims
against Hekatron Vertriebs GmbH
shall be enforceable.
General
To ensure the proper and safe
use of the smoke alarm, read the
operating manual completely and
follow the instructions.
Keep the operating manual for
future reference.
Install a sufcient number
of smoke alarms in the
correct assembly positions
(seechapters“Project planning”
and “Assemblyposition”).
Do not paint over the smoke
alarm.
Do not cover or put tape over the
smoke inlets.
The batteries are rmly installed
and may not be replaced.
Do not expose the smoke alarm to
excessive heat, e.g. sunshine, re,
or similar.
Do not open or modify the smoke
alarm.
Hekatron recommends conducting
the project planning, assembly
and maintenance according to the
national directives and regulations.

Safety | 9
Renovation work
Protect the smoke alarm against
dust and contamination (e.g. cover
the smoke alarm or dismount it
and store it in a plasticbag).
Once the renovation work is
completed, reassemble the smoke
alarm or remove the cover.
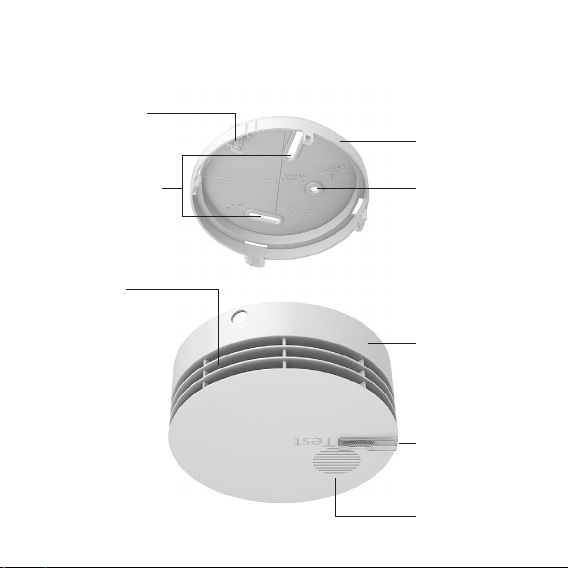
10 | Product description
4. Product description
Round hole for
1-hole assembly
Base
Magnetic holder
Smoke inlets
Elongated holes for
2-hole assembly
Smoke alarm (including
non-removable
batteries)
Opening for the
acoustic alarm
Test button with
LED
Not displayed
Adhesive pad
Screw and dowel for
1-hole assembly

Product description | 11
4.1 Functional
principle
The smoke alarm utilises the
scattered-light principle. Light
beams are regularly sent out in
the measuring chamber, which are
then absorbed by the measuring
chamber. As soon as smoke enters
the measuring chamber, the light
beams are deected by the smoke
particles (scattered) and hit a lens.
This triggers the alarm, which is
signalled by the smoke alarm by
means of a loud alarm sound and the
red ashing LED in the test button.
4.2Features
Contamination compensation:
The smoke alarm automatically
adapts to normal changes in its
environment and thus guarantees
a constant level of sensitivity and a
long service life.
Contamination forecast:
During the functional check, the
smoke alarm calculates whether
a secure operation can be
guaranteed for another 15 months
if the level of contamination
remains the same.
Continuous automatic self-check:
In normal operation, the smoke
alarm regularly carries out
an automatic self-check and
therefore only needs to be
checked once a year
(see chapter “Maintenance”).

12 | Product description
Frequency-optimised audible
sound:
Thanks to the different high and
deep frequencies, the alarm sound
is better perceived by humans.
Radio networking option
(onlyGenius Plus X)
The smoke alarm comprises an
interface for the integration of a
Standard X radio module and can
thus be operated as a smoke alarm
with radio networking.
4.3 Conformity
Hekatron Vertriebs GmbH
herewith declares that the Genius
Plus / Genius Plus X smoke alarm
is compliant with EU regulations
2014/30/EU and 2011/65/EU. The
complete declaration of conformity
can be found on our website
www.hekatron-brandschutz.de.
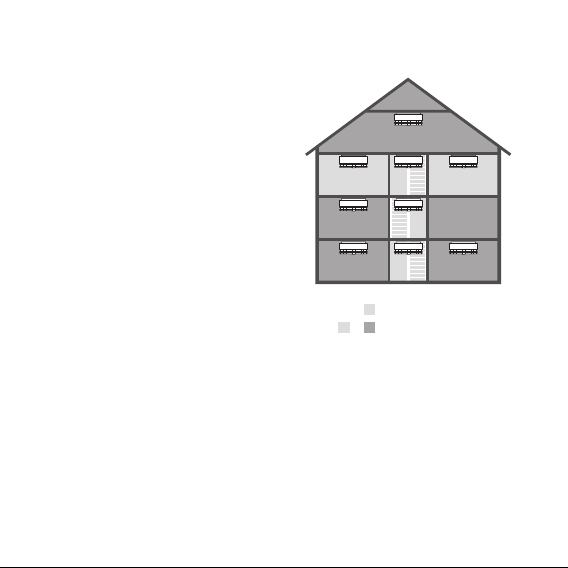
Project planning | 13
5. Project
planning
The corresponding national directives
and regulations shall apply to the
project planning. The gures and
information on the minimum tting
and the ideal tting refer to Germany
(mandatory smoke alarms).
Minimum fitting:
Bedroom (including guest
bedrooms)
Children’s room
Escape routes (e.g. hallway)
For an ideal fitting, we recommend
installing additional smoke alarms in
the following rooms:
Living room
Ofce
Basement
Kitchen
Living room
Bedroom Children’s
room
Ofce
BasementBasement
Minimum tting
+ Ideal tting
14 | Assembly position
6. Assembly
position
CAUTION
Selecting the correct assembly
position in the room is decisive for
the functioning of the smoke alarm.
fSelect an assembly position
in which smoke can reach
the smoke alarm without any
obstructions and thus enables an
early detection.
fThe standard case and special
cases must be observed.
Genius Plus X:
If radio smoke alarms are used,
the chapter
“Project planning” in the
“Standard X radio module”
operating manual is also to be
observed.
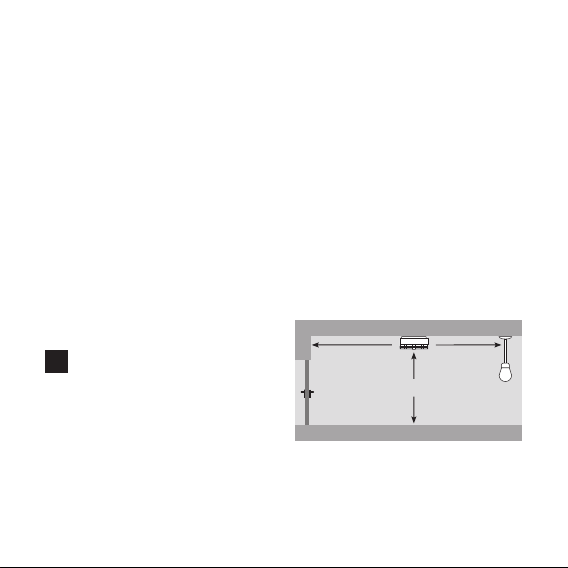
6.1 Standard case
The following conditions apply to
the correct assembly position:
On the ceiling
As close to the centre of the
room as possible, but at least
0.5m away from walls, beams or
furniture (e.g. lamps).
Maximum room height: 6 m
Monitored area per smoke alarm:
max. 60 m²
i
max . 6m
at least 0.5 m at least 0.5 m
max. 60 m2
Assembly position | 15
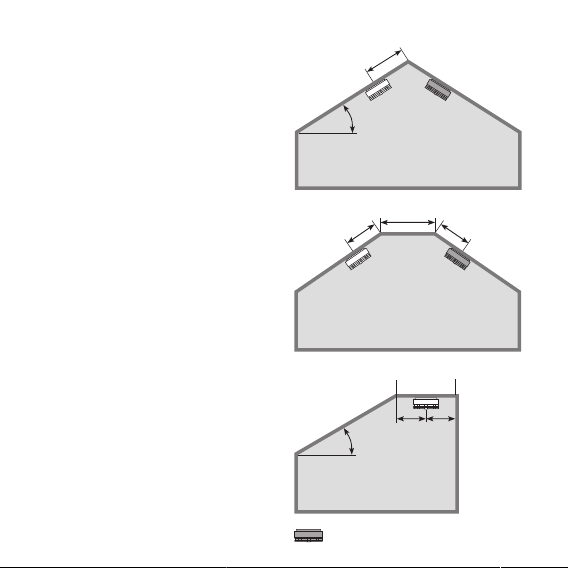
6.2 Special cases
Rooms with sloped ceiling
Slope < 20°:
Sloped ceilings with a small
inclination are treated like horizontal
ceilings (seestandardcase).
Slope > 20°:
The following applies to sloped
ceilings with a larger inclination:
Clearance to peak:
0.5 –1.0 m (see Figure A )
Slope > 20° and horizontal portion:
The following applies to these
ceilings:
If there is a horizontal portion
of≤1 m:
at the slope with
0.5to 1.0 m clearance from the
horizontal portion (see Figure B)
If there is a horizontal portion of
>1m: in a central position in the
horizontal ceiling (see Figure C)
0.5–1.0m
0.5–1.0m
≤ 1 m
Alternative positioning of the smoke alarm
> 20°
0.5–1.0m
> 20°
> 1 m
½ ½
A
B
C
16 | Assembly position
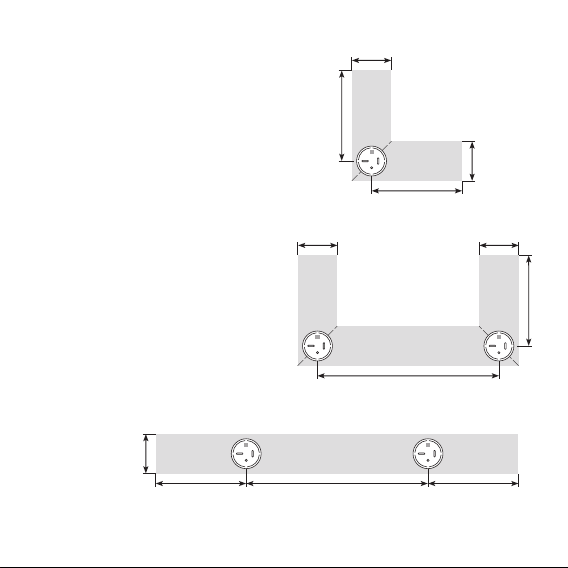
Long and narrow rooms
(e.g. hallways)
In rooms and hallways with a width
of < 1 m, the following assembly
position applies:
In a central position on the ceiling
between the walls
In hallways with a width of < 3 m, the
following assembly position applies:
Clearance to the front side:
max.7.5 m
Distance between 2 smoke alarms:
max. 15m
max 7.5m
max 7.5m
max . 3m
max . 3m
max. 15m
max 7.5m
max . 3m max . 3m
max. 15m max 7.5mmax 7.5m
max . 3m
Assembly position | 17
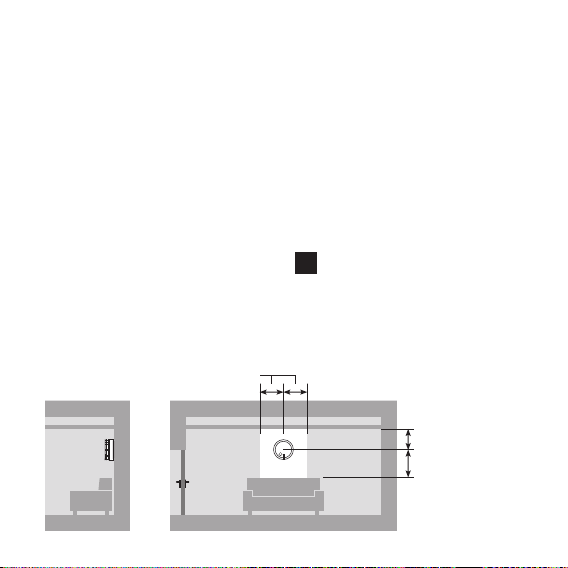
Wall assembly
The smoke alarm may be placed on
the wall of a room in the following
cases:
Ceiling-assembly is not possible
(e.g. in the case of textile ceilings
or ceiling heating)
Rooms and hallways with a
surface area of ≤ 6 m²
Kitchens which serve as escape
routes
The following conditions apply to
wall assembly:
In a central position on the longer
wall
Clearance to ceiling: 0.3 to 0.5 m
Clearance to objects below the
smoke alarm: 1 m
Lateral clearance: 0.5 m
In the event of other special
cases, e.g. rooms larger than
60 m² or ceiling joists, please
contact your dealer.
Smoke alarm wall installation
0.3 to 0.5 m
at least 1m
at least 0.5 m
i

18 | Assembly
7. Assembly
The following options are available
for the assembly of the base:
Screw/dowel assembly with
1screw: see 7.1
Screw/dowel assembly with
2screws: see 7.2
Assembly with an adhesive pad:
see 7.3
For a secure and permanent
connection, Hekatron recommends
the screw/dowel assembly.
The fastening material for a
1-hole assembly is included in
the scope of delivery. If other
screws are to be used, the
screw heads must not reach
into the base by more than
5mm. We recommend using
3.5 x 25mm oval-head screws.
CAUTION:
Depending on the selected assembly
method, lines may be damaged.
fSelect the assembly position in
away that it can be ensured that
no electric lines or other supply
lines (e.g. water) can be damaged
during drilling.
i

Assembly | 19
7.1 Screw/dowel
assembly with
1screw
fHold the base against the ceiling
and mark the hole for the desired
assembly position.
fDrill a hole.
fInsert the dowel into the bore
hole.
fRemove the protective foil from
the fastening pad.
fInsert the screw through the
round hole in the base and screw
it halfway in.
fAlign the base, press it against
the ceiling and rmly tighten the
screw.
7.2 Screw/dowel
assembly with
2screws
fHold the base against the ceiling
and mark the holes for the
desired assembly position.
fDrill 2 holes.
fInsert the dowels into the bore
holes.
fInsert the screws through the
elongated holes, hold the base
against the ceiling and rmly
tighten the screws.

20 | Assembly
7.3 Assembly with
adhesive pad
Only the adhesive pad supplied
by Hekatron may be used for the
assembly with adhesive pad.
CAUTION
The assembly with an adhesive pad
depends on the adhesion characteristics
of the surface of the ceiling in the
desired assembly position. If the surface
is unsuitable, the smoke alarm will not
permanently adhere to the ceiling.
fFor the selection of a suitable
surface, please observe the
following table:
Adhesive pads may leave residues
after their removal.
fClean the surface in the desired
assembly position.
fRemove the protective foil on one
side of the adhesive pad and attach
the pad to the base of the smoke
alarm. When doing so, observe the
recesses for the fastening pad.
fRemove the protective foil on the
other side, hold the base to the
desired assembly position and press
it rmly against the ceiling (for at
least 5 seconds).
i
Suitable Unsuitable
Smooth, level,
undamaged,
clean and free
from dust, grease
and solvents
Loose paint and
porous surfaces (e.g.
plaster, emulsion paint,
plywood, chip-boards
and bre boards)
1In some versions, the adhesive pad is an accessory
which must be ordered separately.
i
Adhesive
pad
Fastening
pad
Other manuals for Genius Plus
1
This manual suits for next models
1
Table of contents
Other Hekatron Smoke Alarm manuals


