Helena Laboratories ProtoFluor-Z 2005 User manual
Helena Laboratories
Operator’s Manual
ProtoFluor-Z
Hematofluorometer
Cat. No. 2005, 110 Vac
Cat. No. 2006, 220 Vac

ProtoFluor-Z
Hematofluorometer
Operator’s Manual
Cat. No. 2005, 100 Vac
Cat. No. 2006, 220 Vac

ProtoFluor-Z Hematofluorometer
Operator’s Manual
Contents
ONE – Instrument Use and Function ........................................................................... 1
TWO – Principles of Operation..................................................................................... 2
THREE – Precautions and Limitations ........................................................................ 4
FOUR – Hazards ............................................................................................................ 6
FIVE – Controls and Displays ...................................................................................... 7
5.1. Controls ............................................................................................................ 7
5.2. Display ................................................................................................................ 7
SIX – Installation Instructions ...................................................................................... 9
6.1. Unpacking and Inspection............................................................................... 9
6.2. Installation .......................................................................................................... 9
SEVEN – Operating Instructions ................................................................................ 11
7.1 Specimen Collection and Handling .................................................................. 11
7.2. Preparation and Warm-up ............................................................................... 12
7.3. Blank Instrument ............................................................................................. 12
7.4. Calibrate Instrument ........................................................................................ 13
7.5 Patient Sample Assay ...................................................................................... 14
7.6 Summary Instructions ...................................................................................... 15
7.7. Procedural Notes ............................................................................................. 18
7.8 Reference Values and Interpretation of Results ............................................. 20
EIGHT – Test Functions and Quality Contro ............................................................. 21
NINE – Performance Specification ............................................................................. 22
TEN – Maintenance, Troubleshooting, Warranty ...................................................... 23
10.1. Maintenance ................................................................................................... 23
10.2 Troubleshooting ............................................................................................. 24
10.3. Warranty ......................................................................................................... 25
10.4. Bibliography ................................................................................................... 25
ELEVEN – Symbology ................................................................................................. 26

List of Figures
1-1. ProtoFluor-Z ………………………………………………………… 1-1
2-1 Block Diagram ……………………………………………………… 2-2
5.1 Front Panel Controls and Displays ………………………………. 5-1
5-2 Back Panel Controls ……………………………………………….. 5-2
10-1 ProtoFluor-Z Back ………………………………………………….. 10-1
List of Tables
6-1 Inventory …………………………………………………………….. 6-1
10-1 Troubleshooting……………………………………………………… 10-2
ProtoFluor-Z ONE – Instrument Use and Function
Page 1
ONE – Instrument Use and Function
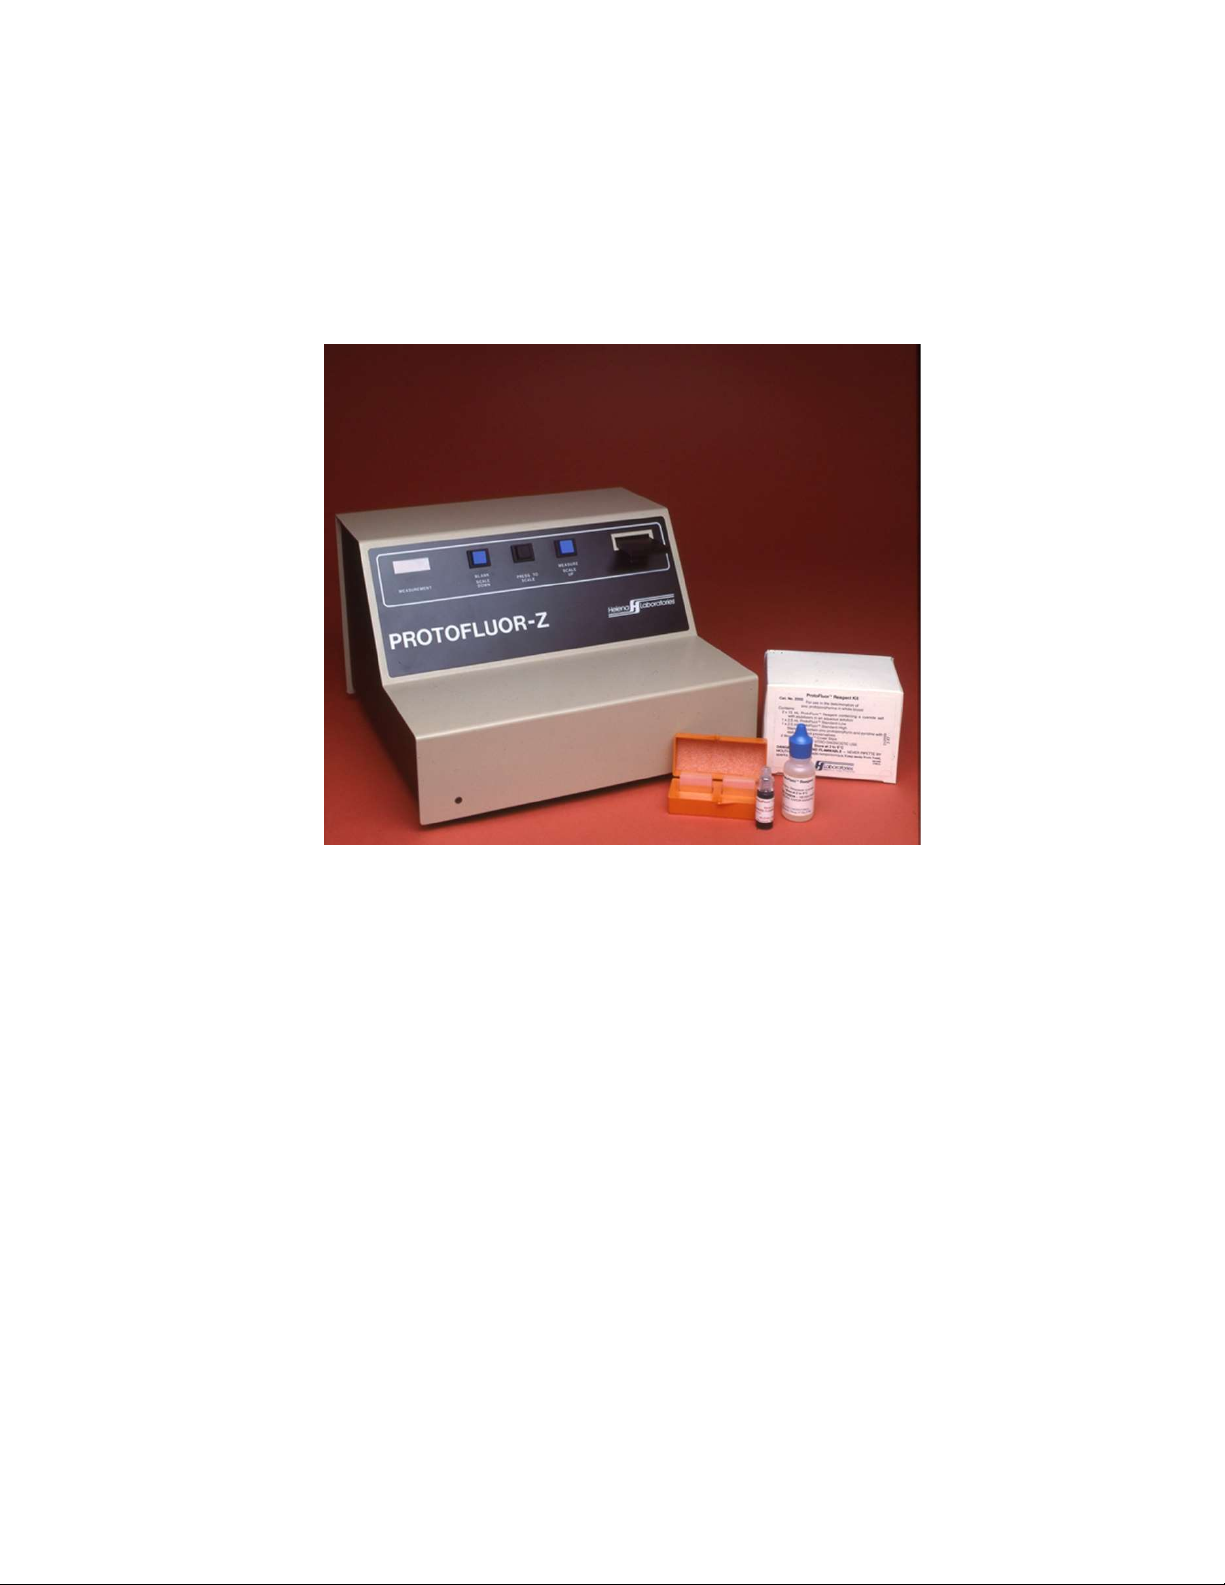
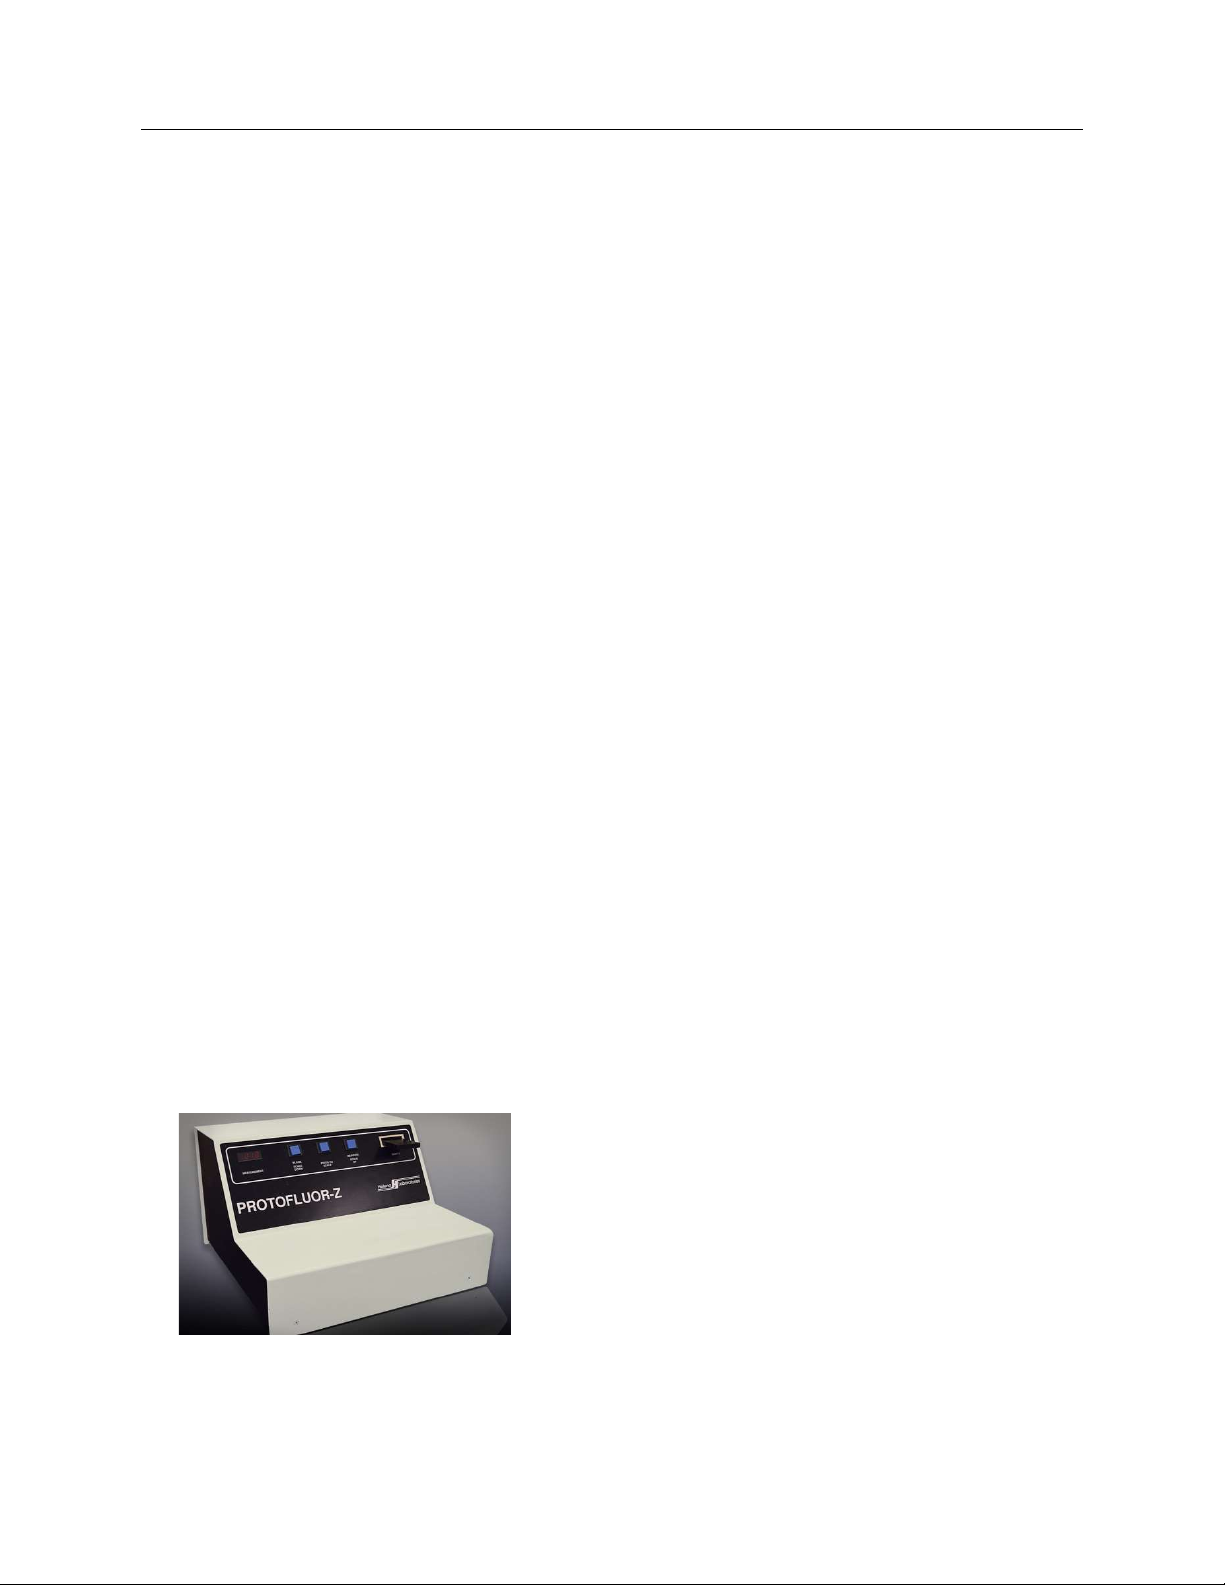
The ProtoFluor-Z (Fig. 1-1) is a front-face
fluorometer designed for the
measurement of zinc protoporphyrin
(ZPP) in whole blood. This measurement
is used as a diagnostic test for relative
iron deficiency erythropoiesis. 1-4 The
ProtoFluor-Z is intended for in-vitro
diagnosis use only.
Heme is formed in the developing red
blood cell by insertion of iron into a
formed porphyrin ring. In the event of
insufficient iron supply (iron deficiency),
zinc is substituted for iron and inserted
into the porphyrin ring. The ZPP formed
in the chelation process is stable and
remains in the red cell for its 120 day life
span. The level of ZPP in the red cell,
then, is a functional indicator of the
available iron supply.
The presence of elevated blood lead
levels also results in increased ZPP. The
CDC has lowered the recommended lead
screening level in children from 25 ug/dL
to 10 ug/dL. Lead levels below 25 ug/dL
do no significantly affect ZPP formation,
and therefore the use of this test as a
lead screen is no longer recommended.
Lamola and Yamane showed that the
fluorescent erythrocyte and porphyrin
associated with lead intoxication is zinc
protoporphyrin (ZPP) and determined its
absorption and fluorescence can be
detected easily in whole blood by use of
a front face fluorometer. 6.7 The
absorption (424 nm Soret band) and
fluorescence maxima (595 nm) of ZPP in
blood differ from those of the metal-free
porphyrins associated with various
porphyrias. The fluorescent porphyrin
associated with iron deficiency anemia is
ZPP which is identical to that produced
by elevated lead intoxication.
Blood porphyrin assays other than
hematofluorometry involve extraction of
the porphyrin(s) followed by some type of
purification step.8 Hematofluorometry
using the ProtoFluor Reagent and
ProtoFluor Calibrators provides an very
simple, easy, accurate and inexpensive
method for determining erythrocyte
ZPP/H levels in the diagnosis of iron
deficiency. Diurnal variation serum iron
concentration does not interfere. The
method requires only one drop of whole
blood and no sample measurements are
necessary. In addition to general
laboratory diagnosis and nutritional
monitoring, the test can be beneficial in
specialties such as blood banking, sports
medicine obstetrics and pediatrics where
iron status is a particular concern.
Figure 1-1 ProtFluor-Z

ProtoFluor-Z TWO – Principles of Operation
Page 2
TWO – Principles of Operation
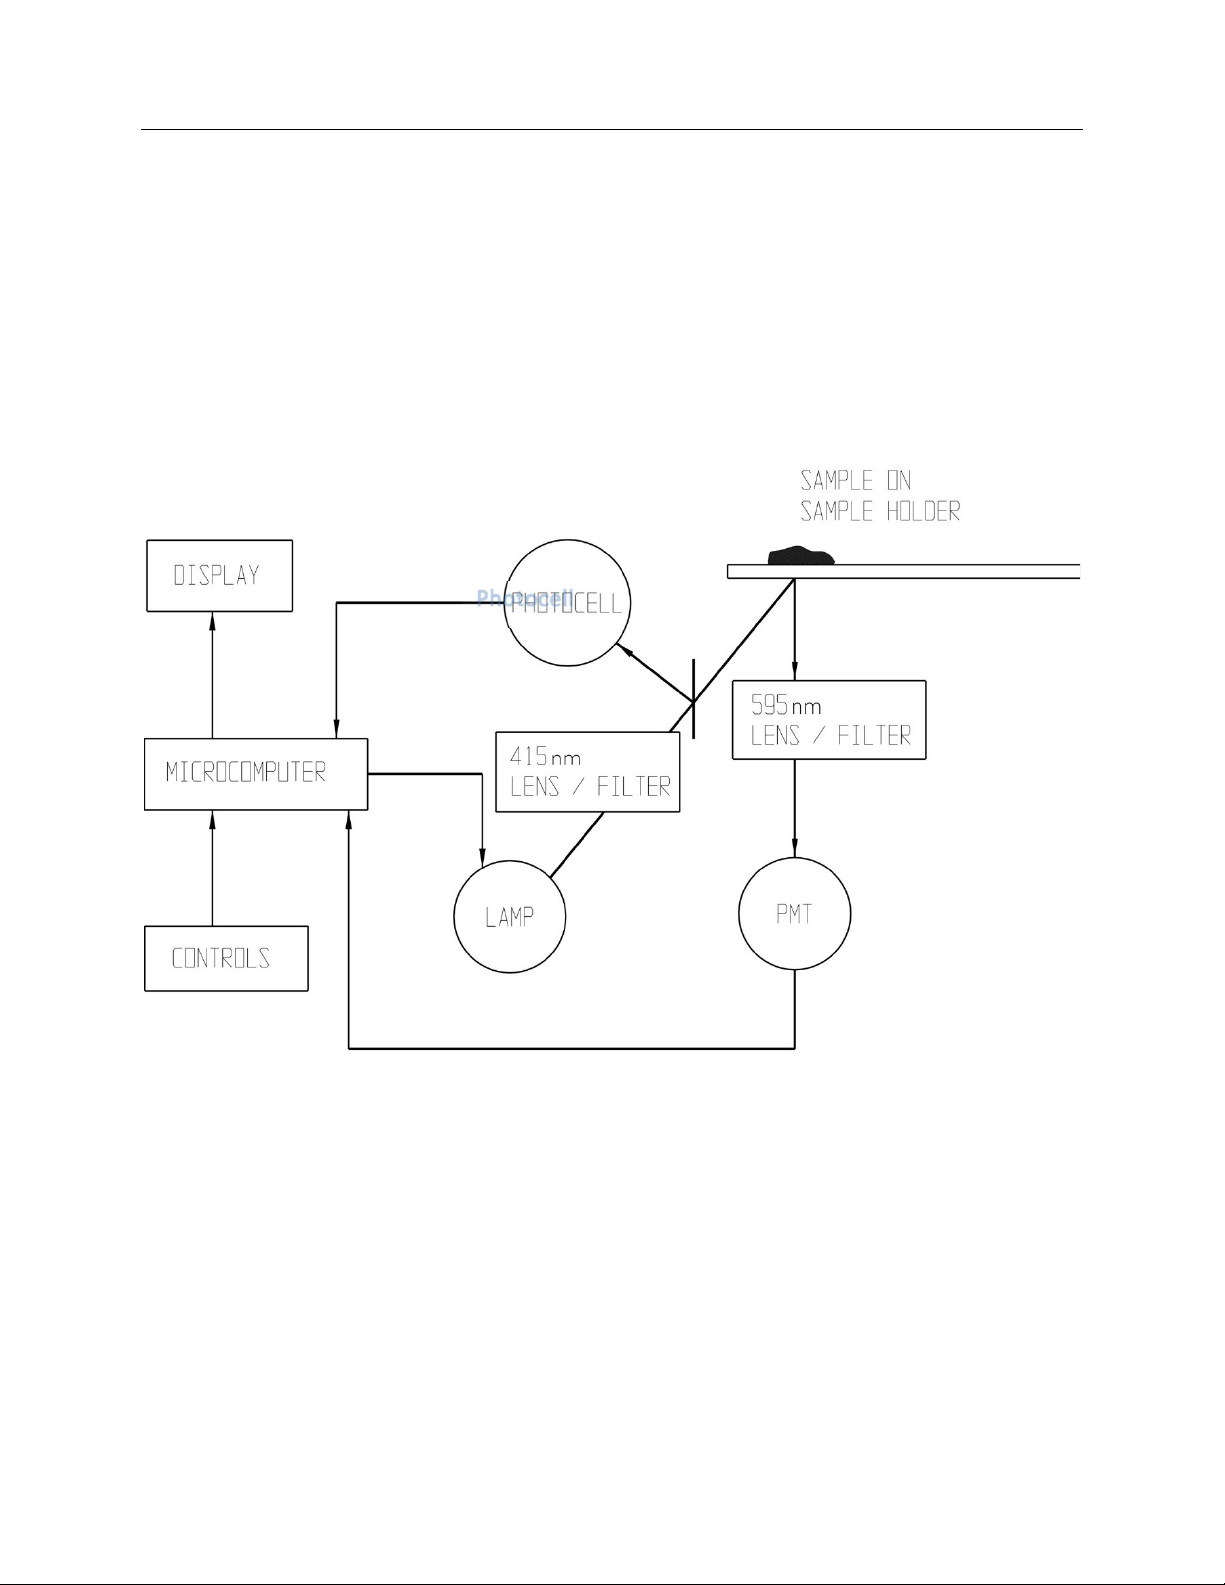
The functional units of the ProtoFluor-Z are shown
in figure 2-1. All user input is through the external
panel controls and the on/off switch. Light from a
quartz-halogen lamp is collected and filtered by a
lens/filter system to produce light at 415 nm. The
415 nm light is focused onto a sample, held on the
sample holder. Part of the 415 nm light is also
detected by a photocell. The photocell
measurement allows correction for variations in the
intensity of the 415 nm light.
When the sample is exposed to 415 nm light, zinc
protoporphyrin (ZPP) is excited and emits light at
595 nm. A second lens/filter system collects, filters
and focuses the 595 nm light onto a photomultiplier
tube (PMT). The PMT produces a current level in
response to the light reaching it, which is
proportional to the ZPP/H ratio. In the five seconds
after pressing MEASURE, over 1000 light-level
readings are taken and averaged by the
microcomputer, and a value is displayed in umol
ZPP/mol Heme.
If the user selects the mode for ug ZPP/dL whole
blood, the result in umol ZPP/mol Heme is
converted by the instrument and the result
displayed in ug ZPP/dL whole blood.
ProtoFluor-Z TWO – Principles of Operation
Page 3
Figure 2-1 Block Diagram
Photocell

ProtoFluor-Z THREE – Precautions and Limitations
Page 4
THREE – Precautions and Limitations
3.1. The entire operator’s manual
should be read and understood before
attempting instrument operation.
3.2. Installation is to be performed by
the operator.
3.3. Provide adequate room at the
sides and back of the instrument for good
air circulation.
3.4. Should instruments be
contaminated by blood or blood
derivatives, spray commercial virucidal
and germicidal agent onto the area
contaminated. Observe where
specimens are used inside the
instrument, and confine cleaning to that
area. Wipe up the agent residue, as
these materials may contain alcohol,
which is corrosive to metal surfaces.
No harsh cleansers, acids, or bases
should be used or spilled on inner or
outer surfaces. Do not immerse the unit.
ALWAYS TURN THE POWER
SWITCH OFF AND UNPLUG THE MAIN
POWER CORD BEFORE CLEANING.
3.5. For emergency shut down,
disconnect the power cord or use the
power on/off switch located on the rear of
the instrument.
3.6. Do not use hemolyzed
specimens. Hemolyzed specimens
generate unpredictable results.
3.7. Do not use frozen specimens or
specimens that have been stored longer
than recommended.
3.8. Specimens must be run with
reagent. Results with fresh samples
may be significantly decreased when run
without reagent and moderately aged
samples run without reagent may
generate unpredictable results.
3.9. Abnormally elevated bilirubin will
crea.te positive interference due to its
spect.ral qualities.
3.10. Riboflavin may cause elevated
results if greater than 10 times normal
serum concentration.
3.11. The reagent/sample mixture must
be read within 5 minutes of preparation.
Make only one reading from each
prepared slide. If a repeat reading is
necessary, put a fresh drop of sample
mixture on a clean coverslip for a repeat
reading. Irradiation of the sample may
cause photodecomposition.
3.12. Blood samples, calibrators and
reagents must be warmed to room
temperature before use, since
fluorescence is affected by temperature.
3.13. The sample applied to the
coverslip must make a spot at least 8-10
mm in diameter in the center of a
coverslip.
3.14. Testing should be performed only
with Helena coverslips which have been
tested for potential fluorescent
interference.
3.15. Keep the sample holder level
when in use.
3.16. Do not measure sample
containing a bubble, since this will cause
a falsely low reading.

ProtoFluor-Z THREE – Precautions and Limitations
Page 5
3.17. The sample holder should be
stored in the slot to prevent dust from
entering the instrument.
3.18. The ProtoFluor Z must have
annual preventative maintenance,
including replacement of the optics.
Failure to do so may lead to decreased
results.
Preventative maintenance must occur at
Helena Laboratories.
Results may be affected prior to
detection by calibration and optical
checks.
3.19. Should biological or radiological
contamination take place, use
appropriate decontamination
procedures. Should servicing be
necessary, the unit must be properly
decontaminated and cleaned before
servicing will be performed. A written
statement (outlining the procedure used)
may be required to certify proper
decontamination.
3.20. The CDC has lowered the
recommended lead screening level in
children from 25 ug/dL to 10 ug/dL. Lead
levels below 25 ug/dL to 10 ug/dL. Lead
levels below 25 ug/dL do not significantly
affect ZPP formation, and therefore the
use of this test as a lead screen is no
longer recommended.
3.21. The use of ZPP testing for
occupational lead exposure testing
has not been validated on ProtoFluor
Z.
3.22. Instructions for the “responsible
body*” (*Under IEC 61010-2-101:2002 –
the person(s) responsible for the use and
maintenance of equipment and for
ensuring that operators and adequately
trained for eliminating and reducing
hazards involved in removal from use,
transportation, or disposal.)
3.23. Action(s) to be taken in case of
malfunction: See section 3.6 and 10.2
3.24. Requirements for handling
biohazards: Due to potential biohazard
risk from human based components
blood, CSF [Cerebrospinal Fluid], urine,
plasma, blood cells, etc.), guidelines
pertaining to Universal Precautions shall
be adhered to when handling the
samples and operating this instrument.
This includes the use of protective gloves
and any other protective equipment as
warranted for safe handling and disposal
of test tubes, reagents, applicators, or
other items containing or contaminated
by biohazards and use, transportation
and disposal of this device. For
information on minimizing biohazard risk,
see to section 3.4.
3.25. Storage and transport
environmental requirements: Operating
Temperature range: 15o to 30o C.
Storage and shipping temperatures: -20o
to 70o C.
3.26. The Helena Agent shall provide a
power cord or adapter of the proper
configuration for the country in which the
instrument is to be installed. The power
cord or adapter will comply with IEC
60227, IEC 60245, or be certified as
rated for the power specified if section 9
of this manual.

ProtoFluor-Z FOUR – Hazards
Page 6
FOUR – Hazards
4.1. This device contains high voltages
which can be extremely dangerous. Turn
off the power, disconnect the power cord,
d use extreme care when attempting
disassembly for cleaning, repair, or
adjustments. Do not operate any
instrument with the cover removed
unless instructed to do so by a qualified
service technician directly representing
Helena Laboratories, its subsidiaries or
its distributors.
4.2. Do not attempt to operate the
instrument without plugging the power
cord into an easily accessible grounded
wall outlet of the proper voltage and
frequency. This information is contained
on the serial number plate located on the
back of the instrument.
4.3. Before turning on the instrument
power, ensure that the voltage select
switch on the rear panel is set for the
correct voltage.
ProtoFluor-Z FIVE – Controls and Displays
Page 7
FIVE – Controls and Displays
5.1. Controls
BLANK/SCALE DOWN Button: Press
BLANK once to blank cover slip. When
holding the PRESS TO SCALE button
down during calibration, press SCALE
DOWN to decrease the reading.
PRESS TO SCALE Button: During
calibration, hold down PRESS TO
SCALE and press SCALE UP or SCALE
DOWN button to adjust reading to
published value for calibrator.
MEASURE/SCALE UP Button: Press
MEASURE once to read sample. When
holding the PRESS TO SCALE button
down during calibration, press SCALE
UP to increase the reading.
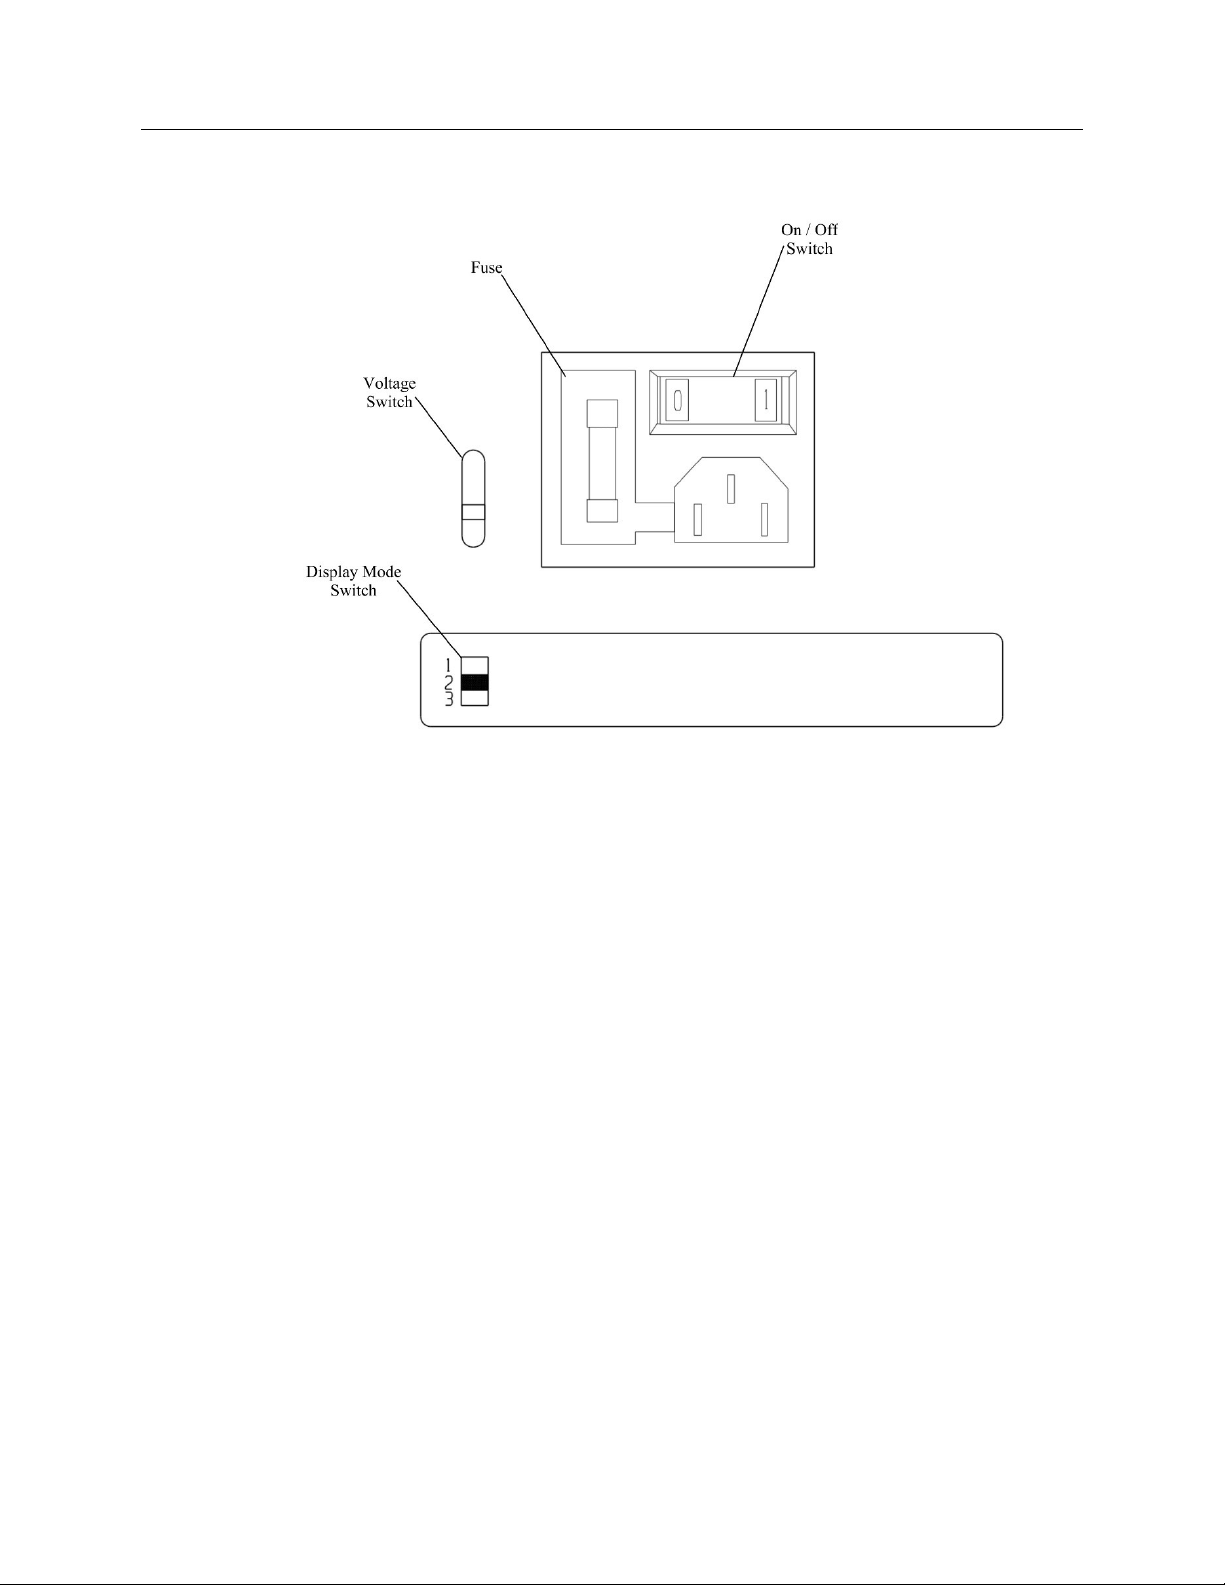
Power On/Off Switch: Located on the
back panel. Controls power to the
instrument.
Voltage Switch: Factory preset for 110
Vac or 220 Vac for domestic or foreign
use.
Switch to Select Reporting Units:
Located on the back panel, switch has
three positions to select reporting units in
umol ZPP/mol Heme, ug ZPP/dL whole
blood (25 hematocrit) or ug ZPP/dL
whole blood (42 hematocrit).
1 (up) ug/dL using 42 Hct
2 (middle) umol/mol
3 (down) ug/dL using 35 Hct
The mode selected is indicated on the
LED display when the MEASURE button
is pressed. In the 5 second delay before
the ZPP value is shown, the LED display
will display the following.
----: in umol/mol mode
H-35: in ug/dL mode, 35 hematocrit
H-42: in ug/dL mode, 42 hematocrit
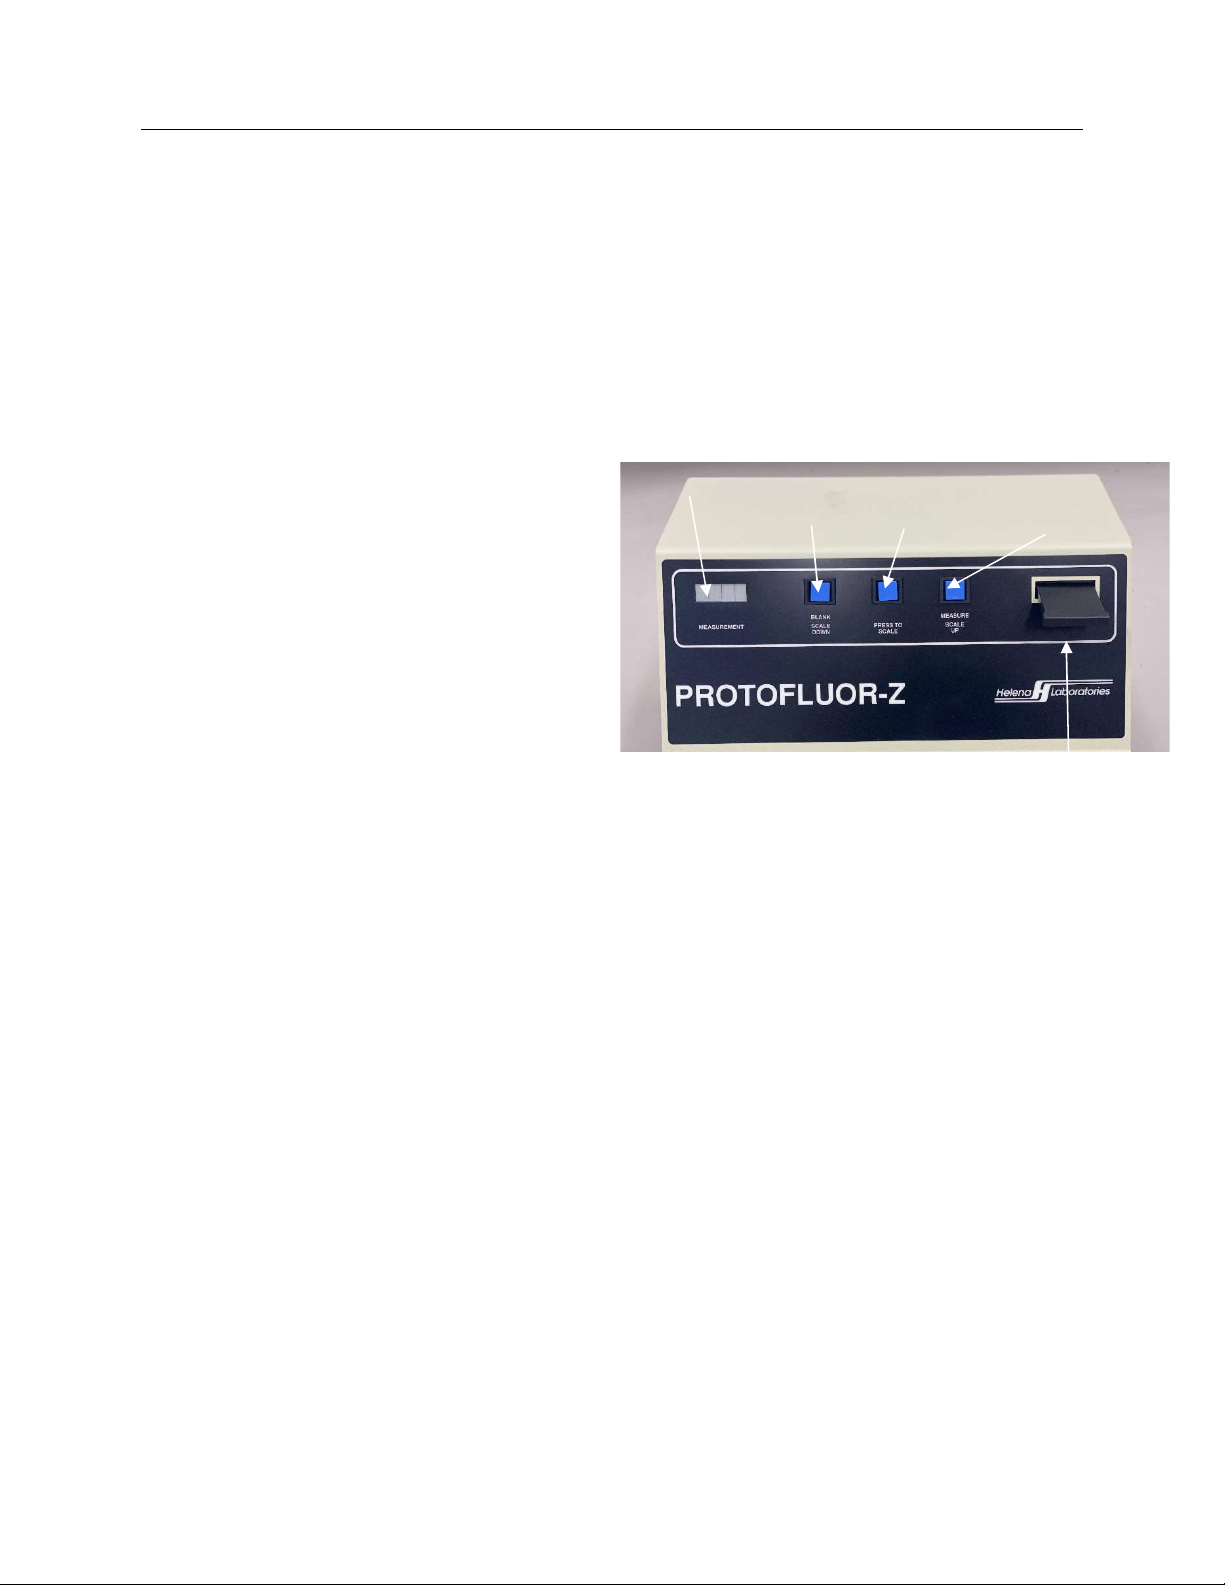
5.2. Display
LED display shows results of
measurements in umol/mol or in ug/dL.
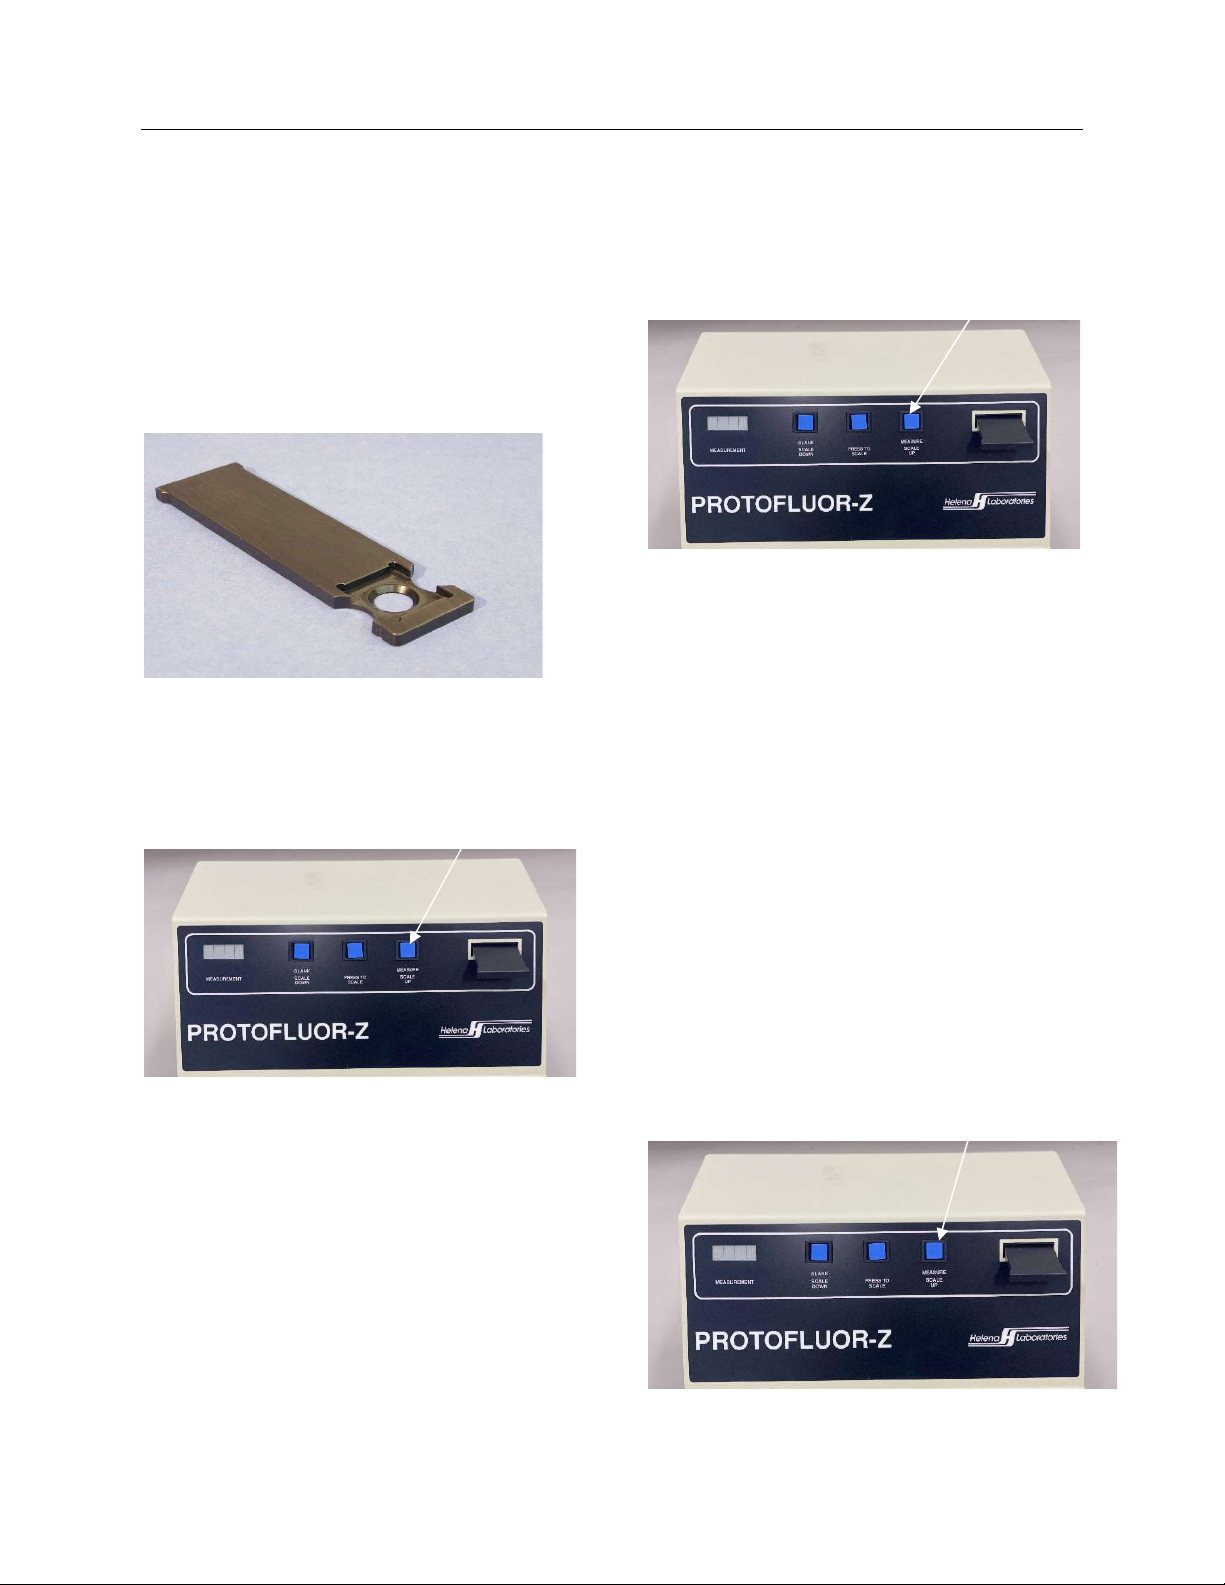
Figure 5-1. Front Panel Controls and
Display
Display Blank and
Scale Down
Press to
Scale
Measure and
Scale Up
Sample Holder
ProtoFluor-Z FIVE – Controls and Displays
Page 8
Figure 5-2. Back Panel Controls

ProtoFluor-Z SIX – Installation Instructions
Page 9
SIX – Installation Instructions
WARNING: Read Section Three
(Precautions and Limitations) and
Section Four (Hazards) before
attempting installation or operation.
Installation is to be performed by the
purchaser.
6.1. Unpacking and Inspection
1. Check all shipping containers for signs
of damage. If damage is found,
immediately notify the shipping carrier.
2. Carefully unpack the instrument and
accessories and remove them from the
shipping cartons. The packing material
should be removed undamaged, if
possible, should repacking be
necessary.
3. Remove plastic wrappings from the
instrument and accessories. If scissors
or a knife are used to cut the plastic or
binding tape, take care not to scratch the
instrument.
4. Inspect the instrument for any obvious
signs of damage. If damage is found,
notify the shipping carrier and Helena
Laboratories.
5. Inventory all items: If any parts are
missing, recheck the packing materials
before notifying Helena Laboratories.
Table 6-1 Inventory
1 ProtoFluor-Z
1 Sample Holder
1 Power Cord
1 Operator’s Manual
1 Bulb Assembly (for
microhematocrit tube)
6.2. Installation
1. Select an environment free of drafts,
excessive humidity, dust, and large
temperature fluctuations.
2. Place the unit on a level, flat surface.
Make sure that there is enough space
behind and around it to allow good air
circulation.
3. Insert the sample holder into the slit at
the upper right marked SAMPLE. The
end with the hole should enter the
instrument with the recessed area facing
up. Push it into the slot until it slicks into
place.
4. Ensure that the voltage switch on the
back panel is set for the correct input
voltage (115 V for 110 V unit or 230 V for
220 V unit). If incorrect, change the
switch position using a small screwdriver
and see section 10.1.1 (Fuse
Replacement) for proper fuse selection.
5. With the power off, insert the female
end of the power cord into the three-
prong plug on the back of the instrument.
6. Plug the other end of the power cord
into a grounded wall outlet of the proper
voltage and frequency. Because the
power cord is the mains disconnect
device, the wall outlet used should be
easily accessible. This information is
located on the serial number plate on the
back panel of the instrument.
The wall outlet should not be on the same
circuit as any large load device such as a
refrigerator, compressor, centrifuge, etc.

ProtoFluor-Z SIX – Installation Instructions
Page 10
The instrument’s circuitry contains filters
to reduce the effect of line voltage
fluctuations: however, they should still be
avoided. If the operator experiences
difficulty, it may be necessary to install an
isolation transformer.
ProtoFluor-Z SEVEN – Operating Instructions
Page 11
SEVEN – Operating Instructions
7.1 Specimen Collection and Handling
Specimen: Whole blood collected with
an anticoagulant such as heparin, EDTA,
or citrate.
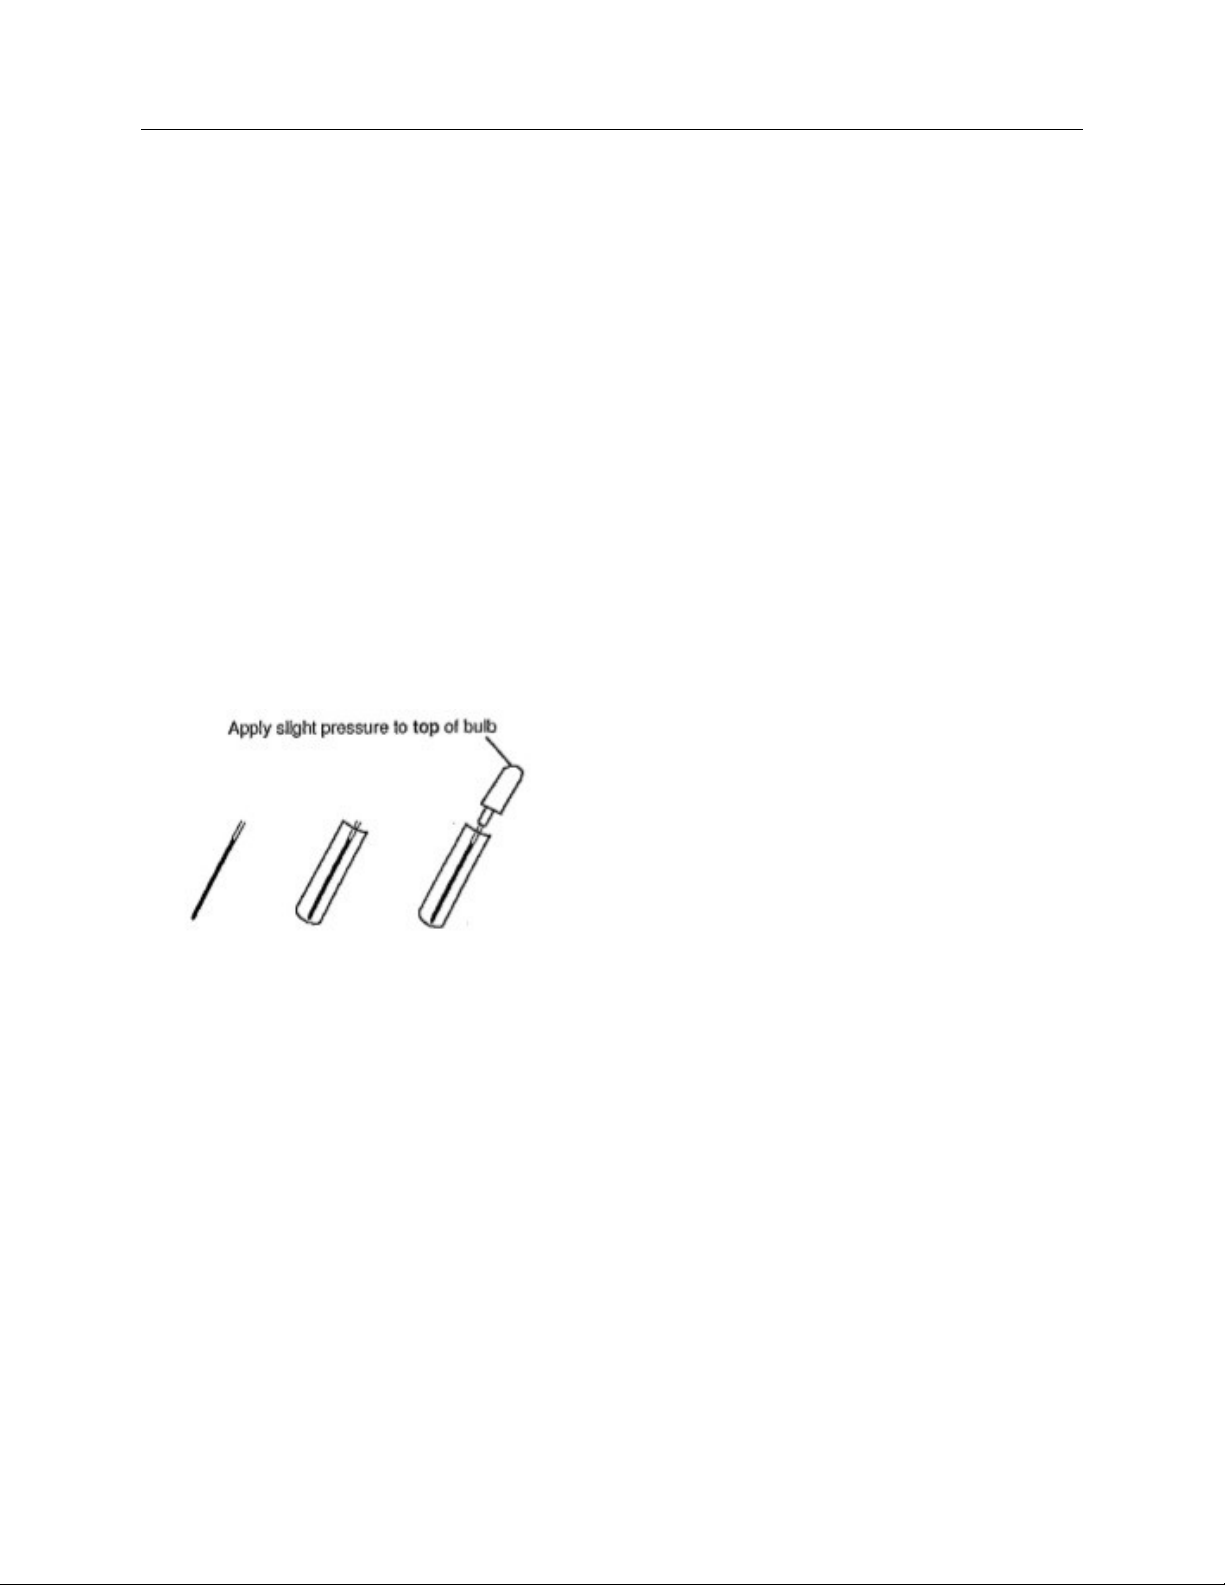
Blood collected from a fingerstick:
Collect a drop of blood from a fingerstick
into a heparinized microhematocrit tube.
The capillary tube must have a volume of
at least 50 uL. Fill the capillary tube to
the line. Drop the capillary tube into a
13x75 mm test tube. Expel all the blood
from the capillary tube using the bulb
assembly supplied with the instrument.
Add 2 drops of ProtoFluor Reagent and
proceed with the test.
If the test is not to be run immediately, the
capillary tube can be sealed at both ends
with Critoseal and stored. When ready to
perform the test, cut off the ends and
expel the blood into the test tube.
Patient preparation: No special patient
preparation is required.
Interfering factors:
1. Do not use hemolyzed specimens.
Hemolysis is indicated when the plasma
has a reddish color due to the rupture of
red blood cell membranes. Unreliable
results (Incorrectly low or high) are
obtained with hemolyzed specimens.
2. Samples stored longer than
recommended may have falsely
increased or decreased results.
3. Abnormally elevated bilirubin will
create positive interference (high values)
due to its spectral qualities. Increased
bilirubin is indicated by a bright yellow
color in the plasma.
4. Riboflavin concentrations greater than
10 times normal may cause elevated
results. Patients receiving nutritional
therapy may have increased levels of
riboflavin.
5. Routine washing of cells to
eliminate plasma interferences is not
recommended.
6. Freezing of specimens, hemolysis,
failure to use reagent, and failure to
maintain instruments may cause falsely
low results.
NOTE: Even though there are a few
interferants that may cause falsely
elevated ZPP values, extensive case
studies have shown that any
abnormal result obtained with zinc
protoporphyrin measurements is
indicative of some pathological
condition requiring intervention.
Stability of sample preparation: After
adding one drop of well mixed whole
blood to two drops of reagent, the sample
mixture should be used within five
minutes.

ProtoFluor-Z SEVEN – Operating Instructions
Page 12
Storage and stability: Specimens
should be analyzed soon after collection
and before hemolysis occurs. Storage
at 4oC for up to one week may be
acceptable, but as anticoagulated
blood ages, it becomes hemolyzed,
which may cause erroneous results.
7.2. Preparation and Warm-up
1. Verify that the instrument is in a
location free of a draft from air
conditioning or heating vents.
Drafts from heating or air conditioning
vents result in fluctuating values which
are particularly noticed when trying to
calibrate the instrument
2. Turn on the power if unit is off. It is
recommended that the unit be left on
when not in use and only cycled off/on
prior to beginning test.
NOTE: If your instrument is left on
continuously, turn the power off and
on again to reset electronics.
The instrument can be left on
continuously, if preferred. However,
instruments left on continuously must
have the power turned off and on again
to clear all previous settings before a new
daily setup
3. Verify that the instrument is in the
correct mode for the units to be reported.
Properly set switch on back of unit.
Position Mode
1 (Up) ug/dL (42 Hct)
2 (Mid) umol/mol
3 (Down) ug/dL (35 Hct)
4. Allow the instrument to warm-up at
least 30 minutes.
This 30 minute warm-up warms the
electronics in the instrument, but the light
bulb is on only when MEASURE is
pressed.
5. Press MEASURE 5 to 10 times to
warm up the light bulb, waiting
approximately 5 seconds between each
time the button is pressed for the screen
to reset. This cycles the light bulb on and
off and should be done prior to making
the first reading.
6. Remove calibrators and samples from
the refrigerator and allow to equilibrate to
room temperature before testing begins
(requires about 30-45 minutes).
ProtoFluor Reagent is stored at room
temperature.
Fluorescence is affected by temperature
and inaccurate readings will be obtained
if samples and reagents have not
equilibrated to room temperature.
7.3. Blank Instrument
1. Insert the empty sample holder (no
coverslip) into the instrument.
When the sample holder is completely
inserted into the instrument, a “click” is
heard as the sample holder is pushed
into place.
2. Press MEASURE.
Note that after MEASURE is pressed, the
display will read either (----), H35 or H42
(indicating the mode of operation) for 5
seconds and then a value appears.
The reading on the blank cavity (sample
holder inserted with no coverslip) should
be 000-003. Higher values may indicate

ProtoFluor-Z SEVEN – Operating Instructions
Page 13
a problem. Call Helena Electronics
Customer Services Department for
assistance.
The instrument requires 5 sec. to recover
from a reading. Therefore, it will not
accept a new command for 5 seconds
after a reading appears on the LED
display.
3. Place a clean lint-free coverslip into
the sample holder.
Handle coverslips with care to avoid lint,
fingerprints and scratches. Be sure
multiple coverslips are not stuck
together.
Any time a result is obtained that seems
out of line, such as duplicate samples
with very different readings, the first
suspect should be that 2 coverslips are
stuck together or that a coverslip was
dirty.
4. Insert the sample holder into the
instrument.
Be sure you feel the “click” indicating the
sample holder is completely inserted.
5. Press BLANK.
The number that appears on the LED
display is the value of the coverslip that
will be subtracted from the patient
reading. An acceptable value is 4-14 for
instruments with a serial number
beginning with 0, or 7-40 for instruments
with a serial number beginning with 2. If
the reading is outside this range, obtain
another coverslip, insert it into the
instrument, and press BLANK again.
6. Press MEASURE.
The coverslip should now measure 000
+/-1 indicating that the unit is zeroed on
the coverslip.
Note: If 000 +/- 1 is not achieved, repeat
the process with a new coverslip. If the
new coverslip fails, contact Helena
Laboratories.
7.4. Calibrate Instrument
1. Withdraw the sample holder from the
instrument.
2. Place a coverslip in the sample holder
and insert into the instrument.
Use the precautions noted in 7.3 for
correctly handling coverslips
3. Press BLANK.
4. Remove the sample holder with
blanked coverslip from the instrument
and place one drop of ProtoFluor High
Calibrator in the center of the coverslip.
The volume of the Calibrator on the
coverslip should be enough to make a
spot at least 8 to 10 mm in diameter in
the center of the coverslip. Covering the
entire opening in the sample holder is not
necessary.
Do not use a sample preparation
containing a bubble, since this will cause
falsely low readings.
5. Gently insert the sample holder into
the ProtoFluor Z and press MEASURE.
This initial reading of the calibrator may
be as much as +/-30 of the published
value.

ProtoFluor-Z SEVEN – Operating Instructions
Page 14
6. Set the instrument to the published
value of the Calibrator. Use the
appropriate units of measure.
The Calibrator value is printed on the
assay card in the kit. You will note that
three values are provided on the card.
Use the value applicable to the mode you
are using.
Hold down the PRESS TO SCALE button
continuously and press either SCALE UP
or SCALE DOWN until the published
value appears on the LED.
The instrument is calibrated by pressing
two buttons on the front panel of the
instrument. Always press the SCALE
button first, then while continuing to hold
it down, press either the SCALE UP or
SCALE DOWN button to set the
calibrator to the appropriate value.
7. Withdraw the sample holder and
discard the used High Calibrator
preparation. Place a new coverslip in the
sample holder, insert it into the
instrument, and press BLANK.
8. Using the blanked coverslip, insert
another preparation of High Calibrator,
insert it in the instrument, and press
MEASURE.
The reading should be within +/-15 of the
published value of the High Calibrator. If
not, set the Calibration again as
instructed in step 6.
9. Withdraw the sample holder and
discard the used coverslip. Place a new
coverslip in the sample holder, insert it
into the instrument and press BLANK.
10. Remove the sample holder with the
blanked coverslip from the instrument
and place one drop of ProtoFluor Low
Calibrator on it and insert it into the
instrument.
11. Press MEASURE.
The reading of the low calibrator should
be within +/- 3 (+/-6 for position 2
(umol/mol)) of the published value. If this
reading is not within range, press
MEASURE 2 to 3 times. If 2 out of 3
readings are within +/-3 (+/-6 for position
2 (umol/mol)) of the published value, the
instrument is set correctly. If it still does
not meet specifications, recalibrate with
the high calibrator and verify with the low
calibrator. Do not change the calibrator
settings using low calibrator.
13. Calibration of the instrument is
complete.
7.5 Patient Sample Assay
1. Thoroughly mix the patient whole
blood sample.
2. Add 1 drop of patient sample to a
12x75mm test tube.
3. Add 2 drops of ProtoFluor Reagent to
the tube and mix well with gentle shaking
(approximately 2 seconds).
Vortexing is not recommended.
The sample reagent mixture must be
used within 5 minutes of preparation.
For neonate or minimum quantity
samples, use 50 uL of whole blood and
100 uL of reagent. This is approximately
the amount of sample in a
microhematocrit tube.

ProtoFluor-Z SEVEN – Operating Instructions
Page 15
4. Withdraw the sample holder and put a
clean, lint-free coverslip on the sample
holder.
5. Press BLANK.
6. Within 5 minutes of preparation of the
ProtoFluor Reagent, pour the patient
sample onto the center of the coverslip,
covering an area at least 8 to 10 mm in
diameter.
Avoid scratching the coverslip with the lip
of the tube, and avoid contamination of
the sample holder or interior of the
ProtoFluor Z. Do not use sample
containing a bubble, since this will cause
a falsely low reading.
7. Gently insert the sample holder into
the instrument.
8. Press MEASURE.
After a 5 second delay, the ZPP value will
appear.
If the display flashes 9999, the ZPP/H
ratio is above 600 umol ZPP/mol Heme,
or 270 ug/dL whole blood, and the results
should be recorded as greater than 600
umol ZPP/mol Heme or 270 ug ZPP/dL
whole blood. Dilution of the sample and
re-running is not appropriate and not
necessary due to the principle of front-
faced fluorometry.
9. Record the result, withdraw the
sample holder and discard the coverslip.
10. Prepare and measure the next
sample and record the reading.
Multiple reagent/sample preparations
may be prepared at once as long as they
are used with 5 minutes of preparation.
7.6 Summary Instructions
Note: Before initial operation of the
instrument, read the instructions in
Sections 7.2 to 7.5 for a complete
explanation of the importance of each
step. The instructions in this section
are condensed for efficiency in using
the instrument after thorough
understanding of the system.
Preparation
1. Verify that the instrument is in a
location free of drafts from air
conditioning or heating vents.
2. Turn on the instrument and allow it to
warm up 30 minutes.
3. Verify that the instrument is in the
correct mode for the units to be reported.
Properly set the switch on the back of
unit:
1 ug/dL at 42 Hct
2 umol ZPP/mol Heme
3 ug/dL at 35 Hct
Turn power
on, warm
up for 30
minutes
Set Mode Switch:
1. ug/42
2. umol
3. ug/35
ProtoFluor-Z SEVEN – Operating Instructions
Page 16
4. Remove all reagents, calibrators, and
samples from the refrigerator and allow
them to equilibrate to room temperature
(about 30-45 minutes).
Blanking
1. Insert an empty sample holder into the
instrument (no coverslip used).
2. Press MEASURE. The LED should
read 000-003, indicating that the
background reading is correct.
3. Place a clean, lint-free coverslip on
the sample holder.
4. Insert the sample holder in the
instrument. Press BLANK. The reading
should be 4-14 for instruments with serial
number starting with 0, or 7-40 for
instruments with serial number starting
with 2.
5. Press MEASURE. The reading will be
000 +-1 if the instrument has properly
blanked the coverslip.
Calibration
1. Remove the sample holder from the
instrument and leave the coverslip in the
sample holder.
2. Place a drop of ProtoFluor High
Calibrator in the center of the coverslip
(in the sample holder) covering a spot at
least 8-10 mm in diameter (see
illustration).
3. Insert the sample holder into the
instrument and press MEASURE. The
calibrator should read within +/-3 of the
value printed on the assay card.
Press Measure
Press Measure
Press Measure
This manual suits for next models
1
Table of contents
Other Helena Laboratories Laboratory Equipment manuals


