manuals.online logo
Brands
  1. Home
  2. •
  3. Brands
  4. •
  5. Miele professional
  6. •
  7. Laboratory Equipment
  8. •
  9. Miele professional E 957 User manual

Miele professional E 957 User manual

M.-Nr. 05 921 492 / 00 de/en
Gebrauchsanweisung Injektorwagen E 957
,Die Sicherheitshinweise und Warnungen in der Gebrauchsanweisung des
Reinigungsautomaten sowie Hinweise des Laborglasherstellers sind unbedingt
zu beachten.
Glasbruch während der Reinigung kann zu gefährlichen Verletzungen führen.
Das Reinigungsergebnis ist ggf. einer besonderen, nicht nur visuellen Prüfung
zu unterziehen.
Anwendungsbereich
Die Reinigungsverfahren sind nur für Laborgläser geeignet, die vom Hersteller
als wiederaufbereitbar deklariert wurden.
Laborgläser, deren Durchspülung aufgrund der Bauart nicht möglich ist,
können nicht ausreichend gereinigt und desinfiziert werden.
Der Injektorwagen ist nur bedingt geeignet für ständig wechselnde Spülgutarten.
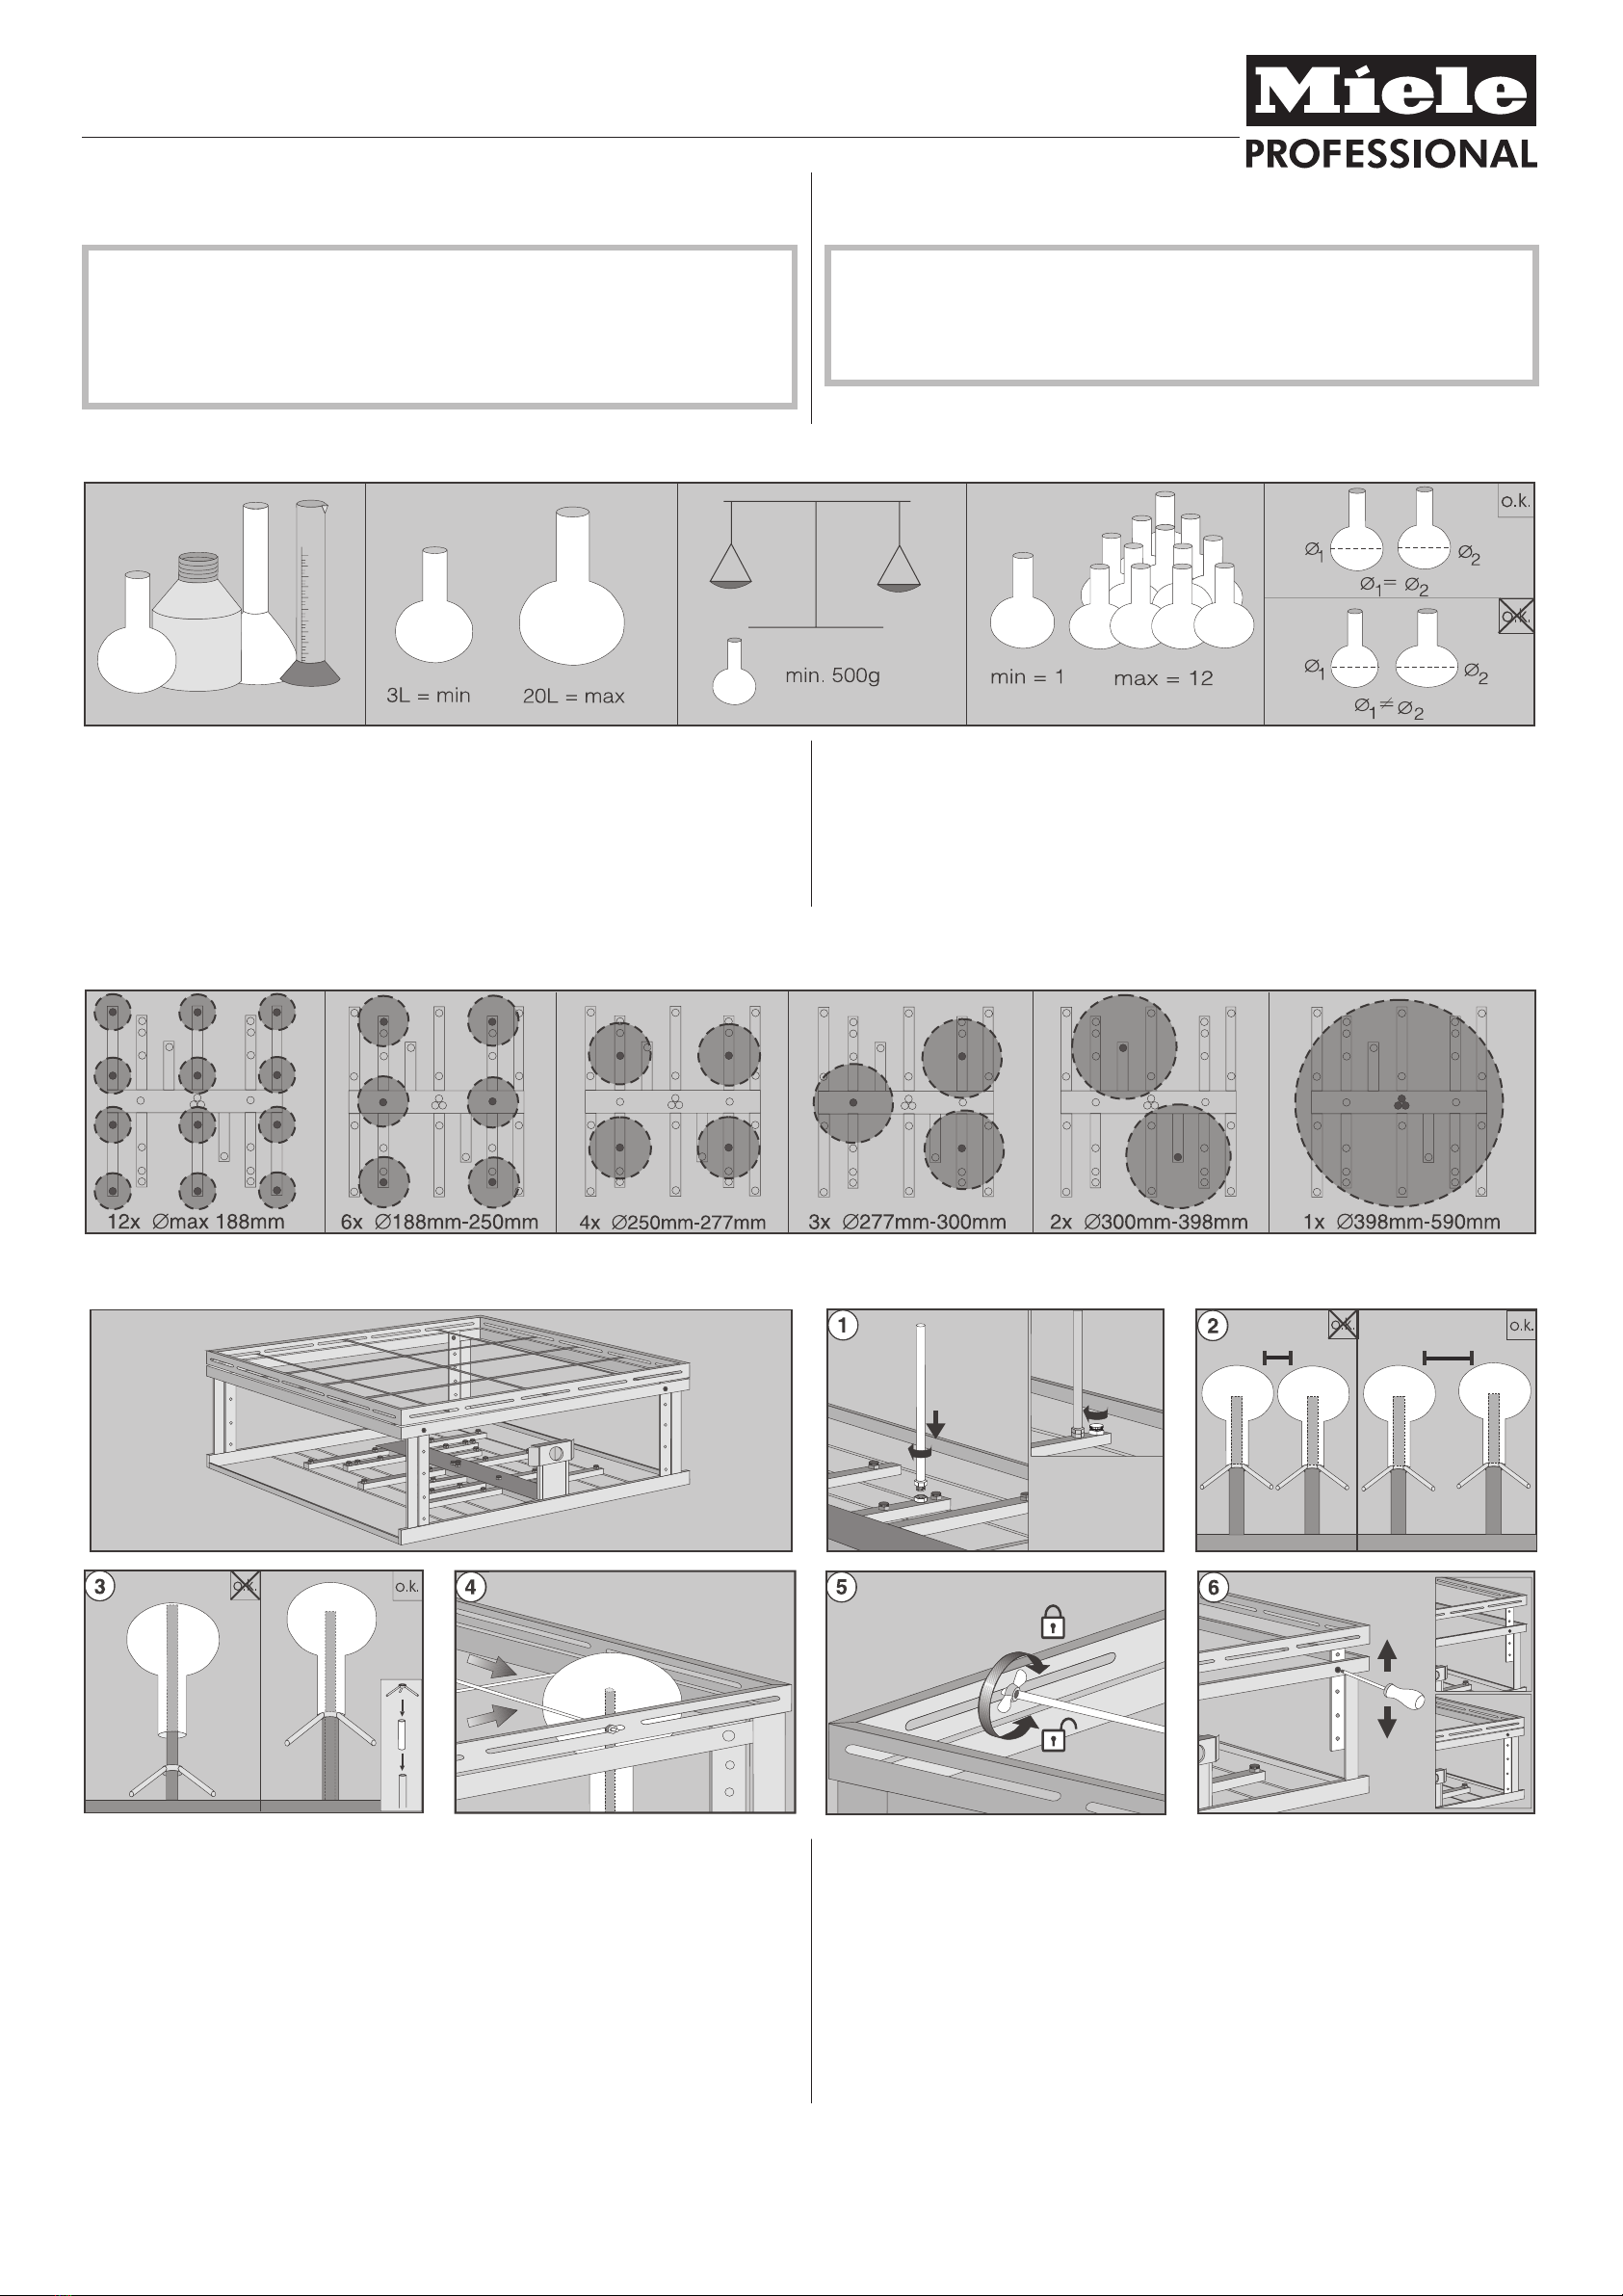
Bestückungsvorschläge
Handhabungshinweise
^Düsen an gewünschter Position einschrauben. Ungenutzte Schraubansätze mit
Verschlussschrauben versehen, damit ein ausreichender Spüldruck entsteht.(a)
^Laborglas aufsetzen. Dabei auf genügenden Abstand zwischen den
Laborgläsern achten.(b)
^Abstandhalter unterlegen, falls die Spitze der Düse am Gefäßboden anliegt. (c)
^Laborglas mit Haltestäben fixieren. (d)
^Stäbe mit Flügelmutter befestigen. Dabei Sechskantmutter festhalten. (e)
^Kann das Laborglas nicht auf der Höhe seines größten Durchmessers fixiert
werden, Abstandhalter einsetzen oder Rahmen in der Höhe verstellen. (f)
Operating instructions for E 957
,Please observe the warning and safety instructions given in the operating
instruction manual supplied with your washer disinfector, as well as your
laboratory glassware manufacturer’s instructions.
Glass broken during the cleaning process can cause serious injury.
Cleaning results should be tested properly. Do not rely on visual checks only.
/ Area of application
The E 957 should only be used for processing laboratory glassware which has
been declared as suitable for machine processing by the glassware manufacturer.
Laboratory glassware, which because of its design cannot be flushed through
properly, will not be sufficiently cleaned and disinfected in this mobile unit.
This mobile unit is not designed to be continually rearranged for different loads.
/ Loading examples
/ Setting up the mobile unit
Miele & Cie. KG, D-33325 Gütersloh / Änderungen vorbehalten / !0908
Miele Co. Ltd., GB-Abingdon, Oxon, OX14 1TW / Alteration rights reserved
^Screw the jets into the positions required. Unused positions should be plugged
using blanking screws to ensure sufficient water pressure is maintained a.
^Place the laboratory glassware over the jets. Make sure there is sufficient space
between each item of glassware b.
^Spacers can be used to hold the bottom of flasks etc. off the top of the jets c.
^Secure the laboratory glassware in position with rods d.
^Tighten the wing nuts to secure the rods and hold in place with hex. nuts e.
^If the laboratory glassware is too tall to secure at its widest diameter you will
need to use spacers or adjust the height of the mobile unit’s frame f.
Mode d'emploi chariot à injection E 957
,Les prescriptions de sécurité dans le mode d'emploi du laveur-désinfecteur
ainsi que les indications des fabricants de verrerie de laboratoire doivent être
respectées.
Le bris de verre pendant le lavage peut engendrer des blessures.
Le résultat de lavage devra le cas échéant être soumis à un contrôle approfondi
et non uniquement visuel.
Domaine d'application
Les procédés de nettoyage sont uniquement conçus pour la verrerie déclarée
réutilisable par le fabricant.
Les pièces dont la forme empêche une circulation et une évacuation de l'eau
ne peuvent pas être nettoyées et désinfectées.
Il est conseillé dans la mesure du possible de toujours traiter le même type
d'instruments dans un chariot à injection.
Conseils de chargement
Utilisation
^Visser les gicleurs à la position souhaitée. Protéger les raccords à filetage avec
des vis de fermeture afin d'obtenir une pression suffisante (a).
^Charger la verrerie de laboratoire. Veiller à préserver des espaces suffisants
entre la verrerie (b).
^Insérer des entretoises si la pointe du gicleur touche le fond de l'instrument. (c)
^Fixer la verrerie à l'aide de baguettes de support. (d)
^Fixer les baguettes de fixation à l'aide d'un écrou papillon. Tenir l'écrou hexago-
nal. (e)
^Si l'instrument en verre ne peut être fixé à hauteur de son plus grand diamètre,
utiliser une entretoise ou régler le cadre en hauteur. (f)
Istruzioni d'uso - Carrello iniettore E 957
,Rispettare scrupolosamente le istruzioni di sicurezza e le avvertenze
contenute nelle istruzioni d'uso del termodisinfettore nonché le indicazioni
fornite dal produttore della vetreria di laboratorio.
La rottura accidentale di vetri durante il lavaggio può essere molto pericolosa.
Il grado di pulizia deve essere verificato eventualmente con altre prove oltre al
controllo visivo.
/ Applicazione
Può essere sottoposta ai procedimenti di lavaggio solo vetreria di laboratorio
dichiarata riutilizzabile dal produtture.
Vetreria di laboratorio che per forma e costruzione non può essere sciacquata in
ogni suo punto non risulterà sufficientemente pulita e disinfettata.
Il carrello iniettore è poco adatto al lavaggio di tipologie di materiali/oggetti sempre
diversi.
/ Esempi di carico
/ Come si usa
Miele S.A.S France, 93151 Le Blanc Mesnil Cedex, 9, ave Albert Einstein - Z.I Le Coudray, http://www.miele.fr
Miele Italia S.r.l. Tel. 0471 666 111 Fax 0471 666 350, Internet: http://www.miele-professional.it
!Sous réserve de modifications / Salvo modifiche / 0908
^Avvitare gli ugelli nelle posizioni desiderate. Chiudere le sedi degli ugelli non
utilizzati con le apposite viti di chiusura, in modo che la pressione di lavaggio sia
sufficiente (a).
^Sistemare gli oggetti. Assicurarsi che la distanza tra i singoli pezzi sia sufficiente
(b).
^Se l'estremità dell'ugello tocca il fondo del vetro, utilizzare il prolungamento (c).
^Fissare gli oggetti con le asticelle (d).
^Fissare le asticelle con i dadi a farfalla. Tenere fermo il dado esagonale (e).
^Se l'oggetto non può essere fissato a livello del suo diametro maggiore, utilizzare
il prolungamento oppure adattare l'altezza del telaio superiore (f).
M-Nr. 05 921 492 / 00 fr/it

Other Miele professional Laboratory Equipment manuals

Miele professional G 7896 DOS User manual

Miele professional

Miele professional G 7896 DOS User manual

Miele professional A 104 User manual

Miele professional

Miele professional A 104 User manual

Miele professional A 620 User manual

Miele professional

Miele professional A 620 User manual

Miele professional PG 8583 CD User manual

Miele professional

Miele professional PG 8583 CD User manual

Miele professional E 497 User manual

Miele professional

Miele professional E 497 User manual

Miele professional PG 8596 User manual

Miele professional

Miele professional PG 8596 User manual

Miele professional A 315 User manual

Miele professional

Miele professional A 315 User manual

Miele professional PG 8583 User manual

Miele professional

Miele professional PG 8583 User manual

Miele professional A 207 User manual

Miele professional

Miele professional A 207 User manual

Miele professional E 380 User manual

Miele professional

Miele professional E 380 User manual

Miele professional A 306/1 User manual

Miele professional

Miele professional A 306/1 User manual

Miele professional DOS-Modul G 60 User manual

Miele professional

Miele professional DOS-Modul G 60 User manual

Miele professional DOS G 7896 User manual

Miele professional

Miele professional DOS G 7896 User manual

Miele professional PG 8593 User manual

Miele professional

Miele professional PG 8593 User manual

Popular Laboratory Equipment manuals by other brands

Radleys Carousel 6 Plus instructions

Radleys

Radleys Carousel 6 Plus instructions

Hemotherm 400MR Operation & technical manual

Hemotherm

Hemotherm 400MR Operation & technical manual

mrclab DVO Series Operation manual

mrclab

mrclab DVO Series Operation manual

CoolLED pE-800 quick start guide

CoolLED

CoolLED pE-800 quick start guide

Luminex Guava easyCyte Maintenance Guide

Luminex

Luminex Guava easyCyte Maintenance Guide

IKA A10 basic operating instructions

IKA

IKA A10 basic operating instructions

Belden HIRSCHMANN RPI-P1-4PoE installation manual

Belden

Belden HIRSCHMANN RPI-P1-4PoE installation manual

Koehler K1223 Series Operation and instruction manual

Koehler

Koehler K1223 Series Operation and instruction manual

Globe Scientific GCM-12 quick start guide

Globe Scientific

Globe Scientific GCM-12 quick start guide

Getinge 86 SERIES Technical manual

Getinge

Getinge 86 SERIES Technical manual

CORNING Everon 6000 user manual

CORNING

CORNING Everon 6000 user manual

Biocomp GRADIENT MASTER 108 operating manual

Biocomp

Biocomp GRADIENT MASTER 108 operating manual

Cole Parmer Stuart SB3/1 instruction manual

Cole Parmer

Cole Parmer Stuart SB3/1 instruction manual

BEVS 2501/2A user manual

BEVS

BEVS 2501/2A user manual

Qiagen DML 3000 user manual

Qiagen

Qiagen DML 3000 user manual

Queensgate NANOSCAN OP400 Quick start instructions

Queensgate

Queensgate NANOSCAN OP400 Quick start instructions

Parr Instrument 4560 Operating instructions manual

Parr Instrument

Parr Instrument 4560 Operating instructions manual

Integra DOSE IT operating instructions

Integra

Integra DOSE IT operating instructions

manuals.online logo
manuals.online logoBrands
  • About & Mission
  • Contact us
  • Privacy Policy
  • Terms and Conditions

Copyright 2025 Manuals.Online. All Rights Reserved.