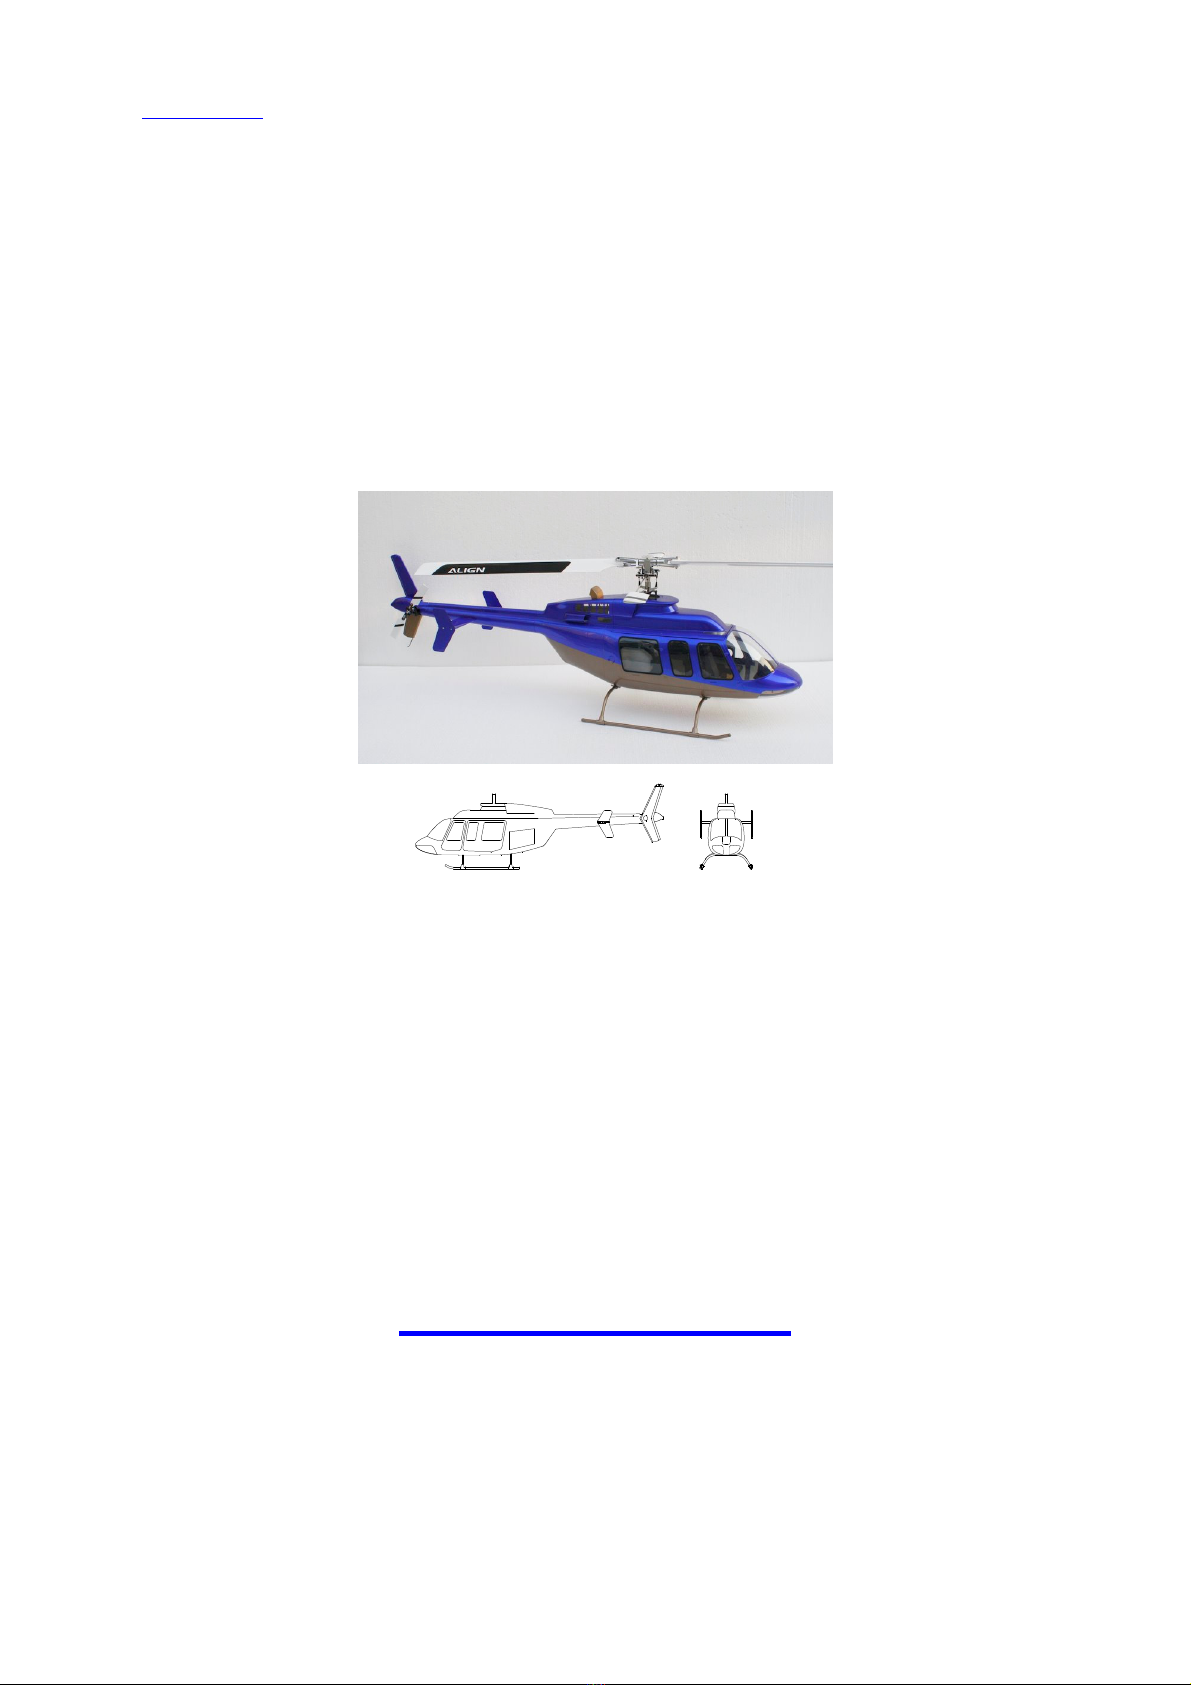
HELI Bell 407 User manual
HELI - SCALE
Copyright ® 2012 - Reproductions interdites
www.heli-scale.fr
Manuel d’assemblage
Instruction manual
Bell 407
Cher client,
Merci d’avoir choisi un fuselage/accessoire HELI - SCALE.
Toute l’équipe vous souhaite une bonne construction et de bons vols.
Dear customer
Thank you for choosing a scale fuselage/accessories HELI-SCALE
All our team wishes you a lot of fun and good flights.
HELI – SCALE
www.heli-scale.fr

HELI - SCALE
Copyright ® 2012 - Reproductions interdites
www.heli-scale.fr
IMPORTANT
Merci de bien vouloir lire et respecter cette notice de montage
étape par étape.
- Avant le collage de certaines pièces, celles-ci doivent être
totalement sèche.
- Les Hélicoptères modèles réduits ne sont pas des jouets : un
mauvais usage de ce produit peut causer des dommages
matériels et corporels très important dont la mort
- Le fabriquant et le revendeur déclinent toutes responsabilités
sur l’utilisation de ce produit.
- Ce produit est destiné à être utilisé par un adulte responsable,
assuré sur un terrain de modélisme officiel.
- Vérifier le réglage votre machine avant le premier vol.
- Vous êtes entièrement responsable du montage et du réglage.
Nous n’assurons aucun service après-vente ou quelconque
garantie après son achat et son montage.
- Volez uniquement dans des endroits sûrs et adaptés à la
pratique du modélisme.
- Ne pas voler proche des habitations ou des lieux fréquentés
par des passants et ou des enfants.
- Les modèles réduits peuvent être la cause d’accidents, de
pannes de différentes natures dont le manque de
maintenance, une erreur de pilotage, des interférences radios,
etc…
- Le pilote est entièrement responsable de sa machine, donc de
tous les dommages qu’il pourrait causer en utilisant un
modèle réduit. Soyez responsable !
- Pensez à renforcer les couples en bois qui supportent le
châssis avec du tissu carbone, au niveau de la jointure entre
ceux-ci et le fuselage.
- Il est conseillé d’améliorer le système existant de fixation avec
un système de verrouillage manuel de la cabine (visses ou
autre solution à votre guise.)
- Le montage nécessite plusieurs heures
- N’oubliez pas de vérifier le centrage avant le premier vol.

HELI - SCALE
Copyright ® 2012 - Reproductions interdites
www.heli-scale.fr
IMPORTANT
Thank you to please read and follow the installation
instructions step by step.
- Before the bonding of certain parts, they must be completely dry.
- The Helicopter models are not toys: misuse of this product
may cause damage and injury is very important that the death
- The manufacturer and retailer assume no responsibility for the use
of this product.
- This product is intended for use by a responsible
adult, provided on a plot of the official model.
- Check the setting on your machine before first flight.
- You are fully responsible for the assembly
and adjustment. Microsoft makes no after sales service or any
warranty after purchase and installation.
- Fly only in safe and suitable for the practice of modeling.
- Do not fly close to homes or places frequented by passers-
by and or children.
- The models can be the cause of accidents, breakdowns of various
kinds including lack of maintenance, pilot error, radio interference,
etc ...
- The driver is fully responsible for his machine, so for any
defect it may cause by using a model. Be responsible!
- Remember
to strengthen couples wooden support frame with carbon
cloth, at the joint between them and the fuselage.
- It is recommended to improve the existing system of fixation
with a locking system manual of the car (screws or other solution to
your liking.)
- The installation requires several hours
- Be sure to check the CG before the first flight

HELI - SCALE
Copyright ® 2012 - Reproductions interdites
www.heli-scale.fr
BELL407
Note:
Ce fuselage a été conçu pour une mécanique de T-rex 700. Mais avec quelques
ajustements, il est possible de monter la plupart des mécaniques classe 90 / 700.
Certaines pièces montrées dans cette notice ne sont pas incluses dans le kit comme
les aimants par exemple.
Toujours faire un pré-assemblage/ ajustage des pièces avant le collage définitif.
Please note:
- These mounting instructions are examples only, as the assembly could take place.
This is based on a TREX 700 mechanics. With slight adjustments, most 90er/700er
mechanics can be installed.
- Not all parts that are shown in this guide are included in the kit. E.g. can magnets
via air freight only be transported with an expensive certificate. Please get magnets
at your local dealer store.
- Always wait for the bonding of parts until you are sure that the parts fit. Do it first
without sticking to the fuselage, to "test it out".
- For the correctness of the instructions, we assume no liability.
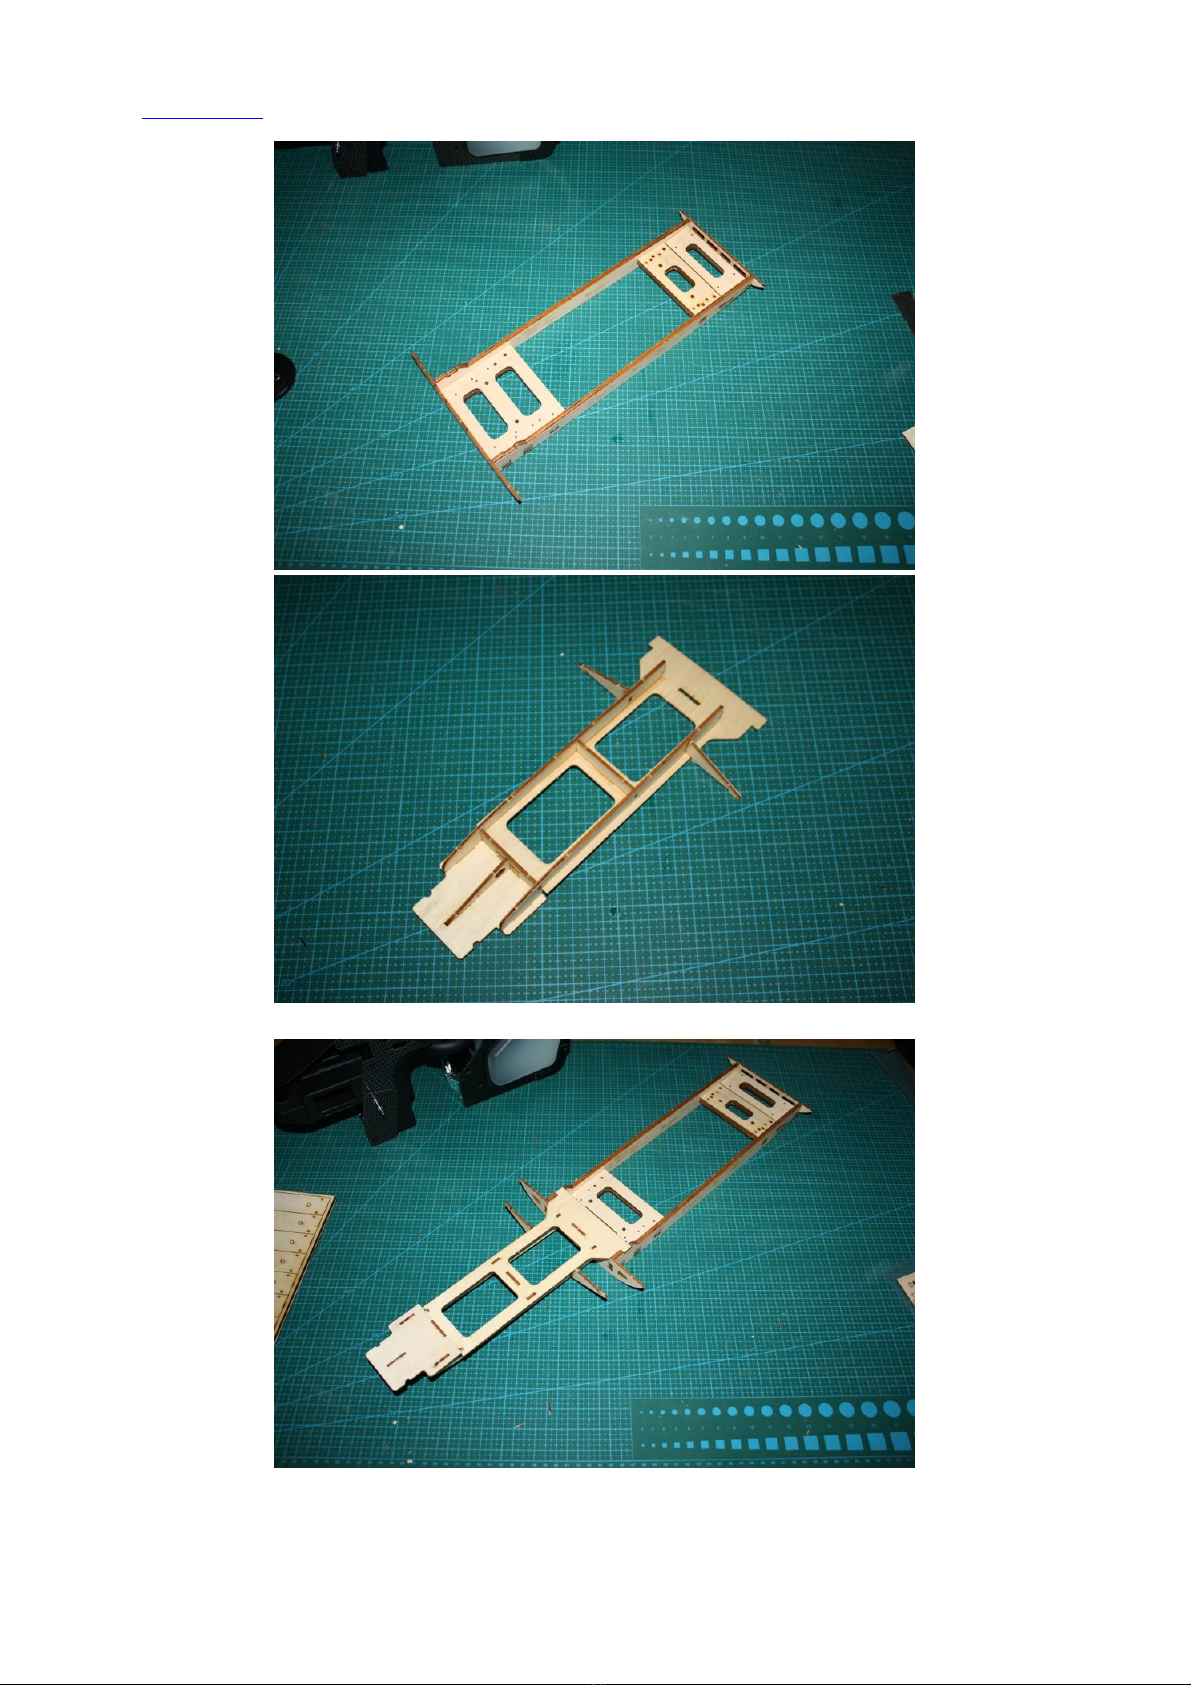
1. Assemblage des pièces du couple / Assembly of the wooden parts for
the frame
Montez les pièces comme indiqué sur la photo ci dessous. Ajustez, puis collez le
tout à la colle époxy
Put the pieces together as shown in the pictures and glue them with epoxy. (Only
stick when you are sure that everything fits!)
HELI - SCALE
Copyright ® 2012 - Reproductions interdites
www.heli-scale.fr
HELI - SCALE
Copyright ® 2012 - Reproductions interdites
www.heli-scale.fr
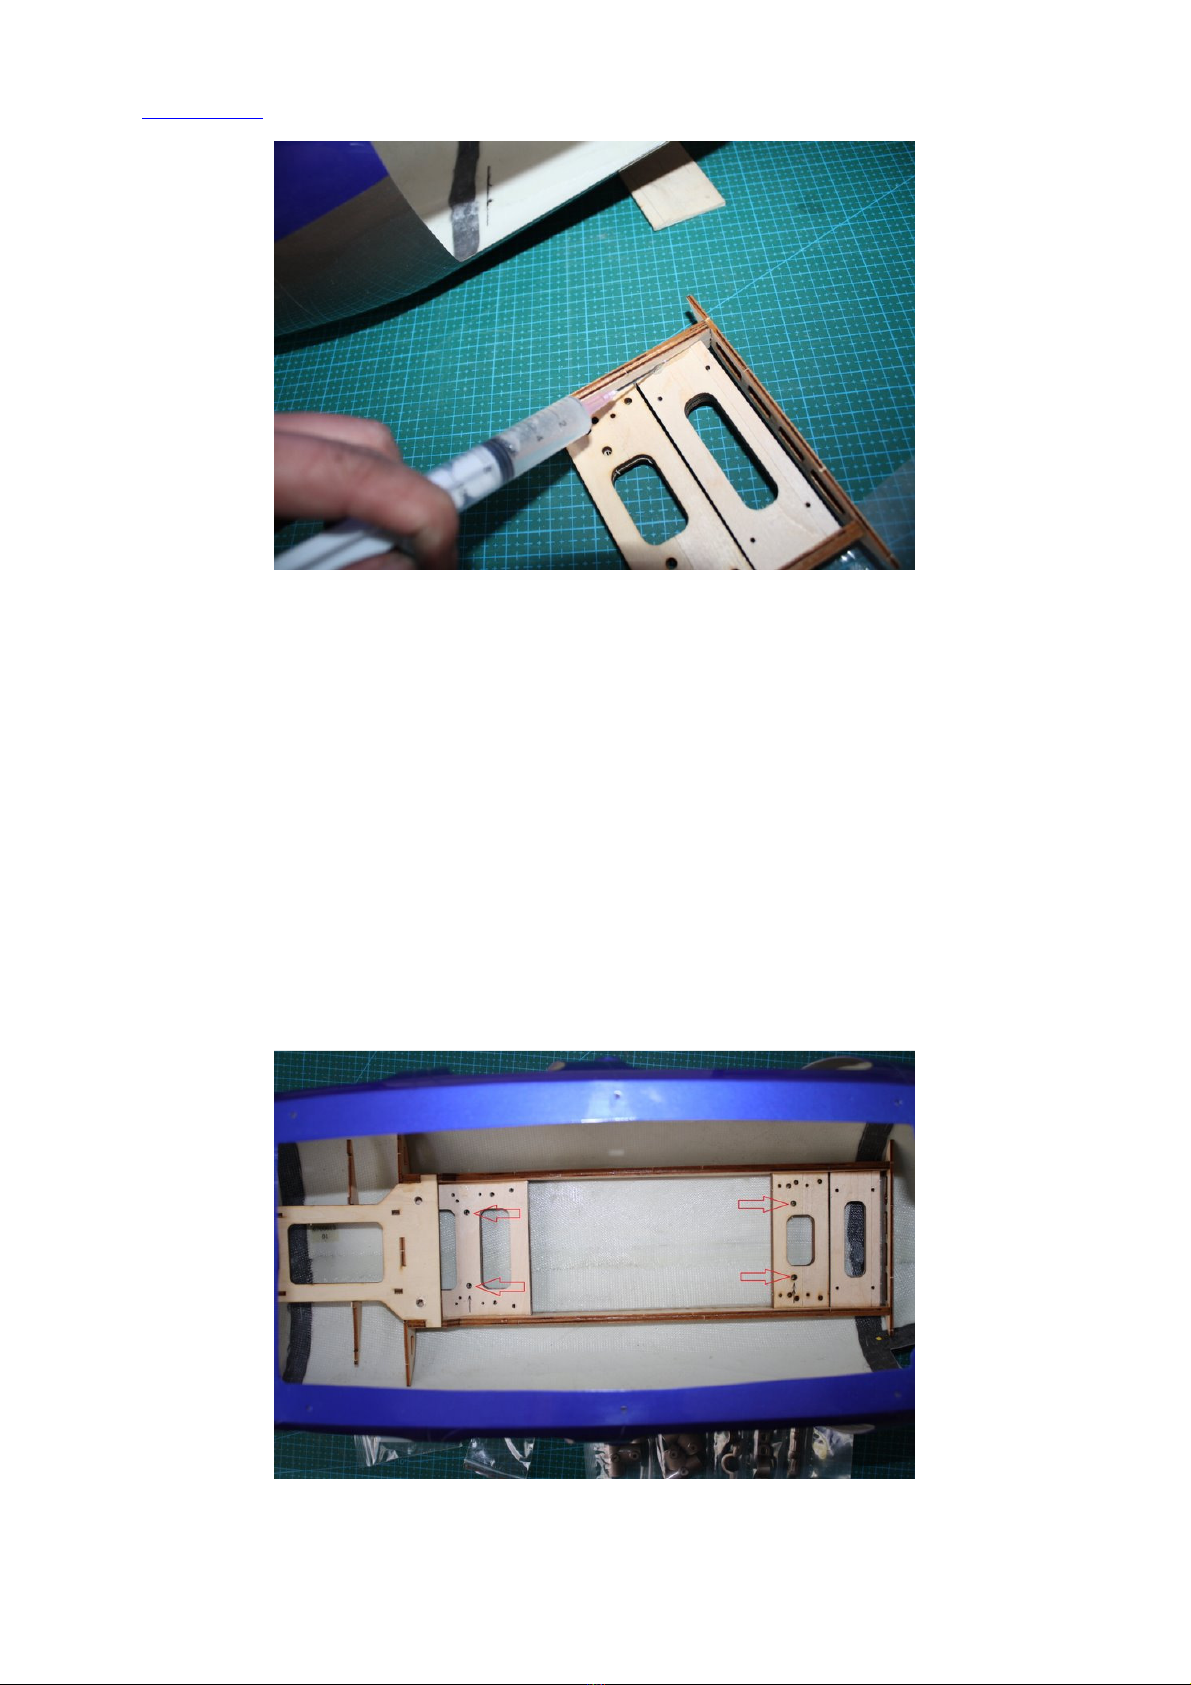
Positionnez les pièces assemblées dans le fuselage. Les 4 flèches rouges sur la
photo ci-dessous représentent les trous de fixation pour une mécanique de t-rex 700.
Installez votre mécanique et alignez l’axe du rotor principal au centre du capot
supérieur. L’axe doit se trouver au milieu du rond du capot supérieur. Repérez et
marquez au feutre, la position des couples et des fixations à l’intérieur sur le
fuselage. Collez ensuite le couple à la colle époxy dans le fuselage en utilisant les
marques faites au feutre.
Place the assembled pieces of wood in the fuselage.
The four labeled (red arrows) mounting holes are suitable for the installation of a
TREX-700 mechanics. Mount the mechanics and then align the rotor shaft centrally
to cover opening. The rotor shaft should be in the middle. Then mark the position of
the wooden parts at the interior of the fuselage interior. Glue (epoxy) the wooden
parts to the fuselage. Use the marks you just have made. Complain to the parts to
cure.

HELI - SCALE
Copyright ® 2012 - Reproductions interdites
www.heli-scale.fr

HELI - SCALE
Copyright ® 2012 - Reproductions interdites
www.heli-scale.fr
2 . Montage du train / Landing gear assembly
Note: L’arceau le plus petit doit être positionné à l’avant, le plus grand à l’arrière.
Note: The lower bow is the front runner, the higher is the rear skid bars.
.
.
Découpez le tube en silicone en 4 sections de 15mm. Enfilez les 4 morceaux sur les
arceaux. La distance entre 2 morceaux est de 70mm.
Cut the silicone tube in 15 mm long sections (4 pieces). Slide the pieces on the
Skids. The parts should have a distance of 70 mm (see pictures).

HELI - SCALE
Copyright ® 2012 - Reproductions interdites
www.heli-scale.fr
Percez le fuselage et les arceaux, de part en part aux emplacements des flèches à
l’aide d’une mèche de 2mm. Utilisez des vis de 3mm + écrous pour fixer et sécuriser
les arceaux sur le fuselage.
Drill from the inside, with a 2 mm drill, through the labeled (black arrows) holes of the
wooden parts. Take 3 mm self-tapping screws to attach the landing here.

HELI - SCALE
Copyright ® 2012 - Reproductions interdites
www.heli-scale.fr
Montez ensuite les fixations des patins comme indiqué sur les photos ci-dessous.
Fix and screw the landing gear respecting the distances on the pictures here under

HELI - SCALE
Copyright ® 2012 - Reproductions interdites
www.heli-scale.fr
3. Assemblage du tube de queue / Screwing together the main part of
fuselage with the tail boom.
Ajustez les trous existants à l’aide d’une mèche de 4mn. Insèrez ensuite les vis auto-
fixantes à l‘intérieur du tube de queue, puis sécurisez ses vis à l’aide de colle cyano
ou d’époxy. Assemblez ensuite après sèchage le tube de queue et le fuselage.
Sécurisez le tout à l’aide des vis M3. Utilisez les rondelles.
Expand the existing holes with a 4 mm drill. Set into the tail boom holes self-tapping
M3 nuts. Secure the nuts with super glue or epoxy. Then connect the two body parts
with M3 x 10 mm hex head screws. Use washers.

HELI - SCALE
Copyright ® 2012 - Reproductions interdites
www.heli-scale.fr

HELI - SCALE
Copyright ® 2012 - Reproductions interdites
www.heli-scale.fr
4. Assemblage des dérives et des stabilisateurs / Tail assembly
Enlevez la peinture comme indiqué sur les photos ci-dessous pour que la colle époxy
adhère correctement. Présentez, ajustez et collez les stabilisateurs à la colle époxy.
Remove the paint layer, as shown in the pictures, so that the epoxy adheres. Adjust
then glue stabes using epoxy

HELI - SCALE
Copyright ® 2012 - Reproductions interdites
www.heli-scale.fr

HELI - SCALE
Copyright ® 2012 - Reproductions interdites
www.heli-scale.fr
Poncez ensuite les extrémités des stabilisateurs comme indiqué sur les photos ci-
dessous. Enduisez de colle époxy, positionnez les stabilisateurs verticaux, puis
sécurisez le tout à l’aide des vis de 3mn.
Now remove the painting from outer side of the horizontal stabilizer. Coat the surface
with epoxy adhesive. Now screw the side fins with 3 mm self-tapping screws on the
horizontal stabilizer

HELI - SCALE
Copyright ® 2012 - Reproductions interdites
www.heli-scale.fr
Percez ensuite sur la partie inférieure de la dérive un trou de 3mm. Insèrez la
béquille , puis collez la à l’époxy
Drill to the bottom of the vertical stabilizer a hole with 3 mm. Attach the tail wire with
an epoxy adhesive
Positionnez, ajustez puis vissez la dérive sur le tube de queue à l’aide des vis et
écrous M3 x 10mm. Découpez et ajustez les trous comme indiqué sur les photos ci-
dessous pour le carter d’anti-couple. Note: ces trous peuvent varier d‘emplacement
selon votre mécanique. Les photos ci-dessous montrent les emplacements pour une
mécanique de T-rex 700. Les commandes de l’anti-couple ne doivent pas toucher le
fuselage et doivent être libres de tous mouvements (débattement).
Attach the vertical stabilizer with M3 x 10 mm bolts on the tail boom. Cut the holes for
the tail gearbox. (Note: This can vary by mechanics, and pictures show the cut-outs
for TREX 700 mechanics).

HELI - SCALE
Copyright ® 2012 - Reproductions interdites
www.heli-scale.fr
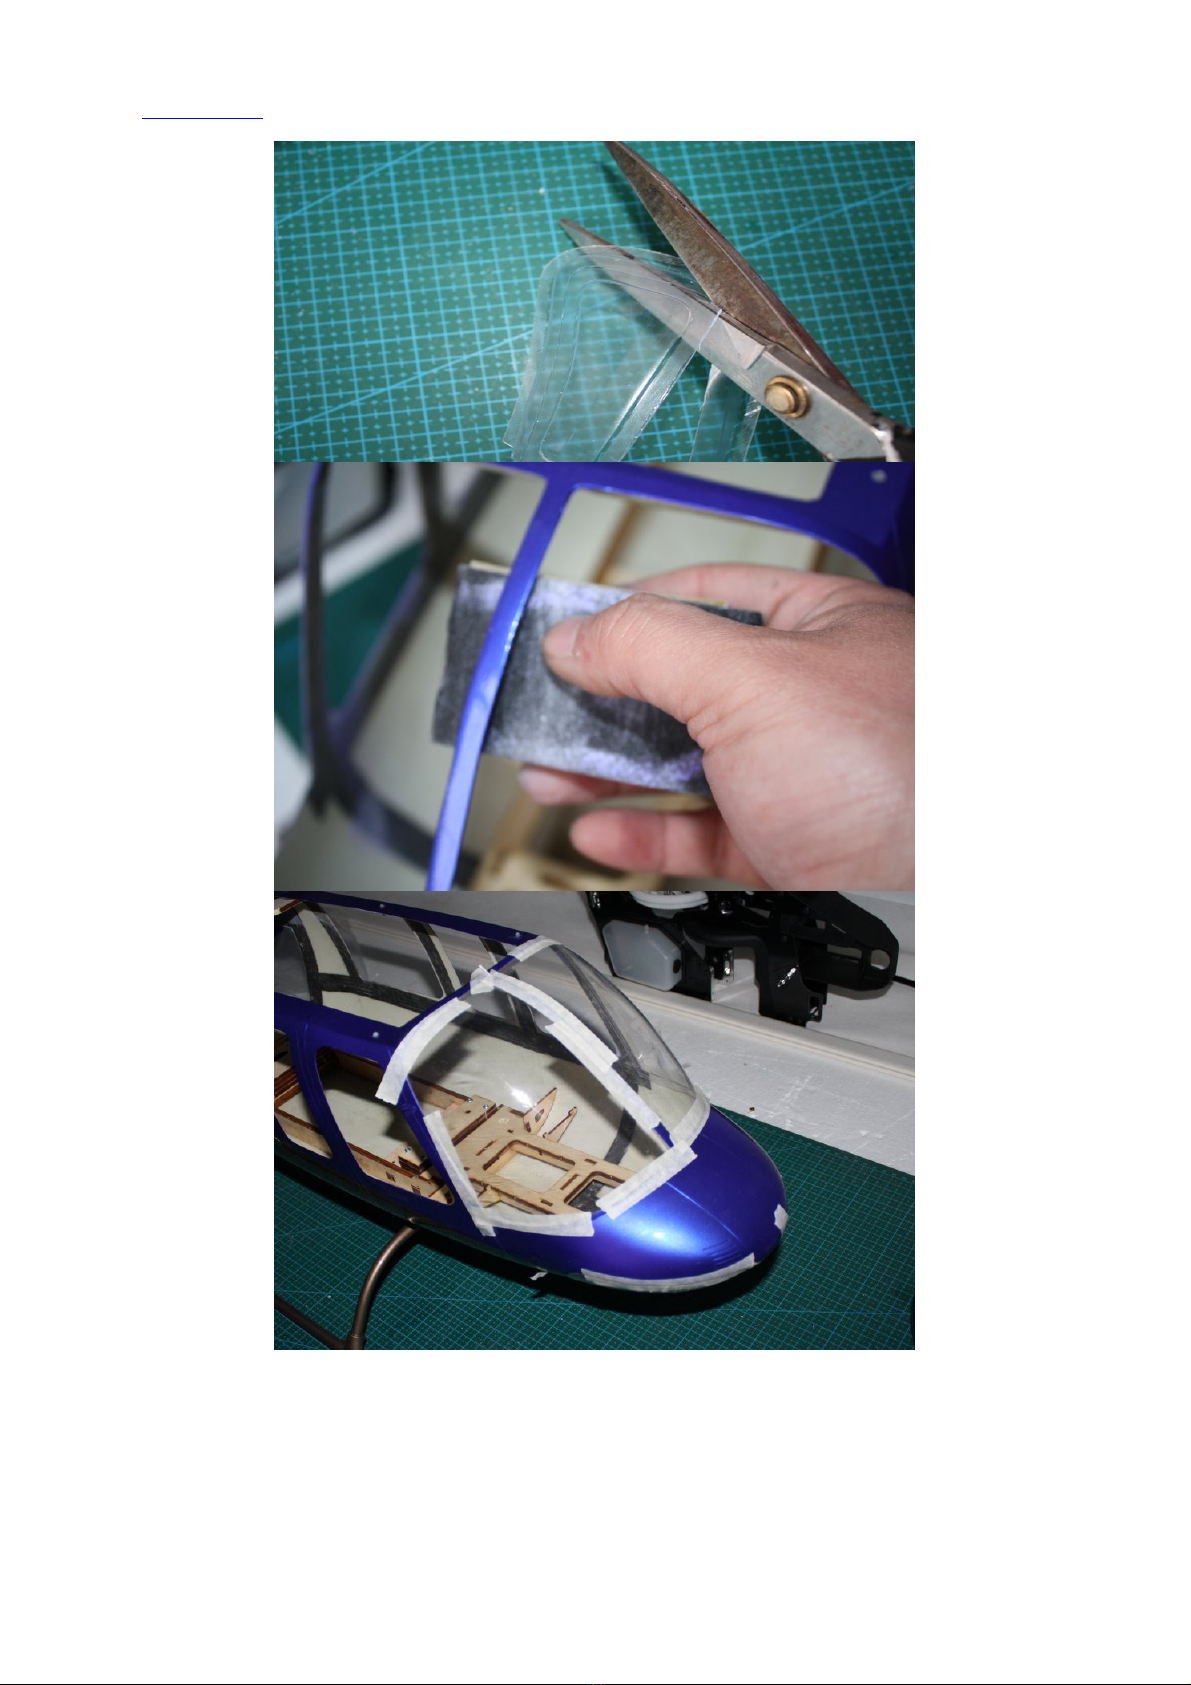
5. Pose des pare brise / The installation of windows and decorative
mesh
Les vitres sont 1mn plus petites que leurs encadrements.
The transparent glass should be ca. 1 mm smaller than the window frame.

HELI - SCALE
Copyright ® 2012 - Reproductions interdites
www.heli-scale.fr
En premier, collez les caoutchoucs sur les vitres à l’aide de colle type super glue.
Positionnez ensuite chaque vitre sur son encadrement, puis collez à l’intérieur à
l’aide de super glue les caoutchoucs et leur vitre sur le fuselage. L’extérieur du
caoutchouc doit s’encastrer sur l’encadrement.
First, glue the window and the rubber with super glue together. Then fix the window
at the window frame. Bonding then the rubber to the window frame

HELI - SCALE
Copyright ® 2012 - Reproductions interdites
www.heli-scale.fr
Poncez l’intérieur du fuselage au niveau de la cabine avant pour la pose du pare
brise principal. Découpez en laissant une marge chaque vitre, positionnez ajustez et
collez. Sécurisez chaque pare brise à l’aide d’adhésif sur l’extérieur du fuselage pour
le sèchage.
Sand the inside of the frame slightly. The remaining windows are cut with overlap and
are glued with epoxy into the back of the frame. While the adhesive has hardened
the windows are fixed with adhesive tape
HELI - SCALE
Copyright ® 2012 - Reproductions interdites
www.heli-scale.fr
Table of contents
Other HELI Toy manuals

Popular Toy manuals by other brands

Stensat
Stensat StenBOT Rover Kit manual

Twisted Hobbys
Twisted Hobbys Twisted Racer Mustang manual

Eduard
Eduard IA-58A quick start guide

Fisher-Price
Fisher-Price 71905 instructions

TQ-TECH
TQ-TECH TQ6 Guide manual

The Great American Train Company
The Great American Train Company Pioneer Mogul 2-6-0 owner's manual


