HELLER BL9293 User manual

1.5L Glass Jug Blender
User Manual
Model Number: BL9293
READ AND SAVE THESE INSTRUCTIONS

IMPORTANT
Please read and follow the instructions in this user manual even if you feel you are familiar with the product, and
find a place to keep it handy for future reference.
For your convenience, record the complete model number (located on the product identification plate) and the
date you received the product together with your purchase receipt, and attach to the warranty and service
information. Retain in the event that warranty service is required.
NOTE: The rating of this product (as marked on the product identification plate) is based on specific loading tests.
Normal use or the use of other recommended attachments may draw significantly less power.
IMPORTANT SAFEGUARDS
When using any electrically powered product, basic safety precautions should always be followed,
including the following:
PLEASE READALL INSTRUCTIONS CAREFULLY BEFORE USING THIS PRODUCT
WARNING!: - to reduce the risk of fire, electrical shock or injury to persons or property:
•Carefully read all instructions before operating your new product for the first time and keep handy for
future reference.
•Remove and safely discard any packaging material and promotional labels before using the product for
the first time.
•Before using, check that the voltage of the wall outlet corresponds to that shown on the rating plate.
•Do not operate any appliance with a damaged cord or plug or after the appliance malfunctions, or is
dropped or damaged in any manner. Return appliance to the nearest authorized service facility for
examination, repair or electrical or mechanical adjustment.
•Always ensure the appliance is switched OFF, prior to plugging into the power outlet.
•If the supply cord is damaged, it must be replaced by the manufacturer, an authorized service agent or a
qualified technician in order to avoid a hazard.
•To protect against risk of electrical shock, do not put the motor base into water or any other liquid. To
disconnect, turn the control to “Off”, then remove plug from power outlet by grasping the plug, not the
cord.
•Close supervision is necessary when any appliance is used by or near children.
•Avoid making contact with moving parts.
•Keep hands and utensils out of container while blending to reduce the risk of severe injury to persons or
damage to the blender. A scraper may be used but must be used only when the blender is not running.
•Unplug from outlet when not in use, before putting on or taking off parts, and before cleaning. To
disconnect, turn any control to “off”, then remove plug from wall outlet by grasping the plug, not the cord.
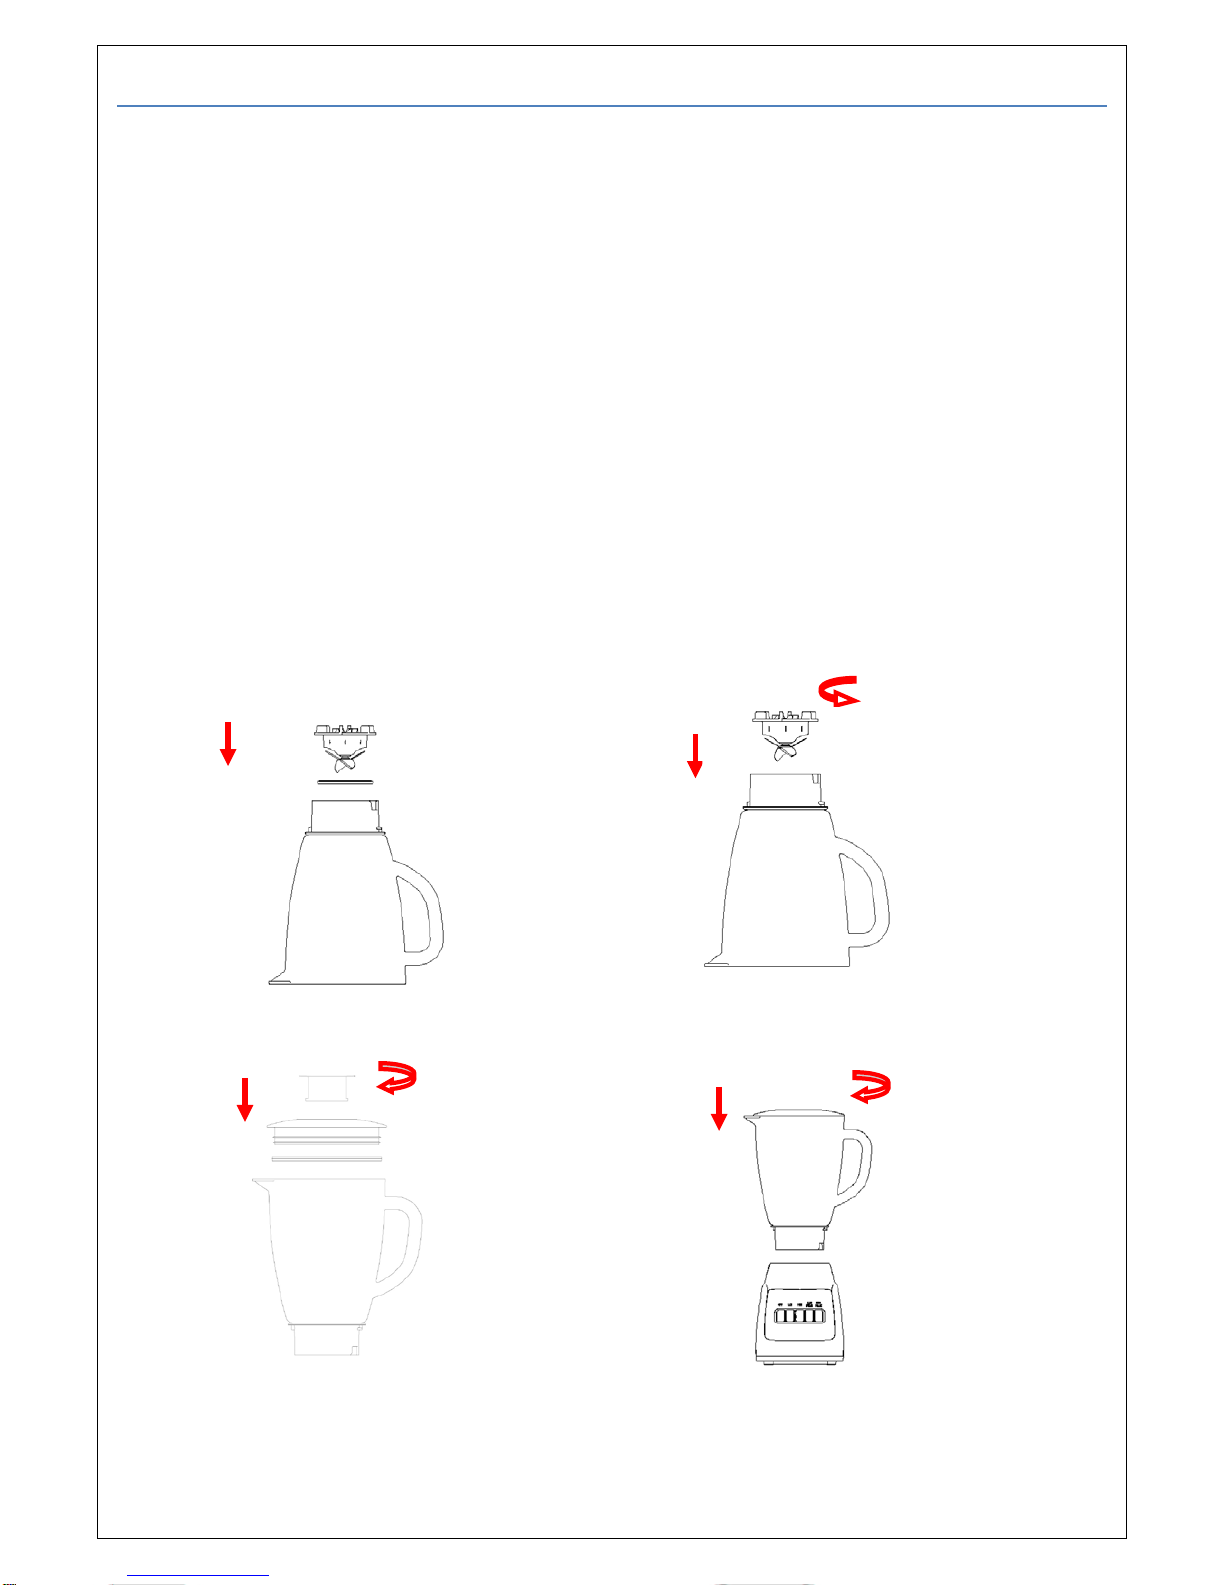
•To reduce the risk of injury, never place blade assembly on motor unit without the jar properly
attached.
•When removing the blender from the motor unit, wait until the blades have completely stopped.

•Always operate blender with lid in place.
•Always use the appliance on a secure, dry level surface.
•Never place this appliance on or near a hot gas or an electric burner or where it could touch a heated
appliance.
•Always remove the blade assembly before pouring contents from jar.
•Be sure to switch off the appliance after each use. Make sure the motor stops completely before
disassembling.
•Do not leave this appliance unattended during use.
•To reduce the risk of injury to persons or property, never use this appliance in an unstable position.
•Do not use outdoors.
•Unplug from outlet when not in use, before putting on or taking off parts, and before cleaning.
•CAUTION:Never immerse in water, or unplug before inserting and/or removing parts.
•CAUTION: DO NOT OPEN LID UNTIL BLADES STOP.
•Do not let the cord hang over the edge of a bench, table or to touch hot surfaces.
•Do not operate product with damp or wet hands.
•Close supervision is necessary when the appliance is being used near children or infirm persons.
•The use of accessories not recommended by the manufacturer may cause injuries to persons.
•This appliance is not intended for used by persons (including children) with reduced physical, sensory or
mental capabilities, or lack of experience and knowledge, unless they have been given supervision or
instruction concerning use of the appliances by a person responsible for their safety.
•Children should be supervised to ensure that they do not play with the appliance.
•Do not operate the appliance other than for its intended use. This appliance is for household use only.
•Do not operate the appliance by means of an external timer or separate remote-control system.
•The installation of a residual current device (safety switch) is recommended to provide additional safety
protection when using electrical appliances. It is advisable that a safety switch with a rated residual
operating current not exceeding 30mA be installed in the electrical circuit supplying the appliance. See
your electrician for professional advice.

FEATURES

Fig.5
Fig.6
Fig.6
BEFORE FIRST USE
1. Before first use, carefully unpack the Blender and its attachments and remove any packaging material,
labels or stickers. Clean all parts except the motor base. Handle the blade with extreme care as it is very
sharp.
2. The jug assembly (including the filler cap, lid, seal ring 1, jug, seal ring 2 , blade assembly and jug base)
has already been assembled into the motor unit. Disassemble to wash all detachable parts except the
motor unit.
3. Once all parts have been cleaned and dried thoroughly, reassemble the blender.
4. Turn the jug upside down on a level surface. Place the seal ring 2 and blade assembly onto the jug (See
Fig. 3).
5. Holding the jug handle, place the jug base onto the jug bottom and secure the base by turning it clockwise
until tight (See Fig.4)
6. Turn the jug back upright. Wrap the seal ring 1 around the lid bottom and put the lid onto the jug assembly.
Place the filler cap exactly into the lid by slotting the grooves on both sides of the cap, into the slots on the
lid. Turning the cap clockwise until tight (See Fig. 5).
7. Finally, place the assembled jug onto the motor unit by aligning the strip on the assembled jug base. (See
Fig.6)
CAUTION: Jar is now secure. Do not try to twist the jar onto motor unit.
Fig.3
Fig.4

INSTRUCTIONS
1. Peel and/or core desired fruit or vegetables and cut into small pieces.
2. Place the food to be blended into the jug (figure. 7). A certain amount of liquid (water, milk, juice etc)
needs to be added to facilitate the smooth running of the appliance. The ratio of food to water is 2:3. The
amount of mixture should not exceed the max level mark.
Note: Never use boiling liquids in this appliance, or run the appliance empty.
3. Put the lid on the jar. Be sure the filler cap is in place.
4. Plug the power cord into a power outlet.
5. Press the appropriate speed button.
6. For quick or delicate blending tasks, press ‘Low Pulse’ or ‘High Pulse’ buttons and blend for a few
seconds. Operate several times until the desired consistency is achieved.
7. If you need to add ingredients while the blender is working, remove the filler cap and place through the lid
opening (Fig. 8).
8. When blending hard foods, keep one hand firmly on the lid for stability.
9. When the desired consistency is achieved, press the ‘Off’ button.
Note: For each use, the operation time should not exceed 3 minutes. At least 10 minutes rest time must
be maintained between two continuous cycles. Let the unit cool to room temperature before performing
the third cycle.
Note: If you want to stop the machine during operation, turn the knob to the ‘O’ position anytime.
HINTS & TIPS
•For best results, food must be blended with some liquid. Pour the liquid into the jar first, then add solids.
•Some tasks that cannot be performed with a blender are: beating egg whites, whipping cream, mashing
potatoes, grinding meat, mixing dough, extracting juice from fruit and vegetables.
•The following items should never be placed in the blender, as they may cause damage to the unit: bones,
large pieces of solid and/or frozen foods, and tough foods such as turnips.
Fig.7
Fig.8

CARE & CLEANING
This product contains no user serviceable parts.
1. Before cleaning, unplug the blender from the power outlet.
2. For easier cleaning, always rinse/wash immediately after use. Do not let food dry in the jar assembly, as
this will make cleaning extremely difficult.
3. Pour a little warm soapy water into the jar and press the “Low Pulse’ button and let the blender run for a
few seconds. Press the ‘Off’ button and then empty the jar.
4. Dismantle all detachable parts. Lift the jar assembly off the motor unit.
5. Wash the jug and blades using warm soapy water, then rinse thoroughly. The blades are very sharp, so
please handle with care.
6. Leave the jug to dry upside down, and away from children.
7. Wipe the motor base with a damp cloth and dry thoroughly. Remove any stubborn spots by rubbing with
non-abrasive cleaner.
CAUTION: Never immerse the motor unit in water or any other liquid.
CAUTION: Do not use rough scouring pads or cleansers on parts or finish.
CUSTOMER SERVICE
Australian Customer Service
GAF Control (Sales) Pty Ltd
P.O Box 19
Altona North Victoria 3025
Phone: 1300 659 489
Hours: 9am-5pm (EST) Mon-Fri
www.gafcontrol.com.au
*This product may vary slightly to the product illustrated due to ongoing product development.
Table of contents
Other HELLER Blender manuals