Henan Liangyi U2 User manual

0
Henan Liangyi Mechanical and Electronic Technology Co.,Ltd
3D Printer--U2 User Manual

1
Legal Notice
We’re entitled to amend the relevant content without
notification. We are irresponsible for any damage while
manipulating according to this manual,caused by including
misprinting and other publishing errors. Nobody is allowed to
amend,copy or translate. The manual is copyrighted and the
final interpretation is reserved.

2
Contents
1. Introduction
1.1 How to use the manual.......................................................................................................3
1.2 Precautions......................................................................................................................... 3
2.Brief Introduction............................................................................................................................. 4
2.1 Appearance............................................................................................................................ 4
2.1.1. Lateral View.............................................................................................................. 4
2.2 Axis.....................................................................................................................................5
2.1.3. Accessories................................................................................................................ 6
2.1.4.Tools........................................................................................................................ 6
2.2 Printer Specifications............................................................................................................ 7
2.3 Work environment.................................................................................................................8
3. Machine Inspection......................................................................................................................... 9
3.1 Printer Installation Preparation..................................................................................................... 9
3.1.1 Packaging inspection..................................................................................................9
3.1.2 Machine Inspection.................................................................................................... 9
3.2 Filament Installation..............................................................................................................9
3.3 Install the Cura.................................................................................................................... 14
3.4 Cura operation.................................................................................................................. 17
4. Remove the model.........................................................................................................................20
5. Remove the support.......................................................................................................................20
6. Troubleshooting.............................................................................................................................20

3
1. Introduction
1.1 How to use the manual
It includes 4 parts: Introduction,Overview,Operation and Common Troubleshooting.
Please read this manual carefully before installing and manipulating the machine just
for your information.
1.2 Precautions
Please read this chapter carefully before using.
1.2.1 Safety
Don’t touch the printed model or the nozzle when it’s working or just fishing,just in case of the
scald and the damage of the printed model.
Plastic nippers and a pair of goggle are advised when you try to remove the support
part.
There will be a less-pleasant odor when it’s printing,so that is why we advise a
well-ventilated environment. In addition, please keep the printer away from strong
airflow which may effect the quality of printing.
Tips: Please keep well-ventilated because some irritant odor will be released when
ABS is melting.
1.2.2 Protective Measures
--Please don’t spoil any water or drinks inside the cabinet which may cause the
damage of circuit.
--Please don’t power off or plug out the SD card or the USB cable,or it may damage
the date of the model.
--Please keep a proper distance, like10mm or above, between the nozzle and the
heating bed when you do the testing. If not,it may cause nozzle jam when the filament
flows out from the nozzle after heating.
4
2.Brief Introduction
Simplicity and stability is the design concept of U2.
It’s easy to manipulate and make whatever you like with a few buttons even for
amateurs. The working principle is extruding the melting ABS/PLA and fast
solidification after shaping to accomplish the 3D printing
2.1 Appearance
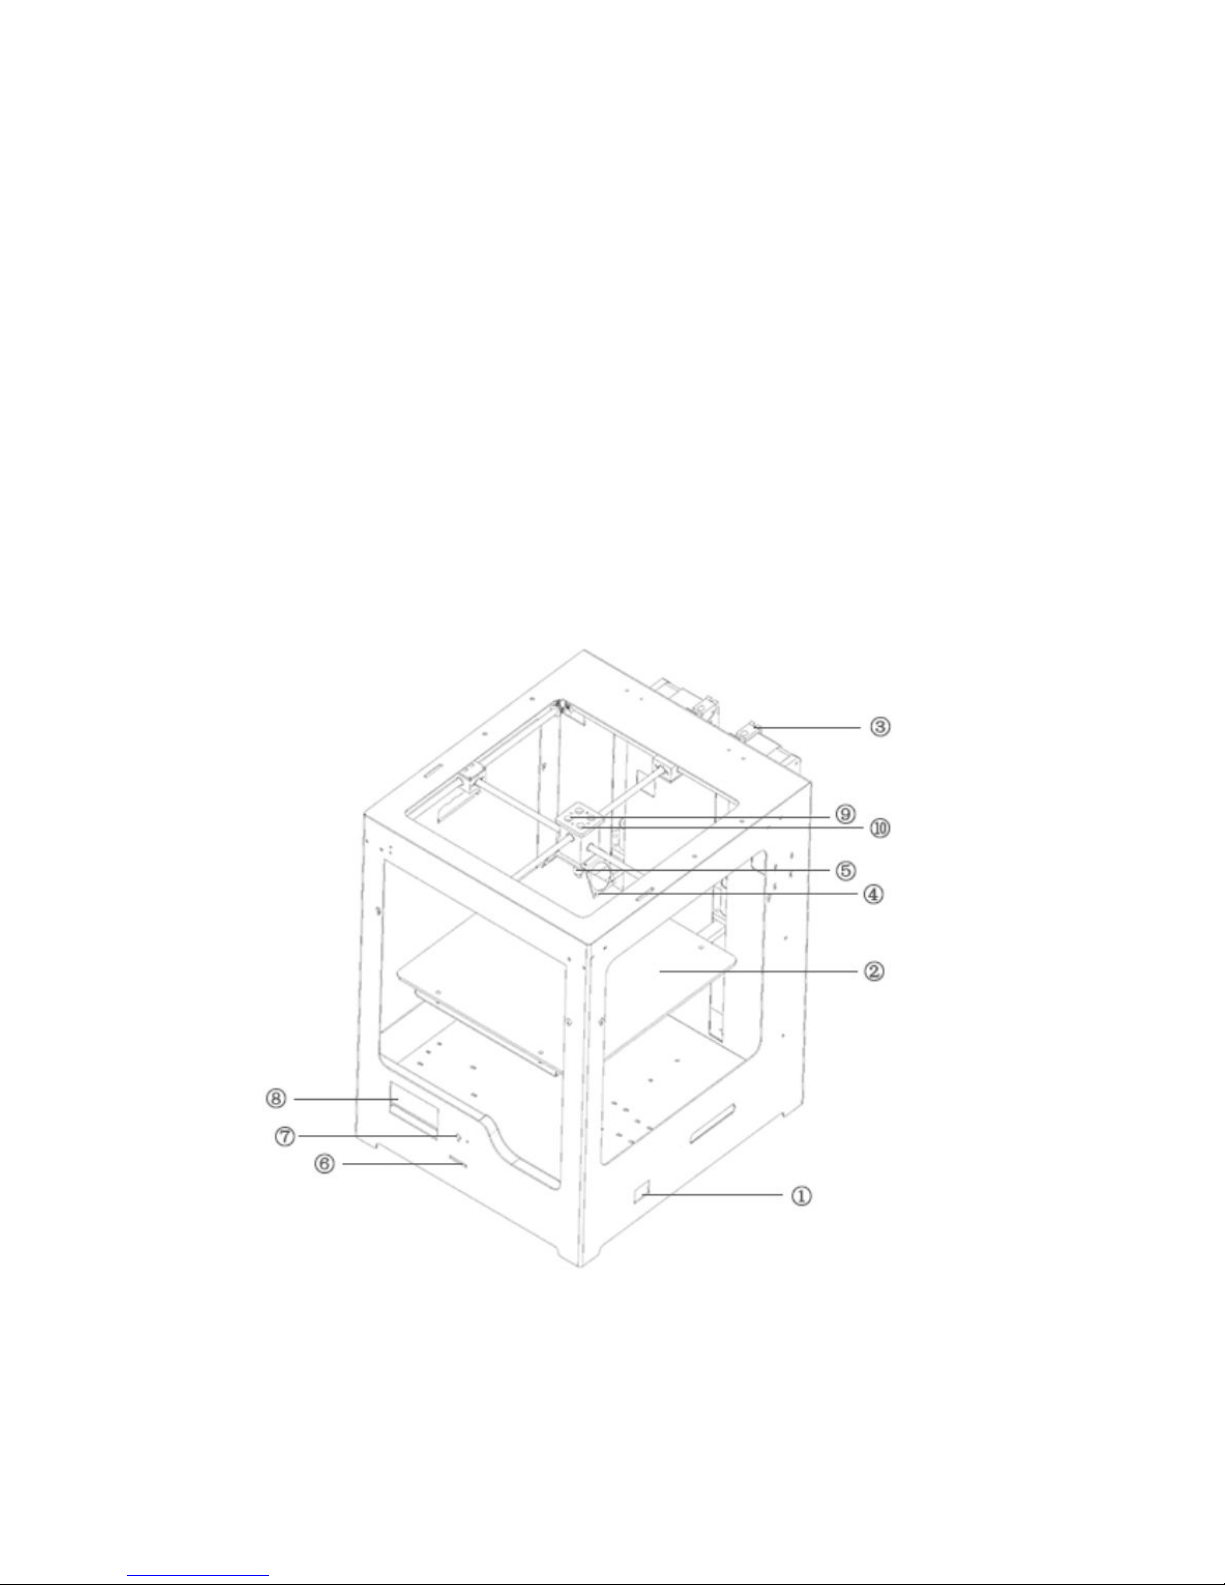
2.1.1. Lateral View
①Power ⑥SD Slot
②Heating bed ⑦Menu Button
③Extruder ⑧LCD Screen
④Fan ⑨A1 Filament-in A1
⑤Nozzle ⑩A2 Filament-in A2
5
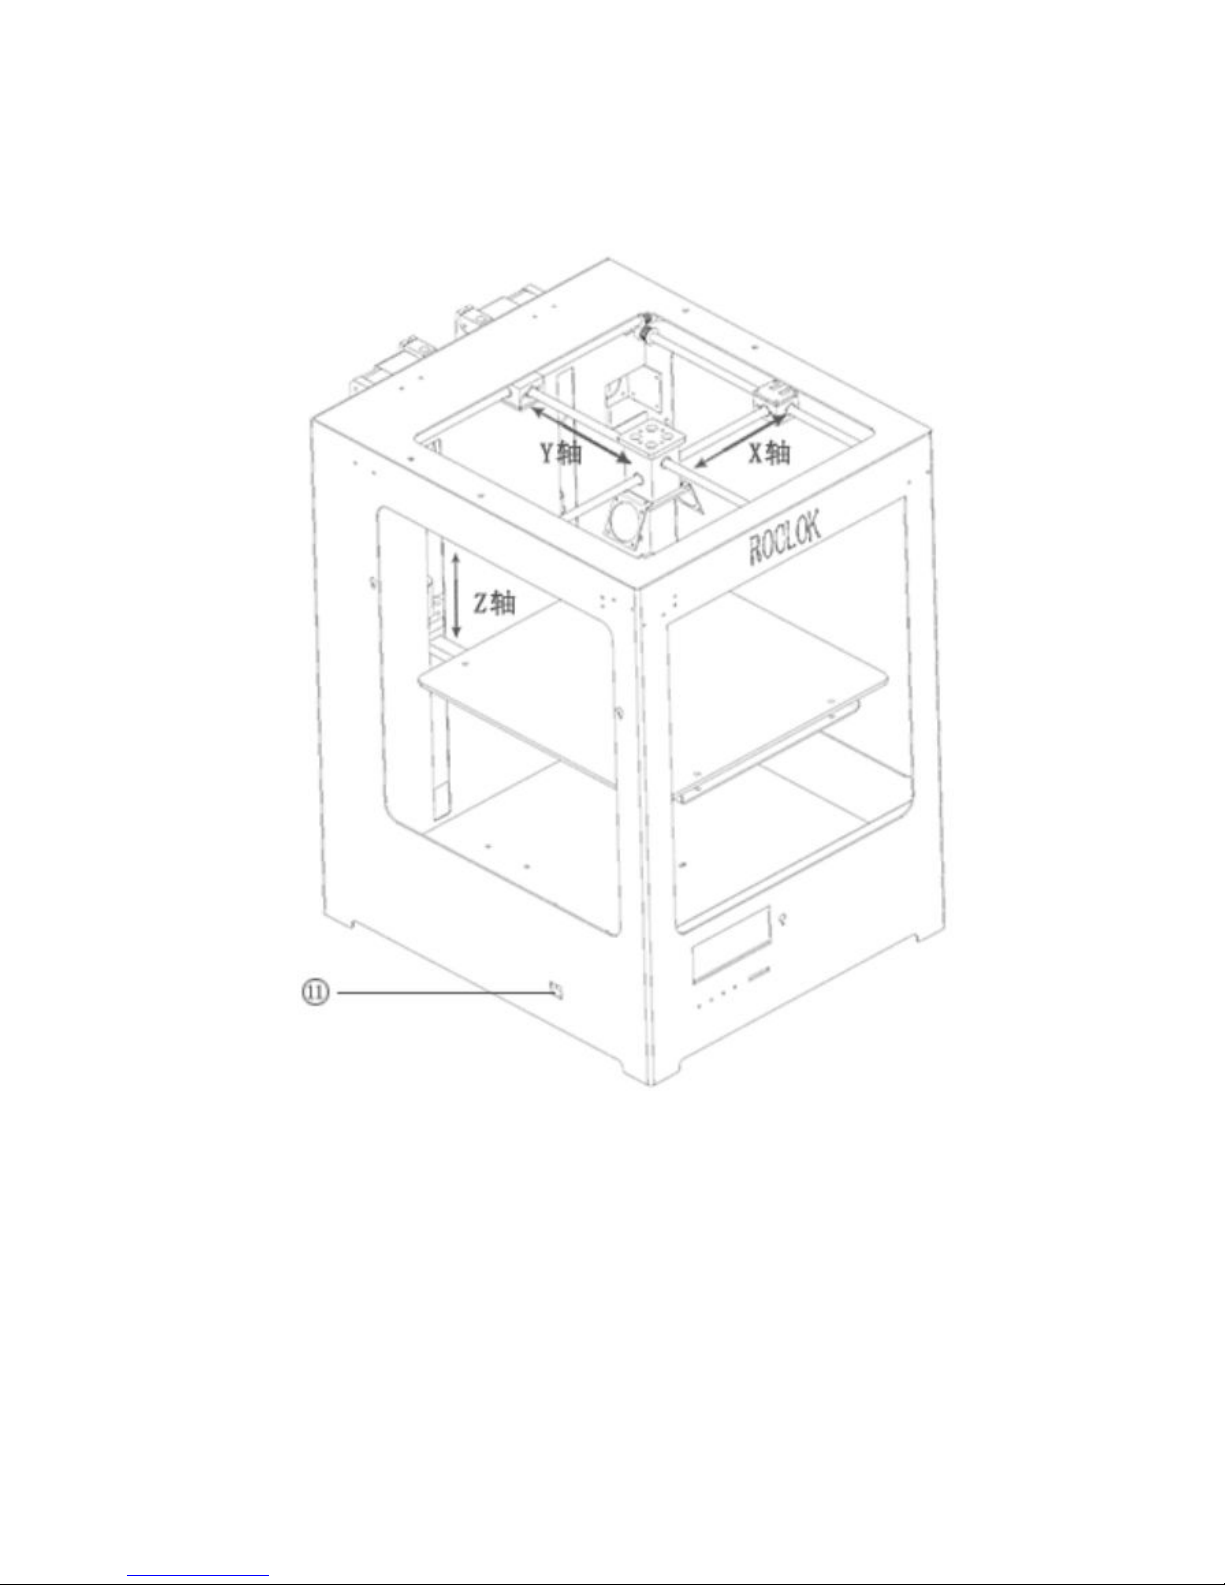
2.2 Axis
⑪USB Slot

6
2.1.3. Accessories
2.1.4.Tools

7
2.2 Printer Specifications
Forming
Technology:
Fused Deposition Modeling(FDM)
Technical
Parameters:
Nozzle Quantity:single nozzle\dual nozzle
Molding size:250*250*300mm
Positioning accuracy:X.Y Axis10Micron,Z
Axis1.5Micron
Minimum print thickness:0.06mm
Nozzle diameter:0.4mm(0.3 Optional)
Maximum air-way speed:250mm/s
Maximum print speed:150mm/s
Maximum extrusion temperature:250 degree
Highest temperature hot bed:120 degree
Highest Feeding speed:100mm/s
Filament:
Support filament:ABS、PLA、PVA、PS、PC
Filament filament:150~250 filament
Filament color:black、white、red、yellow、green、blue and so
on
Hardware:
Controller:Arduino ATmega2560 R3 Microcontrollers
Control board:RUMBA control board
Stepper motor:X、Y 42*48 Stepper motor,1.2A
Stepper motor:Z axis42*48 Stepper motor,1.5A

8
Stepper motor:E axis42*48 Stepper motor,1.8A
Input Power:110~220V,1.5A
Output Power:Special Switching Power Supply,24V,10.5A
Software:
Operating System:XP、Vista、Win7、Win8, LINUX,OS
Input File:STL、OBJ、GCode
Slice Software:Cura、Slic3r、kisslicer
Upper computer software:Cura、Printrun、RepetierHost
Machinery:
Bare metal Dimensions:38*47*57cm
Package Dimensions:44*54*61cm
Net weight:24.5kg
Gross weight:about 32kg
2.3 Work environment
Relative humidity 20%--90%
Room temperature 10℃--35℃
9
3. Machine Inspection
3.1 Printer Installation Preparation
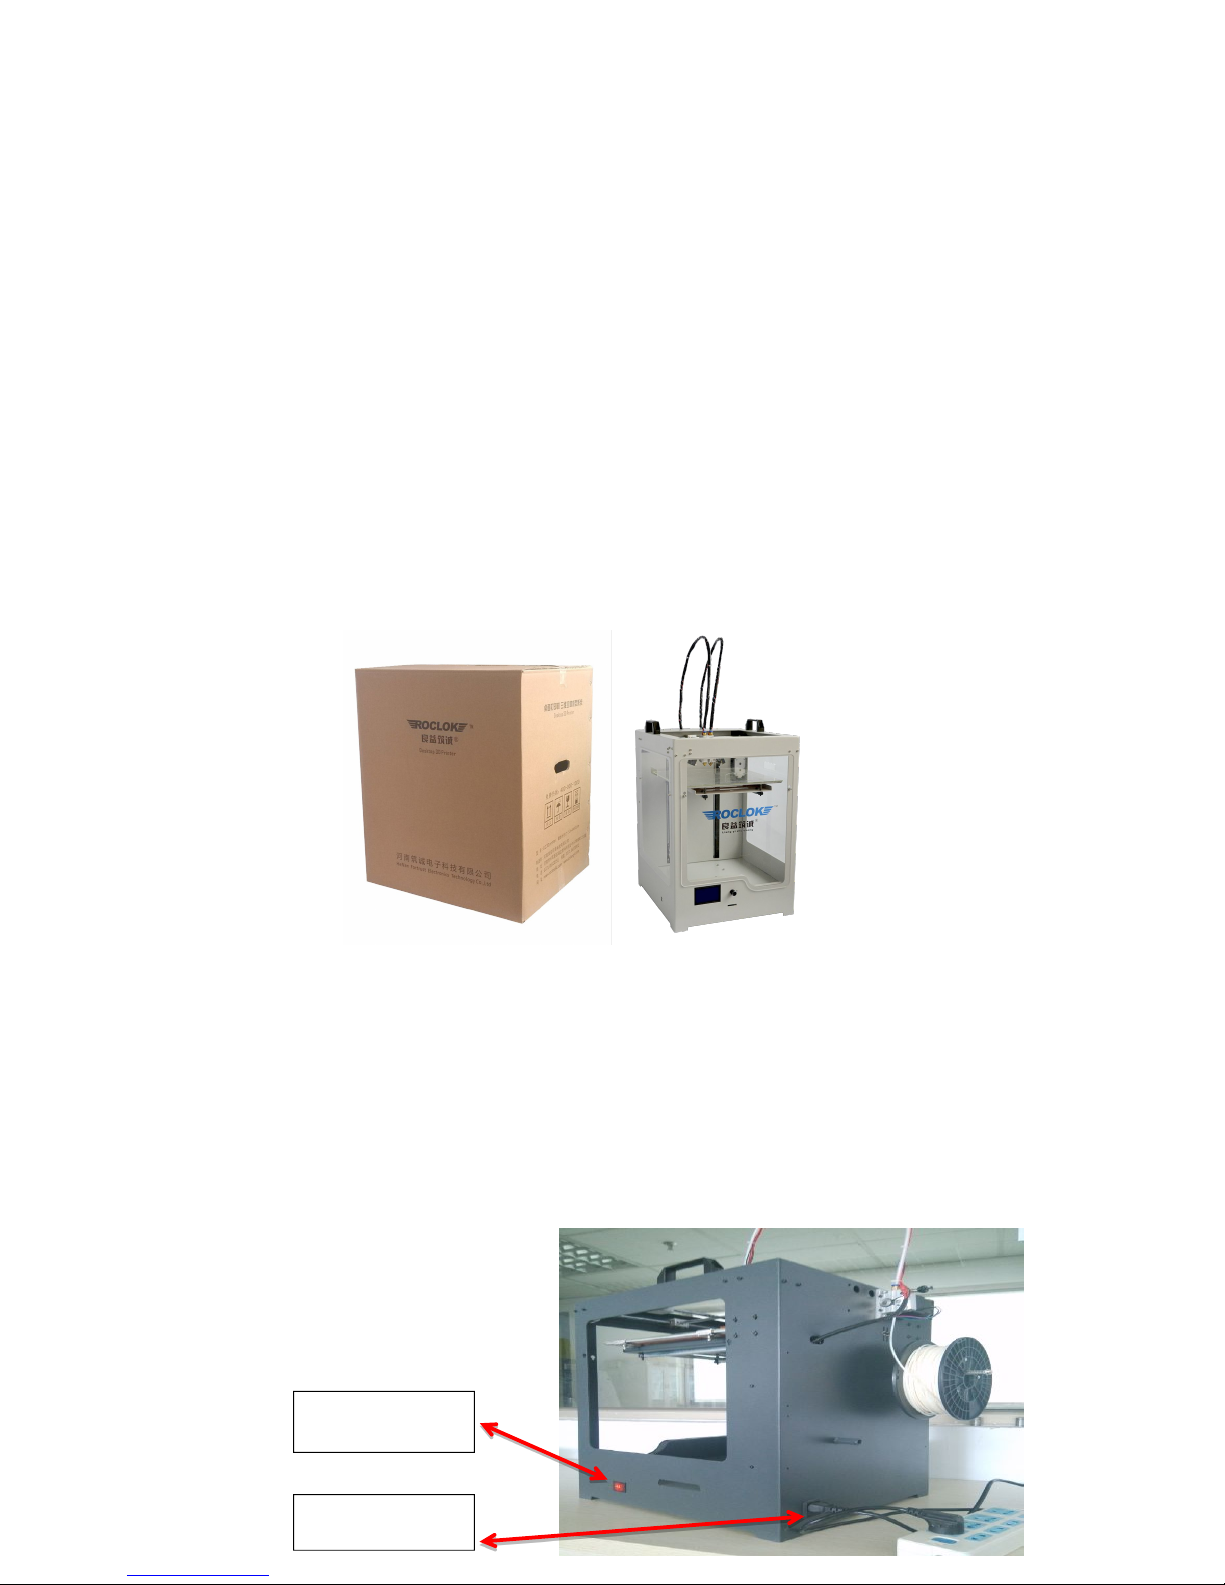
3.1.1 Packaging inspection
3.1.1.1 Please check the integrity of the package
When you receive the product.
3.1.1.2 Please reject the product once any damage.
3.1.2 Machine Inspection
3.1.2.1 Please open the package carefully to check the machine;
3.1.2.2 Any damage found, please take picture and contact the manufacturer in time.
3.2 Filament Installation
3.2.1 Check the glass to see if it’s loose or not,Adjust the glass locker and aluminum plate.
3.2.2 Insert the filament to the tube with tools in tools bag (No12 wrench) in A1 hole.
3.2.3 Preheat(PLA filament)
Power switch
Power jack
10
PLA filament can be installed before the nozzle temperature is up to 210 centigrade.(Adjusting
the distance between nozzle and bed is necessary before installing the filament)
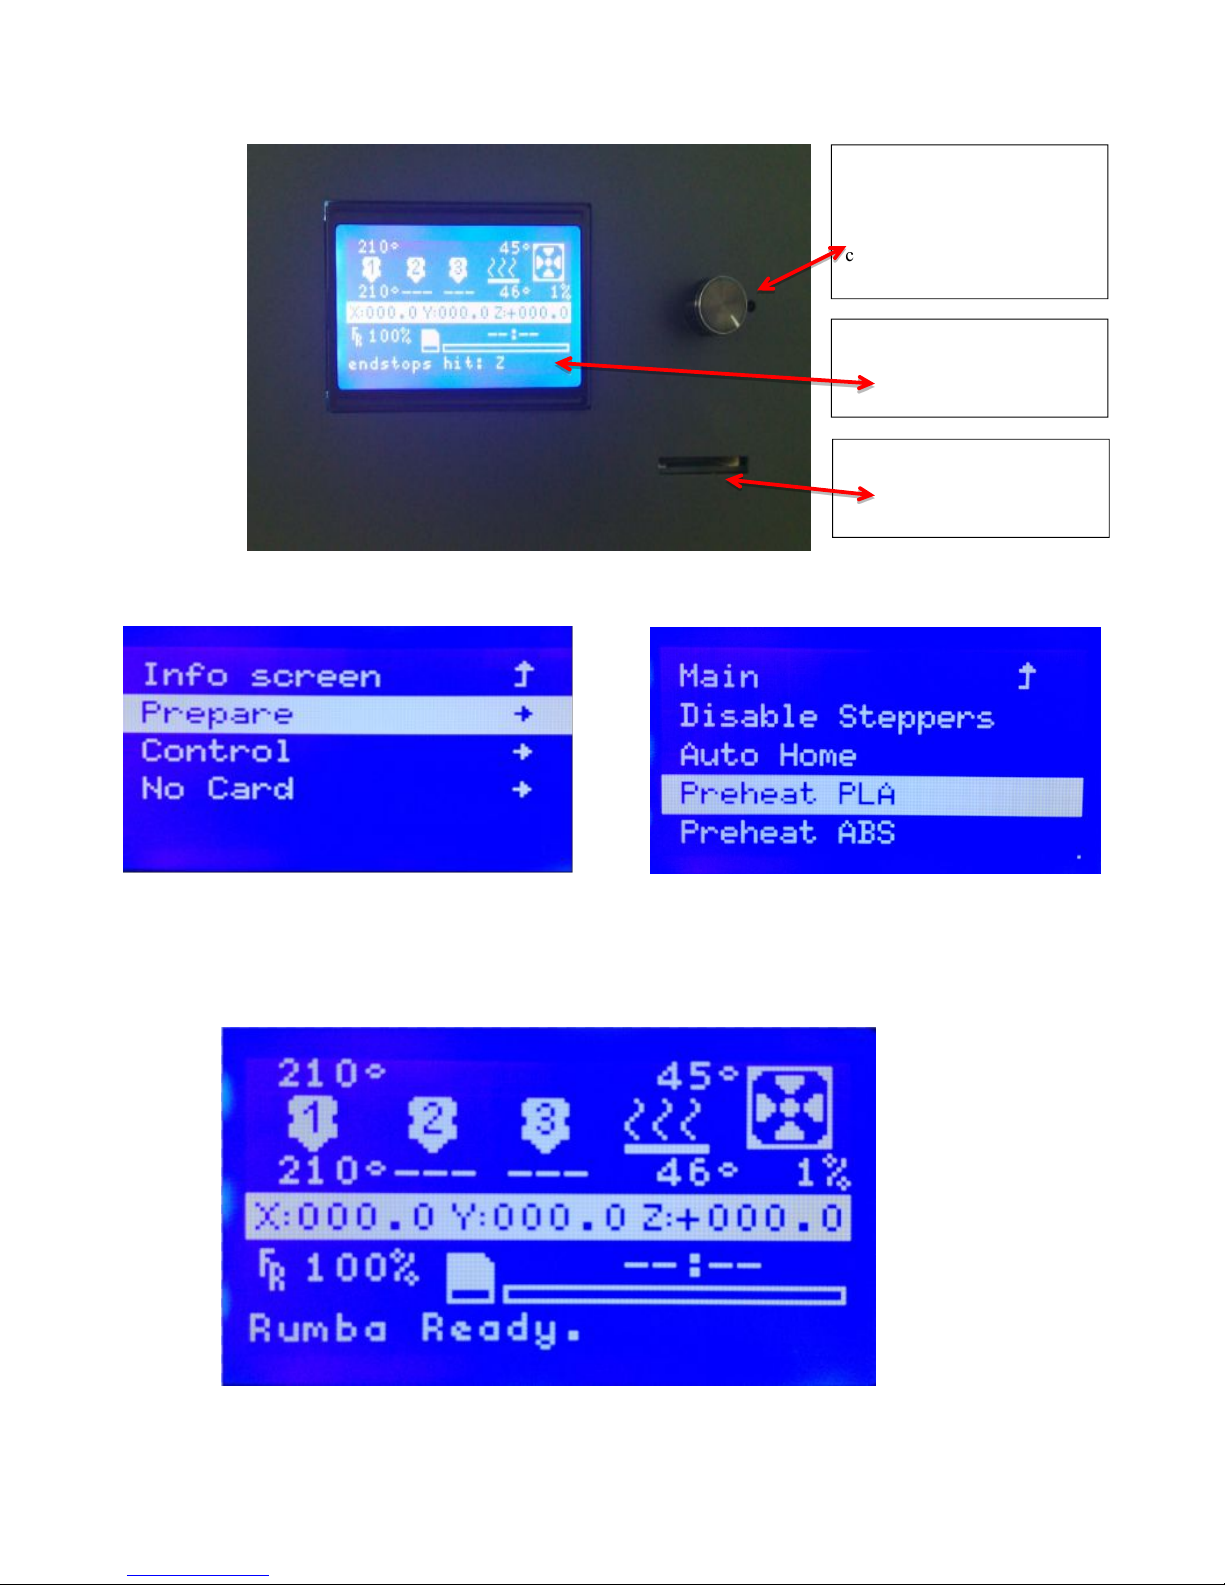
Menu knob
Rotate to choose and press to
confirm operation
SD card slot
Menu

11
Auto Home
Adjust the bed and nozzle distance and watch the flowing of the filament from the nozzle.
12
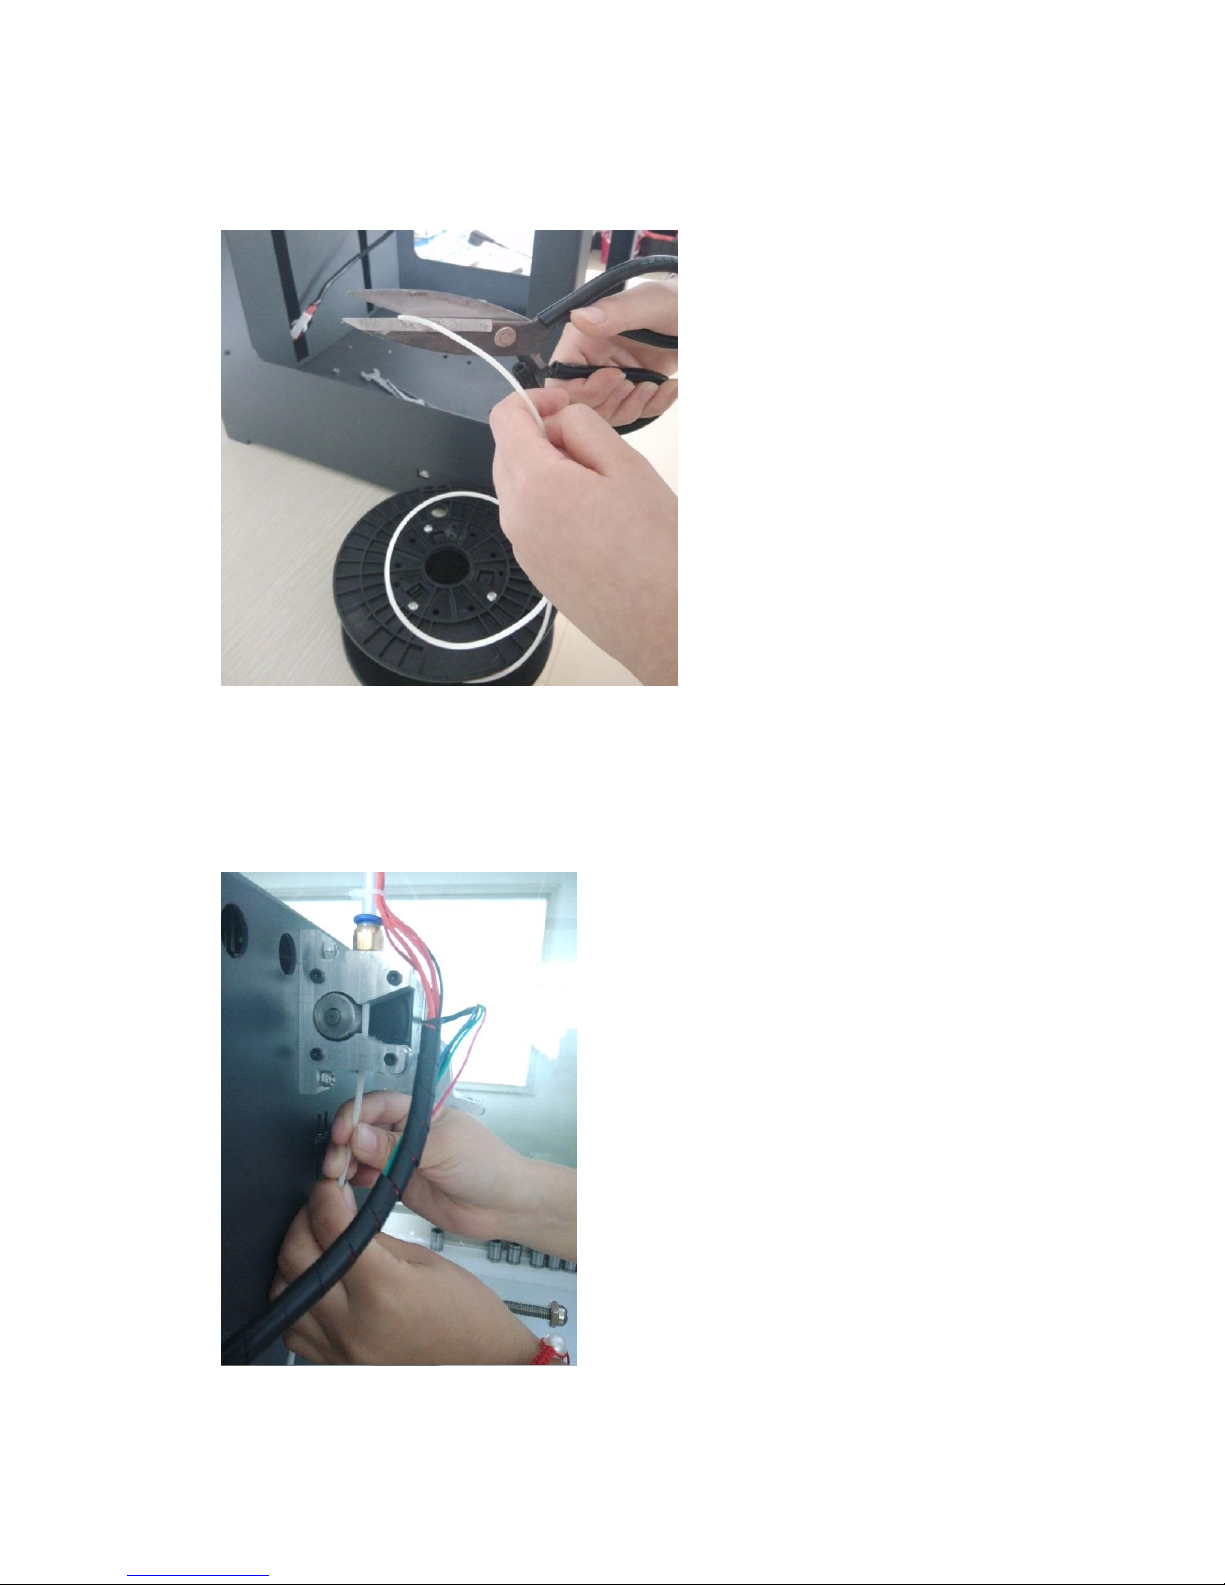
Use scissors to trim the material into a conical.
Insert the filament through the tube until it flows out of the nozzle.

13
Fix the screw and spring with the hex wrench.
Detailed procedure of adjustment:
Auto home-prepare-Disable stepper
Then,place a piece of paper between the nozzle and the bed to adjust the distance between them by
fasten or loosen the screw under the bed.(If you need,I can provide you a video of this part)

14
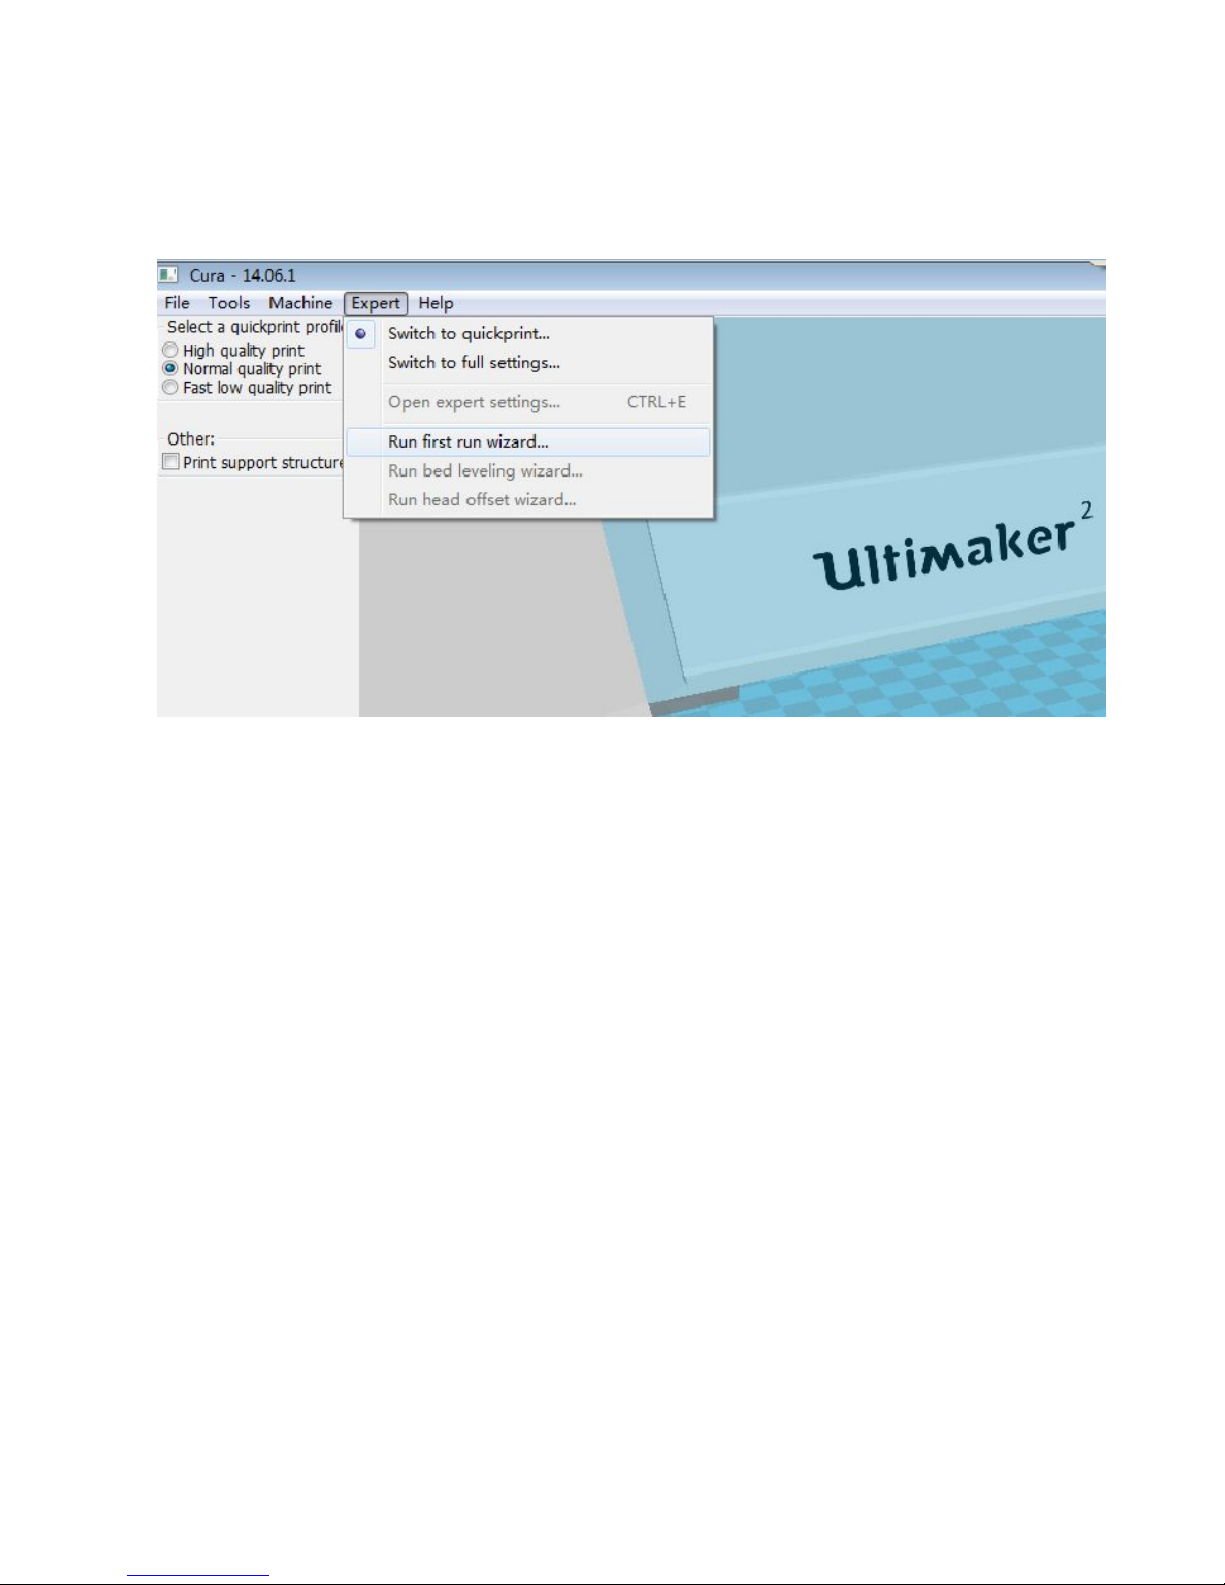
3.3 Install the Cura
This software is already in the SD memory card or you can download online.
3.3.1 Process of installation Cura

15
1.Choose Other
2.Click Next
16

17
3.4 Cura operation
Use Cura to turn .stl into .gcode . Save .gcode into SD card, and print.
3.4.1 Cura “Advanced” Interface

18
3.4. 2 Cura “Advanced” Interface
3.4.3 Cura main parameters
(1)Layer height :every layer thickness usually is 0.2 mm,If you want a higher precision,
Please set a smaller value.The higher accuracy it is, the longer time it takes.
(2)Wall thickness :Especially the hollow objects,
wall thickness should be Integer times the diameter of the nozzle.
(3)Bottom/Top thickness: should be Integer times the wall thickness (suggest 3-5 times) .
(4)Fill Density :10-20% is ok ,if u need harder object ,set 30-40%。
(5) Print Speed:suggest 30---80.
(6)Printing Temperature :PLA 190℃-230℃; ABS 220℃--240℃.
(7)Support Type:TOUCHING BUILDPLATE \ VERYWHERE \ NONE.
(8)Add raft:the machine will print one layer under object , to make object easy to stick together
with the building plate.
(9)Diameter :usually 1.75 or 2.9 mm。And you can measure the diameter of the filament.
(10)Packing Density:PLA is 1.00;ABS is 0.85.
3.4.4 .GCODE made and use
3.4.4.1 move the STL or OBJ into Cura, choose the right parameter , and save the GCODE into
SD card, insert the SD card into machine and print

19
3.4.5 Insert SD card to the machine ,turn on the power,press down the knob and select the
Print From SD,choose the .gcode,press down the knob,wait for printing 。
LCD
Knob
SD Card
Table of contents


