PRODIM ORCABOT XXL PRO2 User manual

Manual: Prodim XXL Pro 2 version 1.0.1 Mar 2017 www.prodim-systems.com
Manual: ORCABOT XXL PRO2 3D printer

Manual: Orcabot XXL Pro 2 version 1.0.1 Mar 2017 2www.prodim-systems.com
Welcome in the world of 3D printing
Thank you for choosing Prodim as your supplier!
This manual will show you the basics of the 3D printing world. The world of the future, full of
opportunities and challenges
It is important that you read this manual carefully for the optimal use of your 3D printer.
Furthermore there are important tips to work safely with the 3D printer.
Let us start making wonderful things!
3D printing is a learning process what you must build up with some experience in time. Prodim 3D
Printers are typical for the high level of research and trying. Boundaries are therefore, continuously
challenged. Prodim tries to assist its users by always improving its printer settings. However, it is not
possible to grant a warranty on this. There are several factors that influence the end result of 3d
printing. For example:
-The ambient temperature of the room.
-Printability of the 3D design.
-Properties of the 3D model.
-The speed of printing.
-The selection of filament from a different supplier.
-Different material batches.
-Settings of the extruder clamp.
-Different print Profiles/settings.
-Different Slicer software.
-Etc.
Prodim is only the supplier of the 3D printer. It’s machines are thoroughly tested according to factory
norms and protocols. Beware that the knowledge of 3d printing is the sole responsibility of the
owner/operator.

Manual: Orcabot XXL Pro 2 version 1.0.1 Mar 2017 3www.prodim-systems.com
Content
Welcome in the world of 3D printing...................................................................................................... 2
Content.................................................................................................................................................... 3
1. Safety ............................................................................................................................................ 5
2. FFF 3D-print technology................................................................................................................ 6
3. Specifications ORCABOT XXL Pro 2 .................................................................................................. 7
4. Glossary of Terms.......................................................................................................................... 8
5. Installing the ORCABOT XXL Pro 2.................................................................................................... 9
5.1. Overview printer ................................................................................................................. 9
5.2. Preparing the printer......................................................................................................... 10
5.3. Installing “Orcabot Repetier Host software”..................................................................... 11
6. The print process......................................................................................................................... 12
6.1. Orcabot Repetier Host (object placement) ....................................................................... 13
6.2. G-code generation with different modes (Slicing) ............................................................ 14
6.2.1. Slicing object(s) for Single extruder mode .................................................................... 14
6.2.2. Slicing object(s) for Dual extruder mode....................................................................... 16
6.2.3. Slicing an object(s) for Copy extruder mode................................................................. 18
6.3. Change or add a print profile (advanced).......................................................................... 20
7. Printing........................................................................................................................................ 22
7.1. Overview display ............................................................................................................... 22
7.1.1. Information on the mainscreen .................................................................................... 22
7.2. Menu structure (schematics) ............................................................................................ 23
7.2.1. Menu Structure ............................................................................................................. 24
7.3. Temperature setting on display ........................................................................................ 27
7.4. Load / replacement of filament......................................................................................... 28
7.5. Start printing & check distance to bed.............................................................................. 29
7.6. Filament cooling (blower).................................................................................................. 31
7.7. Connect Orcabot XXL PRO 2 with Repetier Host................................................................... 32
8. Calibration & Service................................................................................................................... 33
8.1. Printbed alignment............................................................................................................ 33
8.2. Nozzle alignment (height). ................................................................................................ 35
8.3. Calibration 2nd extruder (X, Y-as calibration 2nd extruder) ................................................ 36
8.4. Cleaning the Hotend.......................................................................................................... 38
9. Problem solving........................................................................................................................... 39

Manual: Orcabot XXL Pro 2 version 1.0.1 Mar 2017 4www.prodim-systems.com
10. Repair and warranty.................................................................................................................... 40
11. Contact Prodim ........................................................................................................................... 41
Manual: Orcabot XXL Pro 2 version 1.0.1 Mar 2017 5www.prodim-systems.com
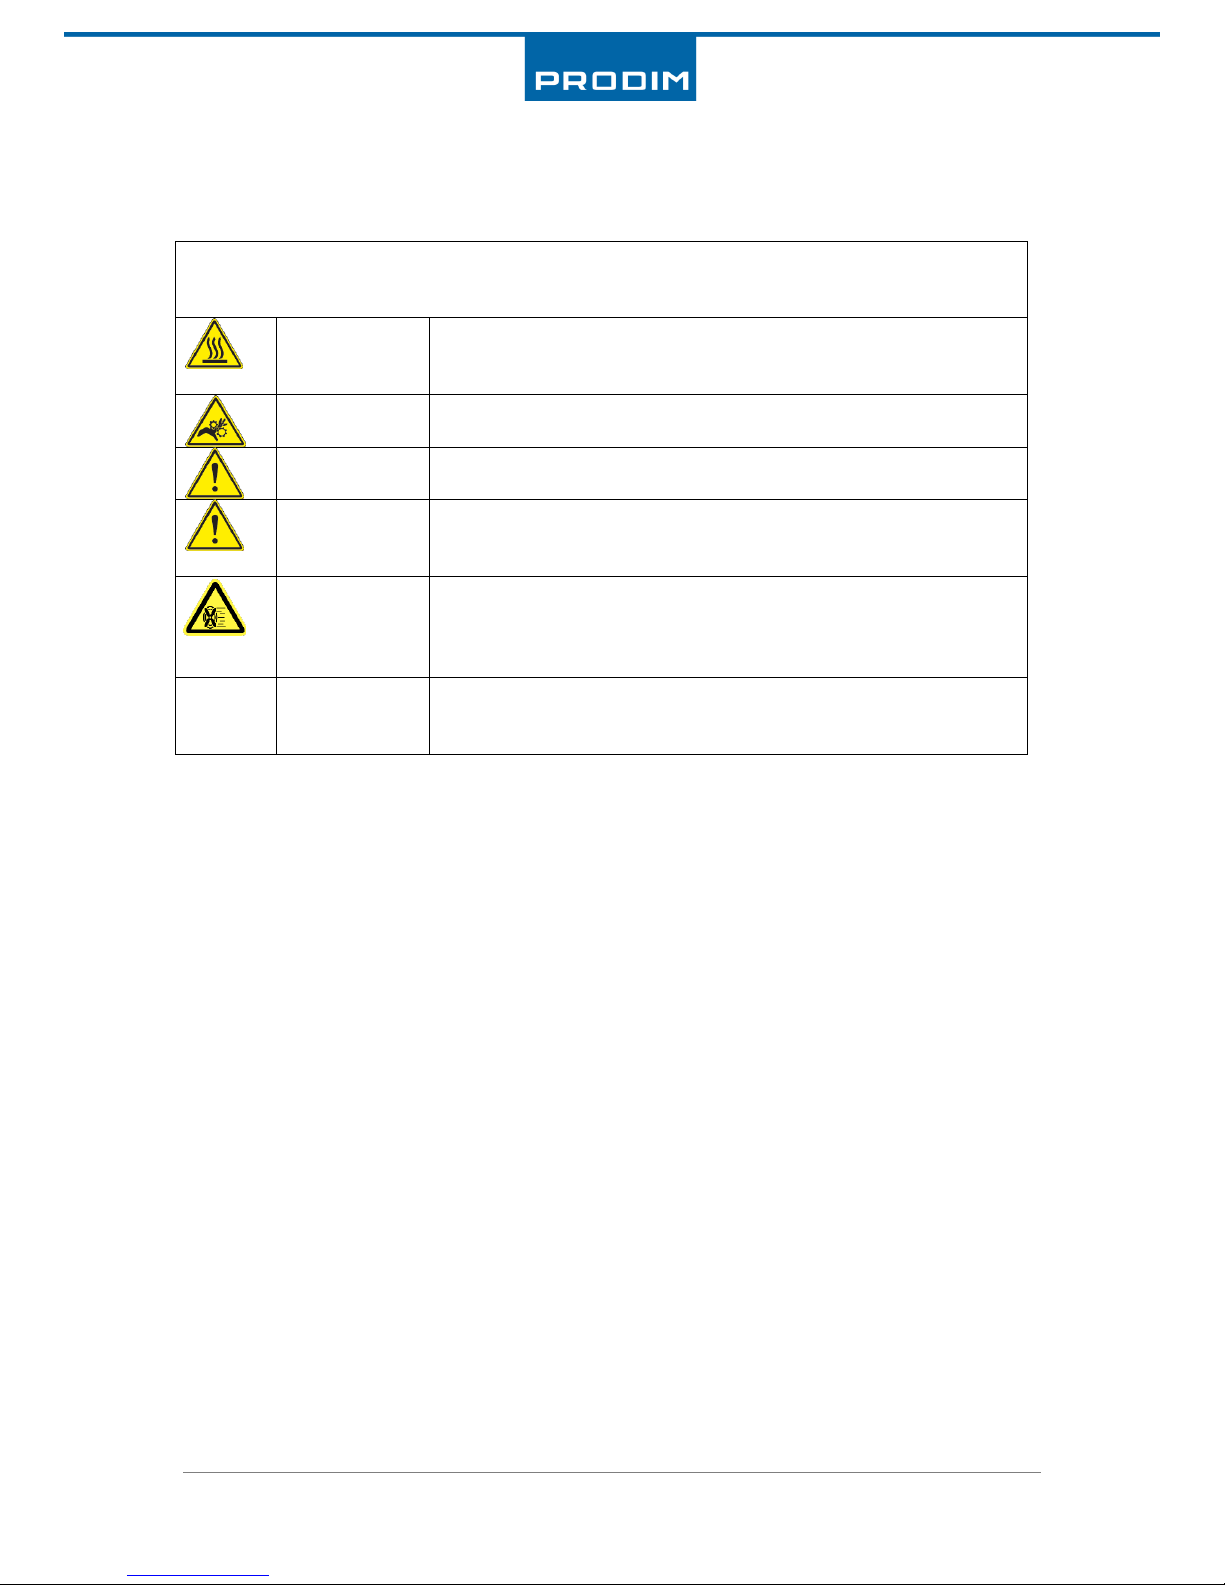
1. Safety
Safety alert symbols precede each safety message in this manual. These symbols indicate potential
safety hazards that could harm you or others or cause product or property damage.
Warning:
The Orcabot XXL Pro 3D Printer generates high temperatures. Do not
reach inside the machine when operating. Always allow the Orcabot
XXL Pro 2 to cool down first.
Warning:
The Orcabot XXL Pro2 3D Printer includes moving parts. Never reach
inside the Orcabot XXL Pro2 when the machine is in operation.
Warning:
Do not leave the Orcabot XXL Pro2 3D Printer unattended during
operation. The operator is responsible for the printer.
Caution:
In case of emergency disconnect power supply from wall socket. Or
switch off the printer using the on/off button at the side of the
printer.
Caution:
De Orcabot XXL Pro 2 3D Printer melts plastic during printing. Plastic
odors are emitted during this operation. Make sure to set up the
printer in a well-ventilated area with little draft and temperature
change.
Remark
Prodim advises the use of filaments delivered by Prodim. Other
materials can have unexpected properties for which Prodim bears
no responsibility.

Manual: Orcabot XXL Pro 2 version 1.0.1 Mar 2017 6www.prodim-systems.com
2. FFF 3D-print technology
The Prodim 3D printer uses the FFF 3D-print technology.
Fused filament fabrication (FFF) is an additive manufacturing technology commonly used for
modeling, prototyping, and production applications.
FFF works on an "additive" principle by laying down material in layers; a plastic filament or metal
wire is unwound from a coil and supplies material to produce a part.
The technology was developed by S. Scott Crump in the late 1980s and was commercialized in 1990.

Manual: Orcabot XXL Pro 2 version 1.0.1 Mar 2017 7www.prodim-systems.com
3. Specifications ORCABOT XXL Pro 2
Construction
Printer dimensions: 620x500x520mm
Frame construction: Aluminum
Bed construction: Aluminum / Glass
Extruders: 2 full metal extruders with blowers
Weight: 20,5 kg
Printing
Print technology: Fused Filament Fabrication (FFF)
Print volume (single extruder) 356x274x230mm (LxWxH)
Print volume (dual extruder) 356x274x230mm (LxWxH)
Print volume (copy mode) 176x274x230mm (LxWxH)
Layer resolution: 0.05mm
Position resolution: 0.05mm
Nozzle diameter: 0,40 mm (standard nozzle diameter)
Filament: 1,75mm filament
Temperature
Maximum print temperature: 285 ˚C
Bed temperature ≈ 100 ˚C
Ambient operating temperature*: 10˚C - 40 ˚C
Storage temperature 0˚C - 50 ˚C
Electrical
AC input: 88-264 VAC
Frequency range: 47-63 Hz
DC voltage: 24V
Rated current: 13A

Manual: Orcabot XXL Pro 2 version 1.0.1 Mar 2017 8www.prodim-systems.com
4. Glossary of Terms
Extruder:
-The print head assembly where you can insert the filament. The printer has 2 extruders (2
print heads) for combining 2 different materials.
Hobbed shaft
-A Hobbed shaft is a part in the extruder. It has sharp teeth in the shaft for transport the
filament to the hot end.
Hotend
-That is the treated rod where the filament is melted. The Hot end is mounted under the
extruder assembly.
Heater block
-The heater block is the block that’s is mounted above the nozzle. The heater element and the
temperature sensor are mounted in the heater Block.
Nozzle
-It is the end of the hot end were the filament comes out. The nozzles are available in
different sizes. (0.25mm, 0.35mm, 0.4mm & 0.5mm)
Retracting
-Retracting is the technique of taking the molten plastic up in the hotend (e.g. to prevent
oozing).
Oozing
-Oozing is leaking material from the nozzle.
Repetier Host
-That is the software that controls the printer and loads the G-code file.
Sli3er
-Sli3er is a program that converts .stl files to a G-code. It makes from a model a printable file
and also calculates the amount of material to be extruded and many more.
G-Code
-It’s a computer language that describe movement (toolpaths) of the Prodim XXL pro 3D
printer.
STL
-Is a widely used 3d format for 3d models. STL = Surface Tessellation Language
Feeler gauge
A feeler gauge is a tool used to measure gap widths. Feeler gauges are mostly used in engineering to
measure the clearance between two parts.

Manual: Orcabot XXL Pro 2 version 1.0.1 Mar 2017 9www.prodim-systems.com
5. Installing the ORCABOT XXL Pro 2
5.1. Overview printer
1. On/off button + socket power plug
2. Display
3. Selection button
4. SD card slot
5. Print bed
6a. Extruder 1
6b. Extruder 2
7. Filament tubes
8. Tube holder
9. Filament roll holders
10. USB port (left)
1
7
9
5
3
4
2
8
6a
10
0
6b

Manual: Orcabot XXL Pro 2 version 1.0.1 Mar 2017 10 www.prodim-systems.com
5.2. Preparing the printer
A few things are important while installing the Orcabot 3D-printer XXL pro 2:
-The Orcabot XXL pro 2 must be placed on a smooth and level surface (solid table).
-There must be an electric socket available.
-The printer melts filament during printing, this can cause damps and odours. Make sure to
choose a room or place which has decent ventilation, little draft and temperature change.
Installing the Printer:
-Take the printer out of the original box and place on a solid table.
(be sure to preserve the original box with original foam inlay)
-Install the float glass plate (use the 4 clamps)
-Install the filament- and tube holders keeping the filament tube to the right side of the
printer.
Glass plate with clamps Tube holder (s) Filament holder(s)
- Connect the supplied power cord to the right side of the printer.
Here you can also find the on/off switch with which you can turn
the printer on or off.
Power cord and on/off switch.
The USB-port is located to the left side of the printer. Running the
printer can be done stand-alone or via a PC-connection. We
advise to use the printer as stand-alone.

Manual: Orcabot XXL Pro 2 version 1.0.1 Mar 2017 11 www.prodim-systems.com
5.3. Installing “Orcabot Repetier Host software”
The Orcabot Repetier Host software is only available for Windows 7 or higher.
The software and drivers to the Orcabot XXL Pro 2 3D printer can be found on the Prodim Systems
website or use the following link:
https://www.prodim-systems.com/en-en/Support/software-downloads.html
Software installation:
-Make sure the printer is not connected to the computer during software installation.
-Download the “Orcabot Repetier Host Software”from aforementioned website.
-Install the downloaded file with administrator rights.
(click with the right mouse button on the .exe file and select ‘’run as administrator’’ and click
on yes).
-Follow the steps on the screen.

Manual: Orcabot XXL Pro 2 version 1.0.1 Mar 2017 12 www.prodim-systems.com
6. The print process
Before you start printing it is important to know how the print process works. Below the steps are
described how an object can be printed. When you are new to printing always use the supplied
Orcabot Repetier Host software. The print process is partly with this software and partly with the
printer itself. Step 1 to 3 are predominantly executed on a computer or laptop. From step 4 onwards
we will work directly on the printer.
Below you can see a part of the software where there are a number of tab pages marked on the
right. These are the process steps from left to right which we use in the printing process which is also
described in the above diagram.
1. Object
placement
•Place Object(s) on the bed and evt. copy, scale, rotate etc.
•This subproces must be done in Orcabot Repetier.
•See chapter 6.1 - Orcabot Repetier Host (object placement)
2. G-code
(slicing)
•Convert placed objects to a G-code.
•Slicing (convert the file in printable layers)
•This is done in the integrated Slic3r program.
•See chapter 6.2 - G-code generation with different modes.
3. Print preview
en save
•Check model with ''Print preview'' in Orcabot Repetier Host
•Save G-code on SD-kaart
•See also chapter 6 - G-code generation with different modes.
4. Printing
•Heating Printer
•Loading of filament
•Start printing from SD-card
•See chapter 7 - Printing with the 3D printer
Manual: Orcabot XXL Pro 2 version 1.0.1 Mar 2017 13 www.prodim-systems.com
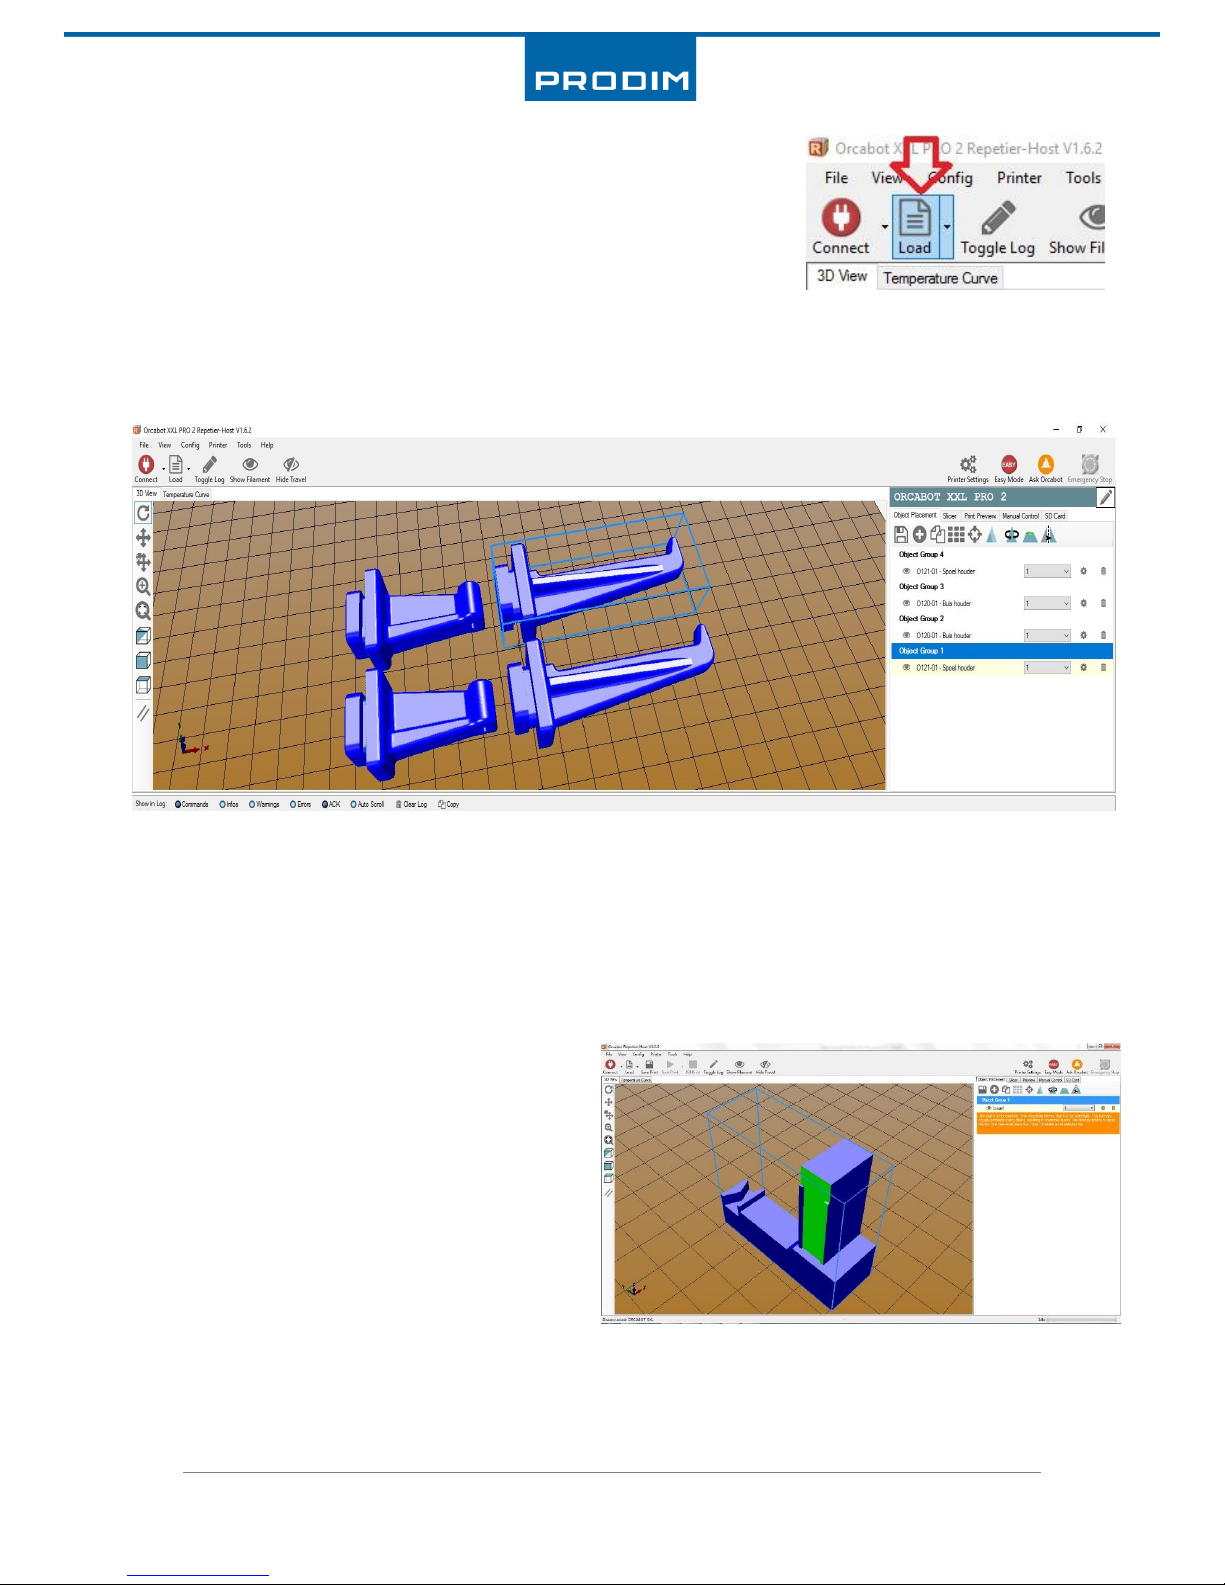
6.1. Orcabot Repetier Host (object placement)
To print an object first a G-code must be created. If you had already
created a G-code you can load this by clicking on the “load” button in
the left corner of the screen and selecting the file from your hard drive.
If you had not done so, it is important you start from a .stl file. Repetier Host works with .stl files that
are subsequently transformed into G-code. The majority of 3d drawingprograms can export a
drawing as .stl.
In “Orcabot Repetier Host” click on the button “Add object” on the tab object placement and choose
the .STL to import. If an object is uploaded, it will be automatiocally displayed on the printbed on the
screen. On the rightside you can see a list of uploaded .STL files. In the Repetier host the model can
be centered, copied, scaled, rotated and mirrored. The object can also be placed at every postion of
the virtual bed. (It is advised to place the object in the middle of the printbed.)
Ensure a correct 3d file. If planes are not
connecting correctly the software will address
this with the notification: “the object is not
manifold”. The surface causing this will be
displayed in green (as depicted in the picture).
If an area is green the .stl will have to be
exported anew from the 3d-cad program.
Another possibility is to fix the file by using the
link given.
Manual: Orcabot XXL Pro 2 version 1.0.1 Mar 2017 14 www.prodim-systems.com
6.2. G-code generation with different modes (Slicing)
Before printing an object it first has to be transformed into G-code. The Orcabot XXL Pro 2 is an
advanced 3D printer that can work in different modes. These will be described in the next
paragraphs.
6.2.1. Slicing object(s) for Single extruder mode
After placement of object(s) on the virtual print bed slicing is
next. Slicing transforms objects into printable layers, eventually
this becomes G-code. Prodim uses Slic3r and provides slicer
profiles of some of the most common filaments.
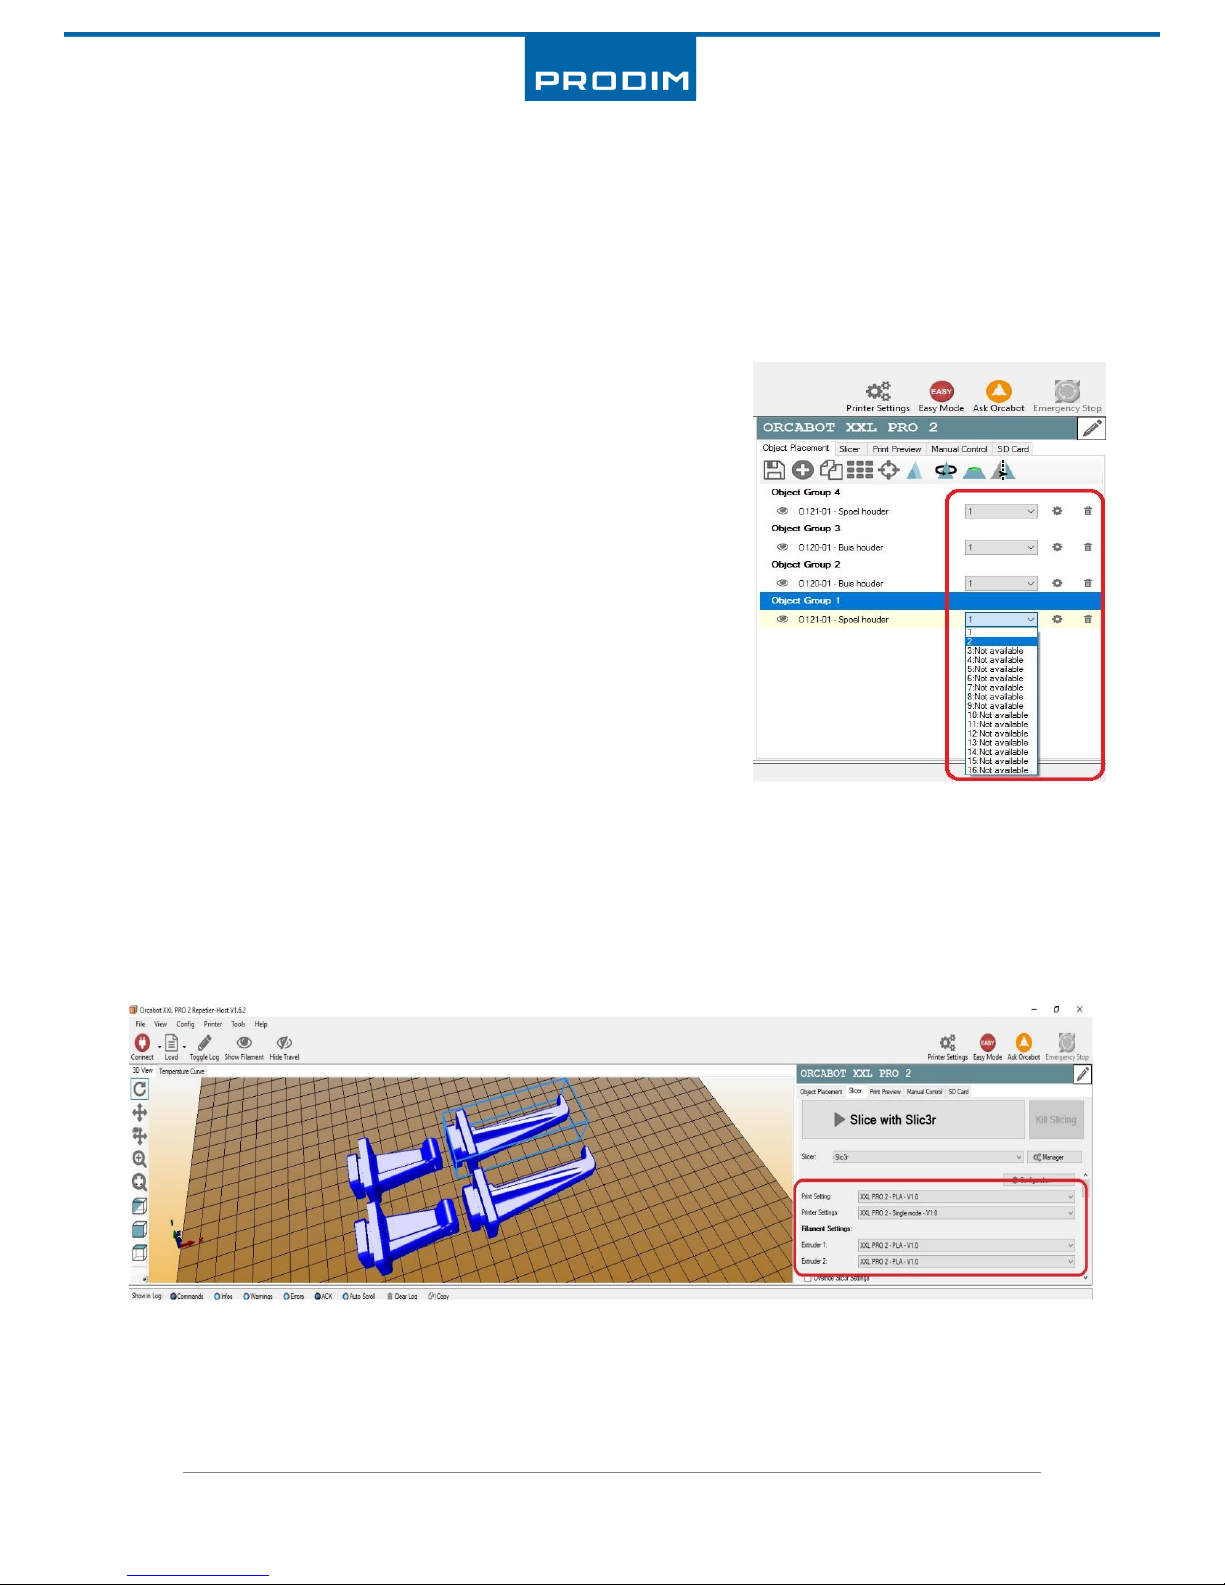
Single extruder mode steps:
1. Place one or more objects on the virtual bed. Via tab
page “object placement”
2. Describe with which print head (extruder) the object has
to be printed. See picture right for selecting print head.
3. Select in Orcabot Repetier Host software the tab page
‘’Slicer”.
Beforehand decide which filament material will be used and
which print head will be used. In this example we select PLA.
4. Select in Printer settings the choice of material. In this example we chose XXL PRO 2 –PLA –
V1.0.
5. Select in Printer settings the print mode. Because we use in this example only one print head
we select XXL PRO 2 –Single mode –V1.0.

Manual: Orcabot XXL Pro 2 version 1.0.1 Mar 2017 15 www.prodim-systems.com
6. Select subsequently also in filament settings the material that is placed on the filament spool
holder.
7. Thereafter click on the big button “Slice with Slic3r”
Depending on complexity and size of the object slicing can take some time.
8. After slic3r is ready slicing the “Print Preview” will be displayed.
In this tab we can view the virtual model and zoom in on every separate layer under the button
visualization. Here you can also see extra information such as estimated print time, how many layers
the product consists of and how many mm filament is required. By pressing on the button G-code we
can see the code (G-code) that eventually will be read by the printer.
9. Click on “Save to File” to store the object on your SD-card.
You have now prepared a g-code with which you can start the printer. See also chapter 7.5 how to
start a print.
The G-code can be stored in two ways.
1. By pressing on ‘’Save to File’’ in the tab Print preview. (recommended).
(This file contains the complete G-code + extra information such as printsettings).
2. By pressing on “Save for SD Print” in the tab Print preview.
(This file contains only the G-code and no extra information)

Manual: Orcabot XXL Pro 2 version 1.0.1 Mar 2017 16 www.prodim-systems.com
6.2.2. Slicing object(s) for Dual extruder mode
Dual extruder mode is in general equal to Single extruder mode. However there are additional other
settings. This mode we use to combine two colours or materials. If you want to print a product with
two extruders, the zero point (origin) of the two objects will have to be placed on top of each other
in the software. Ensure that the origin of both .stl files match before a
combination of the parts is made. As an example we use a cone in which
two different colors are combined.
Dual extruder mode steps:
1. Place two or more objects on the (virtual) bed via tab “object
placement”
2. Determine which print head (extruder) will print the object. See
picture right for selection of the print head. Assign the (2nd)
object to an extruder. In this example the second part of the
cone is assigned to “extruder 2”.
3. Select in the Orcabot Repetier Host software the tab ‘’Slicer”.
4. Choose the object you want to combine and click on
the small gear.
5. A screen pops up in which objects can be grouped together. Select in the dropdown menu
the group to assign one object to another. After assigning an object to a group, the object
will be in the same group as object 1. This way you can overlay the zero points (origins) of
both objects on each other.
Grouping can be undone by clicking “exact from group”.
See next page for the example.

Manual: Orcabot XXL Pro 2 version 1.0.1 Mar 2017 17 www.prodim-systems.com
6. Now both objects are combined and the screen can be closed by clicking ”Close”.
After the desired products are combined you go to the “Slicer” tab to prepare the model to be
printed (g-code).
7. Select in Print settings the choice of the material. In this example we choose
XXL PRO 2 –PLA –V1.0.
8. Select in Printer settings in which mode there will be printed. Because we will use two print
heads in this example we select XXL PRO 2 –Dual mode –V1.0.
9. Select subsequently also in filament settings the material which is placed on the filament
spool holder of the printer.
10. Click on the big button “Slice with Slic3r”
Slicing can take considerable time depending on the size and complexity of the object.
11. Wait until Slic3r is ready with transforming the model. After slic3r is ready slicing the
software will go automatically to the tab “Print Preview”.
In this tab we can view the (virtual) model and observe each layer separately pressing the button
visualization. Here you can also view extra information such as estimated print time, how many
layers the product consists of and how many mm filament is required. By pressing the G-code button
we can view the code (G-code) that will be read by the printer.
12. Click “Save to File” to store the object on your SD-card.
13. You have now prepared a g-code to start the printer. See also chapter 7.5 how to start a
print.
Manual: Orcabot XXL Pro 2 version 1.0.1 Mar 2017 18 www.prodim-systems.com
6.2.3. Slicing an object(s) for Copy extruder mode
With Copy mode you can print one or more products in parallel with two extruders. The function
works almost the same as single mode. However the bed will be split in two parts. The left halve is
for extruder 1 and the right halve is for extruder 2. This means that the width of the print bed is
halved. The print object will in this mode always be assigned to extruder 1. Copy mode copies simply
all movements from extruder 1 to extruder 2.
Advantage: - Timesaving’s in printing multiple equal (geometry and material) objects.
Disadvantage: - Printing range is halved.
Because in copy mode we work with two extruders it is of the utmost importance that the printer
adheres to below conditions.
Conditions printer for copy mode:
Use in ‘’object placement’’ exclusively extruder 1 for the objects (Printer head left)!
Print bed has to be flat and aligned.
The height of the nozzles on the printer must be completely similar in relation to the bed.
Print bed must be completely cleared of former printed parts!
The material choice must be the same.
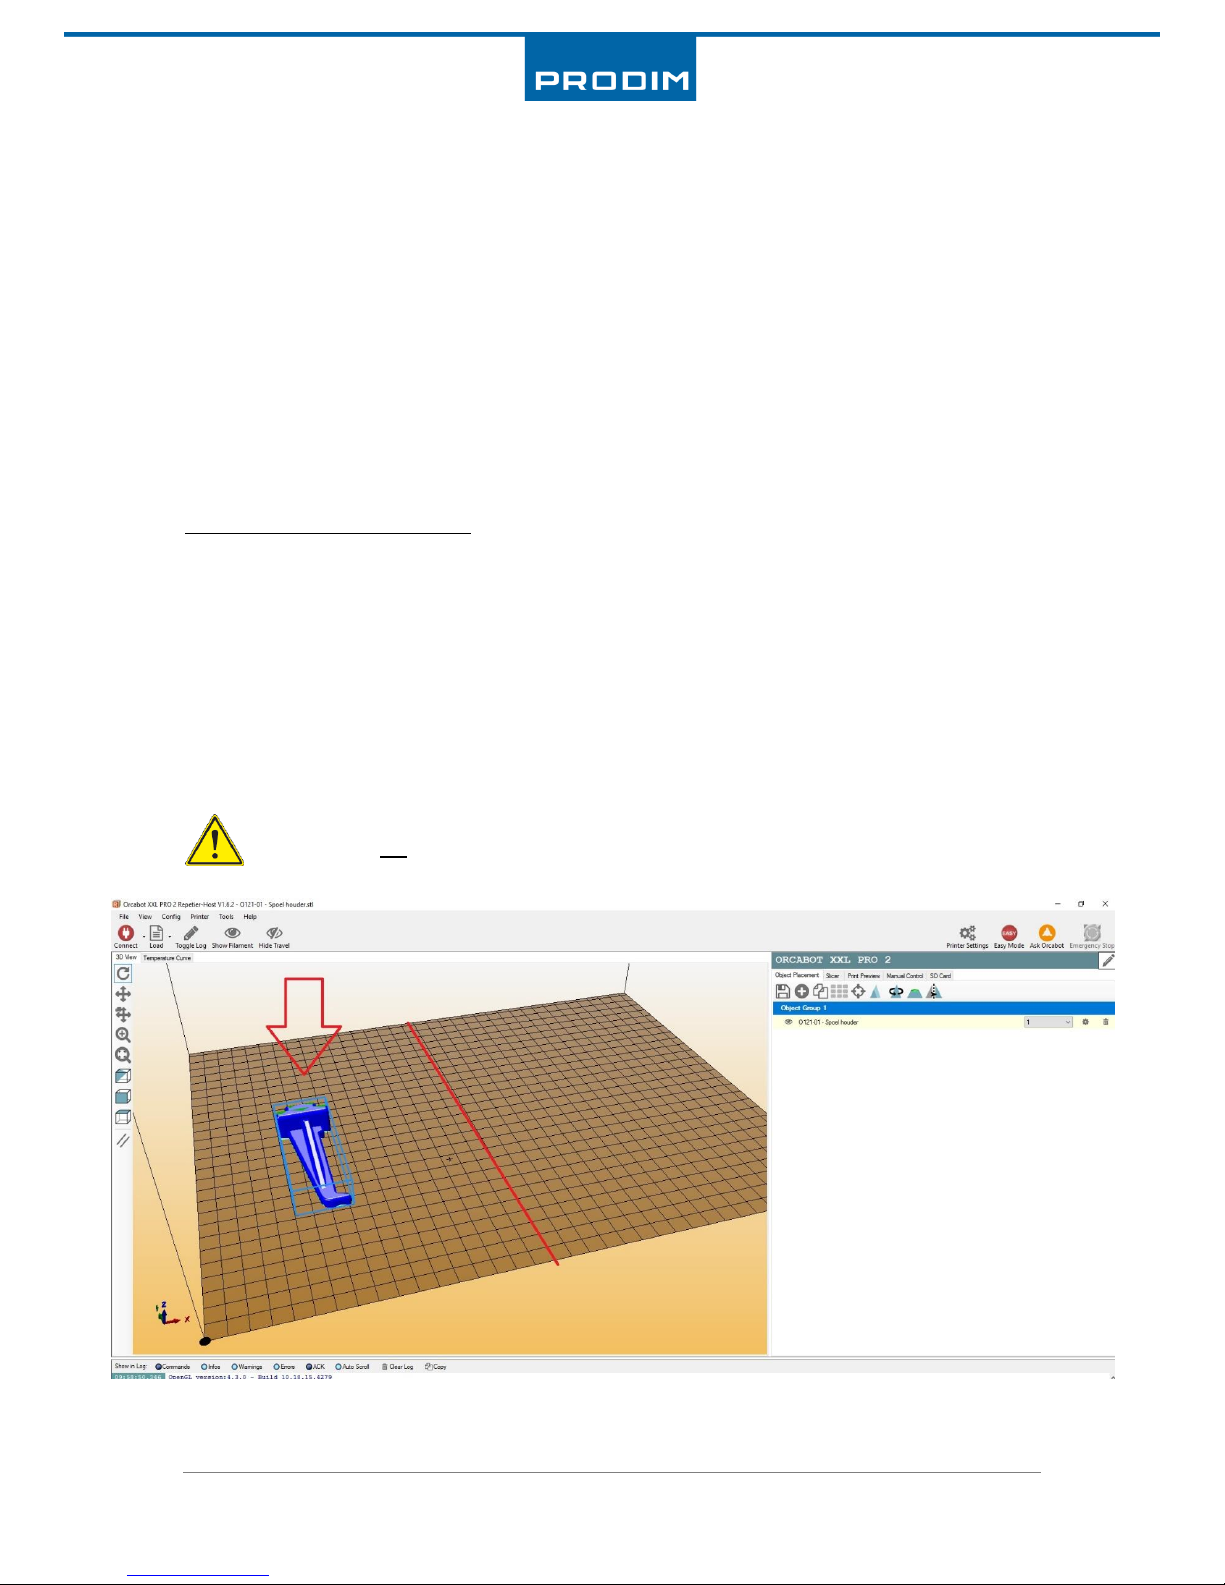
Copy extruder mode steps:
1. Place one or more objects on the left halve of the (virtual) bed via tab “object placement”
Beware! That NO objects are placed on the right halve of the bed.

Manual: Orcabot XXL Pro 2 version 1.0.1 Mar 2017 19 www.prodim-systems.com
2. Assign the object to extruder 1.
3. Select in the Orcabot Repetier Host
software the tab ‘’Slicer”.
4. Select in Print settings the choice of the material. In this example we choose
XXL PRO 2 –PLA –V1.0.
5. Select in Printer settings in which mode there will be printed. Because we will use two print
heads in this example we select XXL PRO 2 –Copy mode –V1.0.
6. Select subsequently also in filament settings the material which is placed on the filament
spool holder (both spools should be the same material!) of the printer.
7. Click on the big button “Slice with Slic3r”
Slicing can take considerable time depending on the size and complexity of the object.
8. Wait until Slic3r is ready with transforming the model. After slic3r is ready slicing the
software will go automatically to the tab “Print Preview”.
In this tab we can view the (virtual) model and observe each layer separately pressing the button
visualization. Here you can also view extra information such as estimated print time, how many
layers the product consists of and how many mm filament is required. By pressing the G-code button
we can view the code (G-code) that will be read by the printer.
9. Click “Save to File” to store the object on your SD-card.
In “Print preview” the 2nd product will not be shown on the (virtual) bed!
Because you selected copy mode there is automatically an extra g-code generated.
Tip! : In the file name comprise the “Copy mode”. This helps in starting the printer next time.
10. You have now prepared a g-code with which you can start the printer. See also chapter 7.5
how to start a print.

Manual: Orcabot XXL Pro 2 version 1.0.1 Mar 2017 20 www.prodim-systems.com
6.3. Change or add a print profile (advanced)
When you are using other types of filament the user can himself make changes to the settings and
profiles.
Beware! Changes to the print profiles is the sole responsibility of the user. Even damages
are not to be excluded. Even more when the user does not adhere correctly in what is
written in this manual.
1. Go to the tab “Slicer” and click on “configuration” in the slicer TAB. Slicer opens a new
screen.
2. Select the profile you want to change.
(Every tab contains different profiles).
3. Change the desired settings.
Beware! Every change of Print settings and Filament settings for a specific material must be
separately adjusted and stored in every tab separately.
4. Store the file. Name the profile differently so an existing profile is not overwritten.
Beware! In changing the settings, you will alter the result of the printed object.
Tip: By keeping the mouse pointer aimed at a setting an info window will pop up with a description
about the setting.
Table of contents
Other PRODIM 3D Printer manuals


