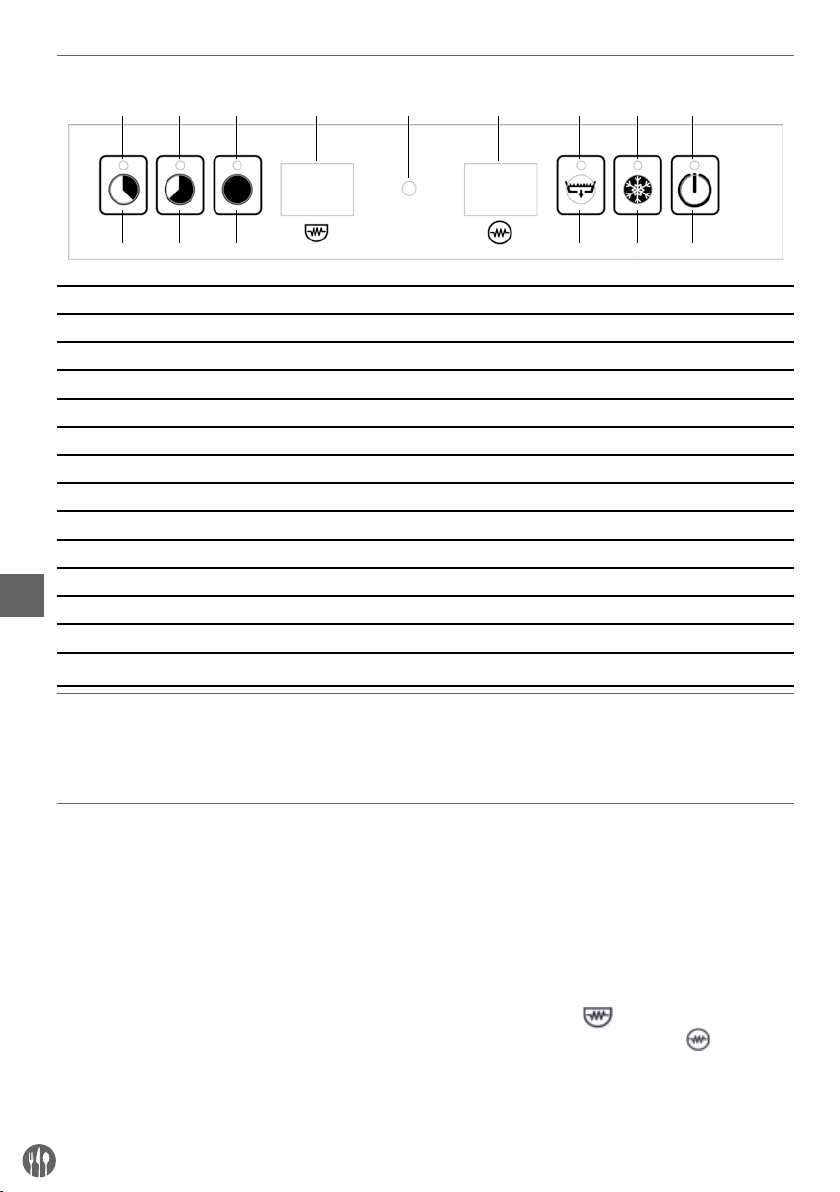
Hendi 230268 User manual

230268, 231753, 231340, 237540
EN: Dishwasher, electronic User Manual pg. 3
DE: Geschirrspüler, elektronisch Benutzerhandbuch s. 14
NL: Vaatwasser, elektronisch Gebruikershandleiding blz. 26
PL: Zmywarka, elektroniczna Instrukcja obsługi str. 38
FR: Lave-vaisselle, électronique Manuel de l’Utilisateur p. 49
IT: Lavastoviglie, elettronica Manuale d’uso pag. 61
RO: Mașină de spălat vase, electronică Manual de utilizare pg. 72
RU: Посудомоечная машина, электронная Инструкция стр. 83
GR: Πλυντήριο πιάτων, ηλεκτρονικό Εγχειρίδιο χρήστη σελ. 95
HR: Perilica suđa, elektronska Korisnički priručnik str. 107
CZ: Myčka na nádobí, elektronika Uživatelský manuál str. 118
HU: Mosogatógép, elektronikus Használati utasítás old. 129
UA: Посудомийна машина електронна Посібник користувача стор. 140
EE: Nõudepesumasin, elektrooniline Kasutusjuhend lk. 152
LV: Trauku mašīna, elektroniska Lietotāja rokasgrāmata lpp. 162
LT: Indaplovė, elektroninė Vartotojo vadovas psl. 173
PT: Máquina de lavar louça, eletrônica Manual do usuário pág. 184
ES: Lavavajillas, electrónica Manual de usuario pág. 196
SK: Umývačka riadu, elektronická Používateľská príručka str. 207
SL: Pomivalni stroj, elektronski Uporabniški priročnik str. 218

2
Keep these instructions with the appliance.
Bewahren Sie diese Anweisungen zusammen mit dem Gerät auf.
Bewaar deze instructies bij het apparaat.
Przechowuj tę instrukcję razem z urządzeniem.
Conservez ces instructions avec l’appareil.
Conservare queste istruzioni insieme all’apparecchio.
Păstrați aceste instrucțiuni la aparat.
Храните эти инструкции вместе с прибором.
Φυλάξτε αυτές τις οδηγίες στη συσκευή.
Držite ove upute s aparatom.
Tyto pokyny uschovejte u přístroje.
Tartsa ezeket az utasításokat a készüléknél.
Зберігати інструкцію разом з обладнанням.
Hoidke neid juhiseid seadme juures.
Saglabājiet šos norādījumus kopā ar ierīci.
Laikykite šias instrukcijas kartu su įrenginiu.
Guarde estas instruções com o aparelho.
Guarde estas instrucciones con el aparato.
Tieto pokyny si uschovajte spolu so spotrebičom.
Navodila shranite skupaj z napravo.
For indoor use only.
Nur für den Innengebrauch.
Alleen voor Gebruik binnenshuis.
Tylko do użytku w pomieszczeniach.
Pour une utilisation en intérieur uniquement.
Solo per uso interno.
Numai pentru uz interior.
Только для использования внутри помещений.
Μόνο για εσωτερική χρήση.
Samo za unutarnju upotrebu.
Pouze pro vnitřní použití.
Csak beltéri használatra.
Використовувати тільки всередині приміщень.
Ainult sisetingimustes kasutamiseks.
Tikai lietošanai telpās.
Naudoti tik patalpoje.
Apenas para uso interno.
Sólo para uso en interiores.
Iba na vnútorné použitie.
Samo za uporabo v zaprtih prostorih.

3
EN
Dear Customer,
Thank you for purchasing this Hendi appliance. Read this manual carefully, paying particular attention to
the safety regulations outlined below, before installing and using this appliance for the first time.
Safety regulations
• The appliance is intended for professional use and can be operated only by qualified
personnel. This appliance is not intended for household use.
• Only use the appliance for the intended purpose it was designed for as described in this
manual.
• The manufacturer is not liable for any damage caused by incorrect operation and
improper use.
• Keep the appliance and electrical plug away from water and other liquids. In the event
the appliance falls into water, immediately remove the power plug from the socket. Do
not use the appliance until it has been checked by a certified technician. Failure to follow
these instructions will cause life threatening risks.
• Never attempt to open the housing of the appliance by yourself.
• Do not insert objects into the housing of the appliance.
• Do not touch the plug with wet or damp hands.
• DANGER OF ELECTRIC SHOCK!Do not attempt to repair the appliance by yourself,
repairs are only to be conducted by qualified personnel.
• Never use a damaged appliance! When it’s damaged, disconnect the appliance from the
socket and contact the retailer.
• WARNING! Do not immerse the electrical parts of the appliance in water or other liquids.
• Never hold the appliance under running water.
• Regularly check the power plug and cord for any damage. When damaged it must be
replaced by a service agent or similarly qualified person in order to avoid danger or injury.
• Make sure the cord does not come in contact with sharp or hot objects and keep it away
from open fire. Never pull the power cord to unplug it from the socket, always pull the
plug instead.
• Make sure that the power cord and/or extension cord do not cause a trip hazard.
• Never leave the appliance unattended during use.
• WARNING!
As long as the plug is in the socket the appliance is connected to the power
source.
• Turn off the appliance before unplugging it from the socket.
• Connect the power plug to an easily accessible electrical socket so that in case of emergency
the appliance can be unplugged immediately.
• Never carry the appliance by the cord.
• Do not use any extra devices that are not supplied together with the appliance.
• Only connect the appliance to an electrical outlet with the voltage and frequency mentioned
on the appliance label.
• Never use accessories other than those recommended by the manufacturer. Failure to do

4
EN
so could pose a safety risk to the user and could damage the appliance. Only use original
parts and accessories.
• This appliance should not be operated by persons with reduced physical, sensory or mental
capabilities, or persons that have a lack of experience and knowledge.
• This appliance should, under any circumstances, not be used by children.
• Keep the appliance and its power cord out of reach of children.
• WARNING: ALWAYS switch off the appliance and unplug from power socket before
cleaning, maintenance or storage.
Special Safety Regulations
• This dishwasher is delivered with water inlet and outlet hoses. According to its construction,
the connection of the machine to water and power supply must be performed by an
authorized and locally recognized installer by keeping the existing specifications.
• Before connecting the appliance, check that the connection data on the data plate (voltage
and connected load) match the mains electricity supply.
• Notechnicalmodificationsareallowedinthisappliance.Themanufacturerisnotresponsible
for any possible damages resulting due to modifications.
• The same applies in case that the appliance is used for any other purpose except the one
anticipated, in case of fault or improper use. The water inside the dishwasher is not potable.
• Use, maintenance and repair of dishwasher should be performed only by persons familiar
with these works and informed for any possible risks.
Water softeners
•CAUTION: all appliances requiring constant connection with the water supply
system (including this appliance) must have an additional water softener
attached in order to remove calcium and magnesium compounds. The softener
must be used in compliance with the manufacturer’s recommendations set
out in the user’s manual.
•If the softener is not attached or is misused and/or regenerated, the distributor shall
reject all complaints entailing repairs required due to the limescale build-up in the
appliance.
•It is recommended to use softeners from the wide range offered by HENDI. Ask your
HENDI sales representative for assistance in the selection of the appropriate model.
We recommend the following agents for the proper regeneration of the softeners: Salt
tablets, 25 kg bags - code: 231265
General Hardness of water
°dGH °fH mmol/l °e Water softener
above 24 above 40 above 4,2 above 28 Necessary
18 - 24 32 - 40 3,2 – 4,2 22 - 28 Necessary
12 - 18 19 – 32 2,1 – 3,2 13 - 22 Necessary
4 - 12 7 - 19 0,7 – 2,1 5 - 13 Necessary
below 4 below 7 below 0,7 below 5 Not required

5
EN
Intended use
• This appliance is intended for washing crockery,
such as glasses, cups, plates and cutlery. Any
other use may lead to damage of the appliance
or personal injury.
• Operating the appliance for any other purpose
shall be deemed a misuse of the device. The user
shall be solely liable for improper use of the de-
vice.
Grounding installation
This appliance is classified as protection class I
and must be connected to a protective ground.
Grounding reduces the risk of electric shock by
providing an escape wire for the electric current.
This appliance is fitted with a power cord that has a
grounding wire and grounded plug. The plug must
be plugged into an outlet that is properly installed
and grounded.
Preparation before first use
• Open the package. Before setting up the appli-
ance, check it for any externally visible damage
due to transportation. If in any doubt, call for a
specialist to check it (from the authorized local
dealer who sold the appliance).
• Place the dishwasher at the installation area,
close to the necessary water and power supply
(the ground should be sufficiently stable).
• Remove the protective foil protecting the steel
housing of the dishwasher from scratches. Any
remaining adhesive residue should be careful-
ly removed. Do not use any scouring materials.
Leaving the protective foil can cause difficult to
remove adhesive glue foil to the dishwasher’s
steel housing.
• The appliance should be placed horizontally.
Possible inclinations should be corrected using
a spirit level.
• Following the successful installation, the dish-
washer should be cleaned thoroughly with a con-
ventional detergent before it is put into operation.
Connection to the water supply
ATTENTION: The connection with the water sup-
ply should be made according to the current safety
standards.
The dishwasher may be connected to water sup-
ply with maximum inlet temperature 60°C/130°F.
In case you need connection with water supply of
high temperature please contact our Factory or our
distributor or our local dealer.
• The water supply hose should have a flap valve
(non-return valve) according to DIN 1988.
• The water supply hose/pipe should be rinsed be-
fore the appliance’s connection.
• The water supply hose/pipe should have a min-
imum internal diameter of 16 mm and the con-
nection with the hose should be 3/4 inch.
• All hose collars should be adjusted in a fixed po-
sition before the appliance is put into operation.
• The dishwasher can be only connected to a
well-functioning softener.
ATTENTION: The water pressure must be between
2 and 5 bar.
Drainage connection
• The outflow is accomplished through gravity
force (natural flow). The outlet hose should be
connected either directly to the main drainage -
where a pipette for odours is anticipated, or wa-
ter runs directly to a drainage well in the ground,
which has a pipette for odours.
ATTENTION: The outlet hose should not be placed
higher than a level of 650mm from the lower side of
the dishwasher’s dispenser.

6
EN
Electrical Network connection
ATTENTION: All electrical work must be carried
out by a suitably qualified and competent person.
• The dishwasher operates under specific voltage
depending on the type of the dishwasher.
• You should supply the power, depending on the
appliance’s power reception (the electrical con-
nection should be made by authorized electri-
cians). Specifications should be met according
to the corresponding parts of DIN, VDE, D100,
the EVU connection terms, the relevant ZH 1/37,
chapter 7.2 - as well as the current specifications
for accident prevention.
• Respectively, the appliance must be connected
to a direct power supply electrical installation
through an HO7 RN-F cable with load relief of the
appliance.
Protective duct connection and voltage compensation
• The electrical safety of this appliance is ensured
only if the protective duct has been connected
and checked properly. The corresponding spec-
ifications should be met at this point (see para-
graph 1.5).
• In addition, the appliance should include a volt-
age compensation system.
• For this reason, the backside of the appliance has
a screw with the indication “voltage compensa-
tion”.
• Following the electrical connection, the action
of the protective duct, the voltage compensation
and the insulation value should be checked ac-
cording to the existing provisions of DIN VDE.
Technical specyfication
Item no. 230268 231753 237540 231340 236567 236574
Type 40x40 50x50 Hood 50x50 50x60
Max. hight of tableware
[mm] 295 335 400 450
Operating voltage and
frequency [V/Hz] 230 / 50 400 / 50 230 / 50 400 / 50
Rated input power [kW] 2,8 6,6 2,8 8,6 5,0 7,1
Temperature of washing /
rinse water [°C] 62 / 85
Standard equipment Rinse aid and detergent dispenser and drain pump Rinse aid and detergent
dispenser
Waterproof protection
class IP44
Amount (pcs.)/lenght of
washing cycle (s.) 3/60, 120, 180
Net weight (approx.) [kg] 39 55 135,5 57
Outer dimension [mm] 470x510x(H)710 570x600x(H)830 750x880x(H)1390 595x730x(H)1340
REMARK: Technical specification is subjected to change without prior notification.
Instructions for the dishwasher’s regular operation
• The appliance is exclusively used to clean dishes,
cups, glasses, silverware, etc. following their use
during lunches/dinners.
• You should pay special attention that the items to
be washed are suitably placed for dishwashing.
• Silverware should be cleaned from food residues,
if not washed right after lunch / dinner (colouring
and spots from certain foodstuffs).
• Do not wash in this appliance items which has
been in contact with acids, mineral oil, grease,
gasoline or colours and solvents (industrial
chemicals).

7
EN
Preparation of dishes for washing
• Do not let food residues dry onto the dish-
es. In order to avoid filter blockage as well as
the cleaning water to become dirty quickly, you
should remove large food residues, olive pips,
lemon peels, tooth picks, etc., before you place
the dishes in the basket.
• We recommend you to leave in water for a while
or rinse the glassware that has food residues
dried on.
Filling of basket
• Put glasses, cups, large plates, etc. with the
opening facing down in the anticipated baskets.
Do not pile one on top of the other.
• Glasses should not touch each other (damage in
glass, stains due to contact).
• Place cutlery in the appropriate basket made of
synthetic material, with the handle facing down.
Silverware may be placed freely on the levelled
plastic basket. In any case, you should avoid
overloading the basket.
• Water supply hoses should remain free (not
blocked or stretched).
Correct insertion of the plates in
the baskets with pins.
Correct insertion of saucers and
cutlery
Correct insertion of glass in open
baskets
Proper insertion of full baskets

8
EN
Control Panel
L1 L2 L3 LCD1 ALARM LCD2 L4 L5 L6
SW1 SW2 SW3 SW4 SW5 SW6
BUTTON NAME DESCRIPTION NOTES
SW1 CT1 Short Cycle Button Duration 1 min
SW2 CT2 Medium Cycle Button Duration 2 min
SW3 CT3 Long Cycle Button Duration 3 min
SW4 DB Drain Pump Button
SW5 CRB Cold Rinse Button
SW6 ON ON/OFF Switch
LED TABLE COLOR
L1 LED of short cycle selection
L2 LED of medium cycle selection
L3 LED of long cycle selection
L4 Drain in Progress
L5 Cold Rinse Selected
L6 LED of ON/OFF Switch
Switching ON
In order to start the machine, press the Button SW6
(ON) for 3 sec. The LED L6 flashes red and a buzzer
sounds.
Procedures before washing
Since the washing machine is switched on, the
boiler and the wash tank start filling with water.
Next, the machine gets filled with detergent and
rinse aid. During these, a “FILL” mes¬sage appears
on the Dash. After the tanks are filled with water
and the necessary detergent and rinse aid liquids
are captured, the boiler’s heating resistance and
the wash tank’s heating resistance start working
sequentially (after reaching boiler’s tempe¬rature
of ope¬ration, its resistance shuts down and the
wash tank starts heating). On the LCD1 & LCD2
screens the current temperature of each tank is
displayed alternately (when LCD 1 shows “bt” then
LCD 2 displays boiler’s temperature; when LCD 1
shows “tt”, then LCD 2 displays tank temperature).
In case that the wash tank’s heating resistance is
ON, a dot in the right lower corner of LCD1 is lit,
while in case that the boiler’s heating resistance is
ON a dot in the right lower corner of LCD2 is lit. For
that reason, symbol (representing the tank) is
shown beneath of LCD1 & symbol (represent-
ing the boiler) is shown beneath of LCD2.

9
EN
Standby
During Standby operation (after the automatic set
up procedures), LCD 1 & LCD 2 should dis¬play the
temperature of the wash tank & boiler tank alter-
nately.
• LCD1 - “bt” or “tt” (alternating)
• LCD2 - “
-- °C”
If the machine stays on Standby mode for more
than 30 min, then it turns into sleeping mode for
minimizing power consumption. When this occurs,
LCD 1 & LCD 2 turn off and L6 is fla¬shing. By
pushing SW6, the machine is again ready for op-
eration.
Thermo-Protector
In order to start the first washing cycle of the day,
both temperatures in the tank and the boiler must
reach operational values (60°C & 85°C respective-
ly). In all the other cycles, due to Thermo-Protector
system, if the temperature in the boiler is not ap-
propriate for rinsing, the washing cycle continues
until the rinse water becomes sufficiently heated.
A message on the screen informs the user that the
washing cycle continues; LCD1 shows the current
value of the water temperature in the boiler and
LCD2 shows “ht” (i.e. heating).
Washing Cycle Selection - Start
This washing machine has three washing cycle
program options. The user could choose be-tween
short, medium and long program by pushing one of
the buttons SW1, SW2 or SW3 ac¬cordingly. After
pushing the corresponding button, the washing cy-
cle starts automatically, UNLESS the door is acci-
dentally open. In the latter case a message “door”
is shown in the Dash and the washing starts again
as soon as the door is closed. The remaining time
(in seconds) is displayed on the Dash.
IMPORTANT: In case that the door is open acciden-
tally before program is finished, the washing stops
and the timer resets. Therefore, in order to finish
the cycle, you should start the procedure from the
beginning.
NOTE: 10 sec before finishing main wash the drain-
ing pump starts working and it stops 10 sec after
rinse cycle.
After completion of the washing cycle, a message
“end” on the dash informs the user that the pro-
gram is finished. The message appears until the
door is opened again.
Draining
This machine has draining pump, so that the drain-
ing cycle is performed automatically. If you want to
perform draining on demand, please remove the
overflow hose that is placed on the wash tank and
press the Button SW4. After 15 sec the draining
starts and LED L4 flashes.
During draining, an internal check of the system is
performed, ensuring that the heating resis¬t¬anc-
es are switched off. In that sense, any possible
overheating caused by heating re-sistances not
immersed in water is avoided. As soon as drain-
ing stops, for the next 30 sec the system performs
self-cleaning (door must be closed).
NOTE: After every On-Demand draining execution,
the machine shuts down.
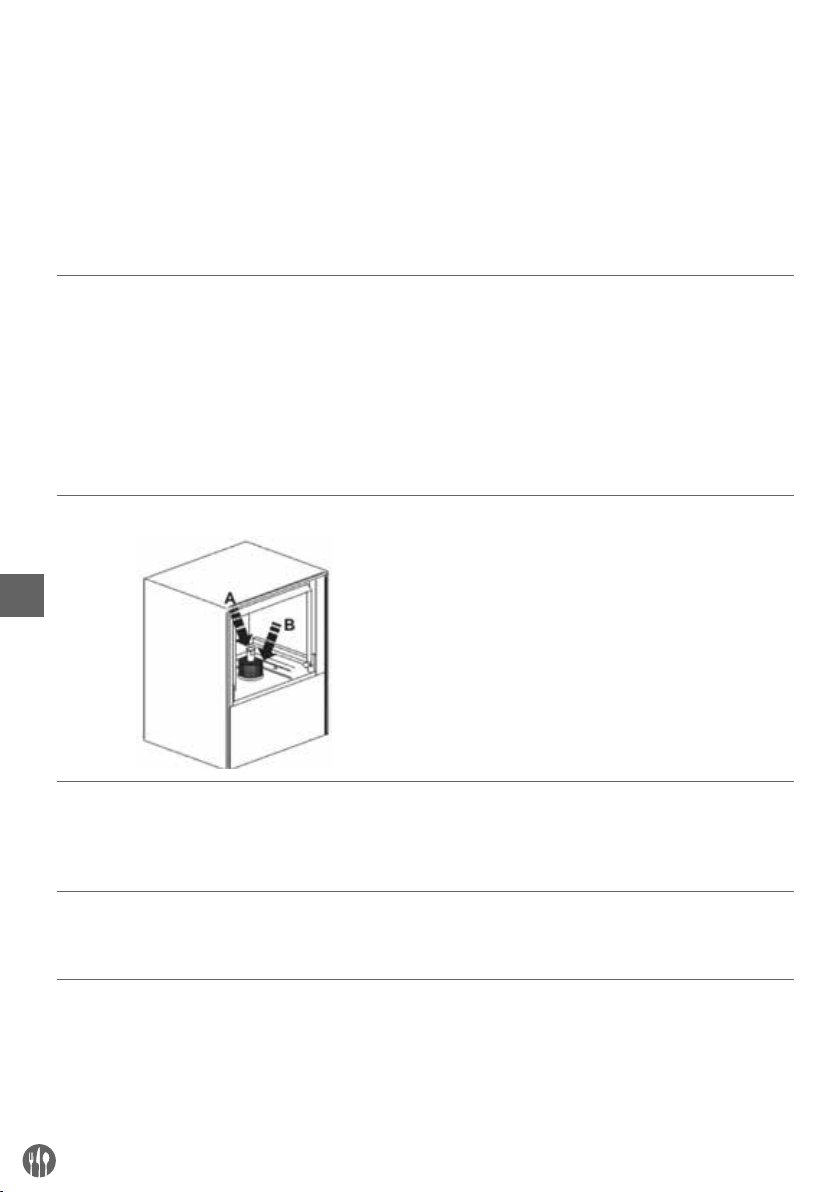
Filling of Detergent and Rinse Aid
This machine is equipped with peristaltic pumps
for the rinse aid and the detergent filling. The fill-
ing inlets for each one are the two corresponding
hoses which should be immersed in the appropri-
ate tanks.
The filling procedure is performed in two stages.
The initial filling (when you turn the ma-chine on)
and additional re-fillings after each washing cycle:
1st Stage: During automatic preparation (before
the first wash) the machine receives from the tank
soap for 180 sec and rinse aid for 35 sec. This could
be adjusted from the user th-rough the User Menu
*Check Section “User Menu”.
2nd Stage: During every complete washing & rins-

10
EN
ing cycle, the machine receives detergent for 13
sec and rinse aid for 12 sec. This could be adjusted
from the user through the User Menu *Check Sec-
tion “User Menu”.
NOTE: In case that you need to adjust the Deter-
gent or Rinse Aid from the User Menu, please bear
in mind that for each second the corresponding
pump captures the following liquid quantities:
• Detergent pump: 0.83 ml/sec
• Rinse Aid pump: 0.19 ml/sec
By multiplying these quantities with the time dura-
tion (seconds) that the pump works, you can calcu-
late the volume of each liquid that it is used.
WARNING: The machine receives rinse aid during
washing cycle and detergent during rinsing cycle.
Cold Water Rinse
This machine has Cold Water Rinse operation. It
could be activated in order to be performed after
every washing cycle or for On Demand occasions.
In order to perform a Cold Water Rinse after one
washing cycle, press Button SW5 for 1 sec. A single
sound buzz will inform you that the machine is set
up for a single cold rinse performance. Then, LED
L5 will be on, while the procedure is performed.
In case that you wish to perform Cold Water Rinse
after each washing cycle, press hold But-ton SW5
for 5 sec while the machine is on Standby mode. A
double sound buzz will inform you that the machine
is set up for a cold rinse performance after every
washing cycle (LED L5 will lit). Should you undo the
selection, please repeat the above procedure.
Shutting down the machine
In case that you want to shut down the machine, re-
move the overflow hose in the wash tank and press
the Button SW4. The machine is going to drain au-
tomatically the used water, perform a self-cleaning
cycle and then shut down. An alternative way is to
press continuously the Button SW6 until the indi-
cation “OFF” appears in the first line of the screen
(it will take about 5 sec). The recommended way is
the first.
ECO Function
In case that the machine is in Standby operation
for more than 15 minutes, the Boiler’s temperature
lowers in order to avoid unnecessary power con-
sumption. During these intervals, if the door of the
washing machine opens, the ECO Function stops.
Soft Start Function
This machine is equipped with Soft Start System
that enables the water pump to start with lower
pressure and gradually increases it, so that the
sensitive crystals are not damaged.
User’s Menu
In order to enter the User’s Menu, shut down the
machine and press hold Buttons SW1, SW3 & SW6
at the same time for 3 sec with the door closed.
LED L6 flashes and a beeper sounds three times.
Message “conf” apears for a few seconds and the
User’s Menu is activated.
Find the parameter that you wish to adjust using
Buttons SW3 and SW4 for navigation inside the
menu. The corresponding parameter will be dis-
played on the screen.
Should you wish to increase the amount (+), press
Button SW1.

11
EN
Should you wish to decrease the amount (-), press
Button SW2.
After defining the value, press Button SW5 once in
order to register the value in the memory.
In the matrix that is presented below you can find
a short description of the functions that can be ad-
justed by the user, as well as their default values.
In order to exit the User’s Menu, press hold Button
SW6 for 3 sec. The beeper sounds three times and
message “off” appears on the screen. After closing
the User’s Menu, the machine is shut down.
No Parameter Range Default Indication
1TEMPERATURE MODE C/F C C
2BOILER TEMPERATURE 30-92°C 85°C bt
3TANK TEMPERATURE 30-70°C 60°C tt
4DETERGENT TIME AT FILLING 100 - 300 s 180 s dF
5 DETERGENT TIME AT CYCLE 0 - 30 s 13 s dc
6RINSE AID TIME AT FILLING 0 - 90 s 35 s rF
7 RINSE AID TIME AT CYCLE 0 - 30 s 12 s re
8COLD RINSE 0 (NO) – 1(YES) 1 Cr
9DRAINING DURATION 20 -60 s 25 s Cd
Maintenance and Repair
After 50.000 washing cycles, a Service reminding
message will be displayed in the screen. Regular
maintenance, performed by licensed technician
using original spare parts is essential for proper
function of the machine.
Alarm Indications
If the system records any malfunction, then a
warning message will be displayed on the screen.
If such a condition occurs, please advise the fol-
lowing table which describes the problem shortly.
Should you need further assistance, don’t hesitate
to contact your local re¬seller.
ALARM PROBLEM DESCRIPTION
Alarm 1 Water filling time excession
Alarm 2 The water level during draining is not reduced
Alarm 3 Excess time of boiler heating
Alarm 4 Excess time of tank heating
Alarm 5 Water temperature in the boiler is above limits
Alarm 6 Water temperature in the wash tank is above limits
Alarm 7 Cold rinse alarm
Alarm 8 Bath thermometer not connected
Alarm 9 The bath tub thermometer is defective
Alarm 10 Boiler thermometer not connected
Alarm 11 The boiler thermometer is damaged
Alarm 12 The washing cycle was completed but the boiler did not heat up properly (the heating time in the
Thermo-protector function was exceeded).

12
EN
Troubleshooting
PROBLEM CAUSE SOLUTION
The dishwasher does not operate
properly
Connection interruption Check the connection
You have not turned the switch of the
appliance ON Turn the switch ON
Main switch / or fuse has not been
activated / or it is faulty Check the main switch / or fuse
The switch of the appliance is faulty Refer to the authorized local dealer
who sold the appliance or directly to
the manufacturer
The water inlet valve is faulty
The door is not closed Close the door
You have not turned the water supply
on Turn the supply on
The appliance operates, but the
switch LED does not light on The LED is faulty Change the LED
Boiler heating does not operate
Switch or main switch or fuse has not
been activated
Check the switch of the appliance
and the main switch or fuse
The safety thermostat of the boiler is
faulty Refer to the authorized local dealer
or the manufacturer
The 93
°C
thermal fuse of the boiler
is faulty
Pressure regulator is faulty Refer to the authorized local dealer
or the manufacturer
“Boiler heating” relay is faulty
Boiler fuse is burned out Refer to the authorized local dealer
or the manufacturer
Boiler heating operates, but LED
does not turn on Faulty LED Change LED
Dispenser heating does not operate
Switch N1 of the appliance or main
switch or fuse has not been activated
Activate the corresponding switch or
fuse
“Compartment heating” relay is
faulty Wait
The 85
°C
thermal fuse is faulty. The
dispenser’s fuse is burned out
The thermostat switch of
60°C
heating is faulty Refer to the authorized local dealer
or the manufacturer
“Compartment heating” relay is
faulty
Pump motor does not operate
Main switch or fuse is not activated.
The door is not closed.
Activate the main switch or fuse
Close the door
Main relay is faulty Refer to the authorized local dealer
or the manufacturer
Pump motor is faulty
Program selection switch is faulty

13
EN
PROBLEM CAUSE SOLUTION
Motor operates, but pump does not
rotate
An object has jammed the pump fin Refer to the authorized local dealer
or the manufacturer
Salts or detergent have been
petrified following non-operation of
the appliance
Rotate the screw on the backside of
the motor, until it rotates freely
Items do not dry (dishes, glasses,
etc.)
Compartment has no drying aid Insert drying aid to the compartment
Drying valve is faulty
Refer to the authorized local dealer
or the manufacturer
Program switch is faulty
Rinsing arms do not rotate
Basket does not rotate
Warranty
Any defect affecting the functionality of the ap-
pliance which becomes apparent within one year
after purchase will be repaired by free repair or re-
placement provided the appliance has been used
and maintained in accordance with the instructions
and has not been abused or misused in any way.
Your statutory rights are not affected. If the appli-
ance is claimed under warranty, state where and
when it was purchased and include proof of pur-
chase (e.g. receipt).
In line with our policy of continuous product devel-
opment we reserve the right to change the product,
packaging and documentation specifications with-
out notice.
Discarding & Environment
When decommissioning the appliance, the prod-
uct must not be disposed of with other household
waste. Instead, it is your responsibility to dispose to
your waste equipment by handing it over to a des-
ignated collection point. Failure to follow this rule
may be penalized in accordance with applicable
regulations on waste disposal. The separate col-
lection and recycling of your waste equipment at
the time of disposal will help conserve natural re-
sources and ensure that it is recycled in a manner
that protects human health and the environment.
For more information about where you can drop off
your waste for recycling, please contact your local
waste collection company. The manufacturers and
importers do not take responsibility for recycling,
treatment and ecological disposal, either directly
or through a public system.

14
DE
Sehr geehrter Kunde,
Vielen Dank für den Kauf dieses Hendi Gerät. Lesen Sie dieses Handbuch sorgfältig und achten Sie
besonders auf die unten aufgeführten Sicherheitsvorschriften, bevor Sie dieses Gerät zum ersten Mal
installieren und verwenden.
Sicherheitsvorschriften
• DiesesGerätistfürdenprofessionellenGebrauchbestimmtunddarfnurvonqualifiziertem
Personal bedient werden. Dieses Gerät ist nicht für den Hausgebrauch bestimmt.
• Verwenden Sie das Gerät nur für den vorgesehenen Zweck, für den es entworfen wurde,
wie in diesem Handbuch beschrieben.
• Der Hersteller haftet nicht für Schäden, die durch fehlerhafte Bedienung und
unsachgemäße Verwendung verursacht werden.
• Halten Sie das Gerät und den elektrischen Stecker von Wasser und anderen Flüssigkeiten
fern. Falls das Gerät in Wasser fällt, entfernen Sie sofort den Netzstecker von der
Steckdose. Verwenden Sie das Gerät erst, wenn es von einem zertifizierten Techniker
überprüft wurde. Die Nichtbefolgung dieser Anweisungen führt zu lebensbedrohlichen
Risiken.
• Versuchen Sie niemals, das Gehäuse des Geräts selbst zu öffnen.
• Legen Sie keine Objekte in das Gehäuse der Appliance ein.
• Berühren Sie den Stecker nicht mit nassen oder feuchten Händen.
• GEFAHR EINES ELEKTRISCHEN SCHLAGS!Versuchen Sie nicht, das Gerät selbst
zu reparieren, Reparaturen sind nur von qualifiziertem Personal durchzuführen.
• Verwenden Sie niemals ein beschädigtes Gerät! Wenn es beschädigt ist, trennen Sie das
Gerät von der Steckdose und wenden Sie sich an den Händler.
• WARNUNG! Tauchen Sie die elektrischen Teile des Geräts nicht in Wasser oder andere
Flüssigkeiten ein.
• Halten Sie das Gerät niemals unter fließendem Wasser.
• Überprüfen Sie regelmäßig den Netzstecker und das Kabel auf Beschädigungen. Bei
Beschädigung muss es durch einen Dienstleister oder eine ähnlich qualifizierte Person
ersetzt werden, um Gefahren oder Verletzungen zu vermeiden.
• Stellen Sie sicher, dass das Kabel nicht mit scharfen oder heißen Gegenständen in
Berührung kommt und halten Sie es von offenem Feuer fern. Ziehen Sie niemals das
Netzkabel, um es von der Steckdose zu trennen, ziehen Sie stattdessen immer den
Stecker.
• Stellen Sie sicher, dass das Netzkabel und/oder das Verlängerungskabel keine
Auslösegefahr verursachen.
• Lassen Sie die Appliance während des Gebrauchs niemals unbeaufsichtigt.
• WARNUNG!
Solange sich der Stecker in der Steckdose befindet, wird das Gerät an die
Stromquelle angeschlossen.
• Schalten Sie die Appliance aus, bevor Sie sie vom Sockel trennen.

15
DE
• Schließen Sie den Netzstecker an eine leicht zugängliche Steckdose an, so dass das Gerät
im Notfall sofort abgenommen werden kann.
• Tragen Sie das Gerät niemals an der Schnur.
• Verwenden Sie keine zusätzlichen Geräte, die nicht zusammen mit der Appliance geliefert
werden.
• Schließen Sie das Gerät nur an eine Steckdose mit der Spannung und Frequenz an, die auf
dem Etikett des Gerätes angegeben ist.
• Verwenden Sie niemals anderes Zubehör als das vom Hersteller empfohlene Zubehör.
Andernfalls könnte ein Sicherheitsrisiko für den Benutzer darstellen und das Gerät
beschädigen. Verwenden Sie nur Originalteile und Zubehör.
• Dieses Gerät sollte nicht von Personen mit eingeschränkter körperlicher, sensorischer
oder geistiger Leistungsfähigkeit oder von Personen mit mangelnder Erfahrung und
Kenntnisnahme betrieben werden.
• Dieses Gerät sollte unter keinen Umständen von Kindern verwendet werden.
• Bewahren Sie das Gerät und das Netzkabel außerhalb der Reichweite von Kindern auf.
• ACHTUNG: Schalten Sie das Gerät immer aus und ziehen Sie es vor der Reinigung,
Wartung oder Lagerung von der Steckdose ab.
Besondere Sicherheitsvorschriften
• Die Spülmaschine wird mit Leitungen angeliefert, die das Wasser zuführen und ableiten.
Das Anschließen an eine Wasserleitungs-, Kanalisations- und Elektroanlage entsprechend
den örtlich geltenden Vorschriften darf nur ein dazu berechtigter Installateur vornehmen.
• Vor dem Anschließen des Gerätes muss man überprüfen, ob die auf dem Typenschild
enthaltenen Daten (Spannung und Belastung) den Netzparametern entsprechen.
• In keinster Weise darf in das Gerät eingegriffen werden. Der Hersteller und der Verkäufer
haften nicht für eventuelle Schäden, die sich aus einem solchen Eingriff ergeben.
• Das gleiche trifft bei einer nicht richtigen oder nicht entsprechend dem Verwendungszweck
durchgeführten Nutzung des Gerätes zu. Das Wasser, das sich in der Geschirrspülmaschine
befindet, eignet sich nicht zum Trinken.
• Die Tätigkeiten im Zusammenhang mit der Bedienung, Wartung und Reparatur dürfen
ausschließlich nur von gesc.
Wasserenthärter
•HINWEIS:AlleGeräte,dieeinenständigenAnschlussandasWasserleitungsnetz
erfordern (u.a. das vorliegende Gerät) müssen unbedingt auch einen
Weichmacher des Wassers angeschlossen haben, der die Kalzium- und
Magnesiumverbindungen aus dem Wasser entfernt. Der Weichmacher muss
entsprechend den Empfehlungen des Herstellers in der Bedienanleitung
genutzt werden.
•Wird der Enthärter nicht angebracht oder falsch verwendet und/oder regeneriert,
weist der Händler alle Reklamationen zurück, die Reparaturen aufgrund von
Kalkablagerungen im Gerät erforderlich machen.

16
DE
•Die Anwendung eines Weichmachers aus dem umfangreichen Angebot von HENDI
wird empfohlen. Bei der entsprechenden Auswahl eines konkreten Modells ist Ihnen
der Handelsvertreter der Firma HENDI behilflich. Für die richtige Regenerierung des
Weichmachers empfehlen wir: Salztabletten, Sack von 25 kg – Code: 231265.
Wasserhärte
Deutsche Grade
(°dH)
Französische Grade
(°fH)
mmol/l Grade von Clark Anschließen des
Weichmachers
über 24 über 40 über 4,2 über 28 notwendig
18 - 24 32 - 40 3,2 – 4,2 22 - 28 notwendig
12 - 18 19 – 32 2,1 – 3,2 13 - 22 notwendig
4 - 12 7 - 19 0,7 – 2,1 5 - 13 notwendig
unter 4 unter 7 unter 0,7 unter 5 Nicht erforderlich
Verwendungszweck
• Das Gerät dient zum Abwaschen von Tischge-
schirr, wie z.B. Glas, Tassen, Teller, Besteck.
Die Verwendung des Gerätes für andere Zwecke
kann zu seiner Beschädigung sowie zu Körper-
verletzungen führen.
• Jede andere Verwendung des Gerätes gilt als
nicht bestimmungsgemäß. Der Benutzer ist al-
lein verantwortlich für die unsachgemäße Nut-
zung des Gerätes.
Erdungsinstallation
Dieses Gerät ist als Schutzklasse I eingestuft und
muss mit einer Schutzerde verbunden werden. Die
Erdung reduziert das Risiko eines elektrischen
Schlags, indem ein Fluchtkabel für den elektri-
schen Strom bereitgestellt wird. Dieses Gerät ist
mit einem Netzkabel mit einem Erdungskabel und
einem geerdeten Stecker ausgestattet. Der Ste-
cker muss in eine Steckdose gesteckt werden, die
ordnungsgemäß installiert und geerdet ist.
Vorbereitung vor dem ersten Gebrauch
• Verpackung öffnen. Vor der Konfiguration des
Gerätes muss man es in Bezug auf sichtbare
Transportschäden überprüfen. Bei irgendwel-
chen Zweifeln ist ein Spezialist zwecks Prüfung
zu rufen (von einem lokalen autorisierten Händ-
ler, der das Gerät verkaufte).
• Stellen Sie den Geschirrspüler im Bereich der
Installation auf, und zwar in der Nähe der benö-
tigten Wasser- und Stromversorgung (der Unter-
grund muss entsprechend stabil sein).
• Nehmen Sie die Schutzfolie ab, die das Stahlge-
häuse des Geschirrspülers vor Kratzern schützt.
Eventuelle Kleberrester sind vorsichtig zu ent-
fernen. Verwenden Sie keine kratzenden Mate-
rialien. Wenn man die Schutzfolie nicht abnimmt,
kann der Kleber der Folie an das Stahlgehäuse
des Geschirrspülers ankleben und schwer zu be-
seitigen sein.
• Das Gerät muss nivelliert werden. Eventuelle Ab-
weichungen von der Waagerechten sind mit Hilfe
einer Wasserwaage zu korrigieren.
• Nach erfolgreicher Installation und vor der Über-
gabe zur Nutzung muss man den Geschirrspüler
sehr genau mit einem gewöhnlichen Waschmit-
tel auswaschen.

17
DE
Anschließen an die Wasserleitungsanlage
HINWEIS: Den Anschluss an die Wasserleitungs-
anlage muss man entsprechend den geltenden
Sicherheitsstandards ausführen.
Der Geschirrspüler kann Wasserversorgung mit
einer maximalen Vorlauftemperatur 60°C/130°
Fangescholossen werden. Falls Sie Verbindung
mit Wasserversorgung der höheren Vorlauftem-
peratur benötigen, kontaktieren Sie unser Werk
oder unser Vertriebspartner oder unsere Fach-
händler.
• Die Zuleitung für Wasser sollte mit einem Kugel-
ventil (Einwegventil) ausgerüstet sein, entspre-
chend der Norm DIN 1988.
• Die Zuleitung für Wasser ist vor dem Anschließen
des Gerätes durchzuspüle.
• Der innere Mindestdurchmesser der Zuleitung
für Wasser sollte 16 mm betragen und die Ver-
bindung mit der Leitung sollte ¾ Zoll haben.
• Alle Flansche der Leitung muss man vor Über-
gabe zur Nutzung für ständig befestigt werden.
• Die Geschirrspülmaschine darf man nur mit ei-
nem effektiv wirkenden Weichmacher anschlie-
ßen.
HINWEIS: Der Wasserdruck muss zwischen 2 und
5 bar liegen.
Anschließen an die Kanalisationsanlage
• Der Wasserablass ist schwerkraftmäßig (gravita-
tiv) (natürlicher Durchfluss). Die Auslassleitung
muss man direkt an den Hauptauslass anschlie-
ßen, in dem ein Syfon vorzusehen ist, der die
schlechten Gerüche eliminiert oder direkt in die
Kanalisation mit Syfon leitet.
HINWEIS: Die Auslassleitung darf man nicht höher
als ein 650 mm und zwar unten von der Dosierein-
richtung des Geschirrspülers. Andernfalls fließt
das Wasser nicht in die Kanalisation und kann
durch die Tür des Geschirrspülers auf den Fußbo-
den laufen.
Anschluss an die Elektroanlage
HINWEIS: Alle elektrischen Tätigkeiten können
ausschließlich nur durch einen qualifizierten und
autorisierten Servicedienst ausgeführt werden.
• Die Geschirrspülmaschine arbeitet in Abhängig-
keit vom Typ des Gerätes unter einer bestimmten
Spannung.
• Die gelieferte Leistung muss man an die Para-
meter des Gerätes anpassen (die elektrische
Verbindung darf nur von einem dazu berech-
tigten Service ausgeführt werden). Ebenso sind
die Normen DIN, VDE, D100, die Verbindungs-
bedingen der EVU, die Vorschriften ZH 1/37 und
auch das Kapitel 7.2 sowie aber auch die örtlich
geltenden Vorschriften bzgl. der Vorbeugung von
Unfällen.
• Das Gerät muss man an die Elektroanlage mit
Hilfe der Leitung HO7 RN-F anschließen.
Anschließen des Schutzleiters und der Kompensation für Spannungsschwankungen
• Die elektrische Sicherheit des Gerätes ist nur
dann gesichert, wenn der Schutzleiter ange-
schlossen und geprüft wurde. Zu diesem Zweck
muss man entsprechende Anforderungen erfül-
len (siehe Pkt. 1.5).
• Darüber hinaus sollte das Gerät ein Kompensati-
onssystem für Spannungsschwankungen haben.
• Hinten am Gerät befindet sich eine Schraube, die
man als „Kompensation der Spannungsschwan-
kungen” bezeichnete.
• Nach dem Anschluss an die Elektroanlage und
dem Anschließen des Schutzleiters muss man
die Übereinstimmung des Kompensationssys-
tems für Spannungsschwankungen und des
Wertes der Isolierung mit den Vorschriften von
DIN VDE überprüfen.

18
DE
Technische Spezifikation
Nr. des Produktes 230268 231753 237540 231340 236567 236574
Typ 40x40 50x50 Haube 50x50 50x60
Max Höhe des Geschirrs
[mm] 295 335 400 450
Betriebsspannung und
Frequenz [V/Hz] 230 / 50 400 / 50 230 / 50 400 / 50
Nennleistungsaufnahme
[kW] 2,8 6,6 2,8 8,6 5,0 7,1
Wasch-/Spülwassertem-
peratur [°C] 62 / 85
Standard Ausrüstung Klarspüler- und Reinigungsmittelspender, Ablaufpumpe Klarspüler- und Reini-
gungsmittelspender
Dichtigkeitsbeiwert IP44
Menge (Anzahl)/Länge des
Waschzyklus (s.) 3/60, 120, 180
Nettogewicht (ca.) [kg] 39 55 135,5 57
Abmessungen [mm] 470x510x(H)710 570x600x(H)830 750x880x(H)1390 595x730x(H)1340
HINWEIS: Die technische Spezifikation kann ohne Vorankündigung verändert werden.
Anleitungen zur laufenden Bedienung der Geschirrspülmaschine
• Das Gerät ist ausschließlich nur zum Abwaschen
von Gefäßen, Tassen, Gläsern, Silbergeschirr
usw. bestimmt (in Abhängigkeit vom Modell).
• Man muss besonders auf die entsprechende An-
ordnung der Gefäße im Gerät achten.
• Das Silbergeschirr muss man von den Lebens-
mittelresten reinigen, falls sie nicht gleich nach
dem Gebrauch abgewaschen werden (einige Le-
bensmittelarten können Verfärbungen und Fle-
cke hervorrufen).
• Waschen Sie im Geschirrspüler keine Gefäße, die
mit Säuren, Mineralölen, Schmiermittel, Benzin
oder Farbstoffen bzw. Lösungsmitteln Kontakt
hatten (chemische Industriesubstanzen).
Vorbereitung der Gefäße zum Abwaschen
• Das Vertrocknen von Lebensmittelresten auf
den Gefäßen darf nicht zugelassen werden. Um
das Verstopfen der Filter und ein schnelles Ver-
schmutzen des Abwaschwassers zu vermeiden,
muss man die größeren Lebensmittelrückstän-
de, Kerne, Schalen, Zahnstocher usw. vor ihrem
Einbringen in den Korb entfernen.
• Bei Lebensmittelresten auf Glas empfiehlt man
das Einweichen oder Spülen.
Das Auffüllen des Korbes
• Die Gläser/Schnapsgläser, Tassen, große Teller
usw. muss man mit dem Boden nach oben in die
entsprechenden Körbe legen. Legen Sie bitte die
Gefäße nicht nacheinander;
• Die Gläser/Schnapsgläser dürfen nicht aneinan-
der stoßen.
•
Die Bestecke sind in einen entsprechenden Korb
aus Kunststoff zu legen, mit den Griffen nach un-
ten.
Das silberne Geschirr kann man frei in einen
Korb aus Kunststoff legen. Vermeiden Sie eine
Überfüllung des Korbes.
• Die Zuleitungen für das Wasser dürfen weder
blockiert (gebogen) noch auseinander gezogen
werden.

19
DE
Richtiges Einstellen der Teller in
die Körbe mit Bolzen.
Richtiges Einstellen der Unter-
tassen und Bestecke.
Richtiges Einstellen der Gläser in
die offenen Körbe.
Richtiges Einschieben der vollen
Körbe.
Bedienfeld
L1 L2 L3 LCD1 ALARM LCD2 L4 L5 L6
SW1 SW2 SW3 SW4 SW5 SW6
SCHALTFLÄCHE NAME BESCHREIBUNG NOTIZEN
SW1 CT1 Kurzzyklus-Auswahltaste Dauer 1 min
SW2 CT2 Mittel zyklus-Auswahltaste Dauer 2 min
SW3 CT3 Langzyklus-Auswahltaste Dauer 3 min
SW4 DB Taste Pumpe entleeren
SW5 CRB Kaltspülen-Taste
SW6 AM EIN/AUS-Schalter
LED-TABELLE FARBE
L1 LED der kurze Zyklusauswahl
L2 LED der mittleren Zyklusauswahl
L3 LED der lange Zyklusauswahl
L4 Ablauf läuft
L5 Kaltspülen ausgewählt
L6 LED des EIN/AUS-Schalters

20
DE
Einschalten
Um die Maschine zu starten, Taste SW6 (ON) 3 sec
drücken. Die LED L6 blinkt rot und ein Summer er-
tönt.
Verfahren vor dem Waschen
Da die Waschmaschine eingeschaltet ist, beginnen
der Kessel und der Waschtank mit Wasser zu fül-
len. Anschließend wird das Gerät mit Waschmittel
und Klarspülmittel gefüllt. Während dieser Zeit
erscheint auf dem Armaturenbrett eine „FILL“-
Nachricht. Nachdem die Tanks mit Wasser gefüllt
sind und die erforderlichen Waschmittel- und Klar-
spülmittelflüssigkeiten aufgefangen wurden, be-
ginnen die Heizbeständigkeit des Kessels und der
Heizwiderstand des Waschtanks nacheinander zu
funktionieren (nachdem die Temperatur des Kes-
sels erreicht wurde, schaltet sich der Widerstand
ab und der Waschtank beginnt zu erwärmen). Auf
den LCD1- und LCD2-Bildschirmen wird abwech-
selnd die aktuelle Temperatur jedes Tanks ange-
zeigt (wenn LCD 1 „bt“ anzeigt, dann zeigt LCD 2
die Temperatur des Kessels an; wenn LCD 1 „tt“
anzeigt, zeigt LCD 2 die Tanktemperatur an). Wenn
der Heizwiderstand des Waschbehälters AN ist,
leuchtet ein Punkt in der rechten unteren Ecke des
LCD1, während der Heizwiderstand des Kessels
AN ist, wenn der Heizwiderstand AN ist, leuchtet
ein Punkt in der rechten unteren Ecke des LCD2.
Aus diesem Grund wird das Symbol (für den
Tank) unter LCD1 und das Symbol (für den
Kessel) unter LCD2 angezeigt.
Standby
Während des Standby-Betriebs (nach der auto-
matischen Einrichtung) sollten LCD 1 und LCD 2
abwechselnd die Temperatur des Wasch- und Kes-
seltanks abspielen.
• LCD1 - “bt” oder “tt” (abwechselnd)
• LCD2 - “-- °C”
Wenn die Maschine länger als 30 Minuten im
Standby-Modus bleibt, wechselt sie in den Schlaf-
modus, um den Stromverbrauch zu minimieren. In
diesem Fall schalten sich LCD 1 und LCD 2 aus und
L6 glänzt. Durch Drücken von SW6 ist die Maschine
wieder betriebsbereit.
System Thermo-Protector
Um mit dem ersten Waschgang des Tages zu be-
ginnen, müssen beide Temperaturen im Tank und
im Kessel die Betriebswerte (60°C bzw. 85°C) er-
reichen. Wenn die Temperatur im Kessel aufgrund
des Thermo-Protector systems in allen anderen
Programmen nicht zum Spülen geeignet ist, wird
der Waschgang fortgesetzt, bis das Spülwas-
ser ausreichend erwärmt wird. Eine Meldung auf
dem Bildschirm informiert den Benutzer, dass der
Waschgang fortgesetzt wird; LCD1 zeigt den ak-
tuellen Wert der Wassertemperatur im Kessel an
und LCD2 zeigt „ht“ (d. h. Heizung).
Auswahl des Waschzyklus – Start
Diese Waschmaschine verfügt über drei Pro-
grammoptionen. Der Benutzer kann zwischen
kurzen, mittleren und langen Programmen wäh-
len, indem er eine der Tasten SW1, SW2 oder SW3
entsprechend drückt. Nach Drücken der entspre-
chenden Taste startet der Waschgang automa-
tisch, SOFERN die Tür nicht versehentlich geöffnet
wird. In letzterem Fall wird im Armaturenbrett die
Meldung „door“ angezeigt und die Wäsche beginnt
wieder, sobald die Tür geschlossen ist. Die verblei-
bende Zeit (in Sekunden) wird auf dem Armaturen-
brett angezeigt.
WICHTIG: Falls die Tür versehentlich geöffnet wird,
bevor das Programm beendet ist, stoppt die Wä-
sche und der Timer wird zurückgesetzt. Um den
Zyklus zu beenden, sollten Sie das Verfahren daher
von Anfang an starten.
HINWEIS: 10 Sekunden vor Abschluss des Haupt-
waschgangs beginnt die Ablaufpumpe zu arbeiten
und stoppt 10 Sekunden nach dem Spülzyklus.
Other manuals for 230268
1
This manual suits for next models
3
Table of contents
Languages:
Other Hendi Dishwasher manuals