Henry Schein PS1 User manual

®
900-3939
0473
VET PIEZO SCALER PS1
Distributed by:
Distribuido por: Vertrieb durch:
Distribué par: Distribuito da:
H
ENRY
S
CHEIN
I
NC
.
Melville,NY 11747 USA
Henry Schein U.K. Holdings Ltd.
Gillingham ME8 0SB U.K.
EC REP
www.henryscheinbrand.com
VET PIEZO
SCALER PS1
MADE IN CHINA
Fabricado en China
Fabriqué en Chine
Hergestellt in China
• Sistema ultrasónico para periodoncia e intervenciones mínimas restauradoras
INSTRUCCIONES DE USO
• Détartreur Piezo pour détartrage et Parodontologie
MODE D’EMPLOI
• HS-Ultraschallgenerator zur Zahnsteinentfernung und Paradontologie
BENUTZERHANDBUCH
• Ultrasonic scaler for use in periodontic and prevention treatments
OPERATING MANUAL
Copyright © 2009 by Henry Schein Inc.
All rights reserved. No part of these instructions may be reproduced or copied in any form by any means – graphic, electronic
or mechanical, including photocopying, typing or information retrieval systems – without written permission of Henry Schein Inc.
Todos los derechos reservados. Ninguna parte de estas instrucciones puede ser reproducida o copiada de ninguna manera y
por ningún medio – gráfico, electrónico o mecánico, incluyendo el fotocopiado, tipeo o los sistemas de recuperación de informa-
ción – sin la autorización expresa por escrito de Henry Schein Inc.
Tous les droits réservés. Aucune partie de ces instructions ne peut être reproduite ou copiée par aucun moyen – graphique, élec-
tronique ou mécanique, y compris la photocopie, la copie à main ou les systèmes de récupération de l’information – sans l’au-
torisation par écrit de Henry Schein Inc.
Alle Rechte vorbehalten. Dieses Benutzerhandbuch darf ohne schriftliche Genehmigung von Henry Schein Inc weder ganz noch
in Auszügen in jedweder Form- grafisch, elektronisch oder mechanisch- reproduziert oder kopiert werden, was Fotokopien,
Abschriften oder das Weiterleiten über andere Kommunikationsmittel einschließt.

1.THE INSTALLATION AND COMPONENTS OF EQUIPMENT
CONTENTS
1. The installation and components of equipment 3
1.1 Instruction .............................................................................................3
1.2 Components...........................................................................................3
1.3 The main technical specifications ..........................................................4
1.4 Installation of the main components .....................................................5
2. Product function and operation 8
2.1 Scaling function......................................................................................8
2.2 Endo function .........................................................................................9
3. Sterilization and maintenance 10
3.1 Sterilization of detachable handpiece..................................................10
3.2 Sterilization of scaling tips, endo wrench and endochuck...................10
3.3 Sterilization of torque wrench ..............................................................10
3.4 Cleaning of tips, endochuck, torque wrench and endo wrench...........11
3.5 Troubleshooting and notes...................................................................11
4. Precaution 13
4.1 Notice when using equipment..............................................................13
4.2 Contraindication ...................................................................................14
4.3 Storage and maintenance....................................................................14
4.4 Transportation ......................................................................................14
5. After service 14
6. Symbol instruction 15
7. Environmental protection 15
8. Manufacturer’s right 15
2 3
ENGLISH
1.1 Instruction
Henry Schein Inc. is a professional manufacturer in researching, developing and producing
ultrasonic piezo scalers. The product is mainly used for teeth cleaning and is also an indis-
pensable equipment for tooth disease prevention and treatment. The new product Vet Piezo
Scaler PS1 has scaling, endo, automatic water supply function.
It contains the following features:
1. Automatic frequency tracking ensures that the machine always works on the best fre-
quency and performs more steadily.The optional function: automatic water supply system.
2. The hand piece is detachable and can be autoclaved to the high temperature of
135and pressure of 0.22MPa.
3. Digital controlled, easy operation and more efficient for scaling.
1.2 Components
1.2.1 The following parts should be included in a complete Vet Piezo Scaler PS1:
Number
1
2
3
4
5
6
7
8
9
10
11
12
13
14
15
16
17
Description
Main unit
Detachable handpiece
Power supply
Foot switch
Scaling tip
Water pipe
Torque wrench
Handpiece decorative ring
Waterproof “O” ring
Packing list
Instruction manual
Warranty card
Qualified certificate
Endochuck
Endo wrench
Reservoir (optional)
Twin tube (optional)
Dimension
190 x 125 x 60mm
18 x 117mm
120 x 75 x 65mm
100 x 62 x 36mm
/
6 x 4mm
32 x 39mm
17 x 15.4 x 2mm
3.2 x 1.1mm
/
/
/
/
/
/
800mL
1m
VET PIEZO SCALER PS1
1.THE INSTALLATION AND COMPONENTS OF EQUIPMENT
1.4 Installation of the main components
1.4.1 Sketch map for installation and connection.
a) Sketch map for front panel and back panel of main unit.
The Vet Piezo Scaler PS1 scaling tips and their accessories are not list-
ed in this instruction manual completely. The detail can be found in the
accompanying documents and packing list attached to the machine.
1.2.2 Product performance and structure
Ultrasonic piezo scaler is composed of electrocircuit, water way and ultrasonic transducer.
1.2.3 Scope of application
Vet Piezo scaler PS1 is us ed for the dental calculus elimination and root canal treat-
ment.
1.3 The main technical specifications
1.3.1 Technical specifications of ultrasonic scaler:
a. Power source Input 220V to 230V~50Hz/60Hz 150mA
b. Main unit input: 24V~ 50Hz/60Hz 1.3A
5V~ 50Hz/60Hz 200mA (optional)
c. Output primary tip Vibration excursion <100µm
d. Output half-excursion force <2N
e. Output tip Vibration frequency 28kHz 3kHz
f. Output power 3W to 20W
g. Main unit fuse: 250VT - 1.6AL
h. Power source fuse: 250VT - 0.5AL
i. Water pressure 0.1bar to 5bar (0.01MPa to 0.5MPa)
j. Weight of main unit 0.73kg
k. Weight of power source 1.2kg
l. Operating mode: Continuous operation
m.Type of protection against electric shock: Class II
n. Degree of protection against electric shock Type B equipment
o. Degree of protection against harmful ingress of water Ordinary equipment (IPX0)
p. Protection degree against water (used on the pedal) IPX1
q. Degree of safety of application in the presence of a Flammable Anaesthetic Mixture
with air or with Oxygen or Nitrous Oxide Equipment not suitable for being used in the
presence of a flammable anaesthetic mixture with air or with oxygen or nitrous oxide.
1.3.2 Working condition
a. Environment temperature: 50C to 400C
b. Relative humidity: <80%
c. Atmosphere pressure: 70KPa to106KPa
4 5
VET PIEZO SCALER PS1
1.THE INSTALLATION AND COMPONENTS OF EQUIPMENT
VET PIEZO SCALER PS1
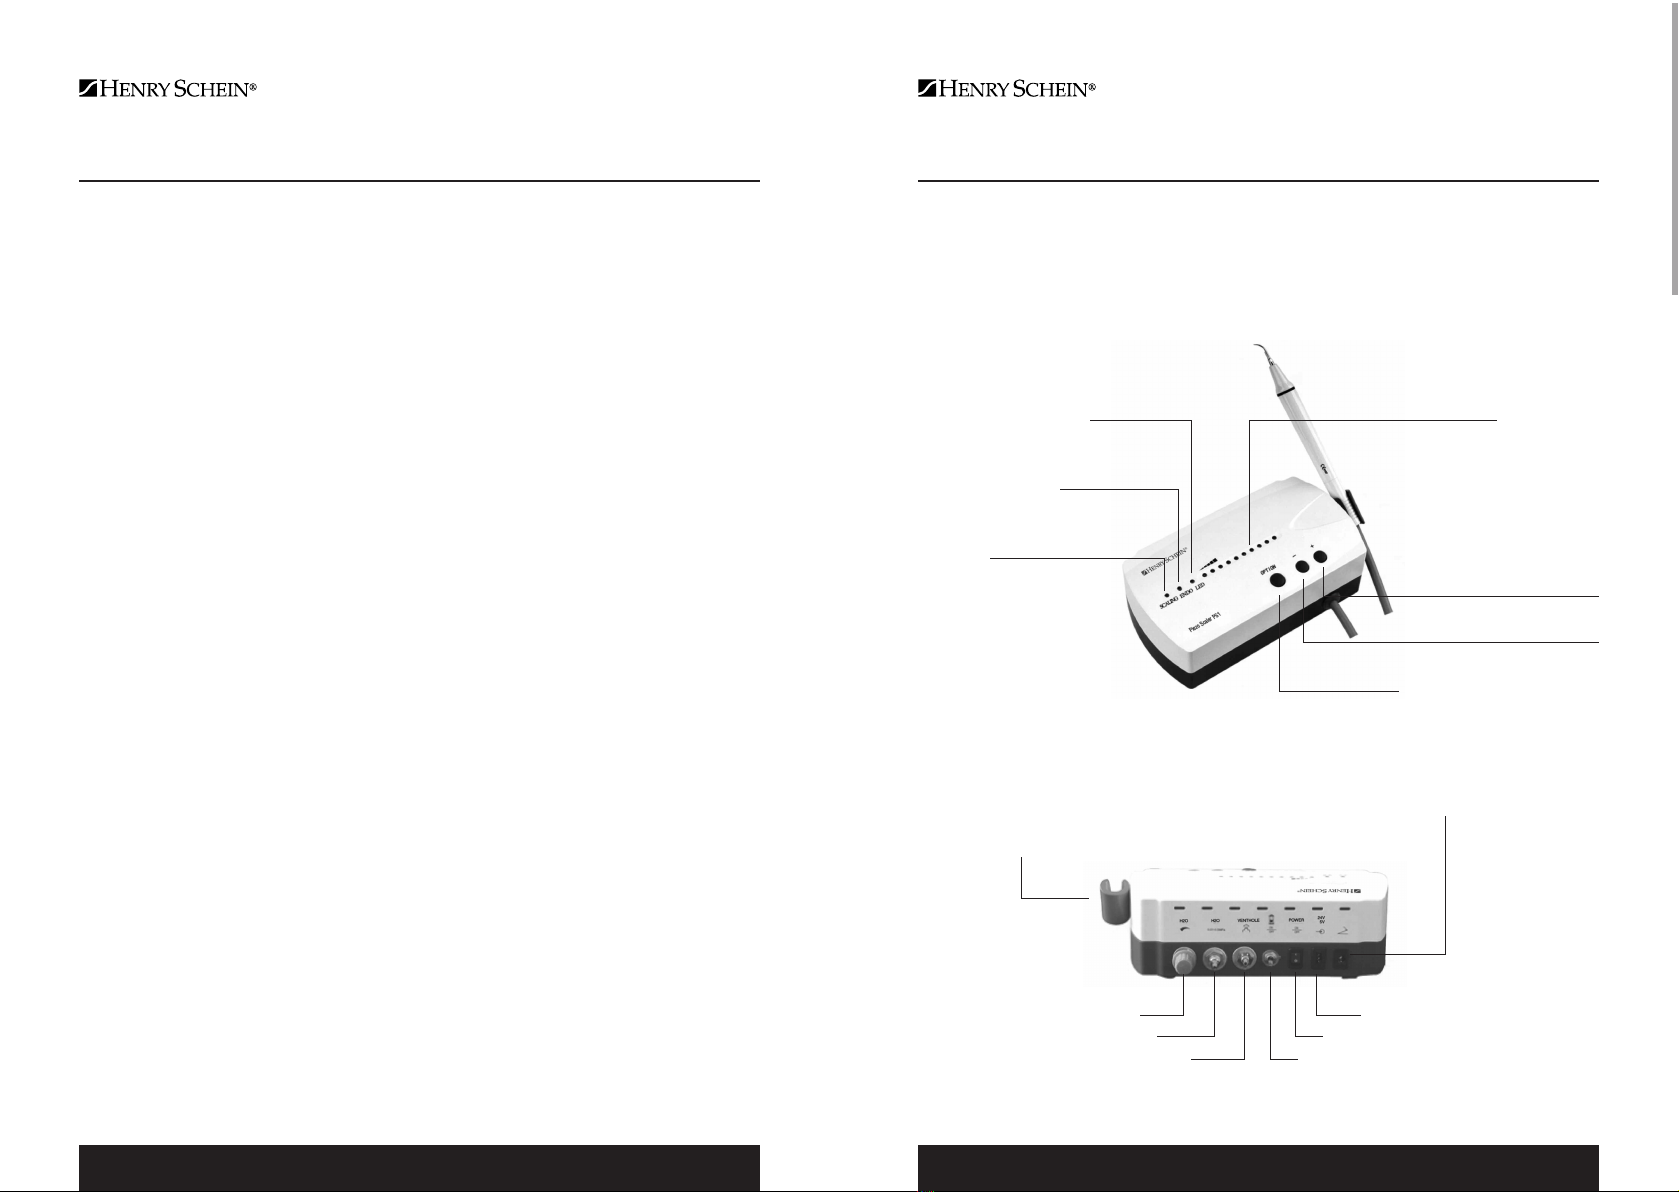
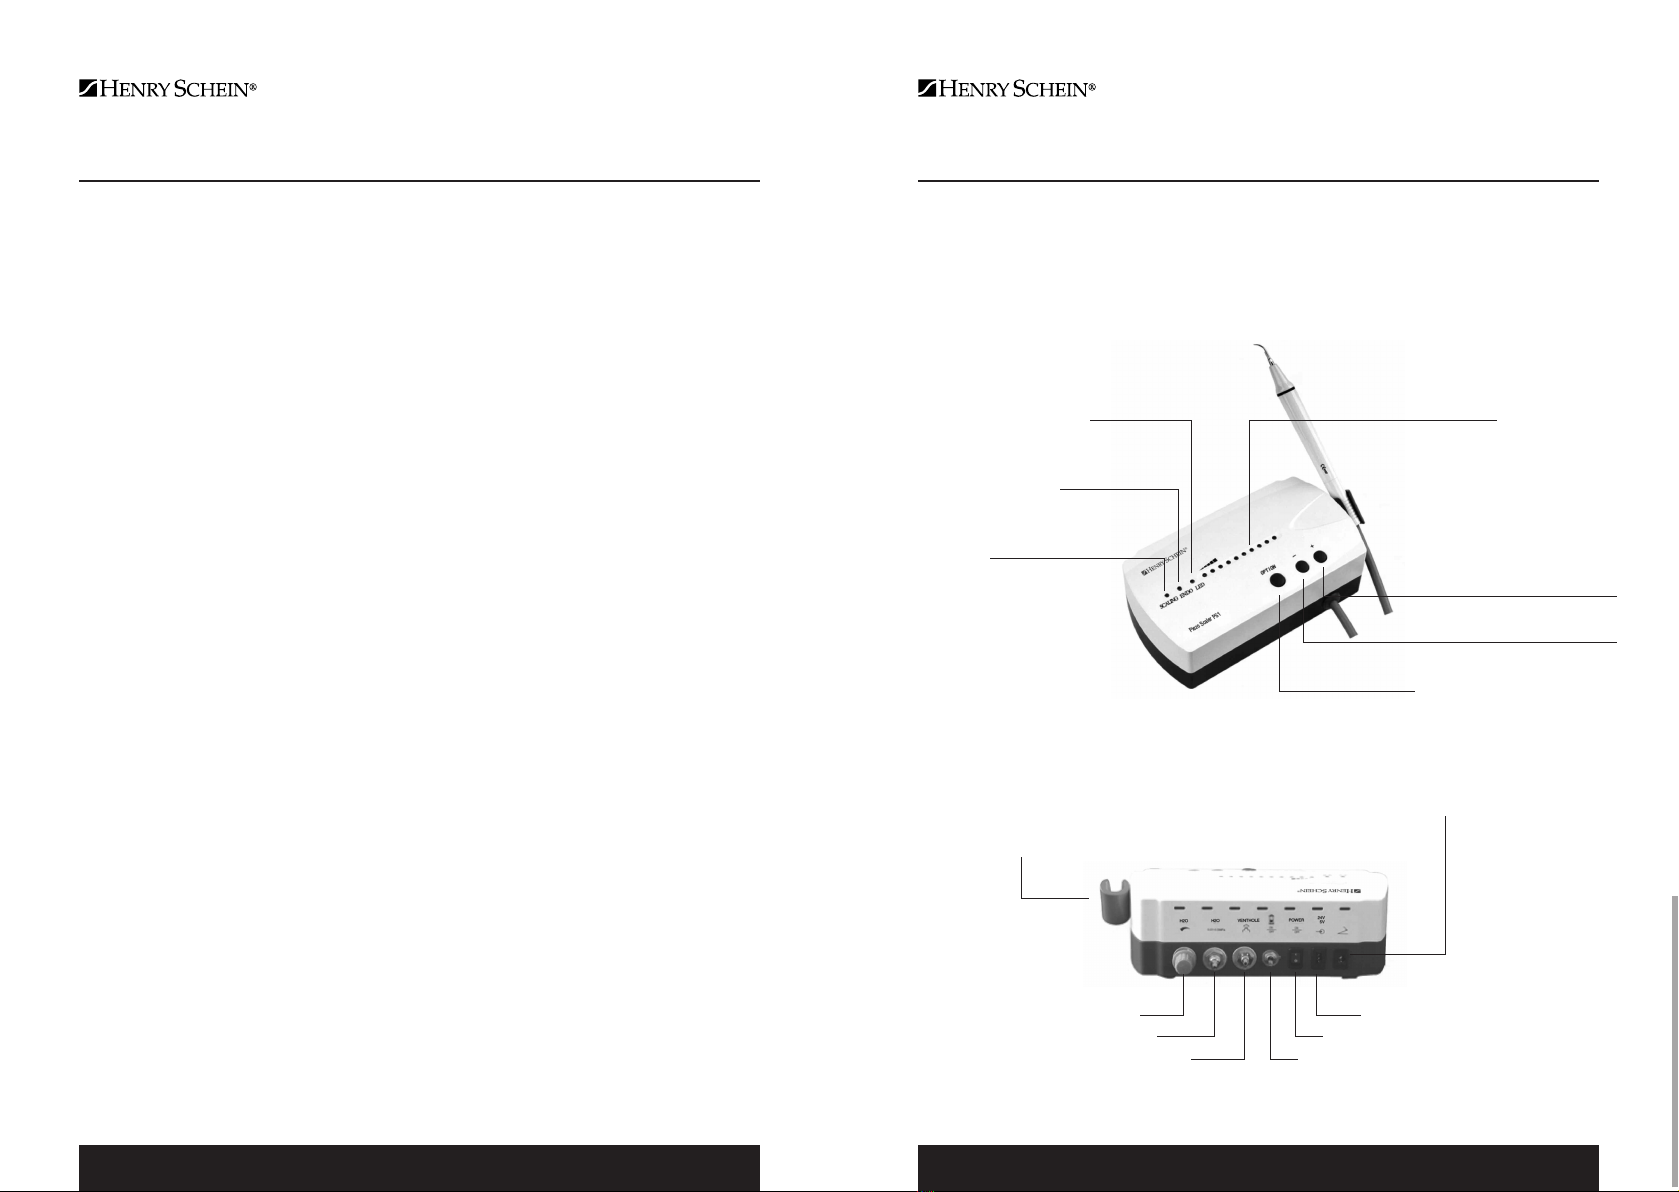
LED indicator Power indicator
Endo indicator
Scaling indicator
Increasing power switch
Decreasing power switch
Option switch
Socket for foot switch
Holder
Water control knob Socket for power supply
Water entrance Switch for power supply
Air exit (optional) Switch for automatic
water supply (optional)
ENGLISH

e) Sketch map for connection of detachable handpiece
f) Sketch map for how to install tip and endochuck with wrench
6 7
b) Sketch map for connection of foot switch, power supply and main unit
c) Sketch map for connection of water supply system
d) Sketch map for automatic water supply system (optional)
1.THE INSTALLATION AND COMPONENTS OF EQUIPMENT
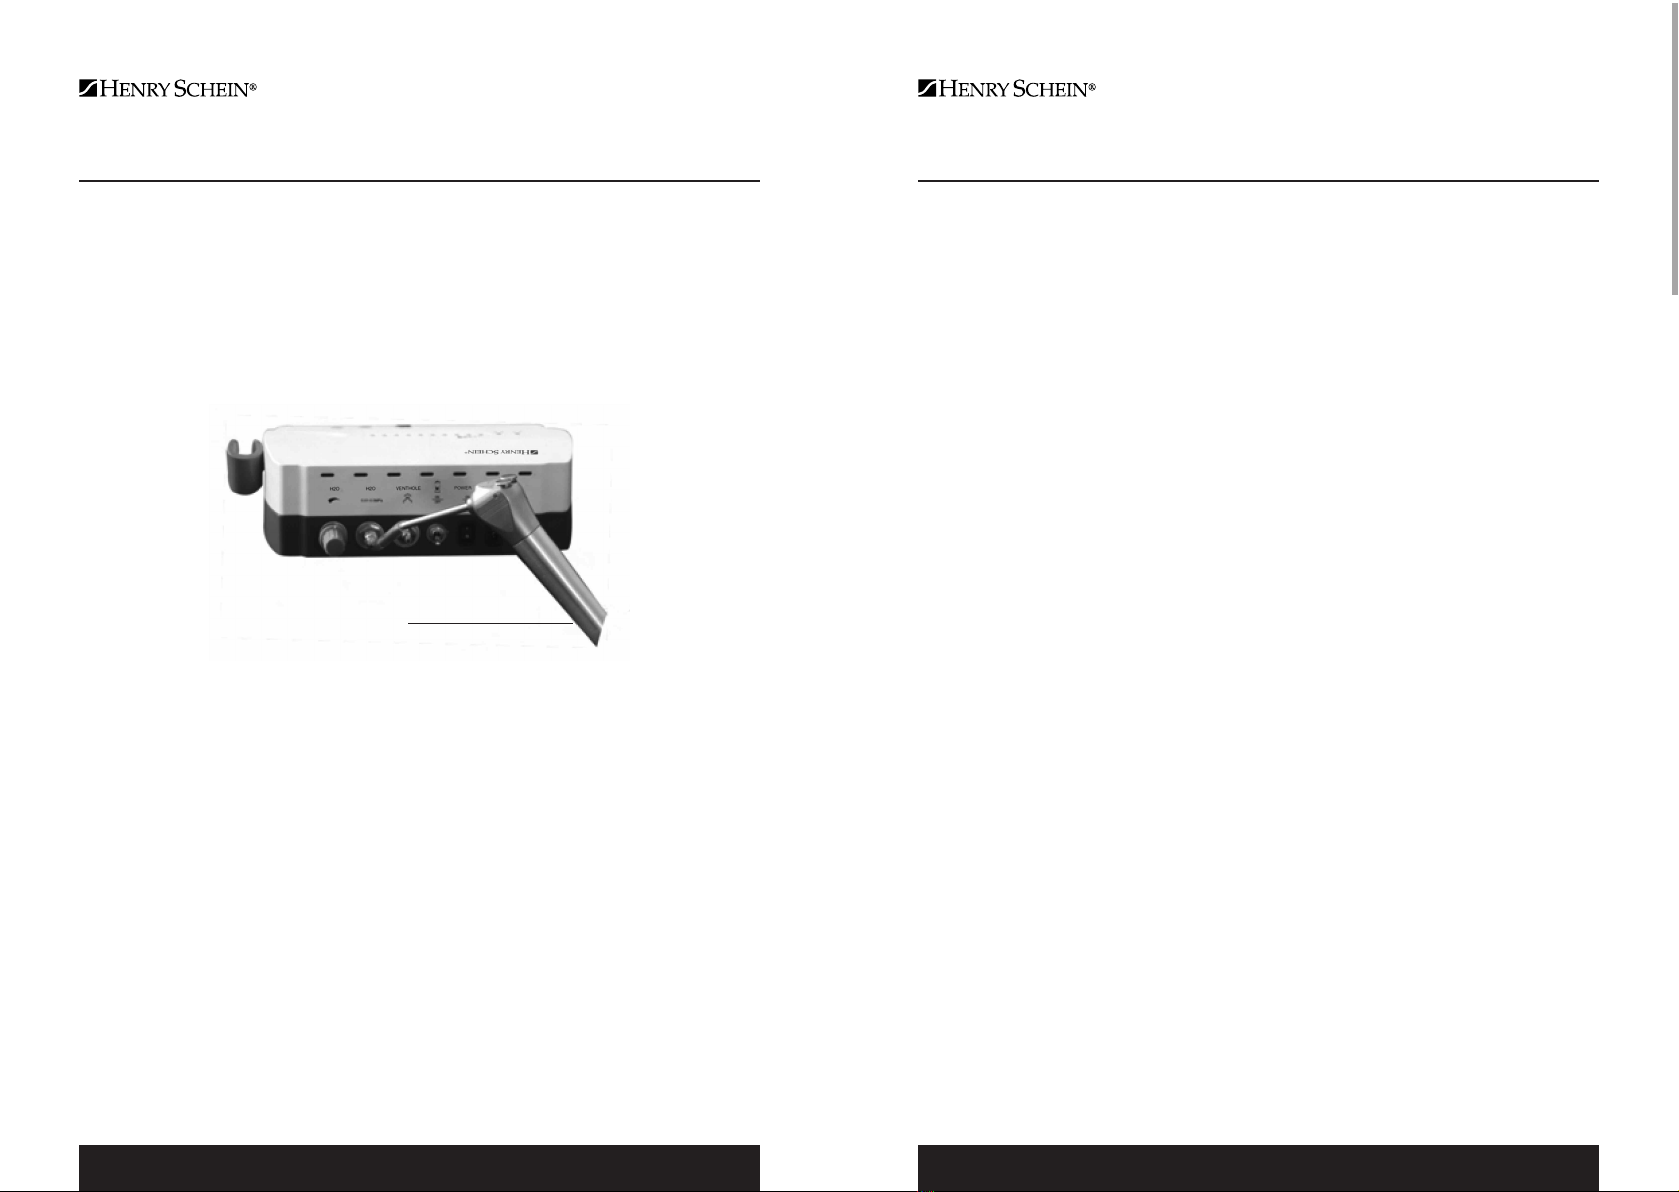
VET PIEZO SCALER PS1
Plug of foot switch Foot switch Handpiece decorative ring
Nipple Handpiece
Shaft
Foot switch socket
Plug of foot switch Power supply
Input voltage 220V to 230V
Power cord plug
Socket for power supply
Power cord plug
Connect pure water Cap of connector
Water pipe
Water entrance Switch for automatic
water supply (optional)
Air exit(optional)
Connect water entrance (small)
Connect air exit (big)
ð
ð
ð
ð
Water entrance
Reservoir
Torque wrench
1.THE INSTALLATION AND COMPONENTS OF EQUIPMENT
VET PIEZO SCALER PS1
Handpiece The connector of cable
Nipple Handpiece
ð
ð
ð
ðð
ððð
Å
Å
Å
Handpiece
Handpiece decorative ring The connector of cable
Nipple Cable
Screw on
Screw onScrew on
HandpieceTip
Endochuck Endowrench File
ENGLISH

8 9
2.1 Scaling function.
2.1.1 Operation.
a) Open the packing box, make sure that all the parts and accessories are complete
according to the packing list.Take the main unit out of the box and put it on a stable plane.
b) Turn the water control knob to the max based on symbol as shown as 3.5.2 [note 1].
c) Insert the plug of the foot switch to its socket (1.4.1 b).
d) Connect one end of the water pipe to the water entrance, and the other end to the clean
water source (1.4.1 c).
e) Screw the scaling tip tightly to handpiece by torque wrench , then connect the hand-
piece and the connector of cable correctly.
f) Connect the main unit with output plug of power source, then connect to the power
(1.4.1 b).
g) Switch on the main unit, then the scaling indicator and the first five lead lights of
power indicator shine.
h) Select a suitable scaling tip as you need,screw it on the handpiece tightly by the
torque wrench (1.4.1 f).
i) The normal frequency is extremely high. Under the normal working state of the scal-
ing tip, a light touch and a certain to-and-fro motion will eliminate the tartar without
heating. Overexertion and long-time lingering are forbidden.
j) Vibrating intensity: Adjust the vibration intensity as you need , generally turn the
knob to the middle grade. According to patient's different sensitivity and the rigidity of
the gingival tartar,adjust the vibration intensity during the clinical treatment.
k) Water volume adjustment: Step on the foot switch, and the tip begins to vibrate, then
turn the water control knob to form fine spray to cool down the handpiece and clean
the teeth.
l) The handpiece can be handled in the same gesture as a pen in hand.
m) During the clinical treatment, be sure not to make the end of tip touch the teeth ver-
tically and not to make the tip overexert on the surface of the teeth in case of hurting
the teeth and damaging the tip.
n) After finishing operation, keep the machine working for 30 seconds on the water
supply condition, to clean the handpiece and the scaling tip.
o) Unscrew the scaling tip and pull out handpiece, then sterilize them.
Notice: Don't pull out the handpiece when the foot switch is stepped on and
the machine is working.
2.1.2 Instruction for main components of detachable handpiece
(showed in 1.4.1 e).
a) NippleThe nipple can be removed.You can screw off the nipple and clean the pole with
alcohol termly.
b) Handpiece decorative ring. The seal can be removed and cleaned with alcohol termly.
2.PRODUCT FUNCTION AND OPERATION
VET PIEZO SCALER PS1
c) HandpieceThe main part of the whole handpiece, can be autoclaved under the high
temperature and pressure.
d) The connector of the cable Connect the handpiece with the water source and power
supply of the main unit.
Notice: Keep the joint of handpiece and the cable connector dry.
2.1.3 Instruction of using torque wrench (showed in 1.4.1 f).
a) The torque wrench's structure is designed in special way which can control the strength
of the scaling tip installation properly and correctly. It also can guarantee the operator screw
or unscrew the scaling tip effectively and keep their hands away from being scratched.
b) Operation: Take the scaling tip into the torque wrench, operate as showed in 1.4.1 f).
Tip installation: Hold the handpiece, turn the tip toward direction as showed in 1.4.1 f) with
the torque wrench. Turn one more circles when the tip stops, then the tip is installed.
Tip uninstallation: Hold the handpiece, turn the wrench toward anti-clockwise direction.
Sterilize it in sterilizer after each treatment. The torque wrench must be cooled naturally
after sterilization to avoid scalding when using next time.Keep the torque wrench in a cool,
dry and ventilated place and keep it clean.
2.1.4 Automatic water supply system(optional).
a) Usage: After adding enough water into the reservoir, install the reservoir cap on the
reservoir properly and tighten it up.
The twin tube is composed of two pipes. The big one is air pipe, and small one is water
pipe.Connect the air pipe to AIR connector on the reservoir, connect the water pipe to
H2O connector. Turn on the automatic water supply switch on the main unit.
b) Precaution: Please operate correctly according to the manual, the reservoir cap must
be tighten up. When adding or changing water, please pull out the air pipe first, then pull
out the water pipe.Under normal automatic water supply condition,the air pump produces
the WOO sound intermittently, which is common phenomenon.
2.2 Endo function
a) Usage process:
Fix endochuck to handpiece by endo wrench.(See 1.4.1 f)). Unscrew the screw cap on
the endochuck. Put the ultrasonic file into the hole in the front of endochuck. Screw down
the screw cap with endo wrench, to tight up the ultrasonic file. Press option key, turn to
endo function, then the indicator of endo function is on. When ultrasonic scaler turns into
endo function,only the first lead light is on and the power is at the first grade. Put the ultra-
sonic file into the patient's root canal slowly, step on the foot switch, then make endo treat-
ment. During the treatment, turn up the power gradually according to the needs.
2.PRODUCT FUNCTION AND OPERATION
VET PIEZO SCALER PS1
ENGLISH

10 11
3.1 Sterilization of detachable handpiece
3.1.1 Autoclaved to high temperature/pressure:
a) 121°C/1bar0.1MPa.
b) 135°C/2.2bar (0.22MPa).
c) Pull out the handpiece and unscrew the scaling tip and endochuck after each operation.
d) Pack the handpiece with sterile gauze or sterile bag before sterilizing.
e) Reuse handpiece after it cools naturally in case of scalding hand.
3.1.2 Notice
a) Clean the cleaning liquid in the handpiece by compressed air before sterilization.
b) Be sure that the scaling tip has been unscrewed from the handpiece and it cannot be
sterilized with others.
c) Please notice whether the outer of the handpiece is damaged during the treatment or
sterilization. Don't smear any protective oil on the surface of handpiece.
d) There are two waterproof orings at the end of handpiece.Please lubricate them with
dental lube frequently, as sterilization and repeated pulling and inserting will reduce their
life-span. Change a new one once it is damaged or worn excessively.
e) The following sterilizing methods are forbidden:
Put handpiece into any liquid for boiling.
Dip handpiece in disinfectors such as iodine , alcohol or glutaraldehyde.
Put handpiece into oven or microwave oven for baking.
3.2 Sterilization of tips endo wrench, endochuck
All the scaling tips and endochuck can be autoclaved to 135°C.
3.3 Sterilization of torque wrench and endo wrench
a) The torque wrench and endo wrench can be sterilized under high temperature and
pressure.
b) The following sterilization ways for torque wrench are forbidden:
Braise in liquor.
Dip in iodine, alcohol or glutaraldehyde.
Torrefy in oven or microwave oven.
Notice:
We are not responsible for any damage of the torque wrench directly or
indirectly made by any way in the above items.
3. STERILISATION AND MAINTENANCE
VET PIEZO SCALER PS1
3.4 Cleaning of tip, endochuck, torque wrench and endo wrench
Scaling tip, endochuck, torque wrench and endo wrench can be cleaned by ultrasonic cleaner.
3.5 Troubleshooting and notes
3.5.1 Troubleshooting
If the problem still can't be solved, please contact with local dealer or manufacturer.
3. STERILISATION AND MAINTENANCE
VET PIEZO SCALER PS1
FAULT POSSIBLE CAUSE SOLUTIONS
The power pipe plug is in loose contact
The foot switch is in loose contact Insert the foot switch to its socket tightly
Contact our dealers or us
Contact our dealers or us
Screw the tip on the handpiece tightly
(1.4.1 f))
Contact our dealers or us
Send it to our company to repair
Contact our dealers or us
Turn on the water control knob note 1
Contact our dealers or us
Clean the water pipe by
multi-function syringe note 2
Contact our dealers or us
Turn the water control knob
to a higher grade note 2
Make the water pressure higher
Clean the water pipe by
multi-function syringe note 2
Screw the tip on the handpiece
tightly (as showed in 1.4.1 f))
Screw on the tip tightly
(as showed in 1.4.1 f))
Dry it by the use of hot air
Change by a new one
Change it by a new "O" ring
Screw it tighly
Change it by a new one
Screw it tightly
Make the plug insert to the socket well
The fuse of transformer is broken
The fuse in the main unit is broken
The tip is in loose contact
The connect plug between the handpiece
and the circuit board is in loose contact
Something wrong with the handpiece
Something wrong with the cable
The water control knob is off
There is impurity in the
electric-magnetic valve
The water pipe is blocked
There is impurity in the
electric-magnetic valve
The water control knob is in
a low setting
The water pressure is not high enough
The water pipe is blocked
The tip hasn't been screwed
on to the handpiece tightly
The tip is shaken loose by vibration
The coupling between the handpiece
and the cable is wet
The tip is damaged note 3
The waterproof "O" ring is damaged
The screw cap hasn't been screw tightly
Endochuck is damaged
The screw cap hasn't been screw tightly
The scaling tip doesn't
vibrate and there’s no water
flowing out when stepping
on the foot switch
The scaling tip doesn't
vibrate but there is water
flowing out when stepping
on the foot switch.
The scaling tip vibrates but
there is no spray when
stepping on the foot switch.
There is still water flowing
out after the power is off.
The handpiece
The amount of spouting
water is too little
The vibration of the tip
becomes weak
Water seeping from the coupling
between handpiece and cable
The u-file doesn't vibrate
Noise coming
from the endochuck
ENGLISH
12 13
3.5.2 Notes
a) [Note 1]
The water control knob can adjust the water volume according to the symbol.
b) [Note 2]
Clean the water pipe with the multi-function syringe of the dental unit (as showed).
Cut the water pipe at a distance of 10cm~20cm from the water entrance.
Turn on the power switch.
Connect the multi-function syringe of dental unit to the water pipe.
Disassemble the tip or handpiece.
Step on the foot switch.
Turn on the switch of the multi-function syringe,press the water into the machine and the
impurity blocked in the water pipe can be eliminated.
c) [Note 3]
If the scaling tip has been screwed on tightly and there is fine spray too, the following phe-
nomena show that the scaling tip is damaged:
• The vibrating intens ity and the w ater atomization degree become weak obviously.
• During treatment, it produces the sound like buzzfrom the scaling tip.
3. STERILISATION AND MAINTENANCE
VET PIEZO SCALER PS1
4.1 Notice when using equipment
4.1.1 Keep the scaler clean before and after operation.
4.1.2 The handpiece, scaling tip, torque wrench, endo wrench and endochuck
must be sterilized before each treatment.
4.1.3 Don't screw the scaling tip and endochuck when stepping on the foot
switch.
4.1.4 The scaling tip must be fastened and there must be fine spray or drip
coming out form the tip when operating.
4.1.5 Change by a new one when the tip and ultrasonic file are damaged or
worn excessively.
4.1.6 Don't twist or rub the tip and endochuck.
4.1.7 Don't use impure water source and be sure not use normal brine
instead of pure water source.
4.1.8 If use the water source without hydraulic pressure, the water surface
should be one meter higher than the head of the patient.
4.1.9 Keep the connector of handpiece and the socket of the cable dry before
installing the handpiece.
4.1.10 Don't pull the cable forcibly in case of the handpiece falling off from
the cable.
4.1.11 Don't knock or rub the handpiece.
4.1.12 After operation, turn off the power, then pull out the plug.
4.1.13 We are only responsible for the safety on the following conditions:
The maintenance, repair and modification are made by the manufacturer or
the authorized dealer.The exchanged components are original of HENRY
SCHEIN INC. and operated according to instruction manual.
4.1.14 The internal screw thread of the scaling tips produced by some man-
ufacturers maybe coarse, rusty and collapsed.
This will damage the external screw thread of the handpiece irretrievably.
Please use HENRY SCHEIN brand scaling tips.
4. PRECAUTION
VET PIEZO SCALER PS1
Multi-function syringe
ENGLISH
14 15
4.2 Contraindication
4.2.1 The hemophilia disease patient is not allowed to use this equipment.
4.2.2 The patients or doctors with heart pacemaker are forbidden to use this
equipment.
4.2.3 The heart disease patient, pregnant woman and children should be
cautious to use the equipment.
4.3 Storage and maintenance
4.3.1 The equipment should be handled carefully and lightly. Be sure that it is
far from the vibration, and is installed or kept in a cool, dry and ventilated place.
4.3.2 Don't store the machine together with the articles that are combustible,
poisonous, caustic or explosive.
4.3.3 This equipment should be stored in a room where the relative humidity is
80%, atmospheric pressure is 50KPa to 106KPa, and the temperature is -10to +50.
4.3.4 If the machine is not used for a long time, please make it get through
the power and water once per month for five minutes.
4.4 Transportation
4.4.1 Excessive impact and shake should be prevented in transportation. Lay
it carefully and lightly and don't invert it.
4.4.2 Don't put it together with dangerous goods during transportation.
4.4.3 Avoid solarization and getting wet in rain or snow during transportation.
We offer one year's free repair to the equipment according to the warranty card.
The repair of the equipment should be carried out by Henry Schein or an accred-
ited repair centre/technician by Henry Schein. We are not responsible for any
irretrievable damage caused by a non-accredited repair centre/technician.
4. PRECAUTION
VET PIEZO SCALER PS1
Symbols you can find in the Vet Piezo Scaler device:
Socket for the foot switch Can be autoclaved
Adjustment for the water flow Electrical supply of 24V,5V(optional)
Air exit Water entrance pressure
Power switch Switch of automatic water supply
Product conforms with the standard of
ENISO 9001:2000, ENISO 13485:2003, EN 60601-1 , EN 60601-1-2.
There are no harmful factors in our product.You can deal with it based on the local law.
We reserve the right to change the design of the equipment, the technique, fittings, the
instruction manual and the content of the origin al packing list at any time without
notice. If there are some differences between blueprint and real equipment, take the
real equipment as the norm.
6. SYMBOL INSTRUCTION
VET PIEZO SCALER PS1
7. ENVIRONMENTAL PROTECTION
8. MANUFACTURER'SRIGHT
5. AFTER SERVICE
ENGLISH
VET PIEZO SCALER PS1
44 45
DEUTSCH
1.
ANSCHLIEßEN UND ZUBEHÖRTEILE DES GERÄTS
INHALT
1. Anschließen und Zubehörteile des Geräts 45
1.1 Anleitung ..............................................................................................45
1.2 Zubehörteile.........................................................................................45
1.3 Die wichtigsten technischen Spezifikationen.......................................46
1.4 Anschließen des Hauptzubehörs.........................................................47
2. Funktion und Bedienung des Geräts 50
2.1 Scale-Funktion .....................................................................................50
2.2 Endo-Funktion......................................................................................51
3. Sterilisieren und Wartung 52
3.1 Sterilisierung des abnehmbaren Handstücks ......................................52
3.2
Sterilisierung der Scale-Spitzen, des Endo-Schraubenschlüssels und des Endo-Bohrfutters
...52
3.3 Sterilisierung des Drehmomentschlüssels...........................................52
3.4
Reinigung der Spitzen, des Endo-Schraubenschlüssels und des Endo-Bohrfutters
...53
3.5 Fehlerbehebung und Hinweise ............................................................53
4. Vorsicht 55
4.1 Hinweise zum Gebrauch des Geräts ...................................................55
4.2 Kontraindikation ...................................................................................56
4.3 Lagerung und Wartung ........................................................................56
4.4 Transport ..............................................................................................56
5. Kundendienst 56
6. Zeichenerklärung 57
7. Umweltschutz 57
8. Rechte des Herstellers 57
1.1 Anleitung
Das Produkt wird hauptsächlich zum Reinigen von Zähnen benutzt und ist außerdem
unverzichtbar für die Vorbeugung und Behandlung von Zahnerkrankungen. Das neue
Produkt Vet Piezo Scaler verfügt über Scalen, Endo, automatisches Wasserversorgungs-
System (optional) und LED Funktionen (optional). Es beinhaltet die folgenden Eigenschaften:
1. Das automatische Verfolgen von Frequenzen stellt sicher, dass das Gerät immer im
besten Frequenzbereich und gleichmäßig arbeitet. Optionale Funktion: Automatisches
Wasserversorgungs-System. MAGENTA OUT?
2. Das Handstück ist abnehmbar und kann bis zu einer Maximaltemperatur von 135
Grad und 0,22 MPa Druck autoklaviert werden.
3. Digital gesteuerte, leichte Bedienung.
4. Die Aushärtelampe kann zusammen mit UDS-L benutzt werden und sich seiner
Ultraschallkraft für die Elektrizitätszufuhr der Aushärtelampe bedienen.
REMOVE?
1.2 Zubehörteile
1.2.1 Das folgende Zubehör sollte bei einem kompletten Vet Piezo Scaler PS1 enthalten sein:
Nummer
1
2
3
4
5
6
7
8
9
10
11
12
13
14
15
16
17
Beschreibung
Hauptgerät
Abnehmbares Handstück
Netzteil
Fußschalter
Scale-Spitze
Wasserleitung
Drehmomentschlüssel
Zierring Handstück
Wasserbeständiger O-Ring
Packliste
Bedienungsanleitung
Garantiekarte
Berechtigungszertifikat
Endo-Bohrfutter
Endo-Schraubenschlüssel
Reservoir ( optional)
Doppelschlauch ( optional)
Abmessung
190 x 125 x 60mm
18 x 117mm
120 x 75 x 65mm
100 x 62 x 36mm
/
6 x 4mm
32 x 39mm
17 x 15.4 x 2mm
3.2 x 1.1mm
/
/
/
/
/
/
800mL
1m
VET PIEZO SCALER PS1VET PIEZO SCALER PS1
46 47
DEUTSCH
1.
ANSCHLIEßEN UND ZUBEHÖRTEILE DES GERÄTS
1.4 Anschließen des Hauptzubehörs
1.4.1 Lageskizze zum Anschließen und Verbinden.
a) Lageskizze für die Frontblende und Rückblende des Hauptgeräts
The Vet Piezo Scaler PS1 Scale-Spitzen und ihr Zubehör sind nicht komplett in
dieser Bedienungsanleitung aufgeführt. Detaillierte Informationen hierüber find-
en Sie in den Begleitdokumenten und der Packliste, die das Gerät begleiten.
1.2.2 Produktleistung und -struktur: Der Ultraschall Piezo Scaler besteht aus einem
Elektrokreislauf für Wasser und einem Ultraschall-Messwertgeber.
1.2.3 Anwendungsbereich:
Der Vet Piezo scaler PS1 wird zum Entfernen von Zahnstein sowie für Wurzelkanal-
behandlungen verwendet.
1.3 Die wichtigsten technischen Spezifikationen
1.3.1 Technische Spezifikationen des Ultraschall Scalers
a. Eingang Leistungsquelle: 220V bis 230V~ 50Hz/60Hz 150mA
b. Eingang Hauptgerät: 24V~50Hz/60Hz 1.3A
5V~50Hz/60Hz 200mA (optional)
c. Ausgang Hauptspitze Vibrationsauslenkung: <100µm
d. Ausgang halbe Auslenkungskraft: <2N
e. Ausgang Spitzenvibrationsfrequenz 28kHz 3kHz
f. Ausgangsleistung: 3W bis 20W
g. Sicherung Hauptgerät: 250VT - 1.6AL
h. Sicherung Leistungsquelle: 250VT - 0.5AL
i. Wasserdruck: 0.1 bar bis 5 bar (0.01MPa bis 0.5MPa)
j. Gewicht Hauptgerät: 0.73kg
k. Gewicht Leistungsquelle: 1.2kg
l. Betriebsart: Dauerbetrieb
m. Art des Schutzes gegen Elektroschock: Klasse II
n. Grad des Schutzes gegen Elektroschock: Typ B Ausrüstung
o. Grad des Schutzes gegen gesundheitsgefährdenden Zufluss von üblichen
Wasseranlagen: (IPX0)
p. Schutzgrad gegen Wasser (Gebrauch am Fußschalter): IPX1
q. Sicherheitsgrad der Anwendung in Gegenwart von brennbaren, narkotischen Gemengen
mit Luft, Sauerstoff oder Lachgas, welches nicht geeignet ist für den Gebrauch in Gegenwart
von brennbaren narkotischen Gemengen mit Luft oder Sauerstoff oder Lachgas.
1.3.2 Arbeitsbedingungen
a. Umgebungstemperatur: 50C bis 400C
b. Umgebungstemperatur:<80%
c. Atmosphärischer Druck: 70KPa to106KPa
VET PIEZO SCALER PS1
1.
ANSCHLIEßEN UND ZUBEHÖRTEILE DES GERÄTS
VET PIEZO SCALER PS1
LED Anzeige Energieanzeige
Endo Anzeige
Scale Anzeige
Leistungsschalter heraufsetzen
Leistungsschalter heruntersetzen
Auswahlschalter
Buchse für Fußschalter
Halterung
Wasserkontrollknopf Buchse für Stromanschluss
Wassereingang Schalter für Stromanschluss
Luftausgang (optional) Schalter für automatische
Wasserversorgung (optional)

48 49
DEUTSCH
e) Lageskizze für die Verbindung zum abnehmbaren Handstück
f) Lageskizze zum Anschließen der Spitze und des Endo-Bohrfutters mit
Schraubenschlüssel
b) Lageskizze für die Verbindung mit dem Fußschalter, Stromanschluss und Hauptgerät
c) Lageskizze für die Verbindung mit dem Wasserversorgungssystem
d) Lageskizze für automatisches Wasserversorgungssystem (optional)
1.
ANSCHLIEßEN UND ZUBEHÖRTEILE DES GERÄTS
VET PIEZO SCALER PS1
Stecker Fußschalter Fußschalter Zierring Handstück
Stutzen Handstück
Spindel
Buchse Fußschalter
Stecker Fußschalter Netzteil
Eingangsspannung 220V bis 230V
Stecker Stromkabel
Buchse Stromanschluss
Stecker Stromkabel
Destilliertes Wasser onnect pure water Anschlusskappe
anschließen Wasserschlauch
Wassereingang Schalter für automatische
Wasserversorgung (optional)
Luftausgang (optional)
Wassereingang (klein) anschließen
Luftausgang (groß) anschließen
ð
ð
ð
ð
Wassereingang
Reservoir
Drehmomentschlüssel
1.
ANSCHLIEßEN UND ZUBEHÖRTEILE DES GERÄTS
VET PIEZO SCALER PS1
Handstück Kabelsteckverbindung
Nipple Handpiece
ð
ð
ð
ðð
ððð
Å
Å
Å
Handstück
Zierring Handstück Kabelsteckverbindung
Stutzen Kabel
Aufschrauben
AufschraubenAufschrauben
HandstückSpitze
Endo-Bohrfutter Endo-Schraubenschlüssel Feile

DEUTSCH
50 51
2.1 Scale Funktion
2.1.1 Bedienung
a) Öffnen Sie das Paket und stellen Sie anhand der Packliste sicher, dass alle Teile und Zubehör
vorhanden sind.Nehmen Sie das Hauptgerät aus dem Paket und stellen es auf eine stabile Fläche.
b) Drehen Sie den Wasserkontrollknopf anhand des Symbols auf Maximum, wie in 3.5.2
[Hinweis 1] gezeigt wird.
c) Stecken Sie den Stecker des Fußschalters in die dafür vorgesehene Buchse (1.4.1 b)).
d) Verbinden Sie ein Ende des Wasserschlauchs mit dem Wassereingang und das
andere Ende mit dem Anschluss für destilliertes Wasser (1.4.1 c)).
e) Schrauben Sie die Scale-Spitze mit Hilfe des Drehmomentschlüssels fest auf das
Handstück, dann verbinden Sie das Handstück und die Kabelsteckverbindung.
f) Verbinden Sie das Hauptgerät mit dem Ausgangsstecker der Stromquelle, dann
schließen Sie es an das Stromnetz an (1.4.1 b)).
g) Schalten Sie das Hauptgerät an, dann leuchten die Scale Anzeige und die ersten
fünf Anschlusslämpchen der Energieanzeige.
h) Wählen Sie eine geeignete Scale-Spitze für Ihren Bedarf aus, schrauben Sie sie
mithilfe des Drehmomentschlüssels fest auf das Handstück (1.4.1 f)).
i) Die Normalfrequenz ist extrem hoch. Im normalen Arbeitsbetrieb der Scale-Spitze
beseitigen eine schwache Berührung und eine bestimmte Hin- und Herbewegung den
Zahnstein ohne Aufheizen. Überanstrengung und langes Verweilen sind unzulässig.
j) Vibrationsintensität: Stellen Sie die Vibrationsintensität nach Ihrem Bedarf ein,
generell können Sie den Knopf mittig einstellen. Gemäß der unterschiedlichen
Empfindlichkeit der Patienten und der unterschiedlichen Härte des Zahnsteins können
Sie die Vibrationsintensität während der klinischen Behandlung anpassen.
k) Einstellen der Wassermenge: Treten Sie auf den Fußschalter, und die Spitze fängt
an, zu vibrieren. Dann drehen Sie den Wasserkontrollknopf auf feines Sprühen, um
das Handstück zu kühlen und die Zähne zu reinigen.
l) Das Handstück kann auf die gleiche Art und Weise wie ein Stift in der Hand gehalten werden.
m) Achten Sie während der klinischen Behandlung darauf, dass das Ende der Spitze
die Zähne nicht vertikal berührt und dass die Spitze auf die Zahnoberfläche nicht über-
mäßig einwirkt, was die Zähne verletzen und die Spitze beschädigen könnte.
n) Nach Abschluss der Behandlung lassen Sie das Gerät noch 30 Sekunden weiter im
Wasserversorgungsbetrieb laufen, um das Handstück und die Scale-Spitze zu reinigen.
o) Schrauben Sie die Scale-Spitze ab und ziehen sie aus dem Handstück, dann ster-
ilisieren Sie beides.
Bemerkung: Ziehen Sie das Handstück nicht heraus, wenn Sie den
Fußschalter betätigen und das Gerät läuft.
2.1.2 Anleitung für die Hauptkomponenten des abnehmbaren
Handstücks (gezeigt in 1.4.1 e))
a) Stutzen: Der Stutzen kann herausgenommen werden. Sie können den Stutzen
abschrauben und den Schaft mit Alkohol reinigen.
b) Zierring Handstück: Die Dichtung kann herausgenommen und mit Alkohol gereinigt werden.
2.
FUNKTION UND BEDIENUNG DES GERÄTS
VET PIEZO SCALER PS1
c) Handstück: Der Hauptteil des gesamten Handstücks kann unter hoher Temperatur und
Druck autoklaviert werden.
d) Kabelsteckverbindung: Schließen Sie das Handstück an die Wasserversorgung und
Energieversorgung des Hauptgeräts an.
Hinweis: Halten Sie das Anschlussstück des Handstücks und die Kabelsteck-
verbindung trocken.
2.1.3 Anleitung zur Benutzung des Drehmomentschlüssels (gezeigt in 1.4.1 f))
a) Die Struktur des Drehmomentschlüssels ist so angelegt, dass die Stärke des Einsetzens
der Scale-Spitze genau und richtig kontrolliert werden kann. Des Weiteren stellt der
Drehmomentschlüssel das effektive An- und Abschrauben der Scale-Spitze sicher und ver-
hindert, dass der Bediener sich Kratzer an den Händen zuzieht.
b) Bedienung:Setzen Sie die Scale-Spitze in den Drehmomentschlüssel, so wie es in 1.4.1 f) gezeigt
wird. Einsetzen der Spitze: Halten Sie das Handstück fest, drehen Sie die Spitze mit dem
Drehmomentschlüssel in die in 1.4.1 f) gezeigte Richtung. Drehen Sie noch eine Runde mehr, wenn
die Spitze anhält, dann ist die Spitze richtig eingesetzt. Entfernen der Spitze: Halten Sie das
Handstück fest, drehen Sie den Drehmomentschlüssel gegen den Uhrzeigersinn.Sterilisieren Sie ihn
nach jeder Behandlung im Sterilisator.Der Drehmomentschlüssel muss natürlich nach der
Sterilisierung gekühlt werden, umVerbrühungen beim nächsten Gebrauch zu vermeiden. Bewahren
Sie den Drehmomentschlüssel an einem kühlen, trockenen und belüfteten Ort sauber auf.
2.1.4 Automatisches Wasserversorgungssystem (optional)
a) Gebrauch: Nachdem Sie ausreichend Wasser ins Reservoir gefüllt haben, setzen Sie die
Reservoirkappe richtig auf das Reservoir und machen sie fest. Der Doppelschlauch besteht
aus zwei Leitungen. Die große ist die Luftleitung, sie kleine ist die Wasserleitung. Schließen
Sie die Luftleitung an die Luftverbindung des Reservoirs an und die Wasserleitung an die H2O
Verbindung. Stellen Sie am Hauptgerät die automatische Wasserversorgung an.
b) Vorsicht: Bitte bedienen Sie das Gerät richtig gemäß der Bedienungsanleitung, die
Reservoirkappe muss festgemacht werden. Wenn Sie Wasser hinzufügen oder auswech-
seln möchten, ziehen Sie bitte zuerst die Luftleitung heraus und danach die Wasserleitung.
Unter normalen Umständen der automatischen Wasserversorgung, macht die Luftpumpe
in gewissen Abständen ein WOO Geräusch, was eine alltägliche Erscheinung ist.
2.2 Endo-Funktion
a) Gebrauchsverlauf: Schrauben Sie das Endo-Bohrfutter mittels des Endo-
Schraubenschlüssels auf das Handstück (See 1.4.1 f)). Schrauben Sie die Schraubkappe des
Endo-Bohrfutters ab. Stecken Sie die Ultraschall-Feile in das Loch, welches sich vorne am Endo-
Bohrfutter befindet. Ziehen Sie die Schraubkappe mit dem Endo-Schraubenschlüssel an, um die
Ultraschall-Feile zu fixieren. Drücken Sie den Optionsschalter, drehen Sie auf Endo-Funktion,
dann ist die Endo-Funktionsanzeige an. Wenn der Ultraschall Scaler sich in Endo-Funktion
befindet, ist nur das erste Anschlusslicht an, und die Antriebsleistung befindet sich im ersten
Härtegrad. Führen Sie die Ultraschall-Feile langsam in den Wurzelkanal des Patienten ein, treten
Sie auf den Fußschalter, dann führen Sie die Endo-Behandlung durch. Passen Sie die
Antriebsleistung während der Behandlung gemäß Ihren Bedürfnissen an.
2.
FUNKTION UND BEDIENUNG DES GERÄTS
VET PIEZO SCALER PS1

DEUTSCH
52 53
3.1 Sterilisierung des abnehmbaren Handstücks
3.1.1 Autoklavieren bei hoher Temperatur/Druck:
a) 121°C/1bar 0.1MPa.
b) 135°C/2.2bar (0.22MPa).
c) Ziehen Sie das Handstück heraus und schrauben Sie nach jedem Gebrauch die Scale-
Spitze und das Endo-Bohrfutter ab.
d) Stecken Sie das Handstück vor dem Sterilisieren in sterile Gaze oder einen sterilen Beutel.
e) Verwenden Sie das Handstück erneut, nachdem es ausgekühlt ist, um Verbrühungen
der Hand zu vermeiden.
3.1.2 Hinweis
a) Reinigen Sie die Reinigungsflüssigkeit im Handstück vor dem Sterilisieren mittels Pressluft.
b) Stellen Sie sicher, dass die Scale-Spitze vom Handstück abgeschraubt wurde und dass
sie nicht mit anderen zusammen sterilisiert wird.
c) Bitte überprüfen Sie, ob das Handstück während der Behandlung oder Sterilisierung äußer-
lich beschädigt wurde.Reiben Sie die Oberfläche des Handstücks nicht mit Schutzöl ein.
d) Am Ende des Handstücks befinden sich zwei wasserfeste O-Ringe. Bitte fetten sie diese
öfters mit dentalem Schmieröl ein, da das Sterilisieren und wiederholtes Herausziehen und
Wiedereinsetzen ihre Lebensdauer verringert. Wechseln Sie die O-Ringe aus, wenn sie
beschädigt oder sehr abgenutzt sind.
e) Die folgenden Sterilisiermethoden sind unzulässig:
Das Handstück in irgendeine Flüssigkeit zum Kochen legen.
Das Handstück in Desinfektionsmittel, z. B. Jod, Alkohol oder Glutaraldehyd tauchen.
Das Handstück in Ofen oder Mikrowelle zum Backen legen.
3.2 Sterilisieren von Spitzen, Endo-Schraubenschlüssel,
Endo-Bohrfutter
Alle Scale-Spitzen und Endo-Bohrfutter können bis 135 Grad autoklaviert werden.
3.3 Sterilisierung von Drehmomentschlüssel und Endo-
Schraubenschlüssel
a) Der Drehmomentschlüssel und der Endo-Schraubenschlüssel können unter hohen
Temperaturen und Druck sterilisiert werden.
b) Die folgenden Sterilisationsmethoden sind für den Drehmomentschlüssel unzulässig:
In Flüssigkeit schmoren. In Jod, Alkohol oder Glutaraldehyd tauchen.
In Ofen oder Mikrowelle rösten.
Hinweis: Wir sind nicht verantwortlich für jegliche Beschädigungen des
Drehmomentschlüssels, die direkt oder indirekt durch obige Verfahrensweisen ent-
standen sind.
3. STERILISIEREN UND WARTUNG
VET PIEZO SCALER PS1
3.4
Reinigung von Spitzen, Endo-Bohrfutter, Drehmomentschlüssel und Endo-Schraubenschlüssel
Die Scale-Spitzen, Endo-Bohrfutter, Drehmomentschlüssel und Endo-Schraubenschlüssel können mittels Ultraschallreiniger gereinigt werden.
3.5 Fehlerbehebung und Bemerkungen
3.5.1 Fehlerbehebung
Falls das Problem immer noch nicht behoben werden kann, nehmen Sie bitte Kontakt zu Ihrem Händler oder Hersteller auf.
3. STERILISIEREN UND WARTUNG
VET PIEZO SCALER PS1
FEHLER MÖGLICHE URSACHE LÖSUNGEN
Der Netzstecker steckt nicht richtig
in der Steckdose
Der Fußschalter ist nicht richtig
eingesteckt Stecken Sie den Fußschalter richtig
in die Dose
Kontaktieren Sie uns oder
unsere Händler
Kontaktieren Sie uns oder
unsere Händler
Schrauben Sie die Spitze fest auf das
Handstück (1.4.1 f))
Kontaktieren Sie uns oder
unsere Händler
Senden Sie es zur Reparatur an uns
Kontaktieren Sie uns oder
unsere Händler
Wasserkontrollknopf einschalten,
Hinweis 1
Kontaktieren Sie uns oder
unsere Händler
Stellen Sie den Wasserkontrollknopf
höher ein, Hinweis 2
Kontaktieren Sie uns oder
unsere Händler
Stellen Sie den Wasserkontrollknopf
höher ein, Hinweis 2
Stellen Sie den Wasserdruck höher ein
Reinigen Sie die Wasserleitung mit Hilfe
der Multifunktions-spritze, Hinweis 2
Schrauben Sie die Spitze fest auf das
Handstück (wie in 1.4.1 f))
Schrauben Sie die Spitze fest
(wie in 1.4.1 f))
Mit Heißluft trocknen
Setzen Sie eine neue auf
Setzen Sie einen neuen O-Ring ein
Schrauben Sie die Kappe fest
Gegen ein neues auswechseln
Schrauben Sie die Kappe fest
Stecken Sie den Stecker richtig
in die Steckdose
Die Sicherung des Trafos ist kaputt
Die Sicherung des Hauptgeräts
ist kaputt
Die Spitze ist nicht richtig befestigt
Der Verbindungsstecker zwischen Handstück
und Platine ist nicht richtig eingesteckt
Handstück nicht in Ordnung
Kabel nicht in Ordnung
Der Wasserkontrollknopf ist
ausgeschaltet
Es befindet sich Schmutz
im Magnetventil
Die Wasserleitung ist blockiert
Es befindet sich Schmutz
im Magnetventil
Der Wasserkontrollknopf ist
niedrig eingestellt
Der Wasserdruck ist nicht hoch genug
Die Wasserleitung ist blockiert
Die Spitze wurde nicht fest auf das
Handstück geschraubt
Die Spitze hat sich durch die
Vibration gelöst
Die Kupplung zwischen Handstück
und Kabel ist nass
Die Spitze ist beschädigt, Hinweis 3
Der wasserbeständige O-Ring
ist beschädigt
Die Schraubkappe wurde nicht
fest angezogen
Endo-Bohrfutter ist beschädigt
Die Schraubkappe wurde nicht
fest angezogen
Die Scale-Spitze vibriert
nicht, und beim Betätigen
des Fußschalters fließt
kein Wasser heraus
Die Scale-Spitze vibriert
nicht, aber beim Betätigen
des Fußschalters fließt
Wasser heraus
Die Scale-Spitze vibriert,
aber beim Betätigen des
Fußschalters kommt kein
Sprühstrahl.
Nach dem Ausschalten fließt
immer noch Wasser heraus
Das Handstück generiert
Hitze
Der Wasserstrahl
ist zu klein
Die Vibration der Spitze
wird schwächer
Aus der Kupplung zwischen
Handstück und Kabel tritt Wasser aus
Die U-Feile vibriert nicht
Das Endo-Bohrfutter
macht Geräusche

DEUTSCH
54 55
3.5.2 Hinweise
a) [Hinweis 1]
Mit dem Wasserkontrollknopf lässt sich die Wassermenge gemäß dem Symbol einstellen.
b) [Hinweis 2]
Reinigen Sie die Wasserleitung mithilfe der Multifunktionsspritze (wie gezeigt wird).
Schneiden Sie die Wasserleitung ca. 10cm~20cm vom Wassereingang ab.
Schalten Sie den Netzschalter ein.
Verbinden Sie die Multifunktionsspritze der Dentaleinheit mit der Wasserleitung.
Bauen Sie die Spitze oder das Handstück auseinander.
Betätigen Sie den Fußschalter.
Schalten Sie die Multifunktionsspritze ein, pressen Sie Wasser in die Maschine, und der
Schmutz, der die Wasserleitung blockiert hat, kann entfernt werden.
c) [Hinweis 3]
Wenn die Scale-Spitze festgeschraubt wurde und auch ein feiner Sprühstrahl her-
auskommt, zeigen die folgenden Vorkommnisse, dass die Scale-Spitze beschädigt ist:
• Die Vibrationsintensität und die Wasserzerstäubung werden offensichtlich schwächer.
• Während der Behandlung macht die Scale-Spitze ein summendes Geräusch.
3. STERILISIEREN UND WARTUNG
VET PIEZO SCALER PS1
4.1 Hinweise zum Gebrauch des Geräts
4.1.1 Halten Sie den Scaler vor und nach dem Einsatz sauber.
4.1.2 Vor jeder Behandlung müssen die Scale-Spitze, der Drehmomentschlüssel,
das Endo-Bohrfutter und der Endo-Schraubenschlüssel sterilisiert werden.
4.1.3 Verschrauben Sie Scale-Spitze und Endo-Bohrfutter nicht, während Sie
den Fußschalter betätigen.
4.1.4 Die Scale-Spitze muss fest sitzen und ein feiner Sprühstrahl oder
Tröpfchen müssen während der Bedienung aus der Spitze kommen.
4.1.5 Bitte wechseln Sie die Spitze und Ultraschall-Feile aus, wenn diese
beschädigt oder extrem abgenutzt sind.
4.1.6 Verbiegen oder polieren Sie die Spitze und das Endo-Bohrfutter nicht.
4.1.7 Benutzen Sie kein unreines Wasser oder gewöhnliche Lauge anstelle
von destilliertem Wasser.
4.1.8 Wenn Sie eine Wasserquelle ohne Hydraulikdruck verwenden, sollte
die Wasseroberfläche einen Meter höher als der Kopf des Patienten sein.
4.1.9 Trocknen Sie die Handstücksteckverbindung und die Kabelbuchse,
bevor Sie das Handstück anschließen.
4.1.10 Ziehen Sie das Kabel nicht gewaltsam heraus, falls das Handstück
vom Kabel abfällt.
4.1.11 Werfen oder polieren Sie das Handstück nicht.
4.1.12 Nach der Behandlung stellen Sie zuerst das Gerät aus, bevor Sie den
Stecker herausziehen.
4.1.13 Wir sind nur für die Sicherheit im Falle von folgenden Umständen verant-
wortlich: Wartung, Reparaturarbeiten und Veränderungen wurden vom Hersteller
oder autorisierten Händler durchgeführt. Die ausgetauschten Komponenten sind
original Teile und wurden gemäß der Bedienungsanleitung benutzt.
4.1.14 Das Innengewinde der Scale-Spitzen von einigen Herstellern könnte
ungeschliffen, rostig oder brüchig sein. Dies führt zu irreversiblen Schäden
am Außengewinde des Handstücks. Bitte benutzen Sie daher Scale-Spitzen
der Marke HENRY SCHEIN oder BA International.
4. VORSICHT
VET PIEZO SCALER PS1
Multifunktionsspritze

DEUTSCH
56 57
4.2 Kontraindikation
4.2.1 Dieses Gerät darf nicht an Bluter-Patienten angewandt werden.
4.2.2 Patienten oder Ärzte mit Herzschrittmachern dürfen dieses Gerät nicht verwenden.
4.2.3 Dieses Gerät sollte vorsichtig im Falle von herzkranken Patienten,
schwangeren Frauen und Kindern benutzt werden.
4.3 Lagerung und Wartung
4.3.1 Dieses Gerät sollte vorsichtig benutzt werden. Bewahren Sie es außer-
halb von Vibrationen, entweder angeschlossen oder an einem kühlen, trocke-
nen und belüfteten Ort auf.
4.3.2 Lagern Sie das Gerät nicht zusammen mit brennbaren, giftigen, ätzen-
den oder explosiven Stoffen.
4.3.3 Dieses Gerät sollte an einem Ort mit einer relativen Luftfeuchtigkeit von 80%,
atmosphärischem Druck von 50KPa bis 106KPa, und einer Temperatur von -10 bis
+50 Grad aufbewahrt werden.
4.3.4 Falls das Gerät für längere Zeit nicht benutzt wird, schließen Sie es
bitte ein Mal im Monat für fünf Minuten an Strom und Wasser an.
4.4 Transport
4.4.1 Während des Transports sollten übermäßige Schläge und Schütteln ver-
mieden werden. Legen Sie es vorsichtig hin und lagern Sie es nicht auf dem kopf.
4.4.2 Transportieren Sie das Gerät nicht zusammen mit Gefahrgütern.
4.4.3 Vermeiden Sie während des Transports Sonneneinstrahlung und
Feuchtigkeit durch Regen oder Schnee.
Gemäß der Garantiekarte bieten wir ein Jahr gratis Reparaturen für dieses
Gerät an. Reparaturen am Gerät sollten durch unseren Fachtechniker durchge-
führt werden. Wir sind nicht verantwortlich für irreversible Schäden, die durch
Nicht-Fachleute hervorgerufen wurden. NEW?
4. VORSICHT
VET PIEZO SCALER PS1
Folgende Symbole finden sie für das Gerät:
Dose für Fußschalter Autoklavierbar
Einstellung des Wasserstrahls
Verbindung zur Stromversorgung 24V,5V(optional)
Abluft Wassereingangsdruck
Netzschalter Schalter für Wasser
Produkt entspricht den Normen
ENISO 9001:2000, ENISO 13485:2003, EN 60601-1 , EN 60601-1-2.
Unser Produkt enthält keine umweltschädlichen Bestandteile. Sie können es gemäß
den örtlichen Gesetzen verwenden.
Wir behalten uns vor, das Design des Geräts, die Technik, Anschlüsse, die
Bedienungsanleitung und den Inhalt der original Packliste jederzeit ohne vorherige
Ankündigung zu ändern. Im Falle von Unterschieden zwischen technischer Zeichnung
und reellem Produkt sehen Sie bitte das reelle Produkt als Standard an.
6. ZEICHENERKLÄRUNG
VET PIEZO SCALER PS1
7. UMWELTSCHUTZ
8. RECHTE DES HERSTELLERS
5. KUNDENDIENST
VET PIEZO SCALER PS1
Table of contents
Languages:


