Hensel PT 350 User manual

INHALT
BEDIENELEMENTE
VORSICHTSMASSNAHMEN
MONTAGE
TECHNISCHE DATEN
GARANTIESCHEIN
GARANTIE
2
2
2
3
4
4
CONTENT
CONTROLS
SAFETY WARNINGS
INSTALLATION
TECHNICAL DATA
WARRANTY
ACCEPTANCE TEST CERTIFICATE
TABLES DES MATIÈRES
CONTRÔLES
MESURES DE SÉCURITÉ
INSTALLATION
CARACTÉRISTIQUES TECHNIQUES
GARANTIE
CERTIFICAT DE GARANTIE
PT 350
BEDIENUNGSANLEITUNG
OPERATING INSTRUCTIONS
NOTICE D'UTILISATION
2
2
2
3
4
4
2
2
2
3
4
4

Temperatureinstellknopf
Temperaturskala
Spannungsversorgung LED-Anzeige
Heizung LED-Anzeige
1
2
3
4
BEDIENELEMENTE
CONTROLS
CONTRÔLES
1
2
3
temperature setting dial
temperature scale
power supply LED
heating indication LED
45413733
29
21
17
PWR HEAT
13 9 5
25
4
1
2
3
4
cadran de réglage de la température
échelle de température
LED d'alimentation
LED indication de chauffage
1
2
3
4
MONTAGE
INSTALLATION
INSTALLATION
BefestigenSiedenThermostatPT350aneinemfürdieInstallationgeeignetenPlatz(z.B.inderNähederHeizung).
NachderInstallationunddemInstallationstestderHeizungkönnenSiediesedirektandenRegleranschließen.
DieSpannungsversorgungdesThermostatsmussmiteinerSicherungundeinemFI-SchutzschalterentsprechenddereinschlägigenNormenversehensein.
1.InstallierenSiedenThermostat
2.SchließenSiedenTemperatursensoran
3.SchließenSiedenHeizkreisan
4.SchließenSiedenThermostatandieSpannungsversorgungan
5.StellenSiediegewünschteTemperaturmitHilfederSkalaein
6.ÜberprüfenSieIhreInstallation
7.SchaltenSiedieSpannungsversorgungein
8.DerThermostathatzweiSignalLED:
DiegrüneLEDleuchtet=IhrSystemisteingeschaltet,aberdieHeizungistaus(diegemesseneTemperaturisthöheralsdievonIhnen
eingestellteTemperatur)
DieroteLEDleuchtet=DieHeizungisteingeschaltet(eingestellteTemperaturwurdeunterschritten)
BittevermeidenSiewennmöglichLeitungseinführungenaufderOberseitedesPT350Gehäuses.DurchstechenSiediebeigelegten
Leitungseinführungennurleicht miteinemkleinenWerkzeug,umeineoptimaleAbdichtungzuerreichen.
BitteachtenSiebeimEinbauderKabeleinführungsstutzen (DurchstoßenderGehäusewandandenperforiertenEinführungen)darauf
dieLeiterplattenichtzubeschädigen!!
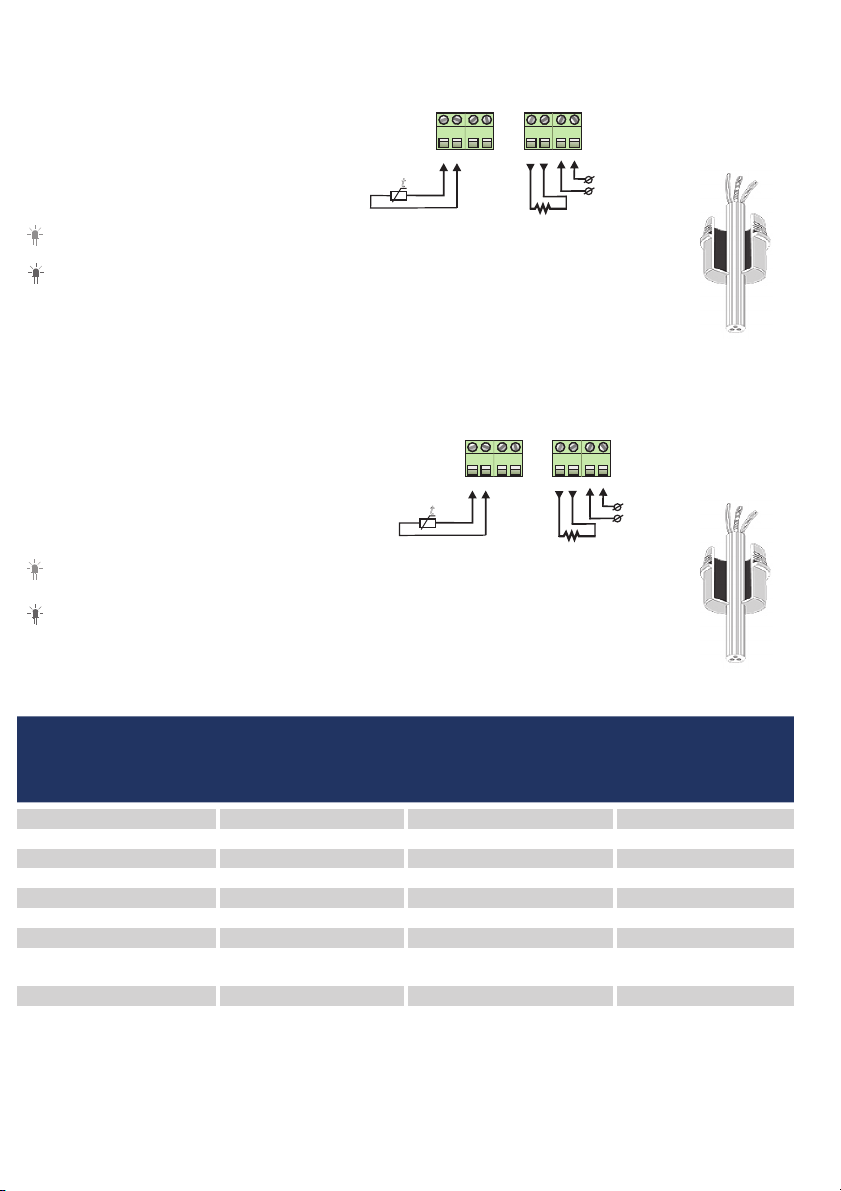
t
S1 LS2 NPE NPE L
Sensor
Last (Heizung)
230 VAC
Die Installation ist ausschließlich durch eine Elektrofachkraft sorgfältig nach den Regeln DIN-VDE auszuführen. Andernfalls erlischt die Garantie. Trennen
Sie die Leitungen von der Spannung bevor Sie einen Thermostat installieren, überprüfen oder austauschen.
VORSICHTSMASSNAHMEN
Only qualified electricians are allowed to work on electrical connections and the electric supply of the device according to national laws and regulations.
Otherwisethewarrantyinvalidates.Switchoffpowerfromallwiringbeforeinstalling,testingorreplacingthethermostat.
SAFETY WARNINGS
Seuls des électriciens spécialisés sont autorisés à effectuer l'installation conformément aux normes DIN-VDE. Dans le cas contraire, la garantie ne sera plus
valable.Coupezl'alimentationdetouslescâblesavantd'installer,detesterouderemplacerlethermostat.
MESURES DE SÉCURITÉ
Install the thermostat PT350 in a place suitable for installation (e.g. near the heater / radiator). After installation and the installation test of the heater / radiator you
canconnectitdirectlytothePT350.
Thepowersupplyofthethermostathastobeequippedwithacircuitbreakerandagroundfaultcircuitbreakerinaccordancetothelatestvalidregulations.
1.Installthethermostat
2.Connectthetemperaturesensor
3.Connecttheheatingsection
4.Connectthethermostattothepowersupply
5.Setthedesiredtemperatureviathescale
6.Checktheinstallation
7.Switchonthepowersupply
8.ThethermostathastwosignalLED‘s(lightemittingdiodes):
ThegreenLEDisactive=yoursystemisswitchedONbuttheheaterisOFF.Themeasuredtemperatureishigherthanthe set
temperature.
TheredLEDisactive=theheater/radiatorisswitchedON.Themeasuredtemperatureisbelowthesettemperature.
PleaseavoidinstallingthegrommetsonthetopsideofthePT350.Sligthlypiercethecablegrommetwithasmallscrewdriverinorder
toattainanoptimalsealing.
Donotdamagetheelectroniccircuitboardwhenpiercingthehousingcasingontheperforationsorwheninstallingthecablegrommet!
Spannung
Max. Stromstärke
Gewicht
Abmessungen
Sensor (TST02)
Länge Anschlussleitung Sensor
Temperatureinstellbereich
Umgebungstemperaturbereich
IP Schutz
230VAC, 50Hz
16 A
250 g
90x90x50 mm
NTC 6,8 kOhm
2 m
+5 ° .....+45 °
+5 ° .....+40 °
IP 55
С С
С С
TECHNISCHE DATEN
TECHNICAL DATA
CARACTÉRISTIQUES TECHNIQUES
Power supply
Maximum load current
Temperature setting range
Operation temperature range
Weight
Dimensions
Floor temperature sensor (TST02)
Sensor cold lead length
IP rate
Tension
Courant max.
Plage de réglage de la température
Plage de température ambiante
Poids
Dimensions
Capteur de sol (TST02)
Longueur du câble d'alimentation du
capteur
Protection IP
Load (heating)
Installez le thermostat PT350 dans un endroit approprié pour l'installation (par exemple à proximité du chauffage ou du radiateur). Après l'installation et le test
d'installationduradiateur,vouspouvezleconnecterdirectementauPT350.
L'alimentationduthermostatdoitêtreéquipéed'undisjoncteuretd'undisjoncteurdemiseàlaterreconformémentauxdernièresréglementationsenvigueur.
1.Installezlethermostat
2.Connectezlecapteurdetempérature
3.Connectezlasectiondechauffage
4.Connectezlethermostatàl'alimentation
5.Réglezlatempératuredésiréeàl'aidedel'échelle
6.Vérifiezl'installation
7.Allumezl'alimentation
8.LethermostatdisposededeuxLEDs(diodesélectroluminescentes):
LaLEDverteestactive=votresystèmeestallumémaislechauffageestOFF.Latempératuremesuréeestsupérieureàla
températureréglée.
LaLEDrougeestactive=lechauffage/radiateurestmisenmarche.Latempératuremesuréeestinférieureàlatempératureréglée.
Veuillezéviterd'installerlesœilletssurlafacesupérieureduPT350.Percezlégèrementlepasse-câbleavecunpetittournevisafin
d'obteniruneétanchéitéoptimale.
Nepasendommagerlacartedecircuitimprimélorsduperçageduboîtierélectroniquesurlesperforationsoueninstallantlepasse-fil!
Capteur
Charge (chauffage)
t
S1 LS2 NPE NPE L
230 VAC
t
S1 LS2 NPE NPE L
Sensor
230 VAC

GARANTIE
WARRANTY
GARANTIE
GARANTIESCHEIN
ACCEPTANCE TEST CERTIFICATE
CERTIFICAT DE GARANTIE
Der Thermostat hat alle Tests erfolgreich bestanden.PT 350
The thermostat has passed all the tests.PT 350
Le thermostat a répondu aux exigences de tous les tests requis.PT 350
Name / Name / Nom:
Straße / Street / Rue:
Postleitzahl, Stadt / Postal Code, City / Code postal, ville:
Land / Country / Pays:
Te
Kaufdatum / Purchase Date / Date d'achat: Installateur / Installer / Installateur:
Installationsdatum / Installation Date / Date d'installation: Unterschrift / Signature / Signature:
l / Tel / Tél: E-Mail / e-mail / E-mail:
Der Hersteller garantiert die Übereinstimmung des Thermostates mit der Konstruktionsbeschreibung unter der Annahme der Beachtung der Montage- und
Betriebsanleitung.
Tritt innerhalb des Garantiezeitraums ein Mangel auf, des auf eine fehlerhafte Herstellung zurück zu führen ist, so hat der Kunde das Recht auf Nacherfüllung.
Schäden aufgrund unsachgemäßer Handhabung, Beschädigung durch Fremdverschulden, falscher Installation (nicht der Anleitung folgend) oder deren
Folgeschäden, sind von der Garantie ausgenommen. Bitte bewahren Sie Ihren Kaufbeleg auf.
Garantiezeitraum–2Jahre ab Kaufdatum.
Garantieleistungen werden nur gegen Vorlage des Kaufbelegs
erbracht.
The manufacturer guarantees the conformity of the thermostat with the design description, assuming compliance with the assembly and operating
instructions.
In case of a failure during guarantee period casued by a manufacturing defect, the customer has the right to supplementary performance. The warranty does
not cover any damages due to inadequate handling, damages through a third party, wrong installation (not following the manual) or its consequential
damages.Pleasekeepyourreceipt.
Warrantyperiod–2 years from date of purchase.
Foranywarranty claims you have to show your sales receipt.
Le fabricant garantit que le thermostat est conforme à la description de sa construction, à condition que les instructions de montage et de service soient
respectées.
En cas de défaut survenant durant la période de garantie, dû à un vice de fabrication, le client a droit à une exécution ultérieure. Sont exclus de la garantie
tous les dommages causés par un maniement impropre, par la faute de tiers, par une installation incorrecte (non conforme aux instructions) ou les
dommages consécutifs.
Garantie de 2 ans à partir de la date d'achat.
Veuillez conserver votre preuve d'achat, les prestations de garantie n'étant accordées que sur présentation de cette
preuve.
INST-0025-PT350-UH-230617


