HER CHEE SS-50 User manual

SERVICE MANUAL
SS-50/100
March, 2008
High Power Engine
HER CHEE INDUSTRIAL CO., LTD.

Preface
The Service Manual in reference is provided as the technical information for
checking and preparation of ADLY SS-50/100 scooter and the edit description is
given in diagrams with " Operation Sequence ", " Highlights " and " Checking
Arrangement " for reference of the service staffs.
The information, illustrations or contents included in this manual may be
different with the actual scooter in case specifications are changed. Your
understanding will be appreciated.
HER CHEE INDUSTRIAL CO., LTD.

I N D E X
Information of preparation 1
CheckandAdjust 2
Engine-
InstallationofLubricant
3
FuelInstallation 4
Engine dismounting/disassembling 5
Cylinder head, Cylinder and Piston 6
Starter / Driving Disc / Clutch / Transmission 7
FinalTransmissionMechanism 8
Crankcase, Crankshaft and Transmission box 9
Chassis-
Frontwheel,Brake,Suspension 10
Rear heel, Brake, Suspension
11
Electricaldevices 12
Wiringdiagram 13
ADLY MOTO 1-1
INFORMATION FOR PREPARATION
Attention on Operation
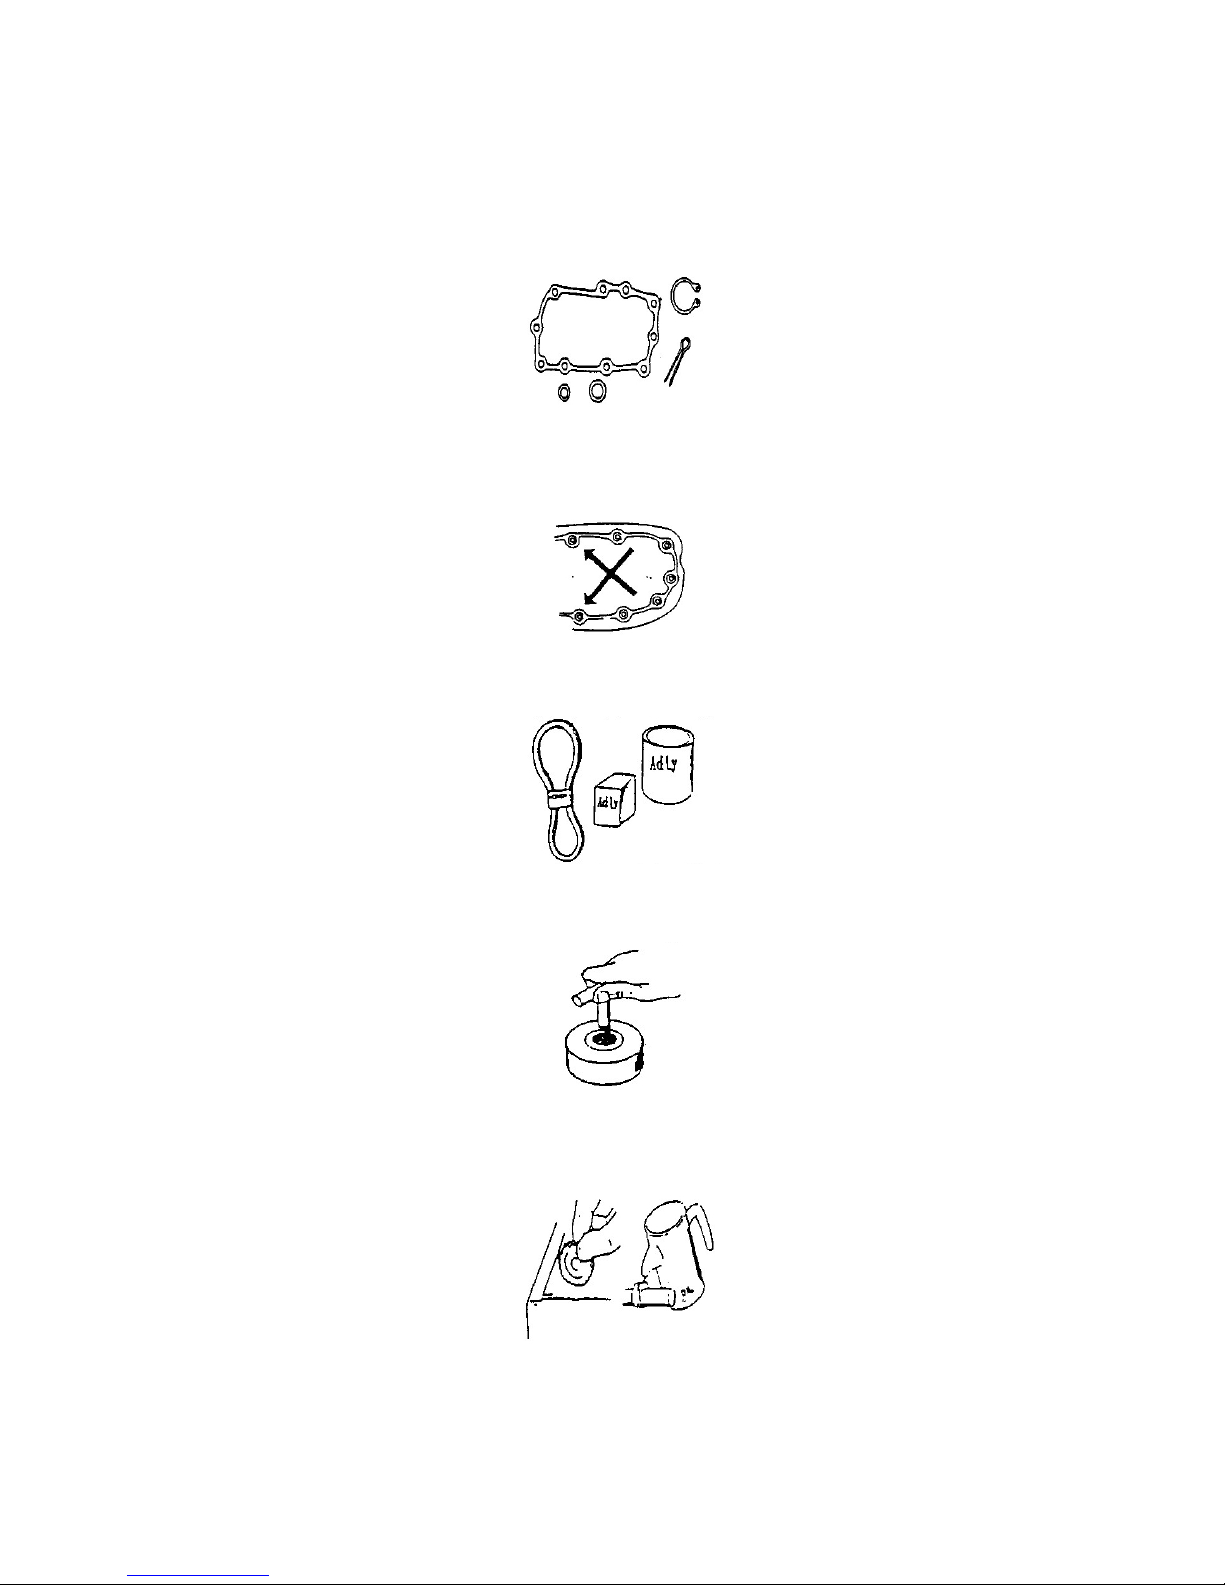
zAll washers, oil rings, clamp rings, opening pins shall be duly replaced by a new item
when dismounted.
zLocking of all screws, nuts, cross screws shall be performed in the order of first the large
screws and then the small ones and from inside to outside in opposite angles by tightening
the torque locks.
zAll items must use original parts, pure oil and greases.
zAll service shall use special tools and general tools to repair.
zAll dismounted items requiring for checks shall be duly cleaned and for assembly, all
items shall be duly lubricated.

ADLY MOTO 1-2
INFORMATION FOR PREPARATION
Attention on Operation
zCertified lubricants in cans shall be used on all the elements to be lubricated.
zAfter assembly, performance of all elements shall be duly checked and the locking shall
be duly verified.
zIn case of an operation is performed by over 2 people, the assignment shall be conducted
in coordination and safety shall be the first priority.
zDefinition of signs:
The sign given in the Service Manual shall refer to the operation methods and observation.
OIL: Lubrication by designated lubricant.
GREASE:Lubrication by grease
Special Tool: Parts on which special tools shall be used
General Tool: General tools shall be used
New: Replace by new items after dismounting
Attention
Dangerous and important operations
ADLY MOTO 1-3
INFORMATION FOR PREPARATION
SPECIFICATION
TYPE SS-50Ⅰ/Ⅱ SS-100Ⅰ/Ⅱ
LENGTH 1780 mm 1780 mm
WIDTH 675 mm 675 mm
HEIGHT 1160 mm 1160 mm
WHEEL BASE 1250 mm 1250 mm
NET WEIGHT 75 kg 75 kg
ENGINE TYPE 4-STROKE, Single Cylinder 4-STROKE, Single Cylinder
COOLING AIR COOLED AIR COOLED
DISPLACEMENT 49.26 C.C. 95.57 C.C.
BORE×STROKE 40.0×39.2 52×45
COMPRESSION RATIO 7.2:1 5.8:1
IGNITION C.D.I C.D.I
STARTER ELECTRIC / KICK ELECTRIC / KICK
SUSPENSION Hydraulic Shock Absorber Hydraulic Shock Absorber
TRANSMISSION AUTOMATIC AUTOMATIC
SS (Ⅰ) 120/70-12 (Front & Rear) 120/70-12 (Front & Rear)
TIRE
FRONT/REAR SS (Ⅱ) 120/70-12 120/70-12
SS (Ⅰ) Disc Disc
FRONT BRAKE SS (Ⅱ) Double Disc Double Disc
REAR BRAKE Drum Drum
MAX. POWER 2.8Kw / 5500 rpm 5.26kw / 7000 rpm
MAX. TORQUE 4.75N-m / 5500 rpm 7.4N-m / 6500rpm

ADLY MOTO 1-4
INFORMATION FOR PREPARATION
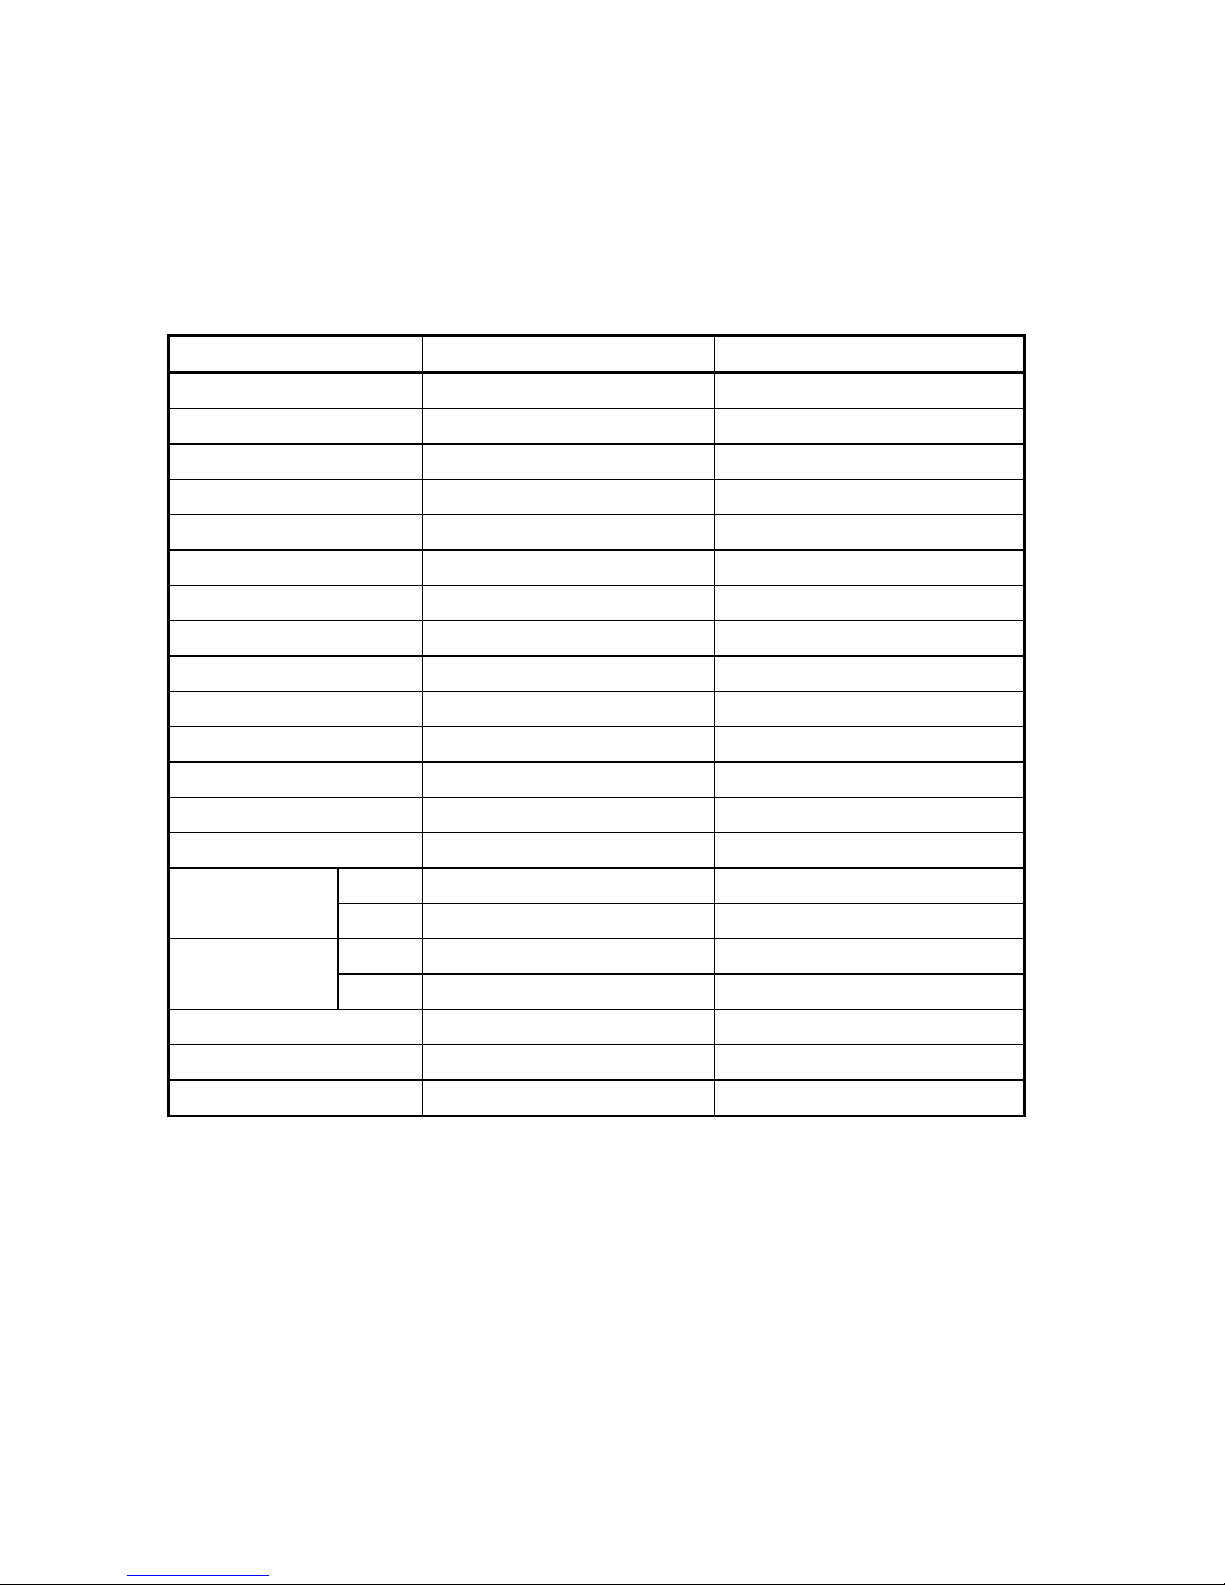
LOCKING TORQUE
Adopt the standard torque locking for the item unlisted.
STANDARD TORQUE:
Type Locking Torque (kg-m)
5 mm Screw 0.4
6 mm Screw 1.0
6 mm Hex Washer Face Bolt / Nut 1.2
8 mm Hex Washer Face Bolt / Nut 2.7
10 mm Hex Washer Face Bolt / Nut 4.0
CHASSIS:
Locking Place Quantity Dia. (mm) Locking Torque (kg-m)
Spanner Nut of Handle Steering Steam 1 25 7.0
Front Wheel Axle Nut 1 10 4.5
Rear Axle Nut 1 14 11
Rear Brake Arm Screw 1 5 0.6
Upper Screw of Rear Shock Absorber 1 10 4.0
Lower Screw of Rear Shock Absorber 1 8 2.7
Engine Mounting Bracket 1 8 6.0
ENGINE:
Locking Place Quantity Dia. (mm) Locking Torque (kg-m)
Screw of Cylinder Cap 4 6 1.0
Flywheel Nut 1 10 3.8
Clutch Jacket Nut 1 11 3.8
Driving Disc Nut 1 28 5.5
Nut of Transmission Disc 1 10 3.8
Oil-check Screw 1 8 1.3
Joint Screw of Exhaust Manifold 2 6 1.2
Exhaust Pipe Support Screw of Muffler 2 6 1.2
Spark Plug 1 14 1.4
Bolt of Crank Shaft Case 6 6 10
Bolt of Engine Installation 1 8 5.0
ADLY MOTO 1-5
INFORMATION FOR PREPARATION
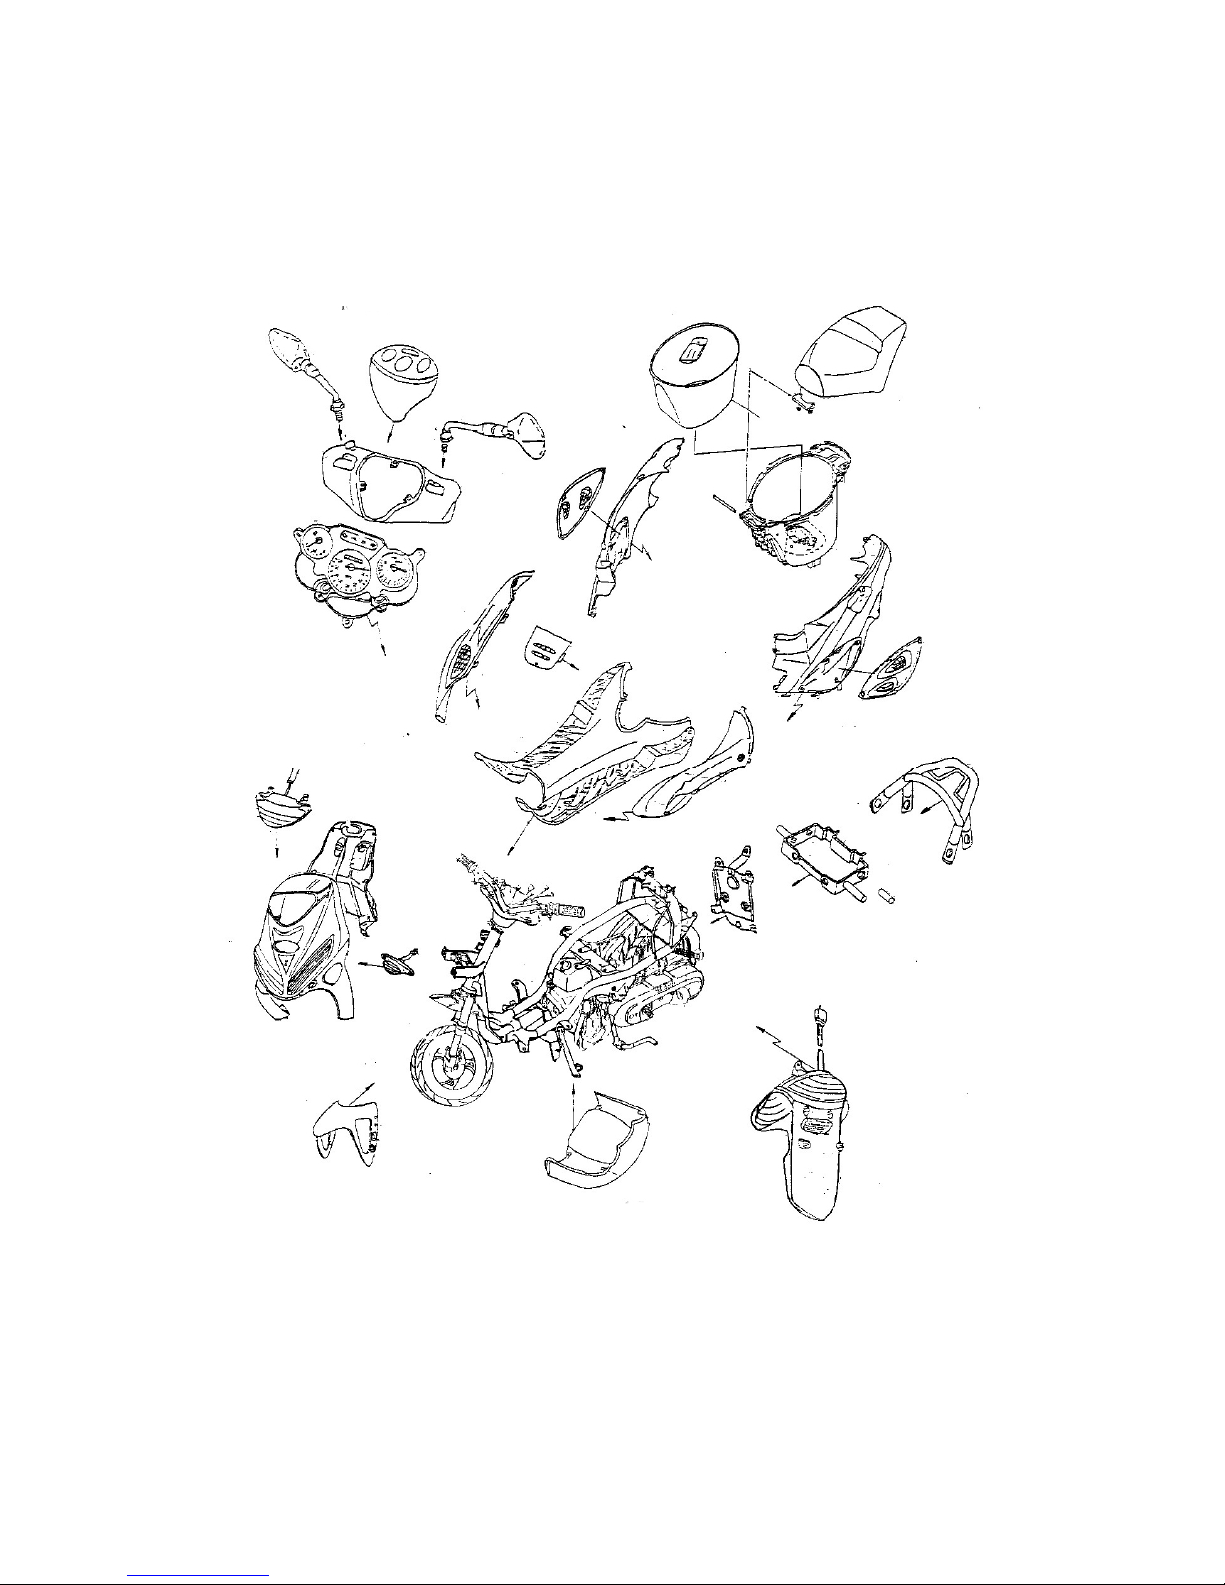
The following drawing that shows the disassembling situation of the cover parts
for SS50/100 scuuter.

ADLY MOTO 1-7
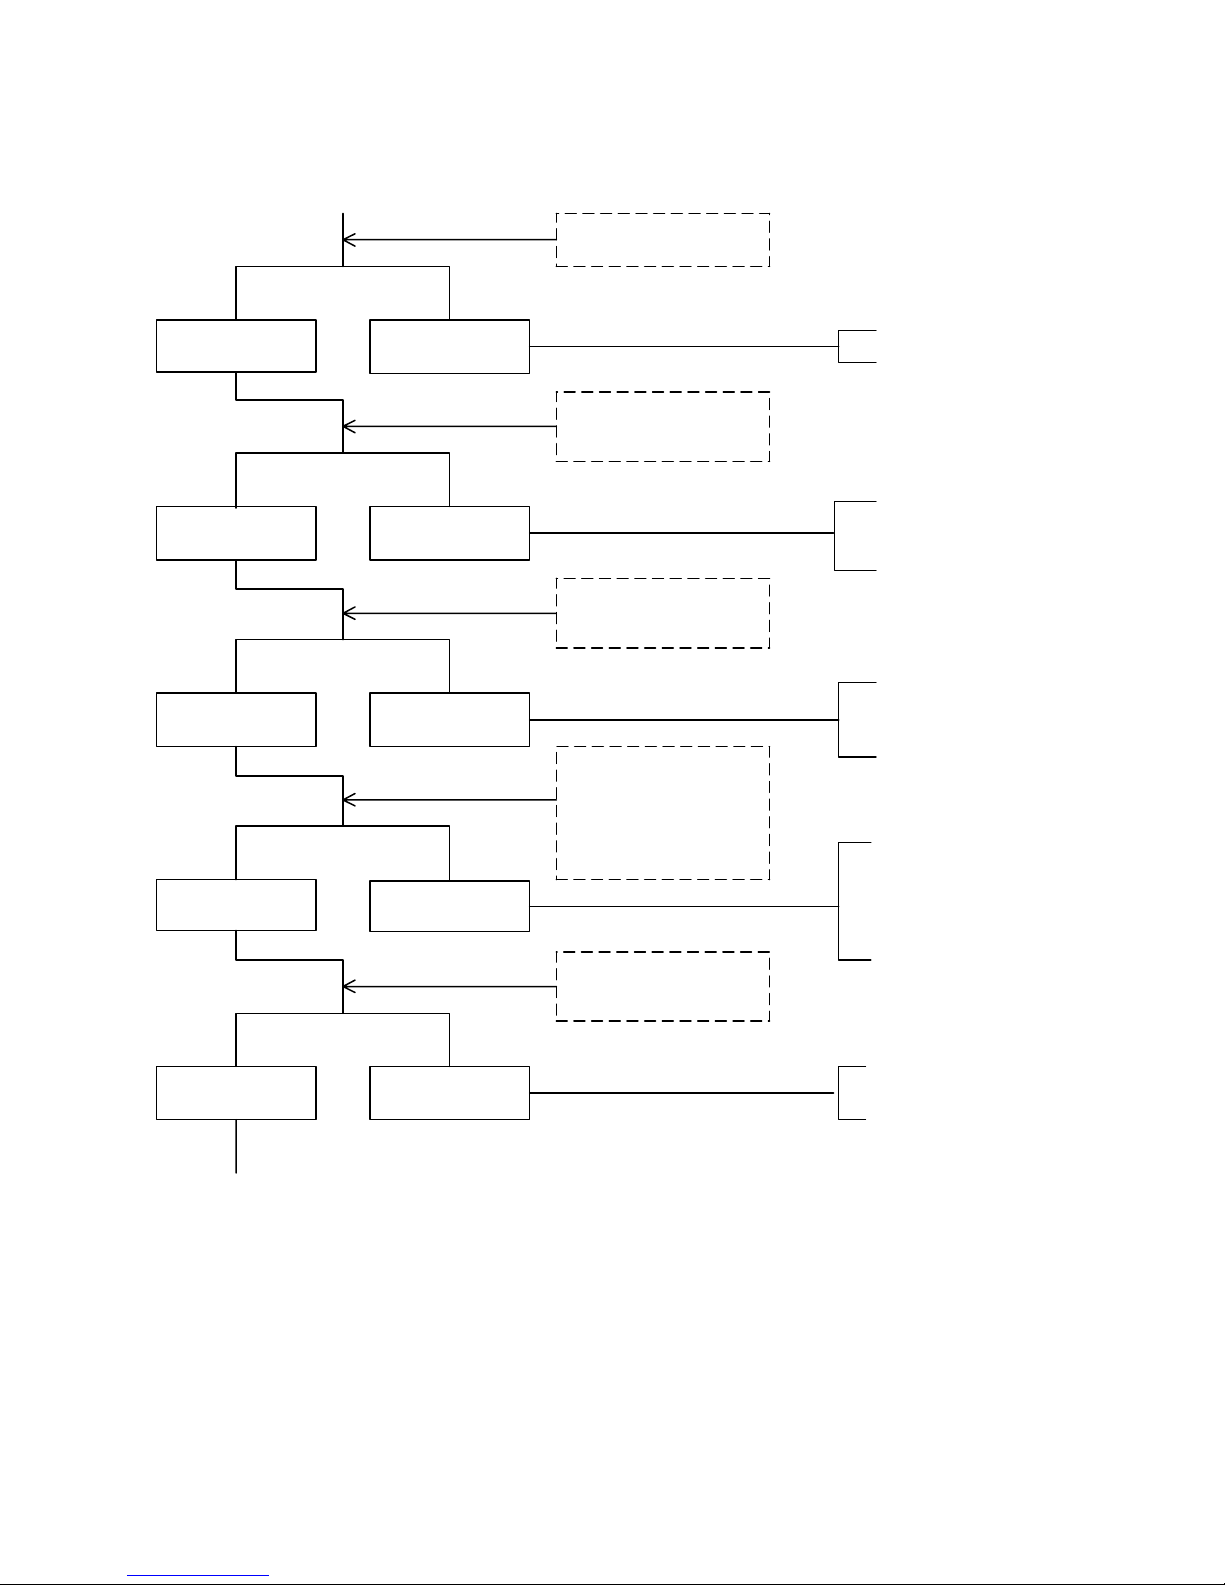
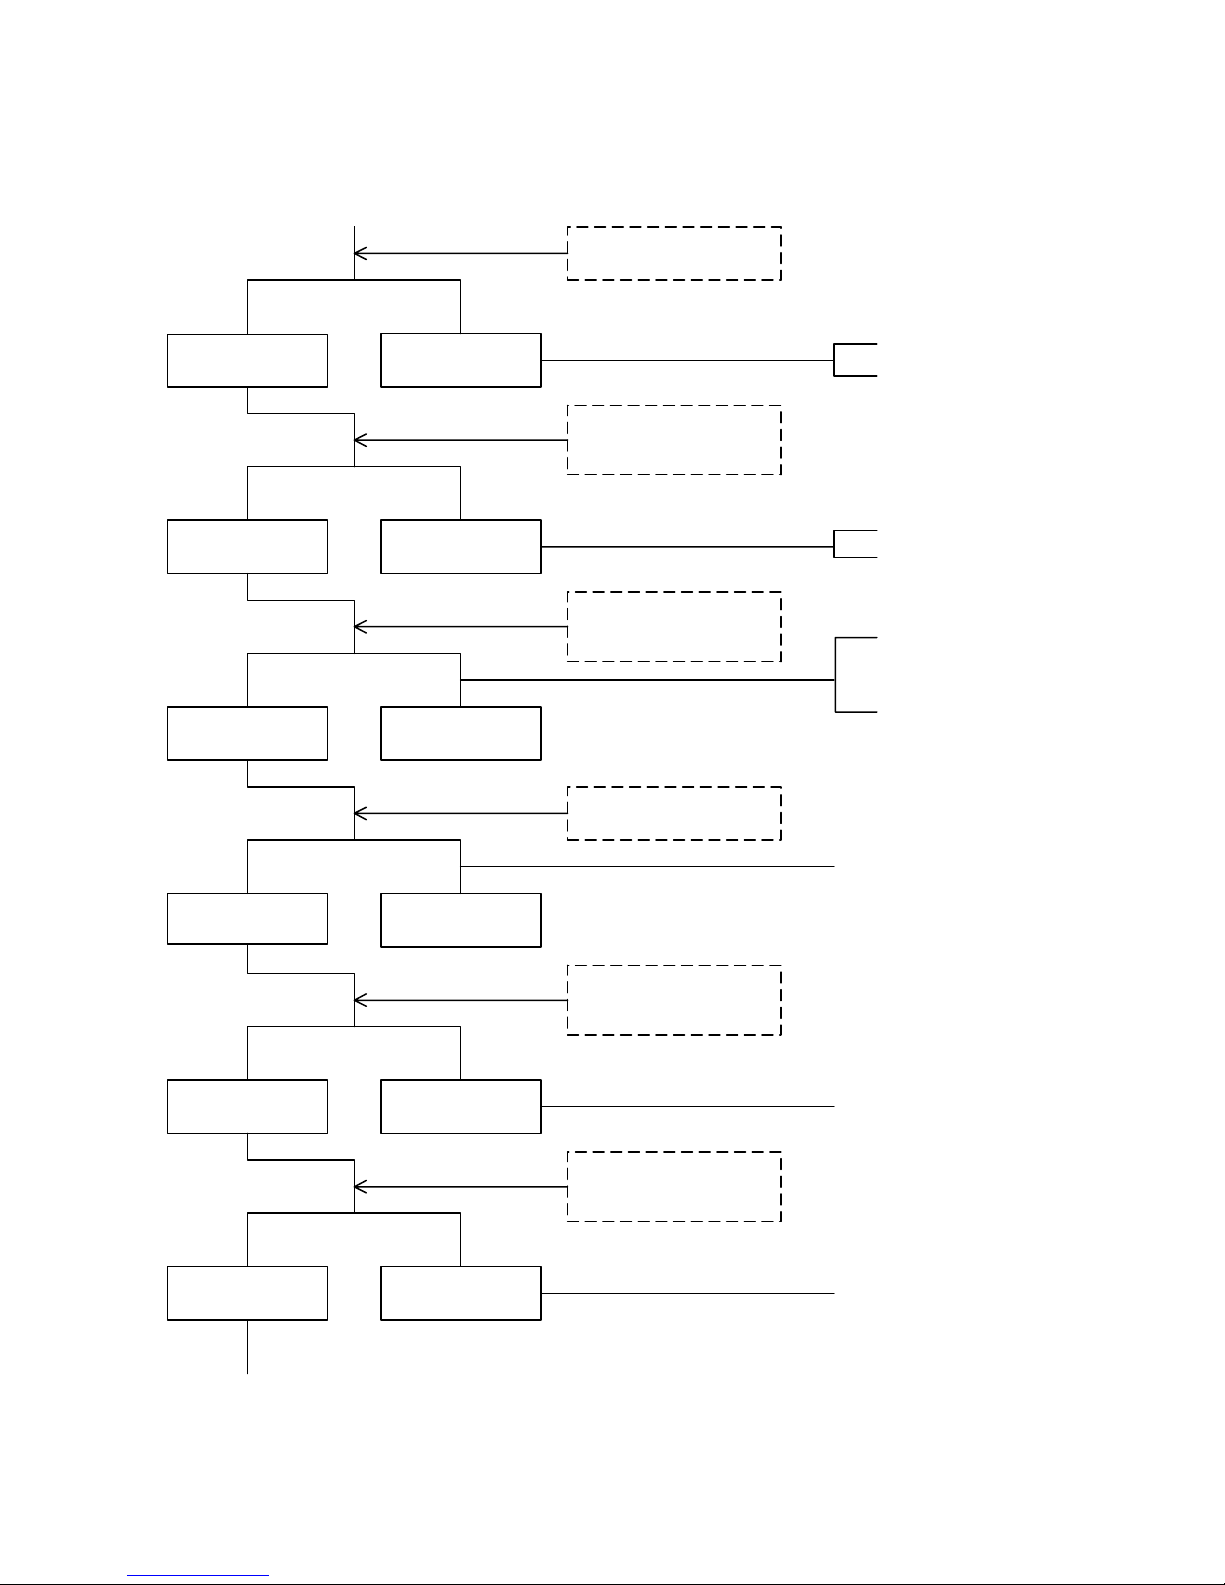
fuel supply to
carburetor is
sufficient
no fuel supply to
carburetor
loose the fuel release
screw of caruretor and
check if the fuel is inside
of carburetor ?
sparking no sparking or
weak
compression
pressure
is normal
compression
pressure too low
or no pressure
engine can not
ignite engine can ignite
but can not start
spark plug is dry spark plug is wet
loosen the spark plug,
connect with the spark
cap and contact with the
frame, check the spark
plug sparking ?
test the compression
pressure
follow the standard
stat-up procedure and
test again
loosen the spark plug
and test
Diagnose
Check and Adjuster Reason of Trouble
fuel tank without gasoline
tubing to carburetor blocking
float chamber tubing of carburetor blocking
fuel filter blocking
fuel cup blocking
air hole of fuel tank blocking
spark plug grimy or damage
C.D.I damage
main switch damage
ACG fulser coil damage
high tension coil damage or no gap
ACG lighting coil damage
valve set damage
cylinder, piston, piston ring damage
cylinder gasket leakage
valve burn
valve timing is not correct
valve gap is too tight or no gap
start clutch damage
ignite timing is not correct
fuel adjuste screw of carburetor isn't correct
intake manifold sucking air
auto. plunger starter is damage
fuel level of carburetor is too high
auto. plunger starter is damage
throttle open angle is too wide
DIFFICULT START OR CANN'T START
continue
INFORMATION FOR PERPARATIO
N

ADLY MOTO 1-8
engine speed go up engine speed can't
go up fully
ignite timing is
correct ignite timing isn't
correct
valve gap is correct valve gap
isn't correct
compression pressure
is normal
compression
pressure
is too low
no blocking blocking
spark plug normal spark plug stain
oil quantity
is normal oil quantity is
too rich
normal abnormal
normal over heat
no knocking knocking
INFORMATION FOR PREPARATION
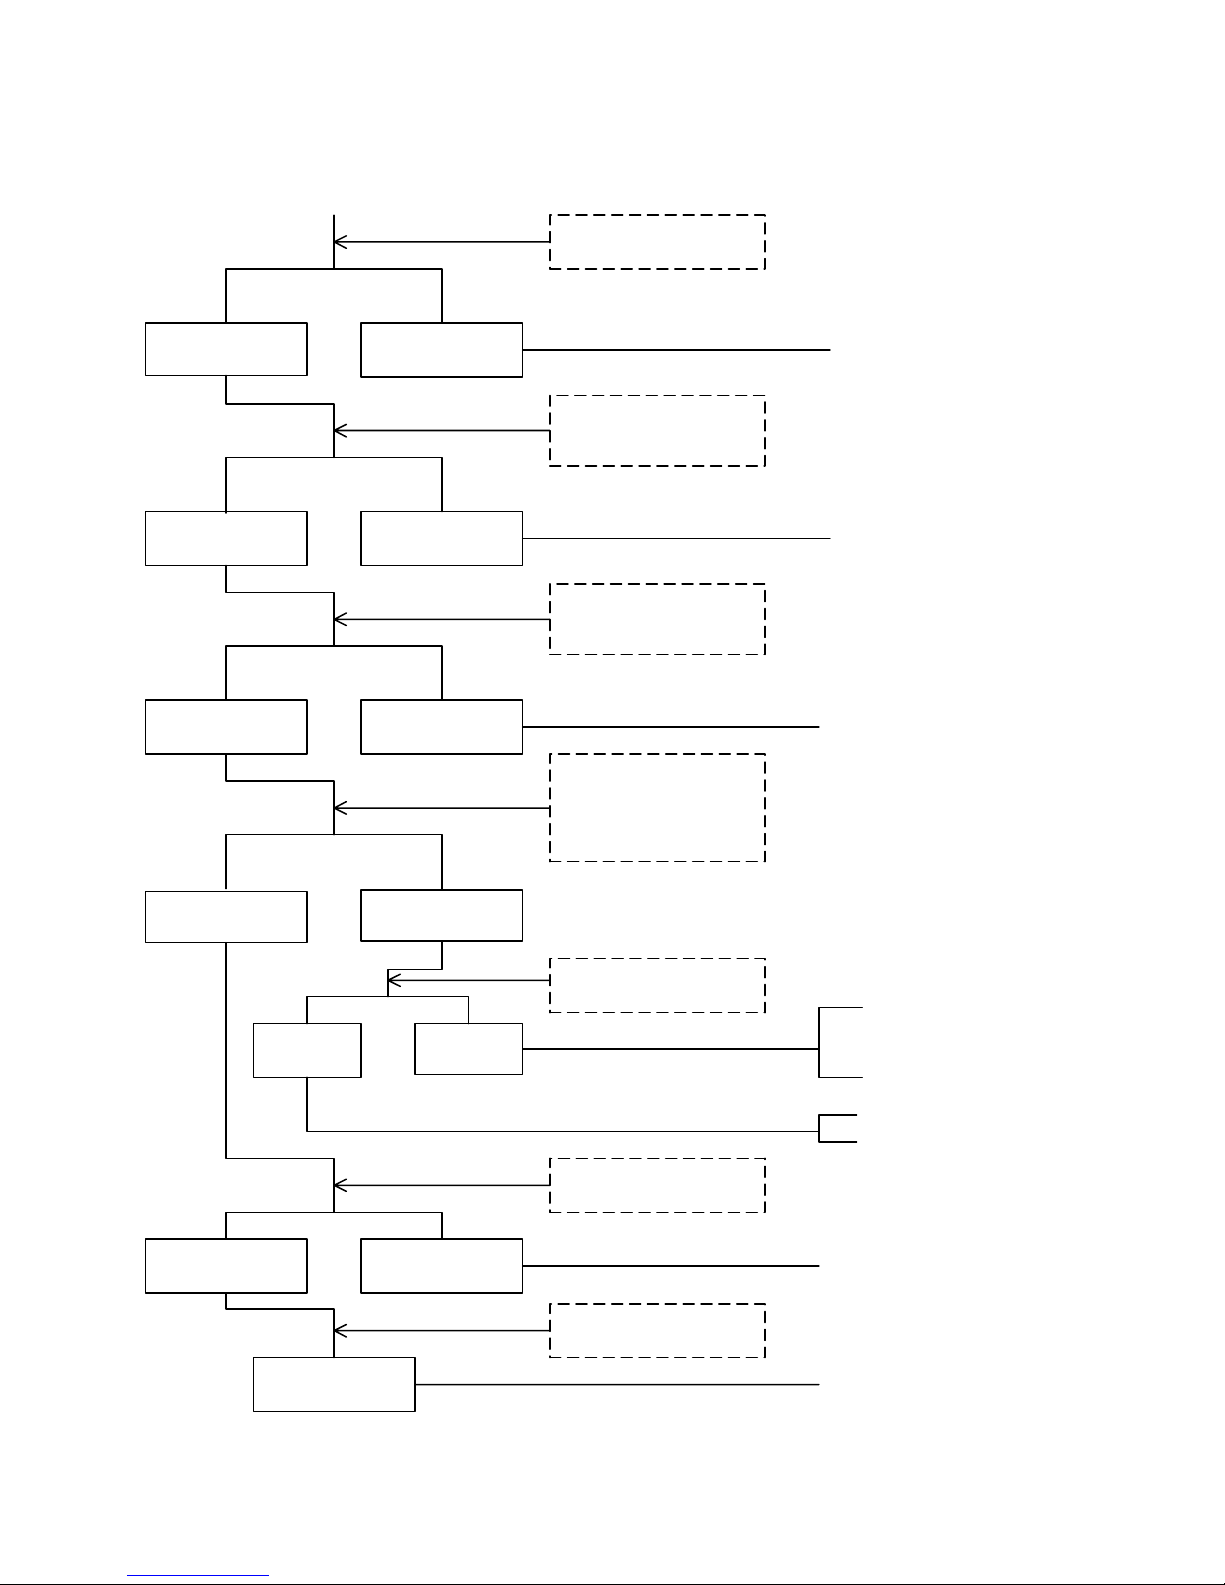
REVOLUTION NOT SMOOTH , LOST POWER
Diagnose
start engine and
go up speed slight
adjusting ignite
timing
adjusting valve gap
is not correct
testing compression
pressure
check carburetor
blocking ?
loosen spark plug
and check
check the oil
quantiity of
crankcase is too
rich or dirty?
check cylinder head
lubricating ?
engine over heat
increase engine
speed or continue
turning at high
speed
Check and Adjust
air cleaner blocking
fuel supply isn't smooth
air hole of air tank blocking
exhaust pipe blocking
auto.plunger starter damage
film of carburetor damage
fuel cup damage
C.D.I damage
pulser coil damage
valve gap adjusting isn't correct
valve set over abrade
valve set damage
cylinder, piston abrade
cylinder gasket leakage
valve timing isn't correct
cleaning carburetor
cleaning the stain
spark plug type isn't correct
oil flowing is too rich
oil flowing is too lean
oil doesn't circulate
oil tubing blocking
oil supply is too lean
cylinder, piston abrade
mixutre gases is too lean
carbon residue in combustion chamber
is too more
igniting time is too earily
fuel isn't good
clutch sliding
mixutre gases is too lean
carbon residue in combustion chamber
is too more
igniting time is too earily
fuel isn't good
Reason of Trouble
continue
ADLY MOTO 1-9
normal abnormal
INFORMATION FOR PREPARATION
REVOLUTION NOT STABLE (LOW R.P.M.)
Diagnose Check and Adjust
adjusting is correct adjusting isn't
correct
no sucking air sucking air
sparking normal sparking abnormal
normal abnormal
ignition timing adjusting
adjust the carburetor fuel
adjuste screw
carburetor sucking air
loosen spark plug,
connecct with spark cap
and contract with frame,
check the spark plug
sparking ?
check A.C.G
end
Reason of Trouble
C.D.I damage
pulser coil damage
mixture gases too lean
(loosing screw)
mixture gases too rich
(locking screw)
spark damage or stain
C.D.I damage
A.C.G damage
coil damage
spark plug cable damage odr short
main switch damage
A.C.G damage
air hole damage or blocking
(-) pressure tube damage
gasket damage
the screw of carburetor is
loosen
(-) pressure tube broken
ADLY MOTO 1-10
normal abnormal
INFORMATION FOR PREPARATION
REVOLUTION NOT SMOOTH(HIGH SPEED)
Diagnose
Check and Adjust
normal abnormal
normal abnormal
no blocking blocking
valve timing is
correct valve timing isn't
correct
adjusting ignite timeing
adjusting valve gap
check fuel cup supply
normal ?
carburetor blocking
check and adjust valve
timing
Reason of Trouble
C.D.I damage
ACG pulse coil damage
fule filter blocking
air hole of fuel tank blocking
fuel cup damage
fuel of tank is too less
camshaft gear mark position is not
correct
normal spring broken or
elastic deformation
end
check the spring of valve
adjusting isn't correct
valve set damage
cleaning
spring damage

ADLY MOTO 1-11
voltage of battery
can't go up voltage of battery
is normal
INFORMATION FOR PREPARATION
CHARGE ABNORMAL
Diagnose
Check and Adjust
normal measure value
too high
battery have voltage battery have not
voltage
normal abnormal
start engine and measure
voltage of the two
terminal for battery
measure the resistance of
ACG coil
check the regulator
check socket of regulator
loosen ?
Reason of Trouble
battery damage
coil damage
terminal damage
YL wire damage
R wire damage
regulator damage
socket damage
ACG damage
(over charge)
main switch at ON
the battery have
voltage
main switch at ON
the battery have no
voltage
normal socket loosen
GR wire broken
regulator damage
socket damage
check the socket of
regulator
check the voltage between
regulator and frame
ADLY MOTO 1-12
no sparking or
weak sparking strong
INFORMATION FOR PREPARATION
SPARK PLUG NO SPARKING
Diagnose
Check and Adjust
loosen no loosen
normal abnormal
normal abnormal
normal abnormal
change spark plug and
check again
check spark plug, cap,
ignition coil loosen?
check C.D.I unit socket
loosen ?
check the terminal of
C.D.I unit unimpeded?
measure resistance
check relate spare parts
Reason of Trouble
the previous spark plug damage
spark plug cap loosen
main switch damage
pulser coil damage
coil damage
lighten coil damage
the previous C.D.I unit damage
socket damage
normal abnormal
main switch damage
socket, joint connect abnormal
change CDI unit
abnormal
change ignition coil
the previous coil damage

ADLY MOTO 2-1
CHECK AND ADJUST
Way of Check & Adjustment
1. Mark “○” is checking time.
2. Mark “☆” is the regular exchange of service items.
This exchange time is just for general riding of the majority not for the special use , please
arrange with this principle according to the difference of the riding condition.
Service Time (month)
Service Items Before
riding 1 st each 6 each 12 Judgement Standard Remarks
Operating Device
Handle- Play, loose/tight
Operation
○
○
Wheels- Right/left turn round angle ○
Front Fork-Damage
Installationofshaft
ShaftGap
○
○
○
○
○
Direction Post
Direction Post
Brake Device
Brake- Play
Trytorun
Correct brake
○
○
○
○
○
○
○
○
○
Play
Handle , handle front
10-20 mm
Wires- Loose / tight and damage ○ ○ ○
Gap of casing & brake ○○
Wore of brake & operating parts ○Direction
Wore & Damage of casing
○
Standard diameter 110 mm
Limitation 110.5mm
Riding Device
Tires-Air pressure of tires
○
○
○front rear
air pressure 1.5 kg/cm 1.75 kg/cm
tire 120/70-12 120/70-12
ADLY MOTO 2-2
Riding Device
Tire
Check & damage of tires ○○ ○ Ditch-front wheel till 0.8mm
Rear wheel till 0.8 mm
Abnormal & ditch in tires ○○ ○
Bolt & nut of tires locking
○
○
Flocking torsion
Front wheel – 4.0~5.0 kg-m
Rear wheel –10~12 kg-m
Damage of felly ,side ring , disc ○ ○
○
Vibration of felly, in edge of felly
Front wheel – horizontal under 2.0
mm
vertical under 2.0 mm
Rear wheel – horizontal under 2.0 mm
vertical under 2.0 mm
Tightness of front bearing ○
Tightness of rear bearing ○
Buffer device
Spring -damage ○Spring of
shock
absorber
Suspension arm – damage of joint gap
&arm
○
Buffer -oil leakage or damage ○
Tightness of installation ○
Power transmission device
Clutch -action ○○○
Transmission
○ ○ Level : way of direction hole , oil
fill to the mark of the hole
It’s rear
Gear case
Electril device
Ignition device -condition of ignition
spark plug
○ ○ Gap of spark plug 0.6~0.7 mm
Battery -connection of terminal ○
Wiring of electrical appliance – damage
or loose in connection place
○

ADLY MOTO 2-3
Check Items Before
riding 1 st
M
6
M
12
M
Judged standard remarks
Engine
Body – starting & abnormal noise
low speed & accelerating
exhaust
air filter
○
○
○
○
○
○
○
○
○
Idle : 1800±100 rpm
Lubrication device
Oil and oil filter ○ ○ Warning light lighting
Oil leakage ○ ○
Oil level ○
Fuel installation
Gasoline filter is dirty ○
Leakage of fuel ○ ○
Throttle gate & choke ○
Fuel filter is clogged ○
Oil level ○
Alteration of pipes 9each 2 years
Lights & direction lights
Action
○ ○
On/off normal , dirty , damage ○
Rear mirror – view ○
○
Reflector & license tag –dirty & damage
Instrument –action ○
Exhaust pipe & muffler
Installation loosed or damage ○
Function of muffler ○
Frame & body –loose or damage ○
Abnormal from previous day –confirm
normal
○
Others - greasing of each part ○ ○
Cleaning combustion chamber , exhaust
pipe , and carbon muck in muffler
○
ADLY MOTO 2-4
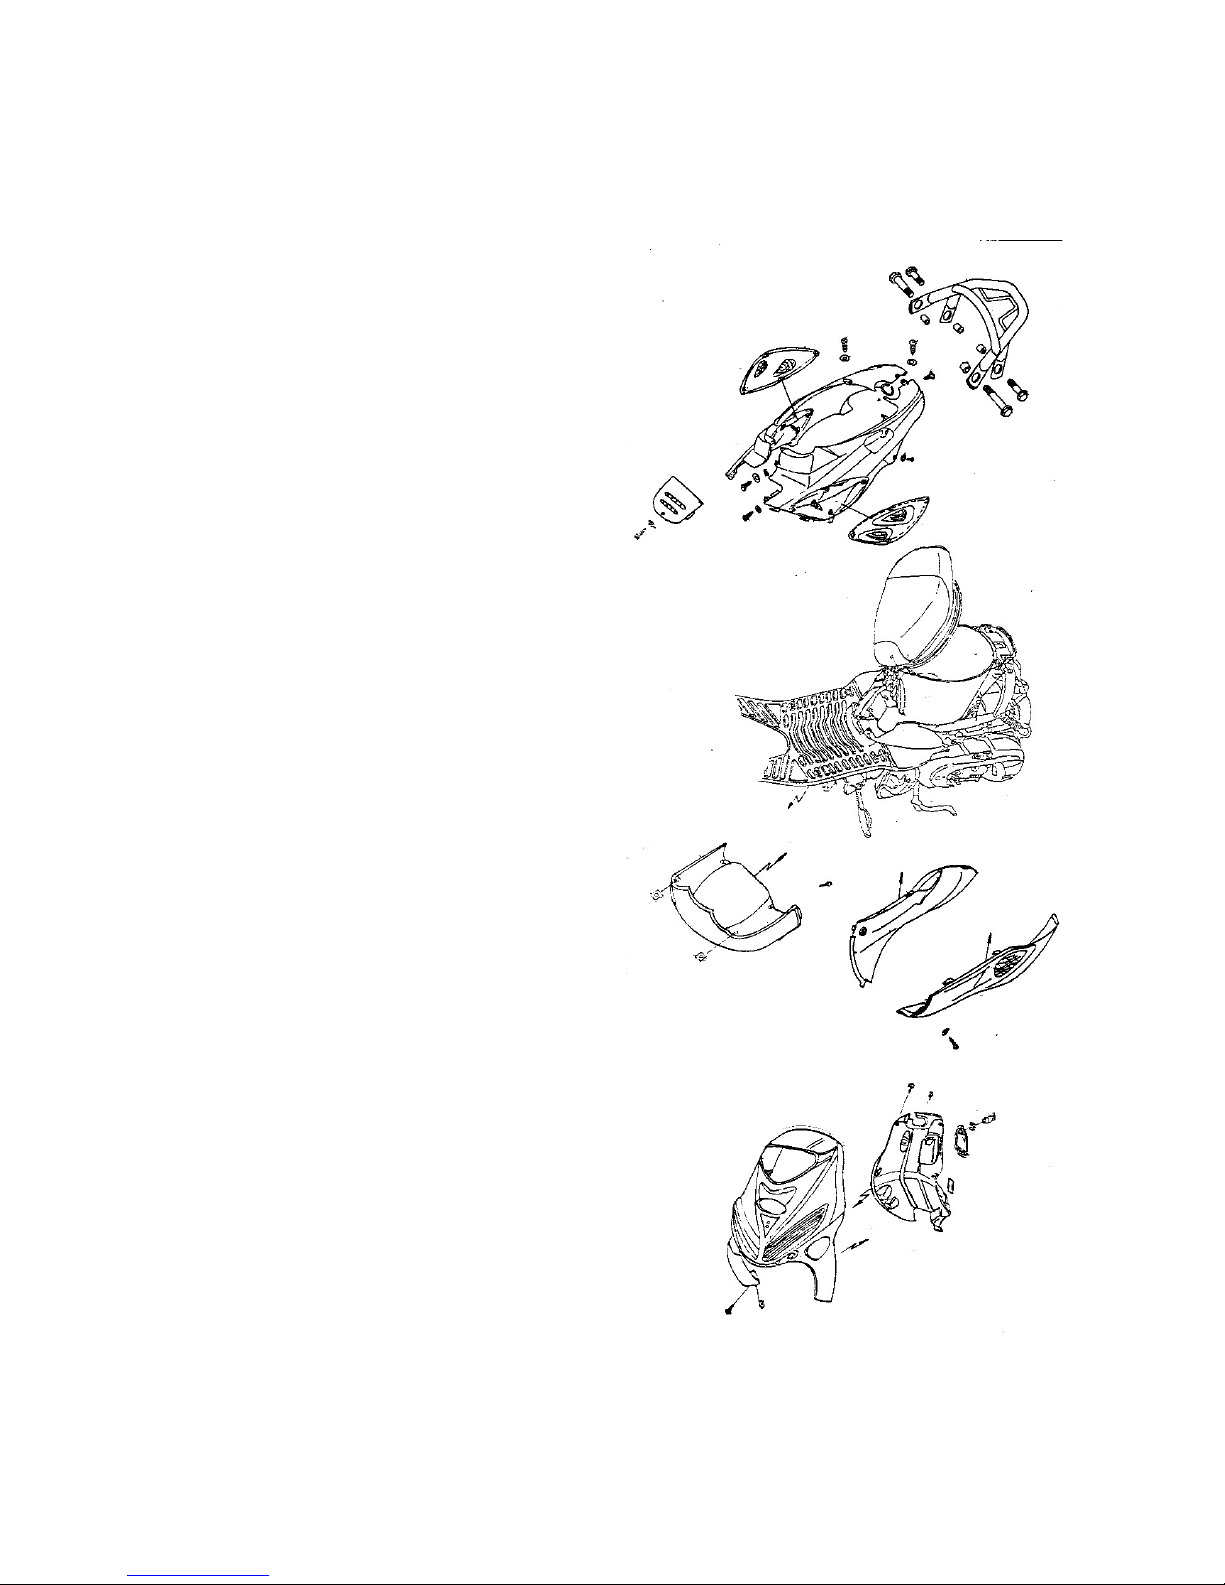
CHECK AND ADJUST
Disassembly of External Parts
•Remove the external parts for check
and adjustment.
•Remove 4 hex washer face bolts,
4 space tubes , and then remove
luggage carrier.
•Remove 12 self-tapping screws and 2
pan flat bolts.
•Remove central cover ,L/R side cover,
decoration strip and cowling.
•Install with the reverse sequence.
WARNNING:
6Do not break the union of body and
pedal.
6Before locking screws , please
confirm the matching correct of all
parts.
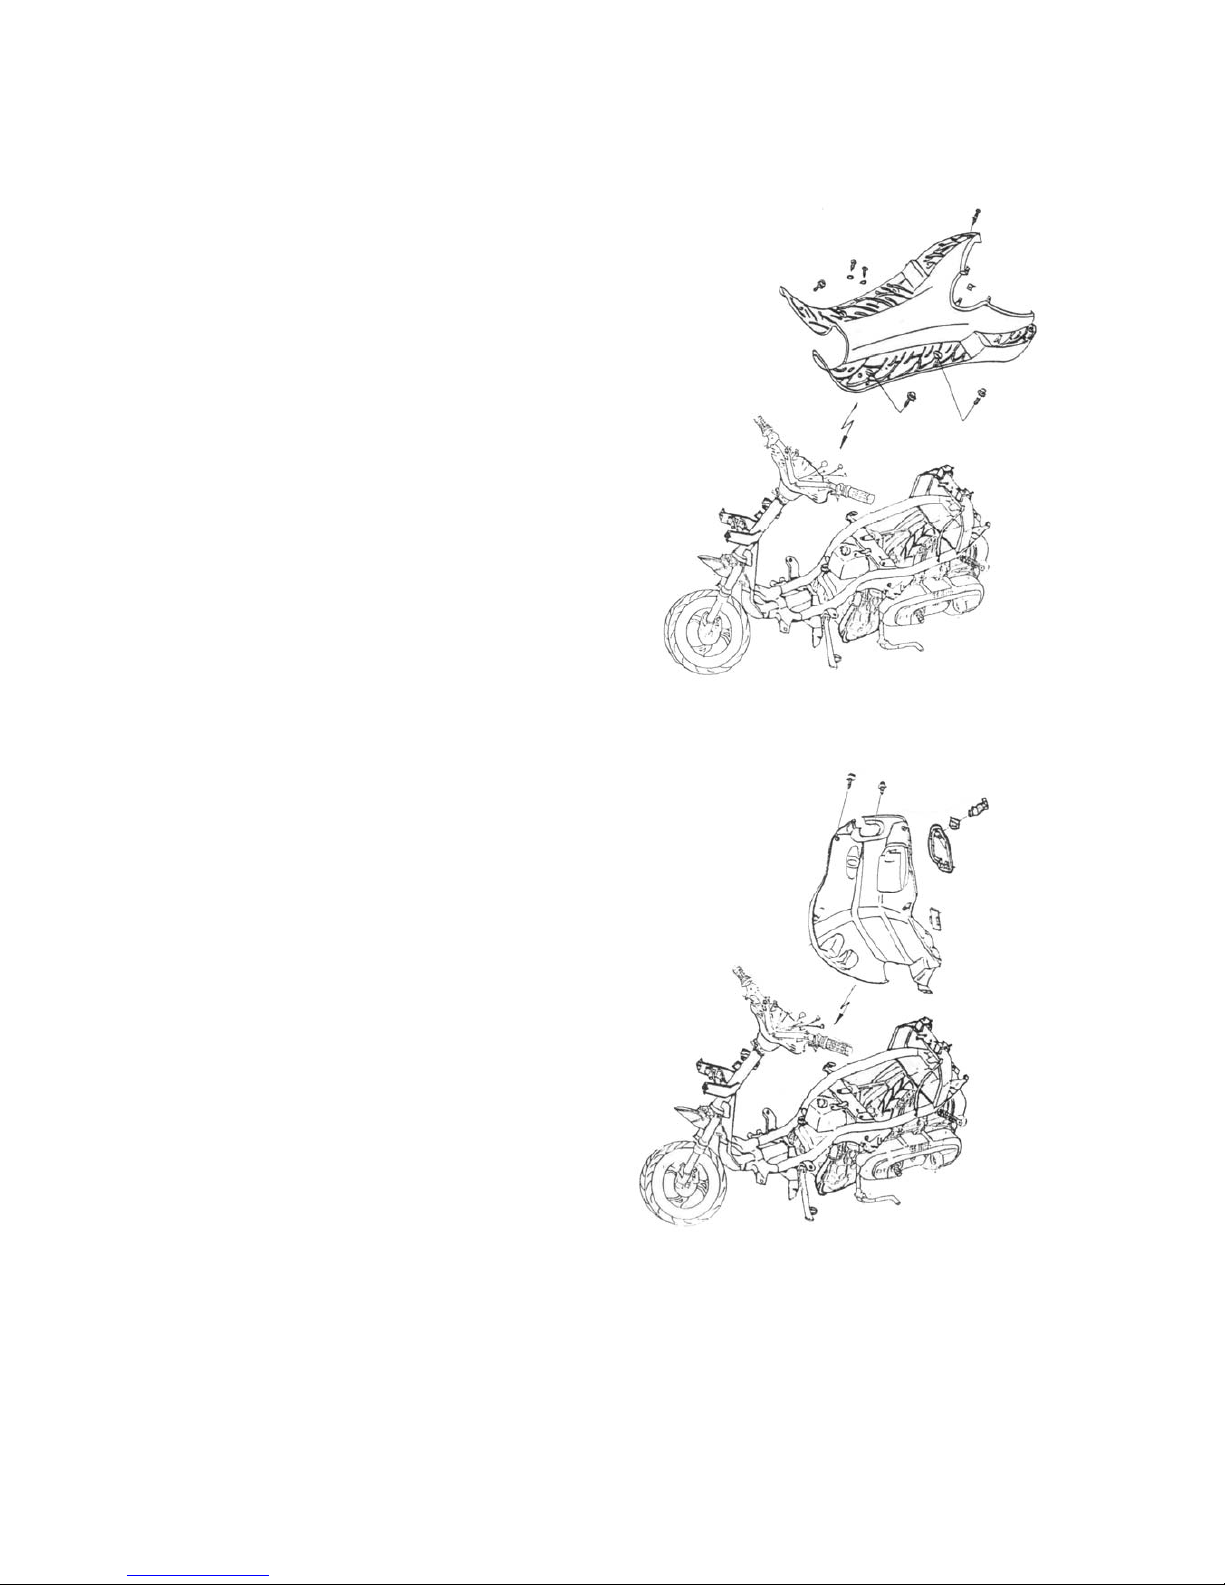
•Front cover.
•Remove 3 pan flat bolts , 1 hex bolt.
•Remove 12 self-tapping screws.
•Disconnect the light connectors.
•Install with the reverse sequence.
WARNNING:
6Do not damage & break the joint of
inner body and front damper.
6Before locking screws , please
confirm the matching correct of all
parts.
ADLY MOTO 2-5
CHECK AND ADJUST
Disassembly of Pedal
•Remove L/R body cover.
•Remove 4 bolts, 6 self-tapping screws
2 pan flat bolts.
•Separate the joint with luggage case
(claw & groove)and remove the pedal
•Install with the reverse sequence.
WARNNING:
6Installing to the luggage box after
composing confirming the pedal with
the joint of luggage case correctly.
Disassembly of Luggage Case
•Remove front fender.
•Disconnect the light connectors.
•Remove power switch cap.
•Remove edge nut on luggage case.
•Install with the reverse sequence.
WARNNING:
6Going on the installation operation
after jointing correctly the luggage
case and front fender.

ADLY MOTO 2-6
CHECK AND ADJUST
Rear Light Assembly
•Remove 2 hex bolts.
•Remove 3 L/R sides body cover.
•Disassembly the connection head of
wireness rear light.
•Assembly with the sequence in
reverse of disassembly.
WARNNING:
6Ensuring the joint of tail light hole
correct with the bulge of truck.
Handle Covering
•Remove 4 self-tapping screws ,
separate the joint with speedometer.
•Remove the handle covering.
•Assembly with the sequence in
reverse of disassembly.
WARNNING:
6Aim handle covering correctly the
handle covering back’s joint.
This manual suits for next models
1
Table of contents
Other HER CHEE Scooter manuals

Popular Scooter manuals by other brands


Tomoloo
Tomoloo Two Wheels Folding Electric Scooter manual

Ignite
Ignite ESC01 user manual

Peg-Perego
Peg-Perego DUCATI DESMOSEDICI IGED1033 Use and care

Yamaha
Yamaha AEROX NS50 owner's manual

Jamara
Jamara KickLight 460495 instruction manual

Mart Cart
Mart Cart 280-3700 Owner's manual and technical documentation


