Hermes miniVAP User manual

Instruction
Manual
for miniVAP
Vaporizer
By HERMES Medical
Engineering SL.

For correct use
of device, please read
the following
document carefully.
The user is not
authorized to use
the device outside
the recommendations
and descriptions in
this manual.
By HERMES Medical
Engineering SL.
Versión 2.0
Contents
1. General description of product
2. Safety instructions
3. Technical Description of product
4. Starting up the miniVAP®Vaporizer
5. Vaporization of substances with miniVAP®Vaporizer
6. Customization, care and cleaning of vaporizer
7. Recommendations to prolong battery life
8. Product guarantee
9. Product registration
3
4
5
8
12
14
17
18
19

3
General description of product
miniVAP®devices are
designed to provide
the user with a safe,
comfortable vaporization in
any location, thanks to its
simple, portable design.
The on-demand, convection
heating system is benecial
because:
• The amount of vapor
produced is in direct
proportion to how strong
and long the inhalation is.
• Substances are only
vaporized when being
inhaled, reducing waste.
The miniVAP®’s small size
is due to the use of LiIon
batteries and the materials
used, providing the safest
and most optimal process
of vaporization available.
In addition, the starter
kit includes various
accessories to customize
vaporization and clean the
product. All within a bag
ideal for transport.
miniVAP®encourages
you to enjoy
a product of quality,
advanced technology
and exclusive design.

4
Safety instructions
Before starting up the device, please read the safety instructions carefully. If you have doubts
about any function, we advise you to contact the seller. If the product was acquired through
the miniVAP®store, please contact miniVAP support.
miniVAP®is not responsible for damages caused by use of the device outside the
recommendations and descriptions indicated in this manual.
• The device must be used and stored in a dry location, protected from
the elements.
• The device must be adequately ventilated to maintain correct cooling.
• The device must never be transported or stored when it is turned on. It should never be
covered with materials that obstruct adequate ventilation.
• Do not blow into the top or inhale from the bottom of the MiniVAP vaporizer. Doing so
can cause dirt to build up inside the unit and can damage the heater and/or battery.
• Never put anything into the vaporization chamber except those accessories designed
for miniVAP®.
• The device and charging dock should be used on a at, horizontal surface, away from
humidity and heat sources.
• Never put fingers inot the vaporization chamber when miniVAP®is on for risk
of suffering burns.
• Do not use the device while it is in the charging dock.
• Do not leave the device on unattended or within reach of children.
• We suggest you read the recommendations on use of the battery.

5
Technical description of product
Dimensions and weight of vaporizer: Length 112 mm. / 4.4“
Diameter 50 mm. / 2”
178 gr. / 0,4 lb.
Temperature regulation: +/- 15º C / 59º F.
Tolerance to temperature adjustment: +/- 5º C / 41º F.
Energy saving modes: Sleep mode (blue) at 10 minutes.
Autoshutoff at 10 minutes after sleep mode.
Dimensions and weight
of combined elements:
miniVAP
®
Portable: vaporizer + battery + cover
Length 207 mm. / 8.2“
Diameter 50 mm. / 2”
480 gr. / 1 lb.
Dimensions and weight
of combined elements:
miniVAP Single: vaporizer + battery + cover
Length 142 mm. / 5.6“
Diameter 50 mm. / 2”
250 gr. / 0,45 lb.
Temperature setting: Digital, 4 levels of temperature
Battery indicator: Rear light, 4 colors
Time of autofunction: Up to 3 hours
Battery level indicator: Rear light, 3 colors
Temperature range: Between 170º C / 338º F and 230º C / 446º F.

6
Product map
The miniVAP®Vaporization system is composed of the parts shown in the diagram:
1. Mouthpiece
2. “Elbow”shaped tube
3. Cover
4. Metal screens
5. Cone
6. Vapor chamber tube
7. Vaporizer
8. Battery
9. Charging dock
10. Power block and feeding cable
11. Power adaptor
1
2
3
5
4
6
7
10
9
4
11
8

7
Installation of the device
See the diagram and connect the parts of the device according to the arrows.
• Hold the lower side
of the cover with the upper side
of the vaporizer, turning
it clockwise until they are
connected, tightening slightly.
• Connect the lower part of the
“elbow” tube or exible tube
into the upper part of the cone,
pressing lightly.
• To connect the vaporizer to
the battery, align the circles
printed on the rear part and
turn the circular battery symbol
toward the lock symbol of the
vaporizer, until they are aligned
and you hear a “click.”
• To connect the vaporizer
to the power adapter, align
the circles printed on the rear
part of the vaporizer toward
the Adaptor socket. Turn the
adaptor until you hear a “click.”

8
Electrical connection: battery and adaptor
To correctly start up the vaporizer it is necessary to perform the steps in the order that they
are explained below.
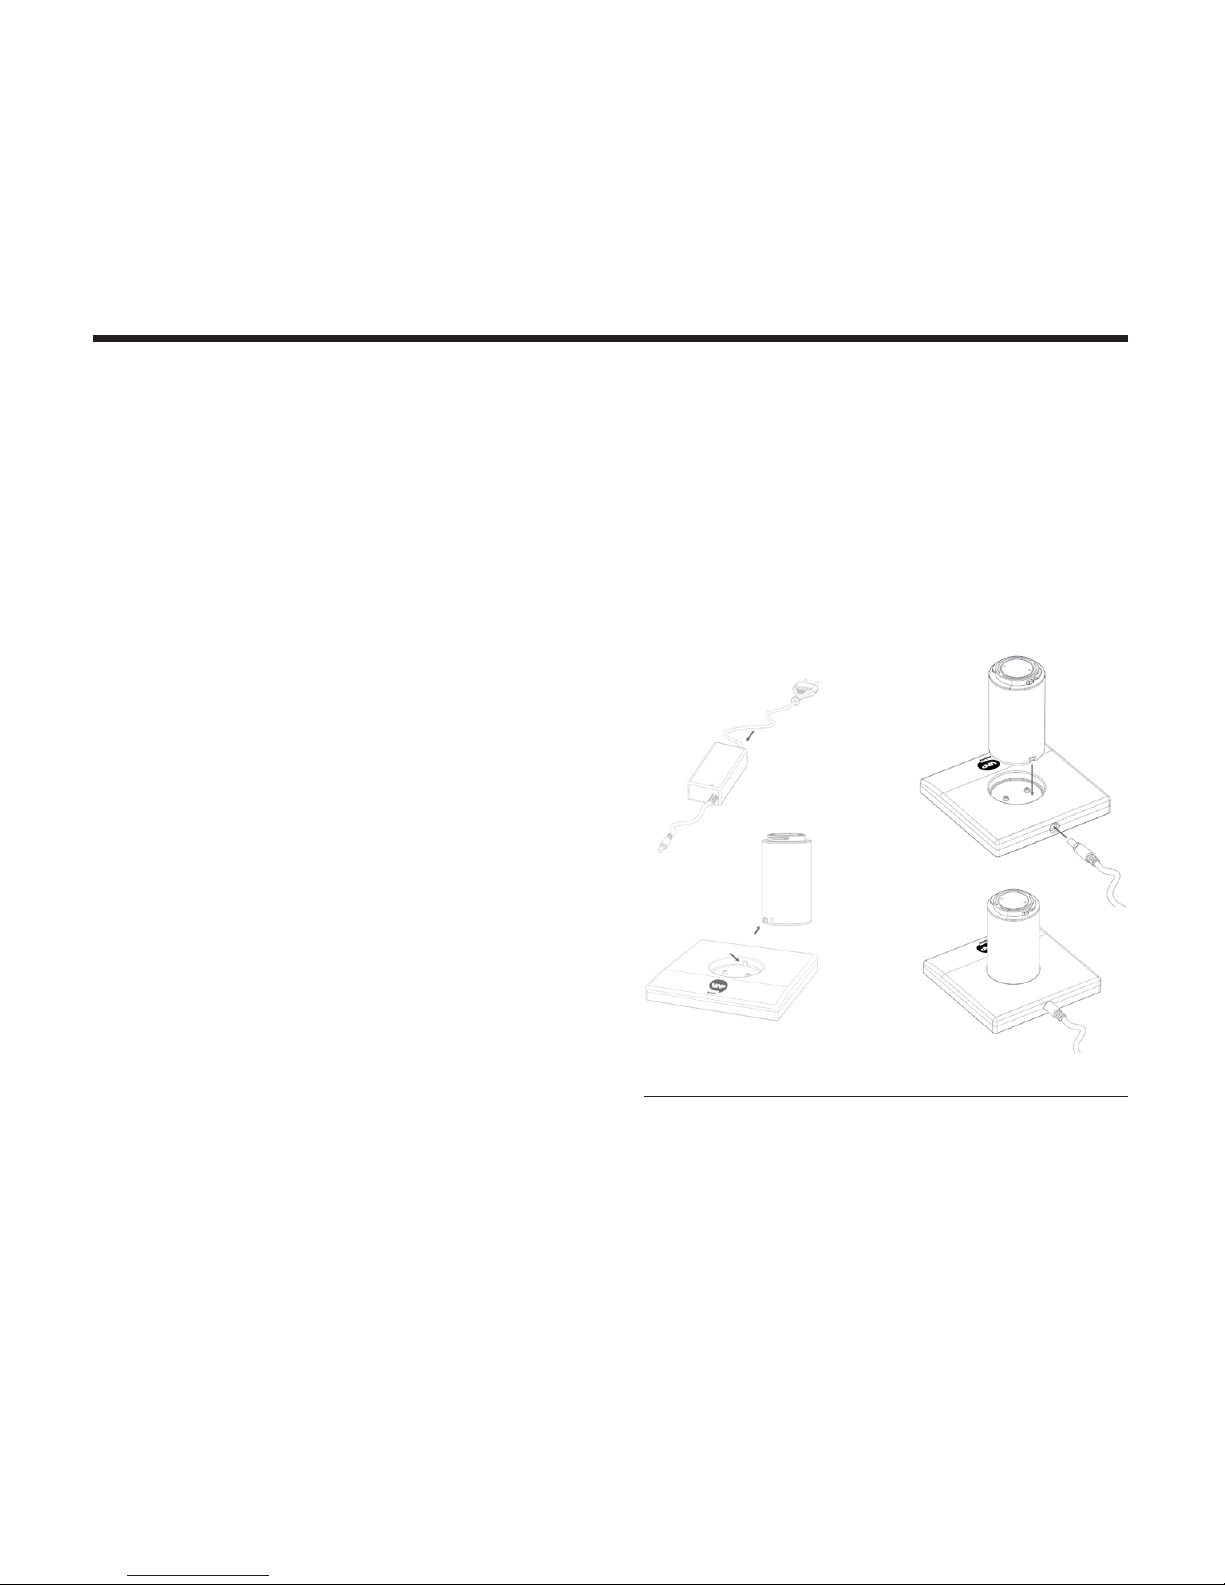
How to connect the power cable
to the charging dock:
• Be sure that the plug (EU/UK/US)
is correctly connected to the power source
(230110Vac, 50/60Hz).
• Check that the other end of the feeding
cable is correctly connected to the power
block. If the charger is correctly plugged
into the grid, the power block indicator light
will be green. (Don’t put the battery in yet.)
• Plug the connector into the hole in the
charging dock or Power Adaptor 1. Check
that the connector is rmly plugged in.
• When you put the battery in the charging
dock, the power block displays a red light 2
(charging). When the battery is charged, the
power block light is green.
1 The power block will indicate a red light when the
vaporizer is consuming energy. It can vary in intensity
or change to green if the vaporizer isn’t consuming
energy or has reached the selected temperature.
2 If you place the battery on the charging dock when
it is not connected to a power source, the light
will display green. (It’s using energy from its own
battery.)

9
Turning on the vaporizer
Battery level indicator
Turning off the device
Push both buttons for more than 1 second.
The device will begin to function and the front light will
display a series of colors, indicating that it is starting up.
The front light will blink, indicating the color of the
temperature selected.
When the temperature light stops blinking, the
vaporizer has reached the selected temperature
and is ready to use
To turn off the device, push the buttons simultaneously for more than 1 second. The front light
will begin a sequence of colors and the device will shut down.
When you connect the battery to the vaporizer and
turn on the device, the rear indicator light will display
the battery level.
Green: High. Orange: Medium. Red: Low

10
Sleep mode
For safety and to conserve energy,
10 minutes after the last button push the
device will display blue and stop heating.
After another 10 minutes of inactivity the
vaporizer will turn off automatically.
Temperature adjustment
The front light will display the level of the
temperature selected for ve seconds:
• 180º C / 356° F (Blue)
Releases an intense avor and aroma.
• 195º C / 383º F (Pink)
The majority of components
of low vaporization.
• 210º C / 410º F (Green)
Vaporizes all chemicals
(including avor and active components).
• 225º C / 437º F (Red)
Produces a cloud of dense vapor.
The front light will blink until it reaches the
selected temperature level.
Now you’re ready to use miniVAP®!
Push temperature buttons to raise or lower the vaporization temperature.
Table of contents


