HERMITAGE BATH 2436 User manual

Installation Manual
Manual de Instalación
For technical suppo contact
Para sopoe técnico, póngase en contacto con
626-341-5763
http://www.homebandc.com/
Model Number/Número de modelo: 2436, 3036, 4236, 4836, 6036, 7236
SQUARE MIRROR
WITH FRAME
ESPEJO CUADRADO
CON MARCO

Detalles del componente
Instrucciones previas a la instalación
8-10
6
7
IPasos de instalación
Component Details
Pre-Installation Guidelines
3-5
1
2
Installation Steps
English
01
Español
02
TABLE OF
CONTENTS
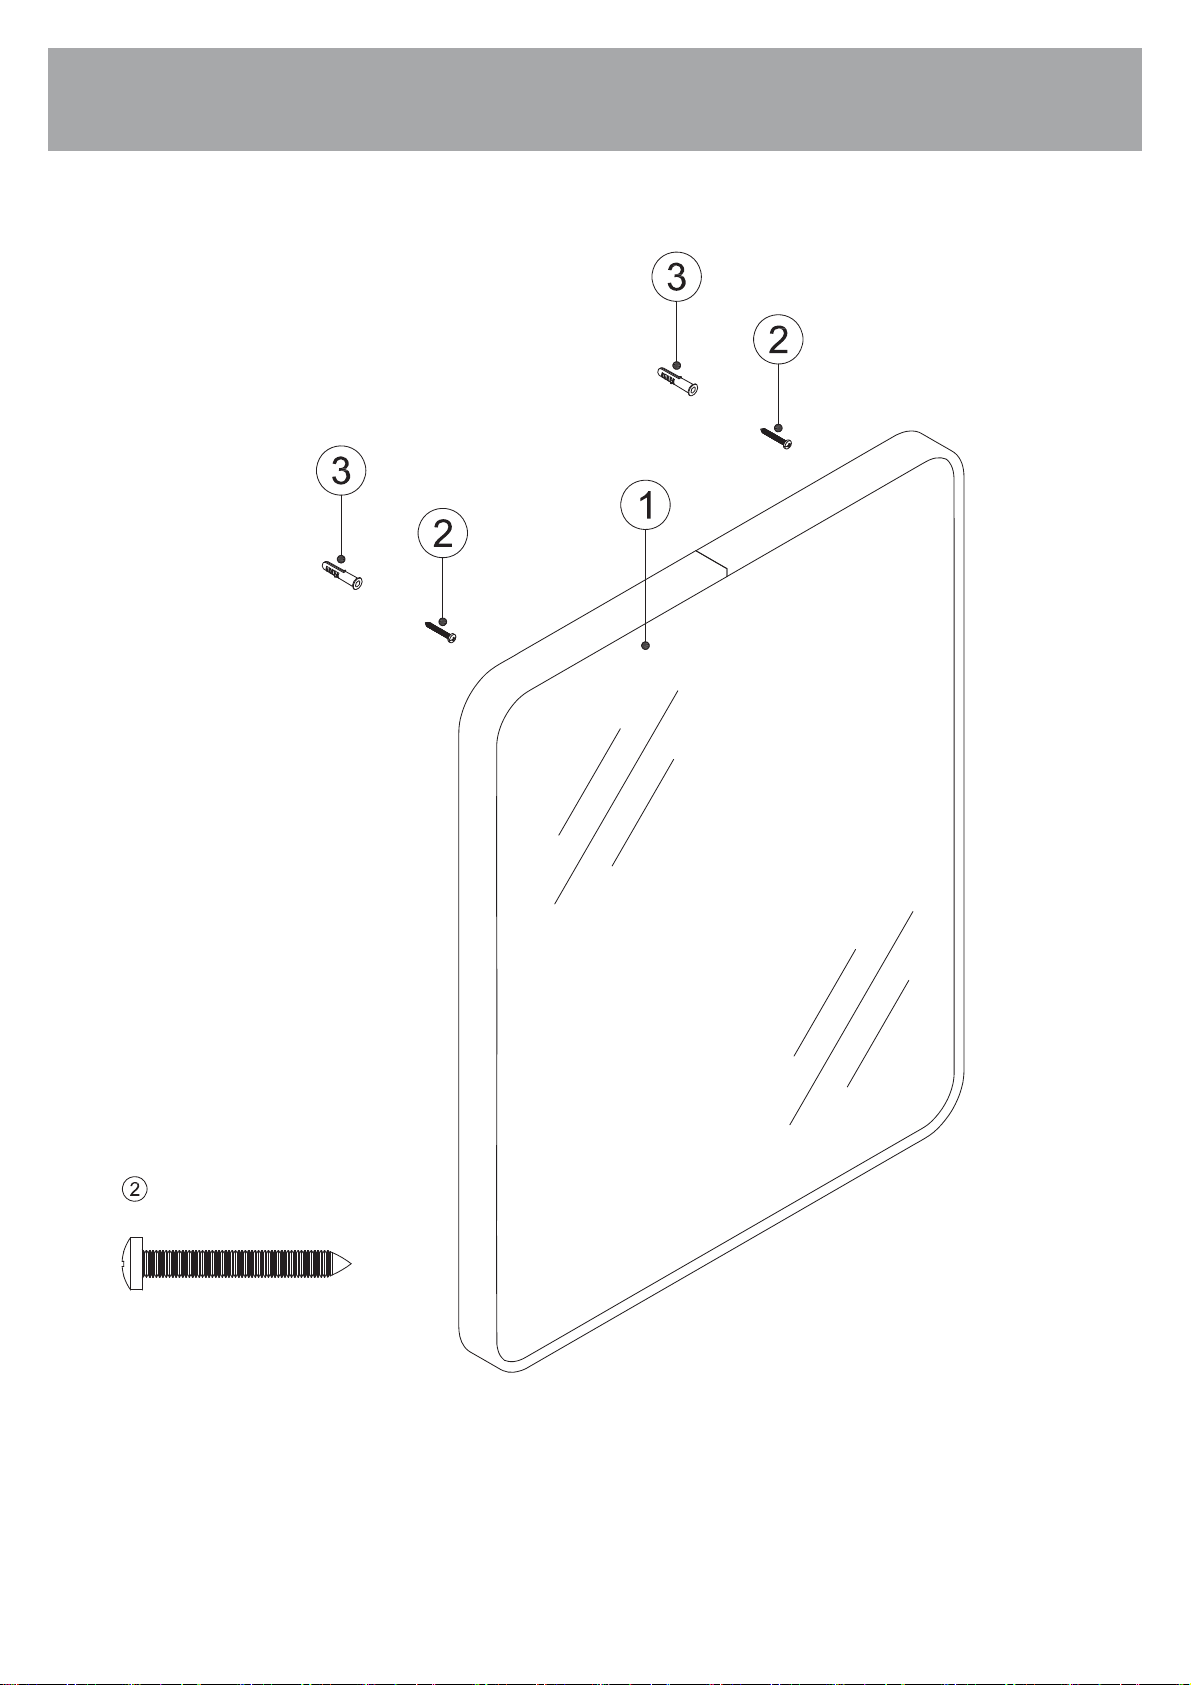
Detailed Diagram of Aluminium
Mirror Components
1
SCREW 1 1/2"
2
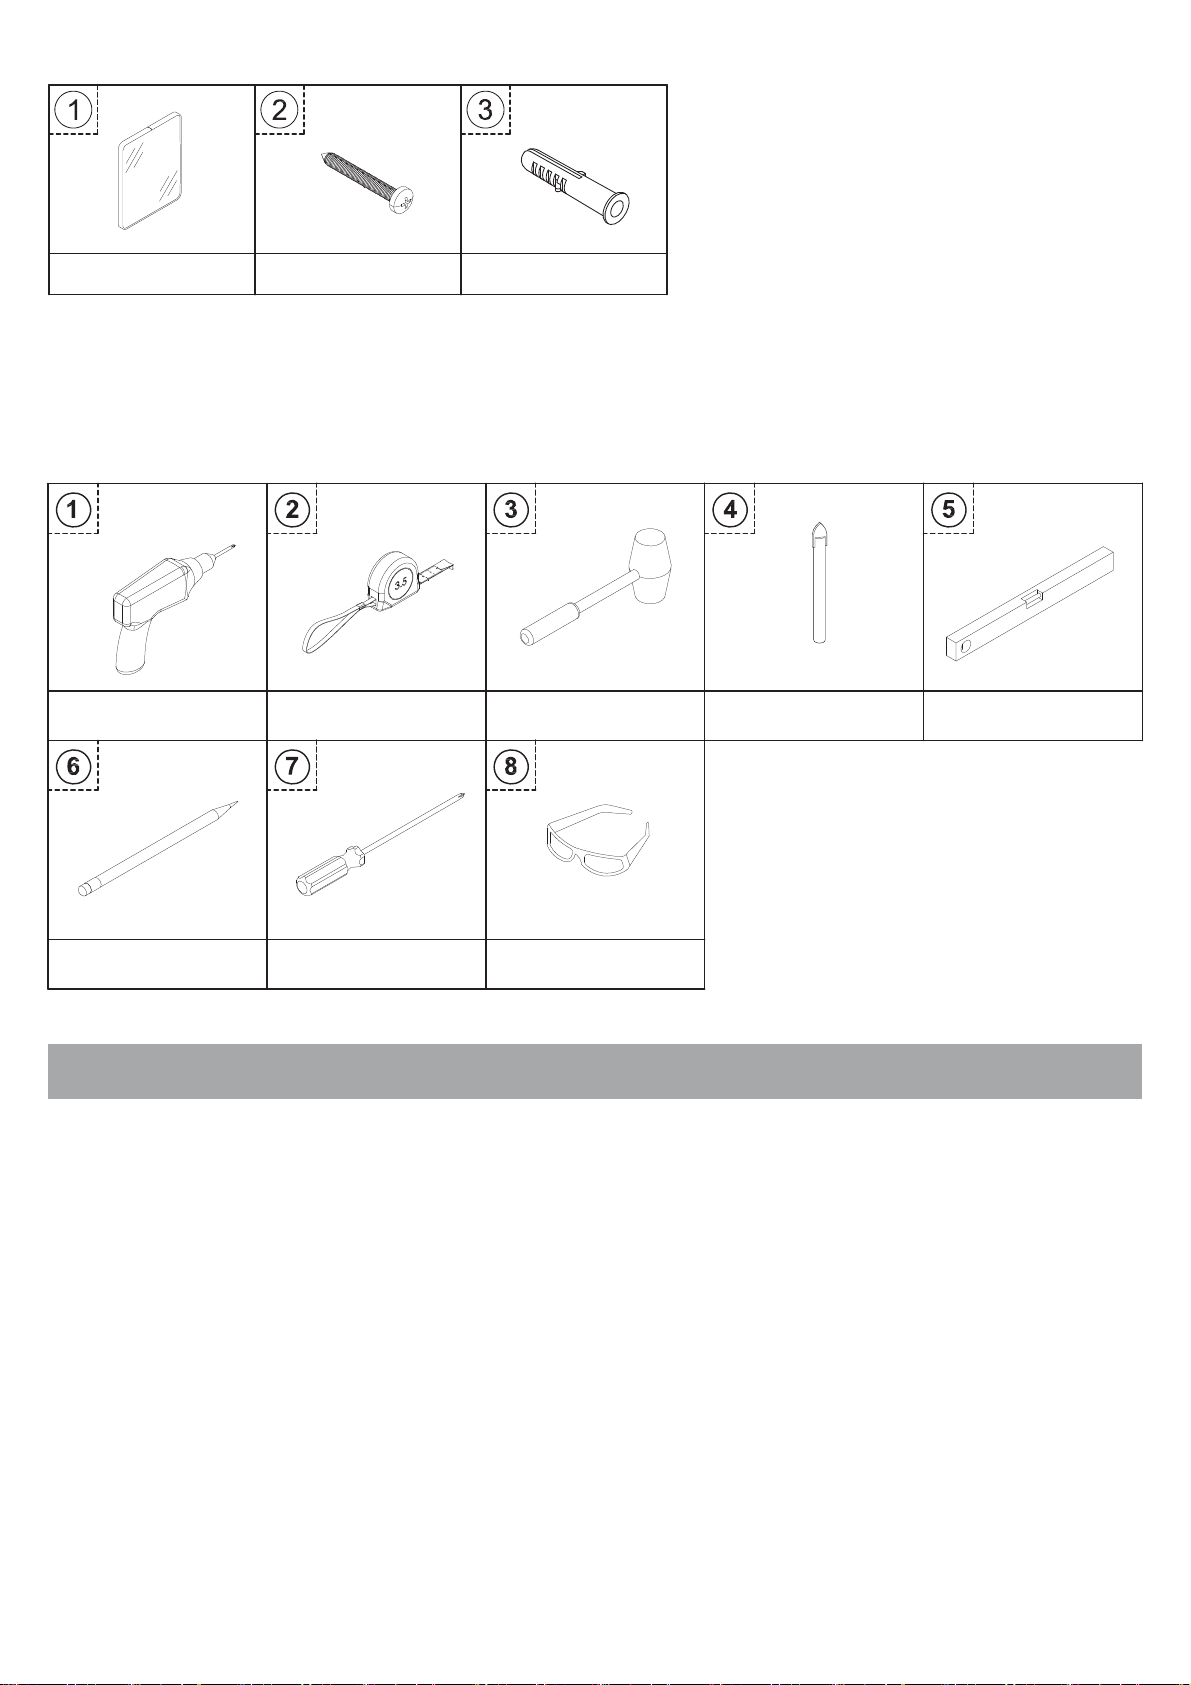
PARTS LIST.
WARNING: SAFETY GLASSES SHOULD ALWAYS BE WORN
WHEN WORKING WITH DRILL.
REQUIRED TOOLS:
MIRROR(1 PCS)
DRILL
PENCIL SCREW DRIVERS SAFETY GLASSES
1 1/2" SCREW(2 PCS) WALL PLUG(2 PCS)
MEASURE TAPE RUBBER MALLET DRILL BITS LEVEL
5/16"
Before You Sta
Thank you for choosing our Aluminium Mirror. We hope to provide you with the most satisfying
product and user experience.
Please read through this manual carefully as it contains impoant product informmationand
step-by-step instructions on how to install this product, Fail to follow ceain conditions of the
instruction may aect the warranty of the product.
1.Prior to installation, please inspect the boxes for damages due to shipping. If there is any miss-
ing pa or defective pa, please contact customer seice through email within 7 business days
of the delive date. Please note that we will not replace any damaged products or missing pas
free of charge after 7 business days from the installation of the product. Feel free to contact us if
you have any questions regarding your Order number.
2.Please make sure to contact your local building codes with questions on installation standards.
Building and plumbing codes may va by location.

Thank you for choosing our Aluminium Mirror. We hope to provide you with the mostsatisfying
product and user experience.
Please read through this manual carefully as it contains impoant product informmationand
step-by-step instructions on how to install this product, Fail to follow ceainconditions of the
instruction may aect the warranty of the product.
1.Prior to installation, please inspect the boxes for damages due to shipping. If there is any miss-
ing pa or defective pa, please contact customer seice through email within 7 business days
of the delive date. Please note that we will not replace any damaged products or missing pas
free of charge after 7 business days from the installation of the product. Feel free to contact us if
you have any questions regarding your Order number.
2.Please make sure to contact your local building codes with questions on installation standards.
Building and plumbing codes may va by location.
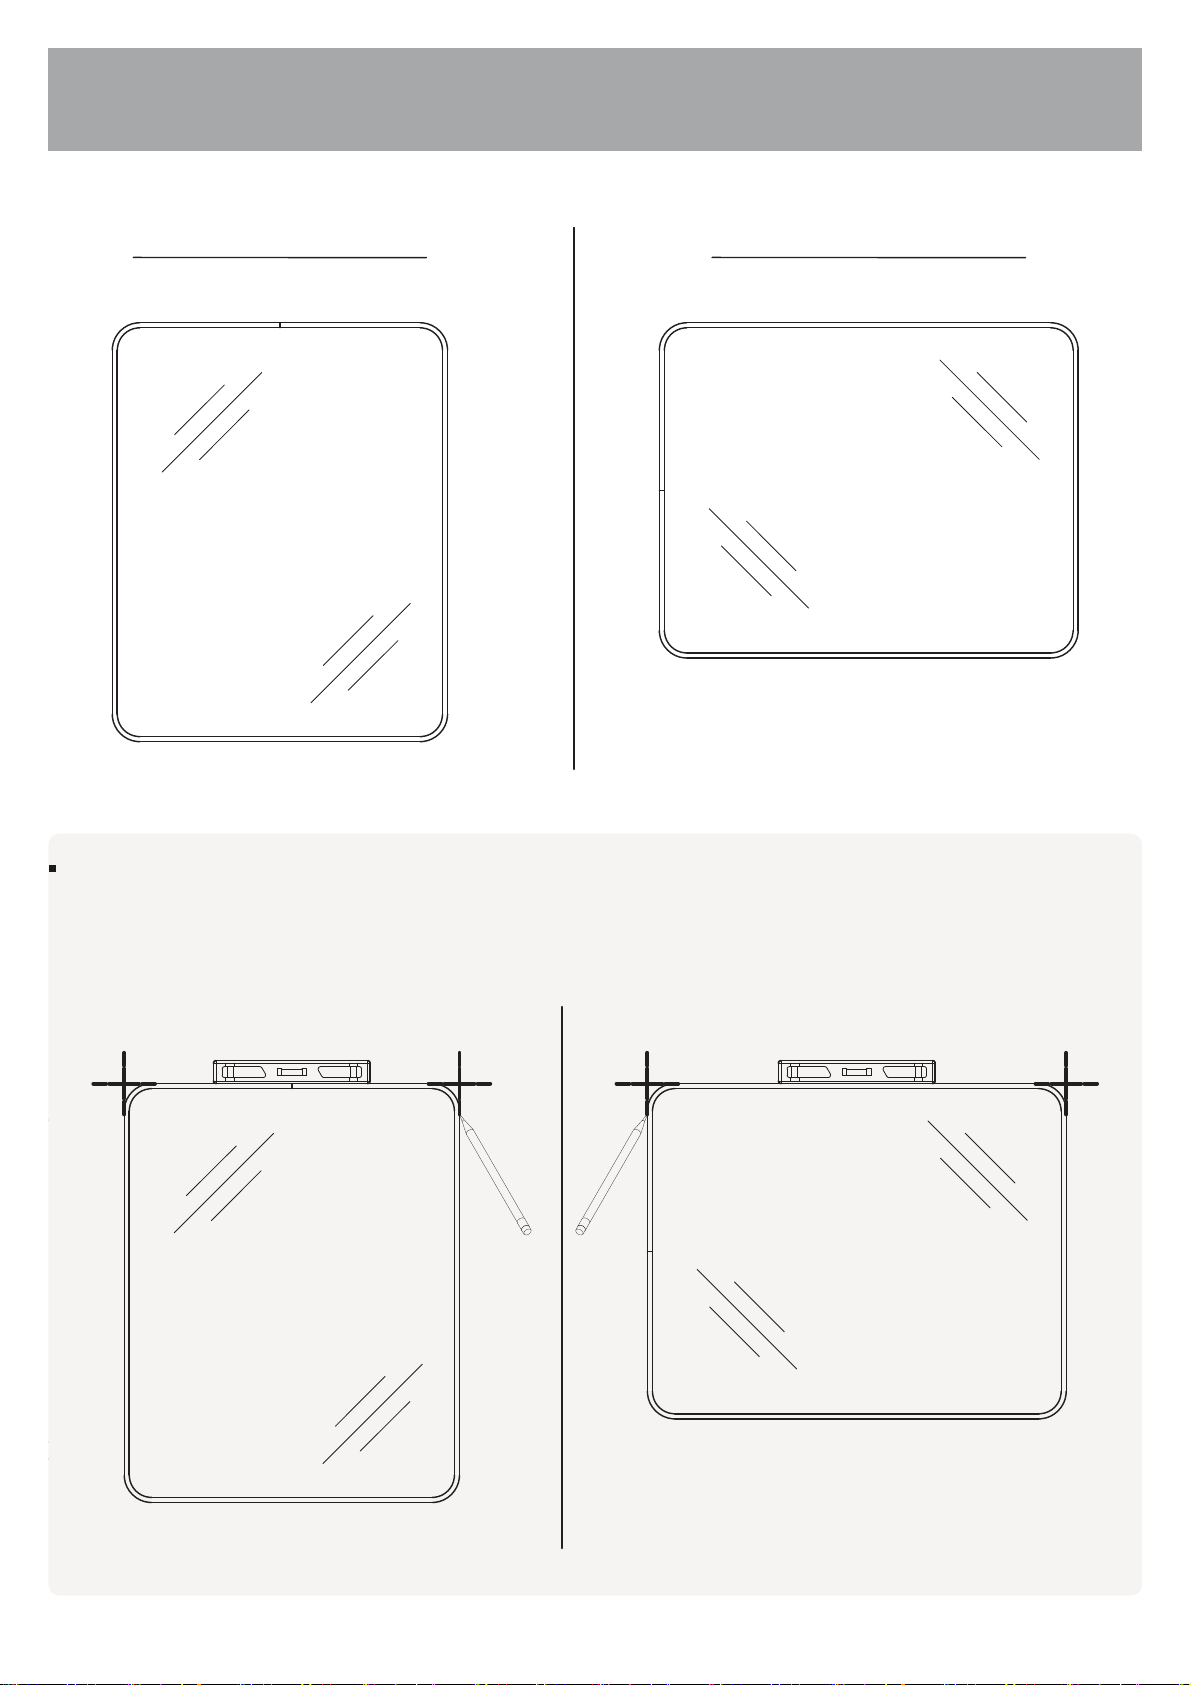
Choose the Mirror direction - veical or horizontal
Follow the appropriate diagram below
VERTICAL ASSEMBLY HORIZONTAL ASSEMBLY
Select the desired position of the mirror. Level and mark the location.
STEP 1
3

STEP 3
STEP 2
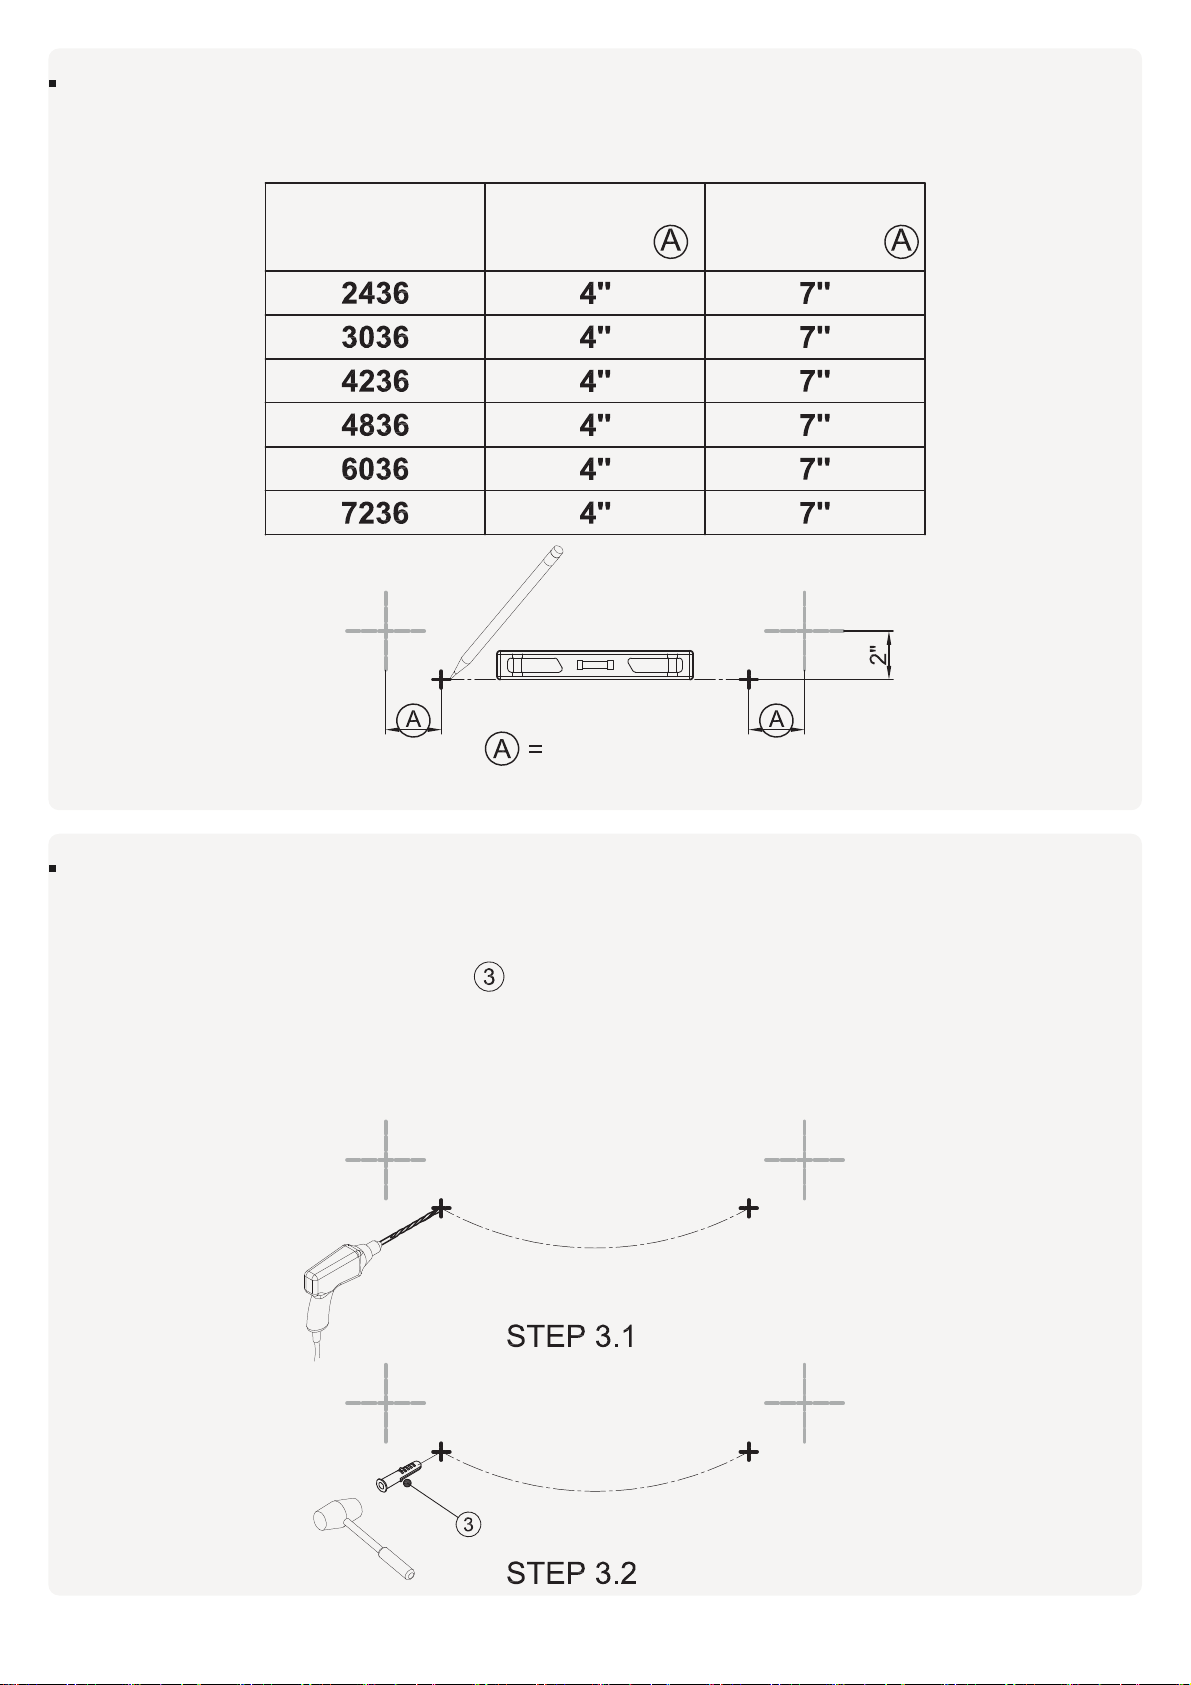
MODEL NO. VERTICAL
ASSEMBLY
Mark the drilling locations and ensure marking are leveled, based on veical or horizontal
mounting. See cha below.
HORIZONTAL
ASSEMBLY
4" for veical
7" for veical
3.1 Drill holes approximately 1 1/2" deep at the marked location.
3.2 Inse wall plug .
For dwall with a thickness exceeding 10-12mm, ensure the use of designated dwall anchors for
installation. For dwall with a thickness less than 10-12mm, make sure to install the brackets on the
stud.
4
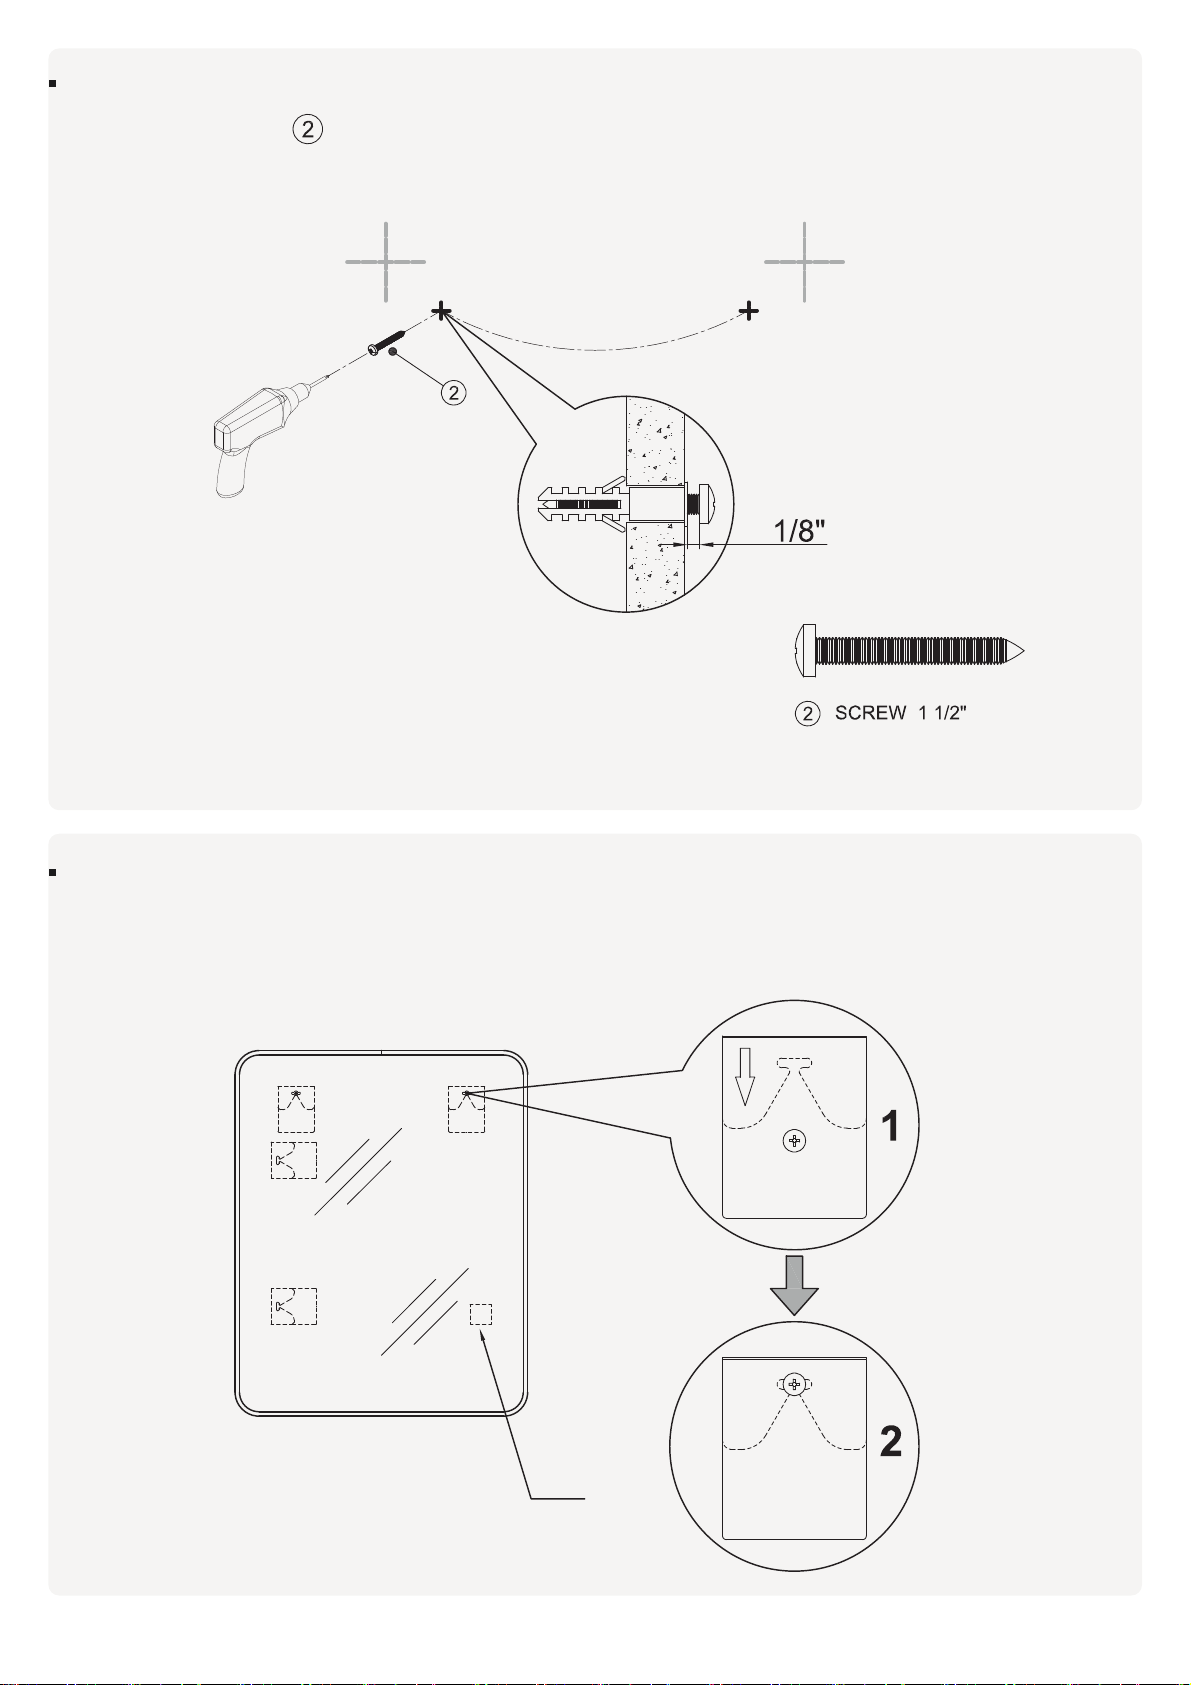
5
STEP 4
Install the screw , leaving a gap of 1/8" between the screw head and the wall.
STEP 5
Peel o the double-sided tape lm from the pad, place the mirror against the
wall, and slide it down, as shown in Figure 2.
PAD

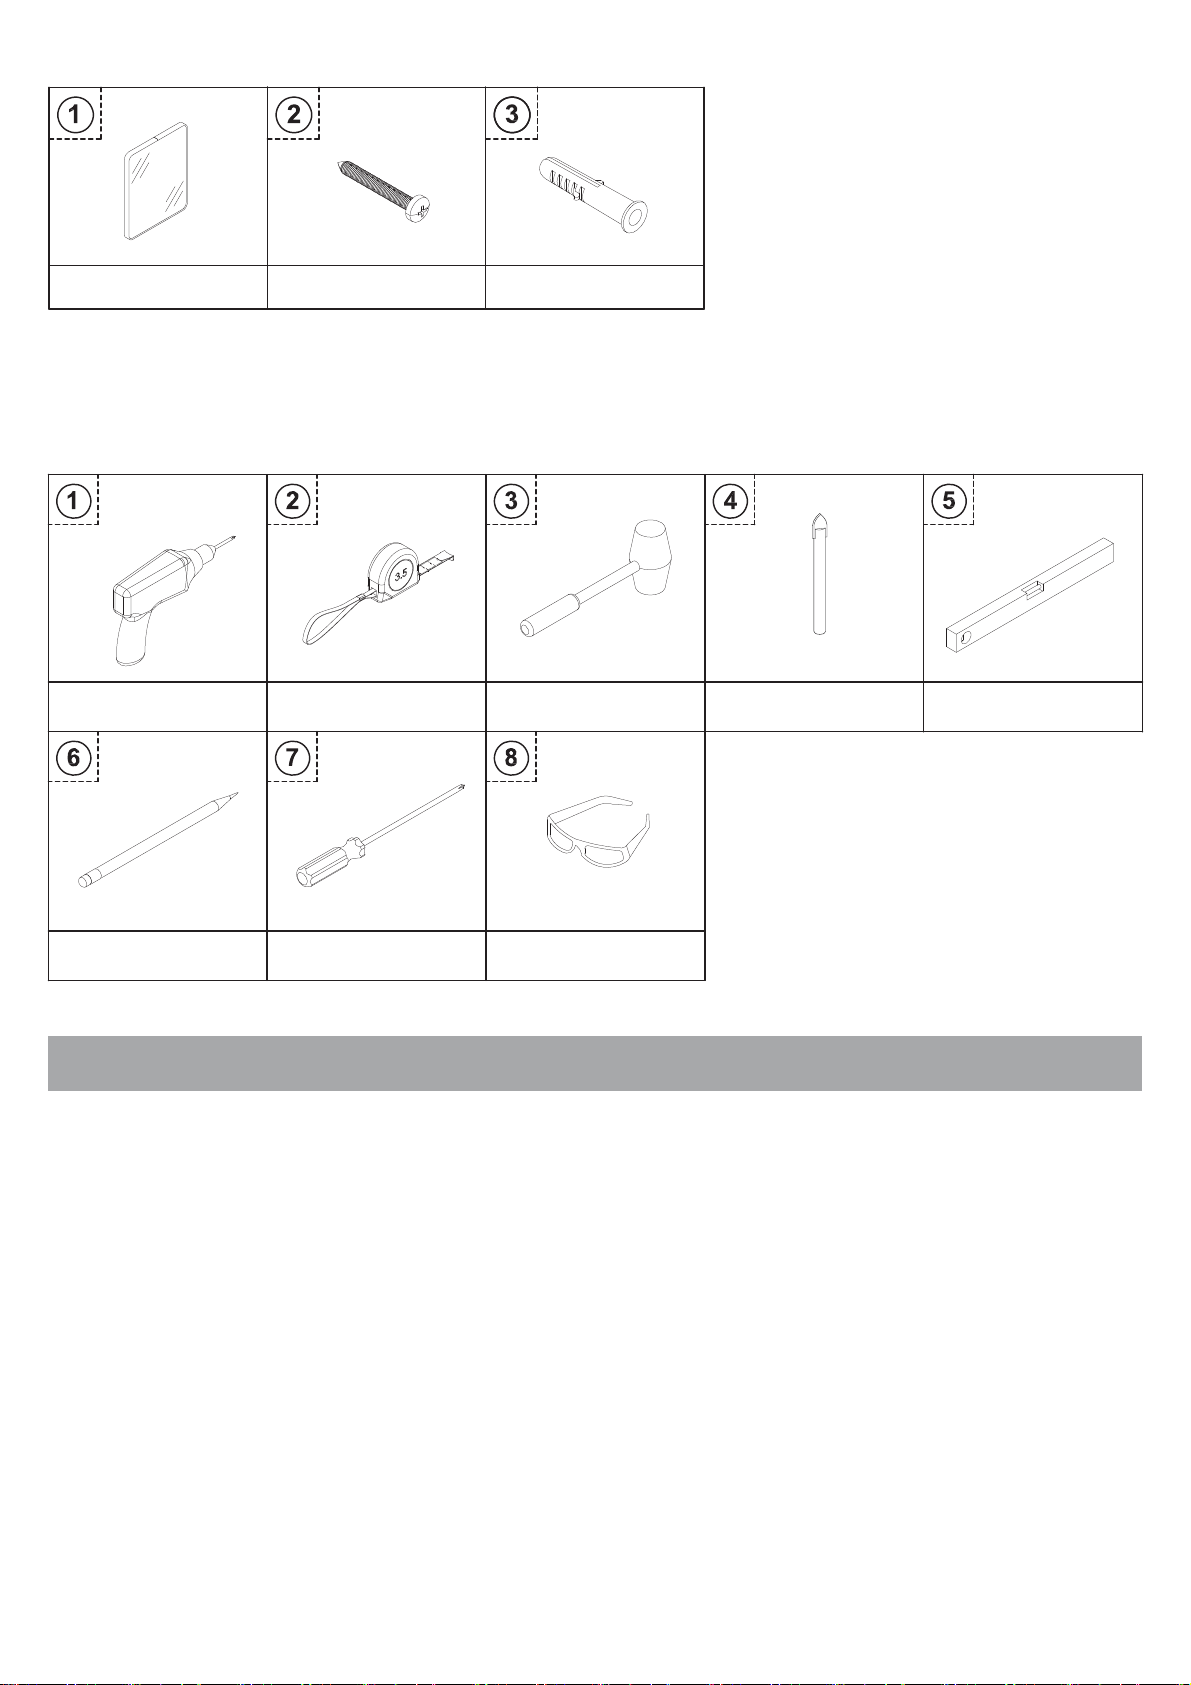
Diagrama Detallado de los Componentes
del Espejo de Aluminio
6
TORNILLO DE 1 1/12"
Thank you for choosing our Aluminium Mirror. We hope to provide you with the most satisfying
product and user experience.
Please read through this manual carefully as it contains impoant product informmationand
step-by-step instructions on how to install this product, Fail to follow ceain conditions of the
instruction may aect the warranty of the product.
1.Prior to installation, please inspect the boxes for damages due to shipping. If there is any miss-
ing pa or defective pa, please contact customer seice through email within 7 business days
of the delive date. Please note that we will not replace any damaged products or missing pas
free of charge after 7 business days from the installation of the product. Feel free to contact us if
you have any questions regarding your Order number.
2.Please make sure to contact your local building codes with questions on installation standards.
Building and plumbing codes may va by location.
7
LISTA DE PIEZAS.
ESPEJO (1 pieza) TORNILLO DE 1 1/2"
(2 piezas) TACO DE PARED (2 piezas)
ADVERTENCIA: SIEMPRE SE DEBEN USAR GAFAS DE
SEGURIDAD AL TRABAJAR CON UN TALADRO.
HERRAMIENTAS NECESARIAS:
Antes de comenzar
Gracias por elegir nuestro Espejo de Aluminio. Esperamos proporcionarle el producto más
satisfactorio y una experiencia de usuario excelente.
Por favor, lea cuidadosamente este manual ya que contiene información impoante sobre el
producto e instrucciones paso a paso sobre cómo instalar este producto. No seguir cieas
condiciones de la instrucción puede afectar la garantía del producto.
1.Antes de la instalación, por favor, inspeccione las cajas en busca de daños durante el envío. Si
falta alguna pieza o hay alguna pieza defectuosa, por favor, contacte al seicio al cliente por
correo electrónico dentro de los 7 días hábiles posteriores a la fecha de entrega. Tenga en cuenta
que no reemplazaremos productos dañados o piezas faltantes de forma gratuita después de 7
días hábiles desde la instalación del producto. No dude en contactarnos si tiene alguna pregunta
con respecto a su número de orden de compra.
2.Por favor, asegúrese de contactar con los códigos de construcción locales para preguntas
sobre estándares de instalación. Los códigos de construcción y de plomería pueden variar según
la ubicación.
TALADRO
LÁPIZ DESTORNILLADORES GAFAS DE SEGURIDAD
CINTA MÉTRICA MARTILLO DE GOMA BROCAS NIVEL
5/16"
Thank you for choosing our Aluminium Mirror. We hope to provide you with the mostsatisfying
product and user experience.
Please read through this manual carefully as it contains impoant product informmationand
step-by-step instructions on how to install this product, Fail to follow ceainconditions of the
instruction may aect the warranty of the product.
1.Prior to installation, please inspect the boxes for damages due to shipping. If there is any miss-
ing pa or defective pa, please contact customer seice through email within 7 business days
of the delive date. Please note that we will not replace any damaged products or missing pas
free of charge after 7 business days from the installation of the product. Feel free to contact us if
you have any questions regarding your Order number.
2.Please make sure to contact your local building codes with questions on installation standards.
Building and plumbing codes may va by location.
Elige la dirección del espejo: veical u horizontal.
Sigue el diagrama correspondiente a continuación
ENSAMBLAJE VERTICAL ENSAMBLAJE HORIZONTAL
Seleccione la posición deseada del espejo. Nivélelo y marque la ubicación.
PASO 1
8
PASO 3
PASO 2
NÚMERO DE
MODELO
ENSAMBLAJE
VERTICAL
Marque las ubicaciones de peoración y asegúrese de que las marcas estén niveladas,
basándose en la instalación veical u horizontal. Vea el cuadro a continuación.
ENSAMBLAJE
HORIZONTAL
4 pulgadas para veical
7 pulgadas para veical
3.1 Peore agujeros de aproximadamente 1 1/2 pulgadas de profundidad en la
ubicación marcada.
3.2 Insear el taco para pared .
Para paneles de yeso con un grosor superior a 10-12 mm, asegúrese de usar los anclajes
designados para paneles de yeso durante la instalación. Para paneles de yeso con un grosor inferior
a 10-12 mm, asegúrese de instalar los sopoes en el montante.
9

10
PASO 4
Instale el tornillo , dejando un espacio de 1/8 de pulgada entre la cabeza del
tornillo y la pared.
PASO 5
Desprenda la película de cinta de doble cara del sopoe, coloque el espejo
contra la pared y deslícelo hacia abajo, como se muestra en la Figura 2.
ALMOHADILLA
This manual suits for next models
5
Table of contents
Languages:
Other HERMITAGE BATH Indoor Furnishing manuals

Popular Indoor Furnishing manuals by other brands

Regency
Regency LWMS3015 Assembly instructions

Furniture of America
Furniture of America CM7751C Assembly instructions

Safavieh Furniture
Safavieh Furniture Estella CNS5731 manual

PLACES OF STYLE
PLACES OF STYLE Ovalfuss Assembly instruction

Trasman
Trasman 1138 Bo1 Assembly manual

Costway
Costway JV10856 manual


