HERSILL OXYMO User manual
Manual Ref.: 9550601 Rev.: 1.6 Jan 2016
Demand Oxygen Delivery System and
Respiratory Monitor
User Manual
www.hersill.com
0051

Manual Ref.: 9550601 Rev.: 1.6 Jan 2016

User Manual
English

CONTENTS
2
1. INTENDED USE................................................................................................ 4
2. SAFETY INFORMATION .................................................................................. 5
2.1. MEANING OF SYMBOLS..................................................................................................5
2.2. SAFETY INFORMATION...................................................................................................5
3. TECHNICAL SPECIFICATIONS....................................................................... 8
4. SCHEME OF THE DEVICE............................................................................... 9
5. INNOVATIVE FEATURES .............................................................................. 12
5.1. SMART FLOW.................................................................................................................12
5.2. SMART ASSIST ..............................................................................................................13
5.3. SMART TRIGGER...........................................................................................................13
5.4. SMART SUPERVISION...................................................................................................14
5.5. OTHER FEATURES ........................................................................................................14
6. OPERATION INSTRUCTIONS ....................................................................... 16
6.1. CONNECTION TO AN O2CYLINDER .............................................................................16
6.2. CONNECTION TO AN O2PIPELINE ...............................................................................18
6.3. CONNECTION TO A LIQUID O2 TANK (LOX) ................................................................19
6.4. SWITCH ON AND PLACEMENT OF THE NASAL CANNULA.........................................20
6.5. SWITCH OFF ..................................................................................................................21
6.6. TO DELETE THE MEMORY............................................................................................21
6.7. KEYBOARD LOCKING....................................................................................................22
6.8. CONFIGURATION...........................................................................................................23
6.8.1. CLOCK SETTINGS ................................................................................................25
6.8.2. SMART FLOW CONFIGURATION .........................................................................27
6.8.3. SMART ASSIST CONFIGURATION.......................................................................30
6.8.4. SETTING THE TIME AT WHICH THE ALARM OF DISCONNECTION OR APNEA
SHOULD BE ACTIVATED....................................................................................................31
6.8.5. CONFIGURATION OF SAFETY FLOW FOR DISCONNECTION OR APNEA........32
6.8.6. CONFIGURATION OF AUTOMATED POWER-OFF ..............................................33
6.9. OPERATING MODES .....................................................................................................34

CONTENTS
3
6.9.1. RESPIRATORY MONITOR MODE.........................................................................34
6.9.2. CONSERVER MODE .............................................................................................34
6.9.3. SETTING THE EQUIVALENT FLOW .....................................................................35
6.9.4. SETTING THE TRIGGER.......................................................................................36
7. ALARMS..........................................................................................................38
7.1. LOW BATTERY ALARM..................................................................................................39
7.2. LOW O2PRESSURE SUPPLY ALARM...........................................................................40
7.3. DISCONNECTION OR APNEA ALARM ..........................................................................40
8. POWER SUPPLY ............................................................................................41
8.1. RECHARGEABLE BATTERIES FEEDING ......................................................................42
8.2. CHANGE BATTERIES.....................................................................................................43
8.3. POWER SUPPLY FEEDING ...........................................................................................44
9. OXYGEN SOURCE .........................................................................................45
9.1. HIGH PRESSURE CYLINDER ........................................................................................45
9.2. LOW PRESSURE OXYGEN PIPELINE (HOSPITAL) ......................................................46
9.3. LIQUID OXYGEN ............................................................................................................47
10. CONTINUOUS FLOW ADAPTER...................................................................47
11. SOFTWARE OXYMO-SW ...............................................................................48
12. SPARE PARTS AND ACCESSORIES ...........................................................49
13. TROUBLESHOOTING ....................................................................................50
14. MAINTENANCE, STORAGE AND REMOVAL...............................................53
14.1. MAINTENANCE...............................................................................................................53
14.2. STORAGE .......................................................................................................................53
14.3. REMOVAL OF DEVICE AND COMPONENTS ................................................................53
15. WARRANTY ....................................................................................................54
16. QUALITY STANDARDS..................................................................................55
16.1. ELECTROMAGNETIC STANDARDS ..............................................................................55

4
1. INTENDED USE
OXYMO is a portable electronic demand oxygen delivery device. These
devices are also called oxygen conservers or savers. It provides a small
amount of oxygen (bolus) when the patient begins the inspiration, with
physiological effect similar to a continuous flow (equivalent flow).
Its main use is to extend the life of portable oxygen cylinders at high
pressure, and thus increasing patient autonomy. It can be connected to any
bottle of high pressure oxygen, to any liquid oxygen (LOX) or to a pipe of low
pressure oxygen. There are accessories for all standard types of regulators
and valves for oxygen channelling. It does not need humidifier. The savings
of oxygen and the humidification accessories allow for a quick return on
investments.
OXYMO has many features that improve its effectiveness over other
economizers. One is that it allows monitoring the patient compliance.
CONTRAINDICATIONS: Common cases in oxygen therapies.

5
2. SAFETY INFORMATION
2.1. MEANING OF SYMBOLS
IWARNING .
Urgent notice on hazardous situation which, if not
corrected, could result in serious injury or death.
I CAUTION .
Important notice on hazardous situation which, if not
corrected, could result in minor or moderate patient
injury or device damage.
I
NOTE .
Additional information in order to prevent problems
during operation.
n
Non-smoking.
I
Consult the attached documents.
Do not use lubricants or greases.
2.2. SAFETY INFORMATION
Please read this manual and that for its accessories before using the device.
If a section does not understand or need assistance, contact your dealer or
manufacturer.
Inform your provider about unexpected events or changes in operation before
continuing to use the device.
IWARNING .
•Oxygen by itself is not combustible, but powers and accelerates
energetically the combustion of inflammable materials, therefore:
- nDo not smoke while using the unit nor near people using it.
Do not use the unit near any flame.
- Avoid exposing the unit to heat sources as stoves, kitchens,
chimneys, etc.

6
Maintain the unit far from any substance susceptible to be
inflammable, like oils, derivatives of petroleum, alcohol, aerosols,
etc.
•In order to avoid high oxygen concentrations, use the unit in well-
ventilated areas (never underneath the clothes). Close the oxygen
supply whenever the device is not used.
I CAUTION .
•OXYMO must be used only to provide medical grade (U.S.P.)
oxygen, and always on the order of a physician. Federal (USA)
law restricts this device to sale by or on the order of a physician.
•The oxygen supplied by OXYMO should not be considered as a
vital treatment.
•Do not use in patients with respiratory rate neither greater than 50
nor lower than 4 breaths per minute.
•Not approved for use in children.
•Like any system pulse oxygen through nasal cannula, it is not
effective in patients with mouth breathing.
•Not reliable as oxygen therapy system during sleep.
•Not for use with masks or with humidifier.
•Wear nasal cannula of a single lumen and a maximum length of 2
meters.
•To detect correctly inspiratory effort, intranasal tubes of nasal
cannula should not be too thin (HERSILL advised to be flared tip.)
•The nasal cannula should be replaced with each patient and
always are deteriorated.
•You can lock the device keypad to prevent tampering by
unauthorized persons.
•Keep the device out of reach of children or pets. Do not allow
children or pets to play with the equipment, accessories and
cables.
•Risk of strangulation and suffocation: route cables and hoses
carefully to reduce the possibility of strangulation or suffocation.

7
•Periodically check the tank pressure (on the gauge), to ensure it is
sufficiently filled (it is advisable to always have a spare bottle).
•Do not immerse the unit.
•Do not subject the device to temperatures above 50 ° C or below
-10 ° C.
•Never open the valve on the oxygen bottle abruptly as this may
damage your pressure regulator. You must always do it slowly.
•In case of failure contact your supplier. Never attempt to repair the
unit or accessories.
•Do not modify the unit or interconnected with other equipment or
accessories other than those described in these instructions. Do
not use any additional tube between the unit and the oxygen.
•Electro-medical devices require special precautions regarding
EMC and needs to be installed and put into service according to
the information relating to the compatibility provided by the
accompanying documents. The use of accessories and cables
other than those specified may result in increased emissions or
decreased immunity of the device.

8
3. TECHNICAL SPECIFICATIONS
Dimensions 96 x 66 x 25 mm
Weight 105 g (165 g with batteries)
Respiratory Rate 4-50 BPM (Breaths Per Minute)
O2Supply Pressure = 1,5 ± 0,15 bar - Flow > 25L/min
Output flow to the
patient Adjustable from 0,5 to 7,5 L/min O2equivalent
Trigger Adjustable from -1,5 mmH2O to -9,5 mmH2O
Alarms
(acoustic and
visuals)
•Low battery.
•Disconnection or apnea.
•Low O
2.
pressure supply
Display
indications
•Flow [L/min Equiv.]
•Trigger [mmH2O]
•Breathing frequency [ BPM]
•Keyboard locking
•Alarms
Power supply
•2 Batteries LR06(AA) rechargeable (NiMH, 1.2V)
or alkaline (1.5V). Internal battery charger
•5 V DC adapter
Autonomy 80 hours (typical use, with batteries NiMH)
Communications USB port
Software OXYMO-SW for Windows®
Operation
temperature
-10 ºC to + 50 ºC
Store temperature -40 ºC to + 70 ºC
Internal memory
In regular use as patient compliance monitor: until 1
year recording
Protection level
Type BF
IPX32: against access to hazardous parts with tool
and against falling drops of water with a maximum
inclination of 15º
9
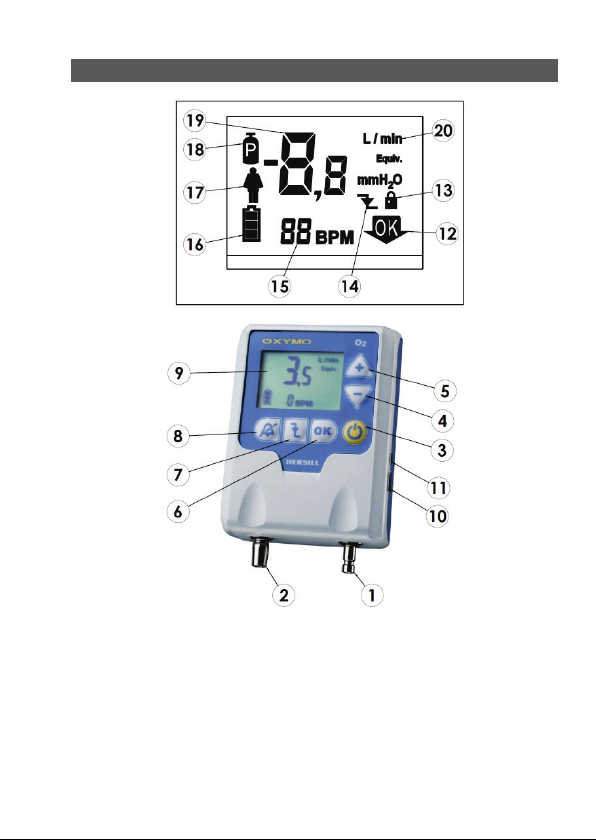
4. SCHEME OF THE DEVICE
1. O
2
input connector
2. O2output connector
3. ON/OFF
4. Minus
5. Plus
6. To confirm (OK)
7. Setting the trigger level
8. Alarm silencer
9. Display
10.MiniUSB port
11. DC supply port
12. Push “OK” button
13. Keyboard locked
14. Detection of inspiration
15. Breathing frequency (b
reaths per
minute)
16. Battery level
17. Alarm of disconnection or apnea
18. Low pressure supply alarm
19. Flow or trigger value
20. Flow or trigger units
(L/min Equiv
or mmH2O)
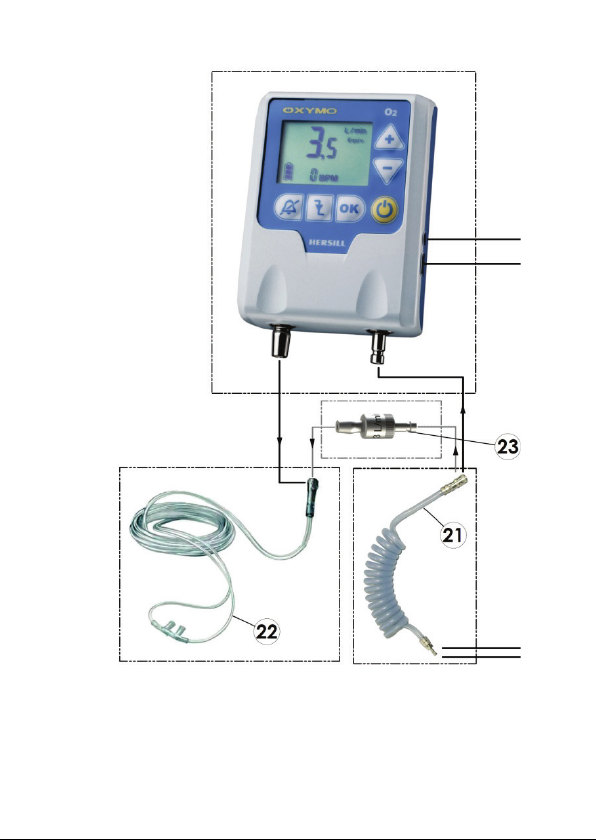
10
21. Spiral hose
22. Nasal cannula
23. Continuous flow adapter (3 L/min)
24. Regulator OXYMO P-15 Micro (with O
2
connection DISS)
25. Cylinder regulator P-300 (with O2 auxiliary output DISS) (*)
*(Consult different types of cylinder connections available).

11
26. Oxygen cylinder
27. AC/DC adapter
28. USB cable
29. O2 pipeline regulator OXYMO P-15 (**)
** (Consult different types of connections available)

12
5. INNOVATIVE FEATURES
OXYMO integrates multiple functionalities and, in particular, 4 sets designed
to improve performance against various clinically relevant problems:
1. Smart Flow
2. Smart Assist *
3. Smart Trigger *
4. Smart Supervision
* Patent pending
5.1. SMART FLOW
In any O2economizer using a pressure bottle, but not in all concentrators
using demand flow oxygen release, the oxygen volume of each pulse
(bolus) is maintained by increasing the breathing rate. Therefore, the
volume/minute of oxygen also increases. Nevertheless, some patients
require more oxygen for their physical efforts. Increased respiratory rate
has an excellent correlation with physical efforts. The innovative Smart
Flow system (patent pending) increases the bolus based on the respiratory
rate. This requires configuring two parameters: the breathing rate of the
patient at rest (baseline frequency) and the percentage of increase in the
equivalent flow desired.
Example: We schedule Smart Flow with a baseline frequency of 20 BPM
and a 5% of increase of the equivalent flow. If the patient's respiratory rate
rises from 20 to 30 BPM, the system will increase the equivalent flow by
50% (5% per 1 BPM above 20). If the flow of oxygen prescribed for the
patient was 2 L/min Equiv., and rising from 20 to 30 BPM, OXYMO would
provide a bolus corresponding to 3 L/min Equiv.
INOTE .
The maximum equivalent flow is 7.5 L/min.

13
INOTE .
This functionality can be enabled or disabled. OXYMO is factory supplied with
the Smart Flow deactivated.
5.2. SMART ASSIST
If the nasal cannula is not well placed, its holes are too small or the patient
breathes through the mouth, any device of pulsed oxygen therapy
(economizer or concentrator) cannot detect inspiratory effort and not send
pulses of O2. It is essential to educate the patient on the need to use
appropriate cannula, take them in place and breathe through the nose. The
innovative Smart Assist system (patent pending) is designed to assist in
this education.
Smart Assist analyses the respiratory time. If it does not detect inspiratory
effort during a time abnormally high, it warns the patient by sending a train
of small pulses of O2, which are not bothersome. If it does not still detect
inspiratory effort, sends a second train of longer pulses. If, despite these 2
warnings, the inspiratory effort remains undetected, it activates
disconnection/apnea alarm.
INOTE .
This functionality can be enabled or disabled. OXYMO is factory supplied with
the Smart Assist deactivated.
5.3. SMART TRIGGER
A) The vacuum is not detected through an electro-mechanical pressure
switch, but in a high sensitivity pressure sensor. This permits to deliver
oxygen very early, so that less bolus is required to achieve the same
physiological effect. If an O2cylinder is used, more O2 it saved and
increases patient autonomy.
B) The trigger level is very low and adjustable. This allows to detect weak
inspirations and to better adapt to each patient. Smart Trigger introduces
an analysis algorithm to avoid false triggering.

14
5.4. SMART SUPERVISION
Many patients use their oxygen therapy equipment less time than
prescribed by their doctors. OXYMO allows to control the patient
compliance.
Working as Oxygen Conserver or as Respiratory Monitor (See Chapter
6.8), OXYMO stores the respiratory rate, the hours of daily use and the
events* for about 1 year. This allows to check therapeutic compliance.
Moreover, on the last day of use each patient's breath is recorded. It
allows, for example, to compare the respiratory pattern of the patient during
wakefulness or sleep,and test the effectiveness of the Smart Flow and
Assist systems. If the memory capacity is exceeded without downloading
data or erasing the memory, the new data replace the old ones
By the OXYMO-SW software, is possible to configure the device
parameters, delete the memory, download data and perform a graphical
and statistical analysis thereof (USB port).
* We call events to the alarms of disconnection/apnea and low O2pressure
and to the changes in configuration parameters.
5.5. OTHER FEATURES
1. Respiratory rate of the patient and trigger signal visible on
screen.
Each time a bolus is triggered, its signal is displayed. OXYMO
calculates and displays on screen the respiratory rate based on
these shots. Both data allows an observer to check if the device
responds appropriately to the inspirations of the patient,
implementing corrective measures if not.
2. Visible and audible alarms for disconnection/apnea, low
battery and low O2pressure.
3. Programmable from the keyboard of the device or from the
computer.
4. Keyboard lock.

15
5. Alarm of disconnection/apnea with the following
characteristics:
a. The time to activate the disconnection/apnea alarm is adjustable
from 10 to 60 seconds.
b. Safety Flow during disconnection/apnea alarms.
Being this feature enabled, during a disconnection/apnea alarm
OXYMO will supply oxygen, by a pulsed mode, reaching a rate of
2 L / min, until the alarm is deactivated or the device is switch off.
If the alarm is silenced (using the button on the keyboard), but
inspirations remain undetected, the alarm is not deactivated and
the security flow is not interrupted.
INOTE .
This functionality can be enabled or disabled. OXYMO is factory
supplied with the Safety Flow deactivated.
INOTE .
The Safety Flow is independent from the 3L/min continuous flow
accessory, provided in case of any OXYMO failure (See Chapter 10).
c. Auto Power-Off system.
Being this feature enabled, if the disconnection/apnea alarm is not
disabled within 5 minutes, OXYMO will consider that there is not
any apnea, but a disconnection (the patient would have removed
the nasal cannula, forgetting to shut down the device). In this
situation, it will turn off itself to avoid wasting battery.
INOTE .
This functionality can be enabled or disabled. OXYMO is factory
supplied with the Auto Power-Off deactivated.

16
6. OPERATION INSTRUCTIONS
Before connecting the device, check for damages that could avoid its correct
operation; if that is the case, you must contact the supplier or the technical
service.
6.1. CONNECTION TO AN O2CYLINDER
1
Check the oxygen cylinder (1) is closed.
Connect to cylinder an oxygen pressure
regulator (2) having a standard DISS
outlet pressure, of between 2.8 and 7
bar (in the figure, Hersill P-300). Open
the cylinder valve slowly. Check for
leaks and that the cylinder has enough
oxygen (the arrow points to
the green
area).
Connect the regulator OXYMO P-15
MICRO (3) to the cylinder regulator.
2
Connect the spiral hose to the regulator
OXYMO P-15 MICRO.
3
Connect the other terminal of the spiral
hose to the inlet connection of the unit.
Insert batteries (back door of the device)
and/or connect de AC/DC adapter
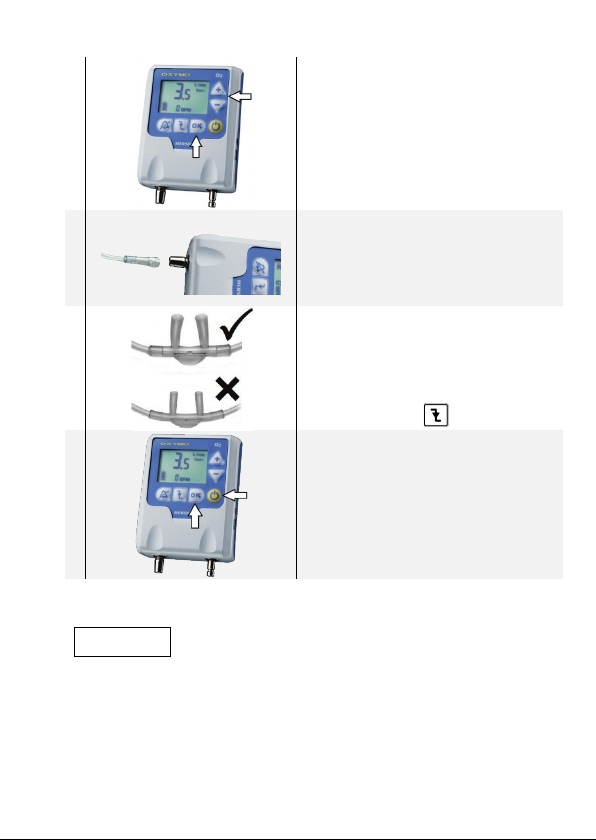
4
Turn-on the device (On button).
During the boot sequence the display
will blink three times and the buzzer will
beep.
ICAUTION .
Does not turn on OXYMO with nasal
cannula connected to the patient.
1
2
3
17
5
After powering on, the display shows the
last flow setting.
To set a different value:
Press the buttons + / -.
To confirm the set:
Press the button OK.
6
Connect the nasal cannula to the inlet
connection of the device.
Put the nasal cannula to the patient.
7
To properly detect inspiratory effort,
intranasal tubes should not be too thin
(HERSILL advised to be flared-tipped).
Check that with each breath, a bolus of
oxygen is released (you can see on the
screen the symbol )
8
To switch off the device:
Press the button ON / OFF.
Confirm by pressing OK.
ICAUTION .
Do not connect the OXYMO device to any other regulator than the OXYMO
P-15 MICRO.

18
6.2. CONNECTION TO AN O2PIPELINE
1
Connect the regulator OXYMO P-15 to
a wall valve outlet.
2
Connect the spiral hose to the
regulator OXYMO P-15.
Place the OXYMO on the wall
regulator: sliding vertically
the plastic
piece on the rail of the OXYMO P-15
regulator.
Follow steps 3 to 8 described in the previous section.
I
CAUTION .
For use of OXYMO in a pipeline oxygen supply, this
last must have a pressure ranging between 2.8 to 7
bar.
Other manuals for OXYMO
1
Table of contents
Other HERSILL Oxygen Equipment manuals


