Herzberg HG-5200 User manual

BRUSH CUTTER
HG-5200

NOTES ON TYPES OF WARNINGS IN THE MANUAL
This mark indicates instructions which must be followed in order to prevent
accidents which could lead to serious bodily injury or death.
This mark indicates instructions which must be followed, or it leads to mechanical
failure, breakdown, or damage.
This mark indicates hints or directions useful in the use of the product.
WARNING
IMPORTANT
Contents
1.PARTS LOCATION.............................................................................. 2
2.WARNING LABELS ON THE MACHINE.........................................................3
3.SYMBOLS ON THE MACHINE........................................................................4
4.SAFETY PRECAUTIONS.................................................................................4
5.SET UP..............................................................................................................8
6.FUEL.................................................................................................................10
7.OPERATION....................................................................................................10
8.MAINTENANCE...............................................................................................12
9.SPECIFICATIONS...........................................................................................15
.............
!
NOTE
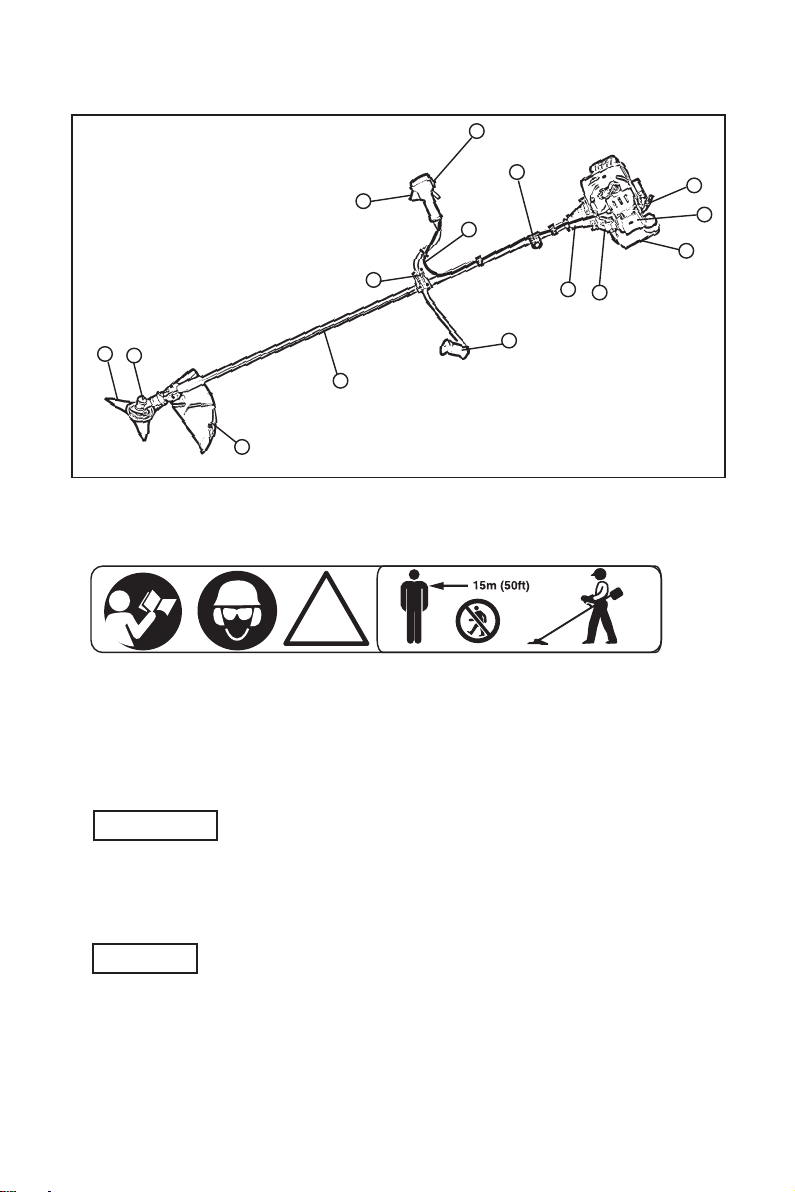
1.PARTS LOCATION
1.Fuel tank
2.Starter
3.Air cleaner
4.Stand
5.Engine switch button
6.Housing
7.Hanger
8.Handle
9.Hale bracket
10.Throttle lever
11.Throttle cable
12.Outer pipe
13.Safety guard
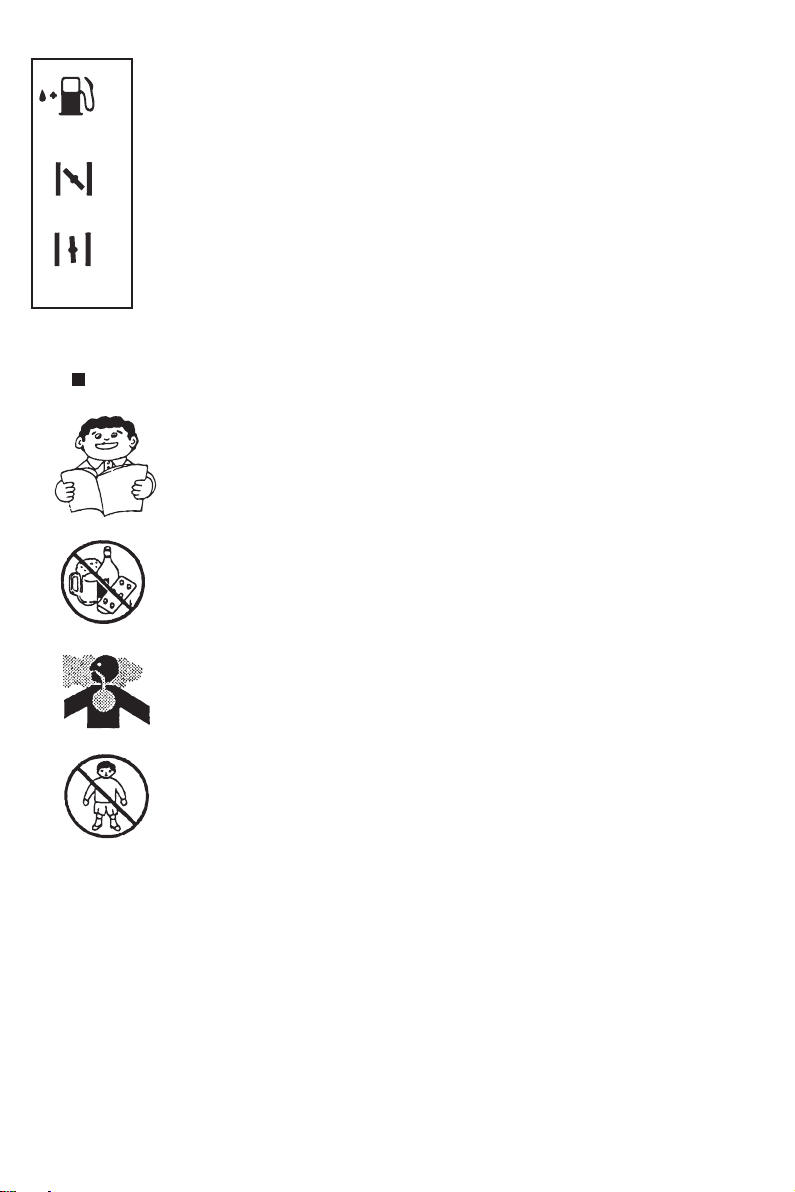
2. WARNING LABELS ON THE MACHINE
(1)Read owner’s manual before operating this machine.
(2)Wear head, eye and ear protection.
(3)Warning/Attention
(4)Keep all children, bystanders and helpers 15 meters away from the brush cutter.
If warning seals peel off or become soiled and impossible to read, you
should contact the dealer from which you purchased the product to order
new seals and affix the new seal in the required location.
IMPORTANT
14.Gear case
15.Blade
!
(1) (2) (3) (4)
WARNING
Never remodel your brush cutter.
We won’t warrant the machine, if you use the remodeled brush cutter or
you don’t observe the proper usage written in the manual.
3. SYMBOLS ON THE MACHINE
13
14
15
12
1
2
3
4
5
6
7
8
9
10
11
For safe operation and maintenance, symbols are carved in relief on the machine.
According to these indications, please be careful not to make a mistake.
(a).The port to refuel the “MIX GASOLINE”
Position: fuel tank cap
(b).The direction to close the choke
Position: AIR CLEANER COVER
(C).The direction to open the choke
Position: AIR CLEANER COVER
a. Read this owner’s manual carefully to understand
how to operate this unit properly.
b. This product has been designed for use in cutting grass, and
il should never be used for any other purpose.
c. You should never use the product when under the influence
of alcohol, when suffering from exhaustion or lack of sleep,
when suffering from drowsiness as a result of having
taken cold medicine, or at any other time when a possibility
exists that your judgment might be impaired or that you might
not be able to operate the machine properly and in a safe manner.
d. Avoid running the engine indoors. The exhaust gases contain
harmful carbon monoxide.
e. Never use the product under circumstances like those described below:
4. SAFETY PRECAUTIONS
BEFORE USING THE MACHINE
(a)
(b)
( c)
1.When the ground is slippery or when other conditions exist
which might make it not possible to maintain a steady posture
2.At night, at times of heavy fog, or at any other times when
your field of vision might be limited and it would be difficult to
gain a clear view of the area.
3.During rain storms, during lightning storms, at times of strong
or gale-force winds, or at any other times when weather
conditions might make it unsafe to use this product.
f. When using this product for the first time, before beginning
actual work, learn to handling it from skilled worker.
g. Lack of sleep, tiredness, or physical exhaustion results in lower
attention spans, and this in turn leads to accidents and injury.
Limit the amount of time of using the machine continuously
to somewhere around 10 minutes per session, and
take 10~20 minutes of rest between work sessions. Also try to
keep the total amount of work performed in a single day under 2
hours or less.
h. Be sure to keep this manual handy so that you may refer to it
later whenever any questions arise.

a. When using the product, you should wear proper clothing and
protective equipments as follows.
b. And you should carry with you.
1.Attached tools and files.
2.Properly reserved fuel
3.Spare blade
4.Things to notify your working area (Tope, warning signs)
5.Whistle (for collaboration or emergency)
6.Hatchet or saw (for removal of obstacles).
(1) Helmet
(2) Protection goggles or face Protector
(3) Thick work gloves
(4) Non-slip-sole work boots
(5) Ear protectors
WORKING GEAR AND CLOTHING
I. be sure to include this manual when selling, lending or otherwise transferring the ownership of this
product
2. Never allow children or anyone unable to fully understand the directions given in this manual
to use this brush cutter.
Always
c. Never use the product when wearing pants with loose cuffs, when wearing
sandals, or when barefoot.
a. The engine of this product is designed to run
on a mixed fuel which contains highly flammable
gasoline. Never store cans of fuel or refill
the fuel tank in any place where there is a boiler
stove, wood fire, electrical sparks, welding sparks,
or any other source of heat or fire which might ignite the fuel.
b. Smoking while operating the product or refilling its fuel tank is
extremely dangerous. Always be sure to keep lit cigarettes away from
the product at all times.
c. When refilling the tank always turn off the engine first and take a careful
look around to make sure that there are no sparks or open flames
anywhere nearby before refueling.
d. If any fuel spillage occurs during refueling, use a dry rag to wipe up
spills before turning the engine back on again.
e. after refueling, screw the fuel cap back tightly onto the fuel tank and
then carry the product to a spot 3 m or more away from where it was
refueled before turning on the engine.
WORKING CONSIDERING HANDLING OF FUEL
THINGS TO CHECK BEFORE USING YOUR BRUSHCUTTER
a. Before beginning work, look around carefully to get a feel for the shape of the land. or grass to be trimmed
and whether or not there are any obstacle. which might get in the way white working, and remove any

obstacles, which can be cleared away.
b. The area within a perimeter of 15m of the person using the brush cutter should be considered a hazardous
area into which no one should enter while the brush cutter is in use, and when necessary yellow warning
rope, warning signs should be placed around the work area. When work is to be performed simultaneously
by two or more persons. always check the presence and locations of others so as to maintain a distance
each person sufficient to ensure solely.
c. Make sure that there are no loose screws or bolts. fuel leaks, ruptures, dents, or
any other problems. which might interfere with safe operation. Be especially
careful to check that there is nothing wrong with the blades or with the joints by
which the blades are attached to the brush cutter.
d. Never use blades that are bent, warped, cracked, broken or damaged in
any way.
e. Keep the blade always sharp.
I. filling the cutting edges, keep the end corner sharp and round the root of the
edge.
g. Check the boll to fasten the blade and be sure the blade turns smoothly
without abnormal noise.
NOTES ON STARTING THE ENGINE
1. Take a careful look around to make sure that no obstacles exist within a perimeter of 15m or less around
brush cutter.
2. Place the body of the brush cutter onto the ground in a flat clear area and hold it firmly in place so as to
ensure that neither neither the blades nor the throttle come into
contact with any obstacles when the engine starts up.
3. Place the throttle into the idling position when starting the engine.
4. After starting up the engine. if the blades continue to rotate even
after the throttle has been moved fully back, turn off the engine
and check the throttle wire and other parts.
KICKBACK SAFETY PRECAUTIONS
A dangerous reaction may occur when the spinning blade contacts a solid object in the critical area. It is
called kick back. as a result, the operator can lose control of the unit. which can cause serious or fatal
injury.
Avoid kickback, observe the safely precautions below strictly.
1. Before beginning work, clear your working area and remove grasses around the obstacles.
2. When using your brush cutter do not grip other parts except the handles.

3. When using your brush cutter never take your eyes off. If you need to place the throttle into the idling
position.
4. When using your brush cutter do not let the unit get closer to your feet nor raise the unit above your waist.
NOTES ON TRANSPORTATION
1. Make sure the appropriate blade cover is in place.
2. When transporting by car fix the unit firmly using a rope. do not transport by bicycle or motorcycle because
it is dangerous.
3. Never transport the brush cutter over rough roads over long distances without first removing all fuel from the
fuel tank, as doing so might cause fuel to teak from the tank.
OPERATION SAFETY PRECAUTIONS
1. Grip the handles of the brush cutter firmly with both hands. If you suspend the work, place the throttle into
the idling position.
2. Always be sure to maintain a steady even posture while working.
3. Maintain the speed of the engine at the level required to perform cutting work and never raise the speed
of the engine above the level necessary.
4. If the grass gets caught in the blade during operation or if you need to check the unit or refuel the tank
always be sure to burn off the engine.
5. If the blade touches a hard object like a stone immediately stop the engine and
check if something is wrong with the blade. If so replace the blade by new one.
6. If someone calls out while working always be sure to turn off the engine before turning
around.
7. Never touch the spark plug or plug cord while the engine is in operation. doing so may
result in being subjected to an electrical shock.
8. Never touch the muffler spark plug or other metallic parts of the engine while the
engine is in operation or immediately after shutting down the engine. Doing so
may result in serious burns.
9. When you finish cutting in one location and wish to continue work in another
spot turn off the engine and turn the unit as the blade faces away from your
body.
MAINTENANCE SAFETY PRECAUTION
1. Perform the maintenance and checking operations described in this manual at regular intervals. If any parts
must be replaced or any maintenance or repair work not described in this manual must be performed
please contact a representative from the store nearest authorized servicing dealer for assistance.
2. Under no circumstances should you ever take apart the brush cutter or alter it in any way. Doing so might
result in the brush cutter becoming damaged during operation or the brush cutter becoming unable to
operate properly.
3. Always be sure to turn off the engine before performing any maintenance or checking procedures.
4. When sharpening removing or reattaching the blade proper tools and equipment to prevent injury.
5. When replacing blade or any other parts or when replacing the oil or any lubricants always be sure to use
only products or products which have been certified by for use with the brush cutter.
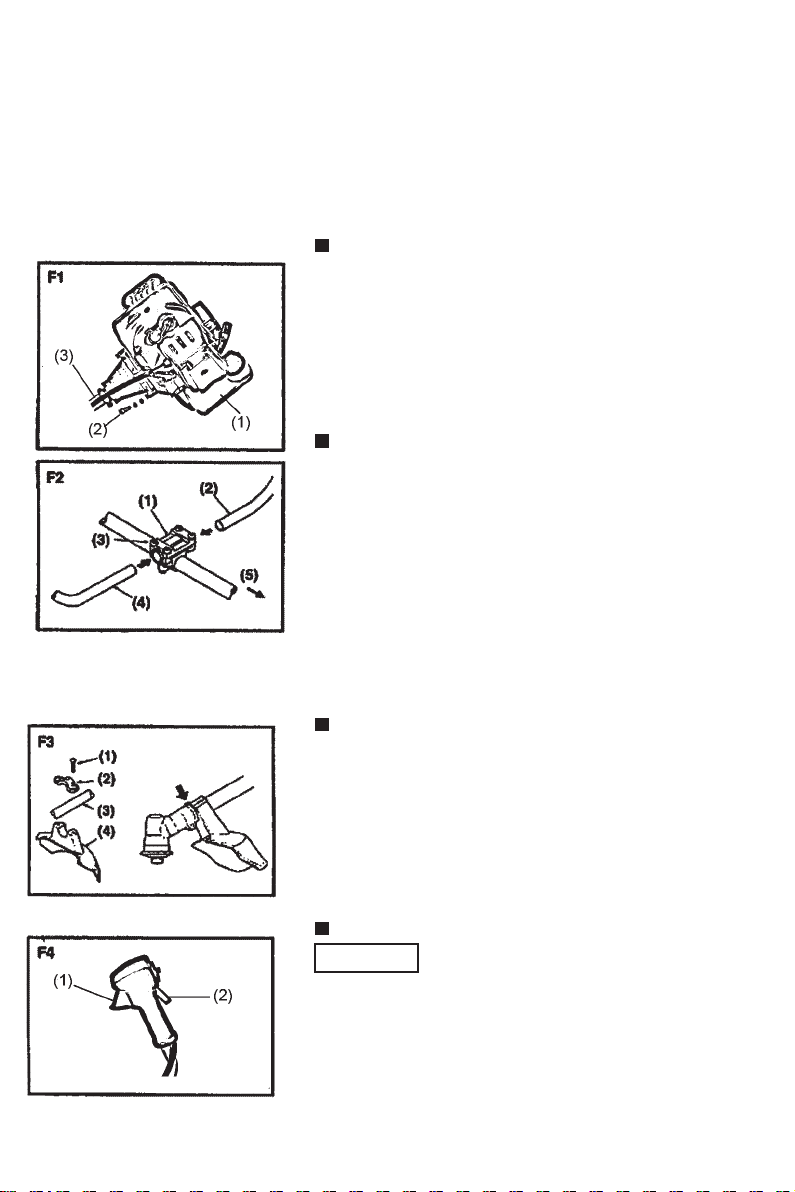
5. SET UP
ENGINE AND MAIN PIPE
Align the hanger and the fuel tank using attached 4 socket screws
secure the connection firmly with equal force.(F1)
(1) Fuel tank
(2) Molt
(3) Main pipe
HANDLE
1.Loosen the 4 bolts on the handle bracket.(F2)
2.Insert the right handle (throttle lever is attached) and the left
handle assembly into the bracket and retighten the bolts
securely.(F2)
(1) Handle bracket
(2) Right handle
(3) Bole
(4) Left handle
(5) Engine side
SAFETY GUARD
Attach the safety guard to the gear case and fix it with the clump
and 2 bolts (M5*25) securely.(F3)
(1) Bolt
(2) Clamp
(3) Main pipe
(4) Safety guard
THROTTLE WIRE
After fitting up the wire make sure that the throttle cable is
put in the throttle lever. If not it is very dangerous because
the engines rotate after releasing the throttle.
1. Hook the cable end into the hole of the throttle lever. And set
the cable in the lever as shown in the picture.(F4)
2. Wrap the band so as the throttle wire is fixed with the handle.
WARINNG
NOTE
(1) Hole
(2) Throttle cable
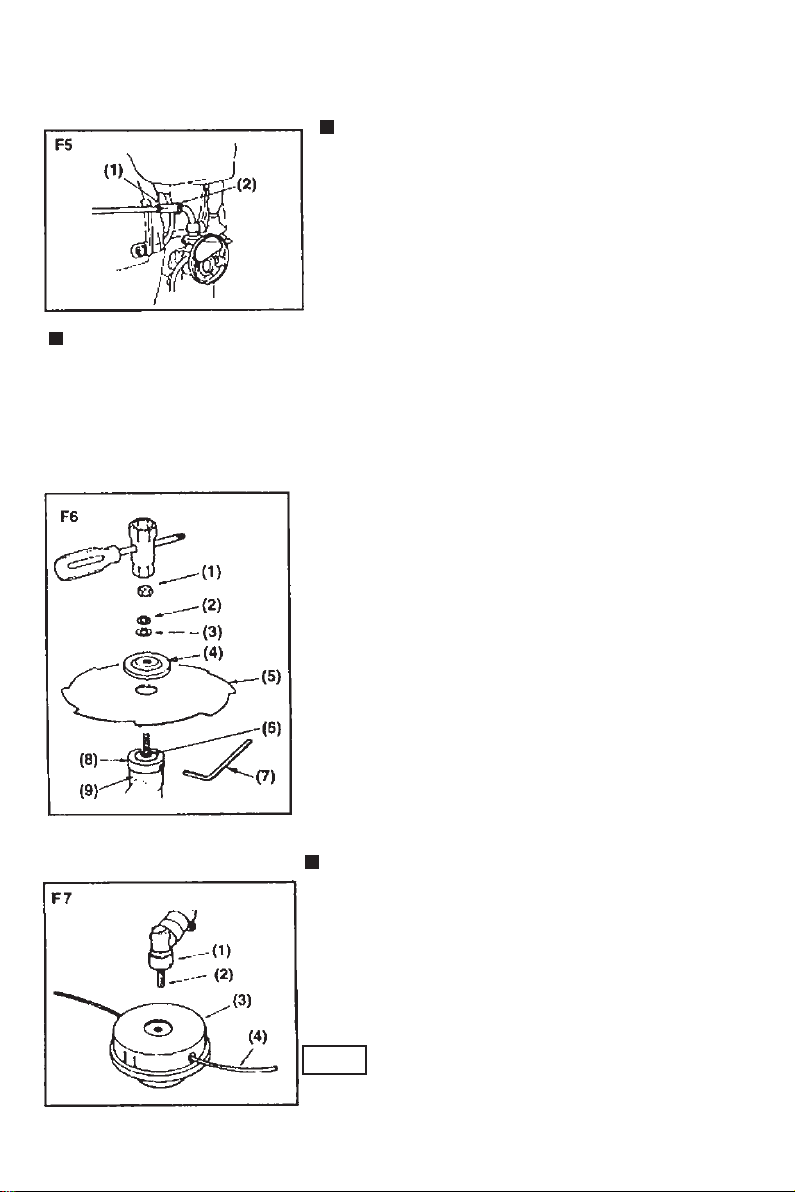
ADJUSTING TH THROTTLE CABLE
1. after releasing the throttle lever pull the throttle wire. The normal
play is 1 or 2 mm when measured at the carburetor side end.
2. If the play is short or long take off the air cleaner cover loosen the
lock nut and adjust the play.(F5)
(1) Adjust nut
(2) Lock nut
INSTALLING THE METAL BLADE (F6)
1. Set the inner holder to the gear shaft and burn to fix with the attached L-shaped bar.
2. Put the blade on the inner holder with letters to the gear case and match correctly the hole of the blade
to the projection of the inner holder.
3. Set the outer holder to the gear shaft with the hollowed face to the blade.
4. Put the attached bolt cover on the outer holder and secure it with
the bolt (left screw) together with the spring washer and the
washer.
() Nut
(2) Spring Washer
(3) washer
(4) Outer holder
(5) Blade
(6) Gear shaft
(7) Bar
(8) Inner holder
(9) Gear case
INSTALLING THE NYLON CUTTER(OPTION) (F7)
1. Set correctly the inner holder and the outer holder to the gear
shaft.
2. Screws the attached bold (M8 Left) into the gear shaft and
secure it with the spanner.
3. Screw the nylon cutter into the bolt by fixing the inner holder with
the L-shaped bar and tighten it manually.
Keep bolts and washers to install the blade carefully so as not to lose
them.

(1) Gear Case
(2) Bolt
(3) Nylon cutter
(4) Nylon cord
6.FUEL
WARNING
Gasoline is very flammable. Avoid smoking or bringing any flame or
sparks near fuel.
Wipe up all spills before starting the engine.
Make sure to stop the engine and allow it cool before refueling the unit.
Keep open flames away from the area where fuel is handled or stored.
☆
☆
☆
☆
IMPORTANT
☆
☆
Never use oil for 4-cycle engine use or water cooled 2-cycle engine. It can cause spark plug fouling
exhaust port blocking or piston ring sticking.
Mixed fuels which have been left unused for a period of one month or more may clog the carburetor or
result in the engine failing to operate properly. Put remained fuel into an airtight container and keep it in
the dark and cool room.
Mix a regular grade gasoline (leaded or unleaded alcohol-free) and a
quality-proven motor oil for air-cooled 2 cycle engines.
RECOMMENDED MIXING RATIO
GASOLINE 25 :OIL 1
7.OPERATION
STARTING THE ENGINE
WARNING
Before starting the engine inspect the entire unit for loose fittings or fuel leaks and the
cutting attachment is properly installed and securely fastened.
Place the unit on a flat firm place. Keep the cutting
head clear of everything around it.
1. Turn the cap to the fuel tank to make sure that it is fixed on
tightly (F8)
(1) Cap
(2) Fuel tank
☆
☆

2. Open the fuel tank cock.(F9)
3. Move the choke lever to the closed position.(F9)
(1) Choke lever
(2) Fuel cock
(3) Close
(4) Open
(5) Close
(6) Open
NOTE
When restarling immediately after stopping the engine move the choke lever to the open position.
4. Set the throttle lever to the starting position.(F10)
(1) Idling
(2) Starting (1/3-1/2 open)
(3) Full throttle
NOTE
When restarting immediately after stopping the engine move the throttle
lever to the idling position.
5. While holding the unit firmly pull out the starter rope quickly.(F11)
6. After the engine has started open the choke gradually.
7. Allow the engine to run for 2 to 3 minutes to warm up.
STOPPING THE ENGINE
1. Return the throttle lever to the idling position.
2. Push the engine switch button.
EQUIPPING THE SHAWL BAND(F12)
1. Equip the attached shawl band.(F12)
2. Turn on the engine return the throttle lever to the lowest speed
position and put the shawl band hook to the hanging part of
the machine.
3. Adjust the length of the shawl band so that the blade may be
parallel to the ground in the working position. In order to
prevent stack during operation turn up the extra part of the band
from the buckle.
CUTTING OPERATION

METAL BLADE USAGE
Always cut by guiding the head from your right to left.
A metal blade cut best up to the point 1/3 from the edge. Use
that area for cutting shrubs tough and thick weeds. For cutting
young grass you can use up to 2/3 from the tip of blade.
Adjust the engine speed according to the cutting objects. Cut
the young grass at middle speed and cut shrubs or tough and
thick weeds at high speed.
☆
☆
☆
(1) For branches and frees
(2) For grass and weeds
(3) Direction of cutting
(4) Direction of rotation
IMPORTANT
Operating at low speed mokes it easier for grass weeds or twigs to
become caught up in the blades and also it mokes the shaft and
clutch wear down more quickly.
NYLON CUTTER USAGE
Nylon cord consumes large power. Please note that the engine speed in operation should be
50% as large as when using metal blade.
Nylon cutter cut grass with the power of cord rotation. If you try to cut grass for the length of cord at one
time rotation speed becomes lower due to resistance and you cannot cut well. In case of large
resistonce get the nylon cutter away from grass once moke the rotation speed higher and cut a small
amount of grass at one time.
If you try to cut grass by swinging the brush cutter in the reverse way (from left to right) scraps fly in the
direction away from the body. You can avoid getting your clothes dirty.
rotation
☆
☆
☆
8.MAINTENANCE
AFTER 25 HOURS OF USE
BLADE
Sharpen each cutting edge and moke sure the bottom corner is
rounded.(F13)
Do not cool the blade with water in case of using grinder. If may
cause cracks on blade.
☆
☆
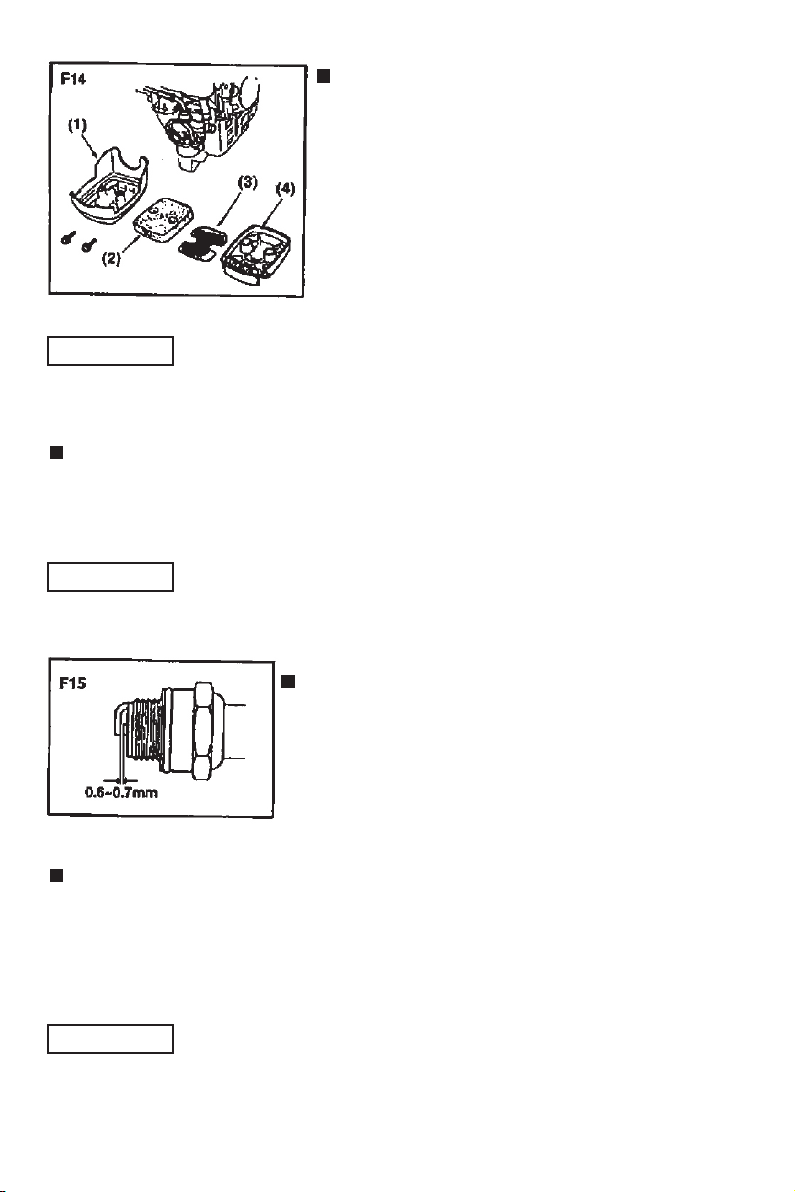
AIR CLEANER
Check and clean the filter element in warm soapy water as
required. Dry completely before installing. If the element is broken or
shrunk replace with a new one. (F14)
(1) cover
(2) Element
(3) screen
(4) Body
IMPORTANT
A clogged air may increase fuel consumption while cutting down the engine power.
And operate the brush cutter without the air filter or with a deformed filter element will quickly ruin the engine.
filter
FUEL FILTER
Take the filter out of the fueling port using a small wire hook. Disconnect the filter assembly from the fuel pipe
and unhook the retainer to disassemble it. Clean the components with gasoline.
IMPORTANT
A clogged fuel fitter may cause poor acceleration of the engine.
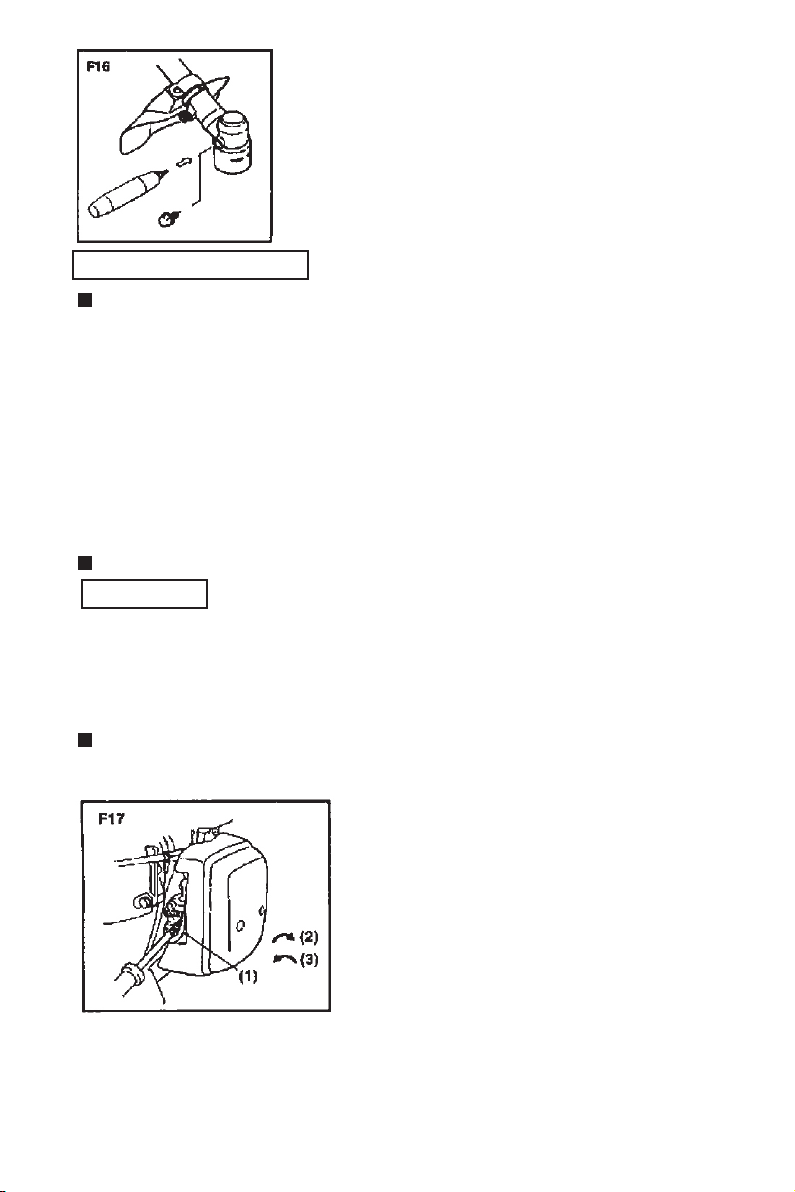
SPARK PLUG
Remove and inspect the spark plug and clean the electrodes as
necessary with brush.
The spark gap should be adjusted to 0.6 - 0.7 mm. (F 15)
INTAKE AIR COOLING VENT
Check the intake air-cooling vent and the area around the cylinder
cooling fins and remove any waste which has attached itself to the brush
cutter.
IMPORTANT
Note that failing to do so could cause the muffler to become overheated
and that this in turn could cause the brush cutter to catch on fire.
☆
☆
GEAR CASE
Supply multi-purpose grease at every 25 hours of use.
Remove the cutter holders to arrange for old grease
to exit.(F16)
AFTER 100 HOURS OF USE
MUFFLER
1. Remove the muffler insert a screwdriver into the vent and wipe away any
carbon buildup. Wipe away any carbon buildup on the muffler exhaust
vent at the same time.
2. Tighten all screws bolts and fittings.
3. check to see it any oil or grease has worked its way in between the clutch
lining and drum and if it has wipe it away using oil-free lead-free gasoline.
4. Remove the float cabin of the carburetor and clean the inside.
ADJUSTING CARBURETOR
A wrong adjustment may cause damage to your unit. If the engine does not
run well after adjusting the carburetor please contact the shop where you
purchased the product.
IMPORTANT
IDLE ADJUSTMENT SCREW (F17)
This is the screw to adjust the engine rotation when the throttle lever is set to the
lowest speed position. If you turn right (clockwise).
rotation increases and left (counterclockwise)
decreases. In case the blade continues to rotate
or engine stops when you return the throttle lever
completely to the original position make
readjustment.
(1) Idle adjustment screw
(2) High
(3) Low
MAINTENACE BEFORE STORAGE
1. Brushing off dirt form the machine check damage or stack of each part if

you find out abnormalities repair them for the next use.
2. Extract fuel from the tank and loose the drain screw of the float cabin to
extract fuel turn on the engine and leave it running until it stops naturally.
3. Remove the spark plug and put in 1-2cc of 2-cycle oil in the engine. Draw
the starter rope 2-3 times, set the plug back and stop it at the contraction
position.
4. Apply anti-rust oil to the metal parts such as the throttle wire put the cove
on the blade and keep it indoor avoiding dampness.

1
Herzberg
haag
HG-5200
OPMERKINGEN OVER DE SOORTEN WAARSCHUWINGEN DIE IN DE HANDLEIDING WORDEN VERMELD
WAARSCHUWING
Dit symbool geeft de instructies aan die moeten worden gevolgd om ongelukken te voorkomen die
kunnen leiden tot ernstig lichamelijk letsel of zelfs de dood.
BELANGRIJK
Dit symbool geeft de instructies aan die moeten worden gevolgd, onder bedreiging van mechanisch
falen, defect of schade.
NOTE
Dit symbool geeft tips of indicaties aan die nuttig zijn voor het gebruik van het product.
Inhoud
1. LOCATIE VAN ONDERDELEN ..................................................................................... 2
2. WAARSCHUWINGSLABELS OP DE MACHINE ............................................……………….3
3. SYMBOLEN OP DE MACHINE .....................................................................................4
4. VEILIGHEIDSMAATREGELEN ......................................................................................4
5. INSTELLINGEN ............................................................................................................8
6. BRANDSTOF ..............................................................................................................10
7. BEDIENING ................................................................................................................10
8. ONDERHOUD .............................................................................................................12
9 SPECIFICATIES ............................................................................................................ 15
LOCATIE VAN ONDERDELEN
1. Brandstoftank
2. Starter
3. Luchtfilter
4. Ondersteuning
5. Motorschakelaarknop
6. Huisvesting

2
7. Kanaal
8. Handvat
9. Hare ondersteuning
10. Gashendel
11. Gaskabel
12. Buitenpijp
13. Bewaker
14. Tandwielkast
15. Blade
Waarschuwingslabels op de machine
(1) Lees de gebruikershandleiding voordat u deze machine gebruikt.
(2) Draag bescherming voor hoofd, ogen en oren.
(3) Waarschuwing / aandacht
(4) Houd alle kinderen, passanten en assistenten binnen 15 meter van de bosmaaier.
BELANGRIJK
Als de Waarschuwingshandleiding vies en onspeelbaar is verwijderd, moet u contact opnemen met de
dealer bij wie u het product hebt gekocht om nieuwe zegels te bestellen en de nieuwe verzegeling op de
gewenste locatie te bevestigen.
WAARSCHUWING
Verander nooit uw bosmaaier. We kunnen de machine niet garanderen als u het vernieuwde
motorzeisapparaat gebruikt of als u niet het juiste gebruik in acht neemt dat wordt aangegeven in de
handleiding.
3. SYMBOLEN OP DE MACHINE
Voor veilig gebruik en onderhoud zijn gegraveerde symbolen op de machine gegraveerd. Zorg er volgens
deze aanwijzingen voor dat je niet fout gaat
(A). De haven voor het tanken van "MIX GASOLINE"
Positie: tankdop
(B). De richting om de starter te sluiten
Positie: LUCHTFILTERDEKSEL
(C). De richting om de starter te openen
Positie: LUCHTFILTERDEKSEL
4 VEILIGHEIDSMAATREGELEN

3
VOORDAT U DE MACHINE GEBRUIKT
a. Lees deze gebruikershandleiding zorgvuldig door om te begrijpen hoe u dit apparaat op de juiste
manier kunt gebruiken.
b. Dit product is ontworpen voor gebruik bij het maaien van gras en mag niet voor andere doeleinden
worden gebruikt.
c. Gebruik het product nooit onder invloed van alcohol, in het geval van uitputting of gebrek aan slaap,
na het nemen van verkoudheid, of op een ander moment wanneer het mogelijk is dat uw oordeel wordt
aangetast of dat u de machine niet goed en veilig kunt bedienen.
d. Laat de motor niet binnenshuis draaien. De uitlaatgassen bevatten schadelijke koolmonoxide.
e. Gebruik het product nooit onder de voorwaarden zoals hieronder beschreven:
1. Als de grond glad is of als er andere omstandigheden zijn die een stabiele houding kunnen voorkomen.
2. 's Nachts, in geval van dichte mist of op enig ander moment. Wanneer uw gezichtsveld beperkt kan
zijn en het moeilijk is om een duidelijk beeld van het gebied te krijgen. 3. Bij stortbuien,
onweersbuien, harde wind of stormen, of op een ander moment wanneer weersomstandigheden het
gebruik van dit product onveilig kunnen maken.
f. Wanneer u dit product voor de eerste keer gebruikt, moet u leren werken met de hulp van een
geschoolde arbeider voordat u aan het werk gaat.
g. Gebrek aan slaap, vermoeidheid of fysieke uitputting leiden tot verminderde aandacht die leidt tot
ongevallen en verwondingen.
I. Neem altijd deze handleiding op als u het eigendom verkoopt, uitleent of anderszins overdraagt.
II. Laat nooit kinderen of iemand die de instructies in deze handleiding niet volledig begrijpt, deze
trimmer gebruiken.
WERK EN KLEREN
a. Als u het product gebruikt, moet u de juiste beschermende kleding en uitrusting als volgt dragen.
(1) Helm
(2) Beschermende bril of gezichtsbescherming
(3) Dikke werkhandschoenen
(4) Non-slip werklaarzen
(5) Gehoorbescherming
b. En je moet meenemen
1. Hulpmiddelen en bijgevoegde bestanden
2. Correct gereserveerde brandstoffen

4
3. Vervangend mes
4. Lijnen om te waarschuwen voor uw werkgebied (Tope, waarschuwingssignalen)
5. Fluit (voor samenwerking of noodsituaties)
6. Hatchet of zaag (voor het verwijderen van obstakels)
c. Gebruik het product nooit bij het dragen van loszittende broeken, bij het dragen van sandalen of op
blote voeten.
WERKEN MET BETREKKING TOT DE BRANDSTOFBEHANDELING
a. De motor van dit product is ontworpen om een brandstofmengsel te gebruiken dat licht
ontvlambare benzine bevat. Berg nooit blikjes benzine op of vul de brandstoftank niet met een kachel,
vuur, elektrische vonken, lasvonken of andere hittebronnen of vuur. waardoor de brandstof zou kunnen
ontbranden.
b. Roken terwijl het product in werking is of de brandstoftank vult, is buitengewoon gevaarlijk. Bewaar
altijd altijd sigaretten uit de buurt van het product.
c. Wanneer u de tank vult, moet u altijd de motor afzetten en rondkijken om te zorgen dat er geen
vonken of open vuur zijn voordat u tanken. d. Als er tijdens het tanken brandstof wordt gemorst,
gebruik dan een droge doek om gemorste vloeistoffen af te vegen voordat u de motor opnieuw
start.
e. Plaats na het tanken de tankdop stevig op de tank en transporteer het product naar een locatie van 3
m of meer vanaf het punt waar het is bijgevuld voordat u de motor start.
Dingen die u moet controleren voordat u uw bosmaaier gebruikt
Kijk goed rond voordat je begint te werken om een idee te krijgen van de vorm van het terrein.
Elimineer alle obstakels die het werk zouden kunnen belemmeren.
b. Het gebied binnen een omtrek van 15 m van de persoon met behulp van de trimmer moet worden
beschouwd als een gevaarlijke omgeving waarin niemand mag voeren tijdens het gebruik van de
trimmer, en, indien nodig, een voorverwarmen koord
geel moet rond het werkgebied worden geplaatst. Wanneer het werk gelijktijdig door twee of meer
personen moet worden uitgevoerd, moet u altijd de aanwezigheid en locatie van anderen controleren
om voor elke persoon voldoende afstand te houden.
c. Zorg ervoor dat er geen losse schroeven of bouten, brandstoflekken, breuken, hobbels of andere
problemen zijn die een veilige werking kunnen verstoren. Let er met name op dat de messen of de
bevestigingsvoegen van de messen op de bosmaaier zich in goede staat bevinden.
d. Gebruik nooit verbogen, kromgetrokken, gebarsten, gebroken of beschadigde messen.
e. Houd het mes altijd scherp.
l. Zorg er bij het vullen van de snijkanten voor dat de laatste hoek scherp en afgerond is aan de wortel
van de rand.

5
g. Controleer de capsule om het mes vast te zetten en zorg ervoor dat het blad regelmatig draait zonder
abnormale geluiden.
OPMERKINGEN BIJ HET STARTEN VAN DE MOTOR
1. Kijk rond om te controleren of er zich geen obstakels bevinden binnen 15 m of minder van een
bosmaaier.
2. Plaats de bosmaaier op de grond, op een heldere en vrije plaats, stevig op zijn plaats zodat noch de
messen noch de gashendel in contact komen met obstakels bij het starten van de motor.
3. Zet de gashendel in de stationaire stand wanneer u de motor start.
4. Stop de motor en controleer de gaskabel en andere onderdelen nadat de motor is gestart als de
messen blijven draaien, ook als deze nog draait, zelfs nadat de gasklep volledig is ingetrokken.
VEILIGHEIDSMAATREGELEN BIJ VERWERPING
Een gevaarlijke reactie kan optreden wanneer het roterende mes een vast voorwerp in de kritieke zone
raakt. Het wordt een rollback genoemd, waardoor de operator mogelijk de controle over de unit verliest.
Wat kan ernstig letsel of de dood veroorzaken. Volg de onderstaande veiligheidsinstructies om
backtracking te voorkomen.
1. Voordat u begint te werken, maakt u uw werkgebied schoon en verwijdert u gras rond obstakels.
2. Voer bij het gebruik van uw bosmaaier geen andere onderdelen in dan de hendels.
3. Wanneer u uw bosmaaier gebruikt, laat uw ogen dan nooit als u de gashendel in de stationaire stand
moet zetten
4. Laat het apparaat niet dichter bij uw voeten komen en til het niet boven uw middel wanneer u uw
trimmer gebruikt.
OPMERKINGEN OVER TRANSPORT
1. Zorg dat de juiste beschermkap op zijn plaats zit.
2. Bevestig het apparaat bij het transport met de auto stevig met een touw. Rijd niet op een fiets of
motor.
3. Draag de bosmaaier nooit op verharde wegen voor lange afstanden zonder eerst alle brandstof uit de
tank te verwijderen, omdat dit kan leiden tot brandstof op de tank.
BEWAKING VAN VEILIGHEID IN WERKING
1. Houd de hendels van de bosmaaier stevig met beide handen vast. Als u werk opheft, plaatst u de
gashendel in de stationaire stand.
2. Zorg altijd voor een stabiele houding tijdens het werken.
3. Houd het motortoerental op het niveau dat vereist is om snijwerkzaamheden uit te voeren en
verhoog het motortoerental nooit boven het vereiste niveau.
4. Als het gras vastzit in het blad tijdens het gebruik of als u het apparaat moet controleren of de
brandstoftank van brandstof moet voorzien, moet u de motor verbranden.
Table of contents
Languages:


 Technical data")