HESBA CONDOR COUPE User manual

Instructions manual
HESBA Combination Prams
Condor Coupé, Corrado, Concepto and Concepto Cabrio
EN

We are delighted that you decided to purchase a HESBA pram “Made in Germany”.
We hope you will enjoy the product and have many nice trips with your child in fresh air.
This combination pram has the following features
1. Carrycot
2. Pram
2.1 Pram with LW carrycot (light-weight carrycot)
2.2 Pushchair with safety bar, restraint system and belt
The delivery includes
1 combination pram 1 rain cover
1 safety bar
1 cap for LW carrycot
This instructions manual contains important safety instructions
Read these instructions carefully before use and keep the instructions manual.
Failure to observe these instructions can impair the safety of your child.
IMPORTANT: Keep these instructions for later reference and enquiries.
When used together with the LW carrycot, this combination pram is suitable for a child of 0-6 months old and a maximum weight of 9 kg if
they cannot sit independently, turn or prop themselves up onto their hands and knees.
The pushchair attachment without the LW carrycot is suitable for a child of approx. 6 months and older and a maximum weight of 15 kg.
Seatbelts must be used in the pushchair attachment.
Welcome to HESBA!
Contents
1. Carrycot.........................................................................................................................................................4 – 5
2. Pram
Pram frame ...............................................................................................................................................6
Brake and installation of wheels.................................................................................................... 7
Pneumatic tyres, push handle and basket................................................................................8
2.1 Pram with LW carrycot..............................................................................................................................9
2.2 Pushchair
Safety bar, restraint system and belt..........................................................................................10
Sun protection and seating positions......................................................................................... 11
Seat and cover ........................................................................................................................................12
3. Care and safety instructions...................................................................................................................13
4. Maintenance and guarantee ...................................................................................................................14
Separately available accessories ...............................................................................................................15
Explanation of the symbols
To allow you to use these instructions quickly and clearly, we use different symbols,
which have the following meaning:
Warning Safety instructions
Care instructions Information

4
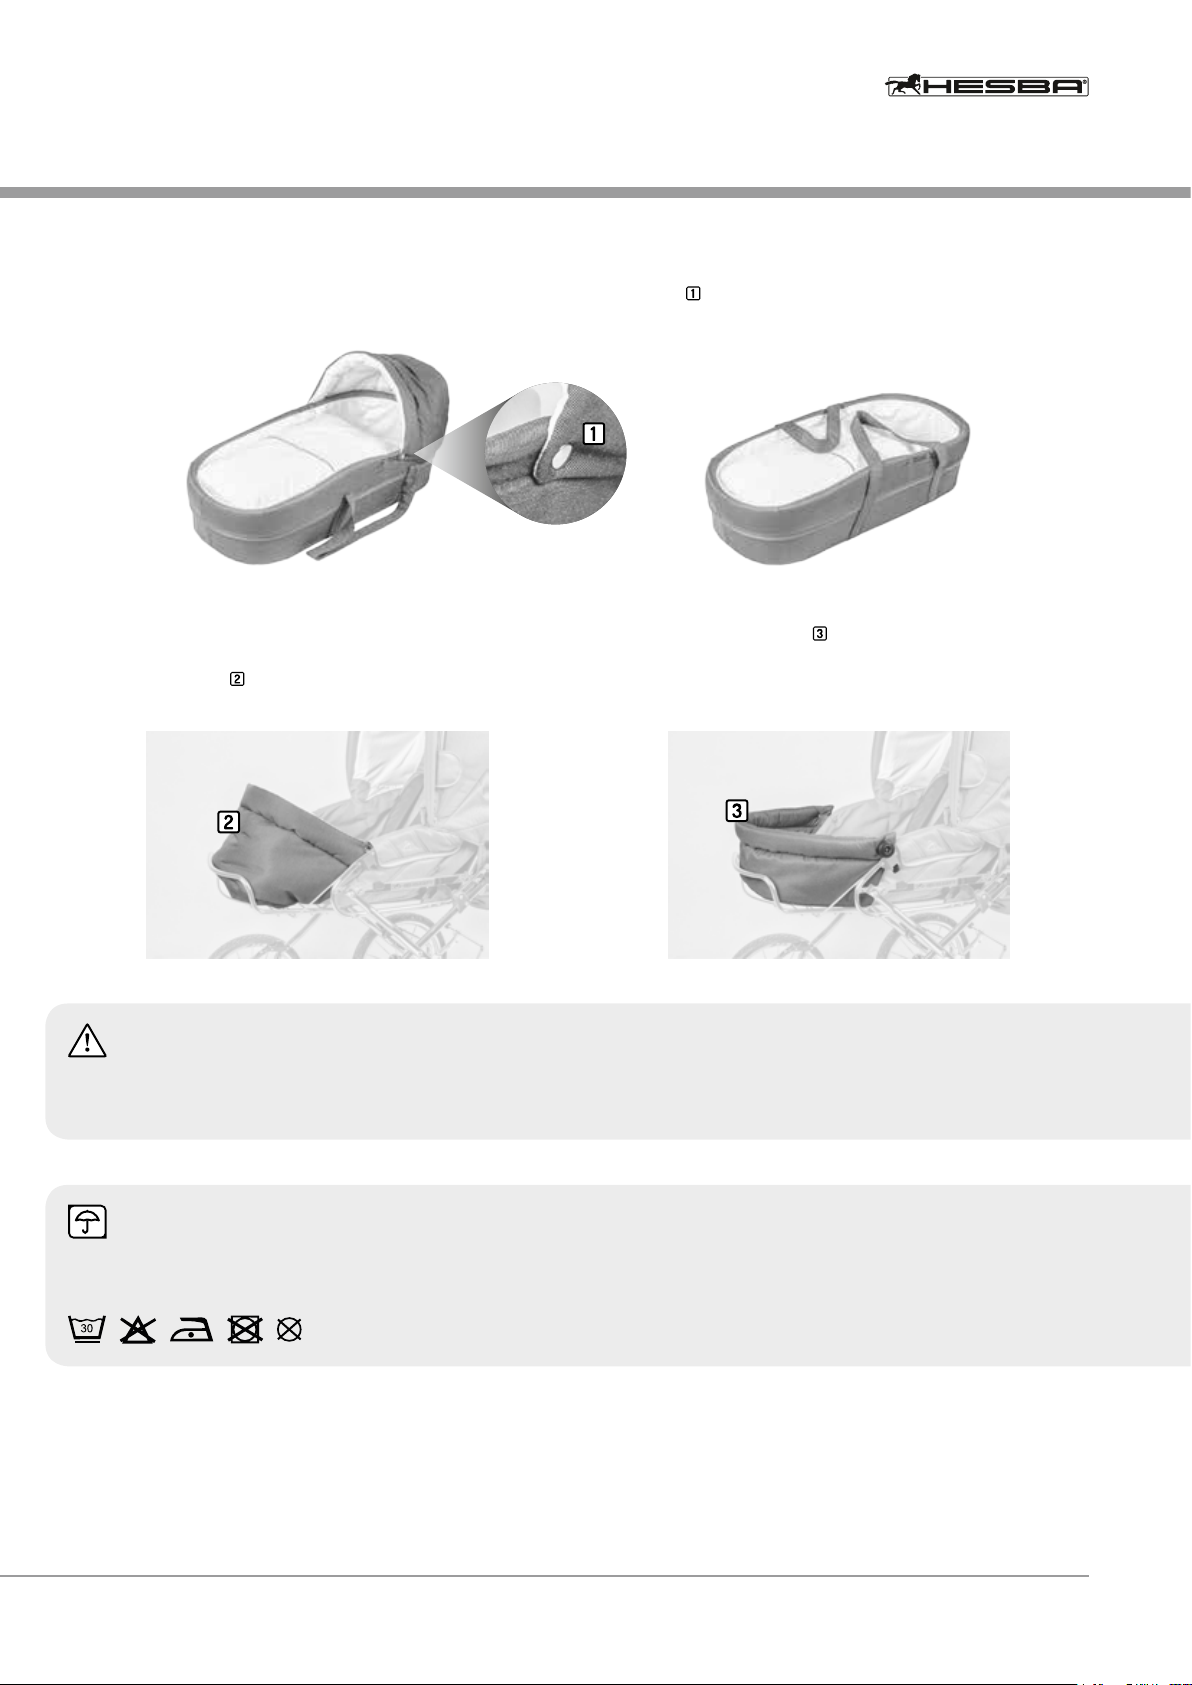
The carrycot is especially important during the rst weeks.
If your baby has fallen asleep in the pram after an outing, you can carry them
into the house in the LW carrycot without waking them up.
The HESBA LW carrycot always stays in a horizontal position, which promotes a
healthy development of your child.
The inside dimensions of the LW carrycot are 80 x 35 x 22 cm and there is enough
room for your baby to lie comfortably during the rst months.
Warning according to DIN EN 1466:2015-02
• When using the LW carrycot, both straps must be connected with the press stud.
• The carrycot must only be used with the straps directed upwards and both straps must be held.
• Never pull the straps outwards during carrying. The child will no longer be safe and could fall out of the LW carrycot.
• Never use this LW carrycot on a stand.
• This product is only suitable for a child that cannot sit independently yet, roll over to one side or prop themselves up on hands and knees.
Maximum weight of child: 9kg.
• Only use the carrycot on a stable, horizontal and dry surface.
• Do not let other children play near the LW carrycot without supervision.
• Do not use the LW carrycot if a part is broken, torn or missing.
• Do not leave the exible carrying straps inside the LW carrycot.
• Do not use the LW carrycot if the child can sit up without assistance.
• Never place the carrycot near an open re or other heat sources.
• Regularly check the straps and the bottom of the carrycot for damage and signs of wear.
Safety instruction
• In the LW carrycot, the child‘s head should never be lower than the body.
• Do not place an additional mattress on the mattress in the carrycot.
• Max. height of mattress: 3 cm
1. Carrycot
5
Description
The cap can be attached and removed from the LW carrycot using the two press studs .
The LW carrycot can be used with and without cap.
When the LW carrycot gets too small after a few months, the cap of
the LW carrycot can be attached as extension to the lower part of the
pushchair attachment , which enlarges the inside area of the pram.
The pram is then used without the LW carrycot.
Alternatively, an extension part can be ordered as accessory in the
pram colour, which can be attached to the pushchair attachment.
Warning
This feature can only be used while the child cannot sit independently, roll on the side or prop themselves up on hands and knees.
Secure your child with the belt when using this feature.
Care instructions
The mattress cover of our comfort mattress and the lining of the „wash“ version of the LW carrycot can be removed and washed in the was-
hing machine at 30° using a mild detergent. Do not spin. Not suitable for tumble dryers. Velcro® straps must be closed.
1. Carrycot

6
Warning
Make sure that your child is out of reach when folding and unfolding the pram to avoid injuries.
Safety instruction
• Always make sure that the safety bar encloses the tube.
• The safety bar and the two plastic rings prevent unwanted collapsing of the pram.
• Before using the pram, always make sure that both frame locks are in their locked positions.
Unfolding the frame
Engage the brake system. Open the frame by pulling the push handle upwards. The push handle clicks into place automatically when unfolding
the frame. To make the pram ready for use, the two black plastic rings must be pushed over the push handle tubes on the right and on the left.
The frame is now ready for use.
Folding the frame
Before folding the pram, always engage the brake. To fold the pram
frame, the safety bar must be unlocked on the right and the two
black plastic rings must be pushed upwards on the right and left of
the frame.
After unlocking, the pram can be folded easily by moving the
push handle forwards.
The frame can be folded and unfolded in the same way when using
the pram attachment.
Recommendation
The model Corrado only folds together completely with the pram attachment when the canopy is not located at the push handle side since the
push handle cannot be pushed past the side clamp of the canopy.
2. Pram – pram frame
7
Safety instructions
The brake must be engaged when you
• stop the pram, even if it is only for a short time • sit the child up in the pram or take it out
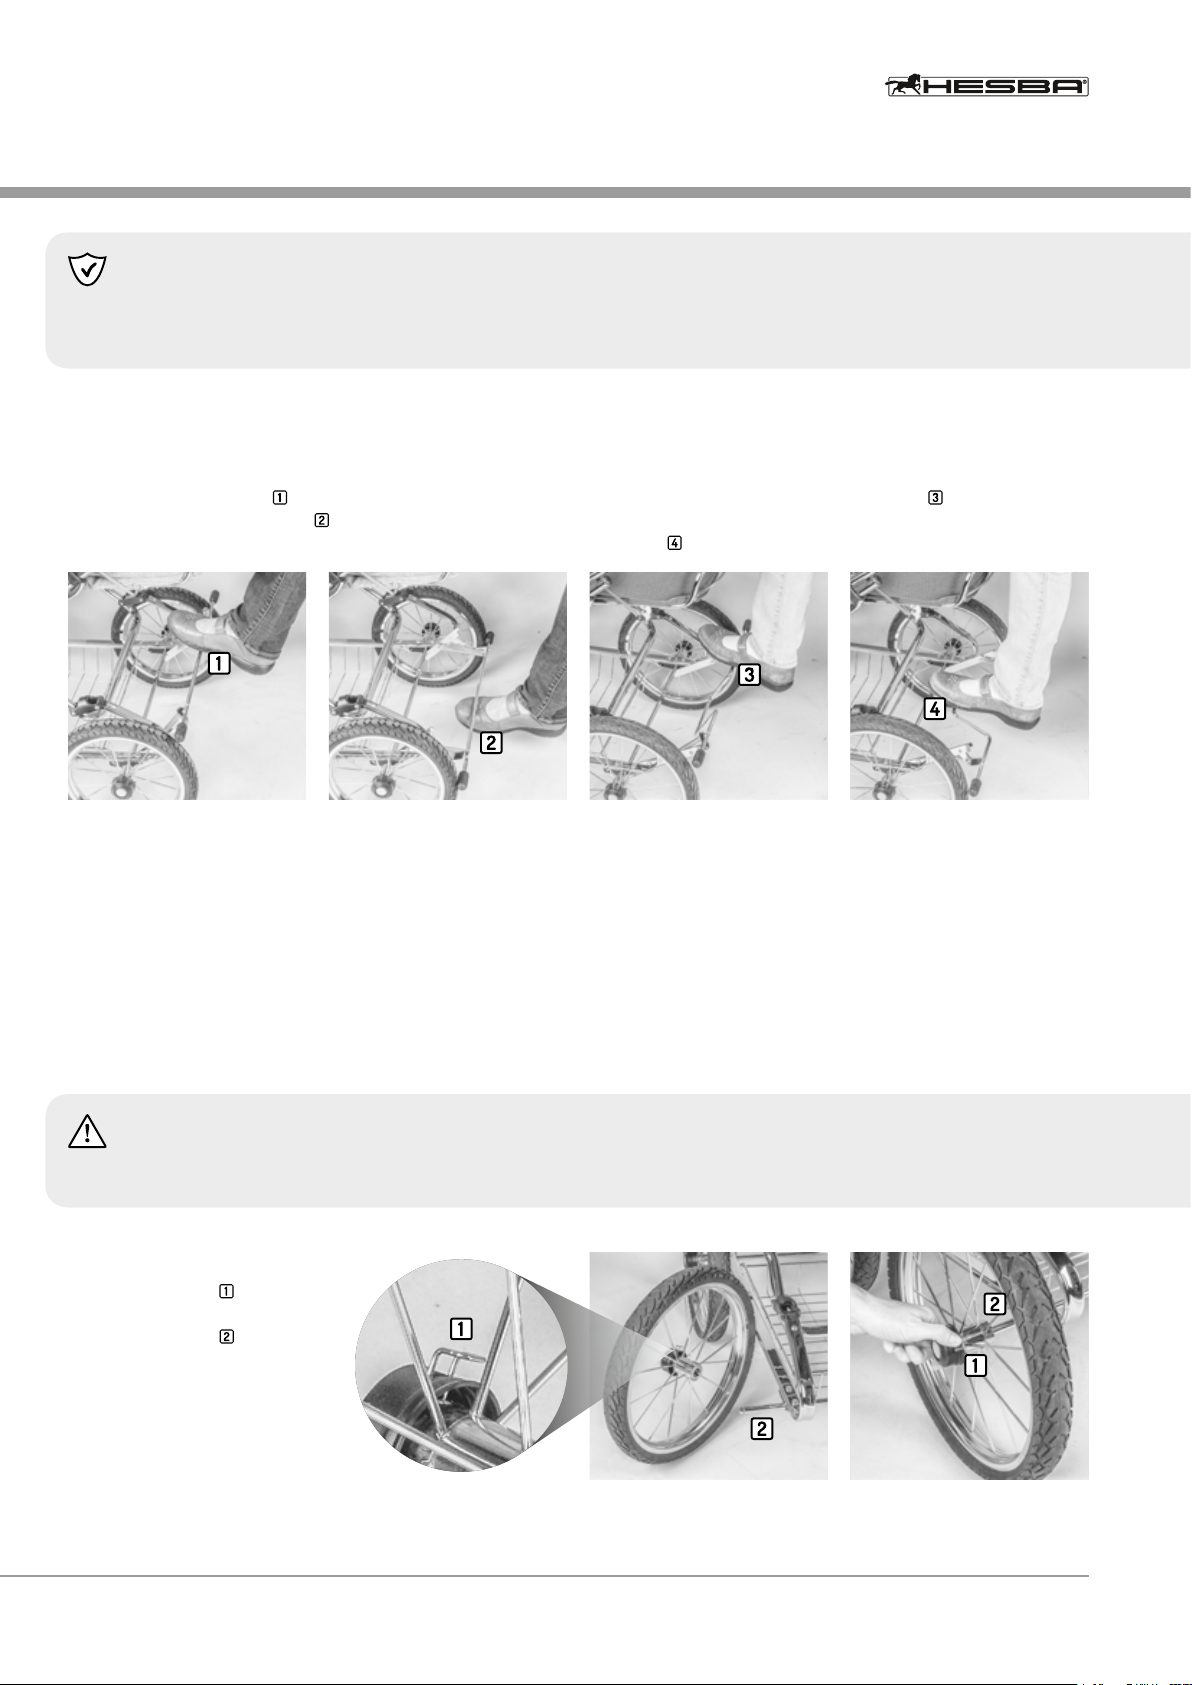
Engaging and releasing the brake with 250 mm rims Engaging and releasing the brake with 300 mm rims
When using wheels with a 250 mm rim, the brake can be engaged by
pushing the brake rod down with the foot and released by reversing
this action and pushing the rod up .
When using wheels with 300 mm rims, the brake rod must be
engaged by pushing the straight part of the rod .
The so-called u-brake is released by stepping on the opening
(=u-angle) of the brake rod.
Installation of the wheels
You can select one of two rim sizes during purchase
• 250 mm
• 300 mm
as well as 3 tyre types
• black pneumatic tyres LR
• black air chamber tyres without tyre tube SL
• white EVA tyres
Remove the plastic cover from the frame shafts. Keep for future storage.
Warning
Danger of suffocation. Keep the plastic covers and plastic bags outside the reach of children.
Make sure that the brake system is re-
leased. Press the bar at the wheel
hub and hold it while pushing the
wheel onto the shaft . Release
the bar and pull the wheel to-
wards you until you hear it click
in place. Pull again to ensure that
the wheel is secured. Repeat this
procedure for all four wheels.
2. Pram – brake and installation of wheels
8
Wheels
Note
• We recommend our black SL wheels, because these tubeless wheels have the comfort of a peumatic tyre and they have the advantage, that
they do not have to be inated.
• Unfortunately pram wheels cannot be balanced like the tyres of a car. Therefore they can show a slight radial run-out (“they wobble”, i.e. they
become misaligned). In this regard we cannot provide any warranty.
Applies to all models with pneumatic tyres
• The pneumatic tyres can be inated with an air pump.
• The pressure must be correct for optimal handling qualities and to avoid at tyres.
Therefore, check the tyre pressure regularly. The pressure must not exceed 30 PSI / 2.0 bar.
• The tyres may show little cracks due to the effect of ozone and UV radiation.
This does not impair the handling qualities and safety of the pram and is no reason for rejection.
Applies to EVA wheels
The elegant hard rubber tyres are less durable have a lower damping property as for example our wheels without tyre tube or pneumatic tyres.
For this reason we recommend this wheel type as an elegant second wheel. Colour: white.
Warning
• Do not go over sharp edges or surfaces with broken glass as this may puncture the peumatic tyres.
• Please also keep in mind that the tyres can stain surfaces. Therefore, do not place the pram on light oor surfaces or lay them on the fabric
covers of the pram.
• On principle, please act carefully at kerbstones or stairs and don’t let the pram sag too strongly. As there is a multiple of weight on the push
handle, the braking axle and the wheels, a break of the braking axle and also of the spokes may occur.
Push handle
Adjusting the push handle height
By simultaneously pressing the two pushbuttons at the right and left of the joint, the height of the push handle can be adjusted.
Basket
The basket at the bottom of the frame can be loaded with a maximum weight of 5 kg. Always place heavy items in the middle of the basket.
The pram can become unstable if the weight in the basket is distributed unevenly. A matching shopping bag for the basket is available as
accessory.
2. Pram – wheels, push handle and basket
9
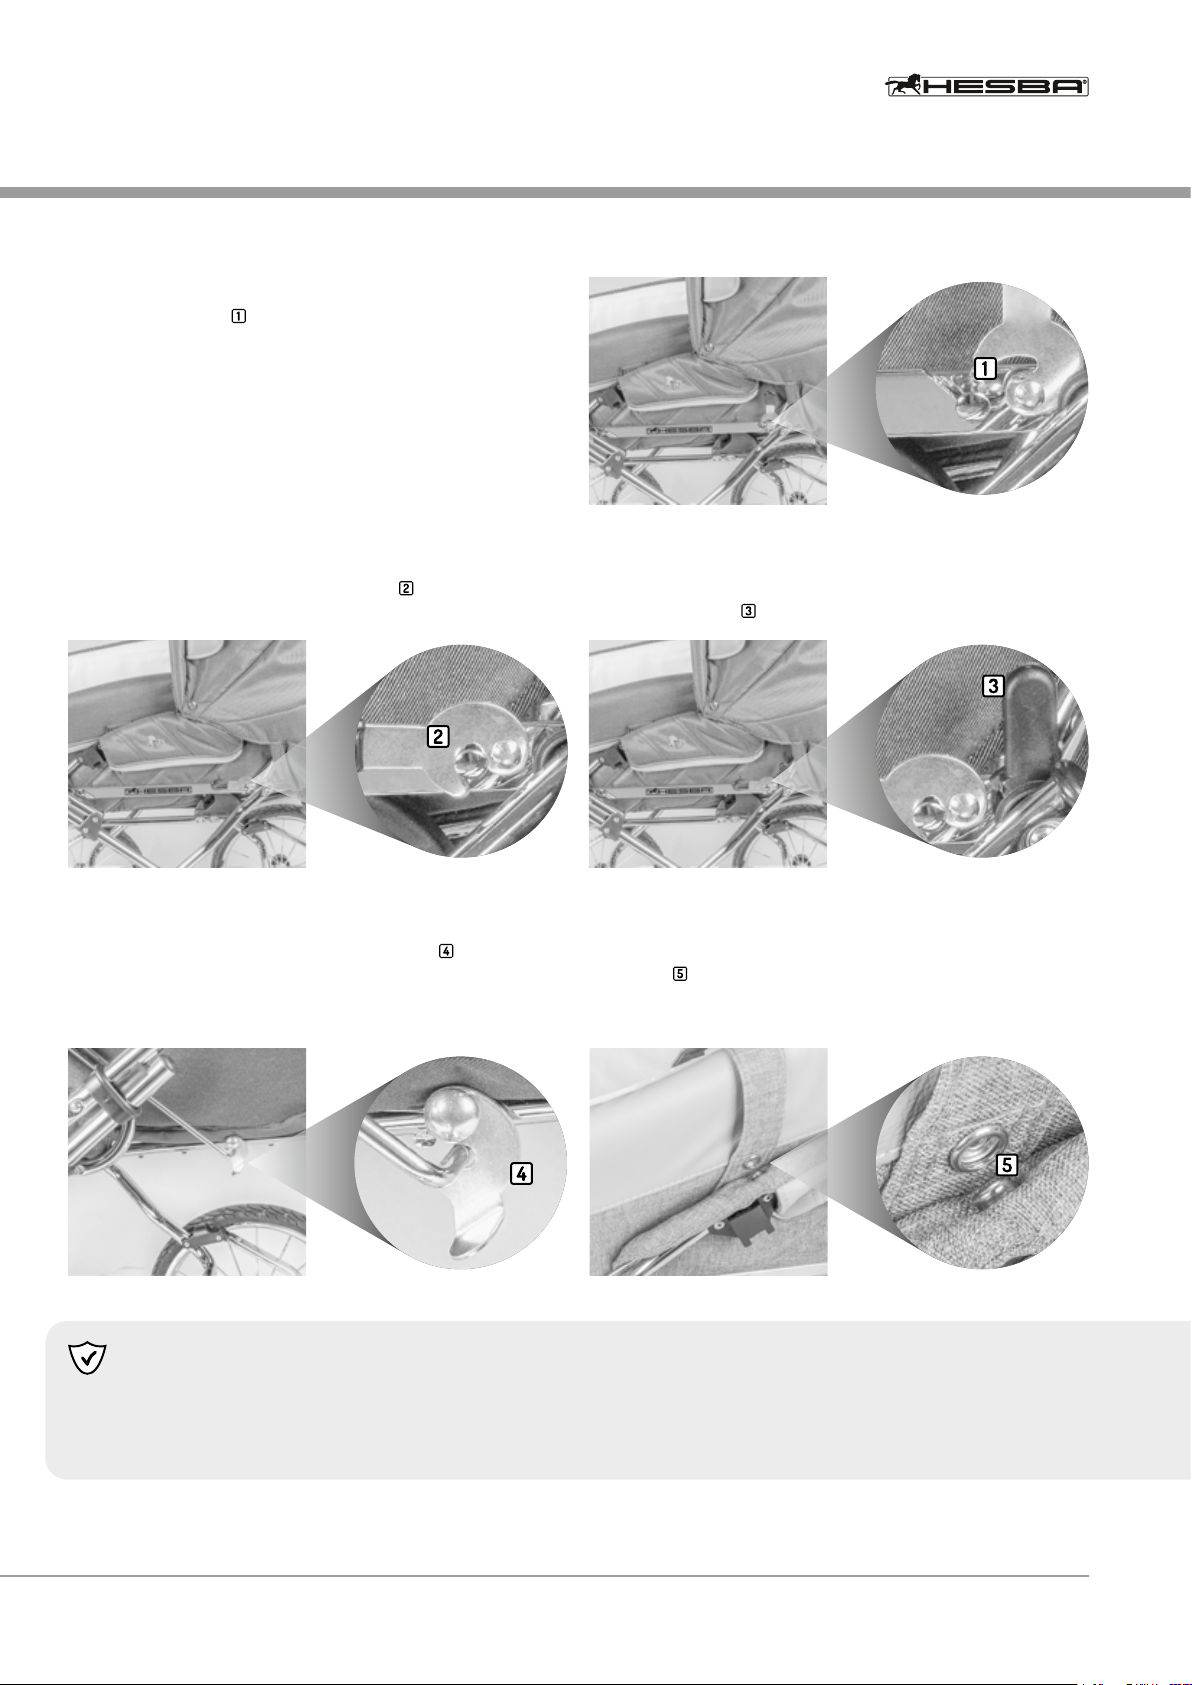
Description
The pram attachment is fastened to the frame in 4 positions.
There are two grooves on each side of the frame.
Once the attachment is positioned correctly with the four fastening bolts in all four grooves, the two locking levers at the right and left of the
frame must be moved to the “closed” position to fasten and rmly anchor the pram. The attachment is now rmly connected to the frame.
For unlocking, the black safety bar behind the locking bar must be moved to a vertical position .
When using the product as pram, the foot rest must always be in a
horizontal position and fastened with the safety bar so that the
LW carrycot is positioned correctly and fastened.
Fastening the LW carrycot:
To connect the LW carrycot rmly with the pushchair attachment, the
press studs on the right and left as well as in the front and rear of
the carrying straps of the LW carrycot must be attached to the
counterparts at the pushchair.
Safety instruction
• The LW carrycot can topple if the foot rest is not fastened.
• In order not to impair the toppling protection, a shopping bag or other bag must not be put on the push handle and an additional seat for a
second child must not be added to the attachment.
2.1 Pram with LW carrycot

10
Pushchair attachment
As soon as your child can sit independently, you can omit the LW carrycot and put your child in the pushchair attachment.
The pushchair attachment can be positioned in two directions.
At rst, children prefer to look at their “driver”. However, after a certain age, children become curious and want to see their surroundings more.
The position of the attachment can now be changed. To do this, the locking lever and the black safety bar are opened as described above and
the attachment can be removed from the frame. The pushchair attachment can be rotated by 180° and then re-attached as described earlier.
Always make sure that the fabric
cover of the foot rest is always
aligned with the foot rest of
the pushchair. Always leave the
elastic strap under the foot rest.
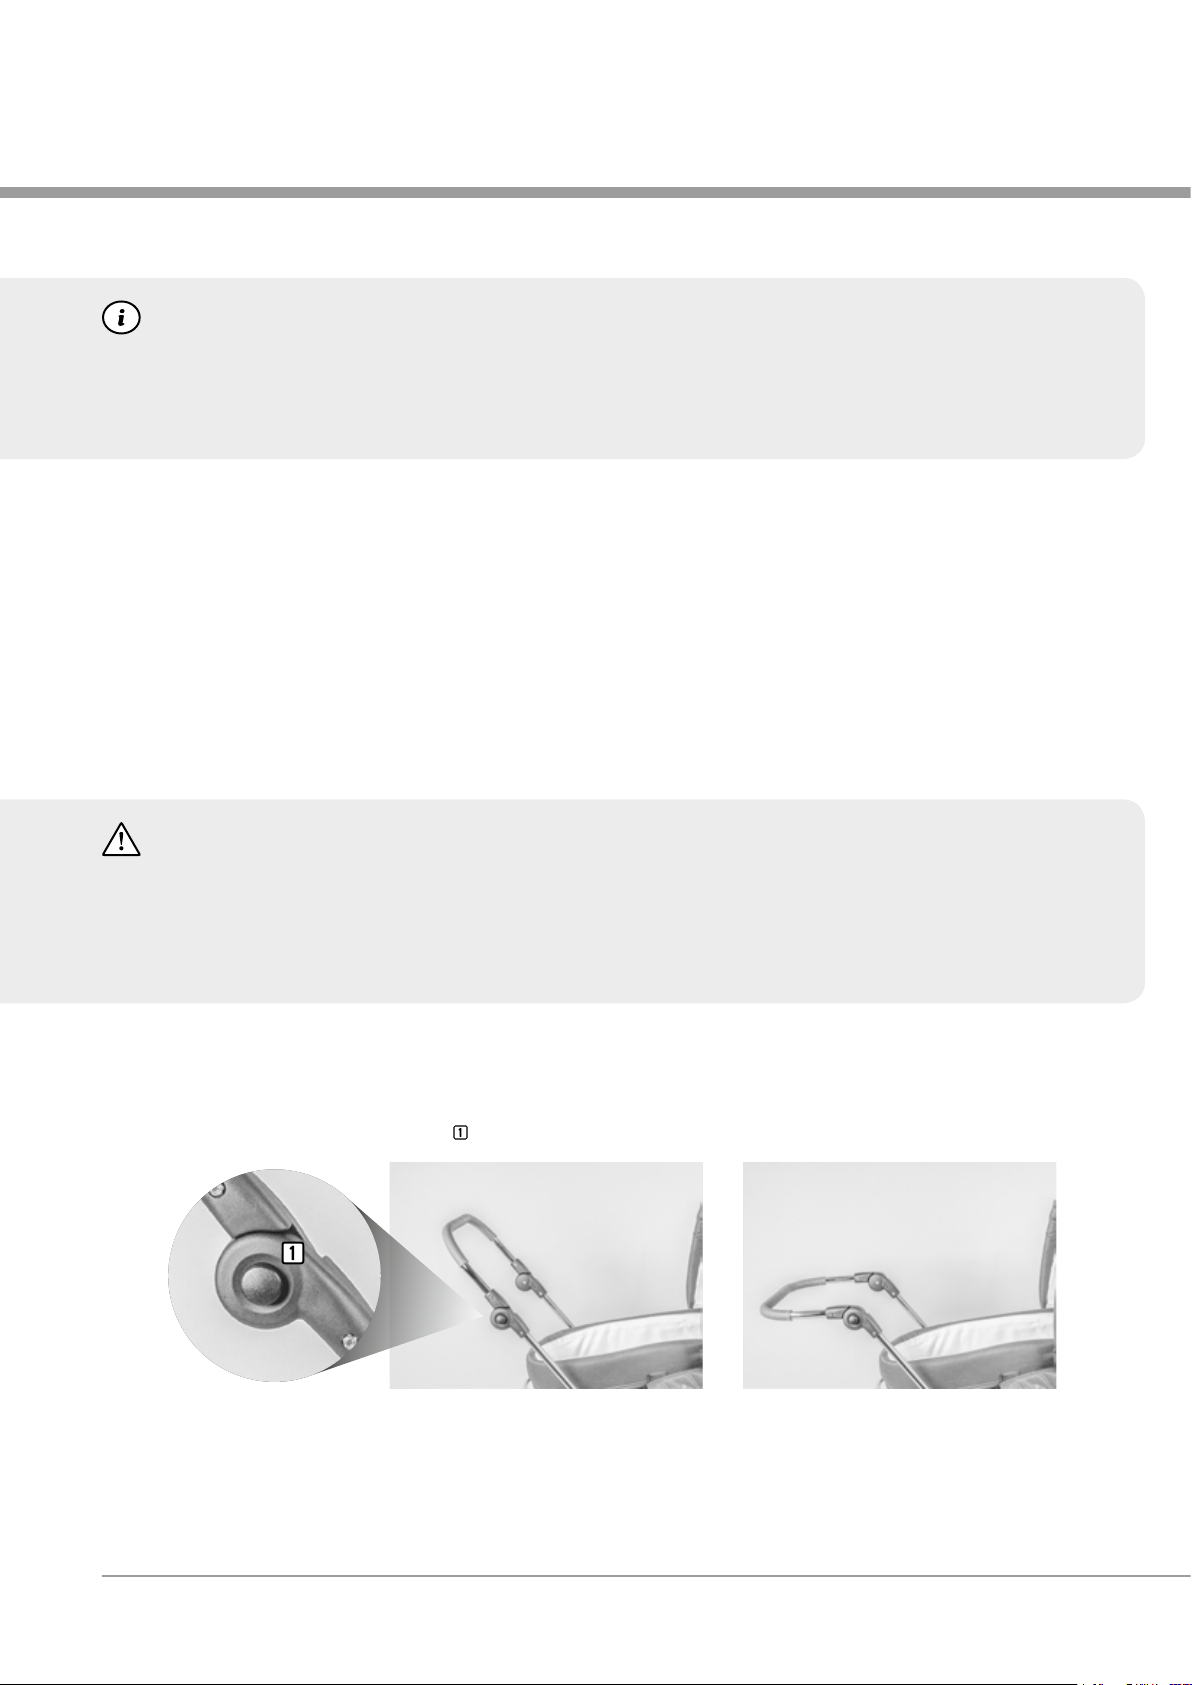
Belt and safety bar
When using the pushchair attachment, your child must be secured with the belt and the safety bar can be attached to the pushchair. The
safety bar must be clicked into place in the plastic holder at the front of the round tube frame. The belt must secure the shoulders of your
child and rmly latch into place in the front.
Care instructions
The strap pads can be removed and washed at 30°.
The belt system is built in and ready for use. It can be found under
the LW carrycot.
The belt is opened by pressing the centre piece of the buckle,
which releases the belts. The belt is fastened in reverse order by
clicking the plastic parts of the belt into the centre piece.
The length can be adjusted with the small buckles so that the belt is
not too loose.
2.2 Pushchair – safety bar, restraint system and belt
Pushchair in direction of travel
This function is also possible:
click the safety bar into place as
described above and attach the
crotch strap to the safety belt
using the press stud.
Pushchair away from
the direction of travel

11
Sun protection
Recommendation
In addition to the canopy, a parasol can also be used. Parasols are available in the colour of your pram and not included in the delivery.
Only exterior fabrics provide UV protection.
Seating position
The backrest of the pushchair can be positioned in 5 different heights.
To do this, the bracket at the backrest must be lifted slightly and
clicked back into place in the desired position.
Safety instructions
• The bar must be pulled at its centre.
• The height of the seat must never be adjusted without lifting the bar.
Warning
• This product is not suitable for jogging or rollerblading.
• Do not leave your child without supervision.
• Before use, make sure that all locks are engaged.
• Make sure that your child is out of reach when folding and unfolding the pram to avoid injuries.
• Do not let you child play with the pram.
• Use a safety belt as soon as your child can sit independently.
• Always use the belt system with the safety bar when using the pushchair.
• Before use, make sure that the pram attachment is secured correctly.
Care instructions
Seat, belt cushion and the cover of the safety bar can be washed at 30° using a mild detergent.
Do not spin. Not suitable for tumble dryers.
Seats with leather or leather parts are not washable at 30° but can be wiped.
2.2 Pushchair – sun protection and seating positions

12
Washable seat
When removing the seat, the elastic strap at the foot rest must rst
be loosened. Afterwards, loosen the Velcro® strap at the front of
the seat and the two carrying straps from the attachment frame.
Seats with leather or leather parts are not washable.
Canopy
Depending on the model, the canopy can be put in different positions
with a locking function (models Condor Coupé, Condor Cabrio and
Concepto) or with the side clamp (model Corrado).
If the tension of the screwed, silent canopy models Condor or
Concepto declines, the safety nuts inside can be tightened again.
Afterwards, close the canopy cover with the Velcro® strap .
Removing the canopy
To remove the canopy, the tensioned canopy holders can be released
by pressing the plastic buckle under the strap at the side. Release
the two hooks at the back of the backrest from the loops. For the
canopy type Corrado, the black knurled screws at the side of the
canopy frame must be loosened and then the canopy can be re-
moved. Screw the knurled screws back onto the threaded bolt so that
you do not lose them.
Note on canopy model Corrado
The side clamps at the right and the left side of the canopy must always be applied synchronously with both hands as otherwise the
inside brackets of the canopy can shift! When using the Corrado as a pushchair, the canopy has to be moved backwards by at least 3 cm, as
otherwise the backrest cannot be positioned upwards. For this open the side star-grip nuts and move the canopy backwards on each side
evenly. Secure the nuts by retightening them. For folding the canopy both clamping brackets have to be pressed evenly. For this only move or
pull the canopy backwards with the front bracket. ATTENTION: When pressing the rear interior brackets the canopy may shift.
Note moisture protection
A rain cover is included in the delivery, which can be used for all parts. To hold off the rain we recommend a rain cape, that is available as
accessory. However, if the pram gets wet, please dry the pram immediately and completely with opened canopy.
Warnings about the rain cape
• Danger of suffocation. Keep the rain cape away from your child.
• Be especially careful when using the rain cape in strong wind.
2.2 Pushchair – seat and canopy

13
Care instructions
Always protect the pram from too much sun.
CARE INSTRUCTIONS FOR FABRICS
• Dust and little dirt can be removed with a soft cloth or a soft brush.
• Larger stains or dirt can be removed with a soap solution up to 30° and a soft cloth.
• Do not use cleaning agents with bleaching effects or solvents.
CARE INSTRUCTIONS FOR WHEELS
• See fabrics; a soft brush can be used for wheels.
• The tyre pressure must be checked regularly but must not exceed 30 PSI / 2.0 bar.
• To get a permanent comfort the pneumatic tyres and the wheels without tyre tube should be treated with a silicon-free spray on the axle.
EVA wheels should be treated with grease.
CARE INSTRUCTIONS FOR FRAME / CHROME
• Use a soft cloth to clean the frame.
• The chrome-plated parts and parts with bright zinc coating should be regularly treated with a commercially available cleaning or polishing
agent to maintain the shine of the surface and to avoid rust. We recommend “Sidol-Metallpolitur”.
• Road salt residues must be removed immediately as the salt affects the chrome-plating!
This also applies to tours on beaches near salt water.
• The frame was treated with rust protection to provide a proper basic protection. Bei fehlender Chrom-Pege ash rust might occur.
The guarantee does not apply in this case.
• All moveable parts at rivets can be kept smooth with a silicon-free spray (e.g. WD-40).
Safety instructions according to DIN EN 1888:2012-06
• Keep in mind that there is a danger to the pram in the vicinity of open re and other sources, strong heat such as electric radiators, gas
ames, etc.
• Never place the pram near an open re or other heat sources.
• Check the pram regularly for damage and signs of wear as well as its general functionality
• Do not use the pram when parts of it are damaged.
• Only use spare parts delivered or approved by the manufacturer
• Always make sure that the wheels are fully clicked into place
• Always make sure that the brake is engaged when you park the pram
• The pram is designed to carry a child
• Maximum weight of the child when using the LW carrycot: 9 kg
• Maximum weight of the child when using the pushchair: 15 kg
• Max. height of mattress: 3 cm
• Do not place an additional mattress on the mattress in the carrycot.
Warning
• When adjusting adjustable elements, the child must not get in contact with moveable parts.
• If possible, avoid stairs, steps or escalators. When using an escalator, stand below the pram.
• Do not use this product in strong wind or storms.
• Please observe that train stations can cause high pressure changes in the air (wind or vacuum).
Never place the product near train tracks without having both hands on the push handle since the brake alone may not be sufcient to keep
your pram safely in its place.
• Do not cross train tracks when your child is inside the pram. The wheels can get stuck in the tracks.
• When using public transport (bus, underground, train, etc), it is not sufcient to only use the brake of the pram.
The pram may be exposed to strong external loads (unexpected braking, corners, potholes, acceleration) for which the pram is not tested
according to the pram standard EN1888. Follow the instructions for safe transport and securing of prams the operator must provide in public
transport vehicles.
3. Care and safety instructions

14
Maintenance
The user is responsible for regular maintenance and care. All connection parts must be xed and secured.
Locks, moveable parts and folding mechanisms should be treated regularly with silicon-free spray.
All functional parts should be checked regularly the chrome should be maintained regularly.
Guarantee
In accordance with legal regulations, we guarantee the function of the product described in this instructions manual with respect to
occurring faults that may be attributed to manufacturing errors or material failures.
The guarantee does not apply to damage due to improper use including damage due to falling or impacts.
The guarantee can only be effected with a proof of purchase.
Damage due to erroneous use is not covered by the legal guarantee but can be repaired by us for a fee.
_____________________________________________________ ______________________________________________________________________________________________________
Date of purchase Company stamp and dealer signature
4. Maintenance and guarantee

15
Separately available accessories
Customise accessories to your wish together with your specialist dealer
Warning Danger of suffocation: All accessories are delivered in plastic bags.
Remove the plastic bag and keep it outside the reach of children.
ECO-MATTRESSES –
for perfect lying comfort
OEKO-TEX® standard 100.
FOOT MUFFS
Summer and winter foot muffs can be
ordered in the colour of the pram.
PARASOLS –
with exterior or interior fabric
RAIN CAPE – Transparent
Quickly covers the entire pram and protects
child and pram from heavy rain.
ADAPTER FOR BABY SEAT
Can be used for the models of maxi-cosi,
Cybex and Kiddy (not for Kiddy evoluna)
SHOPPING BAG
To protect shopping and e.g. jackets in the
metal basket and for a better storage.
BACK EXTENSION
WINTER MUFF –
for woolly warm hands
It is simply attached to the push handle.
FOOT EXTENSION PART –
with click-in connection
BEDDING
Available to t with the interior design of
your pram.
CHANGING BAGS KLASSIK PLUS CHANGING BAGS SOFT PLUS
The changing bags have a changing mat, bags for jars, holders for baby bottles and nappies,
a removable, washable inner pocket.

HESBA Kinderwagenfabrik GmbH & Co. KG
Weißer Weg 16
D– 96257 Marktgraitz / Bayern
www.hesba.deEN | Version 10/2016
This manual suits for next models
3
Table of contents


