hestan KICS User manual

INDOOR COOKING
Smart Induction Cooktop
KICS
Use & Care Manual

SAFETY DEFINITIONS
THIS INDICATES THAT DEATH OR SERIOUS INJURY MAY OCCUR
AS A RESULT OF NOT OBSERVING THIS WARNING
THIS INDICATES THAT MINOR OR MODERATE INJURY MAY
OCCUR AS A RESULT OF NOT OBSERVING THIS WARNING.
THIS INDICATES THAT DAMAGE TO THE APPLIANCE OR
PROPERTY MAY OCCUR AS A RESULT OF NOT OBSERVING THIS
WARNING.
READ THESE INSTRUCTIONS CAREFULLY AND COMPLETELY BEFORE
INSTALLING OR USING YOUR APPLIANCE TO REDUCE THE RISK OF
FIRE, BURN HAZARD, OR OTHER INJURY. KEEP THIS MANUAL FOR
FUTURE REFERENCE.
Do not store or use gasoline or other flammable vapors and liquids in the
vicinity of this or any other appliance.
Installation and service must be performed by a qualified installer or
service agency.
DO NOT REPAIR, REPLACE OR REMOVE ANY PART OF THE
APPLIANCE UNLESS SPECIFICALLY RECOMMENDED IN THE
MANUAL. IMPROPER INSTALLATION, SERVICE OR MAINTENANCE
CAN CAUSE INJURY OR PROPERTY DAMAGE. REFER TO THIS
MANUAL FOR GUIDANCE. ALL OTHER SERVICING SHOULD BE
DONE BY A QUALIFIED TECHNICIAN.
INSTALLER: LEAVE THIS MANUAL WITH THE OWNER OF THE APPLIANCE.
HOMEOWNER: RETAIN THIS MANUAL FOR FUTURE REFERENCE.
IF THE INFORMATION IN THIS MANUAL IS NOT FOLLOWED
EXACTLY, A FIRE OR EXPLOSION MAY RESULT CAUSING
PROPERTY DAMAGE, PERSONAL INJURY, OR DEATH.

Message from Hestan:Message from Hestan:
Hestan’s award-winning culinary innovations and purpose-built features
reinvented the restaurant kitchen and redefined culinary experience in some
of America’s most acclaimed restaurants. Hestan now takes this performance
from the back of the house and puts it front and center in yours. Thoughtfully
designed and meticulously built, Hestan will serve you beautifully for years to
come.
Hestan is the only residential brand born from the dreams and demands of
professional chefs. From ranges to refrigeration, every detail is designed to
deliver the performance and reliability expected in a restaurant – now available
for you.
We appreciate you choosing Hestan, and we promise to deliver the very best to
you.
Welcome to HestanWelcome to Hestan
©2021 Hestan Commercial Corporation
1
EN


©2021 Hestan Commercial Corporation
3
EN
When properly cared for, your Hestan appliance will provide safe, reliable service for many
years. When using this appliance, basic safety practices must be followed as outlined below.
IMPORTANT: Save these instructions for the local Utility Inspector’s use.
INSTALLER: Please leave these Installation Instructions with the owner.
OWNER: Please retain these Installation Instructions for future reference.
Do NOT install this appliance outdoors.
SAFETY PRECAUTIONS - BEFORE YOU BEGIN
ELECTRICAL SHOCK HAZARDELECTRICAL SHOCK HAZARD
Disconnect power before installing or servicing appliance. Failure to do
so can result in death or electrical shock.
ELECTRICAL GROUNDINGELECTRICAL GROUNDING
• This appliance must be grounded. Grounding reduces the risk of electric
shock in the event of a short circuit. Read the ELECTRICAL CONNECTIONS section of the
Installation Manual for complete instructions.
• DO NOT ground to a gas pipe.
• DO NOT use an extension cord with this appliance.
TABLE OF CONTENTS
3 SAFETY PRECAUTIONS - BEFORE YOU BEGIN
7 MODEL NUMBERS
7 RATING LABEL
7 REGULATORY / CODE REQUIREMENTS
8 MODEL AND PART IDENTIFICATION
9 HOW INDUCTION HEATING WORKS
10 USER INSTRUCTIONS
18 SMART COOKING
24 CLEANING AND MAINTENANCE
26 TROUBLESHOOTING GUIDE
27 COMPLIANCE INFORMATION
28 PARTS LIST
28 SERVICE
28 LIMITED WARRANTY

©2021 Hestan Commercial Corporation
4
EN
SAFETY PRECAUTIONS - BEFORE YOU BEGIN
(CONT.)
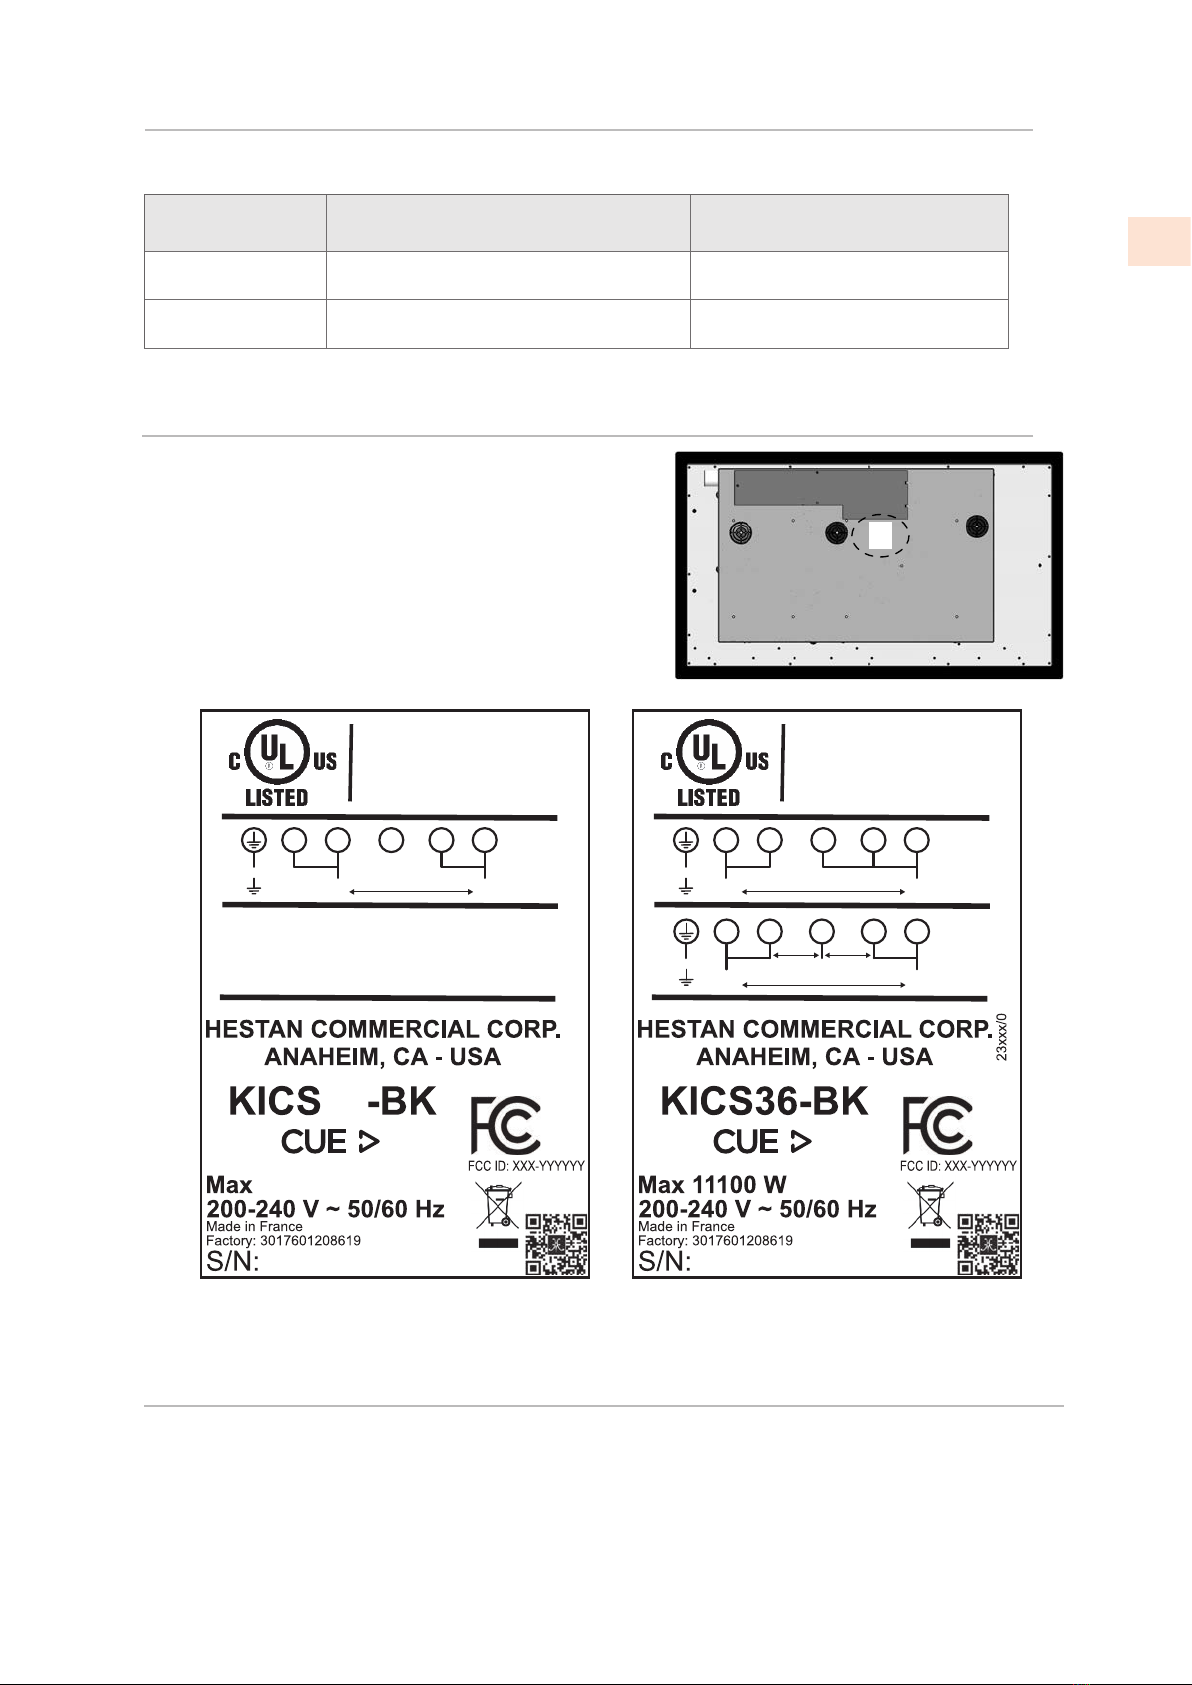
ELECTRICAL SUPPLYELECTRICAL SUPPLY
This appliance must be connected to a dedicated circuit, 200-240 VAC, Single Phase, 50 or 60Hz,
with a circuit breaker as recommended in the chart on page 7. Have the installer show you where
the electric circuit breaker is located so you know how to shut off the power to this appliance.
It is the responsibility of the user to have the appliance connected by a licensed electrician in
accordance with all local codes, or in the absence of local codes, in accordance with the National
Electrical Code. Read the ELECTRICAL CONNECTIONS section of the Installation Manual for
complete details.
MEDICAL WARNINGMEDICAL WARNING
When in use, the Hestan Cue Smart Induction Cooktop generates an electromagnetic field that
may interfere with medical devices such as pacemakers. Anyone using medical devices should
be cautious when in close proximity to a cooking zone that is powered on. Please consult your
doctor or medical device manufacturer for advice regarding the usage of induction cooking zones.
SAFETYSAFETY
1) Proper installation – be sure your appliance is properly installed and grounded by a qualified
technician.
2) Never use your appliance for warming or heating a room.
3) Do Not Leave Children Alone – Children should not be left alone or unattended in an area
where an appliance is in use. They should never be allowed to sit or stand on any part of the
appliance.
4) Wear Proper Apparel – Loose-fitting or hanging garments should never be worn while using
this appliance.
5) User Servicing – Do not repair or replace any part of the appliance unless specifically
recommended in the manual. All other servicing should be referred to a qualified technician.
6) Storage in or on Appliance – Flammable materials should be stored in an oven or near surface
units.
7) Do Not Use Water on Grease Fires – Smother fire or use dry chemical or foam-type
extinguisher.
8) Use Only Dry Potholders. Moist or damp potholders on hot surfaces may result in burns
from steam. Do not let potholders touch hot heating elements. Do not use a towel or other
bulky cloth.
9) Never Leave Surface Units Unattended at High Settings – Boilover causes smoking and
greasy spillovers that may ignite.
USER SAFETYUSER SAFETY
BURN HAZARD - Cookware can get very hot during operation.
Metallic objects such as knives, forks, spoons and lids should not be placed on the cooktop
surface since they can get hot.
In general do not place any foil or metallic object except heating containers on the glass surface.
If power is applied, it may heat, melt, or even burn.
DO NOT TOUCH ACTIVE COOKING ZONES OR AREAS NEAR THEM. Areas near cooking
zones may become hot enough to cause burns. During and after use, do not touch, or let clothing
or other flammable materials contact cooking zones until the residual heat indicators have turned
off.
Do not allow anyone to climb, stand, step on, lean against, or sit on any part of the appliance.
This may result in damage to the appliance or personal injury.

©2021 Hestan Commercial Corporation
5
EN
FIRE SAFETYFIRE SAFETY
Always turn on the ventilation hood when cooking. Clean vent hood grease filters frequently -
grease should not be allowed to accumulate on the fan or filters.
Keep the appliance zone clear and free from combustible materials, gasoline, and other
flammable vapors and liquids. NEVER store flammable liquids and materials above, below, or
on the appliance, or near cooking surfaces. Do not obstruct the flow of ventilation air of the
appliance.
ALWAYS have a working smoke detector near the kitchen.
ALWAYS have an appropriate (Type ABC, or type K) kitchen fire extinguisher nearby.
NEVER pick up a flaming utensil. You may spill the grease on yourself and be severely burned.
Smother fire or flames using the lid of the cookware, a cookie sheet, or metal tray. Then
shut off the cooking zone.
Use an extinguisher, or baking soda if the fire is small and relatively contained.
DO NOT USE WATER ON A GREASE FIRE. Doing so may result in spreading the fire
elsewhere.
IF THE FLAMES DO NOT GO OUT - EVACUATE AND CALL THE FIRE DEPARTMENT.
In the event of personal clothing or hair catching fire, drop and roll immediately to smother the
flames. Seek medical attention if necessary.
EQUIPMENT SAFETYEQUIPMENT SAFETY
Magnetically sensitive objects (credit cards, bank cards) should not be placed on or near the
appliance when in use.
Defective parts must only be replaced with genuine Hestan parts. Contact Hestan Customer
Service for inquiries or to arrange a service call.
The appliance must be disconnected from the power during any service or maintenance work.
SAFETY DURING CLEANINGSAFETY DURING CLEANING
Only clean the appliance as directed in the CLEANING & MAINTENANCE section of this
manual.
Clean cooktop with caution – If using a wet sponge or cloth to wipe spills on a hot cooking area,
be careful to avoid steam burn. Some cleaners can produce noxious fumes if applied to a hot
surface.
Wait until the appliance is completely cool before using any aerosol-type cleaners. Many of
these cleaners use flammable propellants which could ignite in the presence of heat.
SAFETY PRECAUTIONS - BEFORE YOU BEGIN
(CONT.)

©2021 Hestan Commercial Corporation
6
EN
PROPER USAGEPROPER USAGE
Always position the handles of cookware so they do not extend over adjacent work zones or
over the edge of the cooktop. This is to avoid knocking over hot contents which could burn you,
or result in a fire.
The appliance is not intended to be operated by means of external timer or separate remote
control system, except as provided by the Hestan Cue app.
This domestic appliance is exclusively for the cooking of food, and not for any other domestic,
commercial or industrial use.
SMART COOKWARESMART COOKWARE
Do not use ‘smart cookware’ not approved or provided by Hestan.
Do not place a Smart Capsule insert, capsule end cap, or any related parts on the cooktop.
OTHER RESOURCESOTHER RESOURCES
For information about the cooktop, the cookware, or guided cooking, see the following Hestan
websites:
For matters regarding the Smart Induction Cooktop, see
https://hestanhome.com
For Hestan Cue guided cooking resources and Smart Cookware, see
https://hestancue.com
BEFORE USING THE COOKTOP FOR THE FIRST TIMEBEFORE USING THE COOKTOP FOR THE FIRST TIME
All products are wiped clean with solvents at the factory to remove any visible signs of dirt, oil,
and grease which may have remained from the manufacturing process.
Remove any packing, labels, and literature from the cooktop surface.
Clean your glass cooktop before the first time you use it. A thorough cleaning with a glass
cooktop cleaner is recommended. It only takes a minute and puts a clean, shiny coating on the
cooktop before its initial use.
• There may be a slight odor during the first several uses: this is normal and will disappear.
• Optimum cooking results depends on the proper cookware being selected and used.
• The cooking surface can get hot from the cookware and remain hot for some time after
cooking zones have been turned off. Observe the warning symbols in the control area.
• The cooking surface is durable and resistant to impact, but not unbreakable. It can be
damaged if a utensil or other object is dropped on it.
• Do not allow cookware to boil dry. This can damage the cookware and/or cooktop.
• Do not slide cookware across cooking surface, as it may scratch the cooktop.
SAFETY PRECAUTIONS - BEFORE YOU BEGIN
(CONT.)

©2021 Hestan Commercial Corporation
7
EN
MODEL NUMBERS
COOKTOP MODELS
MODEL NO. DESCRIPTION CIRCUIT BREAKER
REQUIRED
KICS30 30” Smart Induction Cooktop 40 Amp
KICS36 36” Smart Induction Cooktop 50 Amp
REGULATORY / CODE REQUIREMENTS
Installation of this cooking appliance must be made in accordance with local codes. In the
absence of local codes, this unit should be installed in accordance with the National Electrical
Code and local codes.
This appliance must be electrically grounded in accordance with local codes or in the absence of
local codes with the National Electrical Code
ANSI/NFPA 70
, or Canadian Electrical code
CSA
C22.1
.
RATING LABEL
The rating label contains important information about
your Hestan appliance such as the model and serial
number, electrical rating and the minimum installation
clearances.
The rating label is located on the bottom of the
cooktop.
If service is necessary, contact Hestan Customer
Service with the model and serial number information
shown on the label.
Rating label
30
27222/0
E503130
ELECTRIC COOKTOP UL
KICS30-BK
L2 L1
200-240V 2P
5 4 2 13
7400 W
Figure 1. Typical rating labels
E503130
ELECTRIC COOKTOP UL
KICS36-BK
L2 L1
200-240V 2P
3P
5 4
L3 L1
200-240V L2200-240V
200-240V
2 13
5 4 2 13

©2021 Hestan Commercial Corporation
8
EN
MODEL AND PART IDENTIFICATION
Position Size of cooking zone Minimum
cookware size
Nominal
power Boost power Double Boost
power
1 8-1/2” [220 mm] 4” [100 mm] 2300W 3000W 3700W
2 8-1/2” [220 mm] 4” [100 mm] 2300W 3000W 3700W
3 7-1/2” [190 mm] 4” [100 mm] 1850W 2300W 3000W
4 7-1/2” [190 mm] 4” [100 mm] 1850W 2300W 3000W
Position Size of cooking zone Minimum
cookware size
Nominal
power Boost power Double Boost
power
1 8-1/2” [220 mm] 4” [100 mm] 2300W 3000W 3700W
2 8-1/2” [220 mm] 4” [100 mm] 2300W 3000W 3700W
3 5-3/4” [145 mm] 3-1/2” [90 mm] 1400W 1850W 2200W
4 7” [180 mm] 4” [100 mm] 1850W 2300W 3000W
5 11” [280 mm] 4” [100 mm] 2500W 3000W 3700W
COOKWARE NOISECOOKWARE NOISE
Some noise may occur from cookware when using the cooktop. It may vary according to cookware
construction and power level.
In addition, the noise may vary according to the use of adjacent cooking zones. Possible noises
include a low humming sound or whistle. A cookware piece that completely covers the cooking
zone will produce less noise.
These noises may be reduced or eliminated by lowering or raising the power level settings of one or
both of the adjacent cooking zones.
COOKWARE SIZECOOKWARE SIZE
Cookware must be at least the minimum size for the zone you use it on.
Full power may not be delivered to cookware with a base smaller than the cooking zone.
CUE
7-1/2”
[190mm]
CUE enabled/
CUE ac�vé
8-1/2”
[220mm]
1
2
3
4
8-1/2”
[220mm]
[190 mm]
7-1/2”
53
2
4
1
11”
[280 mm]
5-3/4”
[145mm]
7”
[180mm]
CUE enabled/
CUE ac�vé
8-1/2”
[220mm]
8-1/2”
[220mm]
CUE
KICS36
KICS30

©2021 Hestan Commercial Corporation
9
EN
1 - Cookware
2 - Induced current
3 - Magnetic field
4 - Inductor
5 - Electroniccircuit
6 - Electricity supply
HOW INDUCTION HEATING WORKS
INDUCTIONINDUCTION
Heating by induction is the most efficient form of cooking available.
The heat is generated by an electromagnetic field, directly on the bottom of the cookware used.
The surface, unless cookware is on it, remains virtually cold.
When the cooking time is up and the container is removed, there is little residual heat. It is
efficient because there is no waste of energy due to dispersion, as happens with gas burners, it is 30
to 50% faster than cooktops using combustion burners and allows substantial energy savings.
If liquid overflows from the container, it is less likely to stick to the surface of the cooktop, because
this is just slightly warm.
OPERATING PRINCIPLEOPERATING PRINCIPLE
This is based on the electromagnetic properties of most cookware.
The electronic circuit supplies power to the coil (inductor), creating a magnetic field, which heats
the cookware.
As the cookware is heated, it heats the food.
Benefits include:
• High performance; the power goes into heating the food rather than heating the kitchen.
• Safety - removing the cookware (simply lifting it) automatically stops power to that cooking zone.
• Precision and flexibility through electronic control.

©2021 Hestan Commercial Corporation
10
EN
USING THE SMART INDUCTION COOKTOPUSING THE SMART INDUCTION COOKTOP
Cookware can be placed on a cooking zone before or after the cooktop is turned on.
Power is not delivered until the cooktop is turned on (1), the zone (with cookware piece present)
is selected (17), and a power is set for that zone (9~10).
COOKWARE DETECTIONCOOKWARE DETECTION
The cooktop will detect suitable cookware in any of the cooking zones. The system will only
apply power to a cooking zone where cookware is detected.
ON
OFF
min
ON
22
21 20 19 2 17 16 15 14 13 12
3 4 5 1 6 7 8 9 10 11
18
# Item # Item
1 Main Power key (ON/OFF) 12 Bridge function indicator
2++Timer 13 Cooking zone “timer active” indicator
3−−Timer 14 Cooking zone power level display
4 Connectivity indicator 15 Power level indicator
5 Connectivity key 16 Cooking zone indicator
6 Pause key 17 Cooking zone selector (zone ON/OFF)
7 Pause indicator 18 Timer display (minutes/seconds)
8 Graphic indicating controlled zone 19 Timer display (minutes/seconds)
9Power slider - minimum power/select
low temp functions 20 Timer display (minutes)
10 Power slider - maximum power 21 Icon indicating minutes
11 Select Power Boost (P) 22 Cooktop power indicator
USER INSTRUCTIONS

©2021 Hestan Commercial Corporation
11
EN
RESIDUAL HEAT INDICATORRESIDUAL HEAT INDICATOR
This warns the user that the glass is hot in the cooking zone. The temperature is determined
using a mathematical model and any residual heat is indicated with an “H” on the corresponding
display.
Heating and cooling are calculated from the power level selected (from “0“ to “9“) and the relay
activation period.
After a cooking zone is switched off, its display shows an “H” until the computed temperature in
the zone falls below 140°F [60°C].
PROTECTION FROM ACCIDENTAL ACTIVATIONPROTECTION FROM ACCIDENTAL ACTIVATION
If a key is activated for about 10 seconds, the buzzer begins sounding until the key is released.
The display shows an error code, which remains until the selector key for that zone is touched
and released.
►If no cooking zone is activated within 20 seconds of switching on the touch control, the
control returns to stand-by mode.
The main Power key takes priority over all other keys, so the touch control can be switched off at
any time, even in the case of multiple or continuous activation of the keys.
In stand-by mode, continuous activation of the keys will have no effect. However, before the
electronic control can be switched on again, it must recognize that no key is active.
If the cooking zone has been in use and is hot, an “H” will appear on the display after the zone is
turned off. The “H” turns off after the zone has cooled.
PRECAUTIONSPRECAUTIONS
• If there is any visible crack or break in the cooktop surface, turn its circuit breaker OFF and
call Hestan Customer Service.
• During operation, move any magnetic materials such as credit cards, computer disks,
calculators, etc., away from all active cooking zones.
• Never use cooking foil or rest products wrapped in foil directly on the cooktop.
• Metallic objects such as knives, forks, spoons and lids must not be rested on the surface of
the cooktop to prevent them from heating up.
• When cooking with non-stick cookware, without using water or oil, limit any preheating time
to one or two minutes.
• When cooking foods which tend to stick to the bottom of the cookware, start at minimum
power and gradually increase the heat, stirring frequently.
• After use, turn off the zone using the zone selector (17), sliding power to “0”, or touching the
main Power key rather than relying on the cookware detection sensor.
USER INSTRUCTIONS
(CONTINUED)

©2021 Hestan Commercial Corporation
12
EN
TYPES OF COOKWARETYPES OF COOKWARE
If a magnet is attracted to the bottom of your cookware then it is suitable for induction cooking.
• Try to use cookware declared as suitable for induction cooking
• Flat, thick-bottomed cookware will perform most effectively
• A small cookware piece will accept less power than a large one. The preferred and minimum
cookware sizes per cooking zone are
shown in the table on page8.
• Stainless steel cookware with multilayer
bottom or ferrite stainless steel may be
used if the bottom indicates: for induction
• Cast iron containers need to have a
smooth bottom, or better with an
enameled bottom to avoid scratching the
cooktop
• Containers made of glass, ceramic,
terracotta, aluminum, copper or non-magnetic stainless steel (austenitic) are not
recommended and are unsuitable for use on this cooktop.
CARING FOR THE COOKTOPCARING FOR THE COOKTOP
Traces of foil, food residues, splashes of fat, sugar or very sugary foods must be
removed immediately from the cooktop using a scraper to avoid damaging the
cooktop surface. Sugars are easier to remove while the surface is still warm.
Then clean with a proper glass cooktop cleaner and paper towels, rinse with
water and dry with a clean cloth.
Never use abrasive sponges or clothes and avoid using aggressive chemical
cleansers such as OVEN SPRAYS or STAIN REMOVERS.
DO NOT USE STEAM CLEANERS
TURNING THE COOKTOP ON AND OFFTURNING THE COOKTOP ON AND OFF
The cooktop is turned on by touching the Power key (1), you will hear a short beep and the
indicator lights up. After switching on, the touch control remains active for 20 seconds. If you
do not select either a cooking zone or the timer, the cooktop returns to stand-by mode.
ACOUSTIC SIGNAL (BUZZER)ACOUSTIC SIGNAL (BUZZER)
During use, the following activities are signaled by a buzzer:
• Normal keytouch sounds a short beep.
• If a key is held for more than 10 seconds, the buzzer will sound and an error symbol is
displayed.
TURNING ON A COOKING ZONETURNING ON A COOKING ZONE
Position a cookware piece and touch the selector key (17) for the cooking zone. Slide your finger
on the power slider to the right to increase the cooking level (10), or slide your finger to the left
to decrease it (9). The power level indicator (15) visually indicates the power selected, along with
the numeric value in the power level display (14).
If suitable cookware is not detected in the cooking zone, the display for that zone will alternate
between the selected power level and the “missing cookware” symbol.
TURNING OFF A COOKING ZONETURNING OFF A COOKING ZONE
A single cooking zone can be turned off directly by touching the selector key (17) for the cooking
zone that is working. Hot cooking zones will be displayed with a letter “H”. You can turn off all
cooking zones immediately at any time using the main Power key (1).
YesNo No
USER INSTRUCTIONS
(CONTINUED)

©2021 Hestan Commercial Corporation
13
EN
AUTOMATIC ZONE POWER-OFFAUTOMATIC ZONE POWER-OFF
If a cooking zone is active but it doesn’t detect a pan for more than 30 seconds, it will shut off.
ACCIDENTAL POWER-OFFACCIDENTAL POWER-OFF
If, during cooking, you inadvertently touch the main Power key and turn the cooktop off, you can
resume with all settings intact as follows:
1) Touch the main Power key - the Pause indicator will blink
2) Touch the Pause key within 6 seconds, before the Pause indicator stops blinking.
POWER LEVELSPOWER LEVELS
The power level of the cooking zone can be set from level 1 to level 9. Two additional levels
(Power Boost) are available for very rapid heating of food.
An automatic heat-up function is also available. When it is active, the power level indicator (14)
shows a numeric value alternating with the letter “A”. See “Automatic heat-up” on page 14 for
more information.
POWER BOOSTPOWER BOOST
The power of a cooking zone can be increased or “boosted” for up to ten minutes.
A “boosted” cooking zone is heated with power that is significantly higher than the rated power.
When Boost is active, the display of the boosted cooking zone shows .
• Activate Boost by touching at the end of the power slider of the cooking zone (11).
• De-activate Boost by sliding on the power slider.
DOUBLE BOOSTDOUBLE BOOST
A second boost level is available, “Double Boost”.
When Double Boost is active, the display of the boosted cooking zone shows an animated
sequence of .
• Activate Double Boost by activating Boost, then touch the end of the power slider again.
• De-activate Double Boost by sliding on the power slider or touching it away from the end.
BOOST POWER LEVELSBOOST POWER LEVELS
The tables on page8 list the base power and power increase for each cooking zone.
If the cooking vessel is removed from the cooking zone during the Boost time, Boost remains
active and the Boost time is not deactivated. With the Boost activated, changing the value set
with your finger in the power slider zone deactivates the Boost. Boost “P” can be activated in all
cooking zones, but priority is given to the last Boost activated, reducing any other cooking levels.
AVAILABLE POWERAVAILABLE POWER
The cooktop has a limited total power available. When a zone is set for Boost or Double Boost,
there is less power available for other cooking zones. Depending on zone usage, power may be
limited to 6 or 8 in some or all other zones when Boost is active.
USER INSTRUCTIONS
(CONTINUED)

©2021 Hestan Commercial Corporation
14
EN
AUTOMATIC HEAT-UPAUTOMATIC HEAT-UP
This feature makes cooking easier by adding ‘boil and reduce’ functionality to the elements. The
surface automatically heats up at full power (level “9”) and then returns to the selected power
level after a certain time (see table below).
ACTIVATING AUTOMATIC HEAT-UPACTIVATING AUTOMATIC HEAT-UP
Slide to choose the cooking power, then hold that position for about 3 seconds until you hear a
beep. For example, if you select level 3 and hold it until it beeps: the cooking zone display will
show the letter “A” alternating with “3”. With these settings, the cooking surface heats the
cooking zone at level “9” for 2 minutes and then continues cooking at level “3”.
DE-ACTIVATING AUTOMATIC HEAT-UPDE-ACTIVATING AUTOMATIC HEAT-UP
To de-activate the function, touch/slide on the power slider for that zone.
Power
level Automatic Heating Function
duration (time in minutes) Maximum time zone will operate at power
setting (time in minutes)
1 0m 40s 516
2 1m 12s 402
3 2m 318
4 2m 56s 258
5 4m 16s 210
6 7m 12s 138
7 2m 138
8 3m 12s 108
9 - 90
P - 10
-
USER INSTRUCTIONS
(CONTINUED)

©2021 Hestan Commercial Corporation
15
EN
BRIDGE FUNCTION (FOR LARGE COOKWARE)BRIDGE FUNCTION (FOR LARGE COOKWARE)
This function facilitates cooking with elongated cookware, and allows the two right-most
cooking zones to work together as one. Activate the bridge function by simultaneously touching
the power sliders of the two cooking zones. (See zones 1, 2 on page8.)
• The icon will light up next to the bridged cooking zone displays.
Once set to bridge mode, both cooking zones are controlled from the left power slider.
(Slider that controls the right rear zone.) To disable bridge mode, touch both slider controls
simultaneously at any point along the adjustment bars.
Boost modes are not available for zones that are actively bridged.
LOW TEMPERATURE FUNCTIONSLOW TEMPERATURE FUNCTIONS
This function is available in each cooking zone and its activation is indicated by one, two, or three
bars. These correspond to three “cooking” levels:
• Water bath with a temperature of approximately 110°F [42°C].
• Melt with a temperature of approximately 160°F [70°C].
• Simmer with a temperature of approximately 200°F [94°C]
These temperatures are approximate and are greatly dependent on the
cookware and the quantity of food.
1) Touch the selector key (17) for the desired cooking zone
2) Touch the initial part of the power slider zone (9) to activate the first warming level
3) To switch to a higher level, touch the power slider in the same position until the desired level
is displayed.
4) To return to the lowest level, lift and touch the power slider again.
The low temperature functions operate for a maximum of 2 hours.
PAUSE FUNCTIONPAUSE FUNCTION
To halt all cooktop functions, touch the Pause key.
All timers are paused, and power is not delivered to any cooking zone.
TO RESUME:TO RESUME:
1) Touch the Pause key again
2) One of the sliders will illuminate. Touch it to resume cooking.
- The Pause indicator turns off
Cooking and timer operations resume from the same point at which they were stopped.
Lowest level
Mid level
Higher level
USER INSTRUCTIONS
(CONTINUED)

©2021 Hestan Commercial Corporation
16
EN
TIMER FUNCTIONSTIMER FUNCTIONS
NOTE: the timers are only intended as acoustic advisors to recall the attention of the user.
• Timers have no effect on the heating elements. Cooking zones must always be stopped
manually by touching the corresponding [OFF] key.
There are two versions of the timer function:
1) An independent timer from 1 to 999 minutes: This function is available when no cooking
zone is active. It beeps when the time has run out.
2) A zone timer from 1 to 999 minutes for each cooking zone: it beeps when the time has run
out. The cooking zones can be programmed independently (the symbol may be less bright if
another cooking zone timer has a remaining time that is less than that set on the independent
timer).
There’s a zone timer indicator (13) in each zone display. The timer with the least time is
highlighted and its icon is brighter (13). The other timers are still active and running, but
those timer icons (13) will be less bright.
INDEPENDENT TIMERINDEPENDENT TIMER
The independent timer is available when none of the cooking zones are active. To activate the
timer, touch the ++and −−keys. The display will show “000”, and you can set a time using the ++key.
The time setting (0-999 min) can be changed in increments of one minute with the ++key from 0
to 999.
Holding down the ++or −−key increases the rate of change up to a maximum value, without beeps.
If the ++(or −−) key is released, the rate of increase (decrease) starts again from the initial value.
The timer can be set by either continuously touching the ++or −−keys or by touching successively
(with beeps).
After the timer is set, it begins to count down. The completion of the time is signaled by a beep
or by the flashing of the timer display, which will show “000”. To stop the flash and beep, press
the ++and −−keys.
TURNING OFF/CHANGING THE TIMERTURNING OFF/CHANGING THE TIMER
The timer can be changed or turned off at any time by turning on the touch display again, if no
cooking zone is on, and touching the ++and −−keys simultaneously to select the timer. Adjust the
time using the ++and −−keys. After adjusting, the “min” icon will flash for a few seconds, then the
time is accepted and the timer starts from the new value.
To turn the timer off, touch the −−key.
The independent timer remains active even when the main Power key is touched.
USER INSTRUCTIONS
(CONTINUED)

©2021 Hestan Commercial Corporation
17
EN
PROGRAMMING A COOKING ZONE TIMERPROGRAMMING A COOKING ZONE TIMER
To program a cooking zone timer, touch the ++and −−keys simultaneously until the timer icon
(13) illuminates for the cooking zone you want. If there is more than one cooking zone on,
you may have to touch and release the ++and −−keys several times until the correct zone timer is
illuminated.
When the timer of the cooking zone is selected, its timer icon (13) becomes brighter. The timers
programmed for each cooking zone remain active.
Other functions of the timer are the same as the independent timer. To increase the time, use the
++(plus) key.
When a timer counts down, the display flashes and beeps. The alerts stop after 2 minutes or
when you touch the ++and −−keys.
USER INSTRUCTIONS
(CONTINUED)

©2021 Hestan Commercial Corporation
18
EN
INTRODUCTIONINTRODUCTION
Smart Cooking uses the Hestan Cue app on your phone or tablet with Cue-enabled cookware
and the Cue-enabled cooking zone on your Smart Induction cooktop to precisely control cooking
conditions for optimum control and stellar results.
The following sections will explain how to prepare your cookware and your phone or tablet for
use with the Smart Induction Cooktop.
COOKWARE AND CAPSULESCOOKWARE AND CAPSULES
Each capsule end cap must be kept with its own kind of cookware piece. (Fry pan, Chef’s
Pot, etc.) This is because the capsule identifies the cookware to the Hestan Cue app, as well
as providing temperature information. If a capsule end cap is installed in the wrong kind of
cookware piece, then Guided Cooking can’t give proper results.
NOTE: This manual covers the cookware supplied with the Smart Induction Cooktop. Other
cookware may require a different procedure for battery installation, even if compatable with the
cooktop. For such cookware, see the literature that came with it for instructions.
For the latest information about Smart Cookware and additional Hestan Cue guided cooking
resources, see https://support.hestancue.com
BatteryCapsule end cap Hestan Cue™Ruler
CUE-enabled cook zone
Hestan Smart InductionTM
KICS30 SMARTINDUCTION COOKTOP
KICS36 SMARTINDUCTION COOKTOP
SMARTCOOKWARE
HESTAN CUE™APP
SMART COOKING
This manual suits for next models
2
Table of contents
Languages:
Other hestan Cooktop manuals

hestan
hestan KICS 36 User manual

hestan
hestan KGC30-NG User manual

hestan
hestan KIC 30 User manual

hestan
hestan KIC series User manual

hestan
hestan KGC Guide

hestan
hestan KIC User manual

hestan
hestan KICS 36 User manual

hestan
hestan KGC30-LP User manual

hestan
hestan KBGIT User manual

hestan
hestan KEC series User manual
Popular Cooktop manuals by other brands

Blanco
Blanco CI905 Instructions for the use and care and installation

Dacor
Dacor Heritage HICT305BG installation instructions

Smeg
Smeg SI5633 Instructions for use

Electrolux
Electrolux 168233 Specification sheet

GE
GE Monogram ZEU30R installation instructions

Miele
Miele SmartLine CS 7612 FL Operating and installation instructions