hestan ASPIRE ERS24 Instructions for use

OUTDOOR REFRIGERATOR
Model: ERS24
Installation / Use & Care Manual

Message from Aspire by Hestan:
Outdoor cooking is a perfectionist’s pursuit, and with your new investment, you’ve
now taken the ultimate step forward. We sincerely welcome you to the Aspire by
Hestan Family. We’ve engineered and built our products so that your guests will
rave about your meal, but deep down, our customers know it could’ve been just
a little more tender, juicier – a pinch more salt in the rub or a few seconds less on
the ame. Yes, we’ve taken the time to know our Aspire by Hestan customer and
we’re excited to be on this journey with you. Aspire by Hestan was born from this
same perfectionist passion. Our engineers experimented, innovated, tweaked and
tinkered until they created the most powerful, versatile and reliable outdoor products
available.
We pride ourselves on restless innovation, superior engineering and purpose-
built designs, but also our in-depth understanding of our target consumer and
the interests and needs of the ultimate end-users we serve and covet. For many
consumers, cooking outdoors is much more than an act of food preparation. It’s a
lifestyle activity that encompasses culinary, leisure and social pursuits among others.
We are thankful and proud that you have chosen Aspire by Hestan, and we yearn to
have you as a customer for life. We take your decision to choose Aspire by Hestan
most seriously, and we promise to deliver the very best to you.
Welcome to Aspire by Hestan
EN

©2020 Hestan Commercial Corporation
2
EN
IMPORTANT SAFEGUARDS
Read all instructions before using this appliance. Use this appliance only for its intended purpose
as described in this instruction manual. Always exercise basic safety precautions, as described
below. After reading the instruction manual, store it in an accessible place where the user(s) of
this product can easily nd it.
The purpose of these safety precautions is to ensure safe and correct use of the product
to minimize risks that could cause serious damage and injury to you or others. The safety
precautions are divided into WARNINGS and CAUTIONS. Cases where improper handling of the
unit could lead to death or serious injury are listed under the WARNING heading. However, the
cases listed under CAUTION could also lead to serious results. To ensure safety, adhere strictly
to both types of safety precautions.
1. All repairs, disassembly and modications should be performed only by qualied technicians.
Attempting to perform these yourself could result in re, malfunction or injury.
2. Never splash water directly onto the product or wash it with water without unplugging, as a
short circuit could result. In a rainy environment, a water-proof covering is recommended.
3. Never put ammable or volatile substances into the unit as explosion and re could result.
4. Do not damage, modify, excessively bend, strain, twist or bundle the power cord. Avoid hot,
sharp, or aggressive surfaces. Also, placing heavy objects on the power cord or binding it
could damage the cord, possibly resulting in electrical shock or re.
5. Use a dedicated wall outlet. Do not use an extension cord or multiple-outlet adaptor as this
could result in electrical shock, overheating and re.
6. Never use ammable spray cans or leave ammable substances near the unit. Sparks from
electrical switches could result in explosion or re. If a combustible gas is present near the
appliance, turn off the source of the gas, then open the windows and doors to allow the gas
to dissipate. To avoid an explosion, do not pull the plug or switch off the unit.
7. The electrical socket used must have good grounding. The ground wire cannot be connected
with a gas pipe, heating pipe, water pipe, telephone line or lightning rod. It cannot be
replaced with the neutral wire of single-phase power. In addition to the ground wire, an
electrical leakage circuit breaker is also required.
8. Use an electrician installed ground fault circuit interrupter (GFCI) electrical outlet. If no GFCI
is installed, electrical shock could result.
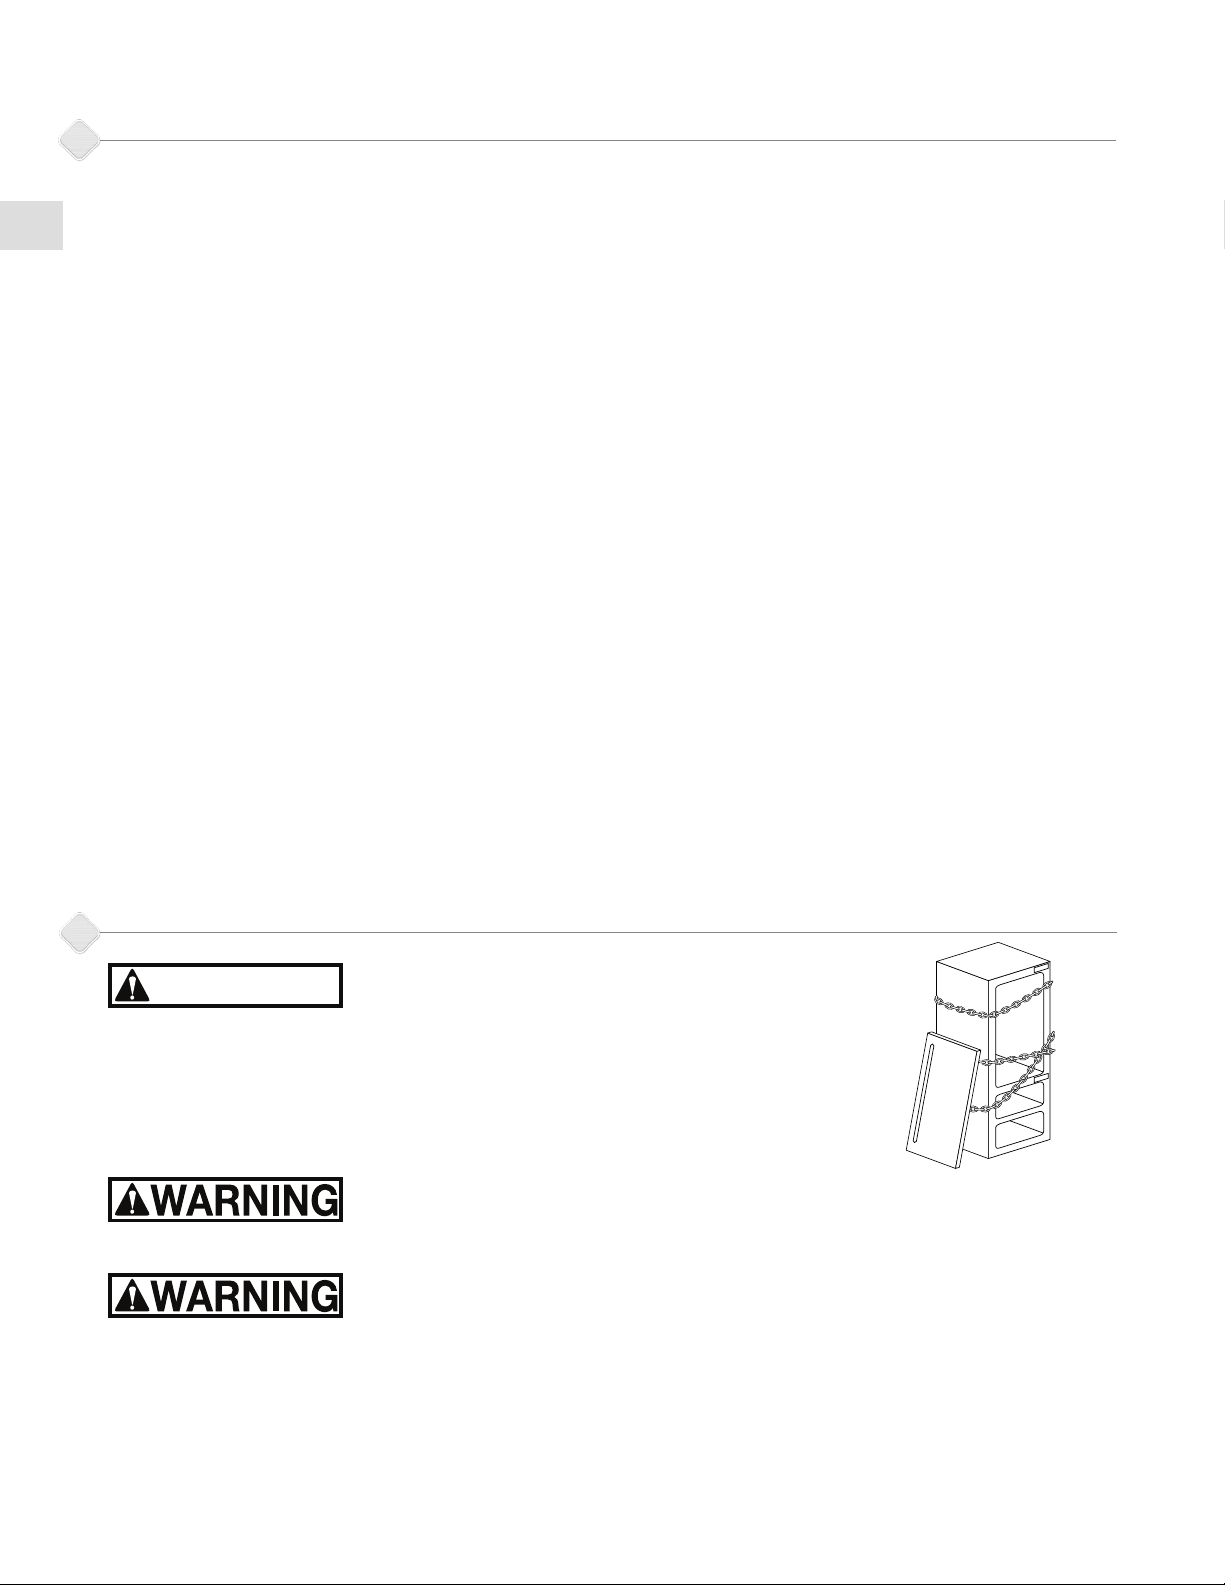
9. Never climb onto the unit. The unit could tip over or fall and cause material damage or
personal injury.
10. Disconnect the power cord plug from the wall outlet before moving the unit and make sure
that the power cord is not damaged during transport. A damaged power cord could result
in electrical shock and/or re.
11. Never unplug the unit by pulling on the power cord. Always grip the plug rmly and pull
straight out from the outlet. Pulling the cord could cause wire breakage, possibly resulting in
overheating and re.
12. Repair or replace any cord that is frayed or damaged. Do not use a cord that shows cracks or
abrasions along its length.
1. This unit must be properly installed in accordance with the installation instructions along with
all local codes before it is used. See grounding instructions in the Installation section.
©2020 Hestan Commercial Corporation
3
EN
For outdoor use ONLY. This appliance is not intended to be
installed in or on recreational vehicles, and/or boats.
Electrical Parts & Components – disconnect all power supplies
before servicing.
READ THIS MANUAL CAREFULLY AND COMPLETELY BEFORE USING YOUR
REFRIGERATOR TO REDUCE THE RISK OF FIRE, SHOCK HAZARD, OR OTHER
INJURY.
SAVE THESE INSTRUCTIONS FOR FUTURE REFERENCE.
IMPORTANT SAFEGUARDS
(continued)
2. This model can either be built-in or free-standing. Built-in units vent at the bottom front and
airow at the front of this vent must be unimpeded.
3. Install the unit in a location where the oor is sturdy enough to support the load of the unit.
If the oor is not sturdy enough or installation is incorrectly performed, the unit could tip
over and cause personal injury. If the unit is placed on a stand, the front surface must be 3”
[7.6 mm] or more back from the edge of the stand in order to avoid accidental tipping of the
appliance during normal usage.
4. Never place heavy objects or items containing water on top of the unit. Objects could fall
and cause injury and spilled water could cause the deterioration of the insulation of electrical
components and result in electrical shock.
5. Disconnect the unit if it is behaving abnormally, and do not reconnect until the situation is
corrected.
6. Pull out the plug before doing any maintenance on the unit to avoid electric shock.
7. Never pull out the power cord when hands are wet!
8. This unit is not intended for the storage of medicines or chemical reagents.
9. Keep packing materials away from children.
10. Condensate water from the evaporator drains into a hole in the oor of the storage
compartment and is channeled into a drain pan located at the back of the unit on the
compressor. Heat transferred from the compressor evaporates any water that has collected
in the pan. Be sure the drain hole in the oor of the unit is clear and unobstructed.
11. During long absences, remove the unit’s contents, unplug the unit, clean it and leave the door
open slightly to avoid possible formation of condensation, mold or odors. Use a cover to
protect the unit and prolong its lifespan.
12. Leave disassembly and disposal of the unit to qualied experts.
IMPORTANT CHILD SAFETY
DANGER
Risk of child entrapment. Before you throw away your old refrigerator:
• Take off the doors.
• Leave the shelves in place so that children may not easily climb inside.
• Do not let children play in, on, or around the refrigerator.

©2020 Hestan Commercial Corporation
4
EN
2 IMPORTANT SAFEGUARDS
3 IMPORTANT CHILD SAFETY
5 LOCATION OF PARTS / TECHNICAL SPECIFICATIONS.
6 CONTROL PANEL
6 ENERGY-SAVING TIPS
6 INSTALLATION
8 OPERATING YOUR REFRIGERATOR
10 CLEANING AND MAINTENANCE
11 TROUBLESHOOTING
12 PARTS LIST / SERVICE
12 WARRANTY
TABLE OF CONTENTS

©2020 Hestan Commercial Corporation
5
EN
TECHNICAL SPECIFICATIONS
Model Number: ERS24
Description: Outdoor Refrigerator
Electrical Input: 115VAC ~ 60Hz
Current Rating: 1.8A
Unit Dimensions: 23”W x 26-¾”D x 33-½”H [584 x 680 x 851 mm]
Unit Weight: 114 lbs. [52 kg]
Ambient Temperature Range: 50ºF - 100ºF [10°C - 38°C]
Compartment Temperature Range: 36ºF - 64ºF [2°C - 18°C]
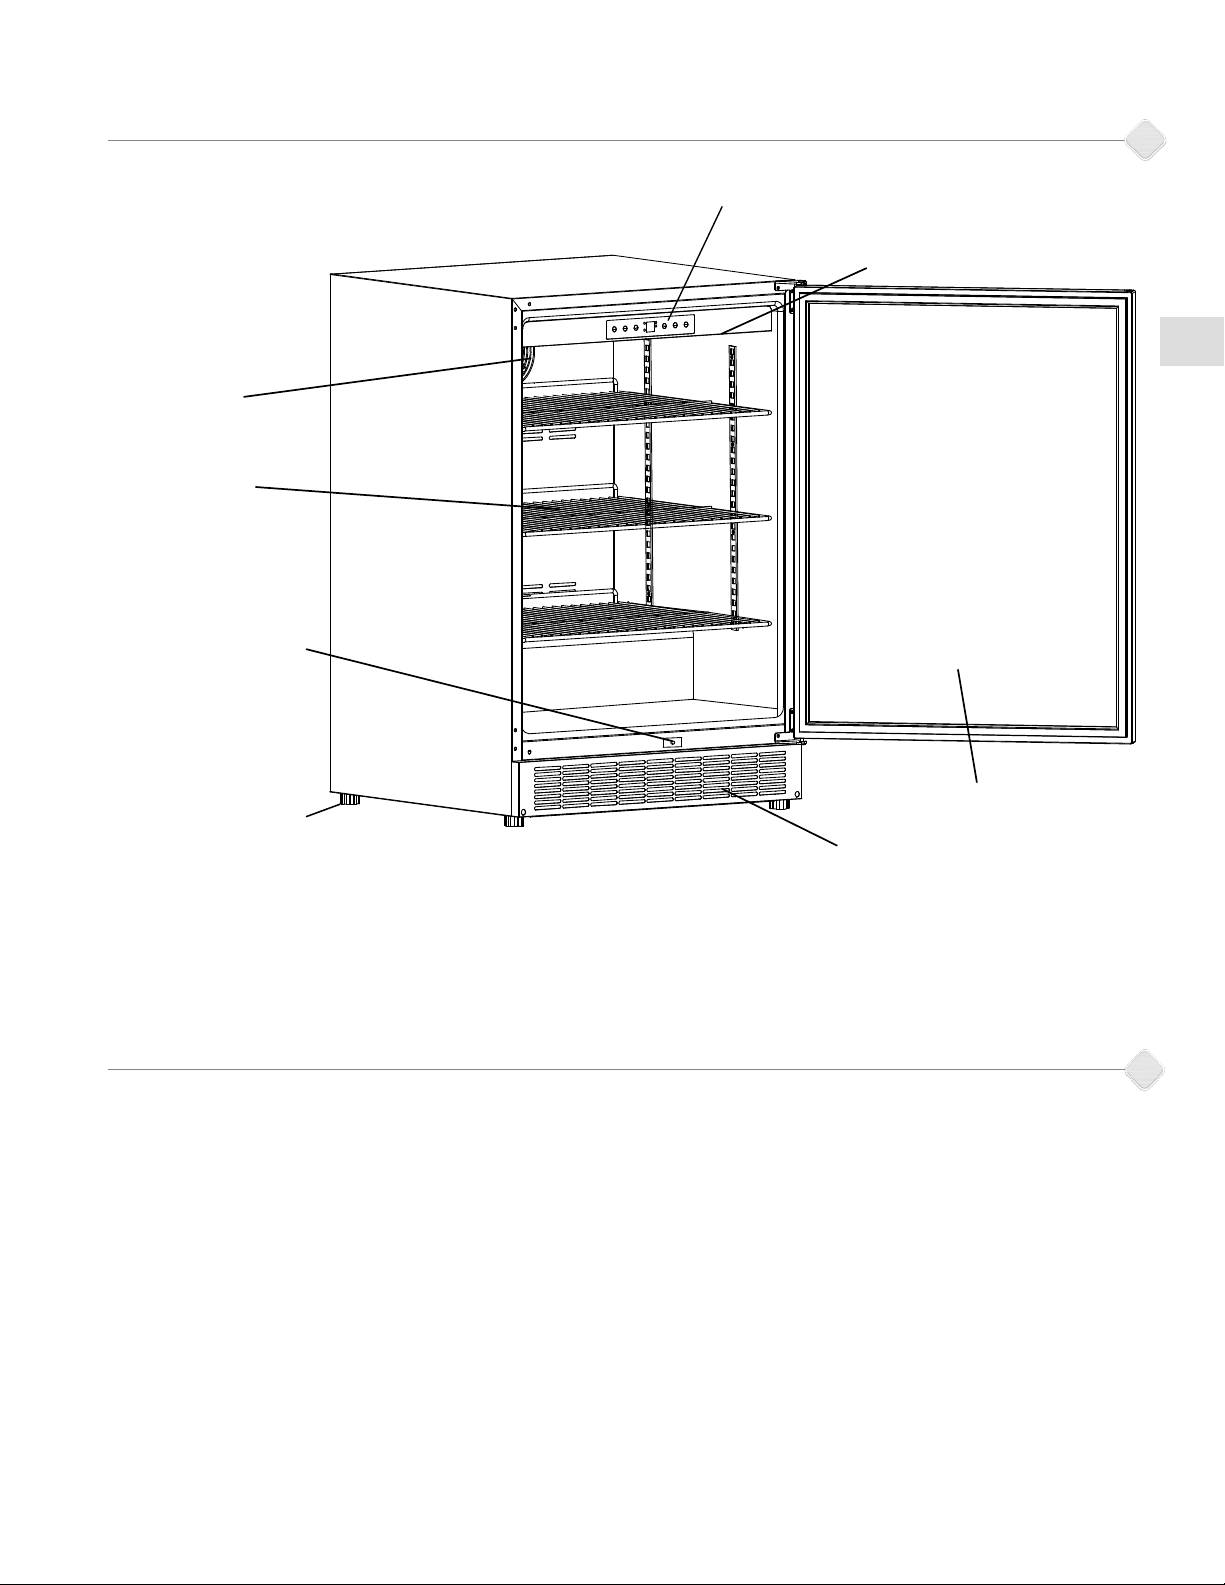
LOCATION OF PARTS
Fan
Shelves
Light Switch
Leveling Legs
Light
Door
Vents
Control Panel
©2020 Hestan Commercial Corporation
6
EN
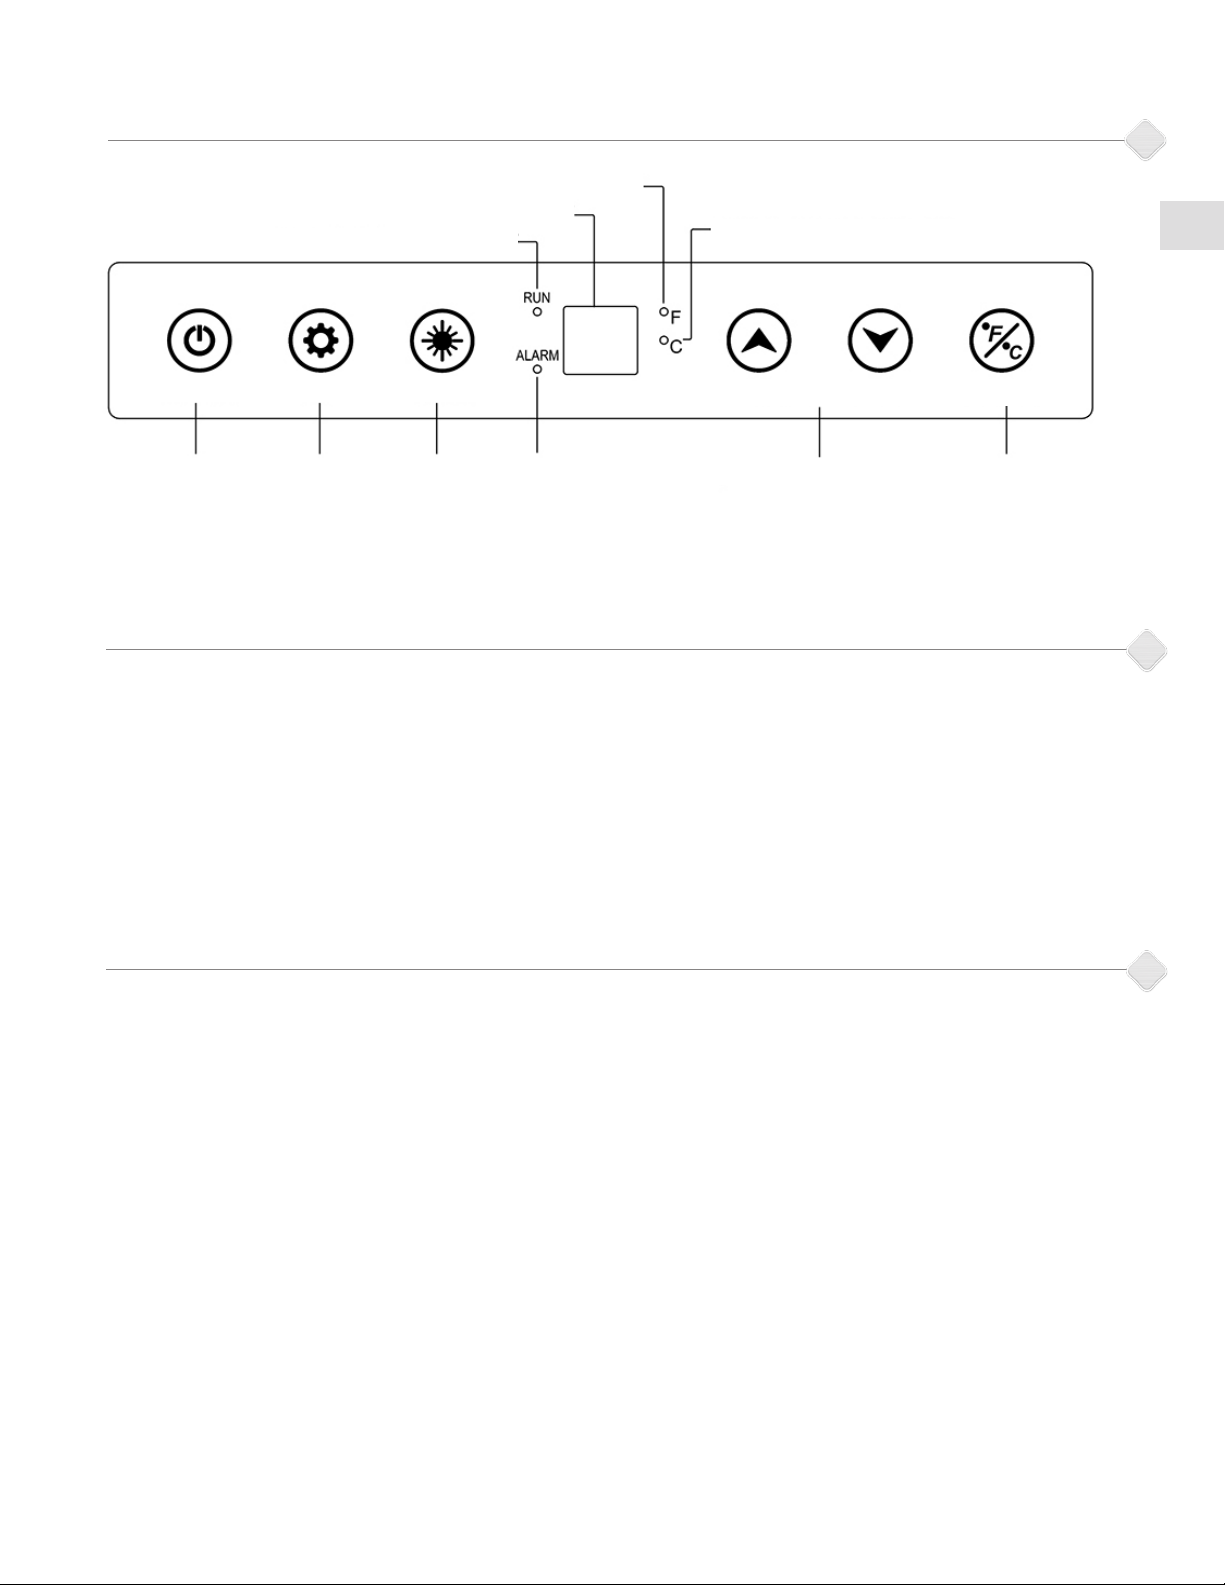
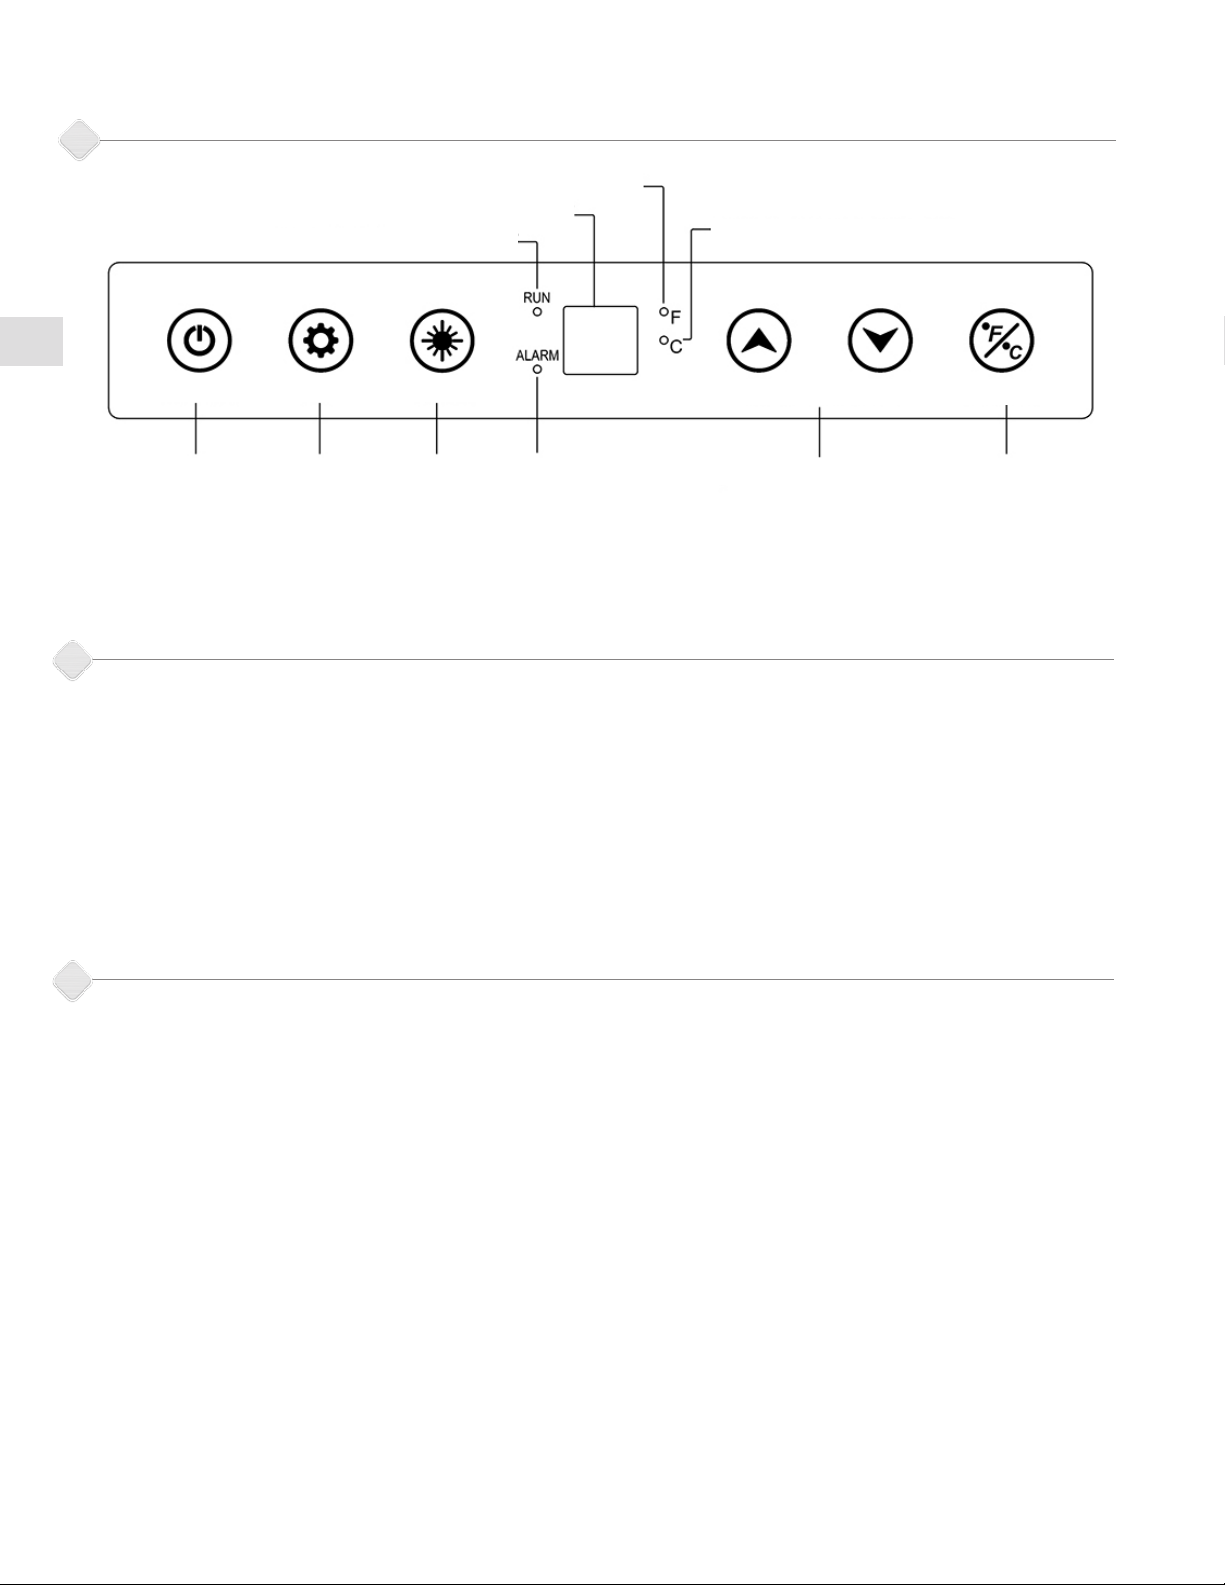
CONTROL PANEL
ENERGY-SAVING TIPS
• Do not place the unit next to a heating vent, a range or in direct sunlight.
• Keep the door closed as much as possible, especially in hot, humid weather.
• Cover foods to reduce moisture buildup inside the appliance.
Centigrade Scale Indicator
Fahrenheit Scale Indicator
Temperature Display
Compressor Run Indicator
Power
Switch
Set Button Light
On/Off
Temperature
Unit Button
Up/Down
Buttons
Alarm
Indicator
INSTALLATION
Remove the exterior and interior packaging. Use a soft dry cloth to wipe down the outside of
the refrigerator thoroughly. Use a clean cloth dampened with lukewarm water to wipe down the
inside of the refrigerator.
The unit should be located in a well-ventilated area. Avoid placing it near any source of heat or
moisture, or in direct sunlight. Direct sunlight may affect the nish, and nearby heat sources will
cause higher electrical consumption.
The Refrigerator is designed to be either free-standing or built-in. It has motorized fans at the
back of the unit that direct compressor-generated heat away from the compressor and through
the front of the unit. Keep the front vents unobstructed. If the unit is built-in, allow minimum
clearances of 1/4” [6 mm] at the sides, 1/2” [13 mm] at the back and 1” [25 mm] at the top.
Once the Refrigerator is positioned, the adjustable legs should be turned to level the appliance.
This will reduce vibrations.
©2020 Hestan Commercial Corporation
7
EN
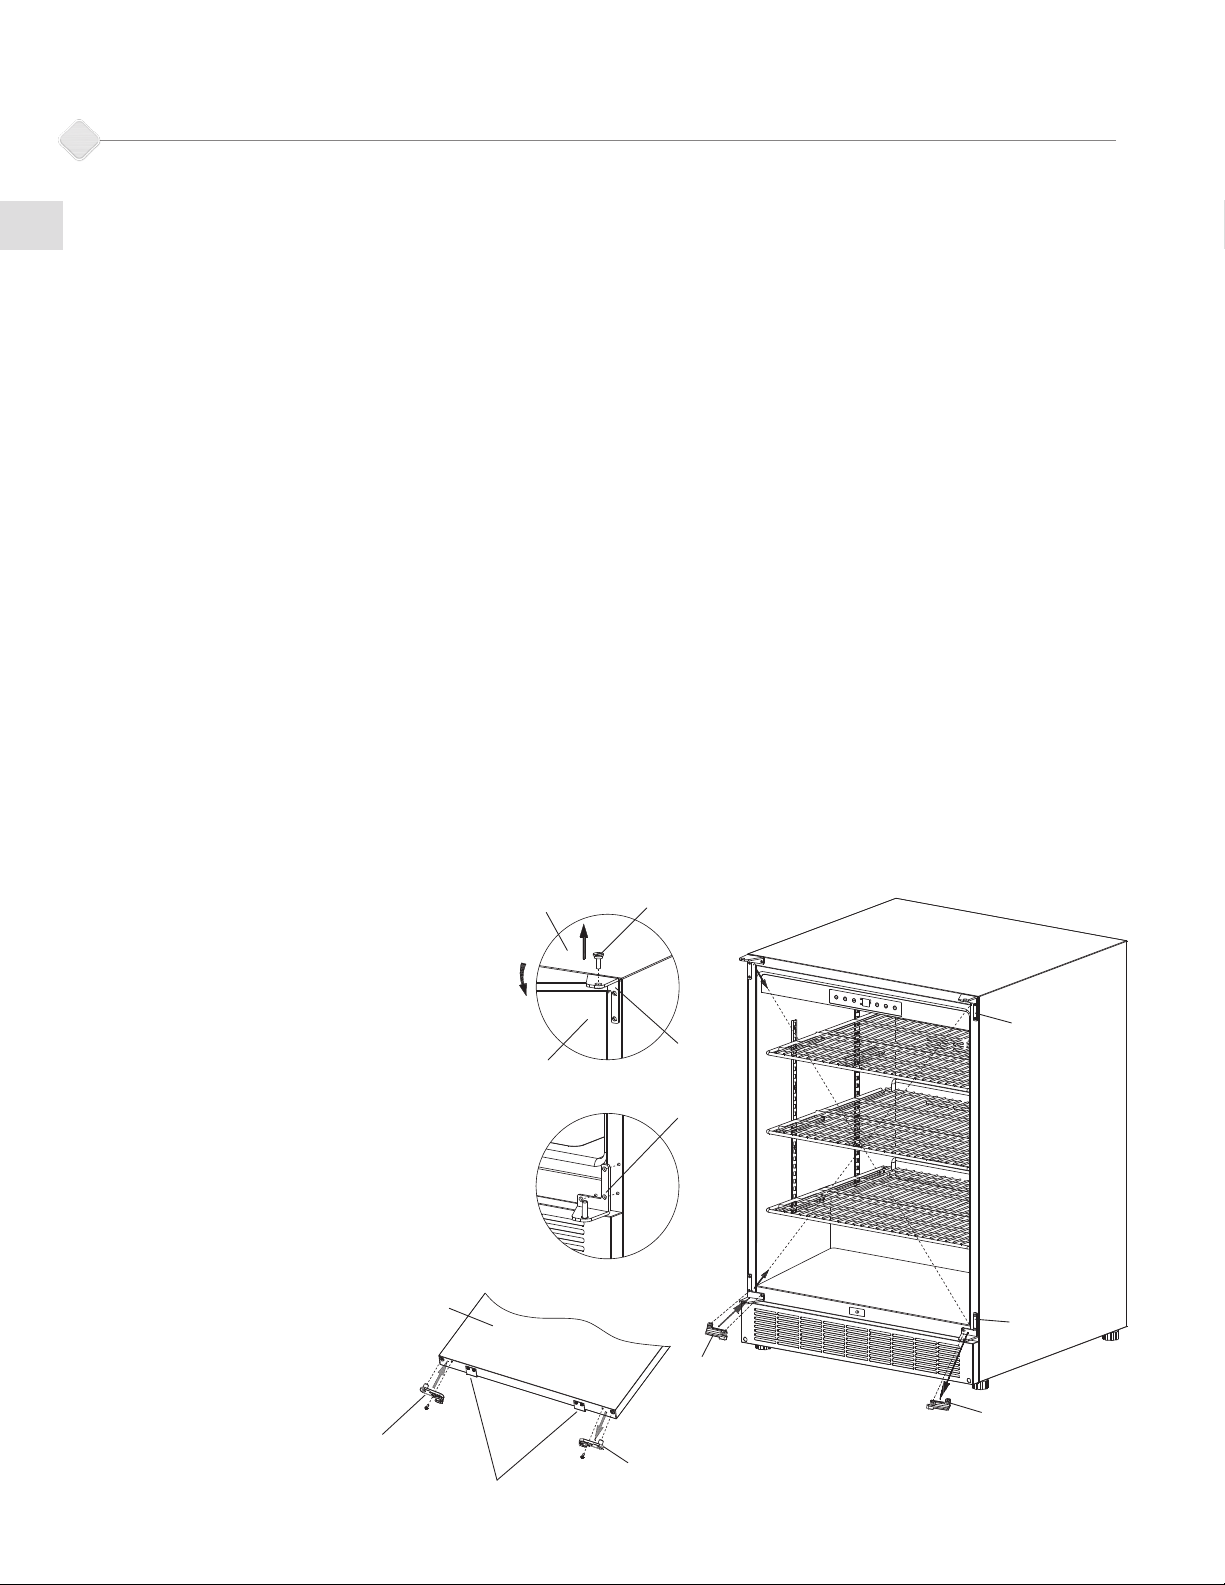
Reversing the Door Swing
Tools needed: Flathead screwdriver, Phillips screwdriver
IMPORTANT: Before you begin, unplug the refrigerator or disconnect power.
Note that the handle does not need to be removed to reverse the door swing.
To remove door from hinges:
1. Using a athead screwdriver, separate the hinge axis from Hinge 1. Set aside.
2. Open the door about 20° around the axis of Bottom Hinge 2, then lift the door off Bottom
Hinge 2 and set door aside.
3. Remove the right latch hook located in the right bottom of the door and plastic cap located
in the left bottom of the door.
4. Install the left latch hook (in accessory bag) to the left bottom of the door where the plastic
cap was placed and put the plastic cap on the other side.
To replace door on hinges:
1. Using a athead screwdriver, remove the plug buttons from the screw holes opposite the
door hinges, top and bottom. Set aside.
2. Replace the axis on the Hinge 1 and tighten it rmly. Remove Hinge 1 and install it with left
latch block (in accessory bag) on the opposite bottom side.
3. Remove Hinge 2 and take down the right latch block, place Hinge 2 on the opposite top side.
Separate the axis from Hinge 2 and set it aside.
4. Align the door on Bottom Hinge 1 and replace axis on Hinge 2. Tighten it rmly.
5. Push the plug buttons into the original screw holes.
INSTALLATION
(continued)
Cabinet Hinge axis
Hinge 1
Door
Hinge 2
Hinge 1
Hinge 2
Door limit
Door
Left latch hook
Left latch block
Right latch hook
Right latch block
©2020 Hestan Commercial Corporation
8
EN
INSTALLATION
(continued)
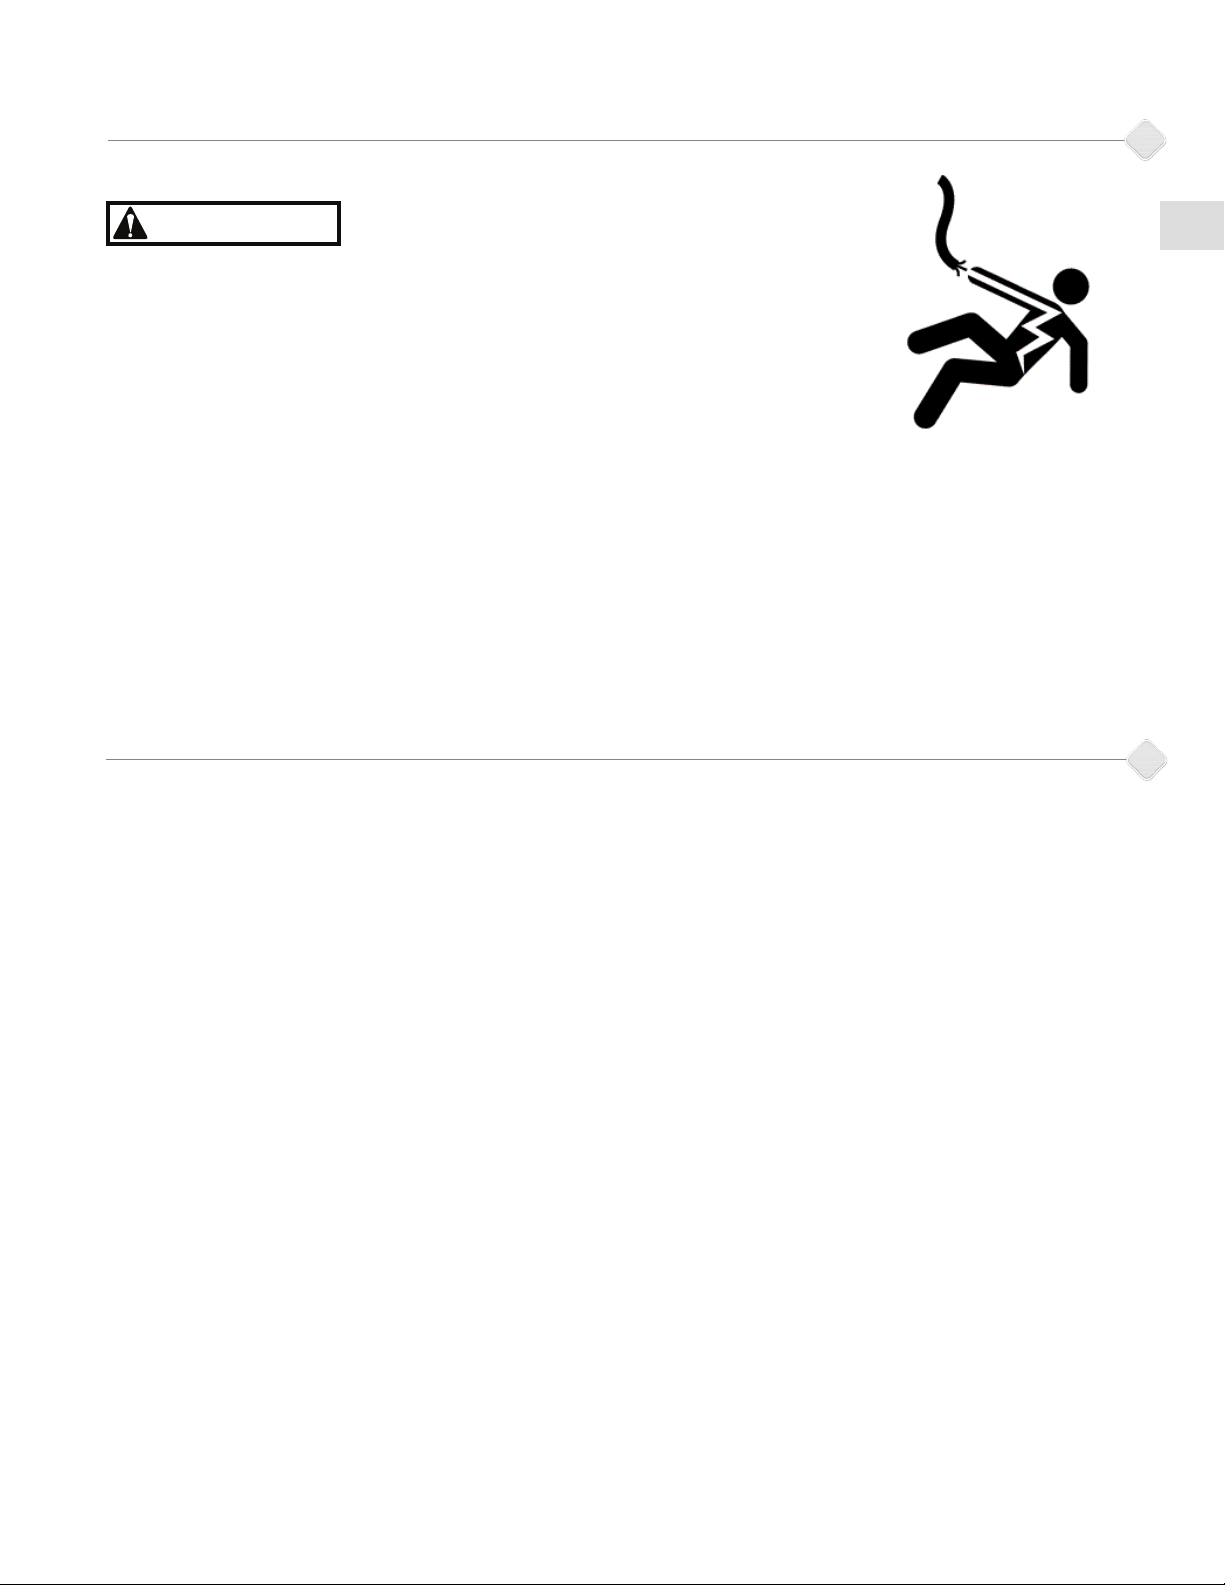
ELECTRICAL CONNECTION
DANGER
Important! For your personal safety, this appliance must be properly
grounded. In the event of an electrical short circuit, grounding reduces
the risk of shock by providing an escape wire for the electric current.
This appliance is equipped with a cord having a grounding wire with a
grounding plug. The plug must be inserted into an outlet that is properly
grounded and installed. The ground wire cannot be connected to a gas
pipe, heating pipe, water pipe, telephone line or lightning rod. It cannot
be replaced with the neutral wire of single-phase power. In addition to
the ground wire, an electrical leakage circuit breaker (GFCI) is also required. Consult a qualied
electrician if you do not completely understand these grounding instructions.
DO NOT UNDER ANY CIRCUMSTANCES CUT OR REMOVE THE THIRD (GROUND) PRONG
FROM THE POWER CORD!
If installation in a damp location is unavoidable, have an electrician install a ground fault circuit
interrupter (GFCI) electrical outlet. If no GFCI is installed, electrical shock could result.
DO NOT USE AN EXTENSION CORD.
Avoid the use of an extension cord because of potential safety hazards under certain conditions.
OPERATING YOUR REFRIGERATOR
IMPORTANT: Do not plug in the Refrigerator for 24 hours after unit is set in place. Failure to do so
may result in the unit working improperly.
Compartment DesignCompartment Design
This outdoor refrigerator has a capacity of 175 cans. The unit has 3 adjustable chrome-plated at
wire shelves to hold cans and bottles of beverages such as beer, water and soft drinks. The control
panel enables you to set your desired temperature and displays the current temperature inside the
compartment.
OPERATING INSTRUCTIONSOPERATING INSTRUCTIONS
First UseFirst Use
The refrigerator control is preset at the factory. Initial startup requires no adjustments.
Turning On the UnitTurning On the Unit
Plug in the Refrigerator to turn it on automatically. (After the unit has been on for about 6 hours,
the compressor will shut down for thirty minutes to allow for automatic defrosting.)
If you want to use the Automatic Temperature (default) setting, do nothing further. The unit will
automatically set the temperature in the compartment at 40 ºF [4ºC]. If you want to set other
temperatures, see below.
Temperature SettingTemperature Setting
Wine Storage Temperatures: While wines store best at temperatures around 56-58ºF [13-14°C],
your unit also allows you to store wine at drinking temperatures. Generally, RED WINE should be
kept at 60-61ºF [16°C] and WHITE WINE, which is usually served chilled, is best kept at 54-55ºF
[13°C]. Sparkling wines should be kept at about 46°F [8°C]. For beer and soft drinks, choose the
temperature setting that is most agreeable to you and your guests.

©2020 Hestan Commercial Corporation
9
EN
To adjust the temperature, press the SET button, then use the UP/DOWN keys to navigate to the
preferred temperature. The range of set temperatures is from 36°F to 64°F [2°C to 18°C]. For
example, if you are storing red wine, you may want to set a temperature of 61ºF [16°C]. When
your desired temperature appears in the DISPLAY window of the control panel, press SET to
conrm. The actual temperature inside the unit will now appear in the window. This temperature
will vary depending on the number of bottles stored and how frequently the door is opened.
Please note: The temperature sensor records the average temperature of the unit. Cold air falls
and warmer air rises, and there will be a temperature variation from the bottom to the top of
the unit. The temperature at the bottom of the unit will always be slightly colder. The controller
controls the average temperature of the unit. The temperature displayed by the electronic
control panel is the instantaneous average temperature of the unit and there may be a variation of
approximately 0°F to 6° F [0°C to 4°C] from top to bottom.
When fully loaded with room temperature product, the refrigerator will operate continuously for as
long as 24 hours to reduce the temperature inside the cabinet to the desired point. Under normal
conditions, when the unit has been on for six hours, it will go through the auto defrost function for
a period of about thirty minutes.
The unit is designed to operate in ambient temperatures between 50°F [10°C] and 100°F [38°C].
Higher ambient temperatures may reduce the unit’s ability to reach low temperatures. Best
results are obtained at temperatures between 65°F [18°C] and 80°F [27°C] for built-in models and
between 65°F [18°C] and 90°F [32°C] for freestanding models.
Caution: Damages caused by ambient temperatures of 40°F [4°C] or below are not covered by the
warranty.
To temporarily stop the cooling cycle, unplug the refrigerator. To shut it down for longer periods
of time, disconnect the plug and leave the door partially open to avoid odors or mold.
NOTE: If you unplug the Refrigerator, allow 3 minutes before plugging it back in. The unit will not
restart in less than 3 minutes.
Memorized Temperature SettingsMemorized Temperature Settings
Your unit has been designed to “remember” the last run mode to which it was set. If there is
a power outage or any other power cutoff, the unit will automatically return to the previous
temperature setting after the power has returned.
Compressor Run IndicatorCompressor Run Indicator
When the compressor is running, the control panel will light a running LED light representing a
running compressor. When the compressor stops running, as it reaches the desired temperature,
the running LED will go out as well.
ALARM ModeALARM Mode
In the event that there is a fault in the unit, an ALARM LED light will appear on the control panel.
In ALARM mode, the unit will make a beeping sound and display an alarm message. If the control
panel displays any of the following messages: EI, HI or LI, consult the Troubleshooting section of
this manual.
Interior LightInterior Light
The interior light can be turned On or Off automatically with the opening or closing of the door.
ShelvingShelving
The unit has 3 adjustable chrome-plated at wire shelves to hold cans and bottles of beverages
such as beer, water and soft drinks.
OPERATING YOUR REFRIGERATOR
(continued)

©2020 Hestan Commercial Corporation
10
EN
These racks are designed to only be pulled out 1/3 of the way. This is a safety feature so that the
refrigerator will not tip over or let the shelf fall out.
The racks are removable and reversible. To remove a rack, take out the cans on the rack and pull it
out until it stops. Then lift up the front of the rack and remove it from the unit. Use these steps in
reverse to reinstall the shelf.
OPERATING YOUR REFRIGERATOR
(continued)
CLEANING AND MAINTENANCE
Cleaning the OutsideCleaning the Outside
Unplug your Refrigerator. Clean the outside with a cloth dampened in mild soapy water. Dry
thoroughly with a soft cloth. Polish with a stainless steel cleaner. To clean the door gasket, use
only mild soapy water. Never use harsh cleansers or scouring pads to clean any part of your unit.
Cleaning the InsideCleaning the Inside
Unplug your Refrigerator and remove its contents. Rinse the inside surfaces with plain water and
dry the chrome racks and shelving. Avoid getting excess water inside the machine since it will ow
into the water trap near the compressor and possibly overow.
Defrosting the UnitDefrosting the Unit
The unit incorporates an automatic defrost system in which the refrigerated surfaces of the unit
defrost automatically. Defrost water drains into a hole in the oor of the storage compartment and
is channeled into a drain pan located at the back of the unit near the compressor. Heat transferred
from the compressor evaporates any water that has collected in the pan. Be sure the drain hole in
the oor of the unit is clear and unobstructed.
Extended Non-UseExtended Non-Use
VACATION/HOLIDAY, PROLONGED SHUTDOWNVACATION/HOLIDAY, PROLONGED SHUTDOWN
The following steps are recommended for periods of extended non-use:
Remove all customable content from the unit.
Disconnect the power cord from its outlet/socket and leave it disconnected until the unit is
returned to service.
If ice is on the evaporator, allow ice to thaw naturally.
Clean and dry the interior of the unit. Ensure all water has been removed from the unit.
The door must remain open to prevent formation of mold and mildew. Prop open the door at a
minimum of 2” [50 mm] to provide the necessary ventilation.
WINTERIZATIONWINTERIZATION
If the unit will be exposed to temperatures of 40°F [4°C] or less, the steps above must be followed.

©2020 Hestan Commercial Corporation
11
EN
TROUBLESHOOTING
Unit does not turn onUnit does not turn on
Not plugged in.
Fuse blown or circuit breaker tripped.
Press Power Button on control panel.
Noise or vibrationNoise or vibration
Check that unit is level. If not, adjust leveling legs.
Unit is too warmUnit is too warm
Check that door is properly closed and sealed.
Check temperature setting. (To change the temperature setting, follow the steps in the
Operating Your Refrigerator section of this manual.)
Check if door has been opened frequently or recently lled with product.
Unit Develops Condensation on External SurfacesUnit Develops Condensation on External Surfaces
Check the unit is properly exposed to excessive humidity. Moisture will dissipate as humidity
levels decrease.
Temperature Window displays “EI”Temperature Window displays “EI”
This message is an ALARM MODE indication. It indicates that thermostatic sensor has
malfunctioned. Contact your authorized service facility for sensor replacement.
Temperature Window displays “LI”Temperature Window displays “LI”
This message is an ALARM MODE indication. It indicates that the actual temperature is much
lower than your set temperature.
Temperature Window displays “HI”Temperature Window displays “HI”
This message is an ALARM MODE indication. It indicates that the actual temperature is much
higher than your set temperature. Possible causes are:
• The door might not be fully closed.
• The refrigerant may have leaked.
• The unit may have been recently loaded with room temperature product.
• The control panel may not be functioning properly and should be replaced. If you are
certain that the door is not the cause of the problem, contact your authorized service
facility immediately.

©2020 Hestan Commercial Corporation
12
EN
SERVICE
All warranty and non-warranty repairs should be performed by qualied service personnel. To locate
an authorized service agent in your area, contact your Hestan dealer, local representative, or the
manufacturer. Before you call, please have the model number and serial number information ready.
This information is shown on the rating sticker afxed to the back of your appliance.
Hestan Commercial Corporation
3375 E. La Palma Avenue
Anaheim, CA 92806
(888) 905-7463
PARTS LIST
Please visit the Aspire by Hestan website to access the parts list for your Aspire by Hestan product:
www.hestanaspire.com.www.hestanaspire.com.
OUTDOOR REFRIGERATOR LIMITED WARRANTY
WHAT THIS LIMITED WARRANTY COVERSWHAT THIS LIMITED WARRANTY COVERS
Hestan Commercial Corporation (“HCC”) warrants to the original consumer purchaser of a Hestan outdoor
refrigerator (the “Product”) from an HCC authorized dealer that the Product is free from defective materials
or workmanship for a period of one (1) year from the date of original retail purchase or closing date
for new construction, whichever period is longer (“Limited Warranty Period”). HCC agrees to repair or
replace, at HCC’s sole option, any part or component of the Product that fails due to defective materials or
workmanship during the Limited Warranty Period. This Limited Warranty is not transferable and does not
extend to anyone beyond the original consumer purchaser (“Purchaser”). This Limited Warranty is valid only
on Products purchased and received from an HCC authorized dealer in the fty United States, the District of
Columbia and Canada. This Limited Warranty applies only to Products in non-commercial use and does not
extend to Products used in commercial applications.
HOW TO OBTAIN WARRANTY SERVICEHOW TO OBTAIN WARRANTY SERVICE
If the Product fails during the Limited Warranty Period for reasons covered by this Limited Warranty,
the Purchaser must immediately contact the dealer from whom the Product was purchased or HCC at
888.905.7463.
Purchaser is responsible for making the Product reasonably accessible for service or for paying the cost to
make the Product reasonably accessible for service. Service is to be provided during normal business hours
of the authorized Hestan Commercial Service Provider. To the extent Purchaser requests service outside
of the normal business hours of the authorized Hestan Commercial Service Provider, Purchaser will pay the
difference between regular rates and overtime or premium rates. Purchaser is required to pay all travel costs
for travel beyond 50 miles (one way) from the nearest authorized Hestan Commercial Service Provider.
WHAT THIS LIMITED WARRANTY DOES NOT COVER:WHAT THIS LIMITED WARRANTY DOES NOT COVER:
This Limited Warranty does not cover and HCC will not be responsible for and will not pay for: damage to
or defects in any Product not purchased from an HCC authorized dealer; color variations in color nishes or
other cosmetic damage; failure or damage from abuse, misuse, accident, re, natural disaster, commercial
use of the Product, or loss of electrical power to the Product; damage from alteration, improper installation,
or improper operation of the Product; damage from improper or unauthorized repair or replacement of any
part or component of the Product; damage from service by someone other than an authorized agent or
representative of the Hestan Commercial Service Network; normal wear and tear; damage from exposure
of the Product to a corrosive atmosphere containing chlorine, uorine, or any other damaging chemicals;
damage resulting from the failure to provide normal care and maintenance to the Product; damage HCC was
not notied of within the Limited Warranty Period; and incidental and consequential damages caused by any
defective material or workmanship.

©2020 Hestan Commercial Corporation
13
EN
ARBITRATION:ARBITRATION:
This Limited Warranty is governed by the Federal Arbitration Act. Any dispute between Purchaser and HCC
regarding or related to the Product or to this Limited Warranty shall be resolved by binding arbitration only
on an individual basis with Purchaser. Arbitration will be conducted by the American Arbitration Association
(“AAA”) in accordance with its Consumer Arbitration Rules or by JAMS. The arbitration hearing shall be before
one arbitrator appointed by the AAA or JAMS. The arbitrator shall not conduct class arbitration and Purchaser
shall not bring any claims against HCC in a representative capacity on behalf of others.
LIMITATION OF LIABILITY:LIMITATION OF LIABILITY:
This Limited Warranty is the nal, complete and exclusive agreement between HCC and Purchaser regarding
the Product.
THERE ARE NO EXPRESS WARRANTIES OTHER THAN THOSE LISTED AND DESCRIBED ABOVE. NO
WARRANTIES WHETHER EXPRESS OR IMPLIED, INCLUDING, BUT NOT LIMITED TO, ANY IMPLIED
WARRANTIES OF MERCHANTABILITY OR FITNESS FOR A PARTICULAR PURPOSE SHALL APPLY AFTER THE
LIMITED WARRANTY PERIOD STATED ABOVE. NO OTHER EXPRESS WARRANTY OR GUARANTY GIVEN BY
ANY PERSON, FIRM OR CORPORATION WITH RESPECT TO THIS PRODUCT SHALL BE BINDING ON HCC.
HCC ASSUMES NO RESPONSIBILITY THAT THE PRODUCT WILL BE FIT FOR ANY PARTICULAR PURPOSE,
EXCEPT AS OTHERWISE PROVIDED BY APPLICABLE LAW.
HCC SHALL NOT BE LIABLE FOR LOSS OF REVENUE OR PROFITS, FAILURE TO REALIZE SAVINGS OR
OTHER BENEFITS, OR ANY OTHER SPECIAL, INCIDENTAL OR CONSEQUENTIAL DAMAGES CAUSED BY
THE USE, MISUSE OR INABILITY TO USE THE PRODUCT, REGARDLESS OF THE LEGAL THEORY ON WHICH
THE CLAIM IS BASED, AND EVEN IF HCC HAS BEEN ADVISED OF THE POSSIBILITY OF SUCH DAMAGES.
NO RECOVERY OF ANY KIND AGAINST HCC SHALL BE GREATER IN AMOUNT THAN THE PURCHASE
PRICE OF THE PRODUCT.
WITHOUT LIMITING THE FOREGOING, YOU ASSUME ALL RISK AND LIABILITY FOR LOSS, DAMAGE OR
INJURY TO YOU AND YOUR PROPERTY AND TO OTHERS AND THEIR PROPERTY ARISING OUT OF THE
USE, MISUSE OR INABILITY TO USE THE PRODUCT NOT CAUSED DIRECTLY BY THE NEGLIGENCE OF HCC.
THIS LIMITED WARRANTY STATES YOUR EXCLUSIVE REMEDY.
No oral or written representation or commitment given by anyone, including but not limited to, an employee,
representative or agent of HCC will create a warranty or in any way increase the scope of this express Limited
One Year Warranty. If there is any inconsistency between this Limited Warranty and any other agreement
or statement included with or relating to the Product, this Limited Warranty shall govern. If any provision of
this Limited Warranty is found invalid or unenforceable, it shall be deemed modied to the minimum extent
necessary to make it enforceable and the remainder of the Limited Warranty shall remain valid and enforceable
according to its terms.
INTERACTION OF LAWS WITH THIS LIMITED WARRANTY:INTERACTION OF LAWS WITH THIS LIMITED WARRANTY:
Some states, provinces or territories may not allow limitations on how long an implied warranty lasts or the
exclusion or limitation of incidental or consequential damages, so the above limitations or exclusions may not
apply to you. Some states, provinces or territories may provide for additional warranty rights and remedies,
and the provisions contained in this Limited Warranty are not intended to limit, modify, take away from,
disclaim or exclude any mandatory warranty requirements provided by states, provinces or territories, including
certain implied warranties. This warranty gives you specic legal rights, and you may also have other rights
which vary depending on location.
Any questions about this Limited Warranty may be directed to:
Hestan Commercial Corp. at (888) 905-7463
OUTDOOR REFRIGERATOR LIMITED WARRANTY
(continued)

Un message de Aspire par Hestan
La cuisine en plein air est le rêve du perfectionniste et, grâce à ce nouvel
investissement, vous vous en êtes maintenant rapproché. Nous vous souhaitons une
sincère bienvenue dans la famille Aspire par Hestan. Nous avons conçu et fabriqué
nos produits pour garantir que vos invités vous complimenteront à propos du plat
que vous leur servirez mais, au fond d‘eux-mêmes, nos clients savent qu’il aurait
pu être un peu plus tendre, un peu plus juteux, qu’il aurait suf d’une pincée de sel
supplémentaire ou de quelques secondes de moins sur la amme. Nous avons pris
le temps de connaître nos clients et nous sommes enthousiasmés par l’idée de faire
ce voyage avec vous. C’est de cette même passion de perfectionnisme qu’est né le
gril de plein air Aspire par Hestan. Nos ingénieurs ont expérimenté, innové, ajusté
et modié, jusqu’à ce qu’ils aient créé les produits de plein air les plus puissants,
polyvalents et ables disponibles sur le marché.
Nous sommes enorgueillissons de nos innovations incessantes, de notre ingénierie
de pointe et de nos modèles conçus spécialement, mais aussi de notre connaissance
approfondie de la clientèle que nous visons, ainsi que des intérêts et des besoins
des utilisateurs nals que nous servons ou convoitons. Pour de nombreux clients, la
cuisine de plein air représente beaucoup plus que la préparation d’aliments. Il s’agit
d’une activité qui englobe, entre autres, des aspects culinaires, de loisirs et sociaux.
Nous sommes reconnaissants et ers du fait que vous ayez choisi Aspire par Hestan,
et nous espérons que vous nous resterez dèle. Nous prenons votre décision d’avoir
choisi Aspire par Hestan très au sérieux et vous promettons de vous offrir ce qui se
fait de mieux.
Bienvenue chez Aspire par Hestan
FR

FR
©2020 Hestan Commercial Corporation
2
SAUVEGARDES IMPORTANTES
Lisez toutes les instructions avant d’utiliser cet appareil. Utilisez cet appareil uniquement pour
l’usage auquel il est destiné, comme décrit dans ce manuel d’instructions. Prenez toujours les
précautions de sécurité de base, comme décrit ci-dessous. Après avoir lu le manuel d’instructions,
rangez-le dans un endroit accessible où les utilisateurs de ce produit pourront facilement le trouver.
Le but de ces précautions de sécurité est d’assurer une utilisation sûre et correcte du produit an
de minimiser les risques qui pourraient causer des dommages et des blessures graves à vous ou à
d’autres. Les précautions de sécurité sont divisées en AVERTISSEMENTS et PRÉCAUTIONS. Les cas
où une mauvaise manipulation de l’appareil pourrait entraîner la mort ou des blessures graves sont
répertoriés sous la rubrique AVERTISSEMENT. Cependant, les cas répertoriés sous PRÉCAUTION
peuvent également conduire à des résultats graves. Pour assurer la sécurité, respectez strictement
les deux types de mesures de sécurité.
1. Toutes les réparations, le démontage et les modications doivent être effectués uniquement
par des techniciens qualiés. Tenter de les effectuer vous-même peut entraîner un incendie, un
dysfonctionnement ou des blessures.
2. Ne jamais projeter d’eau directement sur le produit ni le laver à l’eau sans débrancher, car cela
pourrait provoquer un court-circuit. Dans un environnement pluvieux, un revêtement étanche est
recommandé.
3. Ne placez jamais de substances inammables ou volatiles dans l’appareil car cela pourrait
provoquer une explosion et un incendie.
4. N’endommagez pas, ne modiez pas, ne pliez pas excessivement, ne tordez pas ou ne regroupez
pas le cordon d’alimentation. Évitez les surfaces chaudes, coupantes ou agressives. De plus, le
fait de placer des objets lourds sur le cordon d’alimentation ou de le lier pourrait endommager le
cordon, pouvant entraîner un choc électrique ou un incendie.
5. Utilisez une prise murale dédiée. N’utilisez pas de rallonge ou d’adaptateur multiprise car cela
pourrait provoquer un choc électrique, une surchauffe et un incendie.
6. N’utilisez jamais de bombes aérosols inammables et ne laissez pas de substances inammables
près de l’appareil. Les étincelles des interrupteurs électriques peuvent provoquer une explosion
ou un incendie. Si un gaz combustible est présent près de l’appareil, fermez la source de gaz,
puis ouvrez les fenêtres et les portes pour permettre au gaz de se dissiper. Pour éviter une
explosion, ne débranchez pas la che et n’éteignez pas l’unité.
7. La prise électrique utilisée doit avoir une bonne mise à la terre. Le l de terre ne peut pas être
connecté à un tuyau de gaz, un tuyau de chauffage, un tuyau d’eau, une ligne téléphonique ou
un paratonnerre. Il ne peut pas être remplacé par le l neutre de l’alimentation monophasée. En
plus du l de terre, un disjoncteur de fuite électrique est également requis.
8. Utilisez une prise électrique de disjoncteur de fuite à la terre (GFCI) installé par un électricien. Si
aucun GFCI n’est installé, un choc électrique pourrait en résulter.
9. Ne montez jamais sur l’appareil. L’appareil pourrait basculer ou tomber et provoquer des
dommages matériels ou des blessures.
10. Débranchez la che du cordon d’alimentation de la prise murale avant de déplacer l’appareil
et assurez-vous que le cordon d’alimentation n’est pas endommagé pendant le transport. Un
cordon d’alimentation endommagé peut provoquer un choc électrique et / ou un incendie.
11. Ne débranchez jamais l’appareil en tirant sur le cordon d’alimentation. Saisissez toujours
fermement la che et tirez-la tout droit hors de la prise. Tirer le cordon peut provoquer une
rupture du l, pouvant entraîner une surchauffe et un incendie.
12. Réparez ou remplacez tout cordon efloché ou endommagé. N’utilisez pas de cordon présentant
des ssures ou des abrasions sur toute sa longueur.
1. Cet appareil doit être correctement installé conformément aux instructions d’installation ainsi
qu’à tous les codes locaux avant d’être utilisé. Voir les instructions de mise à la terre dans la
section Installation.

FR
©2020 Hestan Commercial Corporation
3
Pour une utilisation en extérieur UNIQUEMENT. Cet appareil
n’est pas conçu pour être installé dans ou sur des véhicules
récréatifs et / ou des bateaux.
Pièces et composants électriques - débranchez toutes les
alimentations avant l’entretien.
LISEZ CE MANUEL ATTENTIVEMENT ET COMPLÈTEMENT AVANT D’UTILISER
VOTRE RÉFRIGÉRATEUR POUR RÉDUIRE LES RISQUES D’INCENDIE, DE
RISQUE D’ÉLECTROCUTION OU D’AUTRES BLESSURES.
CONSERVEZ CES INSTRUCTIONS POUR RÉFÉRENCE FUTURE.
SAUVEGARDES IMPORTANTES
(suite)
2. Ce modèle peut être installé encastré ou autonome. Les unités intégrées ventilent en bas à
l’avant et le ux d’air à l’avant de cet évent ne doit pas être obstrué.
3. Installez l’unité dans un endroit où le sol est sufsamment solide pour supporter la charge de
l’unité. Si le sol n’est pas sufsamment solide ou si l’installation est mal effectuée, l’appareil
pourrait basculer et provoquer des blessures. Si l’unité est placée sur un support, la surface
avant doit être à 3 po [76 mm] ou plus en arrière du bord du support an d’éviter un basculement
accidentel de l’appareil pendant une utilisation normale.
4. Ne placez jamais d’objets lourds ou d’objets contenant de l’eau sur le dessus de l’appareil. Des
objets pourraient tomber et provoquer des blessures et l’eau renversée pourrait endommager
l’isolation des composants électriques et provoquer un choc électrique.
5. Débranchez l’unité si elle se comporte anormalement et ne la reconnectez pas tant que la
situation n’est pas corrigée.
6. Débranchez la che avant d’effectuer tout entretien sur l’appareil pour éviter les chocs
électriques.
7. Ne tirez jamais sur le cordon d’alimentation lorsque les mains sont mouillées!
8. Cet appareil n’est pas destiné au stockage de médicaments ou de réactifs chimiques.
9. Gardez les matériaux d’emballage hors de portée des enfants.
10. L’eau de condensation de l’évaporateur s’écoule dans un trou dans le plancher du compartiment
de stockage et est canalisée dans un bac de vidange situé à l’arrière de l’unité sur le compresseur.
La chaleur transférée du compresseur évapore toute l’eau qui s’est accumulée dans la casserole.
Assurez-vous que le trou de vidange dans le plancher de l’unité est clair et dégagé.
11. Pendant les longues absences, retirez le contenu de l’appareil, débranchez-le, nettoyez-le et
laissez la porte légèrement ouverte pour éviter la formation éventuelle de condensation, de
moisissures ou d’odeurs. Utilisez un couvercle pour protéger l’appareil et prolonger sa durée de
vie.
12. Laissez le démontage et l’élimination de l’unité à des experts qualiés.
SÉCURITÉ IMPORTANTE DES ENFANTS
DANGER
•
Risque de coincement de l’enfant. Avant de jeter votre ancien réfrigérateur:
• Enlevez les portes.
• Laissez les étagères en place an que les enfants ne puissent pas facilement
grimper à l’intérieur.
• Ne laissez pas les enfants jouer dans, sur ou autour du réfrigérateur.

FR
©2020 Hestan Commercial Corporation
4
2 SUAVEGARDES IMPORTANTES
3 SÉCURITÉ IMPORTANTE DES ENFANTS
5 EMPLACEMENT DES PIÈCES / SPÉCIFICATIONS TECHNIQUES.
6 PANNEAU DE COMMANDE
6 CONSEILS D’ÉCONOMIE D’ÉNERGIE
6 INSTALLATION
8 UTILISATION DE VOTRE RÉFRIGÉRATEUR
10 NETTOYAGE ET ENTRETIEN
11 DÉPANNAGE
12 LISTE DES PIÈCES / SERVICE
12 GARANTIE
TABLE DES MATIÈRES
FR
©2020 Hestan Commercial Corporation
5
SPÉCIFICATIONS TECHNIQUES
Numéro du Modèle: ERS24
Description: Réfrigérateur Extérieur
Entrée électrique: 115VCA ~ 60Hz
Intensité Nominale: 1.8A
Dimensions de l’unité: 23po W x 26-¾po D x 33-½po H [584 x 680 x 851 mm]
Poids de l’unité: 114 lbs. [52 kg]
Plage de température ambiante: 50ºF à 100ºF [+10°C à +38°C]
Plage de températures du compartiment: 36ºF à 64ºF [+2°C à +18°C]
EMPLACEMENT DES PIÈCES
Ventilateur
Étagéres
Interupteur
Pieds de Mise
à Niveau
Lumiere
Porte
Évents
Panneau de Control
FR
©2020 Hestan Commercial Corporation
6
PANNEAU DE COMMANDE
CONSEILS D’ÉCONOMIE D’ÉNERGIE
• Ne placez pas l’appareil à côté d’un évent de chauffage, d’une cuisinière ou en plein soleil.
• Gardez la porte fermée autant que possible, surtout par temps chaud et humide.
• Couvrez les aliments pour réduire l’accumulation d’humidité à l’intérieur de l’appareil.
Indicateur d'échelle Centigrade
Indicateur d'échelle Fahrenheit
Affichage de la Température
Indicateur de Marche du Compresseur
Interrupteur Bouton de
Réglage
Lumière Bouton de
Température
Bouton
Haut / Bas
Indicateur
d’Alarme
INSTALLATION
Retirez l’emballage extérieur et intérieur. Utilisez un chiffon doux et sec pour essuyer
soigneusement l’extérieur du réfrigérateur. Utilisez un chiffon propre imbibé d’eau tiède pour
essuyer l’intérieur du réfrigérateur.
L’unité doit être située dans un endroit bien ventilé. Évitez de le placer près d’une source de
chaleur ou d’humidité, ou en plein soleil. La lumière directe du soleil peut affecter la nition et
les sources de chaleur à proximité entraîneront une consommation électrique plus élevée.
Le réfrigérateur est conçu pour être autonome ou intégré. Il a des ventilateurs motorisés à
l’arrière de l’unité qui dirigent la chaleur générée par le compresseur loin du compresseur et
à l’avant de l’unité. Gardez les évents avant dégagés. Si l’unité est intégrée, prévoyez des
dégagements minimum de 1/4 po [6 mm] sur les côtés, 1/2 po [13 mm] à l’arrière et 1 po [25 mm]
en haut.
Une fois le réfrigérateur positionné, les pieds réglables doivent être tournés pour mettre
l’appareil à niveau. Cela réduira les vibrations.
Table of contents
Languages:
Other hestan Refrigerator manuals

hestan
hestan KRB series User manual

hestan
hestan KRP User manual

hestan
hestan KRPR36 User manual

hestan
hestan GRSL24 Quick guide

hestan
hestan GRS_24 User manual

hestan
hestan KRB User manual

hestan
hestan KRP series User manual

hestan
hestan GRS_24 User manual

hestan
hestan GRWGR24YW User manual

hestan
hestan GRR24 Installation instructions

Popular Refrigerator manuals by other brands

GE
GE GFSF6KEXCBB and Owner's manual and installation instructions

Hotpoint
Hotpoint CTF-17 How to get the best

Maytag
Maytag MSD2542VES - 25.0 cu. Ft. Refrigerator Energy guide

Dometic
Dometic HDC195 Installation and operating manual

Zanussi
Zanussi ZFC 85 L Instruction booklet

Indesit
Indesit RG 2330 operating instructions


