hestan KRP series User manual

INDOOR PRESERVATION
Refrigerators, Freezers and Wine Storage
KRP / KRB / KRC / KFC / KWC / KRW
Installation Manual

SAFETY DEFINITIONS
THIS INDICATES THAT DEATH OR SERIOUS INJURY MAY
OCCUR AS A RESULT OF NOT OBSERVING THIS WARNING
THIS INDICATES THAT MINOR OR MODERATE INJURY MAY
OCCUR AS A RESULT OF NOT OBSERVING THIS WARNING.
THIS INDICATES THAT DAMAGE TO THE APPLIANCE OR
PROPERTY MAY OCCUR AS A RESULT OF NOT OBSERVING
THIS WARNING.
READ THESE INSTRUCTIONS CAREFULLY AND COMPLETELY
BEFORE INSTALLING OR USING YOUR APPLIANCE TO
REDUCE THE RISK OF FIRE, BURN HAZARD, OR OTHER
INJURY. KEEP THIS MANUAL FOR FUTURE REFERENCE.
Do not store or use gasoline or other flammable vapors and liquids in the vicinity of
this or any other appliance.
Installation and service must be performed by a qualified installer or service agency.
DO NOT REPAIR, REPLACE OR REMOVE ANY PART OF THE APPLIANCE
UNLESS SPECIFICALLY RECOMMENDED IN THE MANUAL. IMPROPER
INSTALLATION, SERVICE OR MAINTENANCE CAN CAUSE INJURY OR
PROPERTY DAMAGE. REFER TO THIS MANUAL FOR GUIDANCE. ALL OTHER
SERVICING SHOULD BE DONE BY A QUALIFIED TECHNICIAN.
INSTALLER: LEAVE THIS MANUAL WITH THE OWNER OF THE APPLIANCE.
HOMEOWNER: RETAIN THIS MANUAL FOR FUTURE REFERENCE.
IF THE INFORMATION IN THIS MANUAL IS NOT FOLLOWED
EXACTLY, A FIRE OR EXPLOSION MAY RESULT CAUSING PROPERTY
DAMAGE, PERSONAL INJURY, OR DEATH.
EN
TABLE OF CONTENTS
1 SAFETY PRECAUTIONS - BEFORE YOU BEGIN
2 MODEL NUMBERS
3 RATING LABEL
3 REGULATORY / CODE REQUIREMENTS
4 IMPORTANT CHILD SAFETY
4 LOCATION AND PREPARATION
12 CONNECTIONS
15 OVERLAY PANELS
27 FINAL INSTALLATION
36 TESTING AND INITIAL START UP
38 PARTS AND SERVICE
ELECTRICAL SHOCK HAZARDELECTRICAL SHOCK HAZARD
Disconnect power before installing or servicing appliance. Failure to
do so can result in death or electrical shock.
ELECTRICAL GROUNDINGELECTRICAL GROUNDING
• This appliance must be grounded. Grounding reduces the
risk of electric shock in the event of a short circuit. Read
the CONNECTIONS section of this manual for complete
instructions.
• DO NOT ground to a gas pipe.
• DO NOT use an extension cord with this appliance.
• DO NOT have a fuse in the NEUTRAL or GROUNDING circuit. A fuse in the NEUTRAL
or GROUNDING circuit could result in an electrical shock.
When properly cared for, your Hestan appliance will provide safe, reliable service for many
years. When using this appliance, basic safety practices must be followed as outlined below.
IMPORTANT: Save these instructions for the local Utility Inspector’s use.
INSTALLER: Please leave these Installation Instructions with the owner.
OWNER: Please retain these Installation Instructions for future reference.
This appliance is NOT designed for installation in manufactured (mobile) homes or recreational
park trailers. Do NOT install this appliance outdoors.
SAFETY PRECAUTIONS - BEFORE YOU BEGIN
© 2021 Hestan Commercial Corporation
1
EN
MODEL NUMBERS
REFRIGERATION MODELSREFRIGERATION MODELS
FREEZER MODELSFREEZER MODELS
Model Description
KRPR36 Bottom Mount Refrigerator, Top Compressor, Pro, Right Hinged, 36"
KRPL36 Bottom Mount Refrigerator, Top Compressor, Pro, Left Hinged, 36"
KRPR36-XX Bottom Mount Refrigerator, Top Compressor, Pro, Color, Right Hinged, 36"
KRPL36-XX Bottom Mount Refrigerator, Top Compressor, Pro, Color, Left Hinged, 36"
KRBR36 Bottom Mount Refrigerator, Bottom Compressor, Right Hinged, 36"
KRBL36 Bottom Mount Refrigerator, Bottom Compressor, Left Hinged, 36"
KRBR36-OV Bottom Mount Refrigerator, Bottom Compressor, Overlay, Right Hinged, 36"
KRBL36-OV Bottom Mount Refrigerator, Bottom Compressor, Overlay, Left Hinged, 36"
KRBR36-XX Bottom Mount Refrigerator, Bottom Compressor, Color, Right Hinged, 36"
KRBL36-XX Bottom Mount Refrigerator, Bottom Compressor, Color, Left Hinged, 36"
KRCR24 Refrigerator Column, Right Hinged, 24"
KRCL24 Refrigerator Column, Left Hinged, 24"
KRCR24-OV Refrigerator Column, Overlay, Right Hinged, 24"
KRCL24-OV Refrigerator Column, Overlay, Left Hinged, 24"
KRCR24-XX Refrigerator Column, Color, Right Hinged, 24"
KRCL24-XX Refrigerator Column, Color, Left Hinged, 24"
KRCR30 Refrigerator Column, Right Hinged, 30"
KRCL30 Refrigerator Column, Left Hinged, 30"
KRCR30-OV Refrigerator Column, Overlay, Right Hinged, 30"
KRCL30-OV Refrigerator Column, Overlay, Left Hinged, 30"
KRCR30-XX Refrigerator Column, Color, Right Hinged, 30"
KRCL30-XX Refrigerator Column, Color, Left Hinged, 30"
Model Description
KFCR18 Freezer Column, Right Hinged, 18"
KFCL18 Freezer Column, Left Hinged, 18"
KFCR18-OV Freezer Column, Overlay, Right Hinged, 18"
KFCL18-OV Freezer Column, Overlay, Left Hinged, 18"
KFCR18-XX Freezer Column, Color, Right Hinged, 18"
KFCL18-XX Freezer Column, Color, Left Hinged, 18"
KFCR24 Freezer Column, Right Hinged, 24"
KFCL24 Freezer Column, Left Hinged, 24"
KFCR24-OV Freezer Column, Overlay, Right Hinged, 24"
KFCL24-OV Freezer Column, Overlay, Left Hinged, 24"
KFCR24-XX Freezer Column, Color, Right Hinged, 24"
KFCL24-XX Freezer Column, Color, Left Hinged, 24"
KFCR30 Freezer Column, Right Hinged, 30"
KFCL30 Freezer Column, Left Hinged, 30"
KFCR30-OV Freezer Column, Overlay, Right Hinged, 30"
KFCL30-OV Freezer Column, Overlay, Left Hinged, 30"
KFCR30-XX Freezer Column, Color, Right Hinged, 30"
KFCL30-XX Freezer Column, Color, Left Hinged, 30"
© 2021 Hestan Commercial Corporation
2
EN
MODEL NUMBERS
(CONT.)
WINE MODELSWINE MODELS
Model No. Description
KWCR18 Wine Column, Right Hinged, 18"
KWCL18 Wine Column, Left Hinged, 18"
KWCR18-OV Wine Column, Overlay, Right Hinged, 18"
KWCL18-OV Wine Column, Overlay, Left Hinged, 18"
KWCR18-XX Wine Column, Color, Right Hinged, 18"
KWCL18-XX Wine Column, Color, Left Hinged, 18"
KWCR24 Wine Column, Right Hinged, 24"
KWCL24 Wine Column, Left Hinged, 24"
KWCR24-OV Wine Column, Overlay, Right Hinged, 24"
KWCL24-OV Wine Column, Overlay, Left Hinged, 24"
KWCR24-XX Wine Column, Color, Right Hinged, 24"
KWCL24-XX Wine Column, Color, Left Hinged, 24"
KRWR24 Refrigerator with Wine, Right Hinged, 24"
KRWL24 Refrigerator with Wine, Left Hinged, 24"
KRWR24-OV Refrigerator with Wine, Overlay, Right Hinged, 24"
KRWL24-OV Refrigerator with Wine, Overlay, Left Hinged, 24"
KRWR24-XX Refrigerator with Wine, Color, Right Hinged, 24"
KRWL24-XX Refrigerator with Wine, Color, Left Hinged, 24"
NOTE: -XX indicates color model.NOTE: -XX indicates color model.
-BK for Stealth - Black -WH for Froth - White -RD for Matador - Red
-YW for Sol - Yellow -OR for Citra - Orange -BG for Tin Roof - Burgundy
-PP for Lush - Purple -BU for Prince - Blue -GR for Grove - Green
-GG for Pacific Fog - Graphite Gray -TQ for Bora Bora – Turquoise
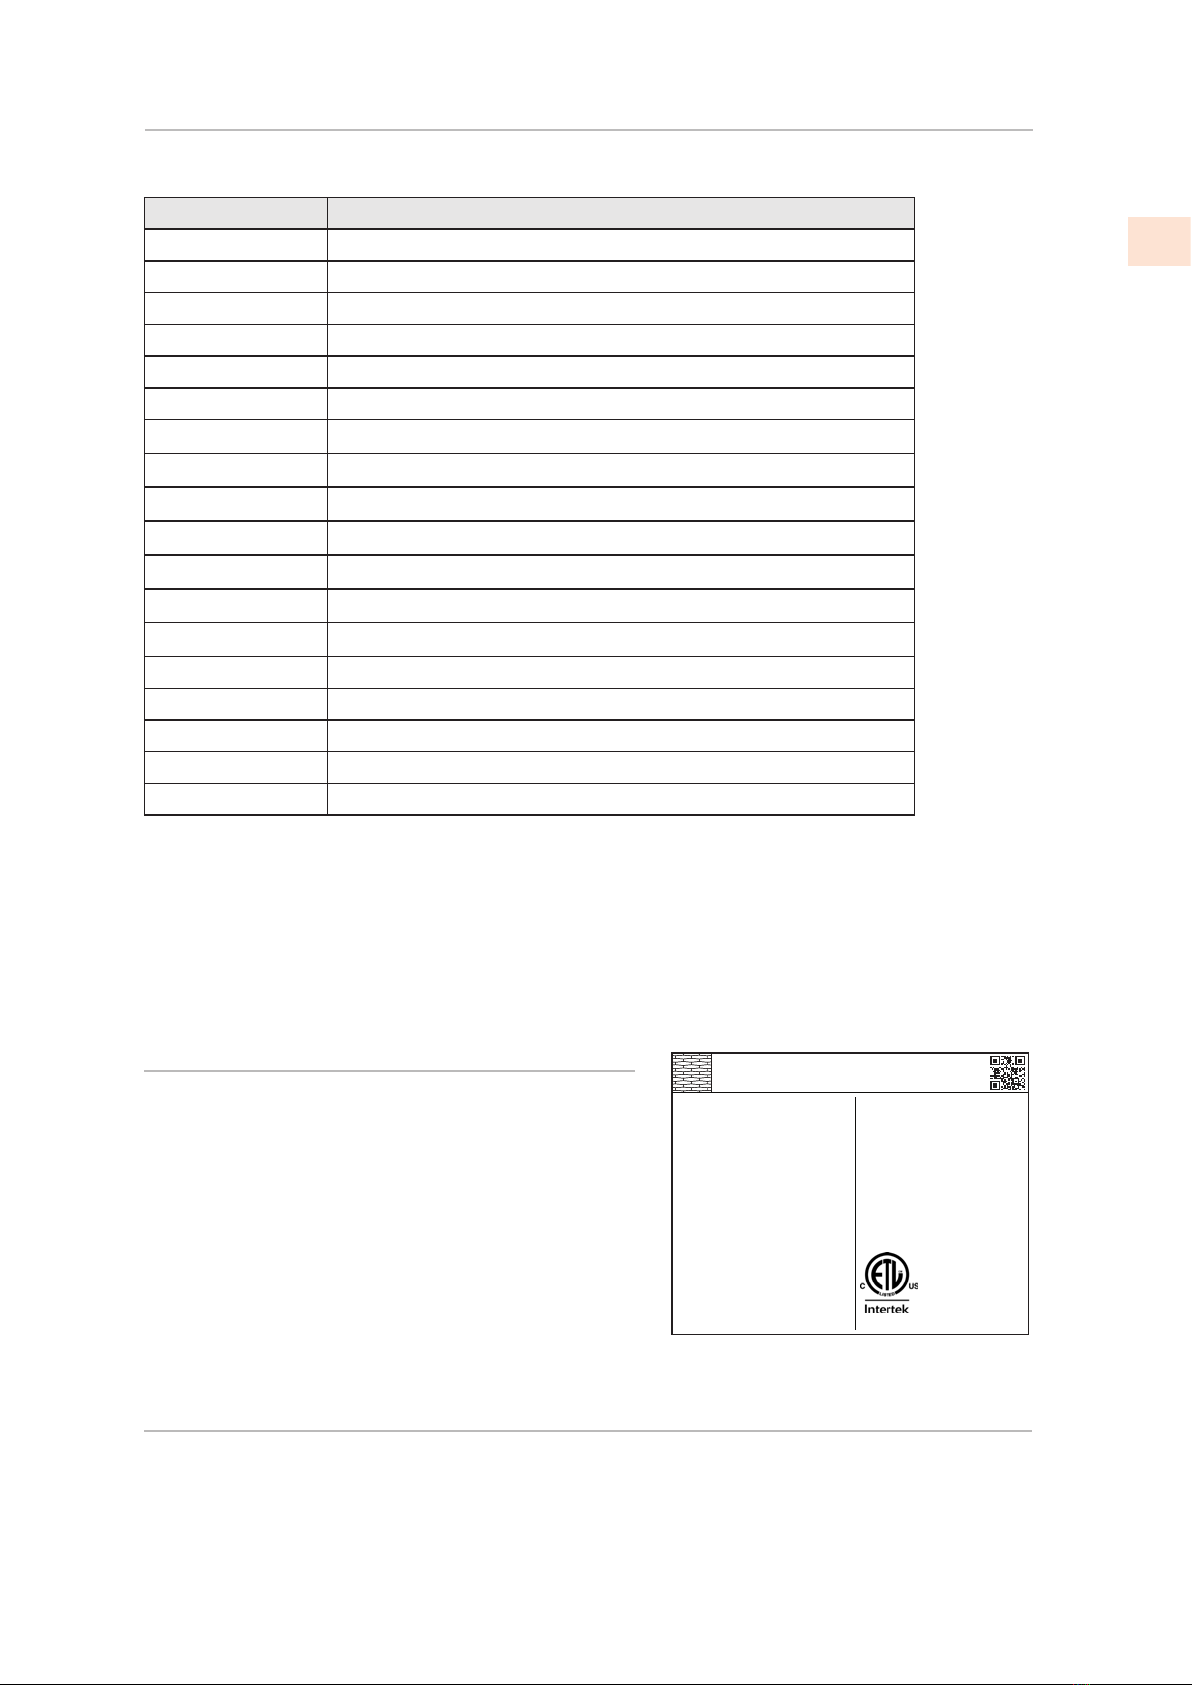
RATING LABEL
The rating label contains important information
about your Hestan appliance such as the model, serial
number, and electrical rating.
The rating label is located on the inside wall of the
appliance.
If service is necessary, contact Hestan Customer Care
with the model and serial number information shown
on the label.
ozFridge Gas Fill Charge
Quantité de Gaz Réfrigerateur
Freezer Gas Fill Charge
Quantité de Gaz Congélateur
Total Absorbed Current
Courant Absorbée Totale
Voltage
Tension
Frequency
Frequence
Refrigerant Gas Type
Type de Gaz Rèfrigerant
MODEL
Made in Italy
CODE
SER.NO./N° SERIE
ETL LISTED
CONFORMS TO
ANSI/UL STD 250
CERTIFIED TO CAN/CSA
STD C22.2 NO.63
A
V
Hz
HESTAN COMMERCIAL CORP.
ANAHEIM, CA - USA
4,5
115
60
R134a
KRPR36
F20200000000001
oz4,2
4,8
REGULATORY / CODE REQUIREMENTS
Installation of this appliance must be made in accordance with local codes. In the absence of
local codes, this unit should be installed in accordance with the National Electrical Code and
local codes.
This appliance must be electrically grounded in accordance with local codes or in the absence
of local codes with the National Electrical Code
ANSI/NFPA 70
, or Canadian Electrical code
CSA C22.1
.
TYPICAL RATING LABEL
© 2021 Hestan Commercial Corporation
3
EN

LOCATION AND PREPARATION
PREPARATION AND UNPACKINGPREPARATION AND UNPACKING
Before moving the refrigerator:
• Protect any finished flooring to prevent damage.
• The grille and trim pieces are packaged on the back of the unit. Handles and other items
may also be packaged on the back. Remove all such items before removing the appliance
from the pallet. See "PREPARING THE INSTALLATION" on page 10 for additional
information.
• Make sure that power can be provided to the location selected.
PACKAGED DIMENSIONS AND WEIGHTSPACKAGED DIMENSIONS AND WEIGHTS
Width Height Depth Weight
18” Models 28-11/32” [720 mm] 89” [2260 mm] 30-1/8” [765 mm] 342 lb [155 kg]
24” Models 28-11/32” [720 mm] 89” [2260 mm] 30-1/8” [765 mm] 507 lb [230 kg]
30” Models 34-1/4” [870 mm] 89” [2260 mm] 30-1/8” [765 mm] 606 lb [275 kg]
36” Models 40-5/32” [1020 mm] 89” [2260 mm] 30-1/8” [765 mm] 650 lb [295 kg]
ELECTRICAL AND WATER SUPPLYELECTRICAL AND WATER SUPPLY
Electrical requirement: 115V 60Hz 15A
Units with icemaker: Connect to potable water only.
Supply pressure: If using external filtration, from 7.3 to 73 psi [0.5 - 5.0 Bar]
If using supplied water filter, from 25.4 to 73 psi [1.75 - 5.0 Bar].
Water supply tube: 3/4” female attachment (see the notice on page 13 for details)
PROVIDED INSTALLATION ACCESSORIESPROVIDED INSTALLATION ACCESSORIES
Customized panel mounting kit (included with -OV models only)
Anti-tip kit
Lateral/side connecting kit
See "PREPARING THE INSTALLATION" on page 10 for unpacking information.
TOOLSTOOLS
The following tools are needed for the installation of the appliance:
• Phillips screw driver
• Drill and 1/8”drill bit, plus 3/8” bit for masonry
• 17mm (or 11/16”) open-end or adjustable wrench
• 13mm (or 1/2”) socket, extension, and handle
• 2.5 mm and 4mm allen wrenches
If installing two units together
• Hand rivet tool (Pop rivet gun)
IMPORTANT CHILD SAFETY
Risk of child entrapment. Before you throw away your old refrigerator or
freezer:
• Take off the doors
• Leave the shelves in place so that children may not easily climb inside.
© 2021 Hestan Commercial Corporation
4
EN

LOCATION AND PREPARATION
(CONT.)
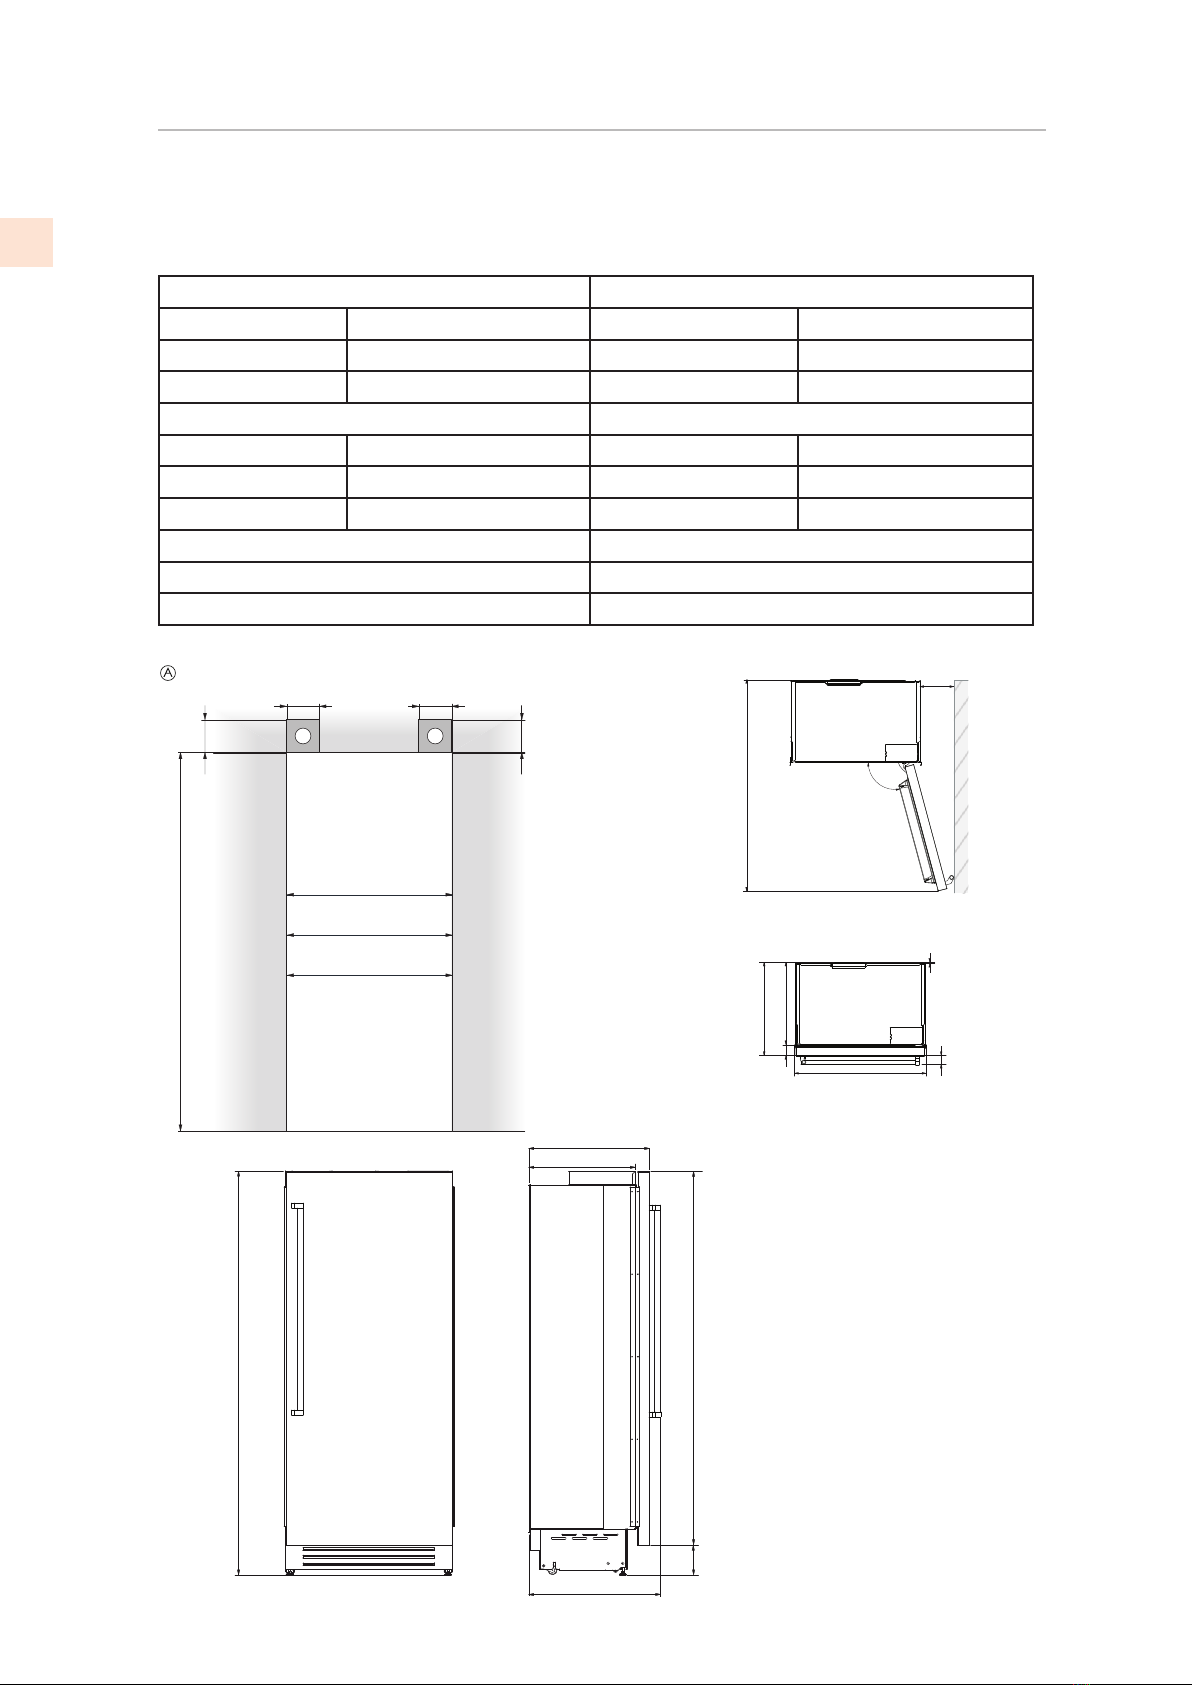
INSTALLATION CUT-OUT - KRP MODELSINSTALLATION CUT-OUT - KRP MODELS
Cut-out Height 84” [2134 mm] Cut-out Width 35-1/2” [900 mm]
Door Swing
Clearance 57” [1448 mm] Door Opening
Angle 105°
Width 35-3/8” [899 mm] Height 83-1/2” [2120 mm] + 1” [25 mm]
Depth with door 25” [635 mm]
Area to be left clear for the anti-tip brackets
5-½” [140]
4” [100]
5-½” [140]
min 84” [2134]
4” [100]
83-½” [2120] + 1” [25]
24-⁄” [613] + 1” [25]
3-⁄” [98] 20-⁄” [516] 50” [1296]
7-⁄” [195]
⁄” [8]
⁄” [8]
22” [560]
28-⁄”[719]
Flush
min ⁄” [10] min ⁄” [10]3-⁄” [84]
25” [635]
25” [635]
3” [75] 22” [560]
35-⁄” [899]
57” [1448]
40” [1016]
9” [230]
35-½”[900]
© 2021 Hestan Commercial Corporation
5
EN

LOCATION AND PREPARATION
(CONT.)
INSTALLATION CUT-OUT - KRB MODELS - SS OR COLORINSTALLATION CUT-OUT - KRB MODELS - SS OR COLOR
Cut-out Height 84” [2134 mm] Cut-out Width 35-1/2” [900 mm]
Door Swing
Clearance 57” [1448 mm] Door Opening
Angle 105°
Width 35-3/8” [899 mm] Height 83-1/2” [2120 mm] + 1” [25 mm]
Depth with door 25” [635 mm]
35-
½
” [900]
5-
½
” [140] 5-
½
” [140]
4” [100]
4” [100]
min 84” [2134]
Area to be left clear for the anti-tip brackets
83-
½
” [2120 ] + 1” [25]
25” [635]
22” [560]
28-
⁄
” [719]
54-
¼
”[1378]
23-
⁄
”[587]
5-
¾
”[146] + 1” [25]
⁄
” [9]
28-
⁄
” [732] + 1”[25]
57” [1448]
40” [1016]
22” [560]
25” [635]
35-
⁄
” [899]
⁄
” [10]
105°
3” [75]
3-
⁄
” [84] 9 “ [230]
© 2021 Hestan Commercial Corporation
6
EN

LOCATION AND PREPARATION
(CONT.)
INSTALLATION CUT-OUT - KRB-OV MODELS WITH OVERLAYINSTALLATION CUT-OUT - KRB-OV MODELS WITH OVERLAY
Cut-out Height 84” [2134 mm] Cut-out Width 35-1/2” [900 mm]
Door Swing
Clearance 57” [1448 mm] Door Opening
Angle 105°
Width 35-3/8” [899 mm] Height 83-1/2” [2120 mm] + 1” [25 mm]
Depth with door
(without panel) 24” [610 mm]
Area to be left clear for the anti-tip brackets
Images show unit
WITHOUT overlay
panel attached.
9-¾
“ + 1” [248 + 25]
1
8-⁄
” [474]
50-⁄
” [1293]
9-⁄
” + 1” [231 + 25]
¾
” [20]
24” [610]
22” [560]
8
3-½
” + 1” [2120 + 25]
2
3-½
” + 1” [721 + 25]
1
9-¾
” [500]
24” [610]
22” [560]
35-⁄
” [899]
⁄
” [10]
57” [1448]
38-⁄” [987]
5-
⁄
” [137]
35-½” [900]
5-½
” [140]
5-½
” [140]
4” [100]
4” [100]
min 84” [2134]
© 2021 Hestan Commercial Corporation
7
EN
LOCATION AND PREPARATION
(CONT.)
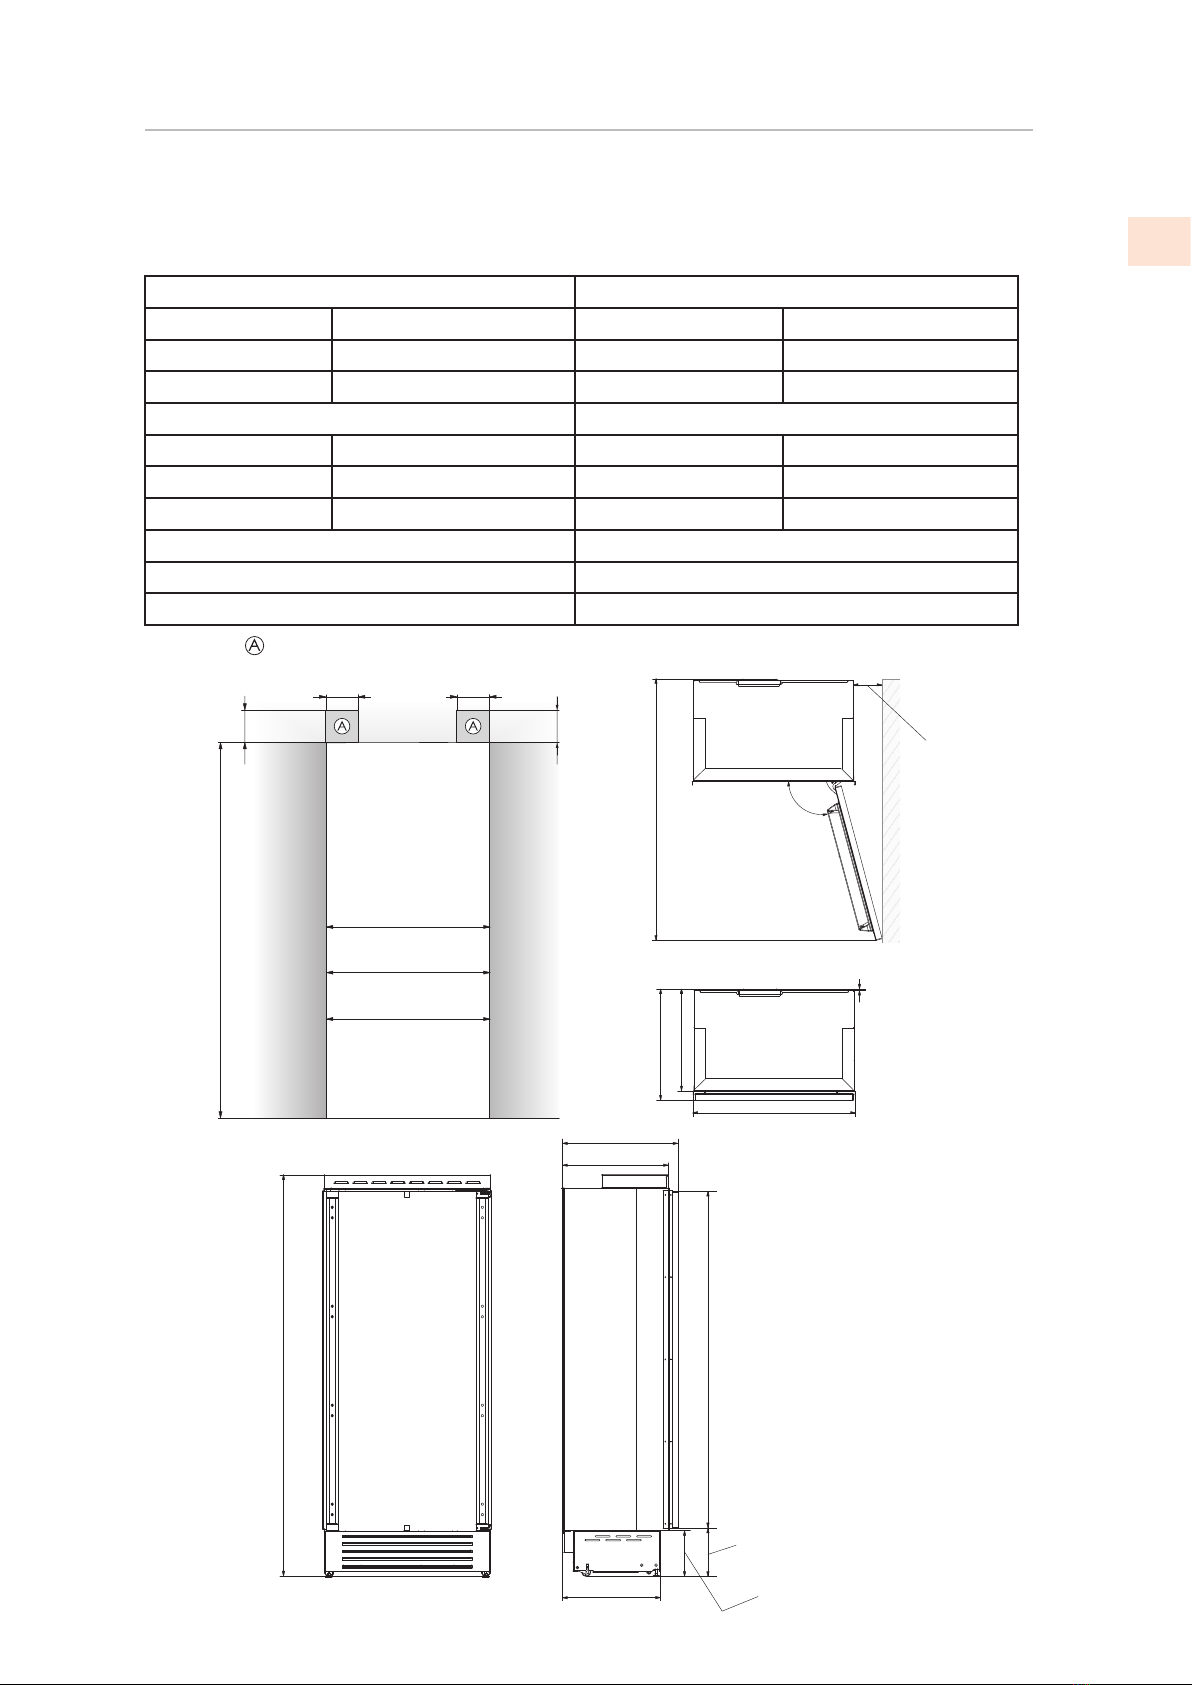
INSTALLATION CUT-OUT - KRC, KFC, KWC, KRW MODELS - SS OR COLORINSTALLATION CUT-OUT - KRC, KFC, KWC, KRW MODELS - SS OR COLOR
18”, 24” AND 30” COLUMN REFRIGERATORS AND FREEZERS
18”, 24” WINE COLUMN AND 24” REFRIGERATOR WITH WINE
Cut-out Height Cut-out Width
18” models 84” [2134 mm] 18” models 17-3/4” [451 mm]
24” models 84” [2134 mm] 24” models 23-3/4” [600 mm]
30” models 84” [2134 mm] 30” models 29-5/8” [750 mm]
Door Swing Clearance Width
18” models 40-5/32” [1020 mm] 18” models 17-11/16” [449 mm]
24” models 45-29/32” [1166 mm] 24” models 23-5/8” [599 mm]
30” models 51-9/16” [1310 mm] 30” models 29-1/2” [749 mm]
Door Opening Angle 105°
Height 83-1/2” [2120 mm] + 1” [25 mm]
Depth with door 25-1/4” [640 mm]
5-
½
” [140]
4” [100]
A A
min 84” [2134]
30: 29-⁄” [750]
24: 23-¾” [600]
4” [100]
5-
½
” [140]
18: 17-¾” [451]
Area to be left clear for the anti-tip brackets
105°
22-
¼
” [565]
25-
¼
” [640]
30: 29-
½
” [749]
24: 23-
⁄
” [599]
18: 17-
⁄
” [449]
⁄
” [10]
3” [75]
3-
⁄
” [84]
30: 51-
⁄
” [1310]
24: 45-
⁄
” [1166]
18: 40-
⁄
” [1020]
30: 6-½” [165]
24: 5-½” [140]
18: 4-⁄” [113]
83-½” [2120 ] + 1” [25]
25-¼” [640]
22-¼” [565]
28⁄” [725]
77-¾” [1975]
5-¾” [146] + 1” [25]
© 2021 Hestan Commercial Corporation
8
EN
LOCATION AND PREPARATION
(CONT.)
INSTALLATION CUT-OUT - KRC, KFC, KWC, KRW-OV MODELS WITH OVERLAYINSTALLATION CUT-OUT - KRC, KFC, KWC, KRW-OV MODELS WITH OVERLAY
18”, 24” AND 30” COLUMN REFRIGERATORS AND FREEZERS
18”, 24” WINE COLUMN AND 24” REFRIGERATOR WITH WINE
Cut-out Height Cut-out Width
18” models 84” [2134 mm] 18” models 17-3/4” [451 mm]
24” models 84” [2134 mm] 24” models 23-3/4” [600 mm]
30” models 84” [2134 mm] 30” models 29-5/8” [750 mm]
Door Swing Clearance Width
18” models 40-5/32” [1020 mm] 18” models 17-11/16” [449 mm]
24” models 45-29/32” [1166 mm] 24” models 23-5/8” [599 mm]
30” models 51-9/16” [1310 mm] 30” models 29-1/2” [749 mm]
Door Opening Angle 105°
Height 83-1/2” [2120 mm] + 1” [25 mm]
Depth with door (without panel) 24-1/4” [615 mm]
105°
Area to be left clear for the anti-tip brackets
30 : 5
1-
⁄
” [1310]
24 : 4
5-
⁄
” [1166]
18 : 4
0-
⁄
” [1020]
30 : 2
-
⁄
” [72]
24 : 1
-
⁄
” [47]
18 :
¾”
[19]
24
-
¼
”[615]
22
-
¼
”[560]
⁄
” [10]
30 : 29
-
½
” [749]
24 : 23
-
⁄
” [599]
18 : 17
-
⁄
” [449]
24
-
¼
”[615]
22
-
¼
”[560]
24 : 2
3-
¾
” [600]
30 : 2
9-
⁄
” [750]
19-
¾
”[505]
9-
⁄
” [231] + 1” [25]
9-
¼
”[233] + 1”[25]
71-
¼
” [1808]
83-½” [2120] + 1” [25]
18 : 1
7-
¾
” [451]
5-½” [140]
4“ [100]
min 84” [2134]
5-½” [140]
4” [100]
Images show unit
WITHOUT overlay
panel attached.
© 2021 Hestan Commercial Corporation
9
EN

PREPARING THE INSTALLATIONPREPARING THE INSTALLATION
Transport to installation site and unpackingTransport to installation site and unpacking
Since this is a large and heavy appliance, before transporting the appliance, check the access to
the location where it will be installed (door size, maneuvering space in stairwells, etc.).
The side trim, door handles (non OV models), grill, and possibly other items will be packaged
on the back of the appliance. Be sure to remove those items and related packaging before
attempting to remove appliance from pallet.
The appliance is attached to the base of the packaging (pallet) through four bolts which can
be removed using a 17 mm (11/16”) wrench.
It is recommended to use a pallet jack or other transporting device to move the appliance to
the installation site, and only at this point to remove the base of the packaging.
The appliance should always be transported in a vertical position. If this is not possible,
transport the appliance laying on its rear side.
Once at the installation site, the appliance, which is equipped with four wheels, can be taken
off the pallet and positioned in the installation area.
Removing appliance from pallet:Removing appliance from pallet:
1) Take off the four bolts securing the appliance to the pallet by means of a 17 mm
(11/16")wrench.
2) Remove the rear hold down brackets .
3) To remove the front fixing brackets , unscrew the rear wheel adjusting bolts one or
two turns using a 13 mm wrench. This will release the front fixing brackets so you can
remove them.
4) From the back of the unit and by means of a suitable, heavy-duty hand truck, remove the
appliance and place it on the floor.
Be very careful to avoid any damage to floors. Delicate floors should be protected with
plywood, hard cardboard or similar.
The appliance is very heavy.
Take great care during handling to avoid injury.
The appliance should always be transported in
a vertical position.
Avoid at all costs leaning it on its front side.
2
1
4
1
3
LOCATION AND PREPARATION
(CONT.)
© 2021 Hestan Commercial Corporation
10
EN
Additional included itemsAdditional included items
Several items are shipped inside the appliance. These include:
• Manuals
• Wood panels installation hardware (-OV models)
• Water connection fitting, water filter (models with ice maker)
• Anti-tip brackets
• Care items - polishing cloth and/or sponge.
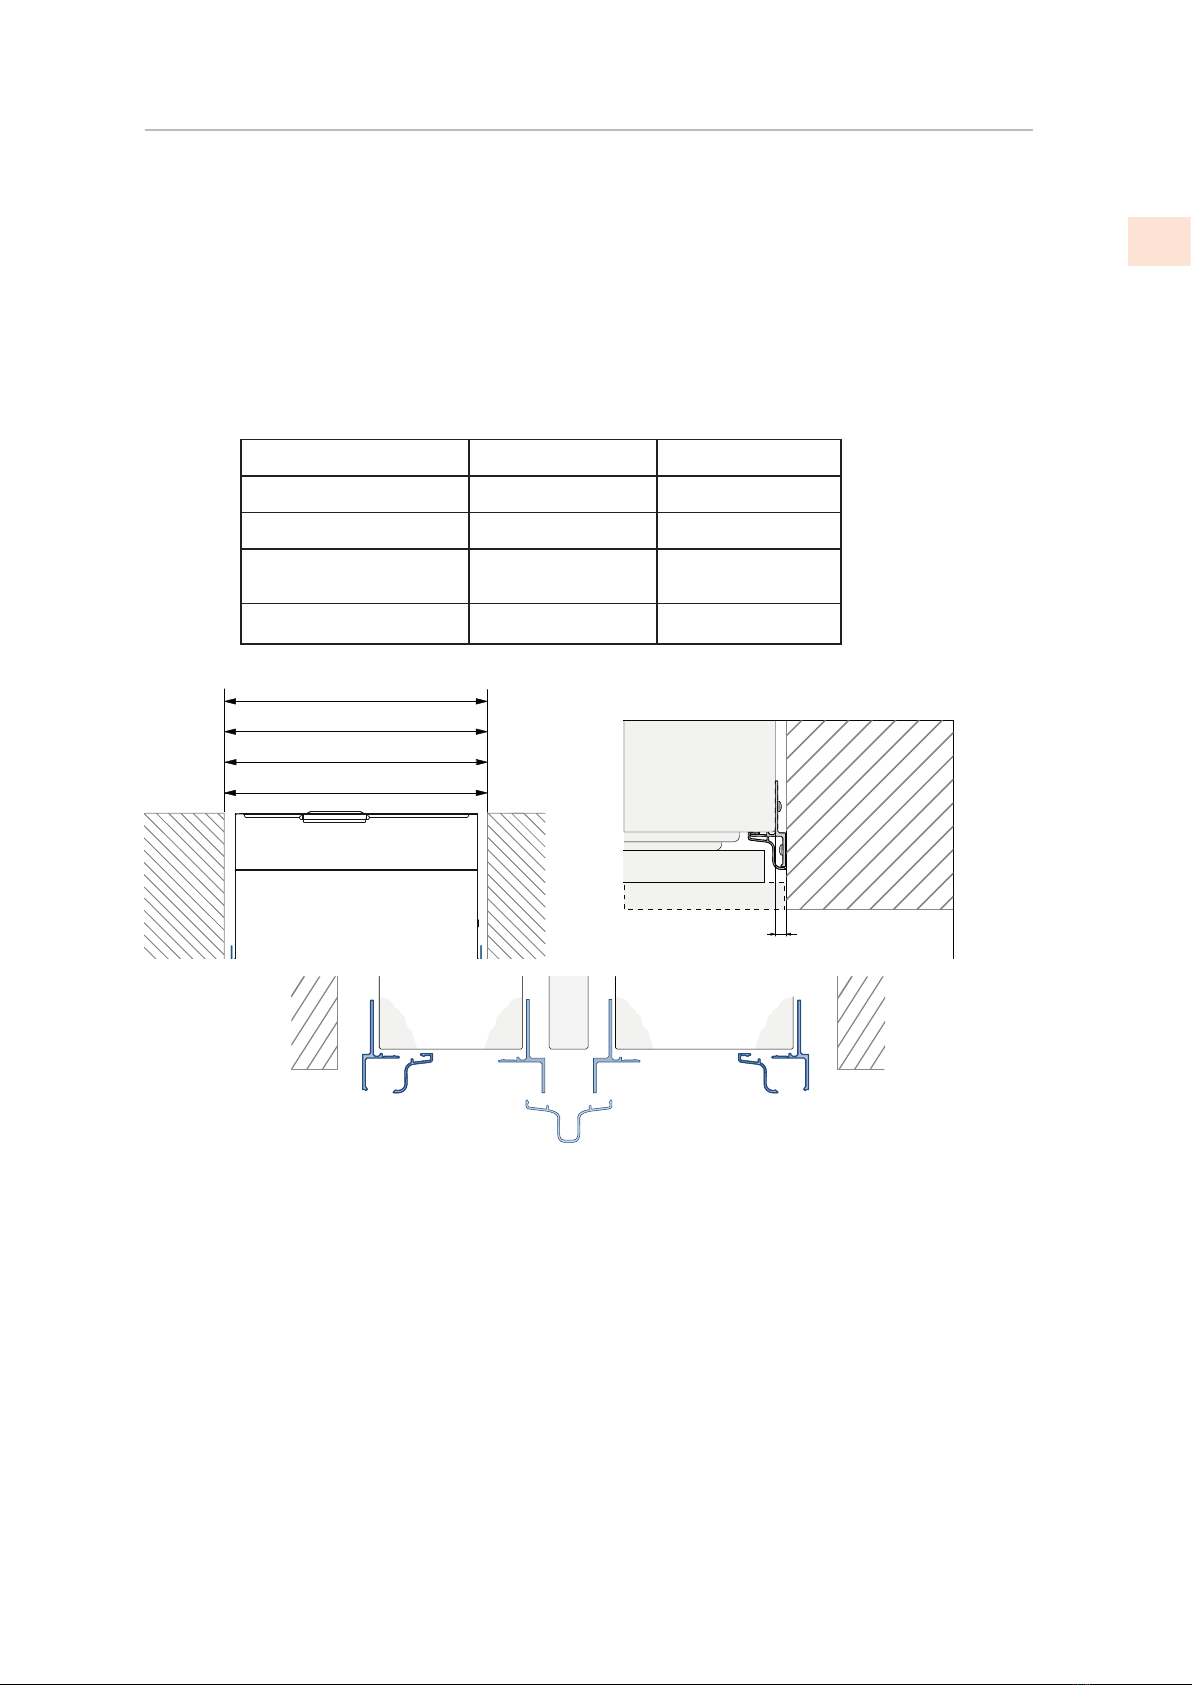
CUT-OUT DIMENSIONS AND INSTALLATION METHODS - FLUSHCUT-OUT DIMENSIONS AND INSTALLATION METHODS - FLUSH
A Lateral/side connection kit (included accessory) (SEE NOTE ON Page 27)
AKRLJK (for KRB, KRC, KFC, KWC and KRW Models)
AKRLJKP (for KRP Models)
B Central connection kit, required when joining 2 units
(not included - must be ordered as a separate accessory)
AKRCJK-OV for KRB, KRC, KFC, KWC and KRW Models with overlay front
AKRCJK for KRB, KRC, KFC, KWC and KRW Models with stainless or colored front
AKRCJKP for KRP Models
C Anti-Condensation kit # AKRACPP, required when joining two KRP units.
(not included - must be ordered as a separate accessory)
KRB36 Models
30” Columns (KxCx30)
24” Columns and Wine
(KxCx24, KRWx24)
35-1/2” [900 mm]
29-5/8” [750 mm]
23-3/4” [600 mm]
Cut-out
Models
18”: 17-3/4” [451]
30”: 29-5/8” [750]
36”: 35-1/2” [900 ]
35-1/4” [897 mm]
29-3/8” [747 mm]
23-1/2” [597 mm]
1/4” [6.5]
Panel Width
A
18” Columns (KxCx18)
24”: 23-3/4” [600]
17-3/4” [451 mm] 17-1/2” [445 mm]
A A
B
C
LOCATION AND PREPARATION
(CONT.)
© 2021 Hestan Commercial Corporation
11
EN
LOCATION AND PREPARATION
(CONT.)
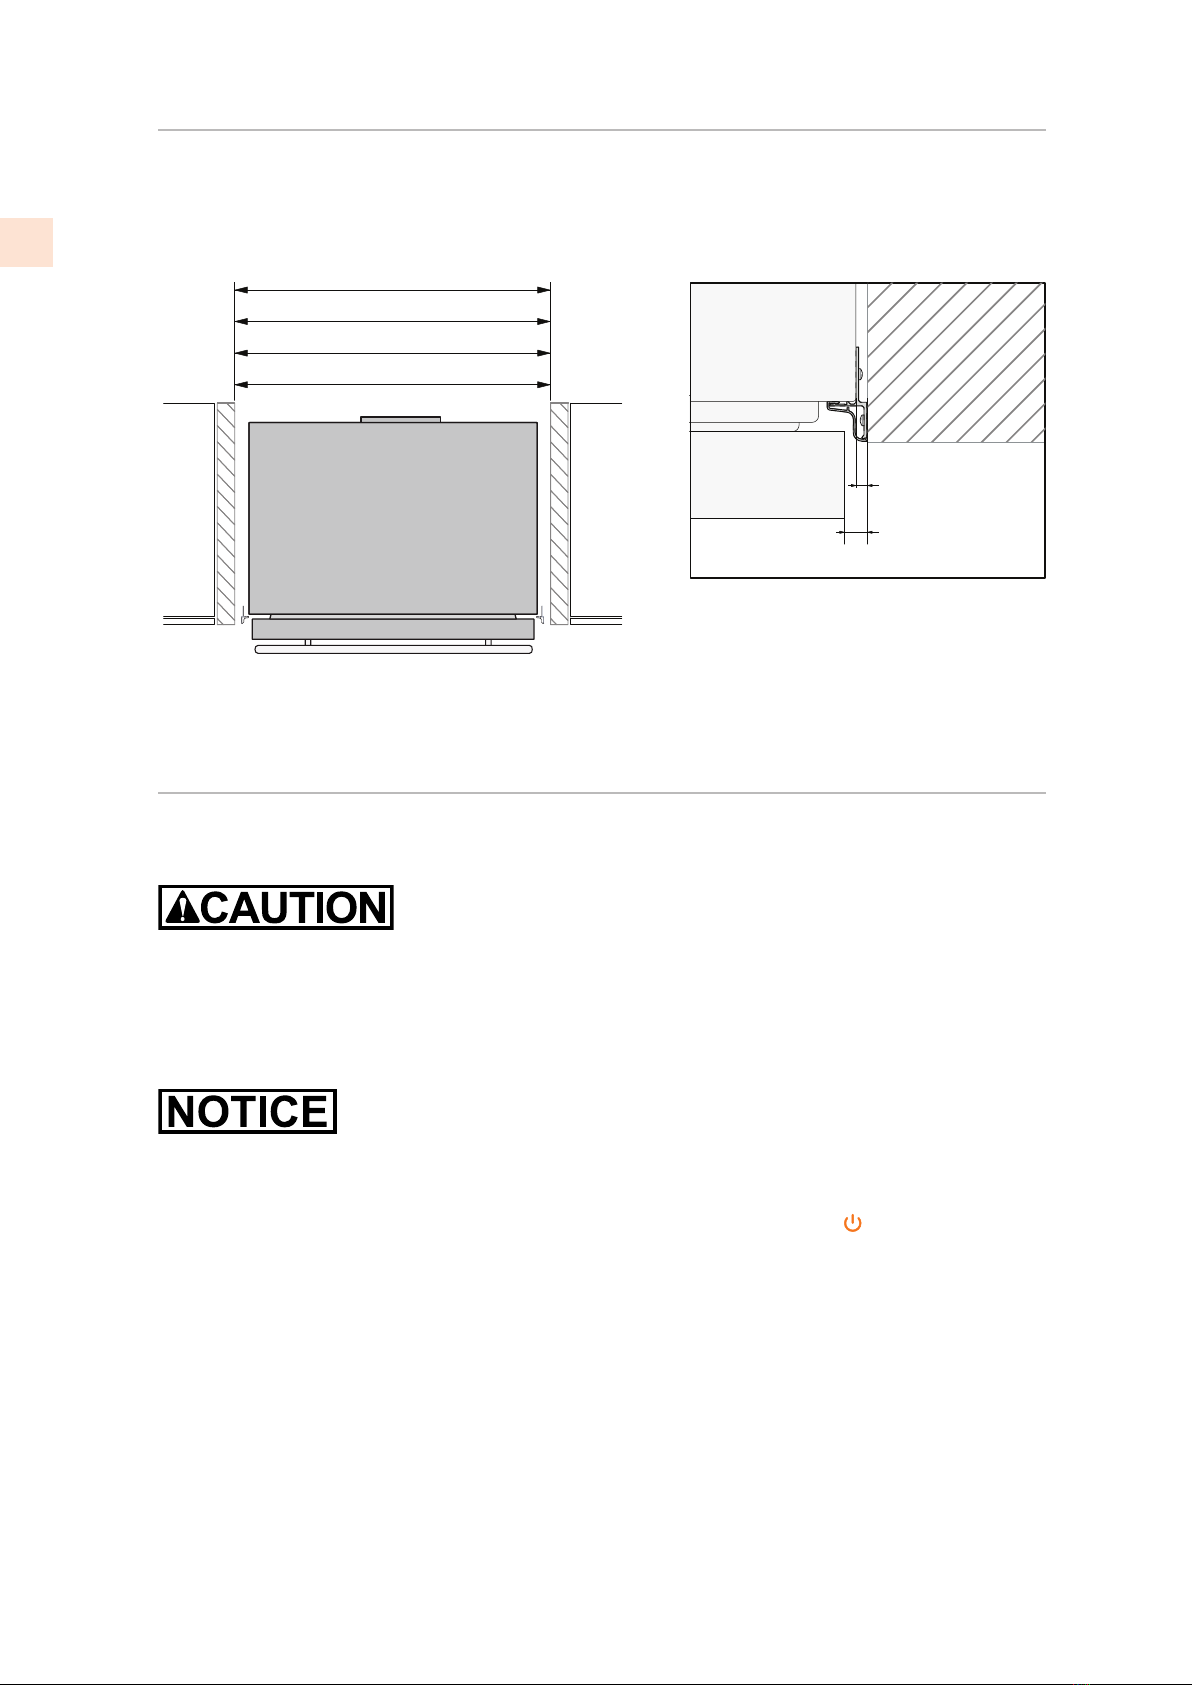
CUT-OUT DIMENSIONS AND INSTALLATION METHODS - NON-FLUSHCUT-OUT DIMENSIONS AND INSTALLATION METHODS - NON-FLUSH
If installing non-flush, the same side trim is used and the same cutout width is required.
A A
24: 23-3/4” [600]
30: 29-5/8” [750]
36: 35-1/2” [900]
A: Lateral / side connection kit
(SEE NOTE ON PG. 27)
A
1/4” [6,5]
3/8” [10]
18: 17-3/4” [451]
CONNECTIONS
ELECTRICAL AND WATER CONNECTIONELECTRICAL AND WATER CONNECTION
Do not use extension cords and/or multiple adapters for the power supply connection.
Do not use extension cords or adapters.
The built-in Hestan filter cannot make any water safe to drink, it must be used with water that
is already suitable for human consumption.
Water supply alarm:Water supply alarm:
If the water supply must be turned off after the the appliance is fully installed, connected to
the water supply (if applicable) and operational, touch the On/Off switch to turn the unit
off first to avoid a ‘NO WATER IN’ alarm.
© 2021 Hestan Commercial Corporation
12
EN
CONNECTIONS
(CONT.)
The appliances are delivered from the factory for operation at 110V-120V AC - 60Hz (US
and Canada). They are provided with a suitable supply cord and plug to be connected to an
appropriate 15A socket (US and Canada) provided with an effective grounding.
A circuit breaker should also be installed and should be easily accessible so that it can be easily
switched off before performing any installation or maintenance.
To connect to the water supply system (for appliances equipped with ice makers) a 1/4” water
line with accessible shut-off valve must be supplied.
The appliance is provided with a water adapter elbow which is suitable for high water pressure
and complies with appropriate regulations. The water filter cartridge provided with the
appliance should be installed according to the accompanying instructions.
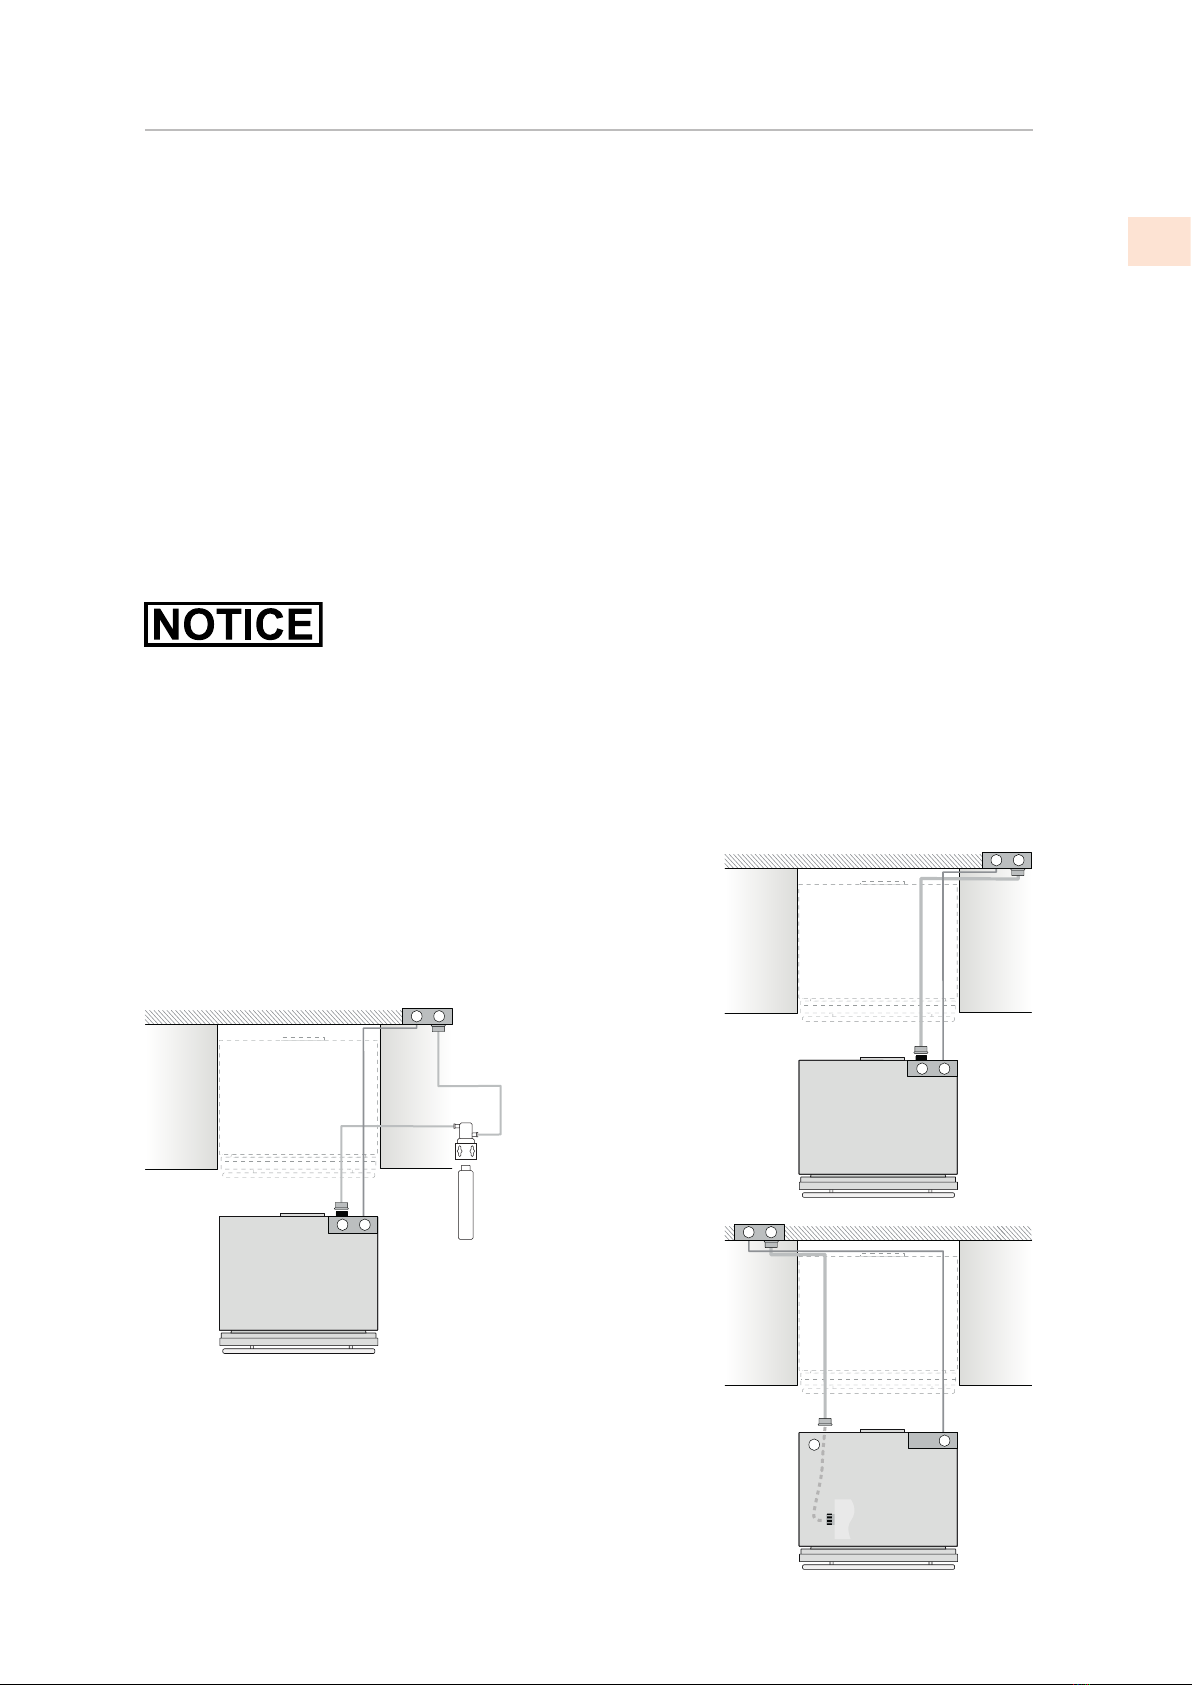
KRP, KRB models have the water filter mounted above the refrigerator compartment above the
glass panel.
KFC models are provided with a water filter assembly which must be mounted outside the
unit.
Use only the new adapter which is supplied with the appliance. The solenoid connection
on the appliance looks like 3/4” diameter but is metric threaded. A standard garden hose
threaded connector such as a braided stainless hose found at typical hardware stores will strip
or damage the solenoid threads. Use only the supplied 1/4” quick connect elbow adapter for
connecting a 1/4” copper or polyethylene source water line to the appliance.
Electrical cord length: 78-3/4” [2000 mm]
Water connection line length: 98-3/8” [2500 mm]
See following page for additional information.
E
W
E
W
E
W
EW
KRB models
KRP models
Water connec-
tion in base of
unit near front
E
W
E
W
KFC models Water filter to
mount in cabinet
© 2021 Hestan Commercial Corporation
13
EN

KRP MODELSKRP MODELS
Connect as follows:Connect as follows:
Unwind the electric cord and connect it directly to the wall socket.
Observe the information display. If the
appliance is not in Stand-by condition or
if any lights are on, press the On/Off
button for three seconds to switch it off.
Connect the water line to the threaded
connection at the base of the unit. (1)
Fit the other end of the hose (2) to the water valve, use the gaskets provided in the Owner’s
Kit.
Firmly tighten by hand - a tool/wrench should not be
needed to make a proper seal.
Turn on the water and ensure all connections are not
leaking prior to pushing the unit into the opening.
ALL OTHER MODELSALL OTHER MODELS
Connect as follows:Connect as follows:
Unwind the electric cord and connect it directly to the
wall socket.
Observe the information display. If the appliance is not in Stand-by condition or if any lights
are on, press the On/Off button to switch it off.
Push the 1/4” source waterline fully into the elbow connector then thread the elbow adapter
to the solenoid at the back of the appliance.
Firmly tighten by hand - a tool or wrench should not be needed to make a proper seal.
Turn on the water and ensure all connections are not leaking prior to pushing the unit into the
niche.
Back of appliance
Water connectionElectrical connection
Front of
appliance
1
2
Backof appliance
Electrical
connection
Water
connection
CONNECTIONS
(CONT.)
© 2021 Hestan Commercial Corporation
14
EN

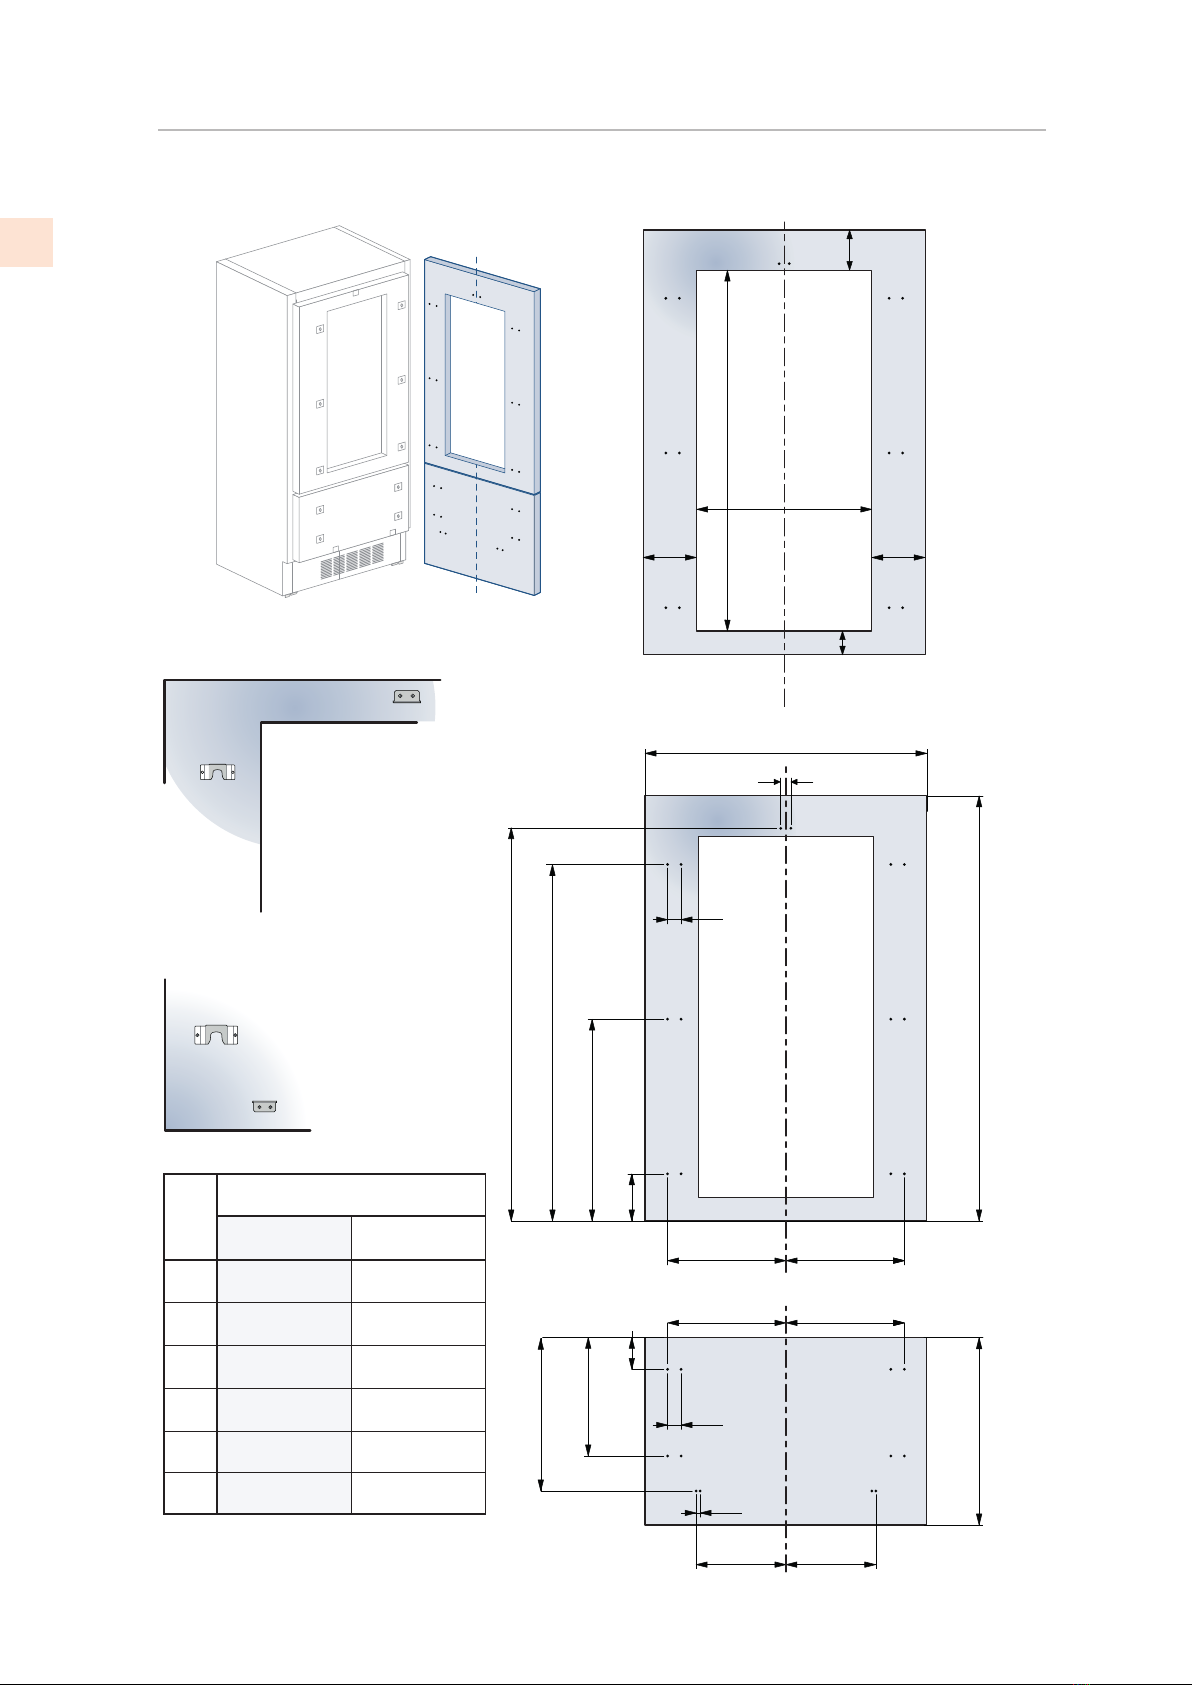
OVERLAY PANELS
DOOR AND DRAWER OVERLAY PANEL PREPARATIONDOOR AND DRAWER OVERLAY PANEL PREPARATION
Decorative panels:Decorative panels:
The dimensions of the panels are indicated in the table
and drawings on following pages.
To align panels with other kitchen structures, sizes
can be adjusted if the door panel needs to be higher
than the upper edge of the refrigerator door, and/or
the drawer panel needs to lower than the edge of the
drawer.
The panels must be mounted using special braces which
attach to adjustable devices provided on the door and
drawer and with brackets that anchor and adjust the
panel’s vertical direction.
Braces, brackets and fixing screws are provided with
the appliance and must be applied to the panel as
indicated.
Layout procedure:Layout procedure:
To prepare the panels to be mounted on the appliance,
follow these steps, working on the back of the panel.
Door Panel
1) Trace a line dividing the panel width in half. (1)
2) Starting from the bottom edge of the panel, mark
the positioning of the brackets. (2)
3) Following the corresponding table, mark the
external and then the internal hole. (3)
1
2
3
© 2021 Hestan Commercial Corporation
15
EN

OVERLAY PANELS
(CONT.)
DOOR AND DRAWER OVERLAY PANEL PREPARATIONDOOR AND DRAWER OVERLAY PANEL PREPARATION (continued)(continued)
Mounting the BracketsMounting the Brackets
4) Position the brackets on each set of marks to make sure
they are aligned. (4)
Note that the support bracket mounts with its flange
toward the top of the door.
• If necessary, drill starter holes in the panel. (5)
(Use a drill stop to avoid drilling through or damaging
the finish surface.)
The installation kit includes 5/8” screws. If the panel isn’t
substantially thicker than 5/8”, you’ll need shorter screws.
1) Screw the brackets in place. (6)
Drawer PanelDrawer Panel
When preparing the Drawer Panel, follow the same
instructions as per the door panel, but make sure
measurements are taken starting from the top edge. (7)
The support bracket faces the opposite way from the door
panel bracket. (Compare images 4 and 8.)
7
8
4
56
© 2021 Hestan Commercial Corporation
16
EN

OVERLAY PANELS
(CONT.)
PANEL DIMENSIONS KRB - OVPANEL DIMENSIONS KRB - OV
D E
D E
A
B C
F G
½” [13]
½”[13]
1-3⁄8” [34]
1-3⁄8” [34]
50-
5⁄8” [1285]
45-¾” [1163]
26” [660]
6-
¼”[157]
min 54-3/4” [1390]
max 25” [635]
20” [507.5]
15-1⁄8”[382]
4” [100]
KRBx36-OV
Hinge Left Hinge Right
A35-1/4” [897 ] 35-1/4” [897]
B14” [355.5] 10-1/4” [261]
C10-1/4” [261] 14” [355.5]
D16-1/2” [418 ] 15-1/4” [386]
E15-1/4” [386]16-1/2” [418]
F / G 14” [354.5] 14” [354.5]
© 2021 Hestan Commercial Corporation
17
EN
OVERLAY PANELS
(CONT.)
PANEL DIMENSIONS KRW - OVPANEL DIMENSIONS KRW - OV
H I
D E
A
F G
50-
5⁄8”[1286]
45-
3⁄8”[1152.5]
25-
5⁄8”[650.5]
5-
7⁄8”[148.5]
¼”[6.5 ]
½”[13]
1-3⁄8" [34]
1-3⁄8" [34]
min 54-¾”[1390]
max 25” [635]
20” [507.5]
15-1⁄8”[382]
4” [100]
12-7⁄8”
[327]
42-
[1075]
3⁄8”
< 7-7⁄8”
[200]
4-½”[115]
5-
3⁄8”
[135]
5-
3⁄8”
[135]
¼”[6.5 ]
KRWx24-OV MODELS
A
H
I
F / G
23-½” [597]
10-5⁄8” [270.5]
9-1⁄8” [230.5]
10-7⁄8” [276.5]
9 3⁄8” [236.5]
D
E
Hinge Left Hinge Right
23-½” [597]
10-7⁄8” [276.5]
9-3⁄8” [236.5]
10-5⁄8” [270.5]
9-1⁄8” [230.5]
8” [203.5]
8” [203.5]
© 2021 Hestan Commercial Corporation
18
EN
Other manuals for KRP series
1
This manual suits for next models
62
Table of contents
Languages:
Other hestan Refrigerator manuals

hestan
hestan GRR24 Installation instructions

hestan
hestan KRB User manual

hestan
hestan GRSL24 Quick guide

hestan
hestan ASPIRE ERS24 Instructions for use

hestan
hestan KRB series User manual

hestan
hestan GRS_24 User manual

hestan
hestan GRS_24 User manual

hestan
hestan KRPR36 User manual

hestan
hestan KRP series User manual

hestan
hestan KRP User manual


