hestan GWD30 User manual

OUTDOOR COOKING
Outdoor Warming Drawer
GWD
Use and Care Manual
Installation Instructions

EN
IF THE INFORMATION IN THIS MANUAL IS NOT FOLLOWED
EXACTLY, A FIRE OR EXPLOSION MAY RESULT CAUSING
PROPERTY DAMAGE, PERSONAL INJURY, OR DEATH.
Do not store or use gasoline or other flammable vapors and liquids in the
vicinity of this or any other appliance.
Installation and service must be performed by a qualified installer or service
agency.
DO NOT REPAIR, REPLACE OR REMOVE ANY PART OF THE APPLIANCE UNLESS
SPECIFICALLY RECOMMENDED IN THE MANUALS. IMPROPER INSTALLATION,
SERVICE OR MAINTENANCE CAN CAUSE INJURY OR PROPERTY DAMAGE. REFER
TO THIS MANUAL FOR GUIDANCE. ALL OTHER SERVICING SHOULD BE DONE BY A
HESTAN AUTHORIZED SERVICE TECHNICIAN.
READ THESE INSTRUCTIONS CAREFULLY AND COMPLETELY
BEFORE INSTALLING OR USING YOUR APPLIANCE TO REDUCE
THE RISK OF FIRE, BURN HAZARD, OR OTHER INJURY. KEEP
THIS MANUAL FOR FUTURE REFERENCE.
SAFETY DEFINITIONS
THIS INDICATES THAT DEATH OR SERIOUS INJURY MAY OCCUR
AS A RESULT OF NOT OBSERVING THIS WARNING
THIS INDICATES THAT MINOR OR MODERATE INJURY MAY
OCCUR AS A RESULT OF NOT OBSERVING THIS WARNING.
THIS INDICATES THAT DAMAGE TO THE APPLIANCE OR
PROPERTY MAY OCCUR AS A RESULT OF NOT OBSERVING THIS
WARNING.
CAUTION
NOTICE
INSTALLER: LEAVE THIS MANUAL WITH THE OWNER OF THE APPLIANCE.
HOMEOWNER: RETAIN THIS MANUAL FOR FUTURE REFERENCE.
©2021 Hestan Commercial Corporation
1

HESTAN OUTDOOR, MOST
POWERFUL, VERSATILE
AND RELIABLE OUTDOOR
COOKING AVAILABLE.

EN
©2021 Hestan Commercial Corporation
3
Message from Hestan:Message from Hestan:
Outdoor cooking is a perfectionist’s pursuit, and with your new investment,
you’ve now taken the ultimate step forward. We sincerely welcome you to
the Hestan Family. We’ve engineered and built our products so that your
guests will rave about your meal, but deep down, our customers know it
could’ve been just a little more tender, juicier – a pinch more salt in the rub
or a few seconds less on the flame. Yes, we’ve taken the time to know our
Hestan customer and we’re excited to be on this journey with you. Hestan
Outdoor was born from this same perfectionist passion. Our engineers
experimented, innovated, tweaked and tinkered until they created the most
powerful, versatile and reliable outdoor products available.
We pride ourselves on restless innovation, superior engineering and
purpose-built designs, but also our in-depth understanding of our target
consumer and the interests and needs of the ultimate end-users we serve
and covet. For many consumers, cooking outdoors is much more than an
act of food preparation. It’s a lifestyle activity that encompasses culinary,
leisure and social pursuits among others.
We are thankful and proud that you have chosen Hestan, and we yearn to
have you as a customer for life. We take your decision to choose Hestan
most seriously, and we promise to deliver the very best to you.
Welcome to Hestan OutdoorWelcome to Hestan Outdoor

EN
©2021 Hestan Commercial Corporation
4
ELECTRICAL SHOCK HAZARD
Disconnect power before installing or servicing appliance.
Failure to do so can result in death or electrical shock.
ELECTRICAL GROUNDING
This appliance must be grounded. Grounding reduces the risk of electric
shock in the event of a short circuit.
ELECTRICAL SUPPLY
Important: This appliance must be electrically grounded in accordance with local codes, or in the
absence of local codes with the National Electrical Code,
ANSI/NFPA 70-1990
.
Appliances equipped with a flexible electrical supply cord are provided with a three-prong
grounding plug. It is imperative that this plug be connected to a properly grounded three-prong
receptacle. If the receptacle is not the proper grounding type, contact an electrician. Do not
remove the grounding prong from this plug.
This appliance is designed to use a grounded receptacle, 120 VAC Single Phase, 60 Hz, with a
current rating as shown in the model number listing on page 5. When installed outdoors, it must
be plugged into a Ground Fault Circuit Interrupter (GFCI) protected circuit.
Have the installer show you where the electric circuit breaker is located so you know how to shut
off the power to this appliance.
TABLE OF CONTENTS
5 MODEL NUMBERS
5 RATING LABEL
5 REGULATORY / CODE REQUIREMENTS
6 SAFETY PRECAUTIONS - BEFORE YOU BEGIN
8 USING THE WARMING DRAWER
12 CLEANING AND MAINTENANCE
15 TROUBLESHOOTING
16 INSTALLATION
20 INSTALLATION - CUSTOM DRAWER FACE (-OV MODELS)
22 WIRING SCHEMATIC
23 PARTS / SERVICE
23 LIMITED WARRANTY

EN
©2021 Hestan Commercial Corporation
5
RATING LABEL
The rating label contains important information about your Hestan appliance such as the model
number, serial number, and electrical rating.
The rating label is located on the bottom of the drawer.
If service is necessary, contact Hestan Customer Care with the model and serial number
information shown on the label.
MODEL NO. DESCRIPTION CIRCUIT BREAKER REQ’D
GWD30 30” Outdoor Warming Drawer 15 Amp
RATING
LABEL
TYPICAL RATING LABEL
REGULATORY / CODE REQUIREMENTS
Installation of this cooking appliance must be made in accordance with local codes. In the absence
of local codes, this unit should be installed in accordance with the National Electrical Code and
local codes.
This appliance must be electrically grounded in accordance with local codes or in the absence of
local codes with the National Electrical Code
ANSI/NFPA 70
, or Canadian Electrical code
CSA
C22.1
.
MODEL NUMBERS

EN
©2021 Hestan Commercial Corporation
6
When properly cared for, your Hestan appliance will provide safe, reliable service for many years.
When using this appliance, basic safety practices must be followed as outlined below.
IMPORTANT: Save these instructions for the local Utility Inspector’s use.
INSTALLER: Please leave these Installation Instructions with the owner.
OWNER: Please retain these Installation Instructions for future reference.
This appliance is NOT designed for installation in manufactured (mobile) homes or recreational
park trailers. This appliance is rated for household indoor use, or outdoor use when connected to a
properly grounded GFCI-protected circuit.
GENERAL APPLIANCE SAFETY PRECAUTIONS
Please read all instructions before using this appliance.
Read all instructions carefully before using this appliance. These precautions will reduce the risk
of burns, electric shock, fire, and injury to persons. When using kitchen appliances, basic safety
precautions must be followed, including the following:
TECHNICAL SAFETY
Do not repair or replace any part of the warming drawer unless specifically recommended. Refer
service to an authorized servicer.
Do not operate this appliance if it is not working properly or if it has been damaged, until an
authorized servicer has examined it.
Install or locate this appliance only in accordance with the Installation Instructions. Do not cover
or block any openings on this appliance.
Use this warming drawer only as described in this manual. If you have any questions, contact
Hestan Customer care.
Use this appliance only for its intended use as described in this manual. Do not use corrosive
chemicals, vapors, or nonfood products in this appliance. This type of warming drawer is
specifically designed to heat or cook. It is not designed for industrial or laboratory use. The use of
corrosive chemicals in heating or cleaning will damage the appliance.
CHILD SAFETY
CAUTION
IT IS THE RESPONSIBILITY OF THE PARENTS OR GUARDIANS TO ENSURE CHILDREN
ARE INSTRUCTED IN THE SAFE USE OF THIS APPLIANCE. Do not allow children to use this
appliance without adult supervision. Do not allow children to play in or around the appliance, even
when not in use. Items of interest to children should not be stored in or on the appliance or in
cabinets above the appliance. Children climbing on the appliance could be seriously injured.
FOOD SAFETY
If food will be held for more than one hour, it must be held at 140°F [60°C] or above. Use a food
thermometer to check.
SAFETY PRECAUTIONS - BEFORE YOU BEGIN

EN
©2021 Hestan Commercial Corporation
7
SAFETY PRECAUTIONS - BEFORE YOU BEGIN
(continued)
GENERAL SAFETY
When using electrical appliances, basic safety precautions should always be followed including the
following:
• Do not touch hot surfaces. Use handles or knobs.
• To protect against electrical shock do not immerse cord or plug in water or other liquid.
• Close supervision is necessary when any appliance is used by or near children.
• Unplug from outlet or turn breaker off before cleaning. Allow to cool before removing or
replacing parts.
• Do not operate any appliance with a damaged cord or plug or after the appliance malfunctions
or has been damaged in any manner. Return appliance to the nearest authorized service facility
for examination, repair, or adjustment.
• The use of accessory attachments not recommended by Hestan may cause injuries.
• Do not let cord hang over edge of table or counter, or touch hot surfaces.
• Extreme caution must be used when moving anything containing hot oil or other hot liquids.
• Do not use appliance for other than intended use.
• The inside of the appliance can reach temperatures of 200°F [93°C] depending on the selected
temperature and the time of operation. If necessary use gloves to remove items from the
drawer.
• Do not lean or sit on the warming drawer when opened, this could cause damage to the drawer
slides. The maximum carrying weight of the warming drawer is 80 lbs. [36 kg].
• Do not keep plastic containers or any flammable objects in the appliance. Such objects pose a
risk of catching fire once the warming drawer is turned on.
• In the event that personal clothing or hair catches fire, DROP AND ROLL IMMEDIATELY to
extinguish flames.
Save these Instructions.
SAFETY DURING CLEANING
Never use a vacuum cleaner. The vacuum could create pressure on the components causing a short
circuit. The vacuum may also damage the components of the appliance, damages for which Hestan
will not be liable.
Follow suggestions listed under “Cleaning and Maintenance” in this manual.
Never use sharp metal objects or abrasive scrubbing pads, as they can damage the surface of the
appliance. If necessary, use standard non-abrasive utensils made of wood or plastic.
REPAIRS
Maintenance work and/or repairs must be performed exclusively by qualified personnel. Incorrect
installation and maintenance can cause personal injury to the consumer for which Hestan will not
be liable.
During the warranty period, the appliance may only be serviced by technicians authorized by
Hestan or the warranty will be void.
Before beginning maintenance, installation, or repair work, disconnect the appliance from the
electrical outlet. The appliance is disconnected only if either:
1. The circuit is turned off (Breaker OFF or the electrical fuse is removed), OR
2. The cord of the appliance is removed from the electrical outlet.
Hestan will not be liable for damage caused by a failure to follow current regulations or the use of
non-original replacement parts.

EN
©2021 Hestan Commercial Corporation
8
USING THE WARMING DRAWER
OPENING THE SOFT CLOSING DRAWEROPENING THE SOFT CLOSING DRAWER
To open the drawer grasp the handle and pull the drawer.
CLOSING THE DRAWERCLOSING THE DRAWER
To close the drawer, gently push the drawer back to engage the soft-close slides of the drawer.
BEFORE YOU BEGINBEFORE YOU BEGIN
Before using the appliance for the first time:
1. Make sure that all packaging materials have been removed from the unit.
2. Gently clean it with a moist cloth and dry it completely as described under “Cleaning and
Maintenance”. Replace the silicone mat on the floor of the drawer.
3. Set the control to 150°F [65°C] and let the warming drawer warm for at least two hours (see
OPERATION on pg. 10 for details). Be sure that the kitchen is kept well ventilated during the
heating period.
• The metal parts have been specially treated with a protective coating that can sometimes cause
odors the first time the drawer is heated. These odors will quickly dissipate and should not be
considered a defect of the appliance.
HEATING SYSTEMHEATING SYSTEM
The appliance is equipped with a hot air ventilating system. A convection fan distributes heat in
the warming drawer to obtain a uniform temperature.
• The thermostat allows the user to control and set the appliance at 4 preset temperatures.
• The circulation of the air heats the drawer in a rapid and uniform way.
• It is not possible to accidentally touch the heating element or the fan.
CHANGING TEMPERATURE SCALECHANGING TEMPERATURE SCALE
The unit is set to the Fahrenheit (°F) temperature scale by default. If you wish to change to Celsius
(°C), do the following:
1. With unit off, press the TEMP button then POWER button and hold for 30 seconds. The
control is in °C mode when the right-most decimal point in the display is on.
2. Use the same process to revert to °F mode.
EN
©2021 Hestan Commercial Corporation
9
USING THE WARMING DRAWER
(continued)
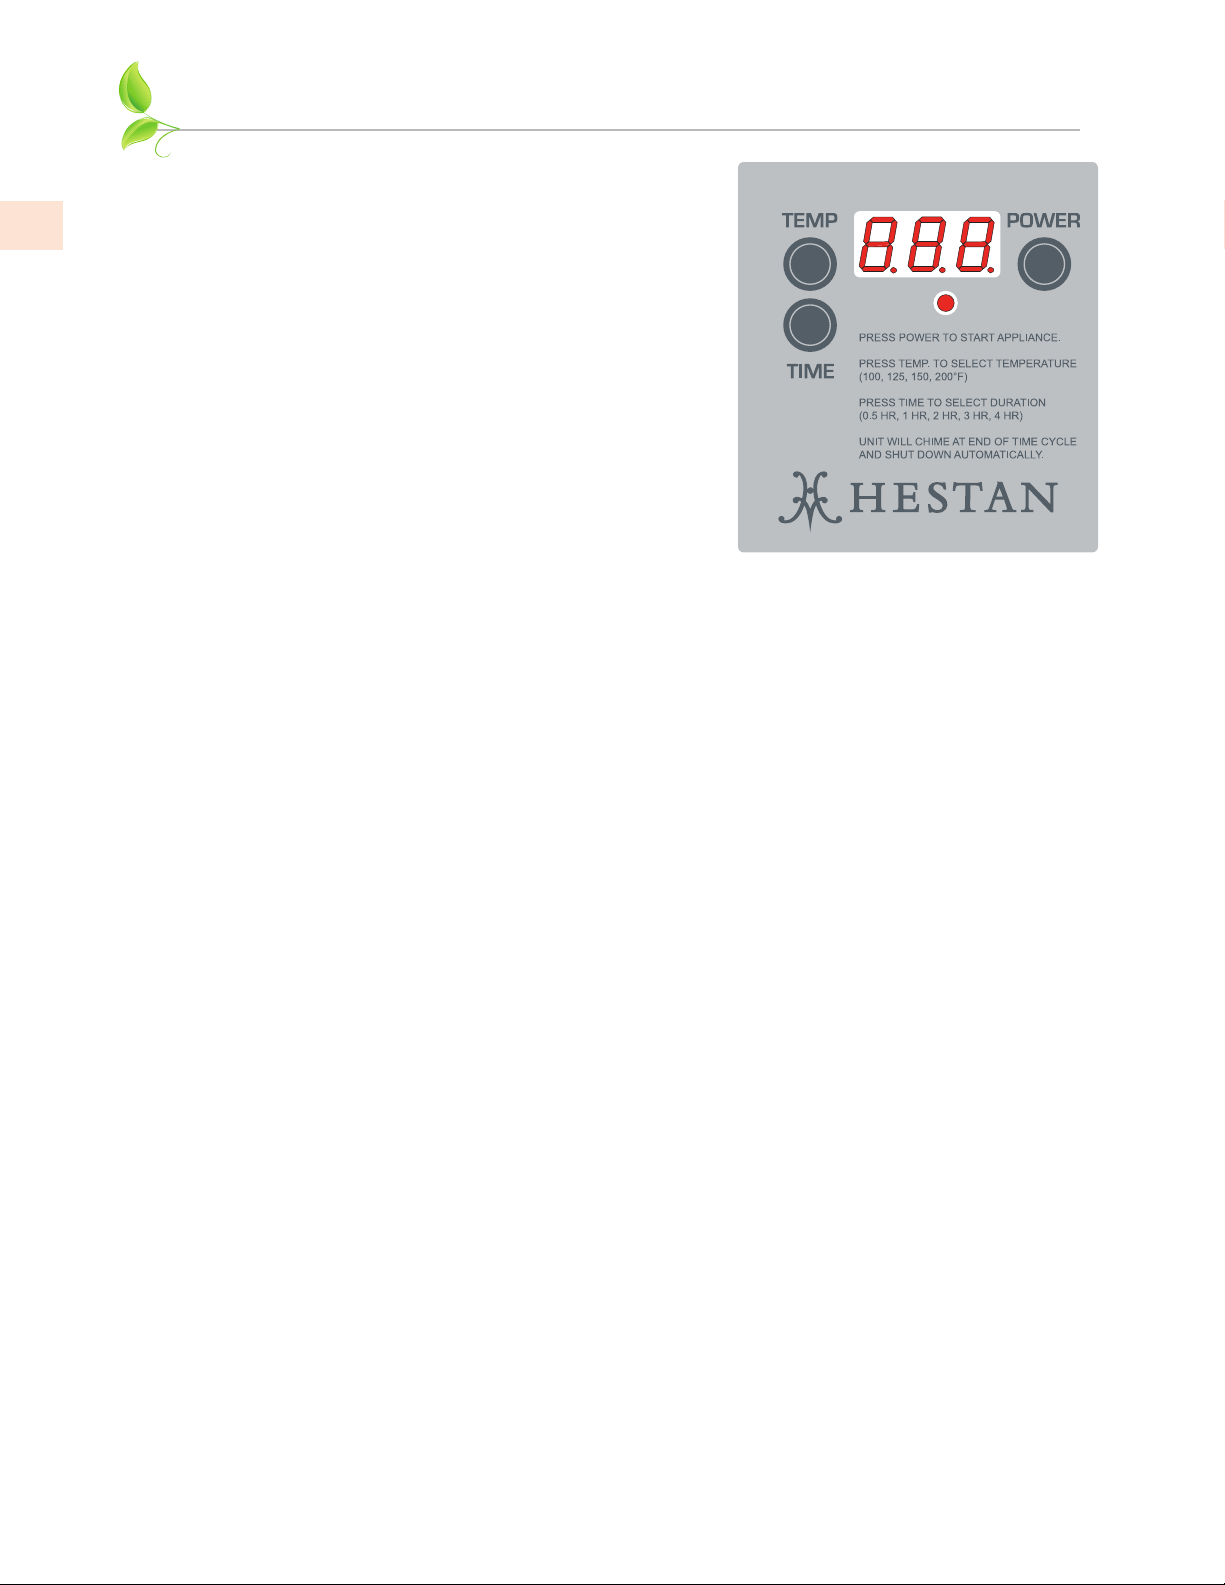
CONTROLS AND INDICATORSCONTROLS AND INDICATORS
The warming drawer features a digital control with a
3-digit time/temperature display. There are 4 preset
temperatures and 5 time intervals as detailed in the
instructions below.
An interior halogen light comes on when the drawer is
opened.
A red power indicator light is present on the control, and
shines through a small lens on the exterior of the drawer
face.
OPERATIONOPERATION
1. Open the drawer and place your dishes or food products inside. The silicone rubber mat inside
the drawer prevents items from sliding around inside the drawer.
2. Press the POWER button. The display will briefly show a software revision, then go blank. The
red power indicator light will illuminate.
3. Press the TEMP button to cycle through the 4 preset temperatures: 100, 125, 150, 200°F
[38, 52, 65, 93°C]. The default temperature is 100°F [38°C]. The set temperature is always
displayed except when adjusting the time. This action initiates the heating cycle. The
convection fan will begin rotating and will be on at all times until the time has run out and the
unit shuts down.
4. Press the TIME button to cycle through the 5 preset time intervals: 0.5, 1, 2, 3, 4 hours. During
the selection, the display shows the time for 3 seconds, and then returns to display the set
temperature.
5. During operation, the heating element will cycle to maintain the set temperature inside
the drawer cavity. The unit will chime at the end of the time interval and then shut down
automatically. The display and power indicator light will also shut off.
6. If at any time you wish to change the temperature or the time interval, shut off the unit
(POWER button) and repeat steps 2-4 above.
To turn off the appliance, press the POWER button.
HEATING TIMEHEATING TIME
The heating time is influenced by:
• Amount of dishes or food in the drawer
• The arrangement of items in the drawer
• The temperature setting
In general, the more dishes or items in the drawer and the higher the set temperature, the longer it
will take to reach the set temperature.
DISH WARMINGDISH WARMING
• Food safety standards recommend hot foods should be kept at an internal temperature of
140°F [60°C] or warmer. Warming your dishes at a setting of 150°F [65°C] will help accomplish
this.
• Warming time will depend on the amount and type of plates you place in the drawer. With
experience you will learn the optimal temperature setting for your needs.

EN
©2021 Hestan Commercial Corporation
10
USING THE WARMING DRAWER
(continued)
DEFROSTINGDEFROSTING
It is possible to defrost foods in the warming drawer, but a low temperature setting of 100 or 125°F
[38 or 52°C] is recommended. Be sure to place your food item on a plate or other receptacle to
catch any melting water.
PROOFINGPROOFING
Proofing of bread dough should be done at a low temperature of 100°F [38°C]. Depending on the
dough type, you may also need added moisture during the prove. Place 1 cup [250 ml] of very hot
water in a small glass measuring cup or small bowl inside the warming drawer next to your dough.
This will add moisture and will keep the dough soft during rising. Place the bowl of dough in the
warming drawer and close.
The warming drawer features a moisture control system of
small vents on the inside face of the drawer. Loosen the
thumbscrew and slide the shutter left or right to adjust
the amount of moisture inside the drawer. Re-tighten the
thumbscrew.
FOOD WARMINGFOOD WARMING
Food recommended for warming: meat, chicken, fish, sauces,
vegetables, side dishes and soups, breads, pizza.
• To avoid spills, do not overfill the dishes.
• Arrange the dishes in the drawer and close it carefully so
that any liquids do not spill.
• It is advisable not to warm food for more than an hour to
prevent it from losing nutritional value.
• If food will be held for more than one hour, it must be held at 140°F [60°C] or above.
Cover moist food and liquids with a lid or heat-resistant cling film. This will prevent the moisture
from escaping, condensation from forming, and moisture settling on the outside of the dishes.
Do not cover roast or fried dishes which need to stay crisp. Keep these dishes hot at high
temperatures.
SLOW COOKINGSLOW COOKING
NOTICE
THIS COOKING METHOD IS LIMITED BY THE MAXIMUM TIME INTERVAL
OF THE CONTROL (4 HOURS). IF YOUR RECIPE REQUIRES A LONGER
TIME, YOU WILL HAVE TO RESTART THE UNIT AGAIN AFTER THE INITIAL
4 HOURS.
Slow cooking is ideal for cooking tender meat which needs to be medium rare or rare. This cooking
method means the meat will always be pink inside. This does not, however, mean that the meat is
raw or undercooked.
• This cooking method not only keeps the juices inside, but it also makes it easy to keep the meat
hot.
• Suitable dishes to use: glass, porcelain or ceramic with a lid.
PROCEDURE
1. Preheat the warming drawer with the chosen dish at 200°F [93°C] for 15 minutes.
2. Heat some butter or oil in a pan. Brown the meat well for the time indicated in the table, then
place it immediately in the preheated pan and cover with the lid.
3. Restart the control between 150/200°F [65/93°C] for the time required to finish the cooking.
(See notice above regarding cooking times longer than 4 hours).
THUMBSCREW
MOISTURE
CONTROL
VENTS

EN
©2021 Hestan Commercial Corporation
11
USING THE WARMING DRAWER
(continued)
TIPS FOR SLOW COOKINGTIPS FOR SLOW COOKING
• Only use fresh meat in perfect condition.
• Trim off any excess fat.
• The pieces of meat do not necessarily have to be turned.
• Once cooked, the meat can be carved immediately; it does not have to rest.
• Meat that is slow cooked is not as hot as meat cooked in the traditional way, so it is advisable
to put the plates in the warming drawer on the left-hand side for the last 20-30 minutes as well.
• Serve the meat with piping hot sauces.
• If you want to keep the meat hot after cooking, restart the control at a lower temperature
(100-150°F [38-65°C]). Smaller pieces of meat can be kept hot for 45 minutes and larger pieces
for two hours.
APPLICATIONSAPPLICATIONS
Slow cooking is suitable for all tender cuts of beef, pork, veal, lamb, game and poultry. The initial
browning times and the subsequent cooking times depend on the size of the slices of meat.
The browning time is for meat placed in a preheated pan with butter or oil.
DISH EXAMPLE INITIAL BROWNING LEVEL
Small slices of meat
Strips about 1 - 2 minutes 150
Small steaks or medallions about 1 - 2 minutes per side 150
Medium size slices of meat
Tenderloin about 4 - 5 minutes per side 200
Lean roast about 10 - 15 minutes per side 200
Large slices of meat
Tenderloin (from 2 lbs. [900g]) about 6 - 8 minutes per side 200
Roast beef about 8 - 10 minutes per side 200
Vegetables about 30 minutes per side 150
COOKING TIMES: As a guideline, allow 4 to 5 hours for a 200°F [93°C] setting, and 8 to 10 hours
for a 150ºF [65ºC] setting. Smaller quantities of food may require less time, while larger quantities
may require more time.

EN
©2021 Hestan Commercial Corporation
12
CLEANING AND MAINTENANCE
DRAWER SLIDESDRAWER SLIDES
The drawer slides allow you to fully extend the drawer for cleaning. The drawer can also be
completely removed for cleaning or to replace the interior light.
NOTE: Load capacity for the drawer is 80 lbs [36 kg].
Remove all items from inside the warming drawer, and allow the warming drawer to cool
completely before attempting to remove the drawer.
TO REMOVE:TO REMOVE:
1. Open drawer to its fully open
position.
2. Locate the black tabs on both sides
of the drawer.
3. Press the tab down on the right
side of the drawer and lift tab up
on the left side of the drawer at
the same time. Then pull drawer
out another inch to disengage the
latches.
4. Hold the drawer by the sides (not
by the front). Pull it slowly all the way out.
TO REPLACE:TO REPLACE:
1. Align the drawer rails with the
receiving slides.
2. Push drawer in all the way.
3. Gently open and close the drawer
to ensure it is seated properly on
the slides.

EN
©2021 Hestan Commercial Corporation
13
CLEANING AND MAINTENANCE
(continued)
CLEANINGCLEANING
The only recommended maintenance for the Warming Drawer is cleaning.
Before you begin cleaning, turn the appliance OFF and disconnect the appliance from the outlet or
shut off the breaker. Allow the appliance to cool before cleaning it.
NOTICE
Do not use harsh detergents or abrasive products and/or scrubbing pads and sponges and sharp
objects as they can stain and damage the appearance of the appliance.
Never use a vacuum cleaner on the internal parts of the appliance.
FRONT SURFACE AND CONTROL PANELFRONT SURFACE AND CONTROL PANEL
The use of a moist cloth is often sufficient when cleaning the appliance. If needed, add a few drops
of liquid detergent in the water. Dry the appliance with a dry cloth. The stainless steel front of
the appliance can be cleaned with products specifically designed for stainless steel. Such products
prevent the formation of dirt on the surface of the drawer. Apply a minimal amount of the product
on a soft cloth and apply it to the surface of the appliance.
Clean the control panel ONLY with a cloth moistened with plain water. The special plastic surface
may discolor or become opaque if you use any harsh cleaners.
If your Hestan appliance has a colored drawer panel, use warm soapy water ONLY. Rinse and dry
thoroughly.
DRAWER INTERIORDRAWER INTERIOR
Use a moist cloth to clean the drawer interior. In the event the appliance requires further cleaning
add drops of detergent to the water. Dry the surface with a dry cloth. Make sure to avoid
excessive water entering into the moisture control vents on the inside face of the drawer, or the
heating louvers and fan openings at the rear wall of the drawer cavity. Only use the appliance after
the drawer is completely dry.
The silicone rubber mat can be cleaned with mild detergent and water.
REPLACING A WARMING DRAWER LIGHT BULBREPLACING A WARMING DRAWER LIGHT BULB
The Warming Drawer is equipped with a halogen light located on the right side of the unit.
ELECTRICAL SHOCK HAZARD - Make sure the power has been shut off to the Warming Drawer.
The light socket is energized when the drawer is open. Failure to shut off the power when
replacing a light bulb could result in electric shock or burns.
Make sure the glass lens is cool to the touch. Use care when handling the lens, it is fragile and can
break if dropped.
Use only 20 watt, 12 volt, halogen “Bi-Pin” bulbs suitable for appliance use. This type of bulb may
be available at hardware stores & home centers, or specialty lighting stores. Call Hestan Customer
Care for more information.

EN
©2021 Hestan Commercial Corporation
14
CLEANING AND MAINTENANCE
(continued)
TO REPLACE A LIGHT BULBTO REPLACE A LIGHT BULB
1. MAKE SURE POWER IS OFF! Unplug the unit or turn off power at the breaker. MAKE SURE
THE LAMP IS COOL. The hot lens and/or bulb can be VERY hot.
2. You may wish to remove the drawer (see page 12) before changing the bulb.
3. Use a small flat-blade screwdriver to carefully pry off the glass lens at the top edge of the lens,
and set aside. Reach into the lamp housing and pull out the old light bulb.
4. Before installation, it is very important to clean the new bulb carefully with a clean, soft cloth
or tissue paper. Grease, fingerprints, or oils in your skin can leave a residue on the glass surface
of the bulb which will create a hot-spot. The bulb will eventually crack at this hot-spot.
5. While still using a cloth or tissue paper, insert the new bulb in the lamp housing. Push the bulb
fully into the socket.
6. Re-install the glass lens taking note of the cutout in the glass which aligns with the bulb socket.
7. Restore the power and check if the new bulb is working.
8. If the drawer was removed, re-install it.
CUTOUT
IN LENS
BULB

EN
©2021 Hestan Commercial Corporation
15
TROUBLESHOOTING
Repairs must only be performed by specialized and qualified personnel. Any repair work not
performed by professional personnel may cause damage to the appliance for which Hestan will not
be liable.
The following problems can be checked by the consumer without the assistance of the Service
Department.
THE DRAWER IS NOT HOT ENOUGHTHE DRAWER IS NOT HOT ENOUGH
Make sure that:
• The appliance is turned on;
• The correct temperature has been set;
• The opening of the ventilation fan is not blocked by plates or other large obstructions;
• The drawer has had sufficient time to heat up.
THE DRAWER DOES NOT GET WARMTHE DRAWER DOES NOT GET WARM
Is it turned on?
Is there a power outage or has the circuit-breaker tripped?
Can you hear the fan running?
• If the fan is running then the heating system should be working. The fan is always running
while the heating element cycles on and off to maintain the proper temperature inside the
drawer. Obviously on low temperatures, it will cycle less frequently.
• In rare circumstances if there is still no heat, the element may have exceeded a safe temperature
and was cut-off automatically. The element will reset itself after a short time. If this problem
persists, contact Hestan Customer Care.
• If the interior light comes on, and the fan still does not run, the fan may be obstructed in some
way. Contact Hestan Customer Care. Do not attempt to dismantle the appliance in any way to
remove obstructions.

EN
©2021 Hestan Commercial Corporation
16
INSTALLATION
BEFORE YOU BEGINBEFORE YOU BEGIN
IMPORTANT: Save these instructions for the local electrical inspector use.
INSTALLER: Please leave this manual with owner for future reference.
OWNER: Please keep this manual for future reference.
If the information in this manual is not followed exactly, electric shock, a fire or explosion may
result causing property damage, personal injury or death.
Please read these instructions COMPLETELY AND CAREFULLY. They will save you time and
effort and help to ensure optimum drawer performance.
Be sure to observe all CAUTIONS and WARNINGS. These installation instructions are intended
for use by a qualified installer.
• Assure that electrical installation is adequate and in conformance with National Electrical
Code, ANSI/ NFPA 70 (latest edition), or Canadian Electrical Code, part 1 C22.1 (latest edition)
and all local codes and ordinances. These shall be carefully followed at all times.
TOOLS YOU WILL NEEDTOOLS YOU WILL NEED
The following tools are needed to install your new warming drawer:
• Tape measure and straightedge or ruler
• Pencil
• Phillips screwdriver
• Level
• Hand or saber saw
• 1” [2,5 cm] diameter hole saw
• Drill and drill bits
• Safety gloves and goggles
• Volt meter (0-250VAC)
PACKAGINGPACKAGING
Remove all tape and packaging before using the warming drawer.
Destroy the packaging after unpacking the drawer following the rules in force in your locale.
Never allow children to play with packaging material.

EN
©2021 Hestan Commercial Corporation
17
INSTALLATION
(continued)
POWER REQUIREMENTSPOWER REQUIREMENTS
This appliance is designed to use a grounded receptacle, 120 VAC Single Phase, 60 Hz, with a
current rating as shown in the model number listing on page 5. When installed outdoors, it must
be plugged into a Ground Fault Circuit Interrupter (GFCI) protected circuit.
Have the installer show you where the electric circuit breaker is located so you know how to shut
off the power to this appliance.
The appliance is equipped with a flexible electrical supply cord with a three-prong grounding plug.
It is imperative that this plug be connected to a properly grounded three-prong receptacle. If the
receptacle is not the proper grounding type, contact an electrician. Do not remove the grounding
prong from this plug.
Power Requirement
Voltage 120 Volts, 60 Hz
Current 7.4 Amperes
Consumption 888 Watts
CHOOSING DRAWER LOCATIONCHOOSING DRAWER LOCATION
Carefully select the location where the warming drawer will be placed.
• It should be located for convenient use in the kitchen. When used outdoors, it is recommended
to apply sealant to the outside of the case where it meets your outdoor cabinet/island structure
to prevent water intrusion. There is also a gasket on the drawer face to prevent water intrusion
at the front of the drawer.
• Make sure that electrical power can be provided to the location selected. If possible, the
receptacle should be accessible after the drawer is installed, so that the drawer can be
unplugged and plugged in after installation. The cord is about 47” [120 cm] long.
PREPARATIONPREPARATION
1. See drawings on the following pages for clearance and cutout dimensions
2. The warming drawer support surface must be a minimum 3/4” [19 mm] thick plywood platform.
It must support 100 lbs. [45 kg]. If the unit is installed outdoors, the platform should be made
of pressure-treated or marine-grade plywood, or other materials resistant to moisture and
insect damage.
3. The platform must be solid, level and flush with the bottom of the cabinet cutout. Additional
interior structures (side walls, etc.) may be needed to support this platform.
4. The cabinet must be secure against tipping when the drawer is opened. If necessary, install
additional bracing at the rear of the cabinet to prevent the cabinet from tipping away from the
wall when the drawer is opened.
5. For best performance results make sure the platform is level before placing the warming
drawer. Use shims under the unit as needed to level it. There is no way to level the warming
drawer after it has been installed.
• If the installation is not level, the door may slide open or not seal tightly, allowing heat to
escape, or water to enter.
CAUTION
Use extreme caution when moving or installing the drawer. It is very
heavy.
NOTICE
• DO NOT LIFT THE WARMING DRAWER BY THE DRAWER HANDLE.
• Be very careful when moving or installing the warming drawer to avoid damage to the frame or
damage to the cabinets.
• If installing the warming drawer below another product, refer to that product’s literature for
any installation or clearance requirements.

EN
©2021 Hestan Commercial Corporation
18
WARMING
DRAWER
CUTOUT
ELECTRICAL
LOCATIONS
ADJACENT
CABINET
OPENING
9 1
4
36"
REF.
"
28 16
"
24"
7
Typical outdoor installation.
[72.2 cm]
[61 cm]
[23.5 cm]
[91.4 cm]
INSTALLATION
(continued)
10-3/8"
[ 26.4 cm]
29-5/8” to 29-7/8"
[ 75.4 to 75.8 cm]
23"
[ 58.1 cm]
8-1/4"
[ 20.8 cm]
9-1/16"
[ 23 cm]
23"
[ 58.3 cm]
[ 75 cm]
29-1/2"
[ 70.7 cm]
27-7/8"
10-3/8"
[ 26.4 cm]
24-3/4"
[ 63.1 cm]
29-7/8"
[ 75.8 cm]
9-1/16"
[ 23 cm]
23"
[ 58.3 cm]
[ 75 cm]
29-1/2"
[ 70.7 cm]
27-7/8"
10-3/8"
[ 26.4 cm]
29-5/8"
[ 75.4 cm]
23-3/4"
[ 60.1 cm]
9-1/16"
[ 23 cm]
23"
[ 58.3 cm]
[ 75 cm]
29-1/2"
[ 70.7 cm]
27-7/8"
PRODUCT DIMENSIONS
CUTOUT DIMENSIONS:
28-⁷⁄16” X 9-¹⁄4” X 24” DEEP
[72.2 X 23.5 X 61 cm]

EN
©2021 Hestan Commercial Corporation
19
INSTALLATION
(continued)
Typical indoor installation
beneath a wall oven.
HOLES FOR
MOUNTING
FRAME
PLACING THE DRAWERPLACING THE DRAWER
NOTE: The unit is heavy and requires at least two people or proper equipment to move. Verify
there is room to run the power cord before placing the drawer without pinching it.
1. As shown on the previous page, the electrical outlet may be located directly behind the unit, or
in a nearby adjacent cabinet opening. If the plug will not be accessible after placing the unit,
turn power OFF at the service panel. Lock service panel to prevent power from being turned
ON accidentally.
2. Run the cord through to the outlet.
3. Position the drawer so that it is directly centered and slide the warming drawer assembly into
the cutout until it is flush with cabinet face.
4. Securely fasten the drawer mounting frame to the cabinet in all four corners using the wood
screws provided.
CAUTION
Failure to secure the warming drawer could result in the drawer moving
or tipping during use and causing damage to the drawer or cabinets or
personal injury.
5. Turn the power back on or plug in the unit.
6. Test operation of the unit (see page 9). Observe that the interior light comes on. Operate the
unit for approximately 5 minutes, then check for warmth.
7. After verifying that the drawer is warming up, turn the unit OFF.
• Make sure that the customer knows how to disconnect the power to the warming drawer at
the circuit breaker or fuse box in case of an emergency.
Table of contents
Languages:
Other hestan Warming Drawer manuals


Popular Warming Drawer manuals by other brands

BRAVILOR BONAMAT
BRAVILOR BONAMAT WHK Series user manual

GE
GE PJ7000SFSS Dimensions and installation information

Monogram
Monogram ZDK910 Use and care guide

ROSIERES
ROSIERES RDCT 140/1MIN instruction manual

Monogram
Monogram ZKD910 owner's manual

Fisher & Paykel
Fisher & Paykel WDU/WDV series Installation instructions and user guide


 Warming Drawer installation instructions")


