Hestia POWER DIVAN User manual

ASSEMBLY
INSTRUCTIONS
Made in England
Made in England
POWER DIVAN
5FT VERSION ASSEMBLY INSTRUCTIONS
OFFICE CODE:
LEAFLET - HESTIA - POWER-DIVAN
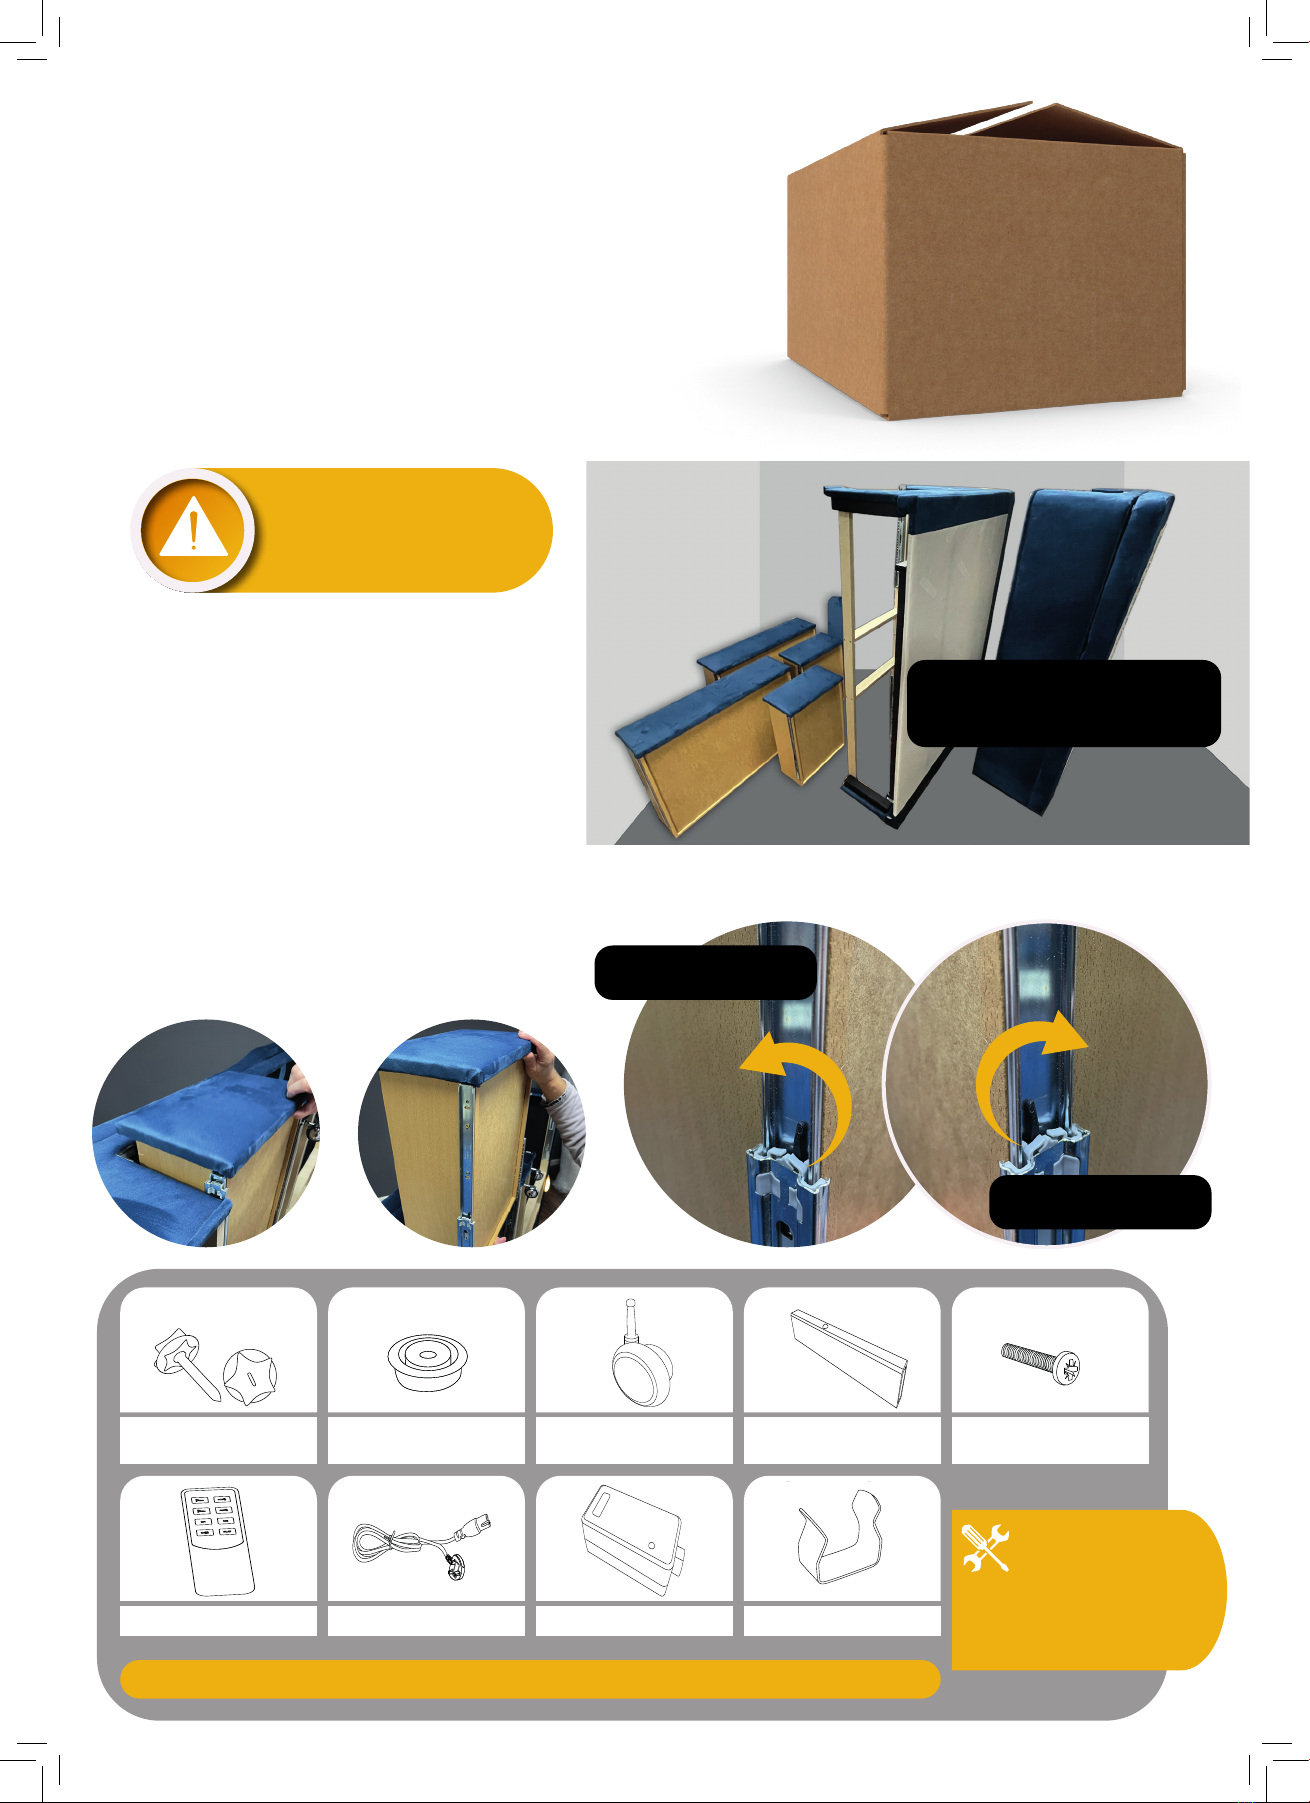
1. Unpack in the room the bed is
intended to be used, remove all
packaging and dispose of carefully,
keeping polythene out of the reach
of children.
Introduction
and components
The following tools are
required for this assembly
1 x 13mm Spanner
1 x Cross Screwdriver
(also known as a Phillips)
Tools required
Imperial 8 inch 3'0 & 2'6
PACKING BAG
FIXING-SCREW-4.0X40 = x4
For securing kframe in place
FIXING-M8HBBOLTS-75 = x4 FIXING-M8HBWASHER = x8
LEG-WF5411-COUNTRY-OAK = X4
MRB-SMALL-SQUARE-COATED = x1
FIXING-M8HBBOLTS-75
= x4
Imperial 8 inch 3'0 & 2'6
PACKING BAG
FIXING-SCREW-4.0X40 = x4
For securing kframe in place
FIXING-M8HBBOLTS-75 = x4 FIXING-M8HBWASHER = x8
LEG-WF5411-COUNTRY-OAK = X4
MRB-SMALL-SQUARE-COATED = x1
FIXING-M8HBWASHER
= x8
Power Divan - 3ft/4ft6/5ft/6ft
PACKING BAG
Assembly Instructions,
Guarantee and Care Guide
ADIVISION OF
Furmanac
furmanac.com
LEAFLET-HESTIA-POWER-DIVAN= x1
FIXING-M8HBWASHER = x4
FIXING-M8HBBOLTS-75 = x2
HANDSET - TRANSFORMER - PWR CABLE
BELOW TO BE PACKED IN HEAD END ONLY
PLACE IN EACH HALF
CASTOR-SILVER-
50MM-SHEP-ME = x4
MOTOR-PD-REMOTE-8 = X1 MOTOR-PD-TRANSOFORMER
X1
MOTOR-PD-CABLE-PWR = X1
PD-MEC-CONNECTOR = X1
CASTOR-SILVER-
50MM-SHEP-ME = x8
Power Divan - 3ft/4ft6/5ft/6ft
PACKING BAG
Assembly Instructions,
Guarantee and Care Guide
ADIVISION OF
Furmanac
furmanac.com
LEAFLET-HESTIA-POWER-DIVAN= x1
FIXING-M8HBWASHER = x4
FIXING-M8HBBOLTS-75 = x2
HANDSET - TRANSFORMER - PWR CABLE
BELOW TO BE PACKED IN HEAD END ONLY
PLACE IN EACH HALF
CASTOR-SILVER-
50MM-SHEP-ME = x4
MOTOR-PD-REMOTE-8 = X1 MOTOR-PD-TRANSOFORMER
X1
MOTOR-PD-CABLE-PWR = X1
PD-MEC-CONNECTOR = X1
MOTOR-PD-
TRANSOFORMER X1
Power Divan - 6ft TWIN
PACKING BAG
Assembly Instructions,
Guarantee and Care Guide
ADIVISION OF
Furmanac
furmanac.com
LEAFLET-HESTIA-POWER-DIVAN= x1
FIXING-M8HBWASHER = x4
FIXING-M8HBBOLTS-75 = x2
HANDSET - TRANSFORMER - PWR CABLE
BELOW TO BE PACKED IN HEAD END ONLY
PLACE IN EACH HALF
CASTOR-SILVER-
50MM-SHEP-ME = x4
MOTOR-PD-REMOTE-8 = X1 MOTOR-PD-TRANSOFORMER
X1
MOTOR-PD-CABLE-PWR = X1
PD-MEC-CONNECTOR = X1
U-CLIP-METAL = x1
ONLY ON TWIN
FIXING-POZICSK-M6X60 = x2
U-CLIP = X1
ONLY ON TWIN
Power Divan - 3ft/4ft6/5ft/6ft
PACKING BAG
Assembly Instructions,
Guarantee and Care Guide
ADIVISION OF
Furmanac
furmanac.com
LEAFLET-HESTIA-POWER-DIVAN= x1
FIXING-M8HBWASHER = x4
FIXING-M8HBBOLTS-75 = x2
HANDSET - TRANSFORMER - PWR CABLE
BELOW TO BE PACKED IN HEAD END ONLY
PLACE IN EACH HALF
CASTOR-SILVER-
50MM-SHEP-ME = x4
MOTOR-PD-REMOTE-8 = X1 MOTOR-PD-TRANSOFORMER
X1
MOTOR-PD-CABLE-PWR = X1
PD-MEC-CONNECTOR = X1
MOTOR-PD-CABLE-PWR = X1
Power Divan - 3ft/4ft6/5ft/6ft
PACKING BAG
Assembly Instructions,
Guarantee and Care Guide
ADIVISION OF
Furmanac
furmanac.com
LEAFLET-HESTIA-POWER-DIVAN= x1
FIXING-M8HBWASHER = x4
FIXING-M8HBBOLTS-75 = x2
HANDSET - TRANSFORMER - PWR CABLE
BELOW TO BE PACKED IN HEAD END ONLY
PLACE IN EACH HALF
CASTOR-SILVER-
50MM-SHEP-ME = x4
MOTOR-PD-REMOTE-8 = X1 MOTOR-PD-TRANSOFORMER
X1
MOTOR-PD-CABLE-PWR = X1
PD-MEC-CONNECTOR = X1
MOTOR-PD-REMOTE-8 = X1
Power Divan - 3ft/4ft6/5ft/6ft
PACKING BAG
Assembly Instructions,
Guarantee and Care Guide
ADIVISION OF
Furmanac
furmanac.com
LEAFLET-HESTIA-POWER-DIVAN= x1
FIXING-M8HBWASHER = x4
FIXING-M8HBBOLTS-75 = x2
HANDSET - TRANSFORMER - PWR CABLE
BELOW TO BE PACKED IN HEAD END ONLY
PLACE IN EACH HALF
CASTOR-SILVER-
50MM-SHEP-ME = x4
MOTOR-PD-REMOTE-8 = X1 MOTOR-PD-TRANSOFORMER
X1
MOTOR-PD-CABLE-PWR = X1
PD-MEC-CONNECTOR = X1
PD-MEC-CONNECTOR
= X2
Power Divan - 3ft/4ft6/5ft/6ft
PACKING BAG
Assembly Instructions,
Guarantee and Care Guide
ADIVISION OF
Furmanac
furmanac.com
LEAFLET-HESTIA-POWER-DIVAN= x1
FIXING-M8HBWASHER = x4
FIXING-M8HBBOLTS-75 = x2
FIXING-POZICSK-M6X60 = x2
HANDSET - TRANSFORMER - PWR CABLE
BELOW TO BE PACKED IN HEAD END ONLY
PLACE IN EACH HALF
CASTOR-SILVER-
50MM-SHEP-ME = x4
MOTOR-PD-REMOTE-8 = X1 MOTOR-PD-TRANSOFORMER
X1
MOTOR-PD-CABLE-PWR = X1
PD-MEC-CONNECTOR = X1
FIXING-POZICSK -
M6X60 = X4
Some stages of this Bed
Assembly will require two
people to hold and lift
components that maybe heavy.
pLEASE NOTE
1
1
2
2
3
3
4
4
Left Hand Side
Right Hand Side
Your bed will be delivered with each
drawer in place for transport.
It will be necessary to remove the
drawers to complete the next steps
- To remove the drawers, slide each
drawer towards you and slide the black
bracket in the directions shown in
image 3 and 4.
Place the drawers to one side until the
nal steps.
YOUR BED WILL BE DELIVERED
WITH EACH DRAWER IN PLACE
FOR SAFE DELIVERY
PLEASE NOTE CONTENTS ARE SUPPLIED IN TWO BAGS - CONTENT QTY IS COMBINED TOTAL

With the Head and Foot base parts
of the bed laying on one side, place
the two PD-MEC-CONNECTORS into
position. These are only nger tight
until both are in place.
Repeat for the other PD-MEC-CONNECTOR,
then tighten with 13mm spanner, make sure
that you tighten all the bolts whilst base parts
are pushed tightly together.
Fit the chrome castors in
the pack to your base. Eight
positions as shown in diagram,
please make sure that each
castor is completely into the hole
(you will feel it click)
2. Fixing the Base Parts together
3. Connect and secure with spanner
4. Fit the Chrome Castors
into the Base
Please Note: this step will require two
people and requires lifting.
A
A
E
E
B
B
F
F
1
1
C
C
D
D
2
2

Connect the two plugs that are positioned on
the “Foot-End” base unit to the controller box
as shown. Please Note that the connecting plugs
have different plugs - so you can’t get these
mixed up.
Connect the power pack and power on. This is required to
lift and open the foot end, this will make it easier to x the
mattress retainer in place - shown in the image below.
5. Connecting the electrics
6. Connecting to power and t the Mattress retainer
A
A
B
B
1
1
2
2
Open the Foot end
to gain space
Screw the bolts back
to secure in place
3
3
Repeat on the
other bracket
Guide
for the Spirit Upgrade Features Bed electrics
Connect
your remote to the bed
USB
CONTROL
BOX
MOTOR UNIT
PRESS TOP TWO
BUTTONS ON
REMOTE TO PAIR
CONNECT THE
CONTROLLER
CONNECT THE 9V
BATTERY
This is an important
back up power
source.
UPGRADE SPIRIT BED
CONNECT POWER
TO YOUR BED
This is a male ended
connector and
connects into the
motor directly.
POWER
HE 150
CONTROL BOX
LIGHT
USB UNIT
USB UNIT
HEAD END
MASSAGE
UNIT
FOOT END
MASSAGE
UNIT
PRESS BUTTON
TO ACTIVATE
PLUG INTO
SOCKET AND
POWER ON
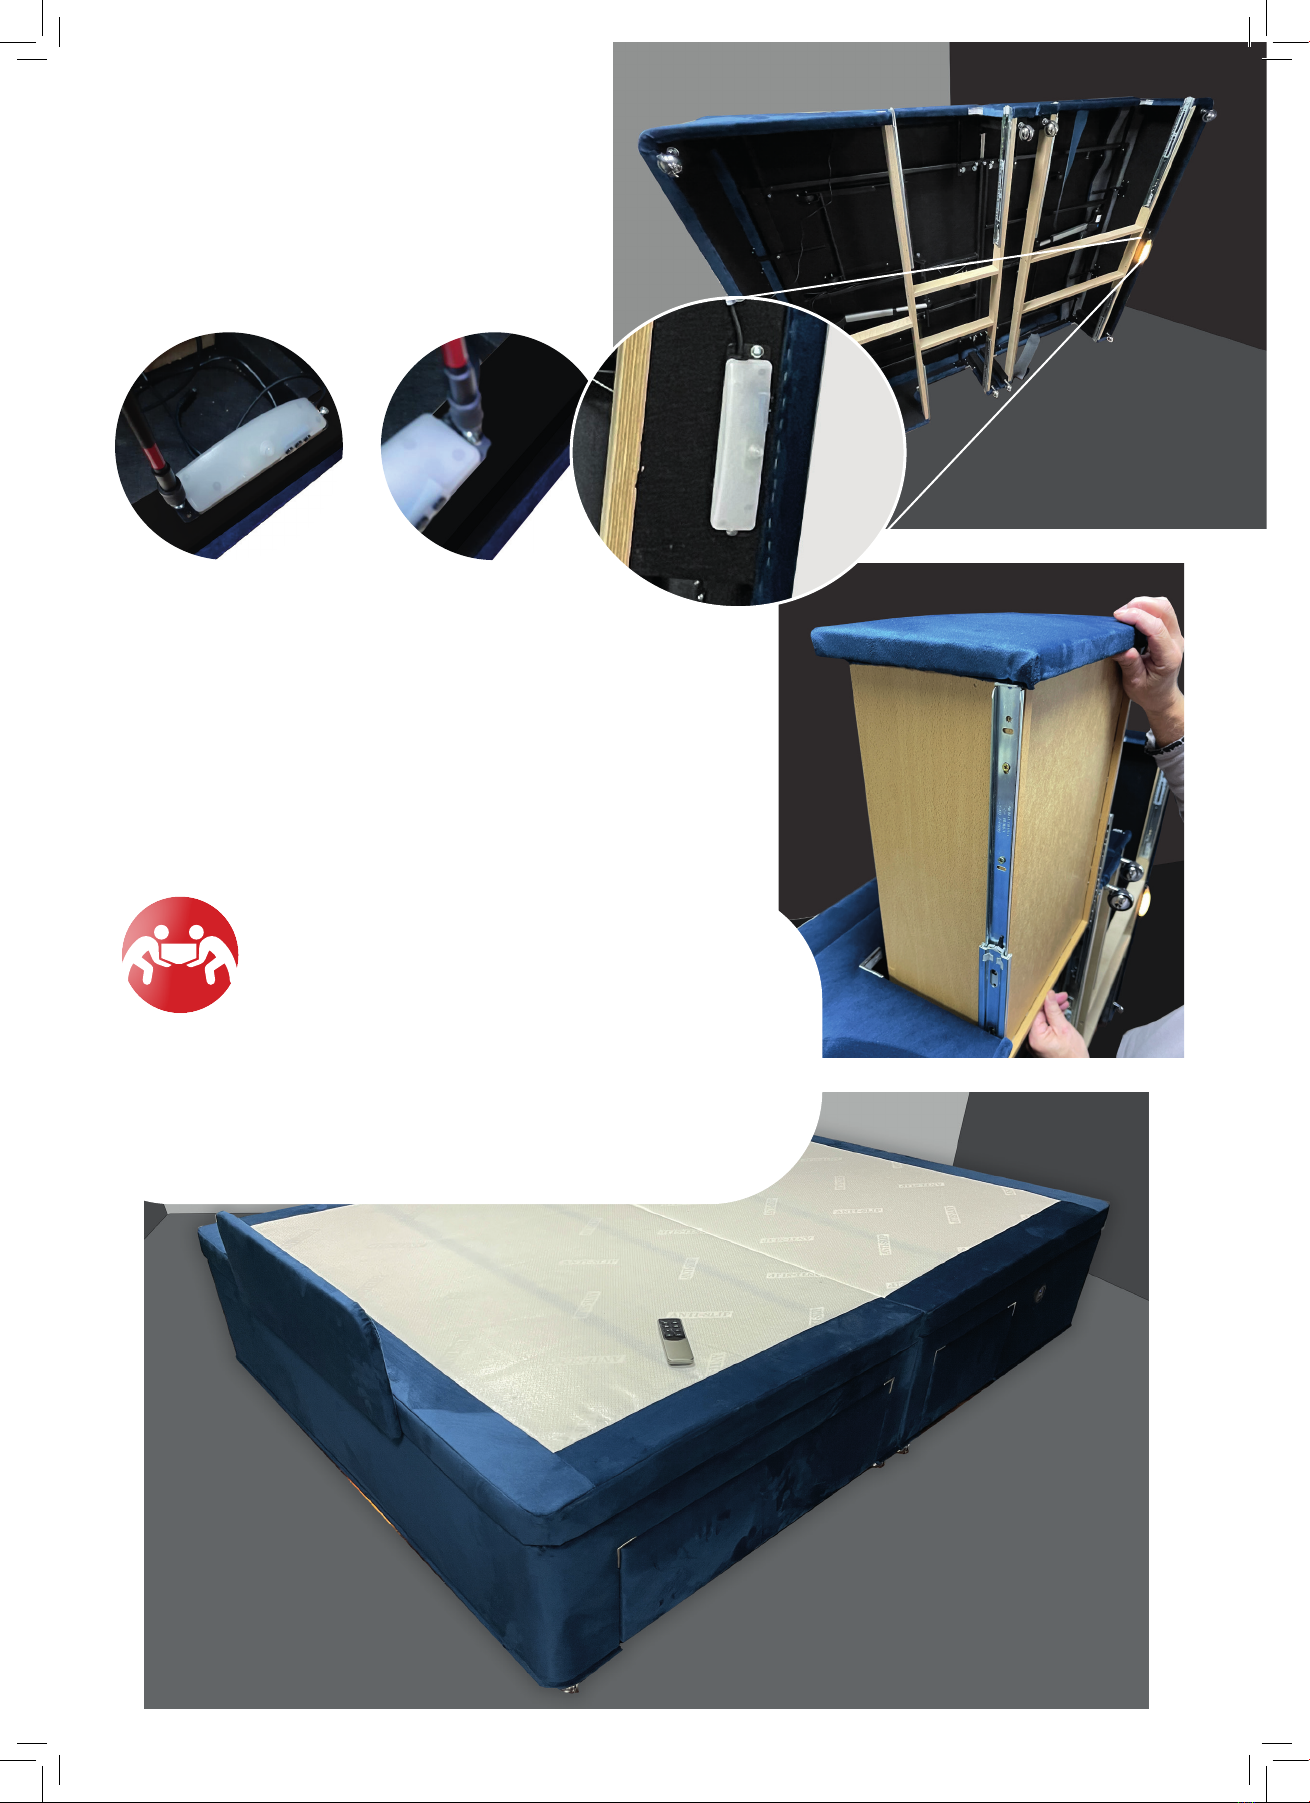
8. Turn the base on to the oor
Before you lower the Base onto the
oor, place the two drawers into place.
8. Lower the drawers in place.
• This step requires two people
Rotate the base onto the oor, and place into position. Fit the
other two drawers into place. Your Power Divan is now ready
for your mattress to be placed onto the bed base.
Please Note: this step will require two
people and requires lifting.
Fix the Light into place using a cross
(phillips) screwdriver - making sure that
the connectors are linked to the control
unit.
7. Fix the light to the base unit
A
A
B
B
C
C

MAP
of the Power Divan Handset
M1 M2
FLAT
HEAD UP
Press and hold button to raise
the Head End of the Bed
FOOT END UP
Press and hold button to raise
the Head End of the Bed
HEAD DOWN
Press and hold button to lower
the Head End of the Bed
FOOT END DOWN
Press and hold button to lower
the Head End of the Bed
MEMORY ONE
Press and hold button to set
your rst memory setting
MEMORY TWO
Press and hold button to set
your rst memory setting
TORCH
Press and hold to activate the
light on back of the hanset
RESET TO FLAT
Press and hold to reset the
base to a at position

Guarantee T&Cs
Please note:
This guarantee is a back to base guarantee and we are not obliged
to repair or replace our product in the end user’s premises.
This guarantee is valid from date of delivery to our customer’s
address and we reserve right at our discretion to repair or replace
any parts that are faulty subject to the following conditions;
• The product has only being used for domestic use
• The original proof of purchase can be provided
• The product has remained with the original owner and has not
been resold or gifted
• The product has been used in accordance with the care and
safety guidelines outlined in this document
• The product has not been modified or attempted to be repaired
by any person not authorised by Furmanac
• For the complete terms and conditions please visit
www.furmanac.com
Making a Claim
• The Contract of Sale exists between you and the retailer. Consequently, if you have any concerns, please
contact your retailer in the first instance, giving proof of purchase and outlining the nature of your query.
If the warranty conditions have been satisfied, the retailer will then liaise with Furmanac on your behalf.
Any replacement, repair or refund during this period can only be obtained from your retailer under their terms
and conditions of sale.
• For electrical manufacturing faults within 7 years, Furmanac will provide replacement parts to the retailer in
to be able to repair the bed. For other manufacturing faults within 7 years, we will discuss with the retailer
whether a repair by a Furmanac technician or replacement will be offered. Whether your Furmanac bed is
repaired or replaced will be at our sole discretion.
• If you find that the retailer you purchased your bed from is no longer in business then please call
01384 408844. Please have details regarding date of purchase, product name and size along with details
of the retailer prior to contacting us. Our dedicated service team will then be able to advise you accordingly.
Your Furmanac Guarantee
We are delighted that you have bought one of Furmanac’s British, quality hand made beds. Don’t forget,
to obtain the full, 7 year guarantee you must register your product online. To do this, please visit www.
furmanac.com/registermyguarantee and complete the online form within 30 days of delivery to your
address.
Your upholstered bed frame is provided with a standard 1 Year Guarantee, protecting you against
manufacturing defects. When you register for your guarantee online this will be extended to our 7 Year
Guarantee. If you feel that your product has developed a fault within your guarantee period then please
follow the process below. However, prior to starting this procedure Furmanac strongly recommends
reviewing all the information on the following pages to confirm that the issue is in fact a manufacturing
fault.

Upholstery Care Guide
This guarantee does not cover the general wear and tear of fabrics. Any claims for upholstery faults outside the
realms of general wear and tear. Please ensure the following guidelines have been adhered to as failure to do so will
invalidate your guarantee.
Major cleaning of fabric must be conducted by an upholstery specialist
A multitude of fabrics consisting of different materials, fibres and constructions make up the Furmanac swatches.
As a result of this it is difficult to provide generalised cleaning instructions, therefore it is recommended that any
major cleaning is conducted by an upholstery specialist.
Minor stains
Some stains can be removed by means of a damp (not over wet) cloth and soapy water or mild detergent if
necessary. It is recommended that any chemicals are pretested in an inconspicuous area of the product. After
cleaning the test area please check the compatibility of the fabrics used, specifically monitoring if any colours have
faded or any shrinkage has occurred. If a ring remains around the stain after cleaning, you’ll need to deep clean the
entire product. For more stubborn stains, please consult a professional cleaning company.
Third Party Treatments
Furmanac will not accept liability for upholstery problems caused by any third parties when applying fabric
protection.
Fabric Fading
To reduce fabric fading avoid letting direct sunlight on product by using blinds or curtains.
Spillages
In the event of a spillage the surface must first be blotted dry with an absorbent colour fast cloth or plain kitchen
roll. Avoid using coloured towels or printed paper towels as they may transfer dye or ink to the upholstery.
• DO NOT apply excessive pressure / rub the spillage as this could permanently damage the fabric.
• If a large amount is spilled, remove as much as possible with clean towelling, a scraper or spoon; blot up the
rest, then treat any remaining stains in the same manner as a minor clean.
• Please note fabrics with a high cotton content are at risk of becoming lighter after spot cleaning.
Pile Crush
All pile fabrics, including Chenilles, are subject to a certain degree of shading or ‘pile crush’. This is not a fabric
fault, but the effect of ‘pile crush’ can be minimised (not eliminated) by using a soft brush to lightly brush the pile in
a different direction over areas that show signs of wear.
Table of contents
Other Hestia Indoor Furnishing manuals


Popular Indoor Furnishing manuals by other brands

Regency
Regency LWMS3015 Assembly instructions

Furniture of America
Furniture of America CM7751C Assembly instructions

Safavieh Furniture
Safavieh Furniture Estella CNS5731 manual

PLACES OF STYLE
PLACES OF STYLE Ovalfuss Assembly instruction

Trasman
Trasman 1138 Bo1 Assembly manual

Costway
Costway JV10856 manual


