Heusinkveld Sim Pedals Sprint Baseplate User manual

Sim Pedals Sprint
Baseplate
product manual

You have acquired a Heusinkveld Sim Pedals Sprint
Baseplate! This product provides a solid mounting
platform for your Sim Pedals Sprint.

Pedal plate mounting:
4x M4 countersunk bolt.
4x M4 anged nut.
Heel plate mounting:
4x M3x 20mm heel rest spacer.
4x M3x 40mm heel rest spacer.
4x M3 countersunk bolt.
4x M3 anged nut.
4x M4 washer.
Pedals mounting:
12x M5x12mm bolts.
12x M5 washer.
12x M5 anged nut.
Rig mounting:
4x M5x16 bolt.
8x M5 large washer.
4x M5 nylock nut.
Tools:
1x M2 hex key.
Introduction
This is the manual for the Heusinkveld
Sim Pedals Sprint Baseplate, an optional
accessory for the Sim Pedals Sprint. We
advise you to read it thoroughly in order to
get the most enjoyment out of your pedal
set.
Table of contents
This manual has the following main sections:
- Introduction.
- Schematics.
- Installation.
Packing list
The Sim Pedals Sprint Baseplate box contains the
following:
Main parts:
2x Powdercoated C-bracket.
1x powdercoated pedal plate.
1x bead blasted heel plate.

Contact
If you have any questions which are not covered in this
manual or in the instruction videos, feel free to send us an
email at support@heusinkveld.com.
Tools
All tools required (hex keys and wrenches) to follow the
instructions are either included with the baseplate or in
the accessory box of your Sim Pedals Sprint.
The supplied ange nuts are self-gripping and don’t require
a wrench in order to keep them in place. Hold the nut with
your ngers to stop it initially rotating and the nuts should
self grip
In case they do slip, the following wrenches are needed:
5.5mm for M3 (heel rest plate).
7mm for M4 (pedal mounting plate).
8mm for M5 (pedals to mounting plate).
Videos
In the Support section of the heusinkveld.com website you
will nd tutorial videos further demonstrating a number of
the instructions shown in this manual.
Manual version & digital download
This is version 1.0 of the manual. The latest version of this
manual can always be found in the Support section at
heusinkveld.com.
Schematics
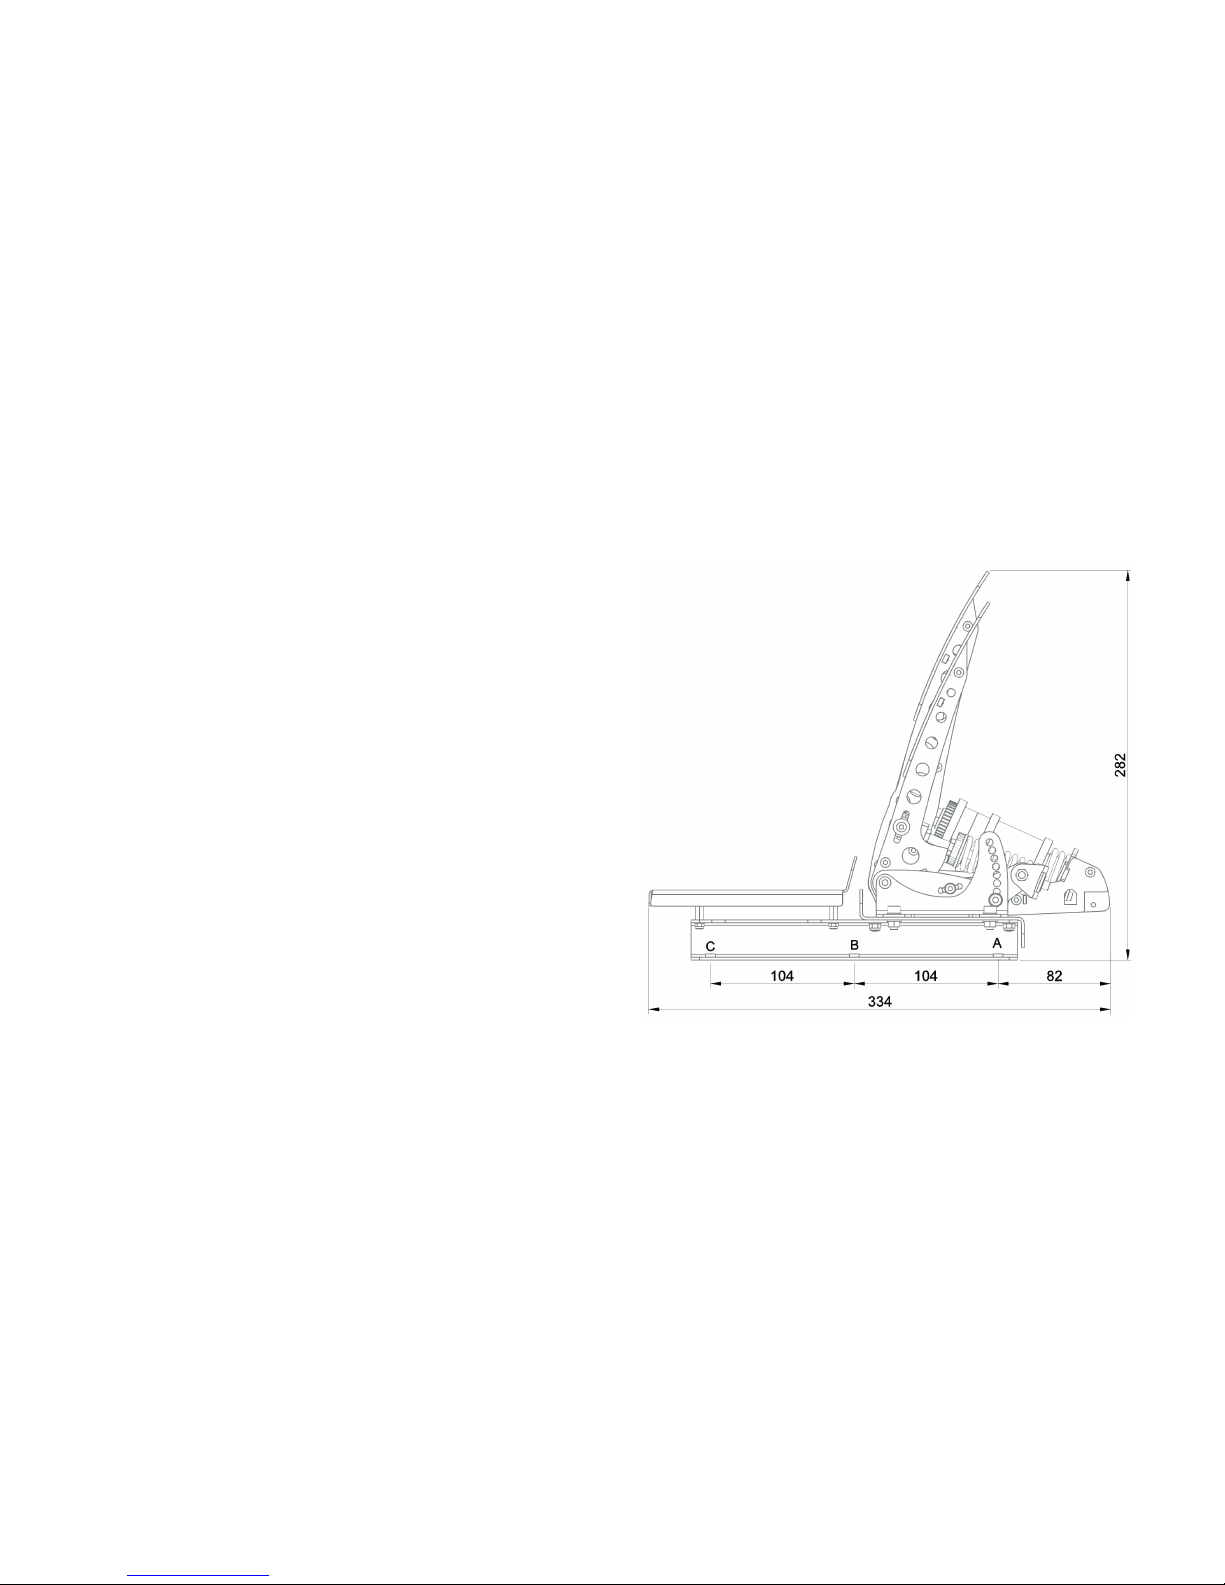
This section shows the main dimensions
of your Sim Pedals Sprint Baseplate.
All dimensions are in millimeters (mm). The bottom
mounting points for your Sim Pedals Sprint Baseplate have
a width of 235mm. This is compatible with the mounting
holes for TM T3PA and T3PA Pro (235mm) pedal sets.
Baseplate with 20mm raised heelplate and pedals installed.
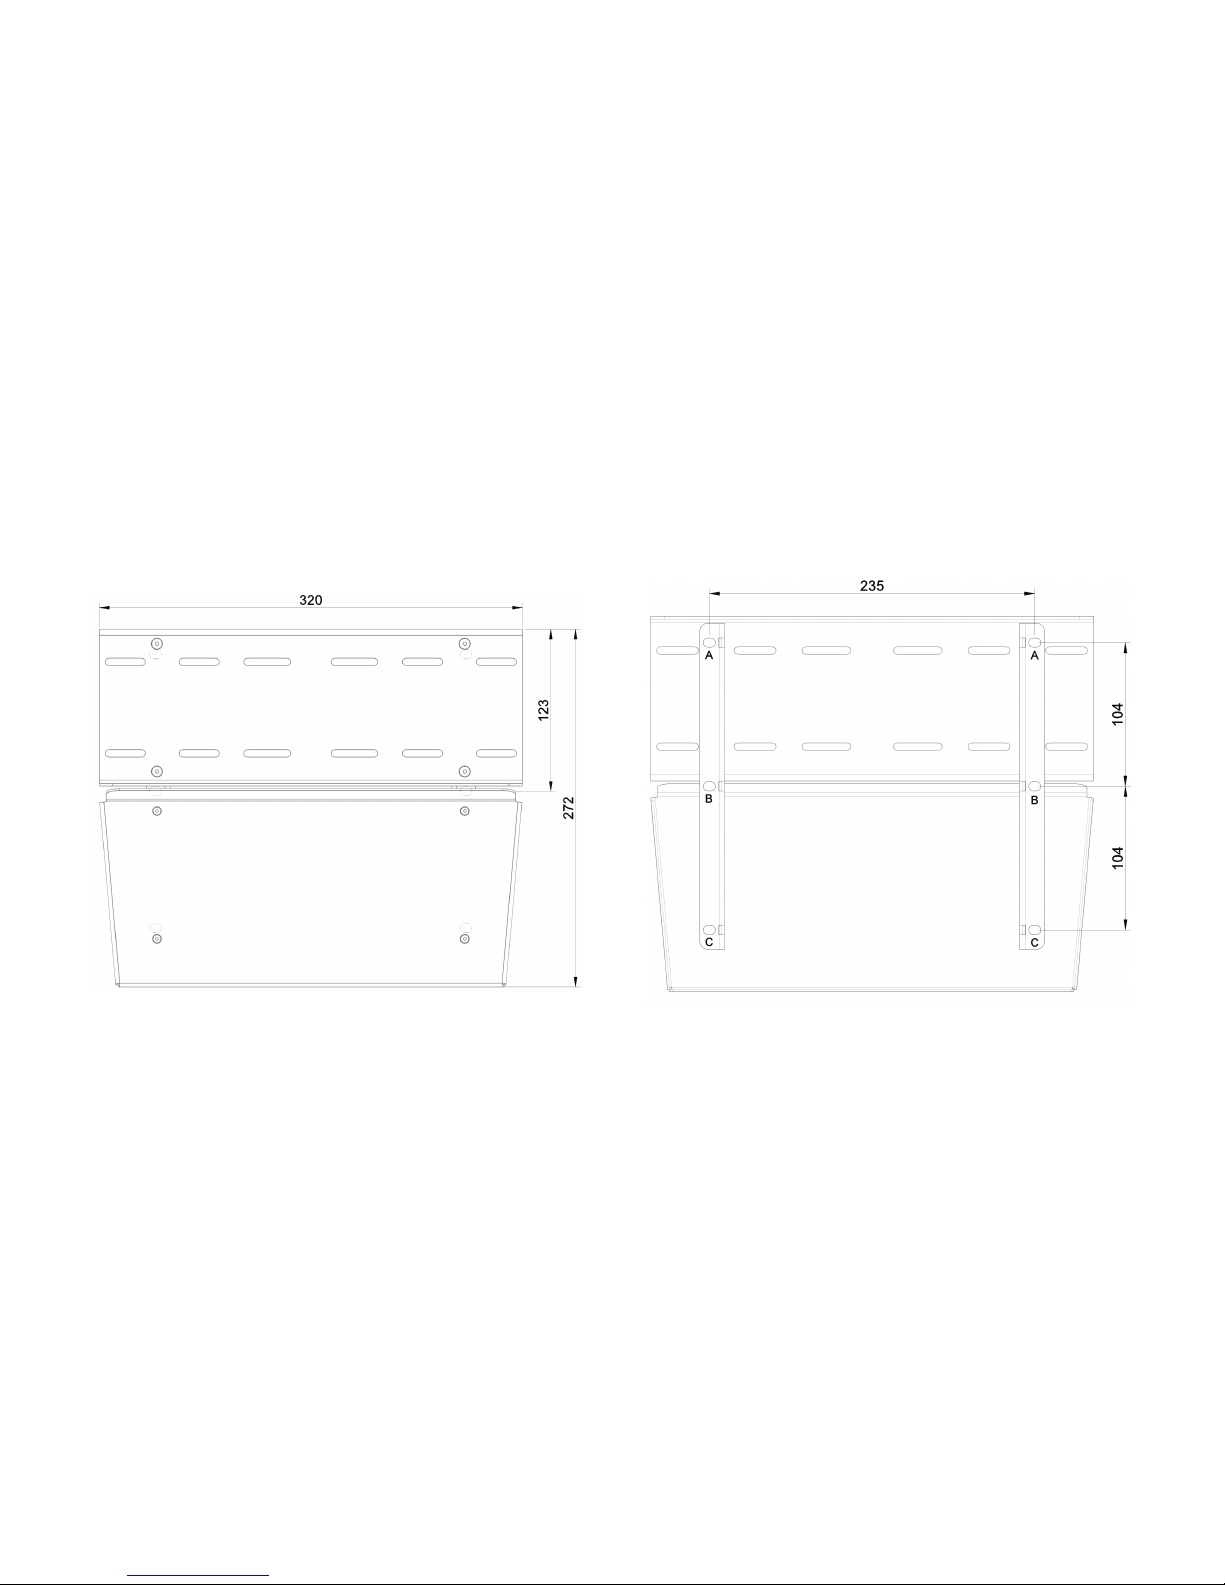
Baseplate, top view. Baseplate, bottom view.
Installation
This section explains how to assemble the
baseplate, mount the pedals and install
the assembly onto your simulator. We
recommend following the instructions in
chronological order.
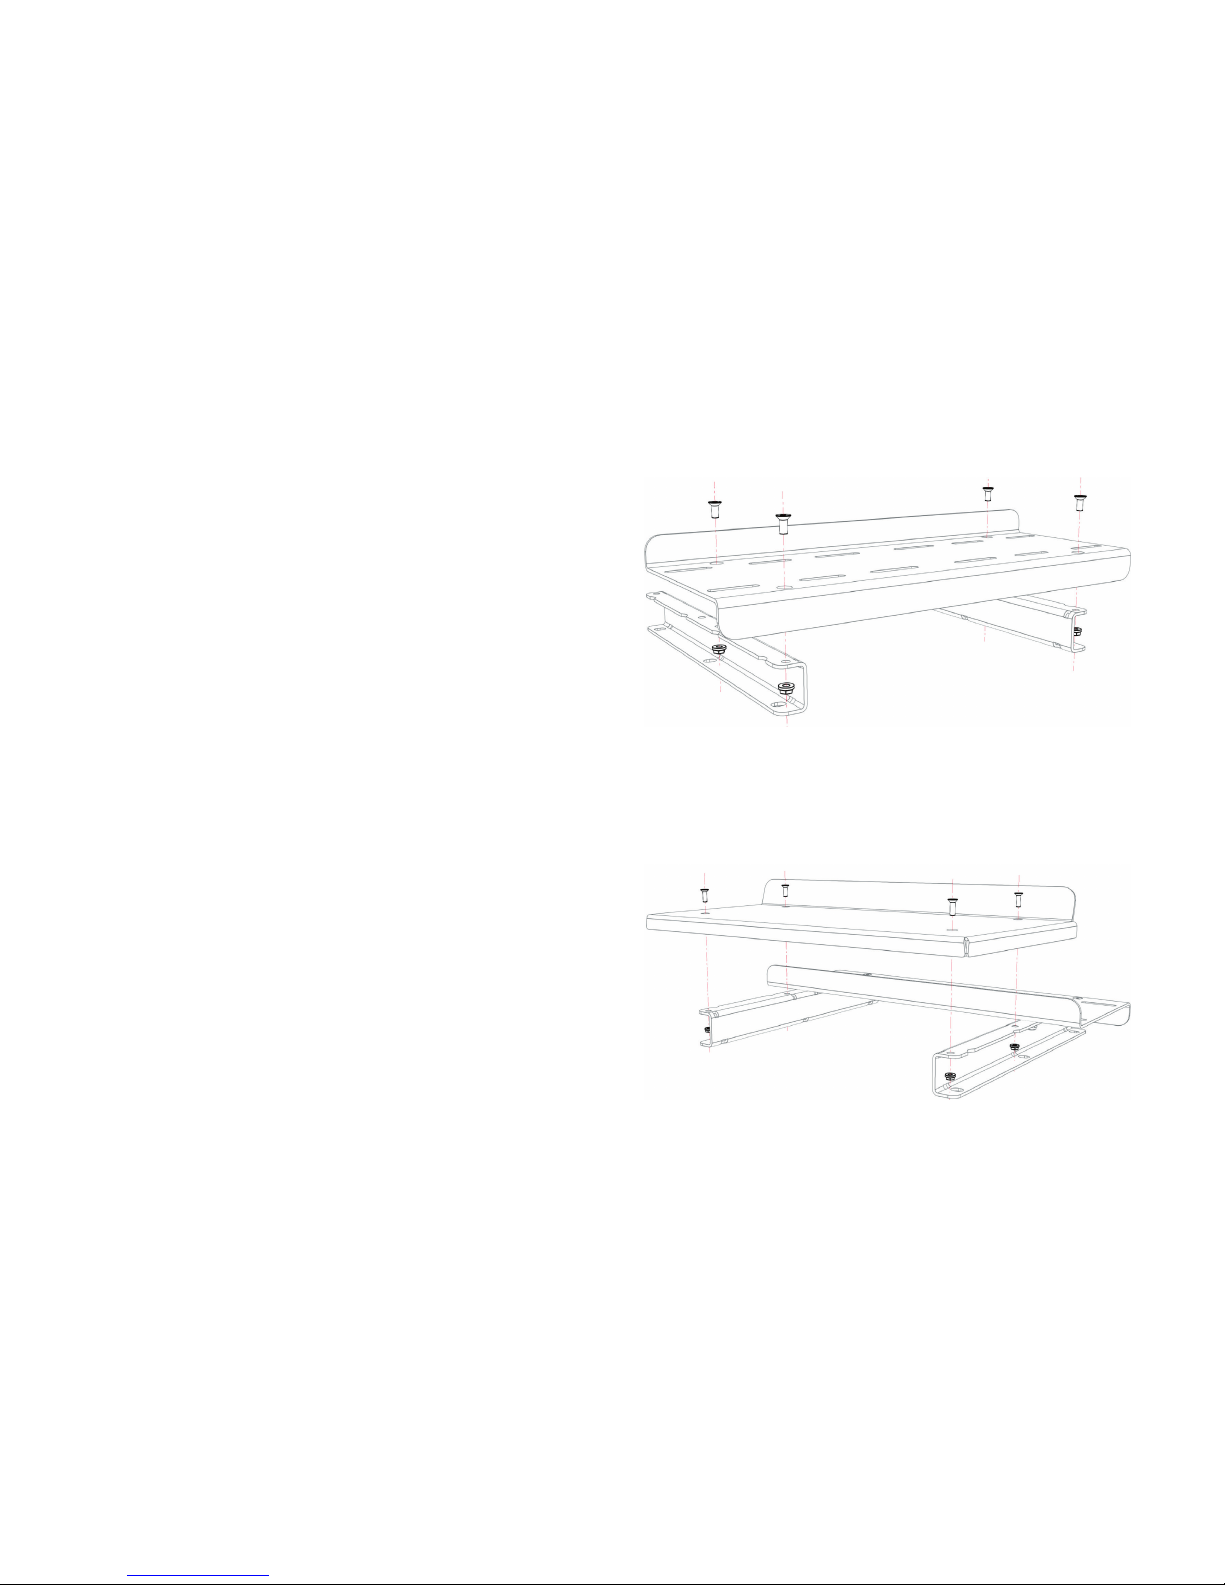
Pedal mounting plate installation
1. Locate the powdercoated pedal mounting plate and the
two C-shaped brackets.
2. Determine the correct installation: Countersunk holes
on the pedal plate should face upwards. The open side of
the C-shaped brackets should face outwards. Use two of
the four smallest holes to connect the plate to a bracket.
The four holes are symmetrical, you can use either side of
the bracket.
3. Mount the pedal plate to the brackets using four M4
recessed bolts and four M4 ange nuts.
Heel plate installation - lowest position
1. Locate the bead blasted heel plate.
2. Mount the heel plate to the brackets using four M3
recessed bolts and four M3 ange nuts.
Pedal mounting plate installation.
Heel plate installation, lowest position.

Heel plate installation - raised position
Two sets of metal spacers (20mm en 40mm length, four
pieces each) are included with your baseplate. You can use
these to increase the heigth of the heel plate. This may be
usefull if you have small feet or drive without shoes. Note
that you can also adjust the pedal plates on the pedal arm
to achieve a similar effect.
To install the heel plate in a raised position, do the
following:
1. Locate the bead blasted heel plate.
2. Choose which spacer length you want to use: 20mm or
40mm.
3. Mount the spacers to the brackets using four M3 ange
nuts.
4. Mount the heel plate to the spacers using four M3
recessed bolts and four M4 washers. One M4 washer
needs to be added between a spacer and the heelplate.
The image on the left shows the pedals in the lowest
(40mm raised heelplate and rotated pedal plates) and the
highest (low heelplate and regular positioned pedal plates)
position.
Heel plate installation, raised position.
Pedals + baseplate in lowest and highest position.

Mounting the pedals to the pedal plate
Before mounting the pedals to the pedal plate, determine
if you want to adjust the angle of the pedal arms. If yes,
this should be done now. Refer to the Sim Pedals Sprint
manual on how to adjust the pedal angle.
Each pedal is connected to the pedal plate using four M5
bolts, four washers (one underneath the head of each bolt)
and four M5 ange nuts.
Fine tuning the pedal spacing
The baseplate mounting points for the pedals are slots
allowing for lateral adjustment of individual pedals. The
dimensions of these lateral slots are 29mm for the brake
and 24mm for the throttle and clutch.
Every single pedal can also be adjusted 12,5mm backwards
and forwards through the slots in the pedal feet
themselves.
These slots allow you to ne tune the pedal spacing.
Drivers who use right foot braking may for example nd
it more convenient to have the brake pedal closer to the
throttle pedal compared to left-foot brakers. Also, in case
of heel-and-toe shifting it may be convenient to place the
throttle pedal a bit behind the brake pedal.
Mounting a pedal to the pedal plate.
Setup with 3 pedals.

Note on 2-pedal sets
Please note than in case of a 2-pedal set (no clutch) the
throttle and brake must be positioned next to eachother,
otherwise the wire to connect the throttle to the controller
in the brake may be too short.
Mounting the baseplate to your rig
We provide the following mounting hardware to mount the
baseplate to your rig:
- 4x M5x16 bolt.
- 8x M5 large washer.
- 4x M5 nylock nut.
These can be used to mount the baseplate to a drilled
metal plate with a maximum thickness of 6 mm. If you
have a different kind of mounting platform underneath
your baseplate, you need to source your own mounting
hardware.
Minimal baseplate mount (T3PA/T3PA Pro mount)
There are 3 rows of mounting holes available underneath
the baseplate. These bottom mounting points have a width
of 235mm. This is compatible with the mounting holes for
TM T3PA and T3PA Pro (235mm) pedal sets.
Setup with 2 pedals.
Mounting the baseplate to your rig - minimal mount (using two bolts).

When using the middle row of mounting holes (row B
- also see Schematics section), your baseplate + pedal
setup will be roughly similar to the ergonomics of TM T3PA
and T3PA Pro pedal sets. This may ease the setup on rigs
which have support for those pedal types. Never use the
rear row (row A) as the only mounting point.
Most solid baseplate mount
For the most solid mount, we recommend using at least 4
mounting points, ideally the rear and the front row (rows A
and C - also see Schematics section).
Mounting the baseplate - most solid mount (using four bolts).
Mounting the baseplate - most solid mount (viewed from below).

Table of contents
Other Heusinkveld Music Pedal manuals


