HEXA HSDVR3507A User manual

H.264 Network DVR
Copyright 20090by hexacctv co.,Ltd
H.264 Network DVR User Manual
Dec. 2009

H.264 Network DVR
Copyright 20090by hexacctv co.,Ltd
Table of Contents
CHARP.1 Product Introduction......................................................................................................... - 5 -
1.1 Overview.......................................................................................................................................... - 5 -
1.2 Features.............................................................................................................................................................................................................- 6 -
CHARP.2 Mouse and Remote Control Operation .............................................................................. - 9 -
2.1 Mouse operation ................................................................................................................................................................................................- 9 -
2.2 Remote Control Operation ............................................................................................................................................................................... - 11 -
CHARP.3 Basic Operations ............................................................................................................... - 14 -
3.1 Power on/Shut down........................................................................................................................................................................................- 14 -
3.1.1 Power on......................................................................................................................................................................................................- 14 -
3.4 Record ......................................................................................................................................................................................................- 17 -
3.4.1 Recording.............................................................................................................................................................................................- 17 -
3.4.2 Playback ...............................................................................................................................................................................................- 18 -
3.4.3 File Backup ..........................................................................................................................................................................................- 20 -
CHARP.4 Menu Operation.................................................................................................................. - 22 -
4.1 Menu Preview...........................................................................................................................................................................................- 22 -
4.2 Menu Operation........................................................................................................................................................................................- 24 -
4.2.1 System Information .............................................................................................................................................................................- 25 -
“Menu”→“SYSTEM INFO”. (Figure 4-2).....................................................................................................................................................- 25 -
4.2.2 Disk Management ................................................................................................................................................................................- 31 -
5.1 PTZ Control ..............................................................................................................................................................................................- 32 -
5.1.1 Connection...........................................................................................................................................................................................- 32 -
5.1.2 Preparation...........................................................................................................................................................................................- 32 -
5.1.3 Operation..............................................................................................................................................................................................- 32 -
5.3 Sound Monitoring .....................................................................................................................................................................................- 34 -
5.4 Alarm Control............................................................................................................................................................................................- 34 -
5.4.1 Alarm Control.......................................................................................................................................................................................- 34 -

H.264 Network DVR
Copyright 20090by hexacctv co.,Ltd
5.4.2 Clear Alarm...........................................................................................................................................................................................- 35 -
CHARP.6 System Setup ..................................................................................................................... - 37 -
6.1 System Setup ...........................................................................................................................................................................................- 37 -
6.3 Recording Setup.......................................................................................................................................................................................- 40 -
6.4 PTZ Setup ................................................................................................................................................................................................- 41 -
"Main Menu"-"System"-"PTZ Setup" (Figure 6-5) ...........................................................................................................................................- 41 -
6.5 Network Setup ..........................................................................................................................................................................................- 42 -
6.6 Alarm Setup ..............................................................................................................................................................................................- 43 -
"Main Menu"-"System"-"Alarm Setup" (Figure 6-8).........................................................................................................................................- 43 -
6.7 Video Detection Setup ..............................................................................................................................................................................- 45 -
7.1 User Account ............................................................................................................................................................................................- 50 -
7.2 Exception..................................................................................................................................................................................................- 53 -
7.3 System Maintenance ................................................................................................................................................................................- 54 -
7.5 Restore .....................................................................................................................................................................................................- 56 -
CHARP.8 Remote Network Control and Management.................................................................. - 57 -
8.1 Remote Settings .......................................................................................................................................................................................- 57 -
8.1.1 Network Security Settings ..................................................................................................................................................................- 57 -
8.1.2 Connection Settings............................................................................................................................................................................- 60 -
8.1.3 ActiveX Download Installation............................................................................................................................................................- 63 -
8.2 Remote Connection..................................................................................................................................................................................- 63 -
8.2.1 Connection...........................................................................................................................................................................................- 63 -
8.2.2 Multiple Servers Login ........................................................................................................................................................................- 67 -
8.2.3 Channel Associated Menus ................................................................................................................................................................- 67 -
8.3 Control ......................................................................................................................................................................................................- 68 -
8.3.1 Common ...............................................................................................................................................................................................- 68 -
8.3.2 Video.....................................................................................................................................................................................................- 69 -
8.3.3 Alarm.....................................................................................................................................................................................................- 70 -
8.3.4 Log ........................................................................................................................................................................................................- 71 -
8.3.5 Download .............................................................................................................................................................................................- 73 -
8.4 Setting ......................................................................................................................................................................................................- 74 -
8.4.1 Local Setting ........................................................................................................................................................................................- 75 -

H.264 Network DVR
Copyright 20090by hexacctv co.,Ltd
8.4.2 Common Setting, Encoding Setting, Record Setting, Alarm Setting, PTZ Setting, Video Detect, Video Loss, Video Blind ......- 75 -
8.5 Toolbar Introduction ..................................................................................................................................................................................- 76 -
8.5.2 Playback ...............................................................................................................................................................................................- 78 -
User can playback the local recording files, and also can remote playback the files on DVR. Click “stop” to stop playing. ...........................- 78 -
8.6 Other Operations ......................................................................................................................................................................................- 79 -
8.6.1 PTZ and Preset Control.......................................................................................................................................................................- 79 -
8.6.2 Lens Control ........................................................................................................................................................................................- 79 -
8.6.3 Window Browse Modes ....................................................................................................................................................................- 79 -
CHARP.9 FAQ...................................................................................................................................... - 80 -
Appendix A: Technical Specifications ...............................................................................................................................................................- 83 -
Appendix B: Alarm Input Interface Instruction..................................................................................................................................................- 84 -
Appendix C: Alarm Output Interface Instruction...............................................................................................................................................- 85 -

H.264 Network DVR
Copyright 20090by hexacctv co.,Ltd
Caution and Preventive Tips
Power Supply
This recorders work at 12V DC power supply, please confirm the power supply voltage before use.
Please shut down the power if you don't use it for a long time, and pull the plug out the socket.
Safety
This machine is indoor equipment ,in order to prevent the risk of short circuit or electrics shock ,don’t put it on the rain or humid environment .
In case of any solid or liquid into the DVR, please cut off the power at once, don't open it until the qualified technician examined.
It is delicate machine, it is too difficult to repair it by user themselves. If there is any problems, please ask the qualified technician to examine, or
contact the distributor.
Installation
DVR should be installed at horizontal place.
DVR shell should be grounded .
Make sure the hard disk is installed before the initial using .
Avoid opening the case or replacing the hard disk under the power state.
Recommend using the high-speed hard disk of 7200 transgenic/s or above.
Please select the appropriate installation place ,so that the air can flow free ,in order to prevent the machine overheating
The machine mustn’t be installed in those areas that near the heat source such as radiator ,or direct sunlight ,or excessive dust or mechanical
vibration areas.
CHARP.1 Product Introduction
1.1 Overview
This series standalone DVRs are high quality digital monitoring system products which are researched and designed specifically for cctv field ,which
adopt embedded processors and linux operating systems, apply of high-performance coding and decoding chipsets, bring in the most advanced IT

H.264 Network DVR
Copyright 20090by hexacctv co.,Ltd
technological achievements, such as audio codec, high capacity storage hard disk, TCP / IP network and more, which fix the code in FLASH,
making the system more stable, the image more clearer and the function more powerful.
This series of digital video recorders can be used independently, but also can be networked to form a powerful network monitoring center, which
have been widely used in different areas and sectors’ security and surveillance, such as domestic and international bank, telecommunications,
power, justice, traffic, residential area, factory, storage resources, water resources,etc. In addition, which also play an very important role in home
monitoring system.
This user manual takes 8ch standalone DVR as sample to illuminate specifically, all the figures are based on this DVR, for the operation of 4ch and
16ch DVR, please take this for reference.
1.2 Features
Realtime
Monitoring
With analog output interface and VGA
interface, support monitor output and display
output;
1/4/8/9 multi-screen monitor;
Display the real-time video stream and how
many resources be occupied per hour;
Through the channel marks to prompt the
channel status, such as recording, motion
detection, video loss, video block, alarm
trigger,etc.;
Support search the system logs local.
HDD
Built-in four SATA interfaces, max support 4pcs hard disk;
The hard disk file, including cycle coverage records and
non-cycle records ;
Adopt special format to store data,so the data can’t be
tampered,and ensure the data security;
Compression
Format
Video compression format,: H.264;
8channel video and audio input, keep video
and audio synchronization stablely.
Backup
Through USB interface (such as USB disk and movable
hard disk, etc.) to back up;
Support DVD/W to back up;
The client computer can download the file on your hard
disk through network to backup;
Multi-tasking operations: It can achieve
not only realtime recording independently
each channel,but also searching and
Network
Functions
Remote monitoring through network;
PTZ control;
Recording files search and playback;

H.264 Network DVR
Copyright 20090by hexacctv co.,Ltd
Playback
playback for single channel/four
channels,remote monitoring, record
searching and downloading;
Multi-recording modes:
manual,time,schedule,alarm linkage, motion
detection,etc. Support preview;
User can playback the recording files of DVR
through network;
It can achieve to search recording files fast
and search the recording file as types;
Multi-playback modes: slow playback, fast
playback and frame-by-frame playback;
It can display the exact time of the incident
when playback the recording file.
Changes the settings and parameters of the system or
software upgrade;
Remote alarm processing and system logs searching and
more functions;
Adopt Embedded TCP / IP protocol and linux operating
system, user can browse the system through IE browser;
Management modes: Adopt the enhanced user
management, only the qualified users can login, user can
set different users with different authorities flexible and
convenient according to their needs;
Alarm
8ch alarm input (the types of alarm can be
generated by setting the regular open or
normally closed the switch), and with video
loss alarm, motion detection alarm, the
alarm device can be a smoke detector,
temperature detectors, infrared detectors,
etc.;
With 4ch relay switch-values alarm output, it
can achieve alarm linkage and the live
lighting control conveniently;
Both the alarm input and alarm output
interfaces are with the protection circuit,
make sure that the main equipment from
damage;
Communication
Interfaces
With a special interface for the achievement of alarm input
and PTZ control;
With a standard Ethernet interface for viewing remotely
through network;

H.264 Network DVR
Copyright 20090by hexacctv co.,Ltd
PTZ Control
Support PTZ decoder through the RS485
communications;
Scalable multiple decoder protocols for the
achievement of PTZ and speed dome
control functions;
Smart Operations
Friendly Human-Computer Interaction interface, it can be
operated by mouse to achieve all functions.

H.264 Network DVR
Copyright 20090by hexacctv co.,Ltd
CHARP.2 Mouse and Remote Control Operation
2.1 Mouse operation
Click the left button of mouse and enter the fuctional menu.
Execute the operation instructed by button.
Change the status of check box or the motion detection block.
Click combination button to get the drop-down list, click on the
list of items to choose.
When at the mode of PTZ control, click the corresponding
buttons on screen to control the rotational direction of the
camera.
In the input box, you can choose the numbers, symbols,
text-transform by clicking the left mouse button on the soft
keyboard, "←" Backspace, "_" spaces.
1
Single left click
when the input type is data/number, this Numeric keypad will
pop .
"0 ~ 9" enter the number, "C" clear the current content, "←"
backspace.

H.264 Network DVR
Copyright 20090by hexacctv co.,Ltd
Real-time monitoring screen, click the right button of mouse,
there will be a pop-up menu as follows:
You can use this menu to switch the window modes of the
preview screen, start records playback, PTZ control, start
audio, set recording modes and more operations.
2 Single right click
In the mode of "Quad", click the left button of mouse, there will
be a pop-up menu as follows:
You can switch the monitoring screen in single window or four
windows, search records and play control, show or hide the
control strip.

H.264 Network DVR
Copyright 20090by hexacctv co.,Ltd
2.2 Remote Control Operation
Users can use the remote controller to control DVR,the remote control keys are distributed as follows:
Click the right button of mouse at the soft keyboard, you can
close the soft keyboard.
Click the right button of mouse at any place except the label,
edit box and buttons, you can close the current window.
Execute the special operations of the window. If user
double-click at any items of the recording file list, it will
playback the file directly.
Double-click the left button of mouse to enlarge the video
window to full-screen or restore it to multi-screens.
3 Left double-click
When at the PTZ control mode, double-click the left button of
mouse at the screen centre to enlarge the screen or restore it
to multi-screens.
Adjust the numbers;
Flip list box up and down;
4 wheel
Contol the lens zoom at the PTZ operation mode;
Hold down the left button of mouse to drag to the lower right
corner to select the motion detection area; hold down the right
button of mouse to drag to the lower right corner to cancel the
selected area.
5 Mouse drag
Drag the play progress bar forwardly or backwardly to adjust
the location of the current record displaying; drag the slider
forwardly or backwardly to adjust the parameter.

H.264 Network DVR
Copyright 20090by hexacctv co.,Ltd
1
2 3
4
56
7
8
9
10
11
12
13
14
H.264 Network DVR
Copyright 20090by hexacctv co.,Ltd
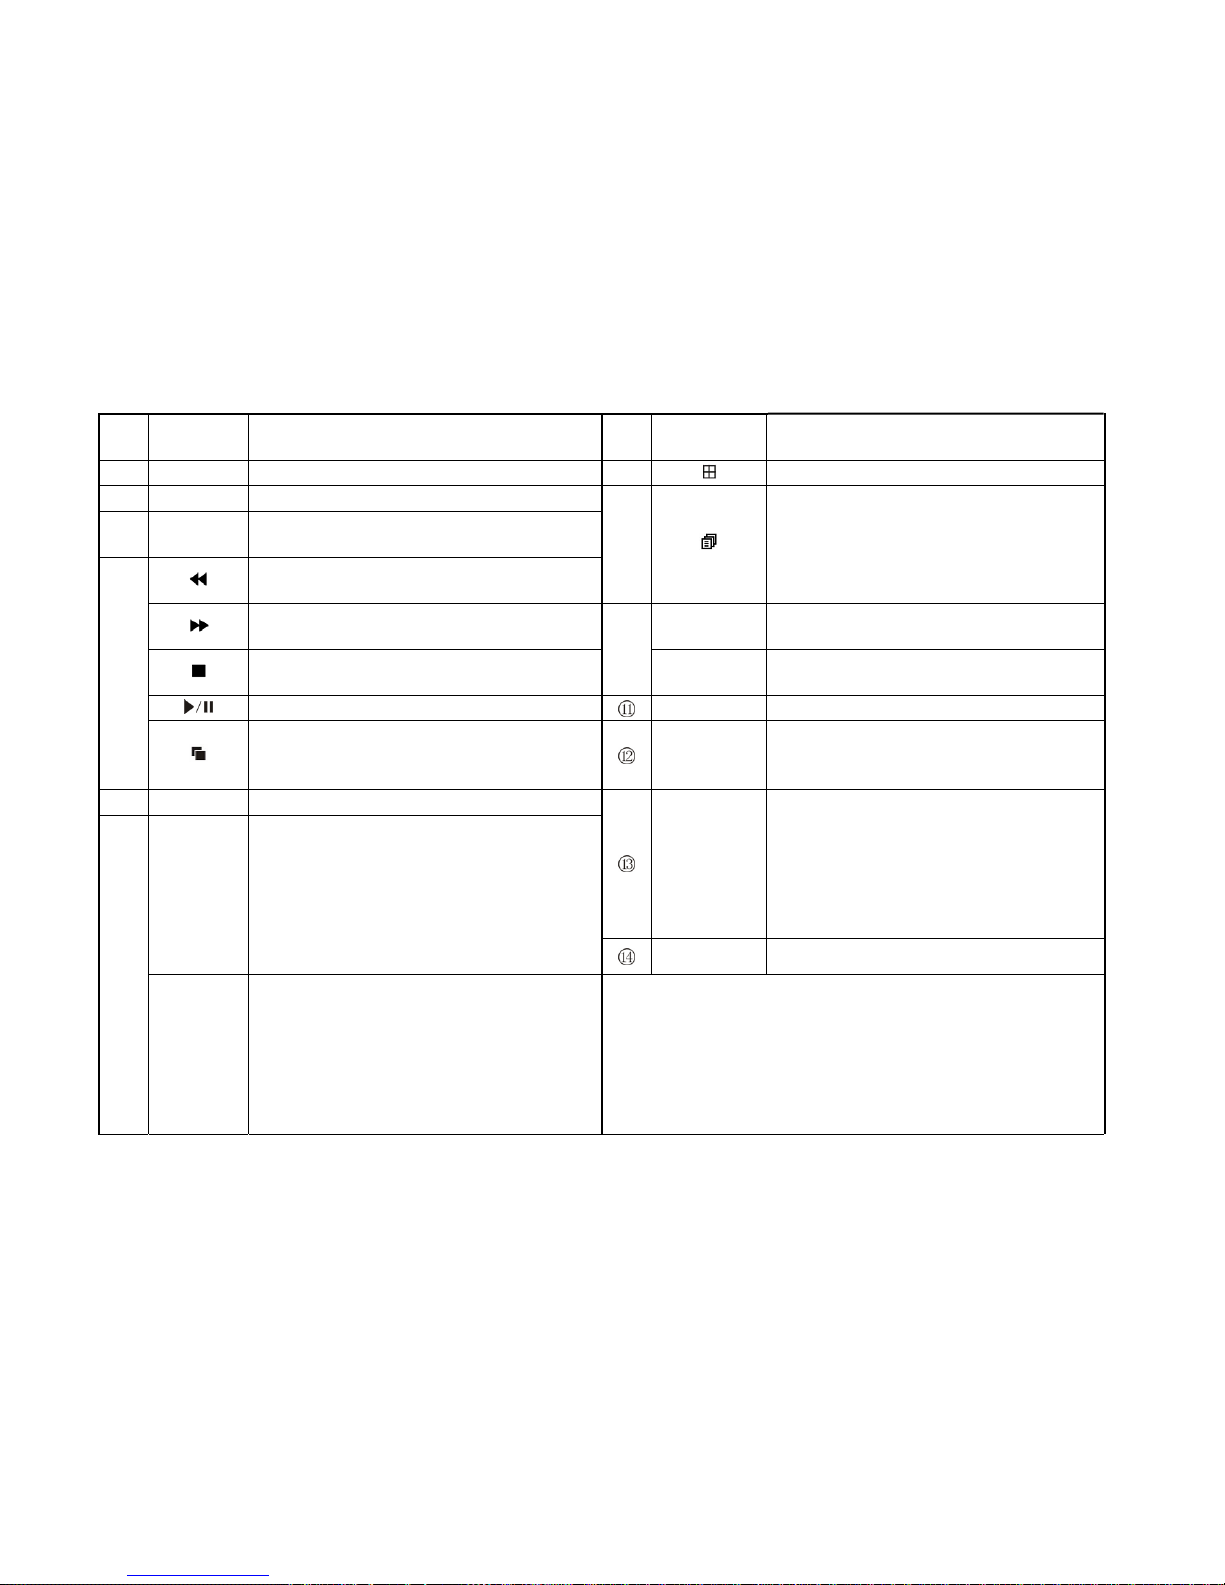
No. English
Name Descriptions No.
English
Name Descripions
【POWER】Power on/Power off 【】1/4/8/9 preview screen window modes switch
【REC】Recording control
【SEARCH
】Search recording files
【 】 Slowly playback,1/2×,1/4×,1/8×, single frame
playback
【】
Pop-up the soft keyboard at the editing status;
Pop-up the relative menu of the currennt
channel at the previewing status;
Pop-up the relative menu of the current channel
at the playback status.
【 】 Speed playback, 2×,4×,8× playback 【LENS/VOL-
】Lens control,Volume down, Number decrease
【 】 Stop
【LENS/VOL+
】Lens control,Volume up, Number increase
【 】 Play at the searching status, Play/Pause 【MUTE】Mute open/close
【】Switch between Full-screen and Multi-screens
playback modes. 【0~9 10+】
Number input;
Enlarge the corresponding channel to
full-screen at the previewing statue
【MENU】Enter into menu.
【←】Backspace
【ESC/PTZ
】
Close the software keyboard;
Close the current window;
Exit the current control;
Back to the last menu;
Exit the status of box list selection;
Enter into or exit the PTZ control at preview
status. 【DEV】Device select
【OK】
Confrim the operations;
Switch the editing area(Time,date,IP address);
Switch between full-screen and multi-screens at
the previewing status;
Enter into the list box selection status and confirm
your selection;
Select/Cancel the status of the check box.

H.264 Network DVR
Copyright 20090by hexacctv co.,Ltd
CHARP.3 Basic Operations
3.1 Power on/Shut down
3.1.1 Power on
If the【POWER】mark lighting is out, please operate as follows:
First: If the power does not plug, please plug in the power, the DVR will start; if the DVR won’t start, please enter the next step;
Second: Open the power switch of the DVR, it will start.
If the 【POWER】mark light is red, just please press the 【POWER】key to start the DVR..
After started the DVR,the video output is the default multi-screen output mode, if the start-up time is in the recording time which have been
setted before, the system will automatically start recording function.
If you didn’t install hard disk before start the DVR, after you entered into the system, it will prompte as follows: (Figure 3-1)
Figure 3-1
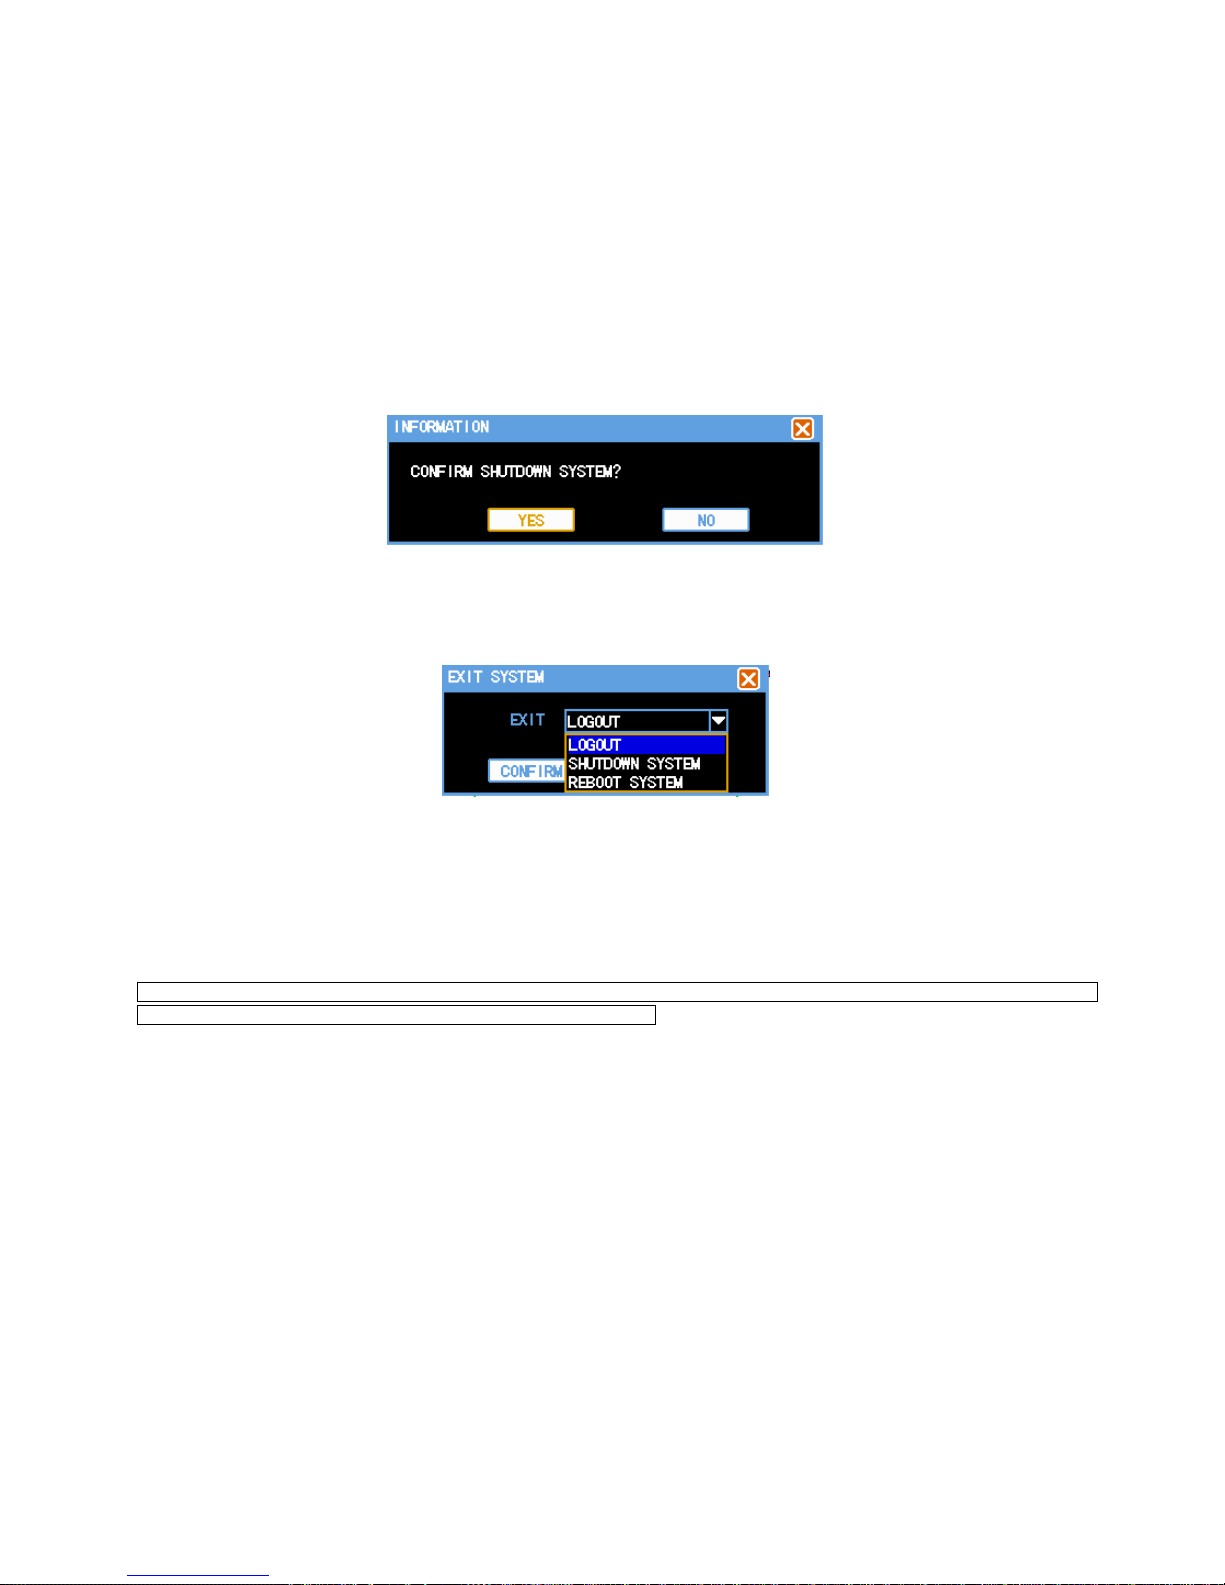
3.1.2 Shut down
Right ways:
A. Hold down the POWER button about 3 seconds and confirm to shut down the system, and stop all the work of DVR.(Figure 3-2)
H.264 Network DVR
Copyright 20090by hexacctv co.,Ltd
Figure 3-2
B. Enter into【menu】, then select “Shutdown system” in exit system menu. (Figure 3-3)
Figure 3-3
Non-normal shut down: (should try to avoid)
A. By turning off power switch
When the DVR is running, you can shutdown it directly by the power switch of the back panel, should try to avoid (especially when it is
recording).
B. Unplug the power cable directly
When the DVR is running, you can shutdown it directly by unpluging the power cable, should try to avoid (especially when it is recording).
Note: In some circumstances, the power supply is abnormal, DVR will lead to not work properly, even DVR will be damaged, In such
circumstances, we recommend user to use the regulated power supply.
3.2 Login
How to enter the menu mode:
Click the right button of mouse and select"menu” to enter the main menu interface;
H.264 Network DVR
Copyright 20090by hexacctv co.,Ltd
Click the "Search " shortcut key, enter into the playback interface;
Click the "REC" shortcut key, enter into manual record interface;
Click "PTZ" shortcut key, enter into the PTZ control interface.
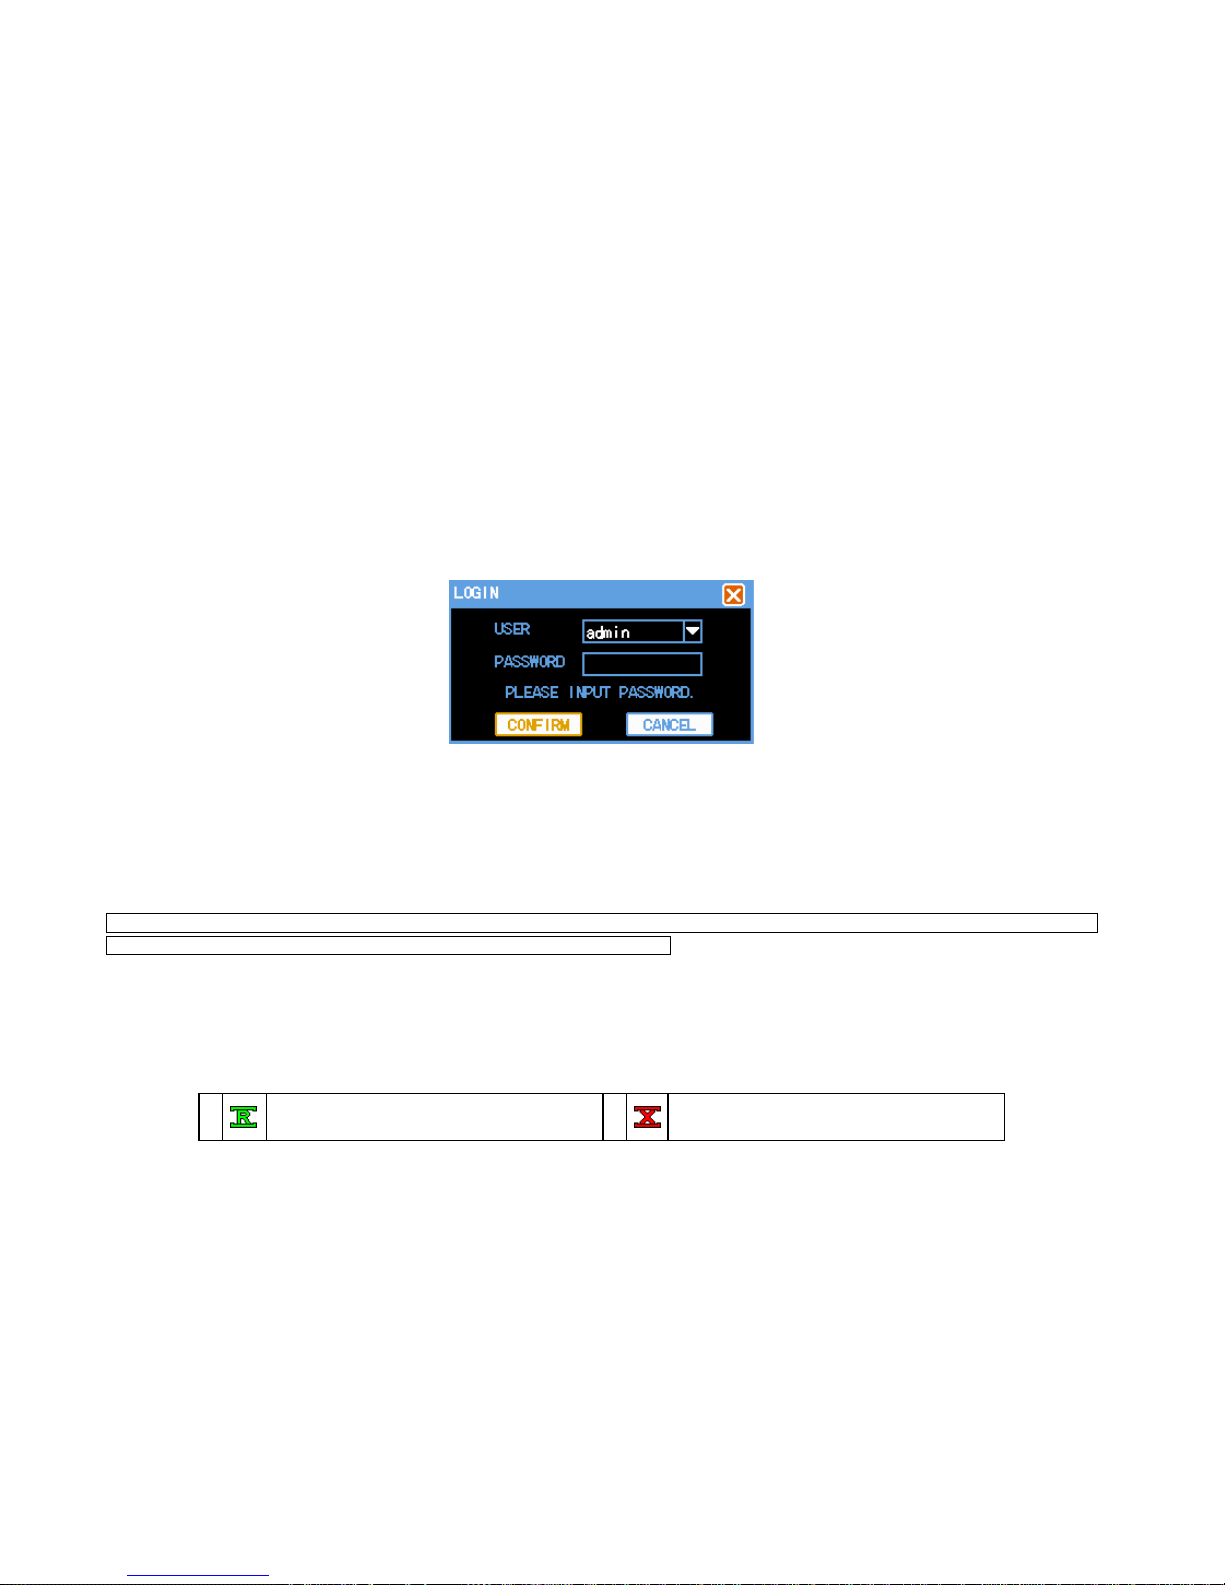
There are three default users of the system, they are "admin", "user", "default", the users of the system can not be removed. The initial password of
user "admin" is 666,666, which is the highest authority user, it can carry out all operations; the initial password of user "user" is 123456, which can
record, playback,backup and set parameters, etc., but it can not add new users or upgrade systems; the user “default” has been defaulted when it
leave factory, which is a lowest authority user, only have monitoring authority. (Figure 3-4)
Figure 3-4
Password security measures: User can only try five times in every 30 minutes, otherwise the account will be locked.
Note: For security reasons, please change the default password in time, if want to add and modify users, please refer "User Management" section.
With regard to input: Except using the DVR front panel and remote control to input, user also can click the left button of mouse at the input box, the
software keyboard will be pop-up.
NOTE: When the DVR is recording, timing recording or alarm recording, if the power is cut off or forced to shutdown, the device will
preserver the videos and automatically return to the prior working condition.
3.3 Preview
After DVR started normbally, it will enter into preview screen directly.
The preview screen display the current time&date, the name and status of each channel, the meaning of the icons are as follows:
1
When the channel is recording,it will display this
icons;
2
If video lose, it will display this icons;

H.264 Network DVR
Copyright 20090by hexacctv co.,Ltd
3
If there is motion, it will display this icons; 4 If there is video block, it will display this icon.
3.4 Record
Users can choose different recording modes according to their own needs. For different recording modes, when the channel is recording, it will
display a recording icon on the channel screen.
3.4.1 Recording
Notes: User must have recording operating authority to record. Before recording, please confirm that the DVR has been installed
hard disk, and the hard disk have been formated correctly.
1) Enter into the recording control interface
Click the right button of mouse at preview status, and select “Recording Control” in the pop-up menu; or through the " Menu" →"Recording
Control" to enter the recording operation interface; user can also press”REC”button at preview mode to enter into to the recording control
interface directly: (Figure 3-5)
Figure 3-5
2) Recording operation interface instructions
【AUTOMATIC】The channel will automatically begin to record as the settings that users has setted before.

H.264 Network DVR
Copyright 20090by hexacctv co.,Ltd
【MANUAL】Which has the highest level of priority, no matter what the current state of the channels are, if user click "Manual" button, all the
relative channels will be recording;
【STOP】Stop all recording;
【ALL】Choose all channels;
3.4.2 Playback
There are two playback ways in the system: fast playback and advanced playback. User can search file to playback, or playback as time.
1) Fast Playback
Click "Search" or the right button of mouse under the preview screen, then choose"playback" in the pop-up menu to enter the fast playback, for
fast playback mode, it only support single-channel playback.
2) Advanced Playback
User Select"Menu"→“File playback”, then can enter into advanced playback. It not only support each channel playback independently, but also
support the 4channels to playback at the same time.
3) Recording Search (Figure 3-6)

H.264 Network DVR
Copyright 20090by hexacctv co.,Ltd
Figure 3-6
【SEARCH DATE】The record date of the files that you want to search;
【START TIME】/【END TIME】The recording time period of the file that you want to search, start time should be less than end time.
【PLAY TYPE】Playback according to the file, or according to time.
【SEARCH TYPE】Select the file type that you want to search, there are ALL,TIME,ALARM,MOTION for options.
【SEARCH CHANNEL】8channles can be selected.
【PLAY】Select the file that you want to play in the search list,click"PLAY"button, or double click the file that you want to playback directly.
【PLAY TOGETHER】Select the search date,start time/end time and the channels that you want to playback, click"PLAY"button to play.
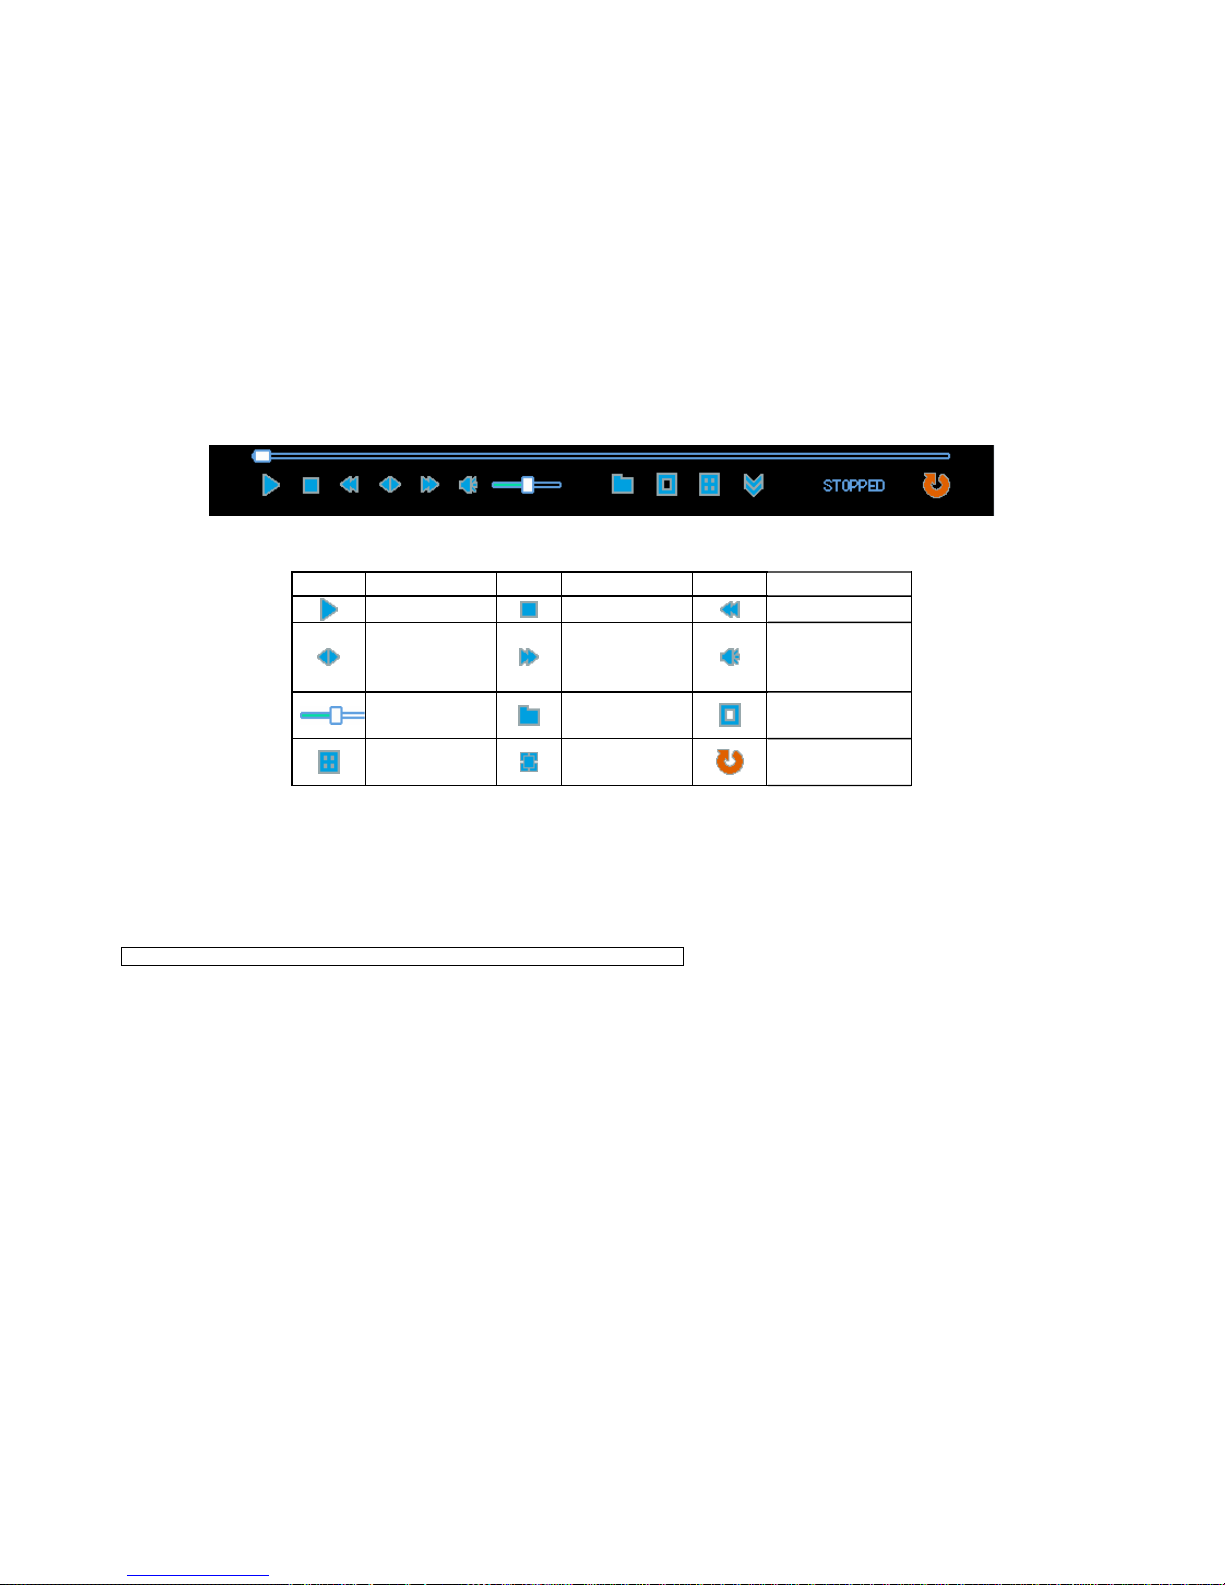
4) Play Control Strip (Figure 3-7,Figure3-8)
H.264 Network DVR
Copyright 20090by hexacctv co.,Ltd
Figure 3-7 Fast Playback
Figure 3-8 Advanced Playback
Button Descriptions Button Descriptions Button Descriptions
Play/Pause Stop Slow play
From fast play,
slowly play to
normal
Fast play Mute
Volume File
Single-screen
model
Four-screen
model
Full screen /
multi-screens Exit
Descriptions:
1) The speed, channel, time, and process will be showed in playback control panel.
2) The playback control is effective for all channels when the videos are played according to precise time. However, the play control is effective
only for current channel if the video is played in elect model
3) According to time synchronization playback mode, the system will automatically skip the periods which all channels have no video.
4) The progress can be located through the mouse.
Note:The volume could be controlled through VOL+ and VOL- during playing.
3.4.3 File Backup
“Menu”→“FILE BACKUP”.(Figure 3-9)
The files backup of DVR could be carried out through DVD burners, USB storage equipment, network downloaded, etc. Here introduces operations
of DVR backup, and the explanations of network backup refer to chapter 8 "remote network control and management
Table of contents
Other HEXA DVR manuals


