HiFiMAN HM1000 User manual

HM1000
User Guide

Welcome
Thank you for purchasing
the HM1000 Portable DAC(Bluetooth & USB-C)
Please read this quick guide before using the HM1000.

Quick start
Exterior
Operation
Interface
4.4mm wiring specification for
balanced line output
DAC
Specifications
Supported music formats
Safety Instructions
Warranty & customer service
01
02
03
04
08
09
15
18
19
20
22
Table of Contents

02
1.
2.
3.
1.
2.
3.
4.
5.
Power on and confirm that the Bluetooth light on the
main panel is working normally (blue light flashing).
Search for devices on a mobile phone or other Bluetooth
source device, find HIFIMAN-HM1000 and select it
You may now enjoy high-definition Bluetooth music with
headphones connected to your HM1000.
Follow the instructions in the operation guide's DAC
Setup to correctly install the driver.
Connect the HM1000 to a computer using a USB-C cable.
Press the Input button once to turn the light of the main
panel green and always on.
Set the playback device on the computer to HM1000.
Now you can Listen to music from your computer on the
HM1000.
Note: Please check the Bluetooth connection and
supported protocol to ensure the best connection.
Bluetooth Direct Connection
USB DAC
Quick Start
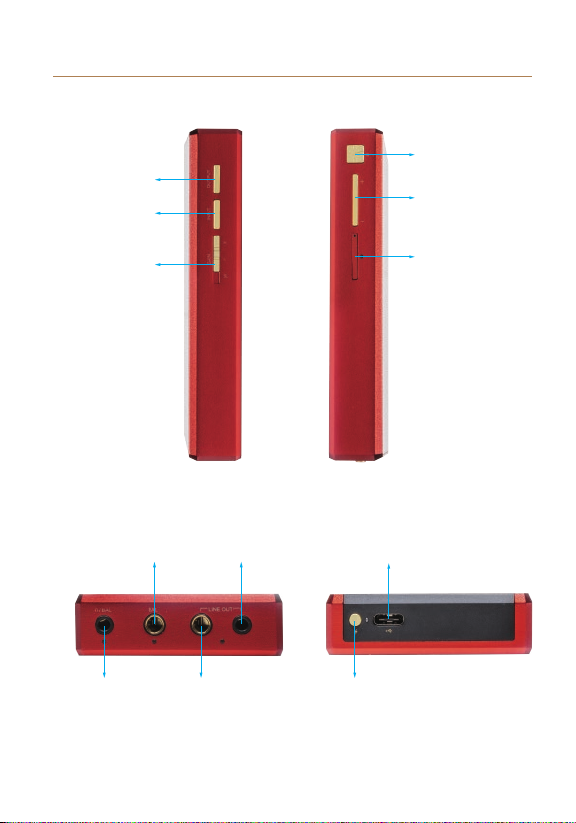
Exterior
Charging
Switch
USB – C power
and Data Input
3.5mm Balance/
Single-ended
4.4mm
Balanced
4.4mm
Balanced
LineOut
3.5mm
Single-ended
LineOut
03
Output
Power Button
Volume+-
Micro SD
Card slot
(Update
Firmware Only)
Input
Gain
(High/Low/
Super low)

04
Volume+/-
1. Press 3 seconds to turn the HM1000 on or o.
1. Press volume+ to increase the volume.
Increase the volume one level at a time.
The maximum volume is 32.
2. Press volume- to decrease the volume.
Decrease the volume one level at a time.
The minimum volume is 0.
3. The body has no screen to show the volume.
Power On / Power Off
Operation

05
Output Selection
1. When powering on for the first time, the default output
jack is balanced 3.5mm balanced. When this jack is
selected, it corresponds to the bottom of the device
and will display a green light.
2. Press the output selection key once. The output jack will
remain the same, however the output will change to
Single-Ended. When this option is selected, it corresponds
to the bottom of the device output and will display
a red light.
3. Press the output selection key again. This will change
the output jack to the 4.4mm Balanced headphone jack.
When this is selected, it will display a green light.
4. Press the output selection button again to change the
output jack to the 4.4mm Balanced line output / 3.5mm
single-ended line output. When selected it will display a
green light.
5. The HM1000 will remember the most recent output
configuration was used when last powered and will
resume the same output status.
Operation

06
1. After powering on, the input defaults to Bluetooth mode.
If the blue light is flashing it is in pairing mode, and will
remain blue when connected.
2. When connecting via USB, press the input selection
key one time. The input mode will switch to USB AUDIO
mode. After switching successfully to USB AUDIO,
the light will remain green.
1. Gain selection is divided into three options: high, low and
super-low. High gain’s driving force is relatively large,
suitable for lower sensitivity and higher impedance
headphones. Low gain’s driving force is relatively small,
suitable for matching with headphones of higher
sensitivity and lower impedance. Super-low gain’s
driving force is smaller still, suitable for in-ear monitors
(IEM) with very high sensitivity and very low impedance.
2. Selection is made by sliding the switch.
Operation
Input Selection
Gain Selection

07
Operation
1. Connect a charging cable from a power supply to the
HM1000. The charging status light will be a steady red.
The light will turn green when fully charged.
2. Press the charge button to switch to non charging
mode. In this state, the charging status light will flash
red and green.
3. When the battery is low, the charging status light will
flash red. If the battery is too low for operation,
it will shut down.
Charge

Headphone Sockets/Lineout
08
Interface
1. Connect a type-C USB data cable to a computer for
data transmission.
2. Use a type-C USB power cable with a power supply
to charge the HM1000.
3. Use a type-C to type C USB cable to connect to a
mobile phone for USB DAC Features.
Note: Phone must support USB AUDIO OTG.
1. With 3.5mm / 4.4mm headphone outputs, match
3.5mm / 4.4 mm with the appropriate headphone use.
2. The 3.5mm headphone socket supports balanced and
single-ended modes, meaning it accepts both TRRS and
TRS jacks.
3. The 4.4mm Headphone socket defaults to balanced mode.
4. Never connect headphones before selecting output, and
never connect headphones with the line out option
selected as it may damage the headphone or the
listener’s hearing.
5. Line-out may be connected to amplifiers or other adapted
audio equipment. (Cables must be purchased separately)
USB-C

09
3-
2+
1G
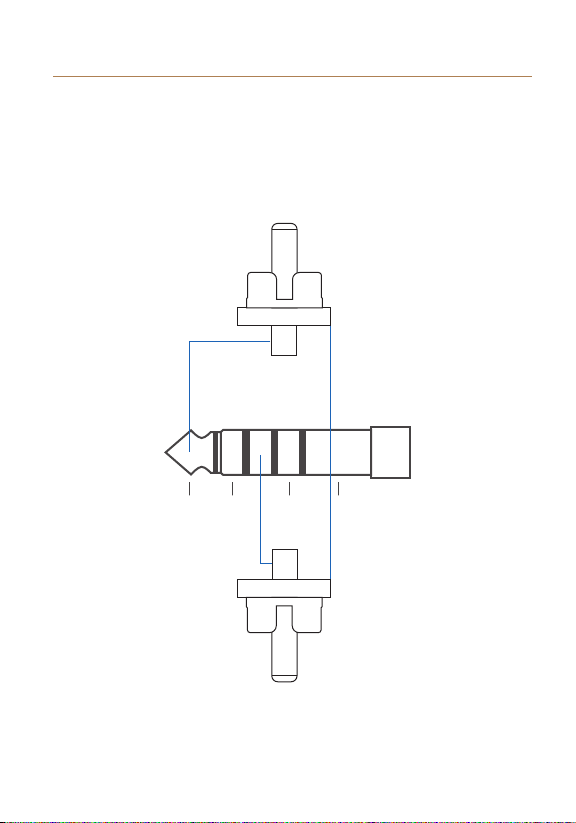
4.4mm Balanced Line Output Wiring Specifications
4.4mm balanced Plug schematic is as follows:
For 4.4mm Balanced to dual XLR connections,
the balanced output should be as wired as follows:
L+ L- R+ R- GND
19.5mm
L+ L- R+ R- GND
19.5mm
3-
2+
1G
10
4.4mm balanced to single-ended RCA connections
should be made as follows:
L+ L- R+ R- GND
4.4mm Balanced Line Output Wiring Specifications

11
L+ L- R+ R- GND
4.4mm balanced to dual mono 6.3mm connections
should be made as follows:
4.4mm Balanced Line Output Wiring Specifications

12
L+ L- R+ R- GND
4.4mm balanced to dual stereo 6.3mm connections
should be made as follows:
4.4mm Balanced Line Output Wiring Specifications

13
L+ L- R+ R- GND
4.4mm balanced to single-ended 3.5mm connections
should be made as follows:
4.4mm Balanced Line Output Wiring Specifications

14
Please note:
Do not use an ungrounded connector as prolonged use
may damage the HM1000.
1
2
3
4
4.4mm Balanced Line Output Wiring Specifications

15
Connect the Type-C USB cable to
a computer or phone to enable the
USB DAC function. Your phone
must support the USB AUDIO and
OTG function. For iOS devices, we
recommend connecting a Light-
ning cable to a USB Camera
Converter. (Lightning to USB3
Camera Converter. Type-C to
Lighting cables cannot be used.
Please use Apple’s Type-C to
Type-A adapter when connecting
to MAC.)
Note: When connecting the
HM1000 to products running iOS,
first change the charging button to
the no-charging mode, then
connect the HM1000 to the device,
and switch the input mode of
HM1000 to USB AUDIO mode.
USB DAC
DAC

16
Type-C
Type-A Lightning
Type-A
DAC

17
For MAC there’s no need to install the driver.
This driver supports Windows XP to Windows 10.
Driver installation and usage:
1. Please go to HIFIMAN’s Ocial
website(www.hifiman.com)→Service and support→
Driver, and download the HM1000 driver.
2. Unzip the compressed package, select the driver and
continue to install the driver.
3. Use a type-C USB data cable to connect the HM1000 to
the computer.
4. Set the HM1000 to USB DAC mode.
5. In Windows controls set "Control Panel→Sound→Play,"
and select "HM1000."
6. Now you can use the HM1000 listen to audio from the
computer.
USB DAC Driver
DAC

18
Size ( LxWxH ) : 115mmx62mmx18mm
Frequency Response: 20Hz-40kHz
Battery Life : 9.5h
Output Options : 3.5mm Single-ended, 3.5mm balanced,
4.4mm balanced,3.5mm Line output, 4.4mm Line out
Bluetooth Version: Bluetooth 5.0
Codecs: LDAC, aptX-HD, aptX, AAC, SBC
Sampling Rate: up to 24bit/384kHz
Specifications
Table of contents


