HIGH ONE CS 207 E W742C User manual


EN
WARRANTY CONDITION
This product has a 2-year warranty as of the date of purchase*, covering any fault
resulting from a manufacturing or material defect. This warranty does not cover defects
or damage resulting from incorrect installation, improper use or abnormal wear of
the appliance.
*upon presentation of the sales receipt.
FR
CONDITION DE GARANTIE
Ce produit est garanti pour une période de 2 ans à partir de la date d’achat*, contre
toute défaillance résultant d’un vice de fabrication ou de matériau. Cette garantie ne
couvre pas les vices ou les dommages résultant d’une mauvaise installation, d’une
utilisation incorrecte ou de l’usure anormale du produit.
*sur présentation du ticket de caisse.
NL
GARANTIEVOORWAARDEN
Dit product wordt gegarandeerd voor een periode van 2 jaar vanaf de aankoopdatum*,
voor elke storing die het gevolg is van een fabricagefout of het materiaal. Gebreken of
schade door slechte installatie, onjuist gebruik of abnormale slijtage van het product
worden niet gedekt door deze garantie.
*op vertoon van kassabon.
ES
CONDICIONES DE GARANTÍA
El certificado de garantía de este producto tiene una duración de 2 años a partir de la
fecha de compra* que se limita a los defectos de fabricación y averías del material.
Se excluyen de la garantía deficiencias o daños originados por una mala instalación,
errores en la manipulación o por un uso inadecuado.
*previa presentación del comprobante de compra.
MADE IN PRC
ELECTRO DEPOT
1 route de Vendeville
59155 FACHES-THUMESNIL
FRANCE

977346 - CS 207 E W742C
INSTRUCTIONS FOR USE .....................02
CONSIGNES D'UTILISATION .....................24
GEBRUIKSAANWIJZINGEN .....................46
INSTRUCCIONES DE USO .....................68
12/2022 - V1
Refrigerator - Freezer
Réfrigérateur-congélateur
Koelkast - Diepvriezer
Frigorífico - Congelador
2/2


1
2
3
4
5
6
7


2 EN2 EN
Thanks!
Thank you for choosing this HIGHONE product.
Chosen, tested and recommended by ELECTRO DEPOT,
the products of the HIGHONE brand are easy to use,
reliable and of an impeccable standard.
Thanks to this appliance, you can be sure that each
use will bring you satisfaction.
Welcome to ELECTRO DEPOT.
Visit our website: www.electrodepot.fr

3 EN3 EN
Table of contents
APreview of the
appliance
CUseful information
BUsing the appliance
Description of the appliance
Reverse door
Installation
Use
Cleaning
Troubleshooting

4EN
Preview of the appliance
A
Description of the appliance
1Thermostat and Light 5Freezer Drawers
2Glass Shelves 6Leveling Feet
3Crisper Cover 7Balconies
4Crisper
This illustration is only for hinting, the detail please check your appliance.

5EN
Using the appliance
B
Reverse door
Tool required: Philips screwdriver, Flat bladed screwdriver, Hexagonal spanner.
• Ensure the unit is unplugged and empty.
• To take the door off, it is necessary to tilt the unit backwards. You should rest the unit on
something solid so that it will not slip during the door reversing process.
• All parts removed must be saved to do the reinstallation of the door.
• Do not lay the unit flat as this may damage the coolant system.
• It’s better that 2 people handle the unit during assembly.
1. Remove four screws in top cover and then lift it.
2. Unscrew top hinge and then remove upper door and place it on a soft pad to avoid scratch.
unscrew

6EN
Using the appliance
B
3. Remove the pin with a screwdriver and flip the hinge bracket. Then refit the pin to hinge
bracket.
180°
4. Unscrew middle hinge. Then lift lower door and place it on a soft pad to avoid scratch.
5. Move the hinge hole covers from left side to right side.
7EN
Using the appliance
B
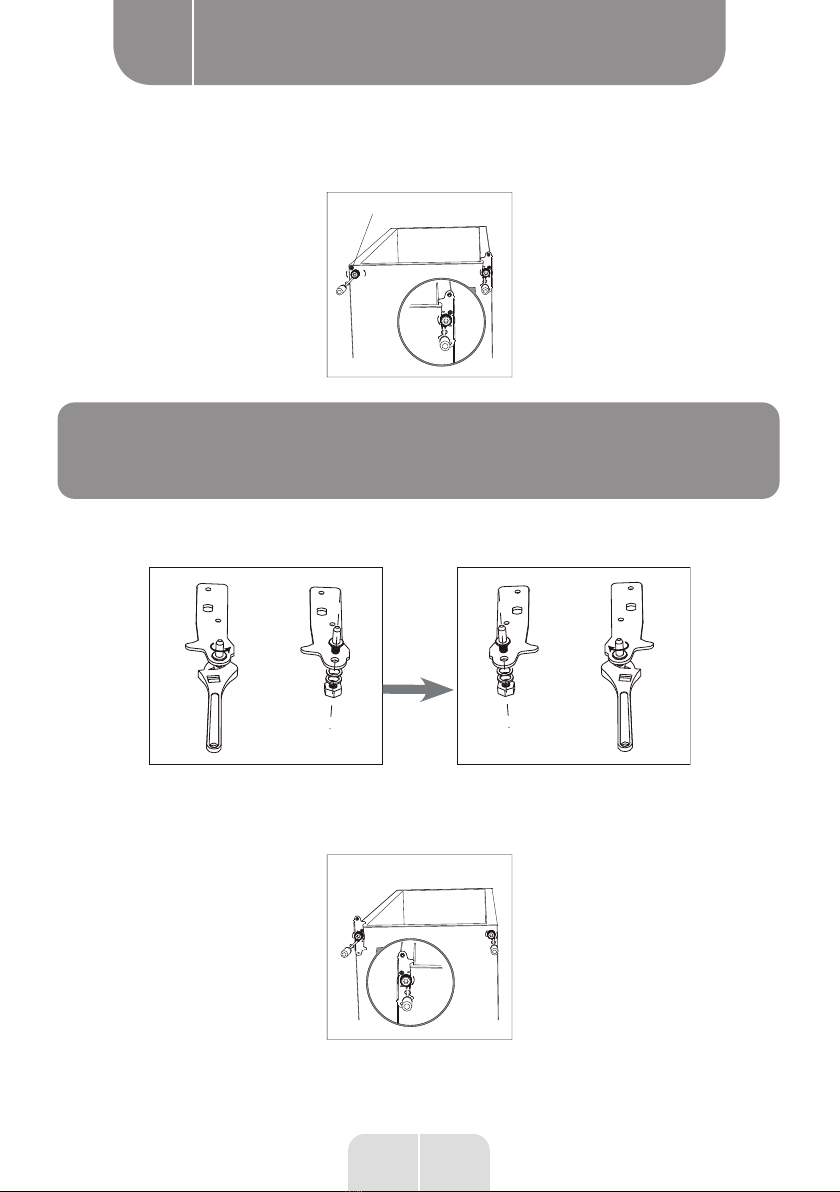
6. Unscrew bottom hinge. Then remove the adjustable feet from both side.
NOTE:
Remove this screw if it presents.
7. Unscrew and remove the bottom hinge pin, turn the bracket over and replace it.
Unscrew Screw
8. Refit the bracket fitting the bottom hinge pin. Replace both adjustable feet. Transfer the
lower door to the property position.

8EN
Using the appliance
B
9. Detach the Fridge and the Freezer door gaskets and then attach them after rotating.
10. Make the middle hinge reverse the direction 180°C, then transfer it to the left property
position. Make the middle hinge pin in the upper hole of the lower door, then tight the bolts.
11. Place the upper door back on. Ensure the door is aligned horizontally and vertically so
that the seal are closed on all sides before finally tightening the top hinge. Then inert the
hinge and screw it to the top of the unit.

9EN
Using the appliance
B
12. Put the top cover and then screw back.
10 EN
Using the appliance
B
Installation
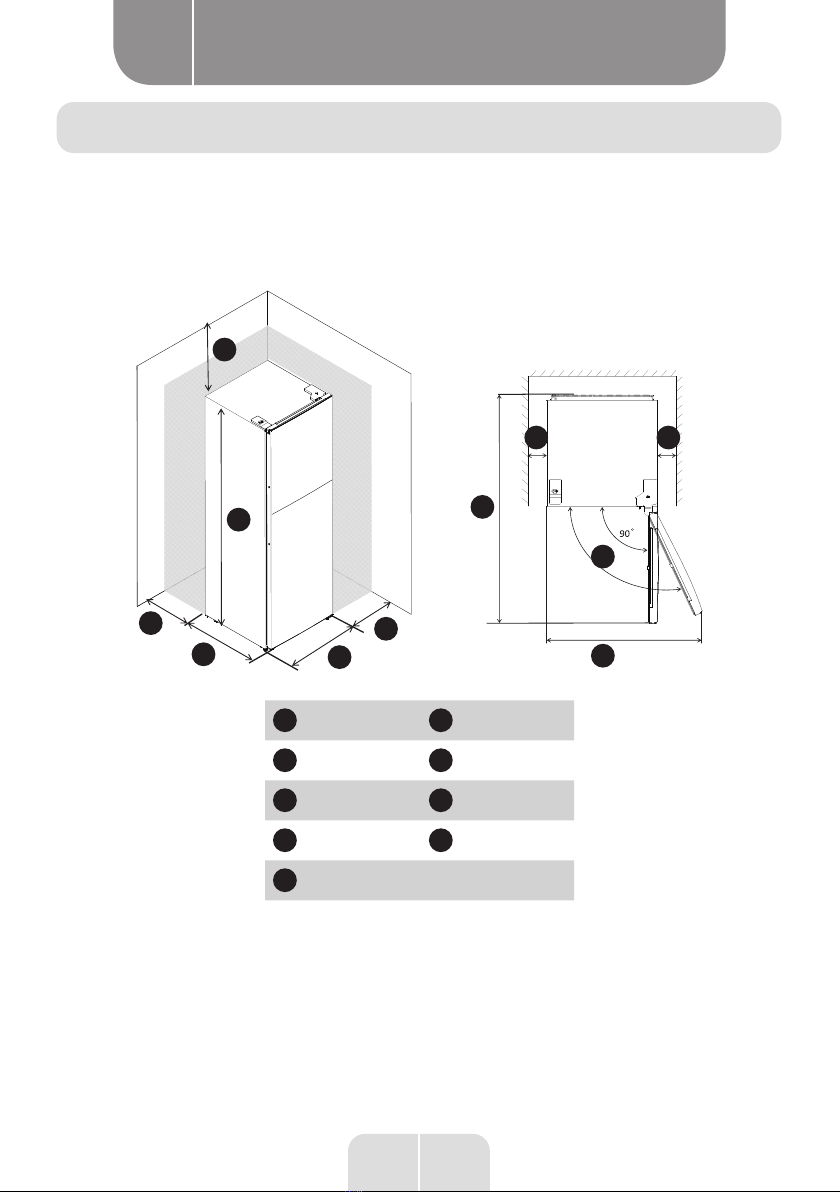
Space Requirement
• Keep enough space of door open.
• Keep at least 50mm gap at two sides and back.
I
A
F
B
D
C
E
H
G
I
F F
A550 Fmin = 50
B580 G1100
C1500 H1130
Dmin = 50 I135°
Emin = 50

11 EN
Using the appliance
B
Levelling the unit
• To do this adjust the two levelling feet at front of the unit.
• lf the unit is not level, the doors and magnetic seal alignments will not be covered properly.
Lengthen Shorten
Positioning
lnstall this appliance at a location where the ambient temperature corresponds to the
climate class indicated on the rating plate of the appliance:
for refrigerating appliances with climate class:
- extended temperate: this refrigerating appliance is intended to be used at ambient
temperatures ranging from 10 °C to 32 °C; (SN)
- temperate: this refrigerating appliance is intended to be used at ambient temperatures
ranging from 16 °C to 32 °C;(N)
- subtropical: this refrigerating appliance is intended to be used at ambient temperatures
ranging from 16 °C to 38 °C;(ST)
- tropical: this refrigerating appliance is intended to be used at ambient temperatures
ranging from 16 °C to 43 °C;(T)
Location
The appliance should be installed well away from sources of heat such as radiators, boilers,
direct sunlight etc. Ensure that air can circulate freely around the back of the cabinet. To
ensure best performance, if the appliance is positioned below an overhanging wall unit, the
minimum distance between the top of the cabinet and the wall unit must be at least 50mm.
Ideally, however, the appliance should not be positioned below overhanging wall units.
Accurate leveling is ensured by one or more adjustable feet at the base of the cabinet.
This refrigerating appliance is not intended to be used as a built-in appliance;

12 EN
Using the appliance
B
WARNING:
It must be possible to disconnect the appliance from the
mains power supply; the plug must therefore be easily
accessible after installation.
Electrical connection
Before plugging in ensure that the voltage and frequency shown on the rating plate
correspond to your domestic power supply. The appliance must be earthed. The power
supply cable plug is provided with a contact for this purpose. If the domestic power supply
socket is not earthed, connect the appliance to a separate earth in compliance with current
regulations consulting a qualified electrician.
The manufacturer declines all responsibility if the above safety precautions are not observed.
This appliance complies with the E.E.C. Directives.

13 EN
Using the appliance
B
Use
First use
Cleaning the interior
Before using the appliance for the first time, wash the interior and all internal accessories
with lukewarm water and some neutral soap so as to remove the typical smell of a brand
new product then dry thoroughly.
IMPORTANT:
Do not use detergents or abrasive powders, as these will
damage the finish.
Temperature Setting
• Plug on your appliance. The internal temperature is controlled by a thermostat. There are
8 settings. 1 is warmest setting and 7 is coldest setting and O is off.
• The appliance may not operate at the correct temperature if it is in a particularly hot or if
you open the door often.
Daily use
Position different food in different compartments according to be below table
Refrigerator
compartments Type of food
Door or balconies of
fridge compartment
• Foods with natural preservatives, such as jams,juices, drinks,
condiments.
• Do not store perishable foods.
Crisper drawer
(salad drawer)
• Fruits, herbs and vegetables should be placed separately in the
crisper bin.
• Do not store bananas, onions, potatoes, garlic in the refrigerator
Fridge shelf – middle • Dairy products, eggs
Fridge shelf – top • Foods that do not need cooking, such as ready-to-eat foods, deli
meats, leftovers.
This manual suits for next models
1
Table of contents
Languages:
Other HIGH ONE Refrigerator manuals


