High Valley 1300 User manual

Owner’s Manual
Safety, Installaon, Operaon, & Maintenance Guidelines
MODEL 1300 N-C W H
High Valley Stoves by Stoll
185 Highway 201 │Abbeville, SC 29639
DO NOT DISPOSE OF THIS MANUAL
INSTALLER: Leave this manual with the individual (s) responsible for operang this wood heater.
OPERATOR: The Owner’s Manual contains important safety, operang, and maintenance informaon.
Please read and understand the enre Owner’s Manual before installing or operang this wood heater. If
you have quesons please contact your High Valley Dealer for assistance.
SAVE THIS OWNER’S MANUAL FOR FUTURE REFERENCE
Safety Noce:
If this wood heater is not properly installed, a house fire may result. For your safety, please carefully read and
follow the installaon direcons. Contact the local Building or Fire Official or other Authority Having Jurisdicon
(AHJ) about code requirements, restricons, and installaon inspecon in your area. The AHJ can advise you if
there is a need to obtain a permit before installaon.
Failure to follow these instrucƟons can result in property damage, bodily injury, or even death.

2
H V S S
185 Highway 201 │Abbeville, SC 29620
www.highvalleystoves.com
U.S. ENVIRONMENTAL PROTECTION AGENCY
Cerfied to comply with 2015 parculate emission standards.
Not approved for sale aer May 15, 2020.
Under specific test condions this non-catalyc wood heater has been shown to deliver heat at rates ranging from 12,548
to 28,846 Btu/hr. Emissions were determined to be 3.1 g/hr. The default EPA efficiency rang for non-catalyc heaters
was 63% at the me of this test. Results of CO (Carbon Monoxide) tesng are not available at this me.
This non-catalyc wood heater has a manufacturer-set minimum low burn rate that must not be altered. It is against
federal regulaons to alter this seng or otherwise operate this wood heater in a manner inconsistent with the operang
instrucons provided in the owner’s manual.
This non-catalyc wood heater needs periodic inspecon and repair for proper operaon. Consult the maintenance sec-
on of this owner’s manual for further informaon.
This non-catalyc wood heater is designed to burn natural wood only. Higher efficiencies and lower emissions generally
result when burning air dried seasoned hardwoods, as compared to sowoods or to green or freshly cut hardwoods.
DO NOT BURN:
• Garbage;
• Lawn clippings or yard waste;
• Materials containing rubber, including res;
• Materials containing plasc;
• Waste petroleum products, paints or paint thinners, or asphalt products;
• Materials containing asbestos;
• Construcon or demolion debris;
• Railroad es or pressure-treated wood;
• Manure or animal remains;
• Salt water driwood or other previously salt water saturated materials;
• Unseasoned wood; or
• Paper products, cardboard, plywood, or parcleboard. The prohibion against burning these
materials does not prohibit the use of fire starters made from paper, cardboard, saw dust, wax
and similar substances for the purpose of starng a fire in an affected wood heater.
Burning these materials may result in release of toxic fumes or render the heater ineffecve and cause smoke.
Smoke Detectors should be Installed in the living areas and bedrooms of your home. Many jurisdicons now require
hard wired Smoke Detectors and/or Carbon Monoxide (CO) Detectors be installed in single family homes. If you are not
subject to such a requirement then baery operated detectors should be installed. Test them regularly and install new
baeries every six months. A smoke detector installed in the same room as a wood heater should be situated as far away
from the heater as possible to prevent accidental acvaon when lighng or refueling the fire. Smoke and CO detectors
should be installed per the manufacturer’s instrucons and code requirements.
Safety Tested by:
OMNI-Test Laboratories, Inc | Portland, Oregon
Report 512-S-01-2 | Tested 12/2012 to UL 1482-2011 & ULC S627-00
Emissions & Efficiency Tested by:
DIRIGO Laboratories, Inc | Clackamas, Oregon
Report 014-S-001-1 | Tested to July 1990 Particulate Emission Standards
MODEL 1300 N-C W H

3
This manual describes the installaon, operaon, and maintenance of High Valley Stoves Model 1300 non-catalyc wood
heater. This heater is cerfied to comply with the U.S. Environmental Protecon Agency’s crib wood emission limits for
wood heaters sold aer May 15, 2015.
Throughout this manual you will find important safety noces and other informaon may be repeated a number of mes.
The repeon is intenonal in an effort to reinforce safety instrucons and to place them in context.
U.S. EPA E S T I P 2
T C Page 3
G S I S P Page 4
I P P 5
C P P 6
C R G P 7
C C D P 8
M 1300 S C P 9
P-I A P 10
W H I P 11
C C P 12
M H I P 12
P-O G P 13
M 1300 F C P 13
O G P 14
O A M P 16
A A B W C P 17
A B H V W: P 18
A C F W P: P 18
W C P 19
Table of Contents

4
Thank you for choosing a wood heater from High Valley Stove. Safe and efficient operaon of your wood heater depends
greatly on proper installaon as outlined in this owner’s manual. If this wood heater is not properly installed, a house
fire may result. To reduce the risk of fire follow all instrucons, cauons, and safety noces contained herein. Installa-
on must also meet all State and Local Code requirements and/or restricons. Check with your local Building Official,
Fire Official, or other Authority Having Jurisdicon (AHJ) regarding the need to obtain a permit prior to installing a wood
heater; and whether an inspecon of the installaon is required upon compleon. Understand that code requirements
and follow-up inspecon are not put in place to make the installaon process more difficult. Rather they are designed
to help ensure your safety. Don’t take shortcuts, use or allow makeshimethods, or other compromises in the instal-
laon. Safety is paramount and the key to enjoying your new wood heater. We strongly recommend installaon by an
experienced professional installer who has the specialized knowledge, tools, and equipment to complete the installaon
safely. Look for an installer who is cerfied by the The Naonal Fireplace Instute (NFI) as a Woodstove Specialist or
Master Hearth Professional (MHP) to have demonstrated their mastery of the knowledge required in all phases of safe
woodstove installaon, and of best current industry pracces. Be sure to contact your insurance company to inquire
whether they have addional requirements.
BURN SOLID WOOD FUEL ONLY. This wood
heater is designed and approved for the burning of
cord wood fuel only. Burning any type of fuel oth-
er than cord wood in this wood heater is against all
safety tesng and will void all warranes.
DO NOT USE CHEMICALS OR FLUIDS TO
START THE FIRE. Never use gasoline, gasoline-
type lantern fuel, kerosene, charcoal lighter fluid, or
similar liquids to start or “freshen up” a fire in this
wood heater. Keep all such liquids well away from
the heater at all mes. Storing these or other flam-
mable liquids near a wood heater could cause a fire.
DO NOT BURN GARBAGE OR FLAMMABLE
FLUIDS SUCH AS GASOLINE, NAPHTHA OR
ENGINE OIL. Cord wood is the only fuel approved
for use in this wood heater.
DO NOT CONNECT THIS UNIT TO A CHIMNEY
FLUE SERVICING ANOTHER APPLIANCE.
DO NOT CONNECT A WOOD HEATER TO, OR
USE IN CONJUNCTION WITH, ANY AIR DIS
TRIBUTION DUCTWORK UNLESS SPECIFICAL
LY APPROVED FOR SUCH INSTALLATIONS.
DO NOT OPERATE IN AN EXTREME MANNER
AS TO OVERFIRE THE WOOD HEATER. If any
part of the wood heater, the chimney, or the chim-
ney connector glows, you are over-firing. If over-fir-
ing occurs, close all combuson air controls imme-
diately. Over-firing can cause damage to the wood
heater and may cause a fire.
HOT WHILE IN OPERATION. KEEP CHILDREN,
CLOTHING, AND FURNITURE WELL AWAY.
CONTACT MAY CAUSE SKIN BURNS. Observe
all minimum clearances as listed in this manual.
Maintain a 36” area around the wood heater to be
kept free of combusble materials including furni-
ture and window treatments. DO NOT allow unat-
tended children in the area of an operang wood
heater.
BURN DIRECTLY ON FIRE BRICKS. Do not use
grates, andirons, or other methods to support fuel.
FUEL STORAGE. Store bulk cord wood covered in
a well venlated area to ensure that the wood fuel is
dry as possible. Do not store wood fuel within stove
clearances or within the space needed for loading
stove or ash removal.
ASH DISPOSAL. Ashes should be placed in a steel
container with a ght-fing lid and moved outdoors
immediately. The closed container of ashes should be
placed on a non-combusble floor or on the ground,
well away from all combusble materials, pending
final disposal. If the ashes are disposed of by burial
in soil or otherwise locally dispersed, they should be
retained in the closed container unl all cinders have
thoroughly cooled. Other waste shall not be placed
in this container.
CREOSOTE FORMATION & REMOVAL: Inspect
chimney connector and chimney twice monthly, and
clean if necessary. Creosote accumulaon in the
connector pipe, chimney, or flue lining can create an
extremely hot fire if ignited.
S P
G S I

5
Your new High Valley Model 1300 has been designed to give you years of clean, efficient service. Take me to consider
carefully where your new wood heater will be installed in your home. If you are planning to use an exisng chimney
and/or hearth, many of the decisions have been made for you. Consult with your High Valley dealer before comming
to a final locaon and take full advantage of their experience. Consider how you plan to use your wood heater, your ex-
pectaons, and the physical layout of your home. Once the wood heater has been installed it would require significant
effort and expense to change its locaon. Perhaps, aer considering all factors, you may come to the conclusion that
the locaon of an exisng chimney may not be the best place for your new wood heater. Evaluate all of your opons
fully before making a final decision.
L: The wood heater should be located in a place where it will be convenient to fuel and maintain the stove,
but well away from human traffic flow, and clear of hallways and doors. It must be possible to maintain the minimum
clearances to combusbles which were determined by safety tesng (see page 5). Ensure that furniture, window treat-
ments (draperies and curtains, wood materials including wood fuel, and any other combusble materials will be no
closer than 36" to the wood heater. If children reside in the home or visit regularly consider how the area immediately
around the heater can be closed offto keep children safely away from hot surfaces. Consult your High Valley dealer for
advice on safety gates and other safety products.
H C:Ideally the wood heater will be centrally located in the area that you wish to heat.
A wood stove is an excellent area heater or space heater. Properly sized and operated it will heat the area where it is
located and heated air will naturally move throughout the home. Keep in mind that a stove does not have the advantage
of a distribuon system to deliver the heat around your home like a central heang boiler or furnace. Don't expect the
type of even heat distribuon that a central heang system can deliver. If your goal is to heat a family room, an addion,
or a poron of the main house, the stove should be sized and operated to create a warm, comfortable space with the
surplus heat allowed to travel around the home on natural convecon (air) currents. A large wood stove with the capac-
ity to heat a home will typically overheat the area where it is located unless the home is constructed with an open floor
plan. If heang a typical paroned home with wood as a primary heat source is truly the goal, then it would be wise
to consider installing a number of smaller sized wood heaters throughout the space to be heated rather than a single
large wood heater. The number would depend on the size and layout of the home. We do not recommend installing
your wood heater in an uninsulated basement. Much of the heat produced will be lost to the uninsulated walls of the
basement. NEVER cut holes or vents in a ceiling/floor in an aempt to get warm air to rise to the rooms above. You will
be compromising a firebreak in your home and could, should a fire ensue, jeopardize your homeowners insurance cover-
age. Contact your local Fire Officials or Building Official, or other Authority Having Jurisdicon for guidance.
C L:Once the best physical locaon for your wood heater from a heang perspecve is agreed
upon, the feasibility of providing a safe and effecve chimney in that locaon must be considered. If the chimney is to
run up through the ceiling and/or the roof then the space above must be clear. The layout and locaon of floor joists
and/or roof raers must be ascertained. Most factory-built chimney components are designed to fit into standard con-
strucon without the need for cung and boxing frame members. A factory-built chimney can also exit through the
sidewall of the house and up the side of the home. Another alternave would be to construct a new masonry specifi-
cally for the woodstove. In any case, the wood stove must not be vented into a chimney flue serving any other appli-
ance. Once again, we strongly recommend that chimney installaon be performed by a cerfied professional installer
who is thoroughly familiar with the requirements of modern wood heaters.
Your High Valley Model 1300 is approved for installaon into either a masonry chimney or a Type HT factory-built chim-
ney listed to UL-103-HT or ULC-S629 standards. A masonry chimney is a permanent installaon requiring a load bearing
foong to support the mass of the chimney. Factory-built chimneys offer flexible installaon opons and use proprietary
support systems for through-the-roof or sidewall installaon. A properly constructed chimney that provides adequate
drais essenal for the safe and efficient operaon of your wood heater. More specific informaon about draand vari-
ous chimney installaons and material will follow, but lets begin at the beginning. Look back to a me when fireplaces,
wood stoves, and later, solid fuel central heang were relied on as the only source of heat in cold weather. Proper
chimney construcon and locaon could spell the difference between surviving the winter and not. Those chimneys had
to work. Life revolved around the fireplace and, later, the cook stove and parlor stove. The chimney helped warm the
home but also was kept warm by the home. A warm chimney drew beer. Likewise the chimney was as tall as possible.
A tall chimney drew beer and was less likely to be affected by wind and weather.
I P

6
Chimneys that were constructed in homes built before the advent of oil and gas-fired central heang systems were
invariably constructed within the walls of the home, typically centrally located, and exited the roof at or near the ridge.
The principals that applied then apply today. A chimney is best located within the envelope of the home to keep it
warm, and it should be installed as close to the peak of the roof as possible. If you have a modern fireplace that was
constructed with the chimney outside the home, exposed to the cold, and with a relavely short chimney, it may not
be your best choice for use with a modern, efficient wood stove. As central heang became prevalent fireplaces and
their chimneys were moved outside the walls of the home to conserve floor space. If they didn't draw well it was not
considered a major problem because the central heang system kept the home warm.
D:The Environmental Protecon Agency defines drathis way: ‘‘Drais the force which moves air from the
appliance up through the chimney." Simply stated, heated air (wood stove exhaust or any heated gas for that maer)
becomes more buoyant and tends to rise. The hoer the gasses contained in a chimney flue are, compared to the tem-
perature of the air outside, the greater the drashould be. There are many variables and the scienfic explanaon can
become complicated. (There are books and scienfic papers wrien for those who would like to know more.) Suffice
to say that you need it; and without it your wood heater cannot perform well. The draof the chimney provides the
sucon that pulls air into the stove to support combuson. A wood heater provided with adequate dracannot leak
smoke, as air is being drawn into the heater, connector pipe, and chimney. If a wood stove is leaking smoke or spills a
lot of smoke during refueling, inadequate drais most likely the culprit.
A complete explanaon of all of the elements that may affect draare beyond the scope of this manual but, briefly,
some factors that contribute to a properly draing chimney are these:
• F S:We recommend that the flue size of the chimney be the same size as the flue outlet on the stove.
Theorecally a larger chimney flue should have a greater flow capacity than a smaller flue. In pracce though,
the heated flue gases are diluted by the extra air in the larger flue and cool faster Drais decreased and, if
cooled too much, creosote may be deposited in the flue. The Model 1300 has a 6" flue collar and 6" factory-built
HT chimney is readily available. With an exisng masonry chimney it can be more challenging. A typical masonry
flue le is 8" square; considerably larger than the 6" flue recommended. Consider that the cross-seconal area
of a 6" flue is @ 28¼ sq. in. (Area = πr2 or A = π32 or A = 3.14 X 9) where Pi = 3.14 (enough for this purpose.) The
cross seconal area of an 8" round flue is 50¼ sq. in.; the cross seconal area of an 8" square masonry flue le is
@ 64 sq. in. In addion, the masonry construcon tends to cool more quickly with cold outside temperatures. If
a new masonry chimney is being constructed, ask the mason to try to source round flue les. They are available
and can be insulated with vermiculite or other approved chimney insulaon materials. The performance of an
exisng masonry chimney may be improved with the installaon of an insulated chimney liner that is the same
size as the flue outlet of the stove.
• I:A chimney flue that is kept warm is more likely to drawell than a cold chimney. Keeping the
chimney within the walls of the home is the best soluon if space allows. If the chimney must be constructed
outside the home, then insulang it is strongly recommended. Factory-built HT chimneys are packed with in-
sulang material and can be further protected by installing them inside an insulated chimney chase (enclosure)
outside the home. Masonry chimneys may require an insulated flue liner to provide adequate drain all sea-
sons. Consider that when it is cold (say 20 degrees for example) outside the home, the air inside the flue of an
outdoor chimney will be the essenally same temperature. When lighng the fire it will be necessary to provide
enough heat to overcome that column of cold air acng like a plug in the chimney flue. Once the wood heater
is lit and burning hot flue gasses will be cooled more quickly in a chimney exposed to the elements and drawill
be negavely affected; perhaps to the point were the drabecomes inadequate to maintain an efficient fire.
• H:A tall chimney is more likely to drawell than a short chimney. The taller column of heated gas cre-
ates a greater temperature and pressure differenal with the outside atmosphere and beer drais the result.
As above, the flue size and insulaon also play significant roles in the process. We recommend a minimum
chimney height of @ ten feet (10') and a maximum height of @ thirty feet (30') measured from the top of the
wood heater. Locang the chimney where it will project above the ridge of the roof, rather than near the eaves
of the home, will net the tallest chimney height praccal for your home. External elements like tall trees, hills,
tall buildings, and the like can affect drawhen the wind is blowing from a parcular direcon. Locang a short
chimney at the eaves of the home may result in draproblems when the wind blows across your own roof ridge.
Height alone is not the only factor to consider when specifying a chimney but, in general, taller is beer.
C P

7
Your High Valley Model 1300 must be connected to either a factory-built Type HT chimney or to a masonry chimney with a
flue liner of a construcon that meets all current code requirements. If the wood heater is to be connected to an exisng
chimney , have the chimney inspected prior to installing the wood heater by an NFI cerfied hearth installer, a CSIA chim-
ney sweep, or a qualified mason in the case of a masonry chimney. The chimney must prove to be sound and serviceable
and to meet all applicable codes. An exisng factory-built chimney must be Type HT with a minimum 6" (152mm) and
maximum 8" (203mm) flue diameter. An exisng masonry chimney must have a clay le liner or approved stainless steel
insulated liner. The wall thimble or pass-through construcon should be inspected to ensure it conforms to current NFPA
211 guidelines. The flue size must not be less than the flue collar (6" or 152mm) or greater than three mes (3X) the
cross-secon of the flue collar. NOTE: An oversize masonry chimney may not prove to provide adequate draand may
require the installaon of an insulated liner approved to UL 1777 to funcon sasfactorily.
If a new chimney is to be constructed to vent the wood heater we strongly advise that the chimney be professionally
installed. Factory-built chimney must be Type HT-2100°F tested to the UL 103 standard and/or ULC S629 standard. A six
inch (6") diameter factory-built chimney is preferred. All components of the factory-built chimney must be from the same
manufacturer and be of the same type to ensure proper connection of components. All chimney components needed for
the installation including but not limited to wall pass-throughs, tees and tee supports, ceiling supports, insulation shields,
fire stops, roof support packages, roof flashings, chimney caps,etc. must be installed exactly to the manufacturer's in-
structions. Installation specification and clearances may vary from manufacturer to manufacturer and must be carefully
adhered to according to the individual manufacturer's instructions.
If a new masonry chimney is to be constructed we strongly recommend the use of a professional masonry contractor.
Specialized knowledge is needed to ensure proper construction and support for a masonry chimney. The chimney must
be constructed in accordance with the latest edition of NFPA standard 211 and must conform to all applicable state and
local codes. Wall thimble construction and clearances to combustibles must meet NFPA 211 guidelines. A permit and
inspection may be required by the local Building Official, Fire Official, or other Authority Having Jurisdiction. A six inch
(6") round or 8" x 8" square flue tile is required. The flue tiles must be mortared together with the approved material and
provided with an air space as required by NFPA 211 and applicable codes.
The following informaon about chimney construcon and requirements is intended for reference only. The use of a
professional installer is strongly recommended. Specific installaon instrucons and/or requirements must conform to
the chimney manufacturer's instrucons and/or applicable building codes. Seek the advice of your High Valley Dealer
and/or the local Authority Having Jurisdicon as to local code, perming, and inspecon requirements.
C H
• The top of the chimney must be at least two feet ( 2' or 0.6m) taller than the highest point of the roof or any part
of the roof or other structure within ten feet (10' or 3m) measured horizontally from the chimney terminaon.
• The chimney must be at least three feet (3' or 0.9m) taller than the high side of the roof penetraon.
C R
C G

8
A R:
• Insulaon material used as part of wall pass-through system shall be of noncombusble material and shall have a
thermal conducvity of 1.0 Btu-in./hr-- °F (4.88 kg-cal/hr-m - °C) or less.
• All clearances and thicknesses are minimums; larger clearances and thicknesses shall be permied.
• Any material used to close up an opening for the connector shall be of noncombusble material.
• A connector to a masonry chimney, except for System B, shall extend in one connuous piece through the wall
pass-through system and the chimney wall to the inner face of the flue liner, but not beyond.
• Minimum 3.5 inch (90mm) thick brick masonry wall framed into com-
busble wall with a minimum of 12 inch (305mm) brick separaon
from clay liner to combusbles. Fireclay liner (ASTM C 315, Standard
Specificaon for Clay Fire Linings, or equivalent), minimum ⁵⁄₈inch
(16mm) wall thickness, shall run from outer surface of brick wall to,
but not beyond, the inner surface of chimney flue liner and shall be
firmly cemented in place.
• Solid-insulated, listed factory-built chimney length of the same inside
diameter as the chimney connector and having 1 inch (25.4mm) or
more of insulaon with a minimum 9 inch (229mm) air space between
the outer wall of the chimney length and combusbles. The inner end
of the chimney length shall be flush with the inside of the masonry
chimney flue and shall be sealed to the flue and to the brick masonry
penetraon with non-water-soluble refractory cement. Supports shall
be securely fastened to wall surfaces on all sides. Fasteners between
supports and the chimney length shall not penetrate the chimney liner.
• Sheet steel chimney connector, minimum 24 gauge [0.024 inch (0.61
mm)] in thickness, with a venlated thimble, minimum 24 gauge [0.024
inch (0.61mm)] in thickness, having two 1 inch (25.4mm) air channels,
separated from combusbles by a minimum of 6 inch (152mm) of glass
fiber insulaon. Opening shall be covered, and thimble supported with
a sheet steel support, minimum 24 gauge [0.024 inch (0.61mm)] in
thickness. Supports shall be securely fastened to wall surfaces on all
sides and shall be sized to fit and hold chimney secon. Fasteners used
to secure chimney secon shall not penetrate chimney flue liner.
• Solid-insulated, listed factory-built chimney length with an inside di-
ameter 2 inch (51mm) larger than the chimney connector and having
1 inch (25.4mm) or more of insulaon, serving as a pass-through for a
single wall sheet steel chimney connector of minimum 24 gauge [0.024
inch (0.61mm)] thickness, with a minimum 2 inch (51mm) air space
between the outer wall of chimney secon and combusbles. Mini-
mum length of chimney secon shall be 12 inch (305mm). Chimney
secon concentric with and spaced 1 inch (25.4mm) away from con-
nector by means of sheet steel support plates on both ends of chimney
secon. Opening shall be covered, and chimney secon supported on
both sides with sheet steel supports of minimum 24 gauge [0.024 inch
(0.61mm)] thickness. Supports shall be securely fastened to wall sur-
faces on all sides and shall be sized to fit and hold chimney secon.
Fasteners used to secure chimney secon shall not penetrate chimney
flue liner.
C C
• Special care must be exercised to ensure that all chimney clearances to combusbles meet current standards.
• Exisng chimneys should be inspected to ensure that clearances to combusbles are in compliance.
• Factory-built chimney clearances are defined in the manufacturer's installaon instrucons.
• Masonry chimney clearances to combusbles are described in the current NFPA standard 211.
• Clearances to combusbles may vary for indoor and outdoor installaons.
C T D
• Special construcon techniques are required to ensure safe connecon to a chimney through a combusble
wall. Seek the current version of NFPA standard 211 and the approval of the local Authority Having Jurisdicon.
C C T D

9
M C C M W H B
Backwall / Sidewall Corner Clearances Alcove Clearances Floor Protecon
Stove to Combusbles
A= 14” (356mm)
B= 12” (305mm)
Flue Pipe to Combusbles
C= 22” (560mm)
D= 15.5” (394mm)
Stove to Combusbles
E= 8” (203mm)
Flue Pipe to Combusbles
F= 18” (457mm)
G= 84” (2134mm)
H= 54” (1372mm)
I= 24” (610mm)
J= 16” (406mm)
Stove to Rear Wall
16.5” (419mm)
Flue to Rear Wall
19” (483mm)
K= 8” (203mm)
L= 8” (203mm)
M= 18” (457mm) U.S.
M= 18” (457mm) CN
Minimum Floor Protector Size
38”w x 43”d U.S.
965mm w x 1092mm d CN
F P:
Use UL 1618 Type 2 Floor Protector R = 1.19 or connuous non-combusble material equivalent to 1” thickness, k = 0.42
NOTE: Clearances to combusble materials may be reduced using shielding methods as described in the current edion of
NFPA 211 Standard for Chimneys, Fireplaces, Vents, and Solid Fuel Burning Appliances. Any reducon of clearances must be
approved by the local Authority Having Jurisdicon.
Model 1300 Over All Width: 22 ½” Flue Size: 6”
Model 1300 Over All Depth: 23 ½” Firebox Volume: 1.34 cu. .
Model 1300 Height with Pedestal: 30” Firebox Dimensions: 16" wide x 11" deep
Weight: 314 lbs Maximum Log Length: 314 lbs.
S V
F V
M 1300 S C

10
CAUTION
• If this wood heater is not properly installed, a house fire may result. To reduce the risk of fire follow
all instrucons, cauons, and safety noces contained herein.
• Installaon must also meet all State and Local Code requirements and/or restricons. Check with your
local Building Official, Fire Official, or other Authority Having Jurisdicon (AHJ) regarding the need to ob-
tain a permit prior to installing a wood heater; and whether an inspecon of the installaon is required
upon compleon.
• Don’t take shortcuts, use or allow makeshimethods, or other compromises in the installaon. Safety
is paramount and the key to enjoying your new wood heater.
• We strongly recommend installaon by an experienced professional installer who has the specialized
knowledge, tools, and equipment to complete the installaon safely. Look for an installer who is cer-
fied by the The Naonal Fireplace Instute (NFI) as a Woodstove Specialist or Master Hearth Profession-
al (MHP) to have demonstrated their mastery of the knowledge required in all phases of safe woodstove
installaon, and of best current industry pracces.
• Be sure to contact your insurance company to inquire whether they have addional requirements.
I
Your High Valley stove was carefully inspected before being packaged at the factory. Chances are that your High Val-
ley Dealer has un-boxed and assembled your stove prior to delivery. Your dealer has the equipment and the experi-
ence to handle heavy stoves. If you have taken delivery of your Model 1300 stove sll in the box proceed as follows:
• Carefully remove the shipping materials. Use cauon. The contents are heavy.
• Carefully inspect the stove and accessories, if any, for signs of damage.
• If any damage is noted or suspected please contact your High Valley Dealer for assistance.
• DO NOT proceed with installaon unl the stove has been inspected and replacement parts obtained.
P I
If your Model 1300 was not assembled before delivery, the stove body must be fastened to the pedestal base. USE
EXTREME CAUTION. The wood heater is very heavy. At least two strong individuals will be needed to lithe stove
body onto the pedestal base. Personal injury and/or damage to the stove or personal property may result if the
stove is handled improperly. If you have concerns about handling the stove please contact your dealer for assistance.
M I:Stove Body, Pedestal Base, four (4) each 3/8" - 16 x 1" bolts, Owner's Manual.
• Place the un-boxed pedestal on the floor close to where the stove will be installed.
Place a piece of cardboard under the pedestal base to protect the floor while assembling the stove.
• Carefully lithe Model 1300 stove body and place it gently top of the pedestal.
○Do not drop the stove body onto the pedestal base. Damage to the floor, the floor covering, or the floor
protector may result.
○Ensure that the stove body is roughly centered on the pedestal.
• Align at least one of the holes in the pedestal with threads in the stove with appropriate holes in pedestal.
○Insert one of the 3/8 -16 x 1" bolts through the hole in the pedestal base and into the threaded hole in
the stove body. Tighten finger ght only at this stage.
○Pivot the stove body carefully on the pedestal base to align the remaining three bolt holes.
○Thread the remaining 3/8 -16 x 1" bolts into the threaded holes in the stove body.
• Tighten the four (4) bolts securely using a 9/16" or 14mm wrench, an adjustable wrench, or similar tool.
B I
The Blower is a standard feature on the Model 1300 and is installed at the factory.
• The Blower is pre-wired at the factory, so no addional wiring is necessary in the field.
• If removal or replacement of the Blower is needed in the future, a wiring diagram is provided on Page 16.
P-I A

11
If this wood heater is not properly installed, a house fire may result.
To reduce the risk of fire follow all instrucƟons, cauƟons, and safety
noƟces contained in this manual.
Do not take shortcuts. Do not use or allow makeshiŌmethods or other
compromises in the installaƟon. Safety is the most important step to-
ward enjoying your wood heater responsibly.
F P I
• The Model 1300 requires a UL 1618 Type 2 Floor Protector R = 1.19 or connuous non-combusble material equiva-
lent to 1” thickness, k = 0.42. If a hearth or floor protector is to be site-built, or an exisng hearth is to be ulized, the
thermal resistance must be determined to ensure the minimum requirement are met. See Appendix - C on Page 18.
• Minimum floor protecon must be connuous under the wood heater and 8 inches (8") to the back and each side,
and eighteen inches (18") in front of the loading door. The minimum size is 38”w x 43”d in the U.S. and Canada.
• Floor protecon must extend under any horizontal secon of connector pipe and at least two inches (2”) to each side.
• We strongly recommend using a floor protector that is larger than minimum size that will cover the flooring to the
wall and provide for extra non-combusble working space for a metal ash container, tools, gloves, etc.
W H I
• With the floor protecon in place, carefully move the Model 1300 into posion.
• Use extreme cauon when liing the Model 1300. It is VERY HEAVY. We recommend the use of liing straps (fur-
niture moving straps) by at least two strong individuals. Personal injury and/or damage to the stove or personal
property may result if the stove is handled improperly. If you have concerns about handling the stove please contact
your High Valley dealer for assistance.
○Lithe wood heater and gently set it in place. Do not drop the wood heater onto the floor protector. Do not slide
the wood heater into posion. Damage to the floor protecon may result. Seng the wood heater onto pieces of
heavy cardboard will minimize the possibility of scratching the floor protecon and allow final posioning of the
wood heater. Remove the cardboard before lighng the first fire in the wood heater.
• The wood heater should be centered on the chimney if possible to allow for the shortest and most direct connecon.
The wood heater does not necessarily need to be centered on the floor protecon as long as the minimum side pro-
tecon requirement (8") is met. An asymmetrical installaon may provide more usable space to one side.
• The wood heater and floor protector must be posioned to maintain at a minimum the clearances to combusbles
as shown in the chart on Page 9 of this manual and on the safety label affixed to the wood heater.
• Clearances to combusble materials may be reduced if needed by using shielding methods as described in the cur-
rent edion of NFPA 211 Standard for Chimneys, Fireplaces, Vents, and Solid Fuel Burning Appliances. Any reducon
of tested clearances must be approved by the local Authority Having Jurisdicon (AHJ).
C P R
• Before connecng the wood heater to a factory-built or masonry chimney, have the chimney inspected to ensure
that it is properly installed, clean, and in good repair. Have the chimney cleaned if necessary.
• Do not pass a chimney connector pipe through any combusble wall (s) or ceiling (s). Special methods are required
when passing a chimney through any combusble wall, ceiling, or roof. Ensure that all chimney clearance require-
ments are met and all penetraons through combusble walls and/or ceilings meet manufacturer's installaon
requirements, NFPA 211, and/or applicable code requirements. See Pages 8 & 9 for addional informaon.
• D .
• Use six inch (6") (152mm) diameter minimum 24 MSG black steel connector pipe or pipe of a greater gauge.
• Use three (3) #10 sheet metal screws to fasten each secon of connector pipe together and to secure the connec-
tor pipe to the flue collar of the wood heater. The length of the screws should be long enough to penetrate both
secons of pipe (@ ¼") or the flue collar and pipe (@ ½") but not overly long.
• Crimped connector pipe ends should point away from the chimney and toward the wood heater flue collar.
• Connector pipe should be kept as short and straight as possible. Extra pipe and extra elbows can impede the flow
of flue gasses and may cool the flue gasses to a point that negavely affects dra.
W H I

12
W H C C
M F I
The Model 1300 was not designed or tested for installaon into a fireplace. The top vent only configuraon of the
Model 1300 makes venng into most masonry fireplaces impraccal.
M H I - U.S. ONLY
CAUTION: T S I M H
F, W, C/R M M.
The installaon must comply with all current HUD Regula-
ons.
Floor protector requirements and installaon, minimum
clearances, and installaon precauons are the same as
those on Page 11 for convenonal residenal construcon.
The wood heater must be anchored to the floor with bolts
of sufficient size and length to penetrate the pedestal
mount, floor protector, home floor, and subfloor.
The wood heater must be properly grounded to the chas-
sis of the mobile home using #8 AWG copper wire or its
equivalent.
WARNING: DN I S R.
For mobile homes use 6 inch diameter Class “A” chimney
listed to UL 103 HT and/or ULC629, suitable for use with
solid fuels, installed from the flue collar to the terminaon
point and fied with a Spark Arrestor and Rain Cap. The
chimney must be removable in the event the home is to
be transported.
An outside air inlet must be provided for combuson and
be unrestricted while the unit is in use. Use High Valley
outside air kit (P/N: AIRKIT). See Page 16.
The front loading door of the wood heater must be kept
closed at all mes except for starng and refueling the fire.
H I
U S W P
• Center the wood heater flue collar in-line with
the wall thimble if possible. All Clearances to
combusbles must be maintained.
• Confirm that the factory-built wall pass through
or masonry thimble meets manufacturer instruc-
ons and/or NFPA 211. (See Page 8)
• Limit the 90° bends to one (1) elbow and the 90°
bend where the thimble meets the flue.
• Maintain at least 18" clearance from single wall
connector to the ceiling.
• Floor protecon must extend under horizontal
secon of connector pipe and at least two inches
(2”) to each side.
• Maintain 1/4” rise per foot in horizontal pipe.
• Crimped connector pipe ends must point toward
the wood heater flue collar.
• Secure each pipe secon to each other and the
flue collar using three (3) #10 sheet metal screws
(see Page 11).
V C I
U S W P
• Center the wood heater flue collar directly un-
der the chimney pipe if possible. All Clearances
to combusbles must be maintained.
• Confirm that any ceiling support, roof support,
fire-stops, insulaon shields, etc. are installed
correctly and match the brand of Type HT 2100°
chimney being used.
• If the wood heater must be offset from the
chimney opening, use 15° or 45° pipe elbows to
make correcons for the offset.
• Crimped connector pipe ends must point down-
ward toward the wood heater flue collar.
• Secure each pipe secon to each other and
the flue collar using three (3) #10 sheet metal
screws (see Page 11).

13
CAUTION: H !
G .
C .
K , , , .
E .
C .
A .
NOTICE: Before lighng the wood heater for the first
me ensure that any inspecon required has been com-
pleted and passed by the local Building Official, Fire Of-
ficial, or other Authority Having Jurisdicon (AHJ).
Smoke and CO detectors should be installed on every floor
of your home. A smoke detector installed in the same
room as the wood heater should be located as far away
from the heater as possible. See Page 2. Many states have
requirements mandang the installaon of smoke and CO
detectors. Those regulaons take precedence.
Be sure you have nofied your homeowner's insurance
company that a wood heater has been installed in your
home.
We recommend that a "Type A B C" fire exnguisher be
on hand in close proximity to the wood heater should hot
embers escape the during the loading of fuel and removal
of ashes. Please use care when loading or servicing the
wood heater. Never throw water on a burning wood heat-
er. Thermal shock could break the door glass exacerbat-
ing the problem and hot steam could increase the risk of
burns or scalding.
P-O G
C A V:Powered by the standard convec-
on blower to deliver heated air to the room.
S A T:Introduce fresh combuson air
over the fire to re-burn gasses. No adjustment necessary.
L D:Allows access to the firebox for loading.
S G:Ceramic material withstands high tempera-
tures and allows a view of the fire.
D H:Rotate to latch/unlatch the loading door.
Fied with a spring handle for safer handling.
E L:Designed to catch ash spillage.
C A D:Controls the amount of air fed
to the fire and thereby regulates the burn rate. Pull out to
open and push in to close using the spring handle.
A U S B P:
B . This wood heater is
designed and approved for the burning of cord wood
fuel only. Never burn any type of coal in this heater.
Burning any type of fuel other than cord wood in this
wood heater is against all safety tesng and will void all
warranes.
D
.Never use gasoline, gasoline-type lantern fuel,
kerosene, charcoal lighter fluid, or similar liquids to start
or “freshen up” a fire in this wood heater. Keep all such
liquids well away from the heater at all mes. Storing
these or other flammable liquids near a wood heater
could cause a fire.
B F . Do not use grates,
andirons, or other methods to support fuel.
D
- W H.If any part of the
wood heater, the chimney, or the chimney connector
glows, you are over-firing. If over-firing occurs, close all
combuson air controls immediately. Over-firing can
cause damage to the wood heater and may cause a fire.
ATTENTION: Any tags or sckers must be removed
and oponal plated loading doors and/or trim must be
cleaned with ammonia free glass cleaner and a sorag
BEFORE lighng the wood heater for the first me. Failure
to clean the glass or plated finish properly to remove any
fingerprints or oils may permanently mar the finish. Never
aempt to clean the door finish or door glass when hot.
ATTENTION: Your new wood heater has been painted
with high temperature (1200°) stove paint. During the
first few firings the heater may give offslight smoke, odors
and/or vapors while the paint and oils used in manufactur-
ing cure. These odors may be irritang to suscepble indi-
viduals. Open the windows in the room where the heater
is installed while the paint cures.
M 1300 F C

14
K S:During the first stage of combuson
keep the Air Damper fully, or nearly fully, open to help
drive offmoisture from the wood load. This stage may
take up to an hour depending on the moisture in the wood.
G V I S: During the sec-
ond stage of combuson the secondary air tubes at the
top of the firebox will light offwith a clean fame. Keep
the air damper open enough to support the secondary
burn. The actual opening will depend on the draof the
individual chimney but a medium to medium-high seng
is usually opmal.
C B:During the final stage of combus-
on the Air Damper opening can be reduced to extend the
burn me. Medium low to medium is opmal. This non-
catalyc wood heater has a manufacturer-set minimum
low burn rate that must not be altered. It is against federal
regulaons to alter this seng.
C B:To maintain a connuous fire
fuel must be added while the charcoal bed it hot enough
to kindle the fresh wood. Wear heat resistant gloves when
operang and loading the wood heater. Fully open the
Air Damper and then open the Loading Door ½" to 1" to
allow room air balance with the air in the firebox. Open
the Loading Door slowly to the fully open posion to
avoid pulling smoke into the room. Have fresh cord wood
logs ready at hand before opening the Loading Door to
minimize the length of me that the door must remain
open. Cord wood should be cut to the appropriate length
or shorter. You should never have to force logs into the
firebox. Avoid contacng the firebrick or air tubes when
loading fuel. Close the Loading Door gently, do not slam it
shut. Keep logs from impacng the Door Glass and never
use the door or Door Glass to push fuel into the firebox.
Do not operate the wood heater with the door open. If it is
necessary to keep the Loading Door slightly ajar to freshen
the fire, never leave the room while the door is unlatched.
Once loading is complete, reset the Air Damper.
S O: Modern wood heaters can burn wood
very cleanly and efficiently but, ulmately, it depends on
the operator to manually adjust the combuson air. The
correct combuson air seng is dependent on the draof
the chimney, the fuel being burned, and the stage of com-
buson. The amount and density of smoke coming from
the chimney is a direct indicator of how the wood heater
is burning. Ideally you will observe lile or no smoke (0%
opacity) if the fire is burning cleanly. Dense smoke indi-
cates poor combuson. Develop a habit of checking the
smoke opacity regularly, and at various stages of combus-
on. With experience a quick glance can confirm proper
operaon or signal that something needs correcon. Be
aware that in cold weather what looks like smoke could be
moisture vapor condensing in cold air.
O-: Never operate the wood heater in an ex-
treme manner. If any part of the wood heater, the chim-
ney, or the chimney connector glows, you are over-firing.
A chimney with a very good dramay draw in too much
combuson air, even with the Air Damper in a fully closed
posion. If the fire seems uncontrollable, consult your
dealer. A hand damper installed in the connector pipe will
allow for manual control under high dracondions..
CAUTION: Before lighng your wood heater please
read and/or re-read the safety informaon on pages 2, 4,
13, and elsewhere throughout this manual. Ensure that
the wood heater has been installed according to the in-
strucons given in this manual, to all applicable codes, and
has been inspected as required. Always use safe burning
and operang pracces, and exercise extreme cauon
when fueling and maintaining the wood heater. Wear heat
resistant gloves when operang the wood heater. Failure
to follow these precauons may result in burns or a fire.
L F: Before loading the firebox with kindling
it is best to test the dracondions in the chimney.
• Open the Loading Door carefully.
• Pull the combuson Air Slide damper all the way out so
that it is fully open.
• Crumple one or two pieces of newspaper into a ball,
place them at the back of the firebox, ignite the paper,
and close the loading door.
• If the smoke from the paper is drawn up the chimney
then proceed with building the fire.
• If smoke has filled the firebox but does not seem to
be venng, the chimney may be cold. Warming the
chimney may take a few aempts. Open the loading
door very slightly and see if extra air helps. NEVER
leave the room with the loading door open. Conn-
ued operaon with the door ajar can cause danger-
ous overheang of the heater and combusbles.
• In the fall or spring of the year the outside tempera-
ture may not be cold enough to establish adequate
dra. Wait for a cooler day and try again.
NOTE: In a well insulated home dramay be af-
fected negavely. In extreme cases dramay be
reversed and cold air pulled down the chimney. Try
opening a window near the wood heater to see if
draimproves. Conversely try turning on a vent
hood or dryer to see if combuson stalls in the fire
box. Introducing outside air, or make-up air, to the
appliance may be the soluon. Consult your dealer.
• Once drais established, begin to build the fire.
• Build the fire directly on the firebrick floor. Never
use fire-dogs, grates, or similar to elevate the fire.
• Tradionally ghtly twisted sheets of newsprint are
placed at the back of the firebox with dry sowood
kindling (½ to 1" diameter) on top, followed by finely
split (1½" to 2") dry wood, and then small logs.
• Using the "top-down" lighng technique instead is
highly recommended. Simply invert the pile of kin-
dling. Place the layer of small logs across the firebox
with the finely split dry wood arranged on top of the
logs and dry kindling wood as the next layer. Alter-
nate the direcon of each layer of wood and leave
air spaces between the pieces of wood. Use twisted
newsprint or clean burning firestarters to ignite the
kindling. This method has been found to produce
less smoke and emissions during startup.
• Once the fire has fully ignited, open the loading door
slowly and add larger pieces of dry firewood.
• Control the fire using the combuson air damper.
• Burn dry, seasoned wood, preferably hardwood only.
No other solid or liquid fuels may be used.
O G

15
O G
S H:Always operate the wood heater
according to the guidelines on page 12, especially in re-
gard to opening the Air Damper before opening the Load-
ing Door and opening the door gradually. A modern wood
heater, properly installed and connected to a good chim-
ney which provides adequate dra, should not leak smoke
into the home. Air will be drawn into the wood heater, and
into any small gaps in the connector pipe, by the negave
pressure created within the wood heater and chimney by
"dra." If smoke is leaking into the home from the wood
heater or the connector pipe there is inadequate draor
the chimney is blocked in some way. A smoke alarm or
CO detector sounding will signal smoke leakage, and they
should be installed throughout your home. But even be-
fore a smoke detector is acvated, a whiffof smoke should
alert you to the fact that there is a venng problem. By-
products of wood heater combuson do contain carbon
dioxide, carbon monoxide, water vapor, tars, etc., but the
disncve aroma of wood smoke also accompanies them.
Negave pressure in the home can also contribute to
smoke leakage. Today's homes are constructed to be
much ghter and beer insulated than older homes.
Older homes tended to "breathe" as fresh air was drawn
in through myriad cracks to replace the air that rose up
the chimney. Today well designed homes are equipped
with "replacement air" systems to bring fresh air into the
home. Without replacement air, ght homes can inhibit
chimney draand may cause the flow of the chimney to
reverse when a vented appliance, such as a kitchen hood,
is turned on. Tight homes and house pressures are com-
plicated subjects, but they can be analyzed and corrected.
If there is smoke leakage, or the fire in the wood heater
slows or "stalls" under these condions, consult your deal-
er. Outside air can be brought directly to the wood heater
to help relieve negave house pressure condions.
C F R: When wood is
burned slowly, it produces tar and other organic vapors
which combine with moisture to form creosote. Modern
wood heaters, properly sized and operated, should not
produce smoke or creosote to the degree that older stoves
did, but the same elements are present. At one me it
was popular to install a very large wood stove, load it full
of wood, and reduce the combuson air; perfect condi-
ons for producing creosote. Tars and vapors, combined
with moisture, condense in the chimney at temperatures
below @ 250°F. The resulng creosote can accumulate
and cling ghtly to the flue liner and, if ignited, can create
a very hot and frightening chimney fire.
Creosote producing tars and vapors are burned at tem-
peratures over 1100°F inside a modern wood heater evi-
denced by the flames at the top of the firebox during the
second stage of combuson. Ensure that there is always
enough combuson air to support secondary combuson.
Even sll, a relavely cool chimney, especially an exterior
masonry chimney, can cool the exhaust gasses before they
exit the flue and some creosote will be produced. The
chimney connector and chimney should be inspected at
least once every two months during the heang season
to determine if creosote build-up has occurred. Contact
your High Valley dealer or local chimney sweep if you are
uncertain how to inspect the system for any build-up.
IC C F: If your wood heater is op-
erated properly to maintain clean, efficient combuson,
connected to a good chimney, burning good, dry wood,
and inspected as needed, a chimney fire should be an un-
likely occurrence. A chimney fire can create a loud rushing
sound and, perhaps, banging noises within the chimney.
Should a chimney fire occur despite your best efforts, alert
everyone in the home and leave the building immediately.
Contact the fire department. If it appears safe to enter
the home, close the Air Damper and manual damper (if so
equipped) wearing a heat resistant glove, to cut offair to
the fire. Do not throw water on the wood heater. Thermal
shock could break the door glass or otherwise damage the
wood heater. Have the chimney inspected and cleaned or
repaired as necessary before resuming operaon of the
wood heater. Always have the chimney cleaned at the end
of the burning season or before the following fall.
A D: Remove ashes once they get @ 2" to 3"
deep, or deep enough to impede the primary air inlet be-
neath the Loading Door opening. Remove ashes when the
fire is relavely cool at the end of the charcoal stage of
combuson. Use a steel rake to gather unburned charcoal
or embers to one side and leave them in the firebox to be
consumed as fuel. Remove spent ash only, leaving @ ½"
to 1" of ash remaining in the firebox to insulate the ember
bed. Use a steel shovel to carefully remove the spent ash-
es into a steel container with a ght-fing lid and move
the container outdoors immediately. Take care to avoid
shoveling up burning embers with the spent ash. Embers
can stay hot in the bed of ashes for days insulated in the
ash. The closed container of ashes should be placed on
a non-combusble surface or on bare ground, well away
from any building and all combusble materials, pending
final disposal. If the ashes are to be disposed of by burial
in soil or otherwise locally dispersed, they should be re-
tained in the closed container unl all embers have thor-
oughly cooled. No other waste of any kind shall be placed
in this container.
Some ashes may spill while removing them from the fire-
box. Ashes can be vacuumed up once they are proved to
be completely cool, but be advised that fine ash can pass
through the vacuum and into the home. Special vacuums,
designed for ash clean-up and removal and equipped with
heat resistant filters, are available through your dealer.
C G: Your wood heater is equipped with a
clear window to permit a view of the fire. The material is
generically referred to as "stove glass", but it is not glass
in the convenonal sense. The ceramic material is made
to withstand the very high temperatures that a modern
wood heater can aain and has excellent heat resistance
and strength characteriscs. However the ceramic can
be damaged through improper use. Inspect the ceramic
regularly for signs of damage. Never operate the wood
heater with cracked, damaged, or broken ceramic glass.
Allow the ceramic to cool completely before cleaning.
Never use abrasive cleaners which may cause scratches
which can develop into cracks. Use a mild window cleaner
or special stove glass cleaners available from your dealer.
Heavy deposits may be removable with a damp cloth or
damp newsprint dipped in wood ash.

16
NOTE: Use only OEM replacement parts or approved
supplies. Do not substute materials when purchasing
parts or other materials. Contact your High Valley dealer
for assistance.
O A K: Outside combuson air is required in
mobile home installaons and may be necessary in ght
homes to improve stove performance. An outside air kit
P/N AIRKIT) is available through your High Valley dealer.
The O/A kit mounts to the back of the pedestal, with the
four (4) #8 x ½" self-tapping screws provided, into pre-
punched holes. A 4" (102 mm) collar is provided for at-
tachment of 4" diameter metal duct (supplied by others).
Kits are available which include aluminum flexible duct,
rain hood, and rodent screen as required by HUD regula-
ons. Consult your dealer. The duct terminaon should
be lower than the duct collar on the wood heater pedestal
and in no case should the terminaon be higher than the
wood heater itself. The maximum length of the 4 inch (102
mm) air intake duct should be no more than 12' (3.66 m)
Combuson air may be drawn from outside of the home
or from a venlated crawl space. Combuson air must
not be drawn from an enclosed space such as a garage, or
an unvenlated crawl space. If the combuson air duct
is to pass through the floor of the home, do not make a
hole in any floor protecon within the minimum floor
protector dimensions (8" [20.3 cm] to the sides and back
of the wood heater.). (See page 8) Seal wall or floor pen-
etraons with waterproof flexible sealer (not provided).
R C G: Never operate the wood
heater with damaged or broken ceramic glass. Never sub-
stute window glass or tempered glass as a fire may result.
Replacement 5mm high temperature ceramic, complete
with gasket, is available from your dealer. (P/N GLS1300)
• Remove the loading door from the wood heater and
lay it flat on a well padded work surface.
• Remove the retaining screws from the door and, wear-
ing gloves, remove any remaining pieces of ceramic.
• Remove a short secon of paper backing covering the
gasket adhesive from the gasket. Center gasket mate-
rial on the edge of the replacement ceramic and firmly
press the gasket onto the edge. Connue around all
four sides of the ceramic. Trim offany excess gasket.
• Center the ceramic in opening, posion brackets in
place, insert screws, and ghten evenly.
CAUTION: Screws should be snug but not overly ght.
D G: The Loading Door is equipped with ⅝"
fiberglass rope gasket. Check the condion of the gasket
on a regular basis for signs of wear. Over me the gasket
will compress and the door may not seal ghtly. Replace
as necessary. A gasket kit (P/N GSKDOR) is available from
your dealer and includes silicone adhesive. Remove all old
silicone before installing a new gasket.
S P: Your High Valley wood heater has been
painted with high temperature stove paint at the factory.
Over me the paint may lighten in color with heat expo-
sure or need touch-up. Stove Bright brand San Black #
1900 spray paint (available from your dealer) is compat-
ible with the OEM paint. It is most oen impraccal to
take the wood heater outside for painng. Open all win-
dows for venlaon and protect all exposed surfaces and
furnishings with drop cloths and/or plasc sheeng. Mask
any areas not requiring paint. Apply light coats and fol-
low all instrucons and precauons on the can. Allow the
paint to dry thoroughly before lighng a fire. The fresh
paint produces an acrid odor as it cures. Open windows
as necessary.
B W: The Model 1300 comes with a stan-
dard convecon blower pre-installed. If it is necessary
to remove the blower for service or replacement, follow
the wiring diagram below when reconnecng wiring. A
replacement blower (P/N BLO1300) or a kit complete with
a new rheostat (BLO1300KIT) are available.
O A M

17
A B W C
Before striking a match to light that first fire please read
the following informaon outlining the basics needed for
clean wood combuson. Space is limited here, but much
has been wrien on the subject and is available elsewhere.
T C T:Air, Fuel, and Ignion are
required to establish and support combuson whether
wood, coal, wood pellets, gas, oil, etc. is the fuel being
burned. The correct proporon of air and fuel will vary,
but the three basic ingredients essenally the same.
I:Ignion in a wood heater is straighorward.
Typically it involves a match, paper, and kindling wood.
Enough heat must be generated and sustained to get the
cord wood burning (@ 350°C to 500°C**). For compari-
son matches are esmated to burn at 600°C to 800°C; a
standard butane lighter is somewhat hoer at @ 800°C
to 1100°C, paper will ignite at @225°C to 250°C and dry
sowood kindling at @350°C. You light the paper with
a match to ignite the kindling and, finally, the cord wood.
NOTE: There are any number of "firestarters" on the
market. They light easily with a match and eliminate the
need for newspaper. We recommend the clean burning
"food safe" firestarters. NEVER use any type of flam-
mable liquid to start or "freshen" the fire.
F:The Model 1300 is designed and approved for use
with solid natural wood. Use of any other fuel may create
excessive emissions and will void the warranty.
The cord wood that you will burn depends to a large de-
gree on what species of trees are abundant where you
live. Transporng hardwood from its source to an area
where hardwood is scarce would be cost prohibive. If
you live where only sowood species are available, then
that is what you will likely use for fuel. In fact all cord
wood, regardless of species, has approximately the same
potenal BTU's* in each pound of wood. A pound of so-
wood has the same potenal @ 8600 BTU's (kiln dry) per
pound as a pound of hardwood. "Hardwood" is denser
than "sowood", varies in specific gravity, and is there-
fore heavier by volume; and, of course, wood is sold by
volume, not by the pound A cord of hardwood will take
up the same space as a cord of sowood but it will be
heavier and contain more potenal BTU's.
NOTE: The common unit for the sale or purchase of
firewood is the cord. One cord equals 128 cubic feet
(4' high x 4' wide x 8' long). Because cord wood is ir-
regularly shaped it would be impossible to achieve a
solid 128 cu. . block of wood. Wood is supposed to be
"well stacked" in a proper cord but that is a subjecve
measure. 85% wood and 15% air space is commonly
accepted as the proper rao but some sources cite 70%
wood and 30% air space. That represents significant dif-
ference of @ 109 cu. . to @ 90 cu. . of usable wood.
Along with density, the other major variable in wood fuel
is moisture content. Unseasoned or "Green" wood will
contain 50% water or more. Good "air-dried" cord wood
is about 20% moisture. At 20% moisture the available
BTU's will be @ 6200 to 7000 per pound not 8600. At 50%
moisture "green" wood will have only @ 4000 BTU's per
pound or less. It follows that cord wood needs to be well
seasoned. It may take 9 months for sowoods and up to
24 months for hard woods to air dry thoroughly.
C:Clean, efficient combuson in your wood
heater depends on good quality, well seasoned fuel.
Buying "seasoned" wood during the burning season is
most oen very disappoinng. The best advice is to get
"green" wood in spring and air dry it yourself. If you don't
cut your own wood, find a reputable, reliable wood seller.
Sowood species may be dry enough for use by the fall of
the year while hardwoods may not be well seasoned unl
the following fall. Stack the wood offthe ground in a well
venlated area, preferably under cover or, at the least,
with a tarp over the top of the stack. More informaon
on wood and wood species see Appendix - B on Page 18.
A:The other leg of the combuson triangle is air. The
air needed to support combuson is drawn into the fire-
box by the draof your chimney. (See Page 6) Final air
delivery and metering required much research and engi-
neering to ensure clean combuson but, the good news
is, you regulate the combuson air with one damper. As
long as your chimney dras well, air control is simplified.
It is against federal regulaons to alter the air control set-
ngs or controls in any way.
S C:Put the three elements of the
Combuson Triangle together in your wood heater and
you will have started a fire. The chemical and physical
processes taking place in that fire are complex, and scien-
fic papers on the subject are lengthy and detailed. Three
major stages are worth nong and will help the operator
understand how to achieve the cleanest burning fire.
STAGE ONE: K M E:
Kindling the fire has been covered above under Ignion.
Provide enough heat to the wood for a long enough me
and it will begin to burn. Before the fire can reach full
heang potenal moisture in the wood must be evapo-
rated. This is why dry fuel is so important. More than
1000 BTU of potenal heat will be needed to drive off
each pond of water. Unl the water present in the wood
is boiled offthe fire will be relavely cool, heat from the
coal bed will be used up, and flue gas temperatures will
be reduced. Burning green wood wastes a lot of energy.
STAGE TWO: G V I: Once
moisture is driven off, the temperature of the fire builds
and various hydrocarbons and other elements begin to
vaporize. At temperatures between 540°F and 1225°F
these gasses will ignite if oxygen is introduced. The stain-
less steel tubes at the top of the firebox meter in air auto-
macally to ignite those gasses. Temperatures approach-
ing 2000°F are possible, providing more heat to the
home. A blueish flame at the top of the firebox indicates
the burning of flammable gasses. If the flames disappear
prematurely increase the air damper seng.
STAGE THREE: C B: Aer flammable
gasses have been burned off, only charcoal remains.
Charcoal burns cleanly at @ 1100°F in the presence of ox-
ygen. Adjust the air damper as needed to extend the fire.
If a connuous fire is desired, add fresh fuel while the
charcoal bed is sll hot enough to kindle the new wood.
*A Brish Thermal Unit (BTU) is a measure of the amount of energy
(heat) required to raise one pound of water by 1°F at sea level.
**The temperatures are given in Celsius and the temperature ranges are
approximate as the values vary from source to source.

18
APPENDICES B & C
A B H V W:Natural
cord wood does not come with a specificaon sheet like
the building materials described in Appendix C. Manu-
factured products can be made to strict, repeatable tol-
erances. Natural wood, on the other hand, varies con-
siderably depending on where it grows, the climate, the
mineral composion of the soil, and more. Even sll,
considerable research and scienfic data is available on
different variees of wood. Added to the variaons in
the wood itself is the fact that fire wood is sold by vol-
ume; most typically by the cord. As discussed in Appen-
dix A, a cord measures 4' wide X 4' high X 8' long or 128
cubic feet. Beyond those facts it begins to get murky.
The amount of burnable wood that will be available in
a given cord can vary greatly on how it is cut, whether
it is split, the sizes of the whole or split logs, and the
skill (or perhaps the integrity) of the person stacking
the wood. An apocryphal story aributed to a Vermont
wood burner avers that well stacked wood will have spac-
es large enough for a mouse to crawl through but not
large enough for the cat chasing him. Well stacked wood
should be @ 85% wood and 15% air space. The air spac-
es are necessary to ensure proper drying. (FYI there is a
lively debate amongst experienced wood burners wheth-
er the bark side of the split wood should be up or down.)
Bark up or down the wood must be well seasoned (@
20% moisture) to be considered good firewood. Burning
green wood is inefficient and disappoinng; cung the
BTU values given below approximately in half.
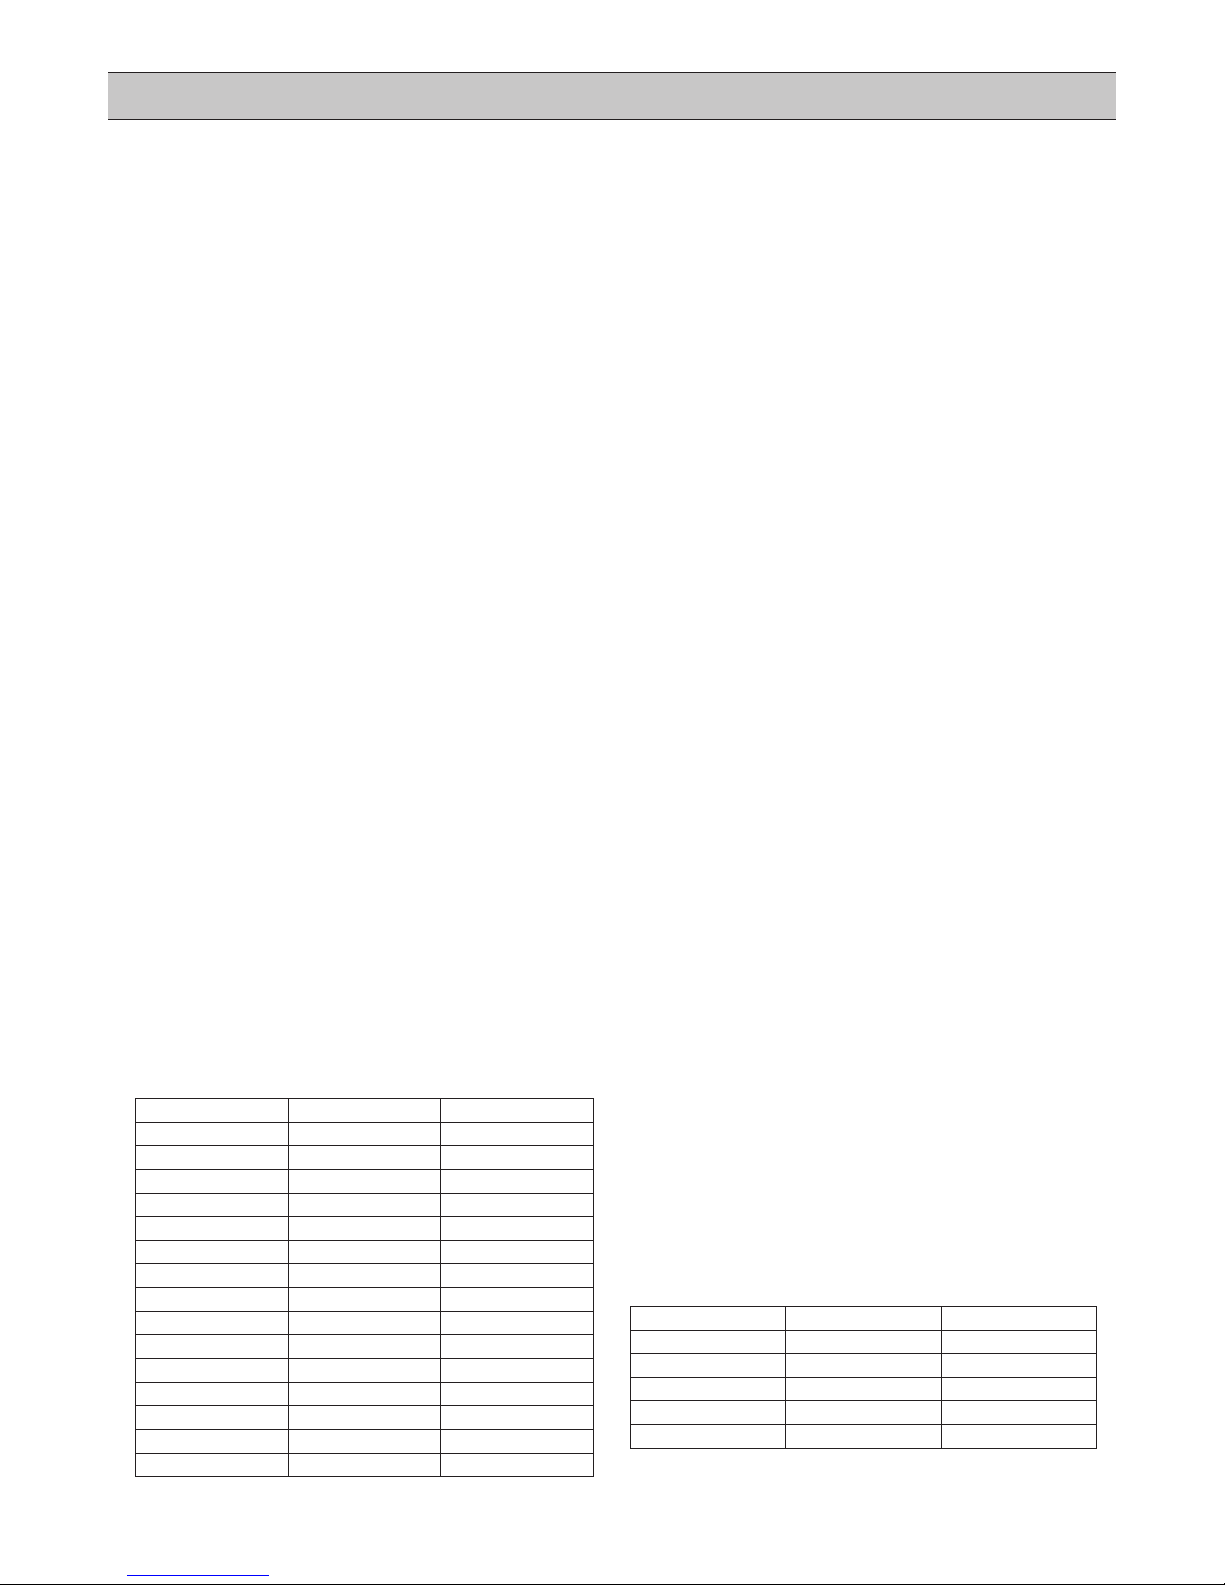
Below is an abbreviated chart that gives some approxi-
mate weight and BTU values for various species of wood.
More comprehensive lists are available on line, but a
word or two of cauon. The stascs can vary widely
depending on the source or, more likely, on the point
they are trying to make. The numbers can be easily ma-
nipulated by changing assumpons. If a cord of wood is
assumed to have 30% air space then the esmated avail-
able BTU's will be considerably less. Likewise, assuming
that a pound of wood at 20% moisture contains say 8000
available BTU will net an appealing, inaccurate number.
In researching data we found the variaons considerable.
Use the numbers below as a point of comparison be-
tween species available to you, not as a score card. The
best advice is to find an honest wood vendor and rely on
them to deliver a full cord of the best wood available.
Buy your wood well ahead of the burning season, dry it
and keep it dry, and enjoy clean efficient wood heat.
W S L. C BTU C
American Elm @ 3000 lbs. @ 20,000,000
Apple @ 3800 lbs. @ 27,000,000
Cherry @ 2925 lbs. @ 20,500,000
Hemlock @ 2700 lbs. @ 18,000,000
Hickory @ 4200 lbs. @ 27,000,000
Red Oak @ 3500 lbs. @ 24,500,000
Shagbark Hickory @ 4325 lbs. @ 27,500,000
Sugar Maple @ 3750 lbs. @ 24,000,000
Tamarack @ 3250 lbs. @ 21,000,000
White Ash @ 3500 lbs. @ 24,000,000
White Birch @ 3200 lbs. @ 20,000,000
White Cedar @ 1915 lbs. @ 12,500,000
White Oak @ 4200 lbs. @ 29,000,000
White Pine @ 2250 lbs. @ 15,000,000
Willow @ 2100 lbs. @ 14,500,000
All values are approximate and for comparison only.
A C F W P:UL Stan-
dard 1618; the Standard for Wall Protectors, Floor Protec-
tors, and Hearth Extensions, was adopted as a standard
in 2011. UL-1618 categorizes floor and wall protectors as
Type 1 or Type 2 protecon. A seemingly minor change
in UL 1618 calls for the actual thermal properes of floor
protecon to be specified in R-value in place of k-value.
In fact, that change makes it one step simpler to calculate
thermal protecon if it becomes necessary.
• Type 1: Ember Protecon = No thermal value
• Type 2: Thermal Protecon = R-value specified
Type 1 Ember Protecon is deemed to be a connuous
non-combusble material extending under the appliance
and to the front , sides, and back in the size specified. Any
thermal value a Type 1 protector may have is disregarded
under UL-1618. Type 2 Thermal Protecon provides ther-
mal resistance in addion to ember protecon. Thermal
value is determined by laboratory test. UL-1618 calls for
thermal requirements to be expressed as R-values rather
than as k-values which were used in the past.
If a hearth or floor protecon is to be built on-site, or
there is an exisng hearth already in place, then the ther-
mal resistance must be calculated. This is where having
thermal requirements expressed as an R-value vs. k-value
simplifies calculaons. R-values can be added together.
• R-value is a unit of measure of Thermal Resistance. It
is best known as the common measure of insulaon.
As with insulaon, the higher the number, the beer.
• k-value is a unit of measure of Thermal Conducvity.
k-value is the opposite (inverse) of R-value in that the
smaller the k-value the greater the resistance.
R-values for different materials can be added together to
determine the total R-value of composite layers of mate-
rials and k-values cannot. Converng k-value to R-value
is relave simple but it tends to add some confusion. (It
should be noted that there are other units of measure,
such as C-value, Thermal Conductance, but they are not as
commonly used in hearth applicaons.) So, again, if only
the k-value is given, then it must be converted to R-value.
(Keep in mind that the k-value is given per inch of materi-
al.) To convert k-value to R-value divide 1 by the k-value of
the material and divide by the thickness of the material. C-
values can also be converted to R-values (1 ÷ C-value) and
R-values can also be converted to k-value (inches ÷ R) but
by staying with R-values materials can be added together.
Floor protecon requirements were once commonly ex-
pressed as "3/8" of asbestos millboard k = 0.84" or similar.
The conversion is: 1 ÷ 0.84 = 1.19 X 0.375" = 0.45 R-value.
Today, with the R-value given, consider this example:
A wood heater requires R = 1.19. If 4" common brick is the
material of choice; their R-value is 0.80 (0.20 X 4"). Add
1/2" of Durock (R = 0.26) and the protecon is sll not ad-
equate (R = 1.06). Add one more layer of 1/2" Durock and
the floor protecon is now acceptable (R = 1.32). (Brick,
le, etc. must be mortared in place, not loose laid.)
M R- -
Common Brick R = 0.20 per inch k = 5.00 per inch
Durock R = 0.52 per inch k = 1.92 per inch
Hardibacker R = 0.51 per inch k = 1.95 per inch
Micore 160 R = 2.86 per inch k = 0.86 per inch
Marble R = @0.09 per " k = @11 per inch
More complete lists of material specificaons and more detailed
explanaons of calculaons can be found online.

19
High Valley Stoves by Stoll warrants its High Valley brand woodstoves to be free from defects in material or workmanship, under normal
use and condions of service, to the original purchaser, for a period of seven (7) years from the date of purchase subject to the follow-
ing limitaons: Electrical Components (blowers, switches, etc.) are warranted against mechanical and electrical failures, under normal
use and condions of service, to the original purchaser for a period of one (1) year. High temperature ceramic glass is warranted to
be free from defects in material, under normal use and condions of service, to the original purchaser for a period of one (1) year.
Damage to glass caused by impact is considered abuse and is not covered under this warranty. Catalyc Combustors are warranted
by the manufacturer for a period of five (5) years. The warranty is administered by the manufacturer of catalyc combustors directly.
The original purchaser should register the purchase of any High Valley stove equipped with a catalyc combustor with the manufac-
turer within 30 days of purchase using the warranty registraon provided by the manufacturer of the catalyc combustor. Terms and
exclusions of warranty on catalyc combustors are established by the manufacturer of the catalyc combustor and not by High Valley
Stoves by Stoll. The following items are not covered under warranty: Gaskets, Paint, Damper, Damper Handles and Rod, Fireclay Bricks
or castable lining, and all parts not permanently aached to the heang unit. Parts not permanently aached to the heang unit are
defined as any part removable with common hand tools. If, aer installaon, assemblies and/or components covered under this war-
ranty are found to be defecve in materials or workmanship during the warranty period, High Valley Stoves by Stoll will, at its opon,
repair or replace the covered components, subject to the limitaons set forth in this warranty.
H V S L W C: This warranty is nontransferable and is extended exclusively for the
benefit of the original purchaser, provided that the appliance purchase was made through an authorized High Valley Stove dealer. The
Stove should be used within 30 days of purchase by having a fire started, the blower operated, and heat generated in the owner’s
home to confirm proper operaon of all components. The product must be installed, operated, and maintained in compliance with
the instrucons set forth in the Owner’s Manual supplied with the product at all mes. Installaon, setup, and start-up procedures
are considered to be normal required acvies not associated with warranty service. Issues such as adjustments or venng should
be included in setup of the product. Such procedures are not covered by warranty. Any installaon, construcon, transportaon, or
other related costs or expenses arising from defecve part(s), repair, replacement etc., will not be covered by this warranty, nor will
High Valley Stoves by Stoll assume responsibility for them. Further, High Valley Stoves by Stoll will not be responsible for any incidental,
indirect, or consequenal damages. This warranty constutes the enre warranty with respect to High Valley Stoves by Stoll and/or
its products. High Valley Stoves by Stoll makes no other warranty, expressed or implied, including any warranty of merchantability, or
warranty of fitness for a parcular purpose
E L:This warranty does not cover the following: Damage caused by transportaon and/or handling
of the product; damage due to incorrect installaon not in accordance with the Installaon Instrucons included with the product and
any applicable naonal, state, and local building and fire codes, etc.; [High Valley appliances must be installed by a qualified (prefer-
ably NFI cerfied) installer. It is the installer’s responsibility to ensure that the product is installed and operang correctly at the me
of installaon. Chimney components and/or other non-High Valley accessories used in conjuncon with the installaon of this product
are not covered under this warranty.] Damage caused by improper use, which is not in accordance with the Instrucons for Use and
Maintenance included with the product (over firing, use of corrosive fuel, etc.); Damage caused by unauthorized modificaon, use,
or repair; Damage caused by the use of non-High Valley spare parts or accessories; Damage caused by lack of regular maintenance
and cleaning by the owner as outlined in the Operang Instrucons, or due to negligence or carelessness; Damage caused by misuse,
accident, neglect, or willful abuse of the product; damage caused by the use of any type of coal in any High Valley stove. (The use of
seasoned wood is required.); Damage due to accidental or uncontrollable environmental causes such as: intense cold, fire, lightning,
voltage overload or drop, inadequate venng or venlaon, negave air pressures cause by mechanical systems such as furnaces,
fans, clothes dryers, etc., and damage due to wiring or mechanical systems not in accordance with applicable naonal, state, and local
codes; Damage caused by rust or corrosion due to condensaon, dampness, humidity, or incorrect installaon; Calls for warranty ser-
vice that are determined to be occasioned by lack of maintenance or factors not related to the High Valley appliance; Normal wear and
tear such as paint discoloraon, abrasion, worn gaskets, etc.; Repair or replacement of wear-parts which are subject to normal wear
and tear during the warranty period, or parts that may require replacement in connecon with normal maintenance; The installaon
of consumer replaceable items and installaon of upgraded components; Noise resulng from the movement of motorized parts or
minor expansion and contracon which is considered normal, not a defect.
T W V :The appliance has been over-fired. Over-firing can be idenfied by, but not limited to, warped firebox
components, discolored cast iron, discolored, bubbled, or cracked painted finishes; The appliance has been used to burn coal of any
type; the appliance is subjected to prolonged periods of dampness or condensaon; There is any damage to the appliance or other
components due to water or weather damage which is the result of, but not limited to, improper chimney or venng installaon.
L L: The exclusive remedy of the owner, and High Valley Stoves by Stoll sole obligaon under this warranty,
under any other warranty, express or implied, or in contract, tort or otherwise, shall be limited to repair or replacement as specified
above. High Valley Stoves by Stoll assumes no liability for incidental damages or damages of any kind which may arise from the use of
its products. In no event will High Valley Stoves by Stoll be held liable for any incidental, indirect, or consequenal damages caused by
defects in its products. The maximum amount recoverable under this warranty is limited to the purchase price of the product. This
Warranty provides specific legal rights and the consumer may have other rights that vary from state to state. Some states do not al-
low exclusions or limitaon of incidental or consequenal damages, so these limitaons may not apply to you. Except to the extent
provided by law, High Valley Stoves by Stoll makes no express warranes on its High Valley Stoves other than the warranty specified
herein. The duraon of any implied warranty is limited to duraon of the expressed warranty specified above.
IW S R:If, during the warranty period, a High Valley product is proved to be defecve in material
or workmanship, High Valley Stoves by Stoll will, at its own opon, repair or replace the product as described below. Any claim for
warranty service should be made to the dealer from whom this High Valley Stove was purchased. Confer with your dealer in advance
to determine any addional costs associated with a warranty service call. Service charges and/or mileage are not covered under war-
ranty. These charges vary from retailer to retailer. Your authorized High Valley Stove dealer will procure replacement parts and/or
contact High Valley Stoves by Stoll to arrange for replacement should the appliance exhibit defects in material and workmanship which
are beyond field repair. Extraordinary repairs which are deemed to require replacement must be approved by High Valley Stoves by
Stoll prior to said repair or replacement. Any removal fees, transportaon costs, reinstallaon fees, construcon costs, or any other
related costs or expenses arising from replacement will not be covered by this warranty, nor will High Valley Stoves by Stoll assume
responsibility for them.
WARRANTY COVERAGE

H V S S
185 Highway 201 │Abbeville, SC 29620
www.highvalleystoves.com
High Valley Model: 1300 Serial Number:
High Valley Dealer: Date of Purchase:
Installed by: Installaon Date:
Inspected by: Date of Inspecon:
NOTES:
OWNER' RECORD
HL1350 Rev. 05/2015
Other manuals for 1300
1
This manual suits for next models
2
Table of contents
Other High Valley Stove manuals
Popular Stove manuals by other brands

Palazzetti
Palazzetti ECOFIRE SABINA IDRO 20 PRODUCT TECHNICAL DETAILS

American Energy Systems
American Energy Systems LR-1 Installation, operation and maintenance manual

Globe fire
Globe fire Vulture quick start guide

Lumme
Lumme LU-HP3640C user manual

NORTHWOODS
NORTHWOODS Base Camp manual

FireBird
FireBird 16 instruction manual