Higher Ground SATPAQ Product information sheet

SATPAQ USER
REFERENCE GUIDE
Copyright © 2020 Higher Ground, LLC
V1.3 4-24-2020

Contents
Getting Started.................................................................................................................................................1
The Basics....................................................................................................................................................1
Opening SpaceLinq the First Time................................................................................................................1
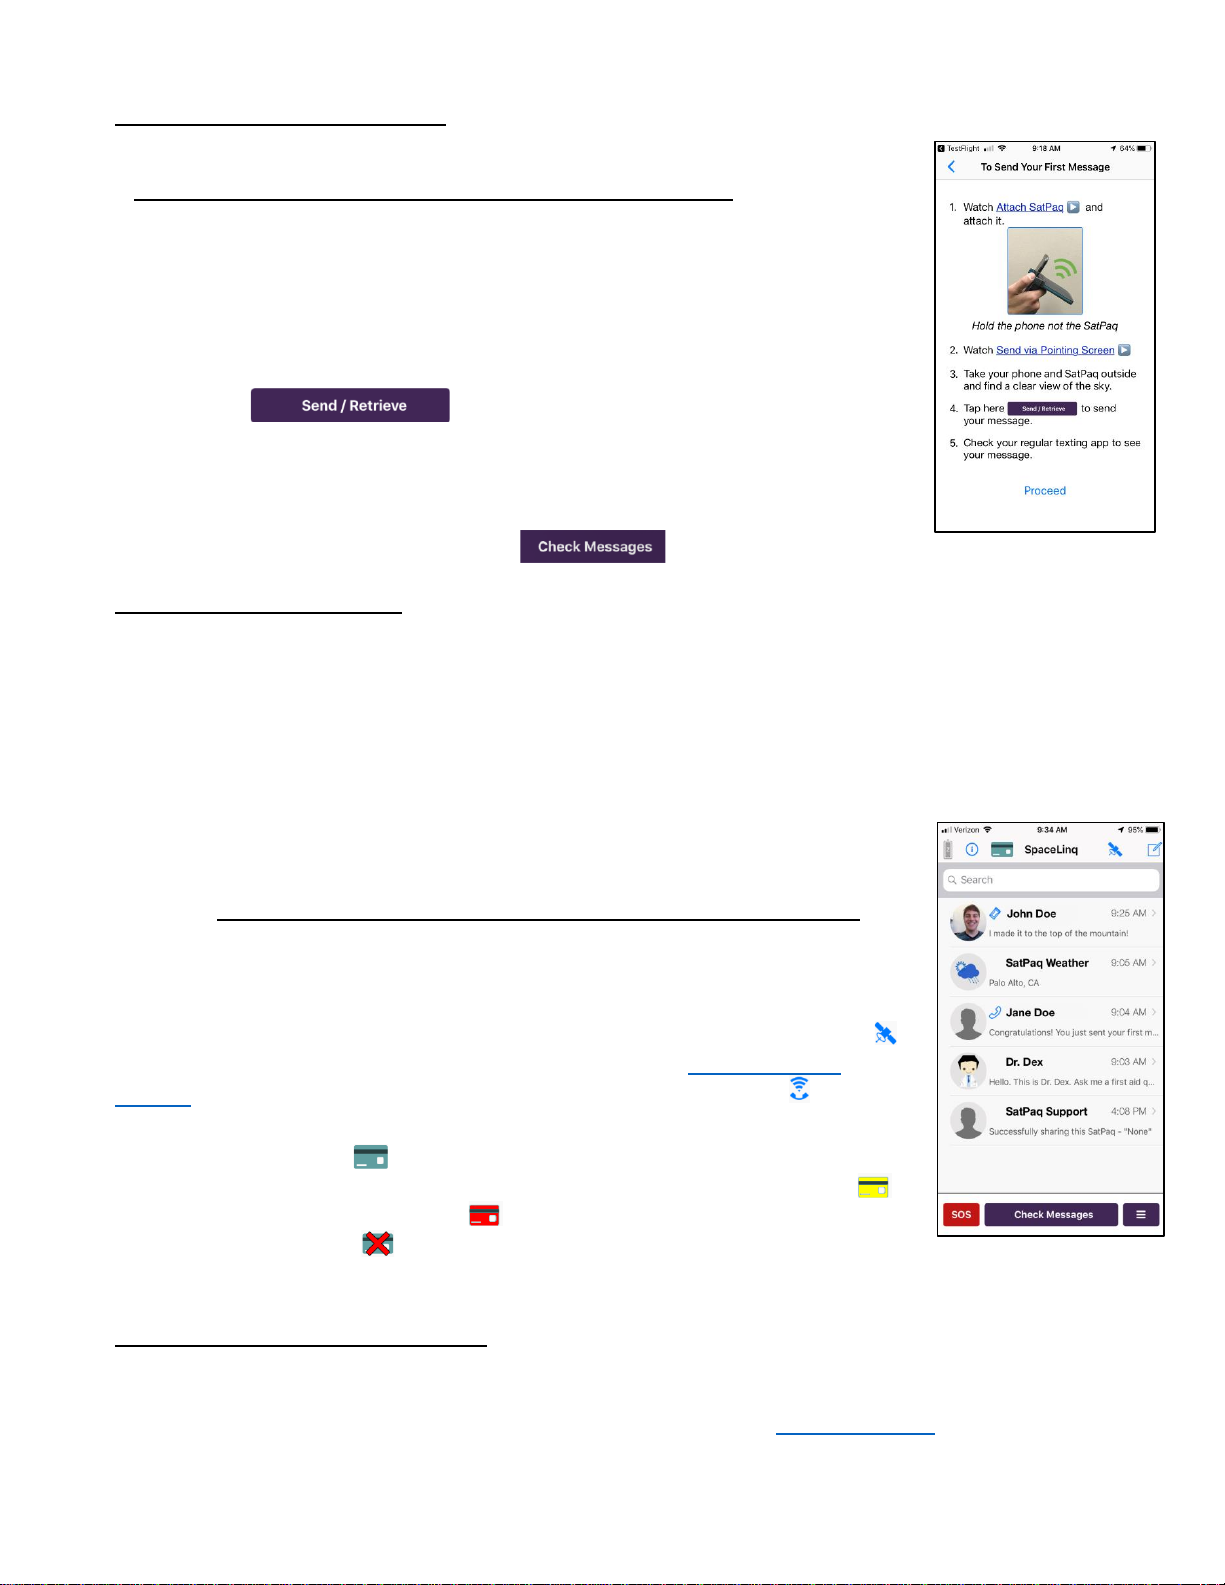
To Send Your First Message ........................................................................................................................2
Registering Your SatPaq ..............................................................................................................................2
SpaceLinq........................................................................................................................................................2
Basic Mode vs. Advanced Mode...................................................................................................................2
Charging and the Battery Icon ......................................................................................................................3
Information ................................................................................................................................................3
Send First Message......................................................................................................................................3
Attach SatPaq video .....................................................................................................................................3
Send via Pointing Screen video....................................................................................................................3
Tips...............................................................................................................................................................3
Reference Guide...........................................................................................................................................3
Compose and Send a Message ..........................................................................................................4
For Best Transmission Results.........................................................................................................................5
Equipment Care............................................................................................................................................5
SOS ........................................................................................................................................................6
Send / Retrieve and Check Messages..............................................................................................................7
What Your Message Looks Like in Your Recipient’s Texting Program ..........................................................7
Options Pop-up Menu ..............................................................................................................................8
Settings ....................................................................................................................................................9
My Location… ...........................................................................................................................................9
Manage SatPaq Account/Settings… YOU MUST HAVE INTERNET ACCESS ........................................9
Manage Profile.......................................................................................................................................9
Manage Signature…............................................................................................................................10
Manage Sharing…...............................................................................................................................11
My Account... ONLY on Android phones.............................................................................................12
In-app Purchase... ONLY on iPhones.................................................................................................12
SatPaq Information..................................................................................................................................13
Select SatPaq......................................................................................................................................13
Communication Options….......................................................................................................................14
SatPaq Detached Mode.......................................................................................................................15
Advanced Mode…...................................................................................................................................16
Customer Support...................................................................................................................................16
Ask Dr. Dex ...........................................................................................................................................17

Weather Report ........................................................................................................................................17
Tracking ....................................................................................................................................................18
SatView ....................................................................................................................................................19
Share ......................................................................................................................................................19
APPENDICES................................................................................................................................................20
FCC Compliance............................................................................................................................................20
Actions to Perform in SpaceLinq ....................................................................................................................21
Enter text....................................................................................................................................................21
Long press a message bubble....................................................................................................................21
Delete a Conversation / Block a Contact.....................................................................................................22
Purchase Credits –from website or SpaceLinq –ONLY on Android phones ..............................................22
Billing Summary –from website or SpaceLinq –ONLY on Android phones................................................23
Manage SatPaqs –from website or SpaceLinq –ONLY on Android phones ..............................................24
Change Password –ONLY from website....................................................................................................24
Icons Used in SpaceLinq................................................................................................................................25
Screen Shots in SpaceLinq............................................................................................................................26
Send / Retrieve Screens.................................................................................................................................27
View of SatPaq –Front & Back ......................................................................................................................28
Troubleshooting..............................................................................................................................................28
Troubleshooting Topics...............................................................................................................................28
Can’t send a message.............................................................................................................................29
Satellite icon in circle, but bars are all gray..............................................................................................29
Satellite icon in circle but the message “No Satellite Signal” is displayed ................................................29
Friend sent a message but it’s not in SpaceLinq......................................................................................30
Tried to send message but got error no message credits........................................................................30
SatPaq falls off phone.............................................................................................................................30
Blue light remains lit on the SatPaq.........................................................................................................30
Can’t access any of the Manage SatPaq Account/Settings screens ........................................................30
Satellite icon jumps out of circle / Pointing screen points in the wrong direction......................................31
SpaceLinq can’t find my SatPaq..............................................................................................................31
I asked Dr. Dex about something and the answer didn't match my question............................................31

1
This User Reference Guide provides instructions and guidance for using the SatPaq and related services.
A SatPaq is a device that attaches to your smart phone and enables it to send and receive messages via
satellite. SpaceLinq is the messaging app you download to your phone to interface with the SatPaq via
Bluetooth. Please refer to our Terms & Conditions (available at satpaq.com/terms & conditions) and our
Privacy Policy (available at satpaq.com/privacy) for terms and conditions that apply to your ownership and
use of the SatPaq and related services.
Getting Started
The Basics
•Best results are obtained when the SatPaq is outside with a relatively clear view of the sky.
•A satellite signal can be blocked by obstructions such as mountains, trees, walls, and some glass.
•When attached correctly, the SatPaq will be at a 90⁰ angle to the phone
with the “SATPAQ” logo pointing towards the sky.
•Always hold the PHONE, NOT the SatPaq when transmitting.
Holding the SatPaq covers the antenna and can prevent communication.
•After sending a message, wait a bit and then tap
(Check Messages button) to check for replies.
•You can use SatView before you attempt to transmit to check for
obstructions that could block the satellite signal.
•Look for the (information icon) at the top of many screens to find help.
Opening SpaceLinq the First Time
When opened the first time, SpaceLinq will ask for permission to access your
location, your contacts, your phone’s camera, and to send you notifications.
Giving permission will allow you to access all of SpaceLinq’s features.
Once permission selections have been made, a login screen appears. Enter
the Username and Password you previously registered on the www.satpaq.com
website or tap “Create Account” (iPhone) or “New User” (Android) to register
yourself. (You must have access to cell or WiFi to register using your cell
phone.)
Once logged in, a Welcome screen appears that reminds you to have your
SatPaq charged and close by. After dismissing the Welcome screen,
SpaceLinq searches for your SatPaq to pair for a Bluetooth connection. When
it finds the SatPaq, it displays its serial number (SN). If this matches the serial
number on the back of your SatPaq, tap “Select.” If more than one SatPaq is
found, all the SNs will be displayed. Select the SN that matches the serial
number on the back of your SatPaq.
2
To Send Your First Message
After you have selected your SatPaq, a tutorial screen will be displayed.
We strongly recommend you follow all the steps in the tutorial.
1) Watch the video (45 secs) –Attach SatPaq.
2) Watch the video (42 secs) –Send via Pointing Screen.
3) Take your phone and SatPaq outside and find a clear view of the sky.
4) Attach your SatPaq to the phone at a 90⁰ angle.
5) Hold the phone, NOT the SatPaq.
6) Tap (Send / Retrieve button) to send a message
we created for you.
7) Check your regular texting app to see our message.
8) Send yourself a reply from your texting app and return to SpaceLinq.
9) Wait a bit after sending then tap (Check Messages button) to retrieve your reply.
Registering Your SatPaq
SpaceLinq automatically registers your SatPaq. Registering your SatPaq means you can disable it if you
lose it, rendering it useless to whoever finds it. You can also enable it again for continued use if it is
recovered. If you ever want to transfer your SatPaq to another person, you can deregister it from your
account. If multiple people want to use the same SatPaq, the first person to select that SatPaq becomes its
registered owner and it appears in their account. Other users become shared users.
SpaceLinq
SpaceLinq is a messaging app that serves as the interface for your SatPaq.
Messages can be sent and received by satellite, cell or WiFi. Recipients receive
SatPaq messages on their regular texting app and can respond just like any other
message. They do not need to have the SpaceLinq app to receive your texts.
From the SpaceLinq screen, you can view information, compose messages, open
individual conversation screens, Send / Retrieve queued messages (messages
waiting to be sent by satellite), access special features, and adjust settings.
Initially, SpaceLinq is configured to only communicate via satellite. There is a
(satellite icon) in the top right corner. If you have changed Communication
Options from Satellite Only to WiFi, Cell, and Satellite, there will be a (cell/WiFi
icon) in the top right corner.
A green credit card icon is displayed if you have sufficient Message Credits.
If your Message Credits go below 15, the credit card icon changes to yellow .
If they go below 7, it changes to red . If there is a problem with your credit
card, the icon has an “X” . You can check the number of available Message
Credits by tapping the credit card icon.
Basic Mode vs. Advanced Mode
Initially, SpaceLinq opens in Basic Mode. In this mode, messages are only sent and received via satellite,
selecting a satellite is automatic and it is not possible to use the Share My Activity feature. Once you are
comfortable using SpaceLinq, you can enable additional features in Advanced Mode from the Settings
screen. In this mode you can send a message to your Share Activity Contact group and/or post on Twitter.
(Recipients of a shared message cannot reply.) You can manually select which satellite you would like to
transmit to. You can choose to see more detailed signal strength information on the Pointing screen.
3
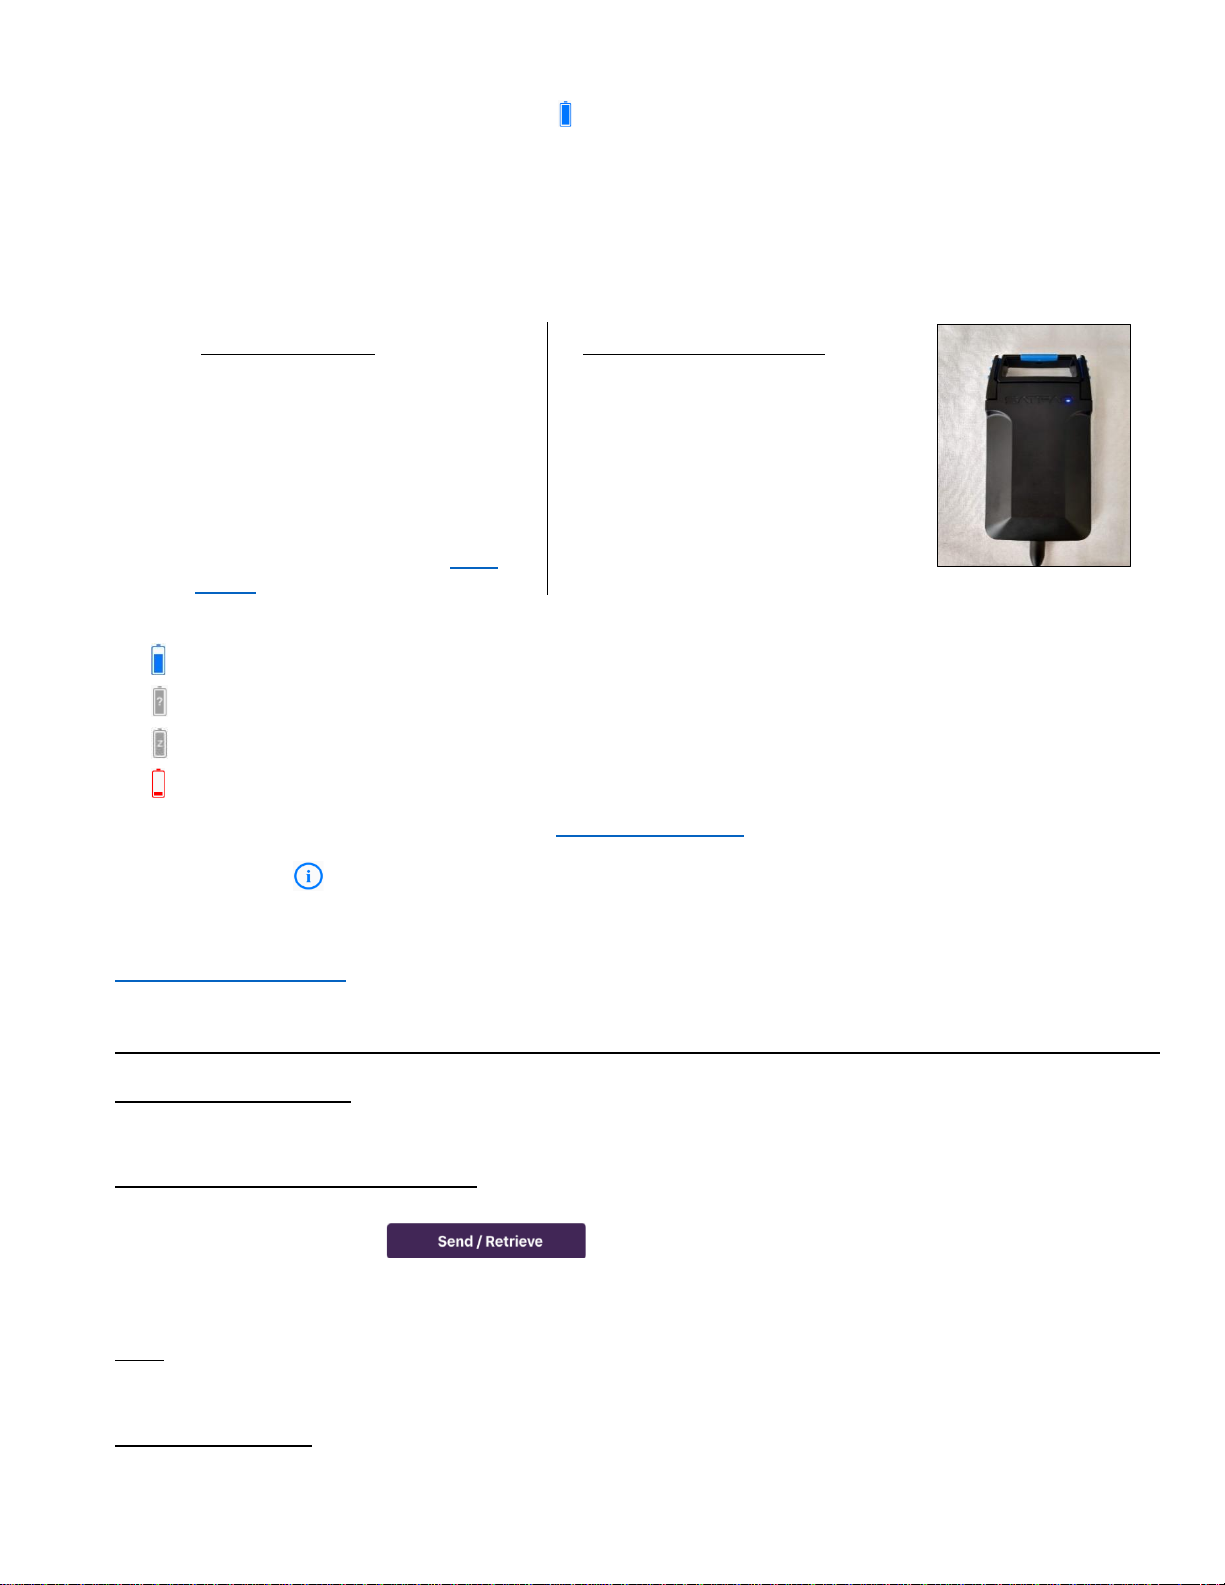
Charging and the Battery Icon
You should be able to send or receive about 150-200 average-sized messages (100 characters) on a single
battery charge. Without use, the SatPaq is expected to retain some charge for approximately 4-5 months,
though the charge level may decline. If the SatPaq has been unused for any extended period, you should
recharge the SatPaq before you expect to use it.
The SatPaq has a multi-color status light in the “Q” of the SATPAQ logo that conveys pertinent information
depending on whether the SatPaq is in use or is plugged in and charging.
Normal Operation
Plugged in and Charging
No light SatPaq not connected
No light Fully charged
Blue SatPaq connected
Green >90% charged
Blue blinking SatPaq on standby
Amber 20% to 90% charged
Red blinking Battery charge <20%
Red <20% charged
Alternating Red and Amber flashing
Error condition. Press the reset
button on the back of the SatPaq
The battery icon in the top left of the SpaceLinq screen displays the status and charge level of the SatPaq.
= Displays level of charge.
= ? - No SatPaq has been selected.
= Z - SatPaq is asleep.
= Battery is very low and should be charged soon.
The battery icon can be selected to open the SatPaq Information screen.
Information
The Information dropdown provides a list of items to help you learn how to use SpaceLinq and your SatPaq.
Send First Message
A tutorial with the steps to send your first message using SpaceLinq.
We strongly recommend you follow all the steps in the tutorial before attempting to send your own message.
Attach SatPaq video
We recommend you watch the “Attach SatPaq” video to learn how to attach the SatPaq to your phone.
Send via Pointing Screen video
To send a message via satellite, for best results the SatPaq must be outside and pointed in the direction of
the satellite. When you tap (Send / Retrieve button), the Pointing screen appears to
help you find the location of the satellite. We recommend you watch the “Send via Pointing Screen”video
to see a preview of what to expect.
Tips
Displays advice to help you successfully operate your SatPaq and use SpaceLinq.
Reference Guide
The Reference Guide provides information on how to use your SatPaq and take advantage of the many
features in the SpaceLinq app.

4
Compose and Send a Message
A message can be written by tapping the (compose icon) in the top right of the SpaceLinq screen or
by tapping an existing conversation.
•Messages can be sent to and received from a recipient’s cell phone number. These messages are
displayed with a (phone handset icon) on the SpaceLinq screen.
•Messages can also be sent directly from one SatPaq to a second SatPaq. This is useful when both
people are out of cell or WiFi range. You must address the message to a person’s SpaceLinq
Username to send messages directly to their SpaceLinq app. These messages are displayed with a
(SatPaq icon) on the SpaceLinq screen.
•If you are in Basic Mode or are out of cell or WiFi range and you tap the (send icon), your
message will appear in an orange bubble to indicate it is queued to be sent by satellite. You can
write and queue as many messages as you choose before sending them.
•If you have chosen “WiFi, Cell, and Satellite”from Communication Options in Settings and are within
cell or WiFi range, when you tap the (send icon), your message will be sent immediately.
To compose and send a message to a new recipient:
1) From the SpaceLinq screen, tap (compose icon, top right).
2) Type a phone number, the name of someone or someone’s SpaceLinq Username in the “To:” entry
box. If the person is in your Contact list, SpaceLinq will display their information.
3) Tap the New Message box and type your message.
4) Tap (send icon, on the right).
5) If you have chosen “WiFi, Cell, and Satellite”and there is cell or WiFi available, your message will
be sent immediately.
If you are in Basic Mode or there is no cell or WiFi available, your message appears in an orange
bubble (conversation bubble) to indicate it is queued to be sent by satellite.
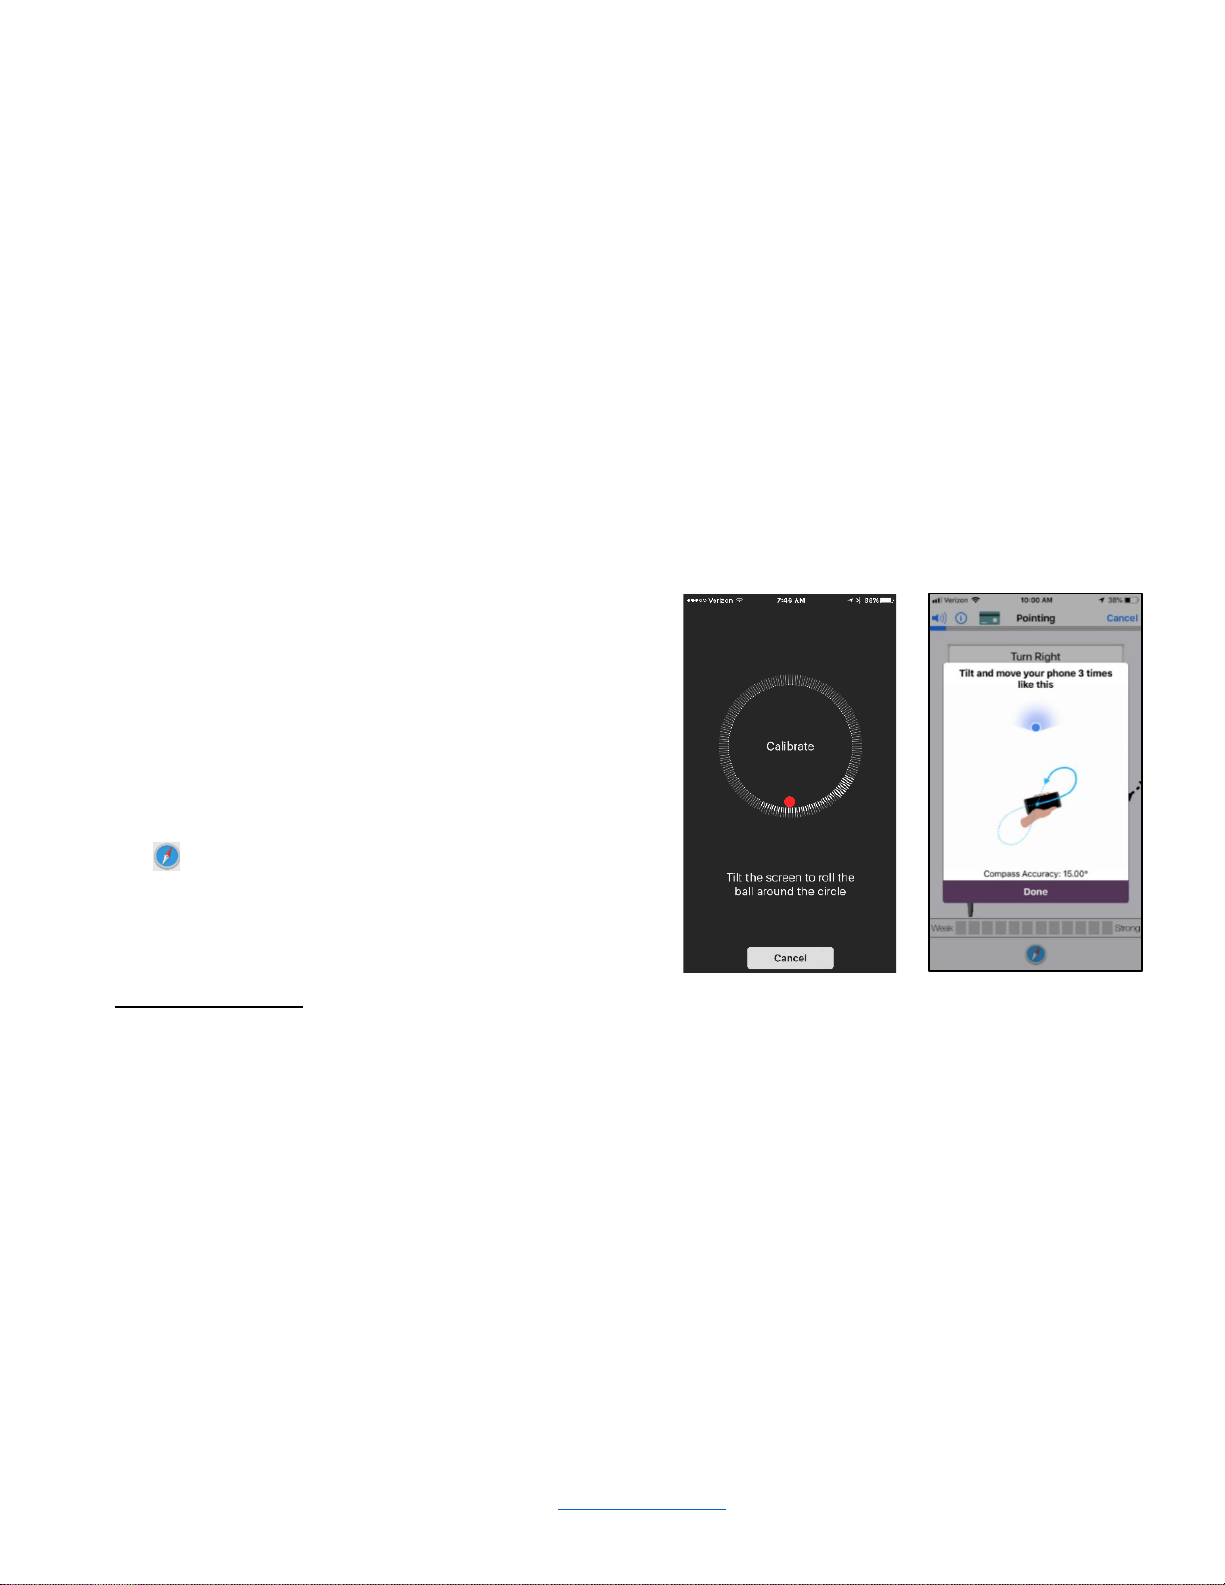
Sending a Message by Satellite
•You MUST go outside, attach your SatPaq to your phone, and then tap
(Send / Retrieve button) to open the Pointing screen which will direct you toward the satellite.
•Follow the screen instructions (“Turn Left” or “Turn Right”) to get the (satellite icon) in the
circle. (See Send / Retrieve Screens for examples of Pointing screens.)
•While keeping the (satellite icon) within the circle, check the color of the bars in the signal
strength meter at the bottom of the screen.
All gray bars = No signal (move around)
Purple bar = Signal is below acceptable transmission level
(move around)
Red bars = Marginal signal; transmission may be possible
Yellow bars = Acceptable signal
Green bars = Strong signal
(signal strength bar, bottom)
•Once a connection has been established with an acceptable signal from the satellite, your
message will be sent and incoming messages will automatically be retrieved if any exist.
•You can turn off the Pointing screen sounds by tapping (speaker icon, top left).
5
For Best Transmission Results
For best results transmitting from the SatPaq to a satellite:
1) Have as clear a view of the sky as possible. A satellite signal can be blocked by mountains, trees,
walls, or some glass. Best results are obtained when the SatPaq is outside with an unobstructed
view of the sky.
2) If the signal is weak (e.g., only gray, purple, or red bars at the bottom of the screen):
•Try lifting and lowering the SatPaq a few inches.
•Take a couple of steps to the left, right, forward, and backward.
•Watch to see if the bars at the bottom change to yellow and/or green.
3) Change to another satellite. The SatPaq can communicate with two different satellites which are
near the equator –G12 (longitude between California and Hawaii) and G3C (longitude Louisiana). If
you are unable to communicate with one, chances are you will be able to do so using the other.
•In Basic Mode after 10 seconds, SpaceLinq will automatically change to the other satellite.
•In Advanced Mode, you can manually select the other satellite.
4) If you continue to have a weak signal, move to a new, more open location and try again.
Equipment Care
The SatPaq has been designed for typical consumer conditions. The SatPaq has undergone limited testing
in severe conditions, but our testing cannot replicate all environmental conditions or stressors to which you
may expose your SatPaq.
To keep your SatPaq in working order, you should avoid exposing it to environmental conditions that could
adversely affect operation, battery charge or longevity, including:
1) Falls/Impact. The SatPaq is resistant to 6-foot drops but is not military rugged and may not
withstand higher or repeated drops or other rough handling.
2) Submersion. The SatPaq is water repellant but is not water proof and may not withstand
submersion or long exposure to water.
3) Heat. The SatPaq has shown normal functionality in hot temperatures (125° F), but extreme heat or
prolonged exposure to direct sunlight in hot weather may overheat the unit. This is similar to the
effect of excessive heat on your smart phone.
4) Cold. The SatPaq has shown normal functionality at freezing (32° F) but may not operate normally
in subfreezing temperatures.
5) Other. SatPaq operation may be affected by other environmental conditions not listed here.
If you notice that the SatPaq is visibly damaged or does not appear to be operating correctly, please see the
Warranty and Return Policy on our website –www.satpaq.com.
NOTE
Occasionally, before looking for a satellite, a screen
appears to calibrate the phone’s internal compass. Tilt
the phone to roll the ball around the circle until all the
pegs are filled in or the screen closes.
Occasionally, while looking for a satellite, it may be
difficult to keep the satellite icon in the circle or you may
be pointed in the wrong direction. If that happens, tap
the (compass icon, bottom of Pointing screen) and
follow the directions to recalibrate the compass.

6
SOS
In an emergency, the SOS button can be used to get help. Your name, GPS location, any details you enter,
and a contact’s information will be sent to the GEOS Emergency Response Center (a 24/7 emergency
monitoring and response center). GEOS will notify a local emergency dispatcher and coordinate responses
with you by text. GEOS will also attempt to get in touch with your emergency contact to collect additional
information if necessary. Higher Ground is not affiliated with GEOS and does not control GEOS’s response.
An initial charge of 70 Message Credits is billed for the use of SOS Emergency Services regardless of
whether initiated over the satellite or over cell or WiFi. In addition, each message sent or retrieved over the
satellite as part of SOS Emergency Services will be billed the same as a standard text message.
1) From the SpaceLinq screen, tap the (SOS button, bottom left).
2) The SOS screen opens and provides five selections. Additional Details can also be entered. If you
are unable to respond, you can simply tap the (Send SOS button) and an SOS incident
will be initiated. (Go to step 5)
If you are in Basic Mode or have no coverage, your message is only queued. It has NOT been sent.
You must tap (Send / Retrieve button) to send your message via satellite.
This will open the Pointing screen which will direct you toward the satellite and send your message.
6) If you sent your message via satellite, wait a couple of minutes and tap
(Check Messages button) to check for a response.
7) Every 10 minutes, you will receive a reminder to tap (Send Location button) to verify
your location. If a response is waiting, it will be retrieved as well.
8) If you tapped (SOS button) in error, you can tap (Cancel button) or < (return
arrow) and no SOS Emergency fee will be charged. After you have sent an SOS message, you can
cancel your request for help by tapping (Cancel SOS button) but you will still be charged
the SOS initiation fee since your request has already been processed by GEOS. Tapping the Cancel
SOS button sends a request to cancel an open SOS conversation but does not immediately close it.
GEOS will respond with a message to confirm when the SOS conversation has been closed. At that
time, the title of the screen changes from “SOS Emergency” to “SOS Closed.”Until you receive the
close confirmation, you need to continue to check for messages from GEOS and you will continue to
receive 10-minute reminders to update your location.
3) If you are able to respond, tap the circle(s) to
select one or more of the items that apply:
oSituation is life threatening
oI am injured
oI am unable to move
oSomeone is trying to harm me
oI am lost
4) Tap Additional Details to enter information
about your emergency, e.g., surroundings, injury.
5) When you have completed your answers, tap the
(Send SOS button). If you are using
Cell, WiFi and Satellite mode and there is
coverage, your message is immediately sent.

7
Send / Retrieve and Check Messages
If you are in Basic Mode or you are not within cell or WiFi range, after tapping the (send icon), your
outgoing messages will not automatically be sent and incoming messages will not be delivered to
SpaceLinq. The outgoing messages will become queued messages, waiting to be transmitted via satellite.
If you are using WiFi, Cell and Satellite Mode and you are within cell or WiFi range, after tapping the
(send icon), your messages will automatically be sent and incoming messages delivered to SpaceLinq.
There is a button at the bottom of the SpaceLinq screen, the New Message screen, and on the individual
conversation screens that changes titles depending on whether there are queued messages or not.
●If you have queued messages, the (Send / Retrieve button) will be displayed.
To transmit queued messages, tap the Send / Retrieve button and then connect to a satellite. If you
have any incoming messages waiting for you, they will also be retrieved.
●If you do not have any queued messages, the (Check Messages button) will
be displayed. If you want to check to see if any incoming messages are waiting for you, tap the
Check Messages button and then connect to a satellite. If you have any incoming messages waiting
for you, they will be retrieved.
IMPORTANT: IF YOU ARE IN BASIC MODE OR THERE IS NO CELL OR WIFI AVAILABLE, INCOMING
MESSAGES WILL NOT AUTOMATICALLY BE DELIVERED TO SPACELINQ. TO RETRIEVE
INCOMING MESSAGES, YOU MUST TAP "CHECK MESSAGES" AND CONNECT TO A SATELLITE.
What Your Message Looks Like in Your Recipient’s Texting Program
When you send a message to someone, it arrives with an unrecognized phone
number and they won’t know who it came from. This number will be
permanently associated with your SatPaq messages on this recipient’s phone
and they can add that number to your Contact information as your SpaceLinq
number. (A different recipient will see a different phone number.)
A signature is automatically added to the beginning of every message to allow
your recipient to more easily recognize you as the sender. If the message was
sent via satellite, “[over Sat]”is displayed with the signature so the recipient
understands you are beyond cell and WiFi coverage and may not be checking
for messages frequently. Your GPS coordinates will also appear with a link to
display your location on a map.
You can remove your location, change to a custom signature or choose not to
include a signature at all by going to Settings in the options pop-up menu,
tapping Manage SatPaq Account/Settings…and tapping Manage Signature.

8
Options Pop-up Menu
In the bottom right of the SpaceLinq screen, a pop-up menu displays a list of features including:
•Settings –Allows you to view information and manage a variety of app features.
•Dr. Dex –Allows you to ask first aid questions and receive information from the Dr. Dex application.
This application does not provide medical advice and is for entertainment, informational,
and educational purposes only. It is not a substitute for professional medical advice,
treatment, or diagnosis and should not be used for medical decision-making. Higher
Ground does not maintain or verify any information provided by the Dr. Dex application.
Instead, Dr. Dex is a third-party application provided by DiagnosisAI, Inc., that was
created and is maintained by practicing medical doctors. Dr. Dex (being a program), is
not itself a medical doctor, and the program does not allow you to interact in any way with
medical or other emergency professionals. If you have a medical emergency, please use
the SOS button to seek medical help without delay.
NOTE: You will only be charged one Message Credit for requesting and receiving a
response from Dr. Dex. In addition, since Dr. Dex uses AI (Artificial Intelligence) to
provide a response, you may receive the reply “I don’t understand the question” and need
to reword your question. If this happens, you will not be charged a Message Credit for
this exchange with Dr. Dex.
•Weather –Provides a detailed weather report and forecast for your approximate location. There are
three sections on this screen. The first includes detailed current conditions. The second
has a bi-hourly forecast for the next 12 hours. The third provides a seven-day forecast.
•Tracking –Allows you to send a message to set a track point that is stored with your location and
the date and time in your account. You can view your tracking data, including a map of
your track points on the website (www.satpaq.com) and in SpaceLinq using the Manage
Sharing… screen. You can also designate Tracking Contacts who will receive your
messages with a link to your tracking data and a map of your track points.
•SatView –Uses augmented reality to project the path and location of both satellites on your phone’s
camera’s real-time viewer. Use it to quickly locate in which direction to point the SatPaq
and to confirm there is an unobstructed path to at least one satellite. You can also select
which satellite to communicate with. When using SatView, you will hold the phone
pointed at the sky. This is a very different angle than when the SatPaq is attached and
you are communicating with the satellite.
•Share –Allows you to send messages to your Share Activity Contacts and/or post on Twitter. To
share messages, you must first enter at least one contact and/or enable the social media
account. Go to Settings, Manage SatPaq Account/Settings… and tap Manage Sharing....
THIS FEATURE IS ONLY DISPLAYED WHEN IT HAS BEEN ENABLED IN ADVANCED
MODE
NOTE: Recipients cannot reply to shared messages.
9
Settings
The Settings screen allows you to view information and manage a variety of app features. To access any of
the Manage SatPaq Account/Settings screens, you must be in cell or WiFi range.
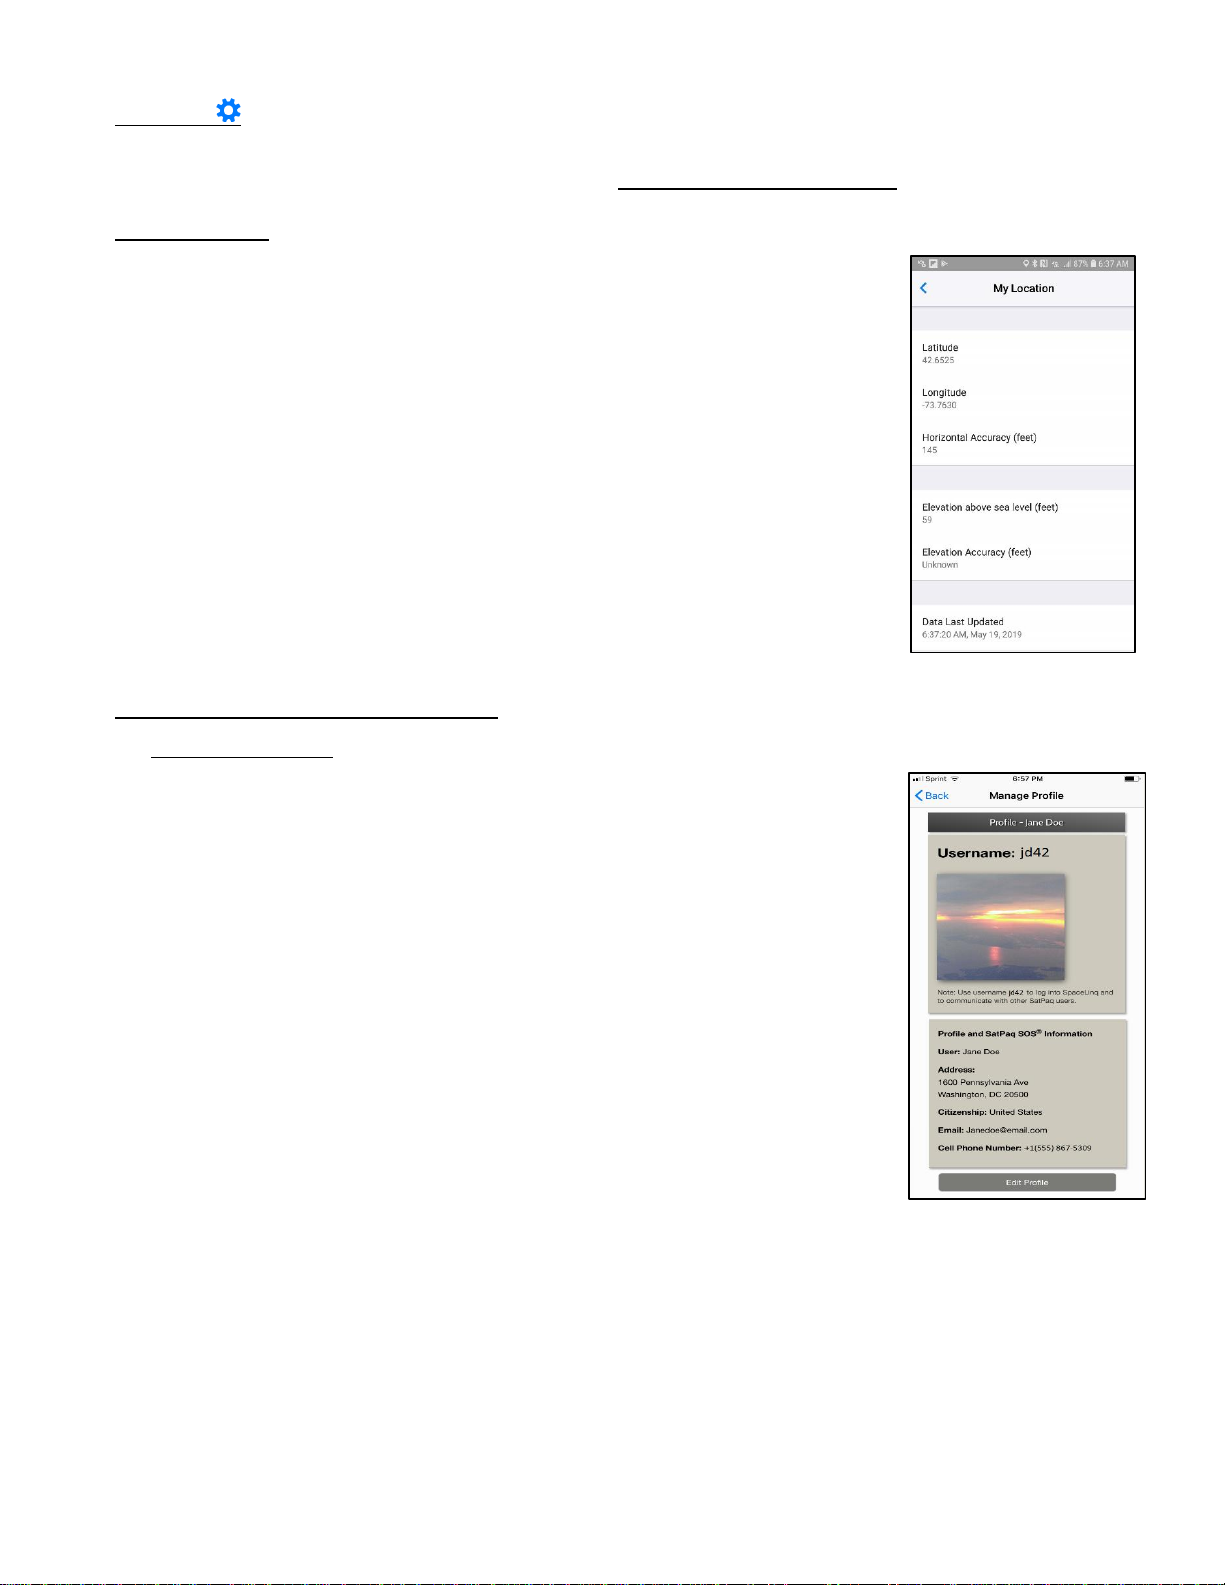
My Location…
My Location displays your current latitude, longitude, and elevation. It also
reports the accuracy of this data and the last time it was collected.
Manage SatPaq Account/Settings…YOU MUST HAVE INTERNET ACCESS
Manage Profile...
Opens the My Profile screen which displays your Username, avatar picture,
first and last name, address, citizenship, email, and cell phone number. Each
of these items can be changed. To Edit, tap Edit Profile, enter your changes,
then tap Save.
NOTE: Your avatar picture is displayed next to your name in a recipient’s
SpaceLinq screen when you send a message using their SpaceLinq
Username.
10
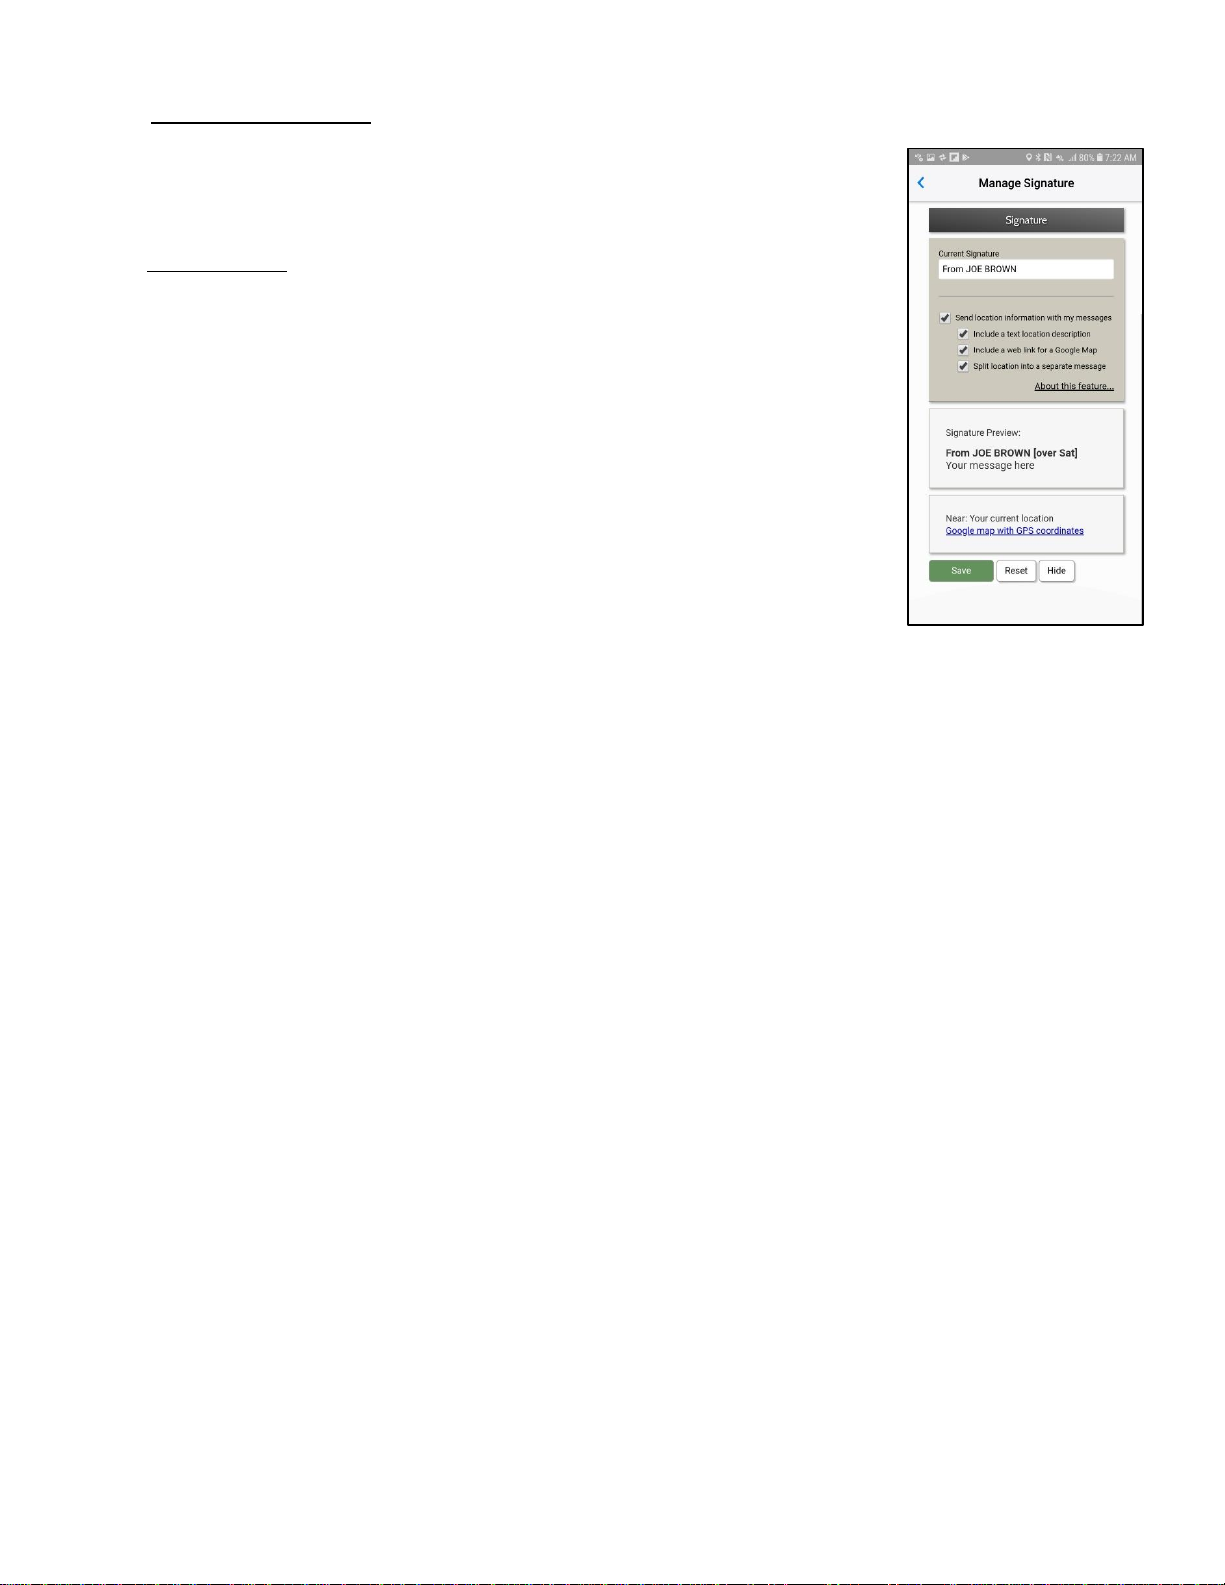
Manage Signature…
on a map.
•To remove the location information, uncheck the box next to the “Send location with my messages”
box and tap Save. You can also select to only send the text description or only send the link to the
map.
Some cell phone carriers (including Sprint) do not support extended length messages. If your message
exceeds a certain length, your GPS coordinates will be split between two different messages. When this
happens, the result is unusable or inaccurate information. If you regularly send messages to recipients
whose carrier does not support extended length messages, you may want to send your location information
as a separate message.
•To send your location information as a separate message, tap the “Split location into a separate
message” box and tap Save.
To see what your Signature will look like to a recipient, tap “Preview.”
To restore your Signature settings to the default settings, tap “Reset.”
Opens the Manage Signature screen which displays the signature that will be
included with your messages. When you send a message to someone, it
arrives with an unrecognized phone number and they won’t know who it came
from. This number will be permanently associated with your SatPaq messages
on this recipient’s phone and they can add that number to your Contact
information as your SpaceLinq number. (A different recipient will see a
different phone number.) A signature is automatically added to the beginning
of every message so your recipient will recognize you as the sender.
•To change your signature, tap the Current Signature box, delete your
name, type your new signature and tap Save.
•To remove your signature, delete the entire entry from the Current
Signature box and tap Save.
If a message was sent via satellite, “[over Sat]” is displayed with the signature
so the recipient understands you are beyond cell and WiFi coverage and may
not be checking for messages frequently.
In addition to a default signature, outgoing messages include a text description
of your location and your GPS coordinates with a link to display your location

11
Manage Sharing…
Hiking, fishing, biking, backpacking, or off-roading –
chances are you will want to share your experiences
with friends and family. You can write one message
and let others know what you are doing and where you
are. In addition, in case you are ever in trouble, you
can designate any of your contacts to be contacted in
an emergency. You can also share your messages on
Twitter.
This selection opens the Manage Sharing screen. You
can View Tracked Messages you have previously sent,
Add a New Contact, Link to your Twitter account, and
view Current Contacts.
•To Add a New Contact:
oEnter their Name, Email and/or Cell Phone
Number (both are required if this person is an
emergency contact)
oSelect their Contact Settings:
▪Emergency Contact
▪Share Activity Contact (to receive your
Shared messages)
▪Tracking Contact (to receive your
messages with a link to your tracking data
and a map of your track points)
oYou can also send this person a test message
to be sure it arrives correctly.
NOTE: You must go to Advanced Mode in Settings to
enable Share. Once enabled, the Share icon
will appear in the pop-up menu.
When you want to Share a message, select (Share icon) from the options pop-up menu (options
icon, bottom right of the SpaceLinq screen), write your message, and when you tap the (send icon)
or the (Send / Retrieve button), it will be sent to all your contacts and/or posted to
your Twitter account.
12
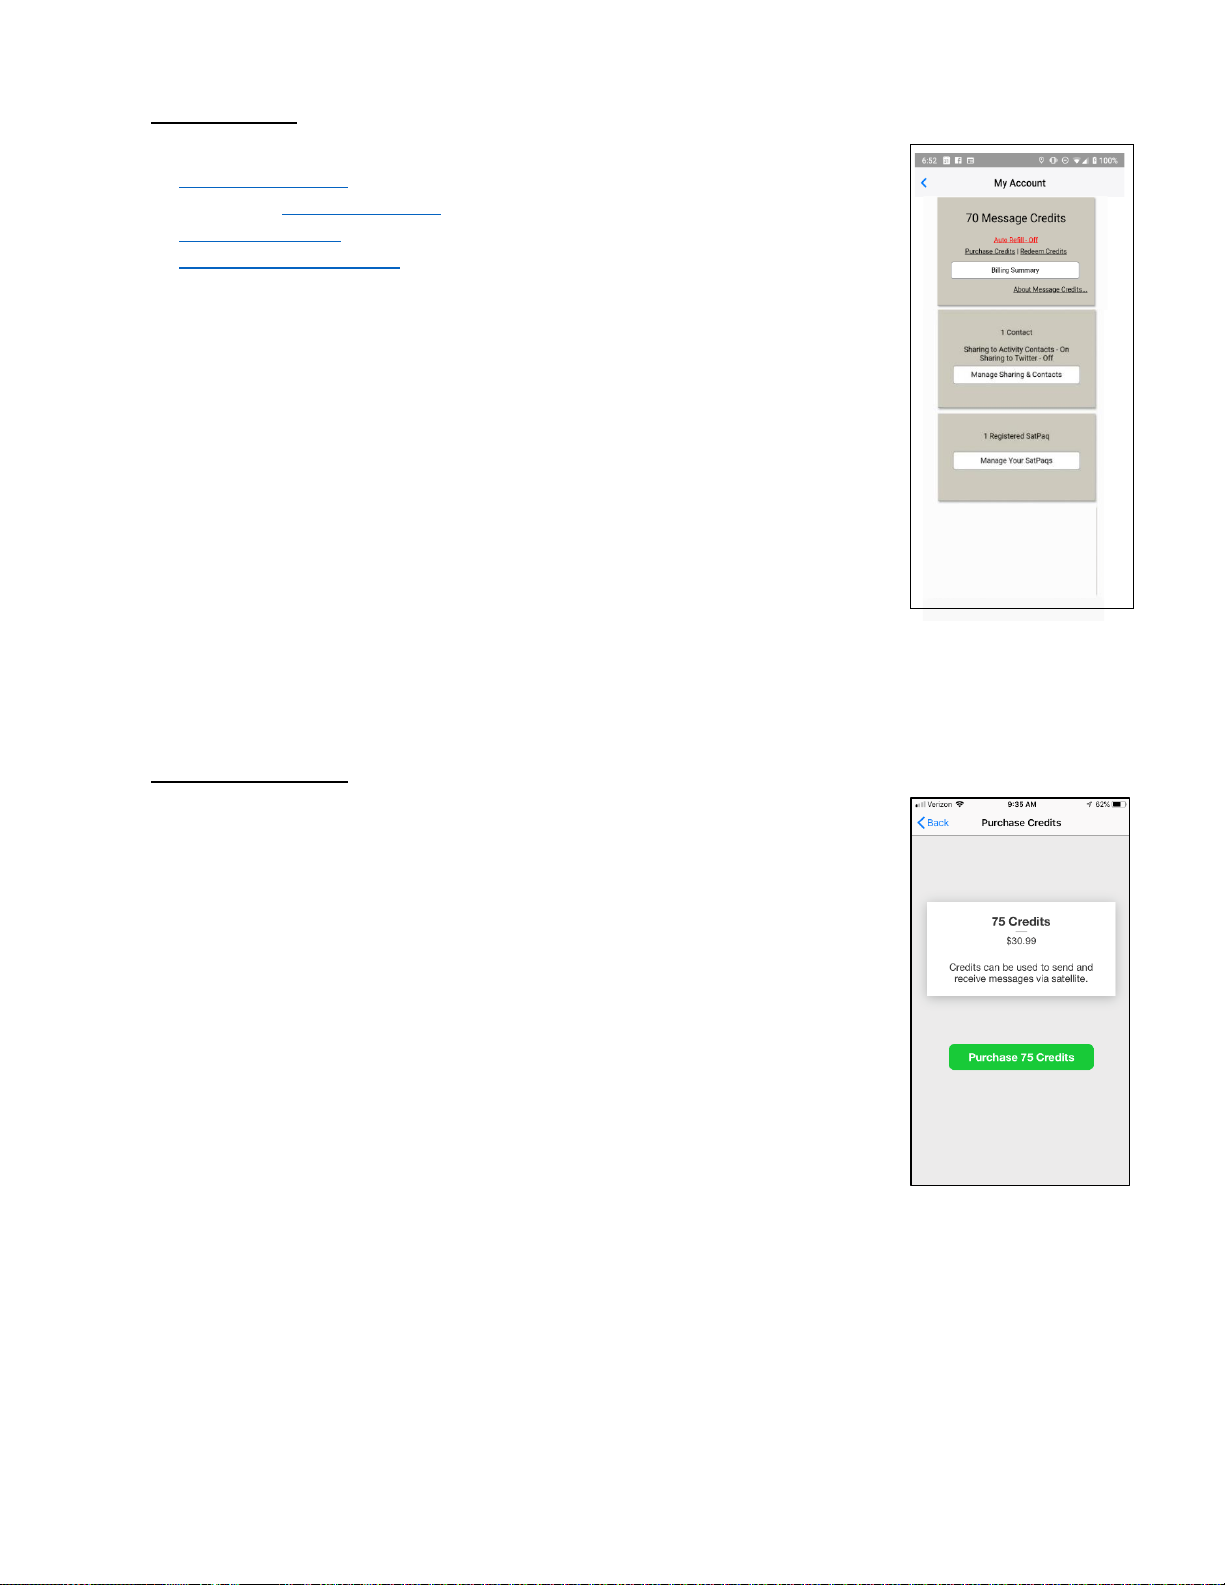
My Account... ONLY on Android phones
Opens the My Account screen which allows you to:
•Purchase Credits
•View your Billing Summary
•Manage Sharing & Contacts
•Manage Your SatPaqs
NOTE: We recommend the use of our Auto Refill feature, which will initiate
the purchase of the MessagePaq of your choice when your account
balance drops below 20 Message Credits.
In-app Purchase... ONLY on iPhones
Allows you to purchase 75 Message Credits using your Apple account.
NOTE: YOU MUST HAVE INTERNET ACCESS to complete this transaction.
We recommend the use of our Auto Refill feature, which will initiate the
purchase of the MessagePaq of your choice when your account
balance drops below 20 Message Credits.
13
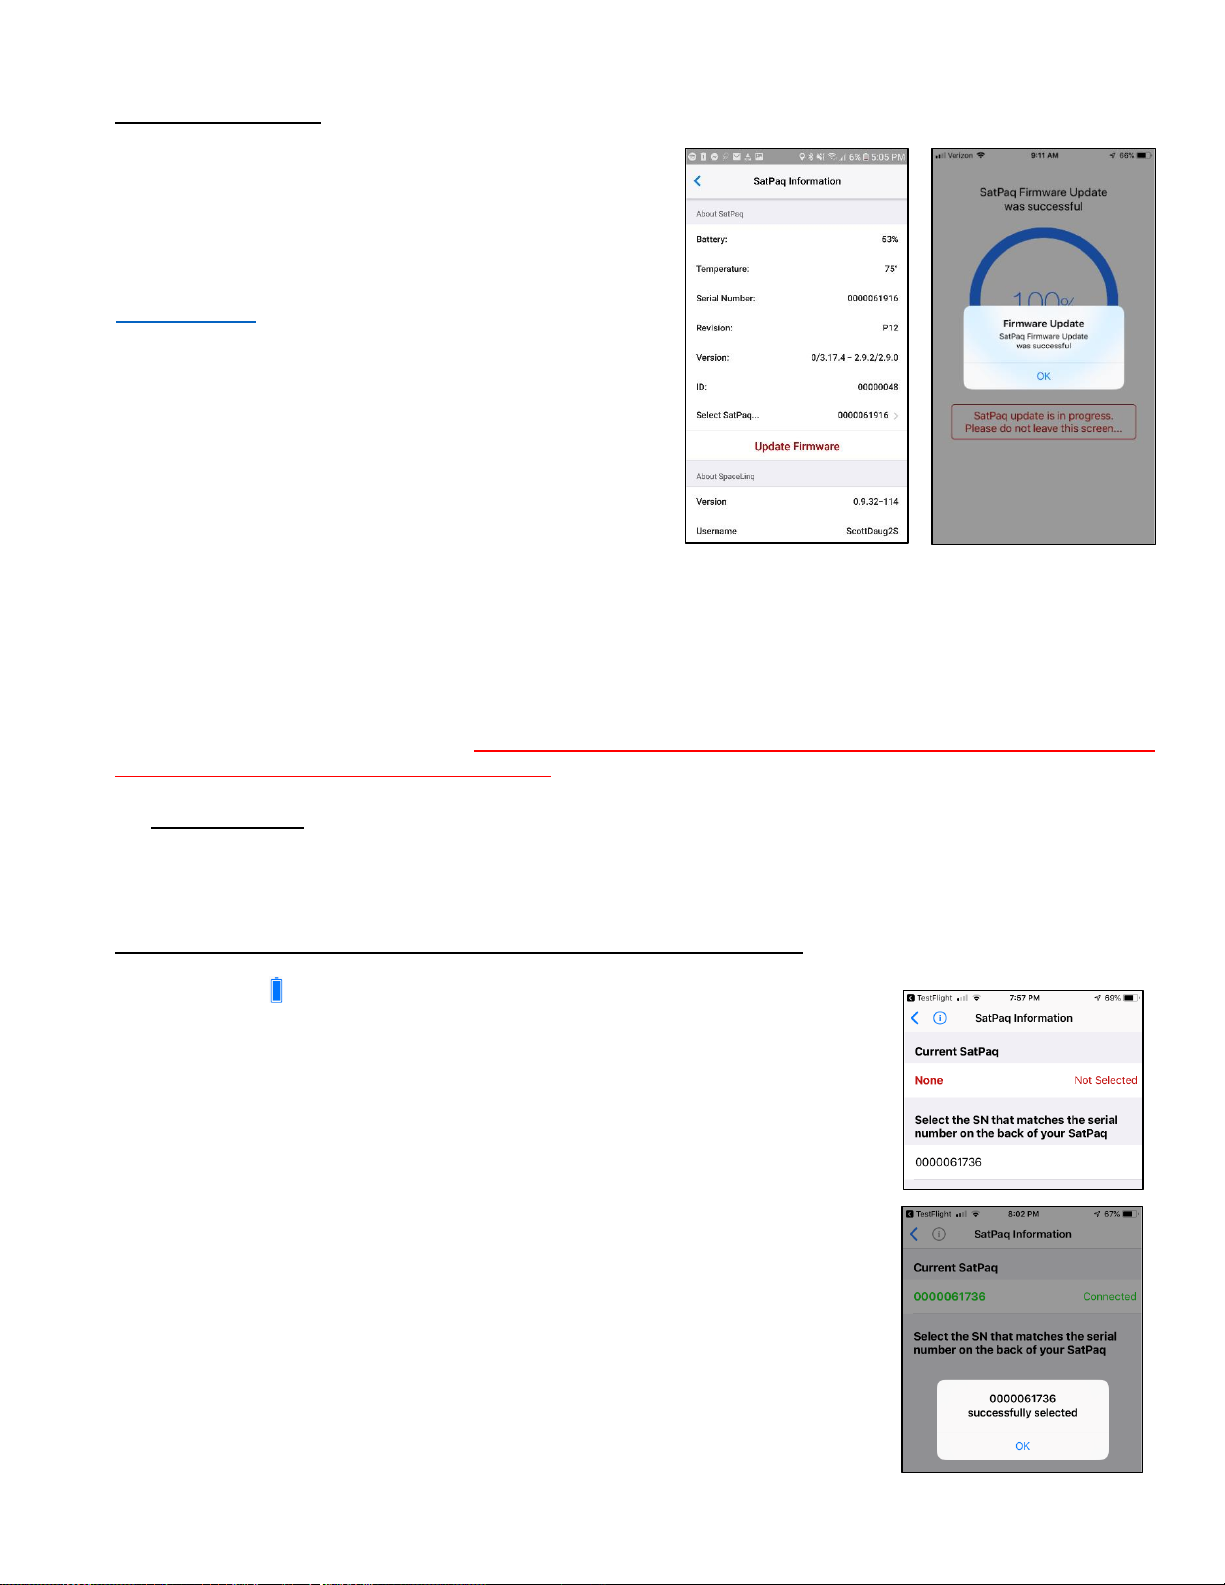
SatPaq Information
When a new version of the SatPaq firmware is available you will see the message Update SatPaq
Firmware. When you tap this message, you will be asked if you want to start the update. You MUST HAVE
ACCESS TO THE INTERNET TO COMPLETE THIS UPDATE.
Once the update begins, you should remain on this screen and connected to the Internet until the message
“SatPaq update was successful” is displayed.
Select SatPaq
Your SatPaq must be paired with your phone to communicate via Bluetooth. Normally, this happens
automatically when you log in the first time. However, if the battery icon in the top left corner has a “?,” you
need to pair. This is done on the Select SatPaq screen.
Be sure to have your SatPaq charged and close by before you select it.
The SatPaq Information screen displays the battery
charge level, temperature of the SatPaq, serial number,
and information about the version of the SatPaq you
are using.
The information screen also provides access to the
Select SatPaq…screen.
In addition, this screen displays the SpaceLinq version
and your Username. Messages can be sent directly
from one SatPaq to a second SatPaq. This is useful
when both people are out of cell range. You must use
a person’s SpaceLinq Username to send to their
SpaceLinq app. Lastly, the number of Message Credits
you have is displayed.
NOTE: The balance is accurate as of the last
transaction.
1) Tap the (battery icon, top left corner of the SpaceLinq screen) OR
select SatPaq Information in the Settings screen. Tap Select
SatPaq… in the middle of the screen.
2) When the Select SatPaq screen opens, wait a moment for the serial
number(s) of the nearby SatPaq(s) to be displayed.
3) Tap the line with the SatPaq that appears under Select a SatPaq with
the serial number (SN) that matches the serial number on the back of
your SatPaq.
4) A message box briefly appears –“Selecting ###...”.
5) A second message box appears –“###... successfully selected.”Tap
“OK” to close.
6) Tap <(back arrow) to return to the SatPaq Information screen and
again to return to the SpaceLinq screen.

14
Communication Options…
NOTE: When in Simulated Satellite Mode, the (satellite icon) will be orange rather than blue.
•WiFi, Cell and Satellite –SpaceLinq will use WiFi or cell when they are
available. Uses the satellite when they are not.
•Satellite Only –SpaceLinq ignores cell or WiFi networks and only
communicates with a satellite. Use it to practice with the SatPaq or when
cell communication is marginal. It remains in the mode until you change
it.
•Satellite Only for 30 Minutes –Operates the same as Satellite Only but
turns off automatically after 30 minutes and is set in WiFi, Cell and
Satellite Mode thereafter.
•Simulated Satellite –SpaceLinq uses cell or WiFi to simulate satellite
communications. Use it to practice finding and pointing at the satellite
when you’re indoors. No SatPaq is required. The satellite icon will
change from blue to orange when in this mode.
•Simulated Satellite for 30 Minutes –Operates the same as Simulated
Satellite but turns off automatically after 30 minutes and is set in WiFi,
Cell and Satellite Mode thereafter.
•Detached Mode –This allows you to put the SatPaq in a stand, pointed
at the satellite, and detached from your phone. Detached Mode uses
WiFi or cell when they are available and uses the satellite when they are
not.

15
SatPaq Detached Mode
A SatPaq can be operated from a stable position (such as in a stand), aligned toward a satellite, and
detached from the phone. The phone will continue to communicate with the SatPaq over Bluetooth
from a distance up to about 30 feet. This makes it convenient to use a SatPaq even when you are
indoors. When you are in SatPaq Detached Mode, you can choose to have incoming messages
automatically retrieved and displayed in SpaceLinq for you when the app is in background mode.
The steps to align a SatPaq for Detached Mode operation are:
1) Tap the options pop-up menu (options icon, bottom right of the SpaceLinq screen).
2) Tap (Settings icon).
3) Tap “Communication Options.”
4) Tap (information icon) next to “Detached Mode.”
5) Watch the “Set Up Detached Mode” video.
6) Take your phone, SatPaq, and a stand outside.
7) To open the stand:
i. Hold it with the narrow side facing you.
ii. Push the center section away from the frame as far forward as possible.
iii. Lift the support away from the center section and set the tabs in the last position.
8) Attach the SatPaq to your phone.
9) Place the SatPaq in the stand on a flat surface and tap Detached Mode.
10) Once the Pointing screen opens, tilt and swivel the stand as needed to align the SatPaq with the
satellite icon inside the circle.
11) It may be necessary to move the stand to a different location to obtain a strong signal.
12) When the SatPaq is aligned, tap Done and remove the SatPaq and your phone from the stand,
leaving the stand in the same position.
13) Detach the SatPaq from your phone and place it in the stand with the SatPaq logo pointed toward
the satellite.
14) If you would like, turn on Auto Retrieve and select how often to have SpaceLinq check for new
messages when it is in background mode.
15) You can now be up to 30 feet away from the SatPaq when you send messages.
NOTE: When in Detached Mode, a D icon replaces the satellite or WiFi/cell icon on the SpaceLinq screen.
16
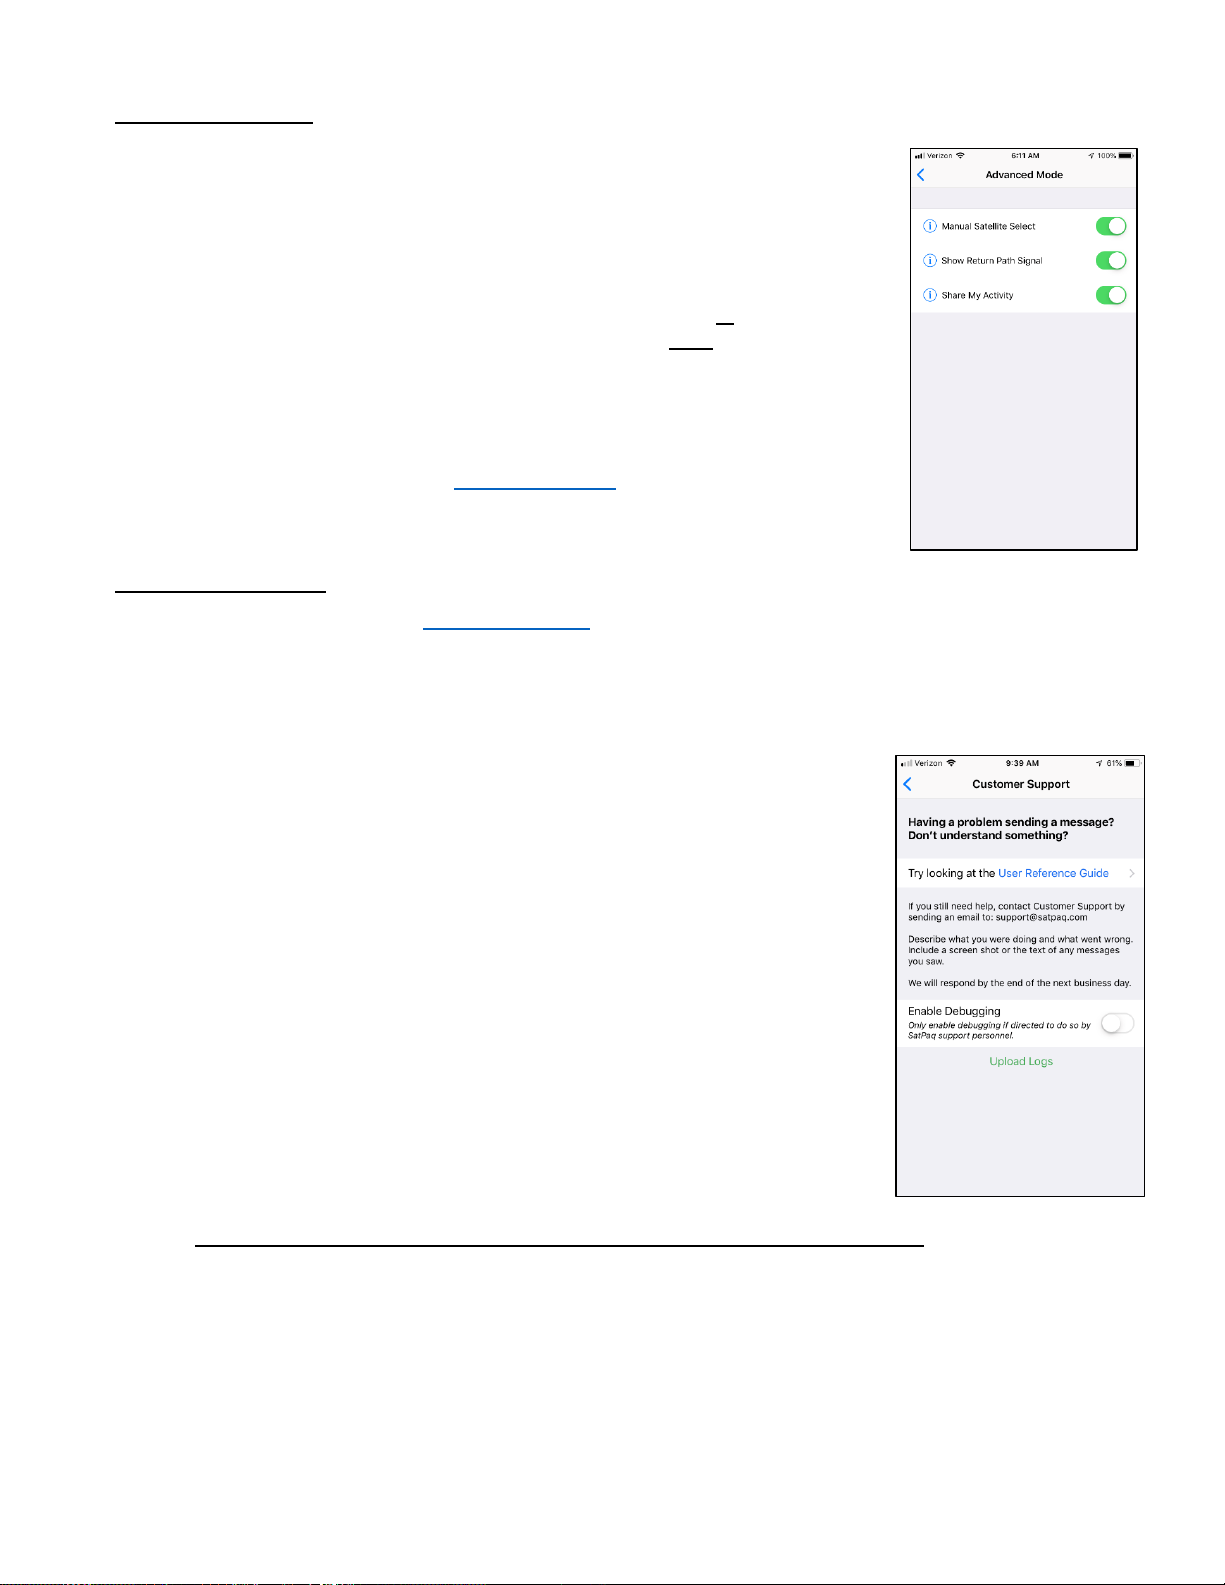
Advanced Mode…
Customer Support
If you need help, you can go to www.satpaq.com.Sign in to your account and from the “Support” tab, select
“Get Support.” The “SatPaq Knowledge Base”has answers to many common questions. If you don’t find
an answer there, select “Contact Support.”Fill out the form, describing what you were doing and what went
wrong. If possible, include a screen shot or the text of any messages you saw. We will try respond by the
end of the next business day.
NOTE: Only enable debugging if directed to do so by Customer Support personnel.
Advanced Mode allows you to enable three additional features including:
•Manual Satellite Select –Allows the user to choose which satellite to
communicate with on the Pointing screen instead of SpaceLinq
choosing.
•Show Return Path Signal –The arcs in the satellite icon on the Pointing
screen will display the signal strength from the SatPaq to the satellite.
The bars at the bottom display the signal strength from the satellite to
the SatPaq. These signal levels can be different.
•Share My Activity –Allows the user to send messages to all their Share
Activity contacts and/or post on Twitter. You must enter contacts and/or
enable the social media account. Go to Manage SatPaq
Account/Settings… and tap Manage Sharing….
If you are having problems with transmissions and have communicated
with a Customer Support agent, you may be directed to turn on Enable
Debugging. This control is found in SpaceLinq under Settings in the
Customer Support screen. When enabled, more detailed data about your
transmissions will be logged to help identify and solve the problem. Creating
and writing to these logs will cause noticeable delays at the end of satellite
transmissions. At some point, you will be directed to tap Upload Logs to send
the data to Customer Support.

17
Ask Dr. Dex
Allows you to ask First Aid questions and receive information from Dr. Dex. This tool does not provide
medical advice and is for entertainment, informational, and educational purposes only, and is not a
substitute for professional medical advice, treatment, or diagnosis.
6) Thereafter you can ask Dr. Dex a question from the Dr. Dex conversation line on the SpaceLinq
screen.
Weather Report
1) From the SpaceLinq screen, tap (options icon, bottom right).
2) Tap (Dr. Dex icon).
3) Type your question in the New Message box.
4) Tap (send icon).
5) If the message is queued for sending:
i) Tap (Send / Retrieve button) to send your
message.
ii) The answer may take a couple of minutes so check back every so
often to see if Dr. Dex has replied by tapping
(Check Messages icon).
Provides a detailed weather report and forecast for your approximate location. The report contains three
sections. The first includes current temperature, conditions (e.g., sunny, cloudy, etc.), sunrise/sunset
times, minimum and maximum temperatures for the day, chance of rain, cloud cover, wind speed and
direction, humidity, dew point, UV index, visibility, and barometric pressure. The next section has a bi-
hourly forecast for the next 12 hours and the final section provides a 7-day forecast.
1) The first time you want to receive a report,
from the SpaceLinq screen tap (options
icon, bottom right).
2) Tap (Weather icon).
3) Tap (Request Weather button).
4) If WiFi or cell is available, the request is sent
and the report is displayed.
If WiFi or cell is not available, the Pointing
screen opens to transmit the request.
If the report does not arrive after the Pointing
screen closes, check back in a bit by tapping
(Check Messages button).
5) Thereafter you can request a report from the Weather conversation line on the SpaceLinq screen.
NOTE: Previous weather reports can be viewed by tapping the white bubbles at the bottom of the screen.
This feature is currently only available on Android phones.
Table of contents


