HIKOKI AW 150 User manual

Do not use the appliance without reading the handling instruction.
Benutzen Sie das Gerät nicht, ohne die Gebrauchsanleitung gelesen zu haben.
N'utilisez pas l'appareil avant d’avoir lu les instructions d’utilisation.
Non utilizzare l’apparecchio senza aver letto le istruzioni per l’uso.
Gebruik dit toestel niet voordat u de gebruiksaanwijzing hebt gelezen.
No utilice el aparato sin leer las instrucciones de manejo.
Não utilize o aparelho sem ler as instruções de utilização.
Nie wolno używaćurządzenia przed przeczytaniem instrukcji obsługi.
Csak a kezelési utasítás elolvasása után használja a készüléket.
Aygıtıkullanım talimatınıokumadan kullanmayın.
Не використовуйте пристрій, не прочитавши попередньо інструкції зексплуатації.
Не используйте устройство без прочтения инструкции по эксплуатации.
Handling instructions
Bedienungsanleitung
Mode d’emploi
Istruzioni per l’uso
Gebruiksaanwijzing
Instrucciones de manejo
Instruções de uso
Instrukcja obsługi
Kezelési utasítás
Kullanım talimatları
Інструкції щодо поводження зпристроєм
Инструкция по эксплуатации
AW 150
High Pressure Washer
Hochdruckreiniger
Nettoyeur haute pression
Idropulitrice ad alta pressione
Hogedrukreiniger
Arandela de alta presión
Anilha de alta pressão
Myjka wysokociśnieniowa
Magasnyomású mosó
Basinçli yikama makinesi
Mийкa високого тиску
Mойкa высокого давления
000BookAW150EEWE.indb1000BookAW150EEWE.indb1 2017/12/0713:39:572017/12/0713:39:57

2
1
2
34
6
8
5
7
@
#
$
9
%
1
(
*
&
^
2
)q
23
*^
1
(1) (2) (3)
9
0
!
v
123
45
67
89
000BookAW150EEWE.indb2000BookAW150EEWE.indb2 2017/12/0713:39:572017/12/0713:39:57

3
)1
3
^
2u
y
et
rw
1
i
2
o
p
2
1
5
4
s
f
d
a
g
h
j
z
;l
k
fx
c
s
h
$
fx
^
v%
b
s
n
m
v
10 11 12
13 14 15
16 17 18
19 20 21
000BookAW150EEWE.indb3000BookAW150EEWE.indb3 2017/12/0713:39:582017/12/0713:39:58

4
.
,
b
b
,
/
¡
™
¢
£∞
l
$
f
@
^
¶
o
!
§
%
22 23 24
25 26 27
28
000BookAW150EEWE.indb4000BookAW150EEWE.indb4 2017/12/0713:39:582017/12/0713:39:58

5
English Deutsch Français Italiano
1Gun holder Pistolenhalter Porte-pistolet Supporto della pistola
2Washer protrusion Reinigervorsprung Saillie du nettoyeur Sporgenza dell'idropulitrice
314 to 15 mm 14 bis 15 mm 14 à 15 mm 14 - 15 mm
420 mm or less 20 mm oder weniger 20 mm au maximum 20 mm o meno
5Gun support protrusion Vorsprung der
Pistolenhalterung Support du pistolet en
saillie Sporgenza del supporto
della pistola
6Washer long hole Langes Loch des Reinigers Trou profond du nettoyeur Foro lungo dell'idropulitrice
7Press firmly Fest drücken Appuyez fermement Premere saldamente
8Screw supplied Mitgelieferte Schraube Vis fournie Vite in dotazione
9Hose handle SchlauchgriffPoignée du tuyau Manovella avvolgitubo
0Attachment hole Befestigungsloch Trou de fixation Foro di attacco
!Power plug Netzstecker Fiche d'alimentation Spina di alimentazione
@Water feed inlet Wasserzulauföffnung Entrée d'alimentation en
eau Ingresso di alimentazione
dell'acqua
#Water feed inlet cap Kappe für
Wasserzulauföffnung Bouchon de l'alimentation
en eau Tappo dell'ingresso di
alimentazione dell'acqua
$Water feed connector Wasserzulaufanschluss Connecteur d'alimentation
en eau Connettore di
alimentazione dell'acqua
%High-pressure hose Hochdruckschlauch Tuyau à haute pression Tubo flessibile ad alta
pressione
^Trigger gun Auslöserpistole Pistolet à gâchette Pistola a grilletto
&Connector Anschluss Connecteur Connettore
*O-ring O-Ring Joint torique O-ring
(Ring Ring Joint Anello
)Nozzle Düse Buse Ugello
qProtrusion Vorsprung Saillie Sporgenza
wJet Strahl Jet Getto
eSpray Sprühen Vaporisateur Spruzzo
rLow-pressure Niederdruck Basse pression Bassa pressione
tHigh-pressure Hochdruck Haute pression Alta pressione
yNozzle tip Düsenspitze Pointe de la buse Punta dell'ugello
uPressure adjuster Druckregler Régulateur de pression Regolatore di pressione
iWater supply pipe Wasserversorgungsrohr Conduite d'alimentation
en eau Tubo di alimentazione
acqua
oDetergent bottle Reinigungsmittelflasche Flacon de détergent Flacone del detergente
pFilter on the tip of the water
feed pipe Filter an der Spitze des
Wasserversorgungsrohrs Filtre à l'extrémité du tuyau
d'alimentation en eau Filtro all'estremità del tubo
di alimentazione dell'acqua
aHose band Schlauchklemme Collier de serrage du tuyau Fascetta fermatubo
sSuction hose Ansaugschlauch Tuyau d'aspiration Tubo flessibile di
aspirazione
dMoisten the inside with
water Die Innenseite mit Wasser
befeuchten Humidifiez l'intérieur à l'eau Inumidire l'interno con
acqua
fStrainer Siebfilter Crépine Filtro
gSlotted screwdriver Flachkopfschraubenzieher Tournevis à tête plate Cacciavite a testa piatta
hOne-touch joint Gelenk auf Knopfdruck Raccord rapide Raccordo rapido
jInsert the suction hose Den Ansaugschlauch
einschieben Insérez le tuyau
d'aspiration Inserire il tubo flessibile di
aspirazione
kPass it through the ring first Zuerst durch den Ring
führen Commencez par le passer
dans le joint Inserirlo prima nell'anello
lTighten Festziehen Serrez Serrare
;Hose end Schlauchende Extrémité du tuyau Estremità tubo flessibile
000BookAW150EEWE.indb5000BookAW150EEWE.indb5 2017/12/0713:39:592017/12/0713:39:59

6
English Deutsch Français Italiano
zInsert it past this point Über diesen Punkt hinaus
einschieben Insérez au-delà de ce point Inserirlo oltre questo punto
xAccumulated water Angesammeltes Wasser Réservoir d'eau Acqua accumulata
cInsert directly Direkt einschieben Insérez directement Inserire direttamente
vSwitch Schalter Interrupteur Interruttore
bTrigger Auslöser Gâchette Grilletto
nCenter of the trigger Mitte des Auslösers Centre de la gâchette Centro del grilletto
mSwitch ON Einschalten Interrupteur ON Interruttore su ON (acceso)
,Trigger stopper Auslöserstopper Sécurité de la gâchette Fermo del grilletto
.Lock Verriegeln Verrou Blocco
/Release Entriegeln Relâchez Rilascio
¡Hose reel Schlauchaufroller Dévidoir Tamburo avvolgitubo
™Hose handle SchlauchgriffPoignée du tuyau Manovella avvolgitubo
£Nozzle cleaner pin Düsenreinigungsstift Broche de nettoyage de
la buse Pulitore dell'ugello
¢Nozzle hole Düsenloch Orifice de la buse Foro dell'ugello
∞Loosen Lockern Desserrez Allentare
§Turbo nozzle Turbodüse Buse turbo Ugello turbo
¶Cleaning brush Reinigungsbürste Brosse de nettoyage Spazzola per pulizia
000BookAW150EEWE.indb6000BookAW150EEWE.indb6 2017/12/0713:39:592017/12/0713:39:59

7
Nederlands Español Português Polski
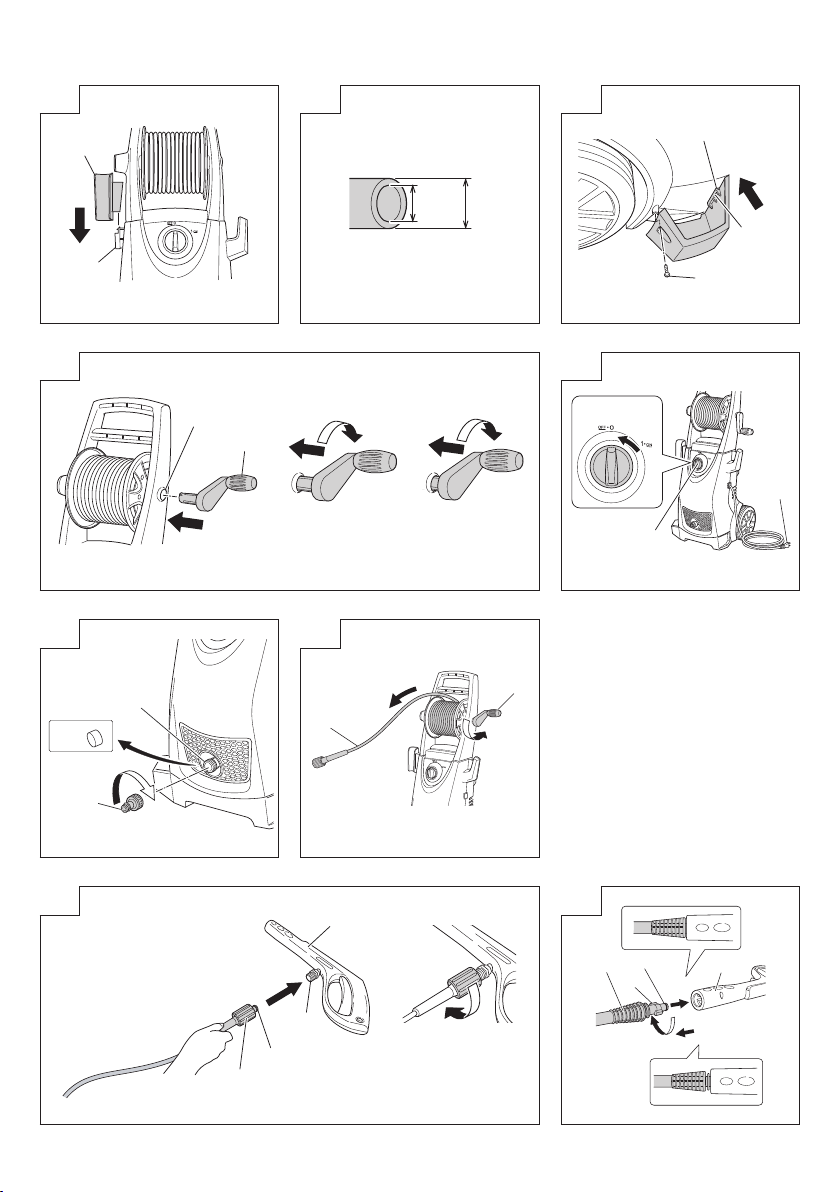
1Pistoolhouder Soporte de la pistola Suporte da pistola Uchwyt pistoletu
2Uitsteeksel
hogedrukreiniger Saliente de la máquina de
limpieza Saliência do dispositivo Występ myjki
314 tot 15 mm de 14 a 15 mm 14 a 15 mm 14 do 15 mm
420 mm of minder 20 mm o menos 20 mm ou menos 20 mm lub mniej
5Uitsteeksel pistoolsteun Saliente de soporte de la
pistola Saliência da base da
pistola Występ podparcia pistoletu
6Lang gat hogedrukreiniger Orificio largo de la máquina
de limpieza Orifício longo do
dispositivo Długi otwór myjki
7Stevig op drukken Presionar con firmeza Premir firmemente Nacisnąć mocno
8Schroef meegeleverd Tornillo suministrado Parafuso fornecido Dostarczona śruba
9Slanghendel Empuñadura de la
manguera Pega da mangueira Rączka węża
0Bevestigingsgat Orificio de instalación Orifício de fixação Otwór do mocowania
!Stekker Enchufe Ficha de alimentação Wtyczka zasilania
@Invoer watertoevoer Entrada de alimentación
de agua Entrada de alimentação
de água Wlot zasilania wodą
#Dop invoer watertoevoer Tapa de entrada de
alimentación de agua Tampa da entrada de
alimentação de água Pokrywa wlotu zasilania
wodą
$Aansluiting watertoevoer Conector de alimentación
de agua Conector de alimentação
de água Złącze zasilania wodą
%Hogedrukslang Manguera de alta presión Mangueira de alta pressão Wąż wysokiego ciśnienia
^Pistool met trekker Pistola de gatillo Pistola Pistolet
&Aansluiting Conector Conector Złącze
*O-ring Junta tórica O-ring PierścieńO-Ring
(Ring Anilla Anel Pierścień
)Sproeier Boquilla Bocal Dysza
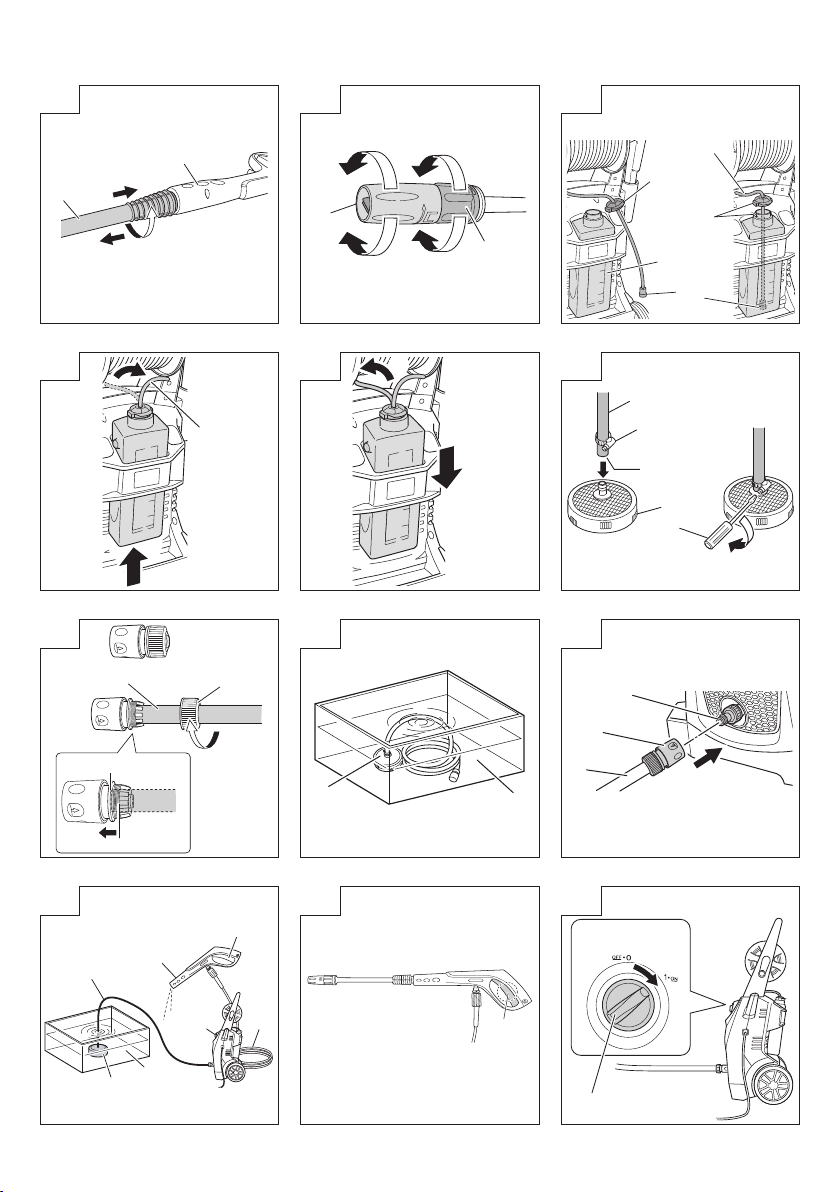
qUitsteeksel Saliente Saliência Występ
wStraal Chorro Jato Strumień
eSproeien Rociado Pulverização Natrysk
rLage druk Baja presión Baixa pressão Niskie ciśnienie
tHoge druk Alta presión Alta pressão Wysokie ciśnienie
ySproeierkop Punta de la boquilla Extremidade do bocal Końcówka dyszy
uDrukregelaar Ajustador de presión Regulador de pressão Regulator ciśnienia
iWatertoevoerbuis Tubería de alimentación
de agua Tubo de alimentação de
água Przewód zasilania wodą
oFles met reinigingsmiddel Bote de detergente Frasco de detergente Butelka na środki czystości
pFilter op de kop van de
watertoevoerbuis
Filtro en la punta de la
tubería de alimentación
de agua
Filtro na extremidade do
tubo de alimentação de
água
Filtr na końcówce
przewodu zasilania wodą
aSlangklem Abrazadera de la
manguera Banda da mangueira Opaska węża
sAanzuigslang Manguera de aspiración Mangueira de aspiração Wąż ssący
dMaak de binnenkant
vochtig met water Humedezca la parte
interior con agua Humedecer o interior com
água Zwilżyćwnętrze wodą
fFilter Filtro Filtro Filtr siatkowy
gSleufschroevendraaier Destornillador de cabeza
plana Chave de fendas plana Wkrętak płaski
hSnelkoppeling Junta de un toque Junta de um toque Szybkozłącze
jSchuif de aanzuigslang in Introduzca la manguera de
aspiración Insira a mangueira de
aspiração Włożyćwąż ssący
kVoer ze eerst door de ring Pásela primero por la anilla Passar primeiro pelo anel Najpierw przeprowadzićgo
przez pierścień
000BookAW150EEWE.indb7000BookAW150EEWE.indb7 2017/12/0713:39:592017/12/0713:39:59

8
Nederlands Español Português Polski
lZet vast Apretar Apertar Dokręcić
;Slanguiteinde Extremo de manguera Extremidade da mangueira Koniec węża
zVoer ze in tot voorbij dit
punt Introdúzcalo pasado este
punto Inserir para além deste
ponto Wsunąć go za ten punkt
xVerzameld water Agua acumulada Água acumulada Nagromadzona woda
cVoer rechtstreeks in Introducir directamente Inserir diretamente Włożyćbezpośrednio
vSchakelaar Interruptor Interruptor Przełącznik
bTrekker Gatillo Gatilho Spust
nMiddelpunt van de trekker Centro del gatillo Centro do gatilho Środek spustu
mSchakelaar AAN Encender Interruptor na posição
"ON" Włączyć
,Trekkerstop Tope del gatillo Batente do gatilho Ogranicznik spustu
.Vergrendelen Bloquear Bloqueio Blokada
/Ontgrendelen Soltar Soltar Zwolnienie
¡Slanghaspel Carrete de la manguera Bobina da mangueira Szpula na wąż
™Slanghendel Empuñadura de la
manguera Pega da mangueira Rączka węża
£Reinigingspen voor
sproeier Clavija de limpieza de la
boquilla Pino de limpeza do bocal Kołek do czyszczenia
dyszy
¢Sproeiergat Orificio de boquilla Orifício do bocal Otwór dyszy
∞Maak los Soltar Desapertar Poluzować
§Turbosproeier Boquilla turbo Bocal turbo Dysza Turbo
¶Reinigingsborstel Cepillo de limpieza Escova de limpeza Szczotka do czyszczenia
000BookAW150EEWE.indb8000BookAW150EEWE.indb8 2017/12/0713:39:592017/12/0713:39:59

9
Magyar Türkçe Український Pyccкий
1Szórópisztoly tartó Tabanca tutucu Тримач пістолета Держатель пистолета
2Mosó nyúlvány YıkayıcıçıkıntısıВиступ на мийці Выступ мойки
314 - 15 mm 14 ila 15 mm 14-15 мм от 14 до 15 мм
420 mm vagy kevesebb 20 mm veya daha az 20 mm або менше 20 mm или меньше
5Szórópisztoly tartó
nyúlvány Tabanca destek çıkıntısıВиступ для основи
пістолета Выступ опоры пистолета
6Mosó hosszú nyílás Yıkayıcıuzun deliği Довгий отвір на мийці Длинное отверстие
мойки
7Nyomja erősen Sıkıca basınСильно натиснути Сильно нажмите
8Tartozék csavar Vida tedarik edilmiştir Гвинт додається Прилагаемый винт
9Tömlőforgató kar Hortum kolu Ручка шлангу Рукоятка шланга
0Csatlakozó nyílás Birleştirme deliğiОтвір для встановлення Крепежное отверстие
!Tápfeszültség dugó Elektrik fişiШтепсель Штепсельная вилка
@Vízellátó bemenet Su besleme girişiОтвір подачі води Входное отверстие
подачи воды
#Vízellátó bemenet sapka Su besleme girişi kapağıЗаглушка отвору подачі
води Крышка входного
отверстия подачи воды
$Vízellátó csatlakozó Su besleme bağlantısıШтуцер для подачі води Разъем подачи воды
%Magasnyomású tömlőYüksek basınçlıhortum Шланг високого тиску Шланг высокого
давления
^Működtetőpisztoly Tetikleme tabancasıПістолет із пусковим
вимикачем Курковый пистолет
&Csatlakozó BağlantıaparatıШтуцер Разъем
*O-gyűrűHalka conta Кільце ущільнення Уплотнительное кольцо
(RögzítőgyűrűHalka Муфта Кольцо
)Szórófej AğızlıkНасадка Сопло
qNyúlvány ÇıkıntıВиступ Выступ
wSugár Püskürtme Струмінь Струя
ePermet Sprey Розпилення Распыление
rAlacsony nyomás Düşük basınç Низький тиск Низкое давление
tMagas nyomás Yüksek basınç Високий тиск Высокое давление
ySzórófej csúcs Ağızlık ucu Наконечник насадки Наконечник сопла
uNyomásállító Basınç ayarlayıcıРегулятор тиску Регулятор давления
iVízellátó csőSu sağlama borusu Трубка подачі води Труба подачи воды
oTisztítószer tartály Deterjan şişesi Пляшка змиючим
засобом Бутылка смоющим
средством
pSzűrőa vízellátó csővégén Su besleme borusu
ucundaki filtre Фільтр на кінці трубки
подачі води Фильтр на конце трубы
подачи воды
aTömlőbilincs Hortum bandıШланговий хомут Ремень шланга
sSzívó tömlőEmişhortumu Шланг забору Всасывающий шланг
dNedvesítse meg a belsejét
vízzel İç kısmısu ile nemlendirin Зволожити всередині Смочите внутри водой
fSzűrőSüzgeç Сітчастий фільтр Сетчатый фильтр
gLaposfejűcsavarhúzó Düz başlıtornavida Пласка викрутка Плоская отвертка
hGyorscsatlakozó Tek dokunuşlu mafsal Муфта швидкого
з’єднання Соединение одним
касанием
jIllessze be a szívó tömlőt Emişborusunu yerleştirin Вставте шланг забору Вставьте всасывающий
шланг
kElőször vezesse át a
gyűrűnÖncelikle halkadan geçirin Спочатку одягніть муфту Пропустите его сначала
сквозь кольцо
lMeghúzni SıkınЗакрутіть Закрутите
;Tömlővége Hortum ucu Кінець шлангу Конец шланга
000BookAW150EEWE.indb9000BookAW150EEWE.indb9 2017/12/0713:40:002017/12/0713:40:00

10
Magyar Türkçe Український Pyccкий
zTolja túl ezen a ponton Bu noktadan geçirin Вставте далі цієї точки Вставьте его за эту точку
xÖsszegyűlt víz Biriken su Зібрана вода Накопленная вода
cIllessze be közvetlenül Doğrudan üzerine geçirin Вставте безпосередньо Вставьте прямо
vKapcsoló Sviç Переключіть Переключатель
bRavasz Tetik Пусковий вимикач Курок
nA ravasz közepe Tetik merkezi Центр пускового
вимикача Центр курка
mKapcsolja be (ON) Açma svici Увімкнути Переключатель ON
,Ravasz rögzítőTetik stoperi Стопор пускового
вимикача Ограничитель курка
.Zár Kilit Заблокувати Блокировка
/Kioldó Serbest bırakma Відпустити Отпустите
¡Tömlődob Hortum makarasıБарабан для шлангу Барабан для
наматывания шланга
™Tömlőhajtókar Hortum kolu Ручка шлангу Рукоятка шланга
£Szórófej tisztító tüske Ağızlık temizleme iğnesi Спиця для очищення
насадки Шпилька очистителя
сопла
¢Szórófej fúvóka Ağızlık deliğiОтвір насадки Отверстие сопла
∞Meglazítani Gevşetin Відкрутити Открутите
§Turbó szórófej Turbo ağızlıkТурбонасадка Турбо сопло
¶Tisztító kefe Temizleme fırçasıОчищувальна щітка Чистящая щетка
000BookAW150EEWE.indb10000BookAW150EEWE.indb10 2017/12/0713:40:002017/12/0713:40:00

11
English Deutsch Français Italiano
Symbols
WARNING
The following show
symbols used for the
machine. Be sure that you
understand their meaning
before use.
Symbole
WARNUNG
Die folgenden Symbole
werden für diese Maschine
verwendet. Achten Sie
darauf, diese vor der
Verwendung zu verstehen.
Symboles
AVERTISSEMENT
Les symboles suivants
sont utilisés pour l’outil.
Bien se familiariser
avec leur signification
avant d’utiliser l’outil.
Simboli
AVVERTENZA
Di seguito mostriamo
i simboli usati per la
macchina. Assicurarsi
di comprenderne il
significato prima dell’uso.
To reduce the risk of
injury, user must read
instruction manual.
Failure to follow
the warnings and
instructions may result
in electric shock, fire
and/or serious injury.
Der Anwender muss die
Bedienungsanleitung
lesen, um das Risiko
einer Verletzung zu
verringern.
Wenn die Warnungen
und Anweisungen nicht
befolgt werden, kann es
zu Stromschlag, Brand
und/oder ernsthaften
Verletzungen kommen.
Pour réduire les risques
de blessures, l’utilisateur
doit lire le manuel
d’utilisation.
Tout manquement
à observer ces
avertissements et
instructions peut engendrer
des chocs électriques,
des incendies et/ou des
blessures graves.
Per ridurre il rischio
di lesioni, l’utente
deve leggere il
manuale delle
istruzioni.
La mancata osservanza
degli avvertimenti e
delle istruzioni potrebbe
essere causa di scosse
elettriche, incendi e/o
gravi lesioni.
Only for EU countries
Do not dispose of electric
tools together with
household waste material!
In observance of European
Directive 2002/96/EC
on waste electrical and
electronic equipment
and its implementation in
accordance with national
law, electric tools that
have reached the end of
their life must be collected
separately and returned
to an environmentally
compatible recycling facility.
Nur für EU-Länder
Werfen Sie
Elektrowerkzeuge nicht
in den Hausmüll!
Gemäss Europäischer
Richtlinie 2002/96/EG
über Elektro- und
Elektronik- Altgeräte
und Umsetzung in
nationales Recht
müssen verbrauchte
Elektrowerkzeuge
getrennt gesammelt und
einer umweltgerechaten
Wiederververtung
zugeführt werden.
Pour les pays européens
uniquement
Ne pas jeter les appareils
électriques dans les ordures
ménagères!
Conformément à la directive
européenne 2002/96/EG
relative aux déchets
d’équipements électriques
ou électroniques (DEEE),
et à sa transposition dans
la législation nationale,
les appareils électriques
doivent être collectés à
part et être soumis à un
recyclage respectueux de
l’environnement.
Solo per Paesi UE
Non gettare le
apparecchiature elettriche
tra i rifiuti domestici.
Secondo la Direttiva
Europea 2002/96/CE sui
rifiuti di apparecchiature
elettriche ed elettroniche
e la sua attuazione
in conformità alle
norme nazionali, le
apparecchiature elettriche
esauste devono essere
raccolte separatamente, al
fine di essere reimpiegate in
modo eco-compatibile.
High-pressure water
can be dangerous if
used incorrectly. High-
pressure water jets
must not be directed
at people, electrical
equipment or the
washer itself.
Wasser unter hohem
Druck kann bei falscher
Benutzung gefährlich
sein. Der Hochdruckstrahl
darf nicht auf Menschen,
elektrische Anlagen,
oder den Reiniger selbst
gerichtet werden.
L'eau sous haute pression
peut être dangereuse
si elle n'est pas utilisée
correctement. Un jet
d'eau sous haute pression
ne doit pas être dirigé
vers des personnes, des
équipements électriques ou
le nettoyeur.
L'acqua ad alta pressione
può essere pericolosa,
se utilizzata in modo
scorretto. Non puntare il
getto ad alta pressione
dell'idropulitrice verso
persone, apparecchiature
elettriche o l'idropulitrice
stessa.
Water that has passed
through the backflow
valve cannot be used
for drinking.
Wasser, das durch
das Rückflussventil
geflossen ist, ist nicht
trinkbar.
L'eau qui est passée à
travers le clapet anti-
retour n'est pas potable.
L'acqua che ha
attraversato la valvola
antiriflusso non è
potabile.
Alternating current Wechselstrom Courant alternatif Corrente alternata
Class II tool Werkzeug der Klasse II Outil classe II Attrezzo di Classe II
Warning Warnung Avertissement Avvertenza
VVolts Volt Volts Volt
AAmperes Ampere Ampères Ampere
Hz Hertz Hertz Hertz Hertz
WWatts Watt Watts Watt
kg Kilograms Kilogramm Kilogrammes Kilogrammi
MPa Megapascals Megapascal Mégapascals Megapascal
000BookAW150EEWE.indb11000BookAW150EEWE.indb11 2017/12/0713:40:002017/12/0713:40:00

12
Nederlands Español Português Polski
SYMBOLEN
WAARSCHUWING
Hieronder vindt u de symbolen
die voor dit toestel worden
gebruikt. Zorg ervoor dat u de
betekenis van de symbolen
begrijpt voordat u het toestel
begint te gebruiken.
Símbolos
ADVERTENCIA
A continuación se
muestran los símbolos
usados para la máquina.
Asegúrese de comprender
su significado antes del
uso.
Símbolos
AVISO
A seguir aparecem os
símbolos utilizados pela
máquina. Assimile bem
seus significados antes
do uso.
Symbole
OSTRZEŻENIE
Następujące oznaczenia
to symbole używane w
instrukcji obsługi maszyny.
Upewnij się, że rozumiesz
ich znaczenie zanim
użyjesz narzędzia.
Om het risico op
verwondingen te
verminderen, moet
de gebruiker de
instructiehandleiding lezen.
Als u geen rekening houdt met
de waarschuwingen en met de
instructies, stelt u zichzelf bloot
aan allerlei gevaren, zoals
elektrische schokken, brand
en/of ernstige blessures.
Para reducir el riesgo
de lesiones, el usuario
deberá leer el manual
de instrucciones.
Si no se siguen
las advertencias e
instrucciones, podría
producirse una
descarga eléctrica,
un incendio y/o daños
graves.
Para reduzir o risco
de lesão, o utilizador
deve ler o manual de
instruções.
Se não seguir todas
as instruções e os
avisos, pode provocar
um choque eléctrico,
incêndio e/ou
ferimentos graves.
Aby zmniejszyćryzyko
odniesienia obrażeń,
użytkownik powinien
przeczytaćinstrukcjęobsługi.
Nieprzestrzeganie
ostrzeżeńoraz wskazówek
bezpieczeństwa może
spowodowaćporażenie
prądem elektrycznym, pożar
i/lub odniesienie poważnych
obrażeń.
Alleen voor lidstaten van de EU
Verwijder elektrische
gereedschappen niet samen
met huishoudelijk afval. In
overeenstemming met de
Europese Richtlijn 2002/96/
EG betreffende afgedankte
elektrische en elektronische
apparatuur en de omzetting
van deze richtlijn in nationale
wetgeving moeten elektrische
gereedschappen na afloop
van hun nuttige levensduur
afzonderlijk worden opgehaald
en naar een milieuvriendelijk
recyclagebedrijf worden
gebracht.
Sólo para países de la Unión
Europea
¡No deseche los aparatos
eléctricos junto con los residuos
domésticos!
De conformidad con la Directiva
Europea 2002/96/CE
sobre residuos de aparatos
eléctricos y electrónicos y su
aplicación de acuerdo con
la legislación nacional, las
herramientas eléctricas cuya
vida útil haya llegado a su fin se
deberán recoger por separado
y trasladar a una planta de
reciclaje que cumpla con las
exigencias ecológicas.
Apenas para países da UE
Não deixe ferramentas
eléctricas no lixo
doméstico!
De acordo com a directiva
europeia 2002/96/CE
sobre ferramentas
eléctricas e electrónicas
usadas e a transposição
para as leis nacionais, as
ferramentas eléctricas
usadas devem ser
recolhidas em separado
e encaminhadas a uma
instalação de reciclagem
dos materiais ecológica.
Dotyczy tylko państw UE
Nie wyrzucaj
elektronarzędzi wraz z
odpadami z gospodarstwa
domowego!
Zgodnie z Europejską
Dyrektywą2002/96/WE w
sprawie zużytego sprzętu
elektrotechnicznego i
elektronicznego oraz
dostosowaniem jej
do prawa krajowego,
zużyte elektronarzędzia
należy posegregować
i zutylizowaćw sposób
przyjazny dla środowiska.
Water onder hoge druk kan
gevaarlijk zijn als het niet op de
juiste manier wordt gebruikt.
Waterstralen onder hoge
druk mogen niet op mensen,
elektrische apparatuur of de
hogedrukreiniger zelf worden
gericht.
El agua a alta presión
puede ser peligrosa si se
utiliza incorrectamente.
Los chorros de agua a alta
presión no deben dirigirse
hacia las personas, el
equipo eléctrico o la misma
máquina de limpieza.
A água a alta pressão
pode ser perigosa quando
utilizada incorretamente. Os
jatos de água a alta pressão
não devem ser direcionados
para pessoas, equipamento
elétrico ou o próprio
dispositivo.
Woda pod wysokim ciśnieniem
może byćniebezpieczna,
jeżeli jest nieprawidłowo
wykorzystywana. Strumienia
wody pod wysokim ciśnieniem
nie wolno kierowaćna ludzi,
urządzenia elektryczne lub
samąmyjkę.
Water dat doorheen de
terugslagklep geleid is,
mag niet als drinkwater
worden gebruikt.
El agua que ha
pasado por la válvula
antirretorno no puede
utilizarse para beber.
A água que passe pela
válvula de refluxo não
pode ser utilizada para
beber.
Wody, która przeszła
przez zawór zwrotny nie
wolno wykorzystywać
do picia.
Wisselstroom Corriente alterna Corrente alternada Prąd przemienny
Gereedschap van
Klasse II Herramienta de Clase II Feramenta de classe II Narzędzie klasy II
Waarschuwing Advertencia Aviso Ostrzeżenie
VVolt Voltios Volts Wolty
AAmpère Amperes Amperes Ampery
Hz Hertz Hertz o hercios Hertz Herce
WWatt Watts o vatios Watts Waty
kg Kilogram Kilogramos Quilogramas Kilogramy
MPa Megapascal Megapascales Megapascais Megapaskale
000BookAW150EEWE.indb12000BookAW150EEWE.indb12 2017/12/0713:40:002017/12/0713:40:00

13
Magyar Türkçe Український Pyccкий
Jelölések
FIGYELEM
Az alábbiakban a géphez
alkalmazott jelölések
vannak felsorolva. A
gép használata előtt
feltétlenül ismerje meg
ezeket a jelöléseket.
Simgeler
DİKKAT
Aşağıda, bu alet için kullanılan
simgeler gösterilmiştir.
Aleti kullanmadan önce
bu simgelerin ne anlama
geldiğini anladığınızdan emin
olun.
Символи
ПОПЕРЕДЖЕННЯ
Тут показані символи,
використані в
керівництві. Будь ласка,
переконайтеся, що
правильно розумієте
їхнє значення.
Символы
ПРЕДУПРЕЖДЕНИЕ
Ниже приведены символы,
используемые для машины.
Перед началом работы
обязательно убедитесь в
том, что Вы понимаете их
значение.
A sérülések
kockázatának
csökkentése érdekében,
a használónak el kell
olvasnia a használati
útmutatót.
A figyelmeztetések
és utasítások be nem
tartása áramütést, tüzet
és/vagy súlyos sérülést
eredményezhet.
Kullanıcıyaralanma
riskini azaltmak için
kullanım kılavuzunu
okumalıdır.
Uyarılara ve talimatlara
uyulmamasıelektrik
çarpmasına, yangına
ve/ veya ciddi
yaralanmaya neden
olabilir.
Щоб зменшити ризик
отримання травми,
користувач повинен
прочитати інструкції
зексплуатації.
Невиконання цих
правил та інструкцій
може призвести
до удару струмом,
пожежі та/або
серйозної травми.
Чтобы уменьшить
опасность получения
травм, пользователь
должен прочитать
руководство по
эксплуатации.
Не выполнение правил и
инструкций может привести
кпоражению электрическим
током, пожару и/или
серьезной травме.
Csak EU-országok
számára
Az elektromos
kéziszerszámokat
ne dobja a háztartási
szemétbe!
A használt villamos
és elektronikai
készülékekről szóló
2002/96/EK irányelv és
annak a nemzeti jogba
való átültetése szerint az
elhasznált elektromos
kéziszerszámokat
külön kell gyűjteni, és
környezetbarát módon
újra kell hasznosítani.
Sadece AB ülkeleri için
Elektrikli el aletlerini
evdeki çöp kutusuna
atmayınız!
Kullanılmışelektrikli
aletleri, elektrik ve
elektronikli eski cihazlar
hakkındaki 2002/96/EC
Avrupa yönergelerine
göre ve bu yönergeler
ulusal hukuk kurallarına
göre uyarlanarak, ayrı
olarak toplanmalıve
çevre şartlarına uygun
bir şekilde tekrar
değerlendirmeye
gönderilmelidir.
Лише для країн ЄС
НЕ викидайте електричні
інструменти із побутовими
відходами!
Згідно Європейської
Директиви 2002/96/EC
про відходи електронного
та електричного
виробництва іїї
запровадження згідно
місцевих законів,
електроінструменти, які
відслужили робочий строк
слід утилізувати окремо і
повертати до установ, що
займаються екологічною
переробкою брухту.
Только для стран ЕС
Не выкидывайте
электроприборы вместе с
обоычным мусором!
Всоответствии с
европейской директивой
2002/96/ЕС об утилизации
старых электрических и
электронных приборов
ивсоответствии с
местными законами
электроприборы, бывщие
вэксплуатации, должны
утилизовываться
отдельно безопасным
для окружающей среды
способом.
A magasnyomású víz
veszélyes lehet, ha
helytelenül használja. A
magasnyomású vízsugarat
nem szabad közvetlenül
ember, elektromos
berendezés vagy maga a
mosó felé irányítani.
Yüksek basınçlısu hatalı
kullanıldığında tehlike
arz edebilir. Yüksek
bacınçlısu püskürtme
işlemi insanlara, elektrikli
ekipmanlara veya
yıkayıcının kendisi üzerine
doğru uygulanmamalıdır.
Струмінь води, який подається
під високим тиском, може
становити небезпеку, якщо ним
користуватися неправильно.
Заборонено спрямовувати
струмінь води під високим
тиском на людей, електричне
обладнання або саму мийку.
Вода под высоким давлением
может быть опасна при
неправильном использовании.
Нельзя направлять струи
воды под высоким давлением
на людей, электрическое
оборудование или саму
мойку.
A visszafolyó szelepen
áthaladó víz nem iható. Ters akım vanasından
geçen su içme amaçlı
olarak kullanılamaz.
Воду, яка пройшла через
клапан повернення,
заборонено пити.
Воду, прошедшую через
клапан противотока, нельзя
использовать для питья.
Váltóáram Alternatif akımЗмінний струм Переменный ток
II. osztályú szerszám Sınıf II aracıІнструмент Класу ІІ Инструмент класса II
Figyelem Dikkat Попередження Предупреждение
VVolt Volt Вольт Вольты
AAmper Amper Ампер Амперы
Hz Hertz Hertz Ге рц Ге рцы
WWatt Watt Ватт Ватты
kg Kilogramm Kilogram Кілограм Килограммы
MPa Megapascal Megapaskal Мегапаскаль Мегапаскали
000BookAW150EEWE.indb13000BookAW150EEWE.indb13 2017/12/0713:40:012017/12/0713:40:01

English
14
GENERAL POWER TOOL SAFETY WARNINGS
WARNING
Read all safety warnings and all instructions.
Failure to follow the warnings and instructions may result in electric
shock, fire and/or serious injury.
Save all warnings and instructions for future reference.
1. Make sure the work area is always kept neat and
tidy.
Failure to observe this may result in accidents.
2. Take the surrounding environment into
consideration when using the washer.
○Make sure the work area is brightly lit.
○Do not use the washer near flammable liquid or gas.
3. Beware of electric shocks.
Do not touch anything that is earthed (grounded) when
using the High Pressure Washer. (For example, pipes,
heaters, microwave ovens, refrigerators, etc.)
4. Do not use the washer near children.
○People other than the person using the washer must not
be allowed to touch the washer or the cord.
○People other than the person using the washer must not
come near the work area.
5. Store the washer in a safe place when not in use.
Store the washer in a dry, high location or protected with
a lock out of the reach of children.
6. Do not use the washer in inappropriate ways.
○Use the High Pressure Washer within the limits of its
capabilities to ensure safe and efficient results.
○Do not use the washer for any purpose other than that for
which it was designed.
7. Wear safe clothing when using the washer.
Use safety boots, gloves, helmets with visors and
earplugs in accordance with necessity.
8. Use protective goggles and dust-protection masks
when using the washer.
There is a chance that splashes and dust may enter the
eyes and mouth when using the washer.
9. Do not handle the power cord roughly.
○Do not carry the High Pressure Washer with only the
power cord or pull the plug from the socket while holding
the power cord.
○Keep the power cord away from heat, oil and sharp
corners.
10. Make sure the item being cleaned is firmly fixed in
place.
There are cases in which the power of the water pressure
will cause light objects to fly off. Do not use the washer on
light objects that cannot be fixed in place.
11. Maintain a proper stance when using the washer.
Make sure your feet are always placed firmly on the
ground to maintain balance.
12. Pay close attention to maintaining the High Pressure
Washer.
○Clean the washer regularly to ensure safe and efficient
use.
○Refer to the instruction manual when replacing supplied
parts.
○Regularly check the power cord and ask your dealer for
repairs in the event of it being damaged.
○If using an extension cord, check it regularly and replace
it in the event of it being damaged.
○Make sure the grip is always kept dry and clean, and do
not allow oil of grease to come into contact with it.
13. Switch offand unplug the High Pressure Washer in
the following situations:
○When it is not in use and when it is being repaired.
○When attaching or detaching supplied or purchased
parts.
○In other situations in which risks seem apparent.
14. Always remove equipment used for adjustment
purposes.
Check to make sure that all equipment used for
adjustment purposes has been removed before switching
on the power.
15. Avoid accidentally switching on the power.
○Make sure you do not accidentally switch on the power to
the washer when it is plugged in.
○Check to make sure that the washer is switched off
before plugging it into the power supply.
16. Inadequate extension cords can be dangerous.
17. Pay attention at all times when using the washer.
○Pay attention to the methods of use stipulated in the
instruction manual and the surrounding environment
when using the High Pressure Washer.
○Do not use the washer when tired.
18. Only use specified accessories and attachments.
Using accessories and attachments other than those
specified in the instruction manual or in HiKOKI catalogs
may result in accidents or injuries and must be avoided at
all costs.
19. High Pressure Washer repairs to be performed only
by experts.
○The High Pressure Washer conforms to all relevant
safety regulations and must not be modified.
○All repairs must be requested to HiKOKI authorized
service centers. Attempting to carry out repairs without
the correct skills may result in accidents or injuries.
20. Do not use the machine if a supply cord or important
parts of the machine are damaged, e.g. safety
devices, high pressure hoses, trigger gun.
21. Use a power supply that conforms to the voltage
listed on the name plate.
Failure to observe this may result in the washer operating
at higher speeds than normal, leading to overheating
and the outbreak of smoke and fire, which may cause
damage or injuries.
22. Use an independent power socket with a rated value
of 15 A or more.
Sharing a power socket with other equipment may result
in the breaker shutting down.
23. Hold the trigger gun firmly in both hands when
using the washer.
Failure to observe this may result in injury.
24. High-pressure water can be dangerous if used
incorrectly.
High-pressure water jets must not be directed at people,
animals, easily-broken items, electrical equipment or the
washer itself.
25. Do not use gasoline, oil, organic solvents or
other inflammable or toxic liquids, or any other
inappropriate liquid.
Failure to observe this may result in explosions, the
outbreak of fire or smoke, or other accidents, which may
cause damage or injury.
(Original instructions)
000BookAW150EEWE.indb14000BookAW150EEWE.indb14 2017/12/0713:40:012017/12/0713:40:01

English
15
33. If the washer is accidently dropped or banged into
something solid, inspect it for damage, cracks and
malformation.
Failure to observe this may result in injury.
34. Do not direct the jet against yourself or others in
order to clean clothes or foot-wear.
35. Always switch offthe mains disconnecting switch
when leaving the machine unattended.
CAUTION
1. Purge all of the pressure within the washer before
disconnecting the high-pressure hose.
2. Attach all supplied accessories correctly in
accordance with the instruction manual.
Failure to observe this may result in the accessories
becoming detached or in injury.
3. Check to make sure that no foreign matter is
adhering to the object being washed.
Failure to observe this may result in the matter flying off
and causing unexpected injury.
4. Do not spray a jet of water at the areas surrounding
labels on the object being washed.
Failure to observe this may result in the labels peeling off.
5. Grip the handle firmly when carrying the washer.
6. Do not use any accumulated water other than clean
water from the faucet (water containing dirt, mud,
sand, etc.) when using the auto-suction function.
7. Children should be supervised to ensure that they
don't play with the appliance.
26. When washing automobile tires, make sure that the
tip of the nozzle is kept at least 50cm distant from
the surface being washed.
Failure to observe this may result in damage to the tire or
brakes, which may cause serious accidents.
27. Do not touch the power plug or power socket with
wet hands.
Failure to observe this may result in electric shocks.
28. High pressure cleaners shall not be used by children
or untrained personnel.
29. Water that has flown through backflow preventers is
considered to be non-potable.
Make sure that a backflow valve is used without fail when
connecting the washer to a drinking water faucet.
Water that has passed through the backflow valve cannot
be used for drinking.
30. Make sure that water is not splashed onto the High
Pressure Washer, power cord, extension cable,
power plug, power socket or other areas. Also,
neither exposes it to rain nor use it in the rain.
Failure to observe this may result in electric shocks.
31. Do not hold the trigger gun when fixing it in place.
32. If the washer is not functioning normally or is
emitting strange noises or vibrations switch it off
immediately and contact HiKOKI authorized service
centers to request inspections or repairs.
Continued use may result in injury.
SPECIFICATIONS
Model AW150
Voltage (by areas)*1Single-phase AC 50/60 Hz
Voltage 220 V to 240 V
Power input*12000 W
Max. discharge pressure (1MPa: 10.2 kgf/cm2) 11.0 MPa
Max permissible pressure 15.0 MPa
Max feed pressure 0.7 MPa
Max water discharge 6.67 L/min
Permissible temperature 40°C or less
Dimensions (Length x Width x Depth) 425 mm x 345 mm x 905 mm
(Including the hose handle, power cord holder, gun holder,
gun support and water feed connector)
Weight*212.4 kg
*1 Be sure to check the nameplate on product as it is subject to change by areas.
*2 Weight: Excluding the power cord, weight consists of trigger gun, high-pressure hose, variable nozzle, water feed connector
and accessory holder.
000BookAW150EEWE.indb15000BookAW150EEWE.indb15 2017/12/0713:40:022017/12/0713:40:02

English
16
STANDARD ACCESSORIES
(1) Trigger gun..................................................................1
(2) High-pressure hose (10 m)..........................................1
(3) Variable nozzle (with pressure adjuster)......................1
(4) Turbo nozzle ...............................................................1
(5) Detergent bottle (stored inside the unit) ......................1
(6) One-touch joint (black)
(For use with the strainer hose)...................................1
(7) Water feed connector..................................................1
(8) Nozzle cleaner pin.......................................................1
(9) Gun holder ..................................................................1
(10)
Hose handle................................................................1
(11)
Gun support (with 1 attachment screw).......................1
(1) (2)
(3) (4)
(5) (6)
(7) (8)
(9) (10)
(11)
000BookAW150EEWE.indb16000BookAW150EEWE.indb16 2017/12/0713:40:022017/12/0713:40:02

English
17
OPTIONAL ACCESSORIES (sold separately)
Items shown in are sold separately. Contact HiKOKI authorized service centers for replacements if the standard
accessories become damaged or broken.
Variable nozzle
(With pressure adjuster)
[Standard accessory]
Turbo nozzle
[Standard accessory]
Cleaning brush
Washes away dirt that has
been dislodged with the
brush.
Rotary brush
The central brush is rotated
by water pressure for cleaning
the windows and other items
with large surfaces.
Angle nozzle (variable)
Used for cleaning difficult-
to-reach places, such as
the underneath of cars and
ceilings, etc.
Pipe cleaning kit
(7.5 mm hose)
High-pressure water jets
from the front of the hose are
reversed to clean the inside
of the pipe.
Trigger gun
[Standard accessory]
High-pressure extension hose
(10 m)
Extends the length of the high-
pressure hose supplied.
High-pressure hose
[Standard accessory]
Water feed connector
[Standard accessory]
One-touch joint (black)
[Standard accessories]
Strainer hose set
Accumulated
water
000BookAW150EEWE.indb17000BookAW150EEWE.indb17 2017/12/0713:40:022017/12/0713:40:02

English
18
APPLICATIONS
○Cleans screen doors, window glass, floors, walls, etc.
○Cleans automobiles, motorbikes, etc.
○Cleans mud offgardening equipment and agricultural
equipment.
PRIOR TO OPERATION
1. Installation of an earth leakage circuit breaker
It is recommended that an earth leakage circuit breaker
is connected to the washer to shut offthe power if leaking
current exceeds 30 mA for 30 milliseconds in order to
prevent electric shocks.
2. Keep the work area neat and tidy
Dirty water will be sprayed about when using the washer.
It is therefore necessary to check the area to make sure
there are no hindrances, and keep the work area neat
and tidy.
3. Situating the washer
Select flat locations where the washer will not be
splashed with water when cleaning.
4. Using extension cords
Make sure the cord is thick enough to provide a constant
supply of electricity, and use cords that are as short as
possible.
Acceptable cord thicknesses (Nominal cross sectional
area cable) and cord length are indicated in the table
below.
Cord Thickness (mm2) Cord Length (m)
1 12.5
1.5 20
2.5 30
5. Attaching the gun holder (Fig. 1)
Align the groove on the gun holder with the protrusion on
the washer and push until it clicks into place.
6. Prepare a water feed hose (Fig. 2)
Prepare the following when using water feed hoses:
○Hoses that can withstand pressure (equipped with
meshes)
○Hoses with an inner diameter of 14 to 15 mm.
○Hoses with an outer diameter of 20 mm or less.
7. Attaching the gun support (Fig. 3)
(1) Press the protrusion on the gun support into the long hole
on the washer at an angle shown in the illustration.
(2) Firmly screw the screw supplied into the screw hole with
a Phillips screwdriver.
8. Attaching the hose handle (Fig. 4)
(1) Insert the hose handle into the attachment hole on the
washer.
(2) Press down while rotating it until it reaches a position
approximately 15 mm deep.
(3) Continue to press down and rotate it until it clicks into
place at approximately 15 mm deep.
INSPECTIONS PRIOR TO USE
WARNING
Check the following before using the washer. Check the
items listed in 1 and 2 before plugging into the power
socket.
1. Check to make sure the switch is at the “OFF”
position (Fig. 5)
Plugging the washer into the power socket with the
switch set at “ON” will cause the washer to immediately
begin operating, which may result in unexpected injuries.
2. Check the power supply
Only use a rated voltage.
Do not use motor engines are direct current. Failure to
observe this will not only result in damage to the washer,
it is also very dangerous.
3. Check the power socket
If the power socket is loose or the plug is easily dislodged,
it needs to be repaired.
It is dangerous to use it in this condition. Consult with
your local electrical engineering outlet.
ATTACHING PARTS
Make sure all parts are correctly attached in the following
sequence in order to guarantee safe usage.
WARNING
Switch offthe washer and disconnect it from the power
socket without fail to prevent unexpected accidents.
1. Attach the water feed connector to the water feed
inlet on the washer (Fig. 6)
Remove the cap on the washer’s water feed inlet and
firmly attach the water feed connector.
Loose connections may result in water leaks.
2. Pull the high-pressure hose from the hose reel
(Fig. 7)
Pull the entire length of the high-pressure hose from the
reel while steadying the reel to prevent it from toppling
over.
NOTE
Using the washer with part of the hose wrapped around
the reel may result in insufficient pressure or abnormal
vibrations.
3. Attach the high-pressure hose to the trigger gun.
(Fig. 8)
Grip the thick end of the high-pressure hose, insert it into
the connector on the trigger gun, and then rotate the ring
on the hose to fix it in place.
NOTE
○Moisten the O-ring with water to facilitate the connection
if it is difficult to insert the hose.
○If the ring cannot be tightened, it means that the end of
the high-pressure hose has not been sufficient inserted.
4. Attach the nozzle to the trigger gun.
<Attachment (Fig. 9)>
(1) Align the protrusion on the nozzle with the entry hole on
the trigger gun and press it into place.
NOTE
○Remove all dirt, mud and other matter from the trigger
gun’s entry hole and the protrusion on the nozzle.
○Moisten the O-ring with water to facilitate the connection
if it is difficult to insert the nozzle.
(2) Press down firmly on the nozzle and then rotate it in the
direction of the arrow until it stops (half rotation.)
(3) Check to make sure that the nozzle cannot be pulled out
once it has been attached.
<Detachment (Fig. 10)>
Press down firmly on the nozzle and then rotate it counter-
clockwise until it stops. The nozzle can be withdrawn at
that position.
000BookAW150EEWE.indb18000BookAW150EEWE.indb18 2017/12/0713:40:022017/12/0713:40:02

English
19
USING DIFFERENT NOZZLES
Variable nozzle (with pressure adjustor) (Fig. 11)
The variable nozzle (with pressure adjustor) can be used
to alternation between “Jet” and “Spray” and between
“High Pressure” and “Low Pressure”.
Rotate the end on the nozzle clockwise for “Jet”, and
counter-clockwise for “Spray”.
Also, rotate the pressure adjuster clockwise for “Low
Pressure”, and counter-clockwise for “High Pressure”.
• Jet washer
A water jet is discharged in a direct line to remove
stubborn mud and other dirt from agricultural machinery,
etc.
• Spray washer
The water is discharged in a wide fan for cleaning walls,
motorbikes and automobiles, etc.
The entire nozzle can be rotated by approximately 90
degrees to change the shape of the spray between
horizontal and vertical.
NOTE
○The pressure adjuster will also be rotated when
alternating between “Jet” and “Spray”, so readjust this to
the required setting after making the adjustment.
○Set the spray adjustment to “Jet” first of all, and then
gradually move it to the “Spray” position while pulling the
trigger.
Note that there is a chance of the water being sprayed
horizontally over a wide area if this is rotated fully to the
“Spray” position.
○Note that the nozzle may be damaged if it is forced to
move past the stop position when alternating between
“Jet” and “Spray”.
Turbo nozzle
The turbo nozzle rotates as it sprays high-pressure jets of
water for efficient washing.
NOTE
The turbo nozzle only discharges powerful jets of water
when set at the “Jet” mode.
Avoid using this on items that are easily broken or for
which coatings are easily peeled.
USING THE DETERGENT BOTTLE (Fig. 12)
Sprays water mixed with detergent.
Uses neutral detergents available on the open market.
WARNING
Do not use acidic or alkali detergents. Use only neutral
detergents available on the open market.
Using detergents other than neutral detergents or
chemical agents may result in accidents or malfunctions.
NOTE
Check to make sure that the water feed pipe is firmly
connected to the washer.
The detergent will not be mixed with the spray otherwise.
1Remove the cap from the detergent bottle and pour the
detergent into it.
2Make sure the filter on the tip of the detergent bottle’s
water feed pipe is inserted into the liquid and then tighten
the cap firmly.
NOTE
Only the “Low Pressure” setting can be used for variable
nozzles (with pressure adjustors) when using the
detergent bottle.
The detergent will not be sprayed if the “High Pressure”
setting on variable nozzles (with pressure adjustors) or
turbo nozzles are used.
3Set the adjustor to “Low Pressure” when using variable
nozzles (with pressure adjustors.)
4Water containing the detergent will be sprayed at low
pressure when the trigger on the trigger gun is pulled.
Cleaning the detergent bottle (Figs. 13 and 14)
1Remove the detergent bottle’s water feed pipe from the
washer.
2Push the detergent bottle from the bottom and withdraw it
from the top.
3Wash the detergent bottle, water feed pipe and filter with
water from the faucet.
4When reattaching the bottle, hold it as shown in Fig. 14,
and then push the protrusion on the bottom in as far as it
will go.
5Insert the water feed pipe into the washer and tighten the
cap while making sure dust or dirt does not enter.
USING THE STRAINER HOSE SET (sold
separately)
The separately-sold strainer hose set is equipped with a
function that will automatically suck water from a water tank,
etc., when attached to the AW150.
The maximum height of suction (lifting range) is
approximately 0.5 m.
Attach this correctly in accordance with conditions.
Suction height when the height of the water feed outlet is
lower than the maximum height of the suction hose: From
the maximum height of the suction hose to the surface of
the water.
Less than 50 cm
Water surface
Water
feed inlet
Maximum height of
the suction hose
Suction height when the height of the water feed outlet is
the same as the maximum height of the suction hose: From
the water feed outlet to the surface of the water.
Less than 50 cm
Water surface
Water feed inlet
(maximum height of
the suction hose)
000BookAW150EEWE.indb19000BookAW150EEWE.indb19 2017/12/0713:40:022017/12/0713:40:02

English
20
1. Attaching the strainer to the suction hose (Fig. 15)
(1) Pass the suction hose through the hose band supplied
and then gently moisten the inside of the suction hose
with water.
(2) Insert the strainer as far as it will go, and then firmly
tighten the hose band with a flat-headed screwdriver.
2. Attaching the one-touch joint (black) to the suction
hose (Fig. 16)
Attach the one-touch joint (black) supplied as a standard
accessory to the suction hose.
3. Starting the suction hose water suction process
(Fig. 17)
Sink the strainer hose set into a container filled with
water.
Start offthe suction process (introduce water to the
suction hose.)
NOTE
○Do not use anything other than clean water (river or pond
water, muddy water containing sand granules.)
Failure to observe this may result in malfunctions.
○Set the switch at “ON” without the nozzle attached.
Failure to observe this may result in dry operations,
leading to malfunctions.
4. Insert the one-touch joint into the water feed
connector (Fig. 18)
Withdraw the one-touch joint from the accumulated water
and insert it into the water feed connector on the washer
while making sure that the water inside the hose does not
escape.
5. Check to make sure the water is flowing out
(Fig. 19)
(1) Connect the trigger gun from which the nozzle has been
removed to the high-pressure hose.
(2) Plug in the power socket and set the switch to “ON”.
(3) Pull the trigger gun’s trigger, and then set the switch to
“OFF” after checking that sufficient water is flowing out.
6. Attach the nozzle.
NOTE
Set the switch at “OFF” if water does not flow out within
two minutes.
Failure to observe this may result in malfunctions (dry
operations.)
7. Washing
Set the switch at “ON” and pull the trigger gun’s trigger to
commence washing.
8. Cleaning
Remove all dirt from the strainer’s grill, wash it with water
and store it after it has dried.
WASHING
WARNING
○Do not switch the washer on while the trigger is being
pulled.
Failure to observe this may result in high-pressure water
being sprayed immediately, leading to unexpected
accidents.
○Do not point the nozzle at people or animals.
Failure to observe this may result in injury.
CAUTION
○Set the switch to “OFF” immediately if the hose becomes
detached from the faucet or washer, and if water is no
longer being fed to the washer.
Failure to observe this may result in immediate
malfunctions (dry operations.)
○Set the switch to “OFF” without fail when temporarily
suspending operations.
Failure to observe this may result in the motor
automatically starting up.
○Place your finger in the center of the trigger during
operations (Fig. 20)
Failure to observe this may result in injury from pinched
fingers.
Grip the gun and nozzle firmly with both hands.
○The trigger gun may kick back when water is discharged.
NOTE
○Do not use the water hose when it is wound onto the reel.
Failure to observe this may result in insufficient water
feed.
○Commence initial washing approximately 2 to 3 meters
away from the targeted item, and then move gradually
closer while checking the level of cleaning until you reach
a distance in which soiling is effectively washed away.
The pressure of the spray from the washer is
approximately 20-times greater than tap water. High-
pressure water jets may therefore damage or peel the
coating from the items being washed.
○There are cases when the water spray will appear
unstable owing to the fact that air that has built up in
the pump and hose is purged together with the water
immediately after use. In this event, allow the water to
flow out until it stabilizes.
○Leave two or more seconds gap between pulling and
releasing the trigger.
Failure to observe this may result in the pressure switch
malfunctions.
○Do not use the washer for more than thirty consecutive
minutes without giving it a break.
1. Open the faucet to its fullest.
Point the nozzle in a safe direction and then fully open the
faucet. Check to make sure no water is leaking from the
joints.
Release the trigger stopper with the washer switched off,
pull the trigger on the trigger gun to discharge a small
amount of water from the nozzle with just the pressure
from the tap water. Check to make sure that no water is
leaking.
NOTE
Do not switch the washer on with the faucet turned off.
Failure to observe this may result in malfunctions.
2. Set the switch to the “ON” position (Fig. 21)
The motor will start operating when the washer is
switched on. The motor will automatically switch offonce
sufficient water pressure has built up inside the washer.
3. Pull the trigger (Fig. 22)
Hold the trigger gun firmly in both hands, point the nozzle
at the item to be washed, and then pull the trigger.
The high-pressure water jet will spray out.
Adjust the nozzle between “Jet” and “Spray” in
accordance with need.
Trigger stopper (Fig. 23)
The trigger gun is fitted with a trigger stopper to prevent
the trigger from being pulled.
The trigger is locked and released by pressing the
stopper in the direction shown by the arrows.
NOTE
Lock the trigger with the trigger stopper during pauses
and after washing has been completed.
000BookAW150EEWE.indb20000BookAW150EEWE.indb20 2017/12/0713:40:032017/12/0713:40:03
Table of contents
Languages:
Other HIKOKI Pressure Washer manuals