Hilka 84991253 User manual
INSTRUCTION MANUAL
Heavy Duty Power Winch
84991253
33700
Before using the equipment, please read this booklet thoroughly and follow the instructions
carefully, in doing so you will ensure the safety of yourself and that of others around you,
and you can look forward to the hand puller giving you long and satisfactory service.
1
GUARANTEE
This product is guaranteed against faulty manufacture for a period of 12 months from the
date of purchase. Please keep your receipt which will be required as proof of purchase.
This guarantee is invalid if the product is found to have been abused or tampered with in
any way, or not used for the purpose for which it was intended. Faulty goods should be
returned to their place of purchase, no product can be returned to us without prior permis-
sion. This guarantee does not effect your statutory rights.
SAFETY PRECAUTIONS
WARNING
As with all machinery, there are certain hazards involved with their operation and
use. Exercising respect and caution will considerably lessen the risk of personal
injury. However, if normal safety precautions are overlooked or ignored, personal
injury to the operator or damage to property, may result.
1. Understand the equipment. Learn the pullers’ applications and limitations as well as
the specic potential hazards peculiar to it.
2. Always inspect the puller before use. Ensure that all parts are in good condition and
operating smoothy, and that no cracks or distortion is apparent and the rope is not
corroded frayed or damaged in any way. If in doubt do not use.
3. Do not use the hand puller for lifting
purposes.
4. Do not exceed the pullers’ capacity.
5. Do not use handle extensions.
6. Ensure that all personnel stand well
clear of the load, and are not between
the load and the hand puller.
7. When using a car as an anchor point
ensure that it is “in line” with the load,
so that the rope does not pull the car
sideways.
8. Do not pass the wire rope around tree trunks or gate posts etc., to be used as fulcrum
points (see g. 1) the abrasive action will cause severe damage to the rope.
9. Do not prevent the tool from pivoting to line up with the direction of pull (see g. 1)
10. It is strongly advised that industrial gloves are worn at all times when using the puller.
Take care not to trap ngers within the moving parts.
11. When pulling or dragging a load, be aware that the load may suddenly ‘give’, eg. Pulling
a tree stump etc. Take the necessary precautions.
12. Never allow the rope to be unwound completely. Ensure there is at least ONE complete
turn on the drum.
13. Do not wear loose clothing, which could become entangled with the moving parts.
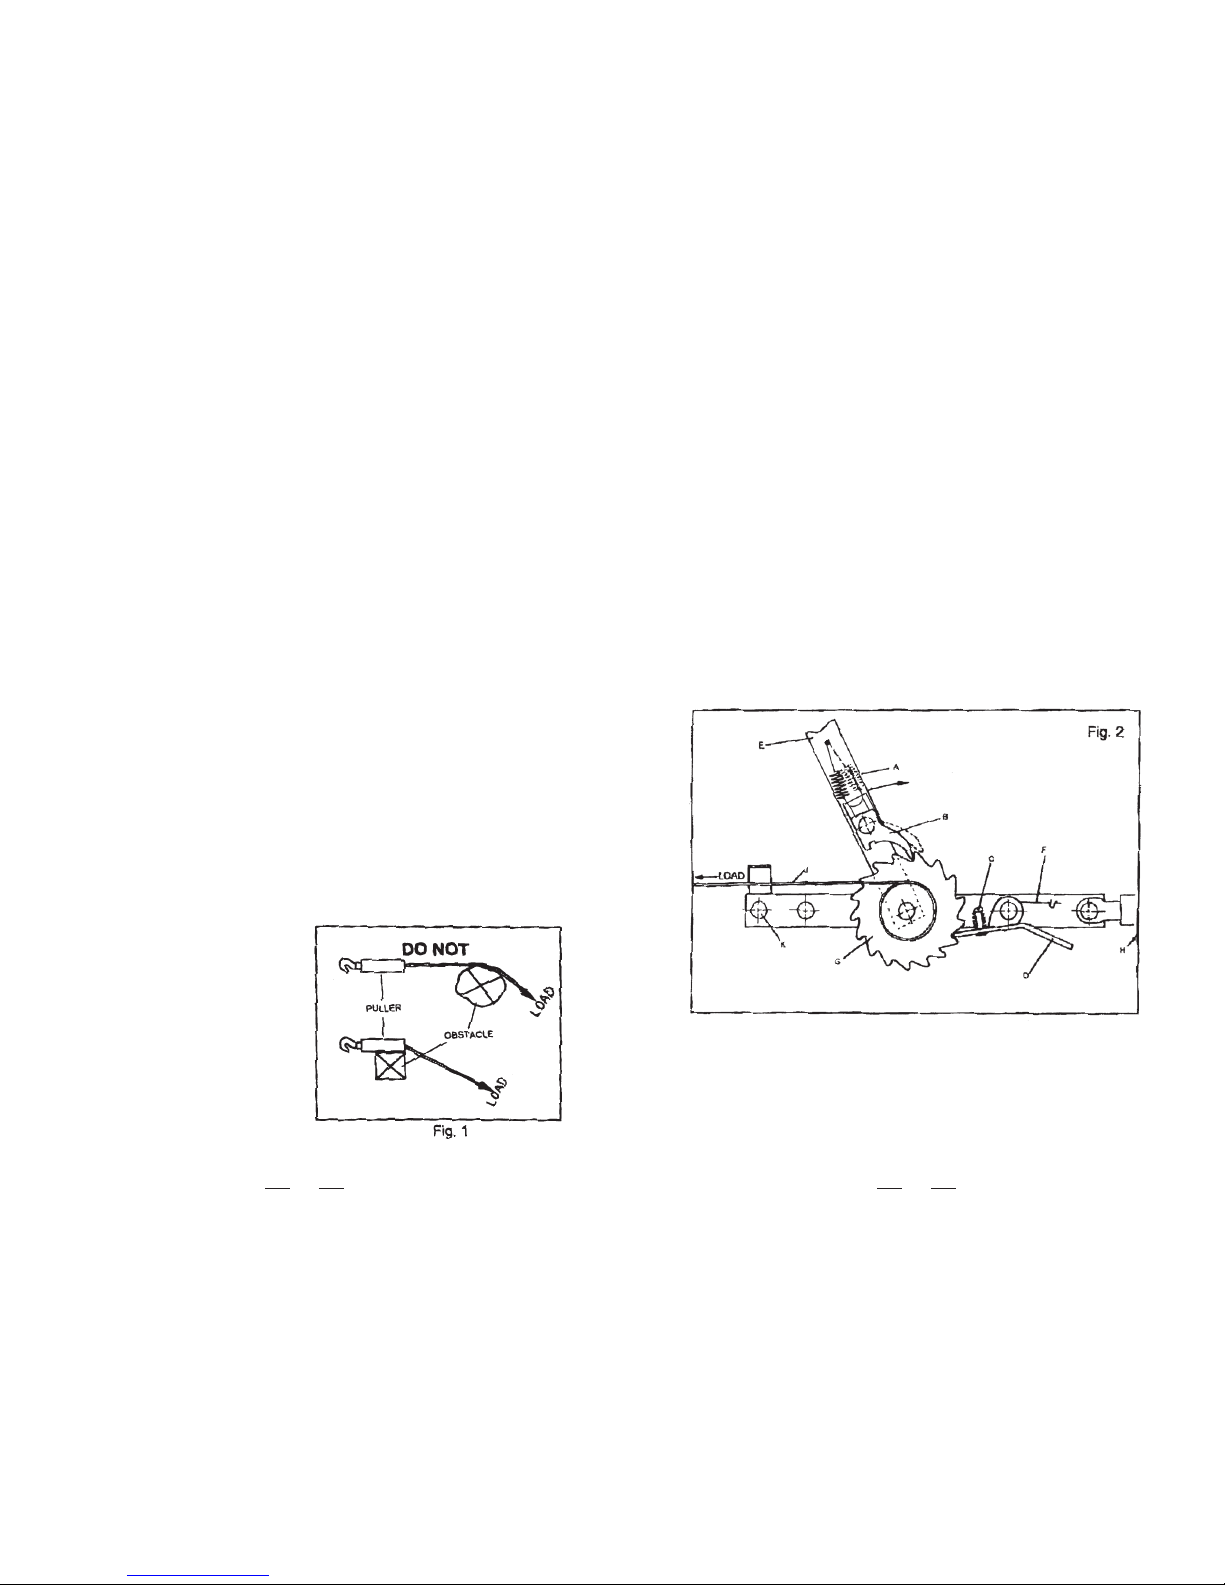
CHARACTERISTICS
The schematic diagram above illustrates the major components as follows:
A Pawl Spring
B Pawl
C Locking Lever Plunger
D Locking Lever
E Handle
F Locking Lever Spring
G Ratchet Wheel
H Anchor Hook
J Wire rope
K Wire rope Guide Bolt
2

43
1. Winching IN
Move pawl spring (A) in the position shown (in solid lines) in g 2. This ensures the pawl (B)
is held rmly into contact with the ratchet wheel (G) under pressure of spring L. The load, is
locked in position by locking lever (D) engaging with a tooth of the ratchet wheel.
Move the handle (E) so that it is pointing lowards the load. Now, pulling the handle away
from the load, winches the load ‘in’.
When the pressure on the handle is relieved slightly, at the end of its’ travel, the locking
lever (D), engages with one of the teeth of the ratchet wheel, thereby locking the load once
more, and the cycle is repeated.
OPERATION (Ret. Fig. 2)
2. Winching OUT
The hand puller has the capability of “winching out”, under control, one ratchet tooth at a
time.
Move pawl spring to the position shown in dotted lines (g. 2), freeing the handle to move in
the direction of the anchor. (The load meanwhile is being held by the locking lever).
As the handle nears the end of its travel, the pawl is forced into contact with the ratchet
wheel, by the spring loaded locking lever plunger (C) and eventually, locks into one of the
teeth. Continue to turn the handle, causing the pawl to turn the ratchet wheel slightly, taking
the full load from the locking lever (i.e. effectively, winching “in”). When you have taken the
full load, allow the handle to move back towards the load. The ratchet wheel will move one
tooth, paying out the rope by the same amount, until the locking lever locks into place once
more under its’ spring pressure preventing any further movement, and the cycle is repeated.
Note: It is necessary to move the handle only by a small ammount each cycle.
3. Paying out the Wire Rope
In order to pay out the wire rope, rst ensure the pawl spring is set to the position shown in
dotted lines, g. 2, so that the pawl is held off the ratchet wheel. Holding the puller
firmly with the handle uppermost, and preferably wearing a good pair of heavy duty
gloves,press the locking lever (D), up, thereby disengaging the locking lever from the ratchet
wheel.
It is now possible for an assistant, also wearing gloves, to pull the wire rope out, or, having
anchored the ropes’ hook, walk backwards with the puller to the anchor point, paying out the
rope behind you.
Release the locking lever, and move pawl spring to begin winching ‘in’
4. 2:1 or Double Cable Winching
The wire rope is provided with a drop forged safety hook, and a third hook with a pulley
attached, which allows a 2 to 1 conguration. To accomplish this, the main hook is looped
back and hooked over the bolt which secures the cable guide (K). The third hook, with
pulley, is then attached to the load. The length of pull is thereby halved, but the load
capability is doubled.
5. Winching in Conned Spaces
The third hook may also be used to winch
a load which is not directly in line with the
anchor. An example is shown at g. 3,
where the wire rope passes over the pulley
of the third hook, which is rmly anchored,
and from there to the load.
MAINTENANCH
WARNING
NEVER run your bare hands along the
wire rope, always wear a pair of good quality heavy duty industrial gioves.
1. Inspect the puller before use to ensure that it is in good condition, and that it is not
damaged in any way. If cracks appear in the frame, do not use. In this event, the tool is
past its useful working life.
If the frame is distorted, the tool is considered to be beyond repair and should not
be used.
2. Keep the pawl and ratchet pivots, and rope lightly oiled at all times.
3. Inspect the wire rope periodically for corrosion, kinks, broken wire etc.
If corrosion is apparent, clean with a stiff wire brush, and lightly oil. A damaged or
badly corroded rope must be replaced.
SPECIFICATIONS
Max. Pulling Capacity (direct pull) 600kg
Max. Pulling Capacity (double rope) 800kg
Max. Pulling Distance (direct pull) 3000mm
Max. Pulling Distance (double rope) 1500mm
Min. Pulling Distance 500mm
Weight 4kg
Rope Type Twisted Steel Cable 5mm dia.


