Regalo WideSpan Extra Tall 1154 User manual

www.regalo-baby.com
Regalo International, LLC.
3200 Corporate Center Drive, Suite 100 / Burnsville, MN 55306-9803, USA
866.272.5274 (U.S. only) or 952.435.1080
Made in China
WideSpan®Extra Tall
Safety Gate
OWNER’S MANUAL MODEL: 1154
• READ ALL INSTRUCTIONS BEFORE ASSEMBLY AND USE OF GATE.
• KEEP INSTRUCTIONS FOR FUTURE USE.

Before Using Product
Read and follow all instructions carefully to ensure that your gate and extensions
are properly installed. Improper installation could result in the gate becoming
unstable or dislodged from the doorway. Always make sure the extension is securely
attached to the gate before using. The safety of your child is your responsibility.
Please keep these instructions for your reference.
IMPORTANT
• NEVER use more than two extensions per side of gate.
• If hardware mounting to a surface other than drywall or wood,
please consult with a professional about installation.

English 3
WARNING
• To prevent serious injury or death, securely install gate or
enclosure and use according to manufacturer's instructions.
• Children have died or been seriously injured when gates are not
securely installed. ALWAYS install and use gate as directed using
all required parts.
• STOP using when a child can climb over or dislodge the gate.
• Use only with the locking/latching mechanism securely engaged.
• To prevent falls, NEVER use at top of stairs.
• NEVER use to keep child away from pool.
• Intended for use with children between 6 and 24 months.
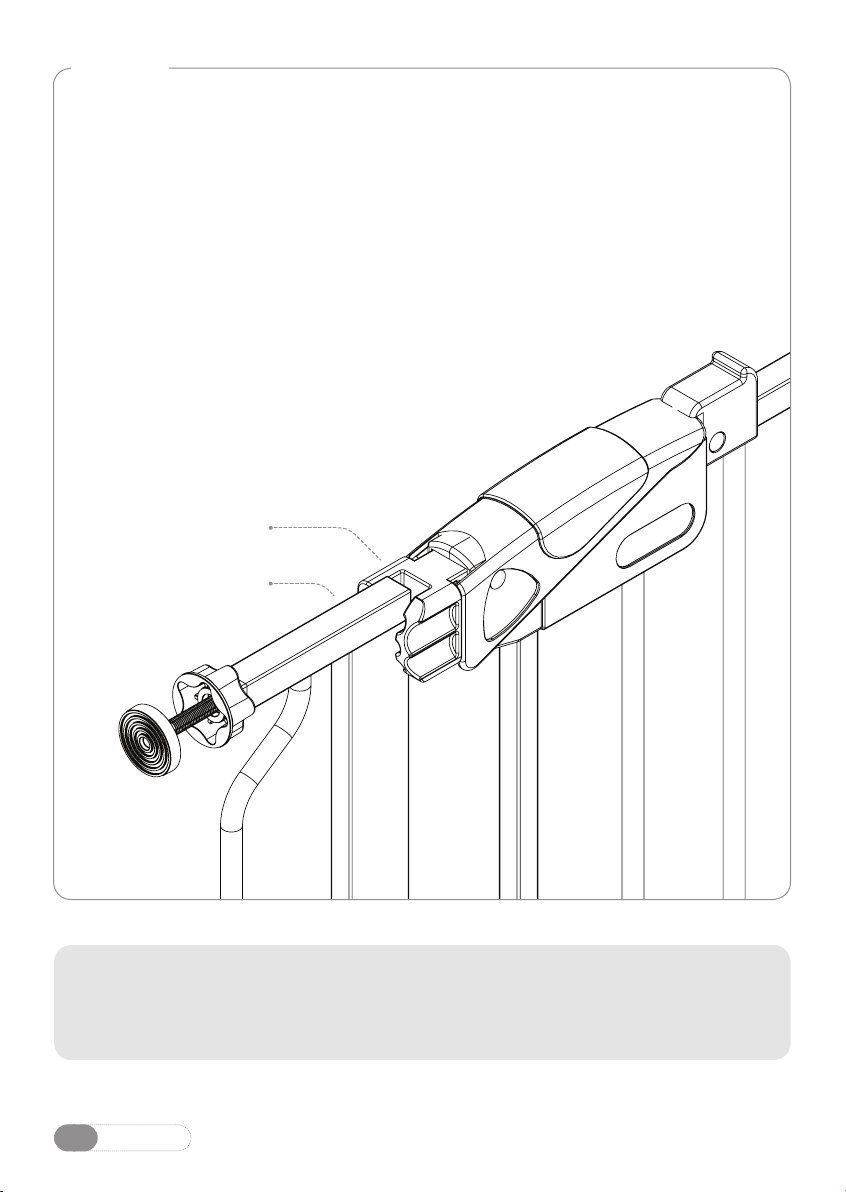
• Always ensure the gate is resting against the floor before
beginning installation.
• This product will not necessarily prevent all accidents. NEVER
leave child unattended.
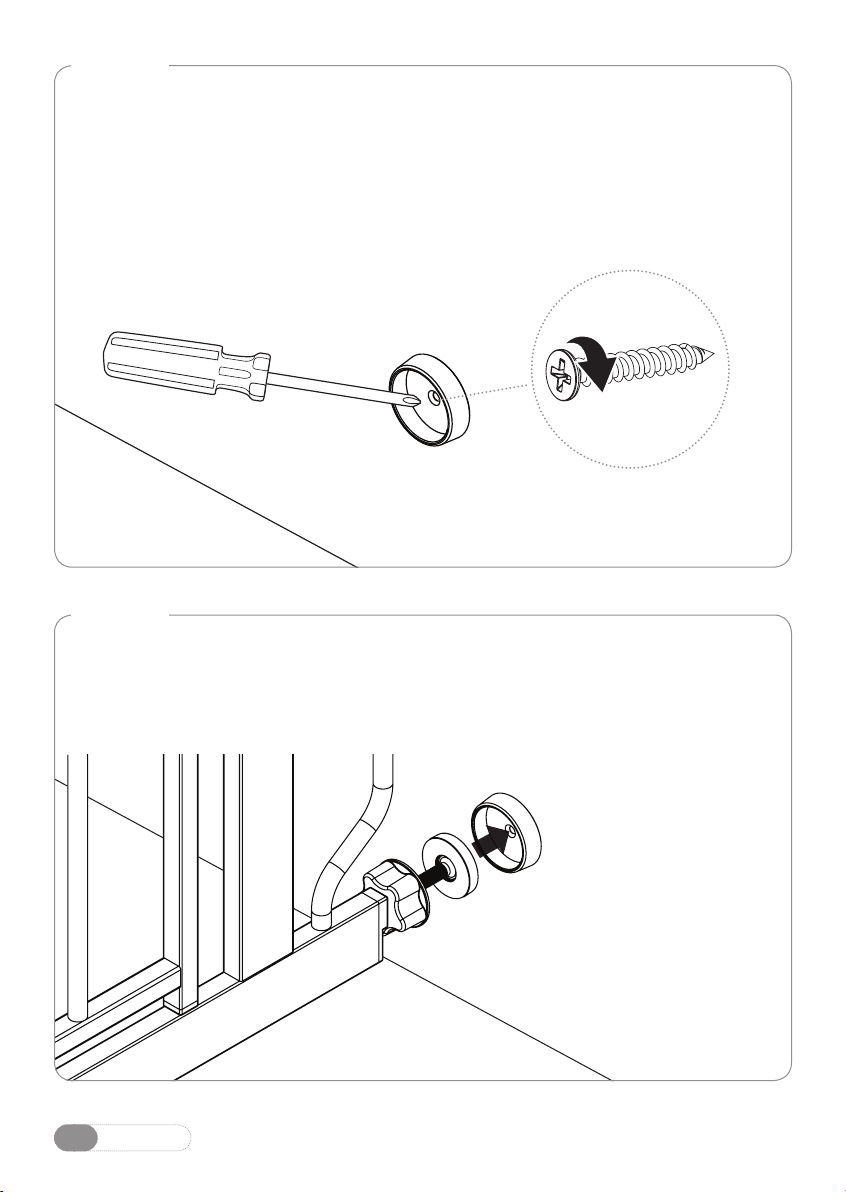
• Check the gate regularly to see if all the hardware and mountings
are tightened.
• Do not use if any components are missing or damaged.
• Adult assembly required.

A
English4
PLEASE CHECKTO MAKE SUREYOU HAVE THE FOLLOWING PARTS:
A Gate Frame (1)
B Wall Cups (4)
C Screws (4) (requires a Phillips/cross-head screwdriver)
D Threaded Spindle Rods (4)
Before Assembly
D
C
B

English 5
MODEL NO. MAX SIZE
4" 6" 8" 12"
1154 29 – 52 inches
Extensions List
NOTE
NOTE: When installing any gate at its maximum width, use wall cups to
ensure stability and safety.
WARNING: The gap between the gate and wall should not exceed more
than 2.5 inches.

English6
STEP 1
Locate the (4) threaded
spindle rods. Rotate the
adjustment wheels along
the threading, eliminating the
gap between the adjustment
wheel and the rubber foot.
Assembling and InstallingYour Gate
STEP 2
Insert the (4) threaded spindle
rods into the holes at each of
the four corners of the gate.
NOTE: You will notice a slight gap between the gate door latch and the
frame. This is not a defect. Your gate is a pressure mounted gate and this
gap will disappear once you tighten your gate in its opening.
RUBBER FOOT
ADJUSTMENT WHEEL

English 7
NOTE: It may be necessary to hold the threaded spindle rods or rubber feet
while rotating the adjustment wheels to ensure the entire unit does not rotate.
STEP 3
Position the gate so that it is level and centered within your doorway or
opening. Rotate the adjustment wheels on the threaded spindle rods in the
opposite direction as in STEP 1, expanding the gap between the rubber foot
and the adjustment wheel. Expand each of the (4) threaded spindle rods
until they make contact with the doorway or opening. Do not fully tighten the
threaded spindle rods yet.

English8
STEP 4
When you are satisfied with the general placement of your gate, fully
tighten the threaded spindle rods attached to the lower corners of the gate
by further rotating the adjustment wheels.
Continue by tightening the upper threaded spindle rods. As you tighten
the upper threaded spindle rods, you will notice the gap between the door
frame and the easy open latch begin to narrow.
In order for the gate to function properly, stop tightening the upper
threaded spindle rods just before the inner wall of the locking latch and
the gate frame touch.
LOCKING LATCH
GATE FRAME
NOTE: The gap between the gate and wall should not exceed more than 2.5
inches. Make the appropriate adjustment to ensure you have installed your
gate safely.

English 9
Positioning and Attaching the Wall Cups
Your gate is a pressure mounted gate. Therefore, it is not necessary to use the
screw attached wall cups in your door opening if you choose not to. However, if
you are using the gate at the top of the stairs you must use the wall cups.
Using the wall cups will affix your gate more firmly in the doorway or opening.
STEP 1
After you have mounted your gate, and you are satisfied with its positioning,
draw a circle on the surface of your doorway or opening around the perimeter
of the (4) rubber feet.
STEP 2
Next, completely remove the gate from the opening by loosening each of the
(4) threaded spindle rods to depressurize the gate.

English10
STEP 3
With the gate fully removed, you can now use the circles you marked during
STEP 1 as guides for screwing in your (4) wall cups.
Center each of the wall cups within the guide circles and use the provided
self-tapping screws to fasten them in place via the hole through the center
of each wall cup.
STEP 4
Reinstall your gate in the doorway or opening according to the instructions,
using the newly installed wall cups as anchoring points for the (4) threaded
spindle rods.

English 11
Operating the Door Latch
LOCK LEVER
SPRING LOCK
STEP 1
Pull the spring lock away from the easy open latch while simultaneously lifting
the lock lever upwards. This will release the locking latch from the gate frame
and allow the door to push or pull open.
STEP 2
To lock the door shut, close the door completely, then push down on the lock
lever to re-engage the spring lock.
NOTE: If your easy open latch is not properly engaging with the receiving
component, ensure that your gate is level, mounted properly, and that you
have not over-tightened the threaded spindle rods.

English12
Adding a Gate Extension
STEP 1
Choose the side of the gate to be extended and remove the top and bottom
threaded spindle rods.
STEP 2
Assemble the gate and extension as illustrated. Reposition the gate and fit in
accordance with the gate fitting instructions.
NOTE: It is preferable to install any extensions on the hinge side of the gate.
If you have an application that requires additional extensions, please
contact the manufacturer.

English 13
REMOVING YOUR GATE FROM THE WALL
To remove your gate from the wall, rotate the adjustment wheels on each of the
(4) threaded spindle rods to depressurize the gate from its doorway or opening.
Then, gently pull or push the gate free from its doorway or opening.
CARE AND MAINTENANCE
Periodically check the gate for signs of damage, wear, or missing components.
Do not use if any part is missing, worn or damaged. Check the gate regularly to
ensure all the hardware and mountings are tightened. Do not use abrasive
cleaners or bleach. Clean by sponging with warm water and a mild detergent.
90 DAYS LIMITED WARRANTY
If, during the first 90 days after consumer purchase of the item, under reasonable
and non-commercial use and conditions of maintenance, it fails while owned by
the original purchaser because of the quality of materials or workmanship of finish
and assembly, Regalo International, LLC, will replace or repair it at Regalo’s option.
PROOF OF PURCHASE REQUIRED.

English14
Replacement Parts
A
F
B C D E
A Easy Open Latch
White = #13037
B Top Plug Insert
Gray = #14020
C
C Threaded Spindle Rods
w/Adjustment Wheel
Gray = #14016
D 1" Wall Mount Screws
#10001
E Wall Cups
Gray = #14015
F Bottom Plug Insert
Gray = #14019

French 15
www.regalo-baby.com
Regalo International, LLC.
3200 Corporate Center Drive, Suite 100 / Burnsville, MN 55306-9803, États-Unis
866.272.5274 (États-Unis seulement) ou 952.435.1080
Fabriqué en Chine
Barrière de sécurité WideSpan
®
extra haute
MANUEL D’UTILISATION MODÈLE: 1154
• LISEZ TOUTES LES INSTRUCTIONS AVANT LE MONTAGE ET
L’UTILISATION DE LA BARRIÈRE.
• CONSERVEZ LES INSTRUCTIONS POUR UNE UTILISATION ULTÉRIEURE.

French16
Avant d’utiliser le produit
Lisez et suivez attentivement toutes les instructions pour vous assurer que la
barrière et les rallonges sont correctement installées. Une mauvaise installation
pourrait rendre la barrière instable ou la déloger de l’encadrement de la porte.
Assurez-vous toujours que la rallonge est solidement fixée à la barrière avant de
l’utiliser. La sécurité de votre enfant est de votre responsabilité. Veuillez garder
ces instructions pour votre référence.
IMPORTANT
• N’UTILISEZ JAMAIS plus de deux rallonges par côté de la barrière.
• Si la barrière est fixée à une surface autre que du placoplâtre ou du bois,
veuillez consulter un professionnel pour son installation.

French 17
AVERTISSEMENT
• Pour éviter des blessures graves ou la mort, installez solidement la
barrière et utilisez-la conformément aux instructions du fabricant.
• Des enfants sont morts ou ont été grièvement blessés lorsque des
barrières n’étaient pas solidement installées. Installez et utilisez
TOUJOURS la barrière comme indiqué en utilisant toutes les
pièces requises.
• CESSEZ D’UTILISER la barrière lorsque l’enfant est capable de
grimper par-dessus la barrière ou de la déloger/l’ouvrir.
• Utilisez uniquement la barrière lorsque le mécanisme du loquet
est fermement engagé.
• Afin d’éviter les chutes, N’UTILISEZ JAMAIS la barrière en haut
d’un escalier.
• N’UTILISEZ JAMAIS la barrière pour tenir l’enfant éloigné
d’une piscine.
• Barrière destinée à une utilisation avec des enfants âgés de 6 à
24mois.
• Assurez-vous toujours que la barrière repose sur le sol avant de
commencer l’installation.
• Ce produit n’évitera pas nécessairement tous les accidents. Ne
laissez JAMAIS l’enfant sans surveillance.
• Vérifiez la barrière régulièrement pour vous assurer que la
quincaillerie et les supports de fixation sont bien en place.
• N’utilisez pas la barrière si des éléments sont manquants ou
endommagés.
• La barrière doit être montée par un adulte.

French18
A
VÉRIFIEZ QUE VOUS DISPOSEZ BIEN DES PIÈCES SUIVANTES:
A Cadre de la barrière (1)
B Éléments de fixation muraux (4)
C Vis (4) (nécessite un tournevis Phillips/cruciforme)
D Tiges filetées (4)
Avant le montage
D
C
B

French 19
MODÈLE N° TAILLE MAXI
4po 6po 8po
(20,32 cm) 12po
1154
Liste des rallonges
REMARQUE
REMARQUE: Lors de l’installation d’une barrière à sa largeur maximale, utilisez les
éléments de fixation muraux pour assurer la stabilité et la sécurité de la barrière.
AVERTISSEMENT: L’espacement entre la barrière et le mur ne
doit pas dépasser 2,5pouces (6,35cm).
(15,24cm)(10,16cm) (30,48cm)
29 à 52pouces
(73,66 à 132,08cm)

French20
ÉTAPE1
Localisez les (4) tiges
filetées. Déplacez les
molettes de réglage le long
du filetage en les faisant
tourner afin d’éliminer
l’espacement entre les
molettes de réglage et les
pieds en caoutchouc.
Montage et installation de la barrière
ÉTAPE2
Insérez les (4) tiges filetées
dans les trous situés aux
quatre coins de la barrière.
REMARQUE: Vous remarquerez un léger espacement entre le loquet du
portillon et le cadre de la barrière. Ceci n’est pas un défaut. Cette barrière
est une barrière qui se monte par pression et cet espacement disparaîtra
une fois que vous aurez fixé la barrière au moyen des molettes de réglage.
PIED EN CAOUTCHOUC
MOLETTE DE RÉGLAGE
Table of contents
Languages:
Other Regalo Other manuals
Popular Other manuals by other brands

Kohler
Kohler RIALTO K-3386-JA installation instructions

Suki
Suki Suki 12 user manual

SMART DESIGN
SMART DESIGN C SANS SEUIL installation instructions

Invicta
Invicta INVICTA installation manual

Kuryakyn
Kuryakyn 2596 Installation instructions manual

Harken
Harken Radial 40 Rewind Installation and maintenance manual