HINGMED DBP-01H User manual

Shenzhen Hingmed Medical instrument Co.,Ltd. (Enterprise Edition) 2020-11-18
Shenzhen Hingmed Medical instrument Co.,Ltd.
Clinical Automatic Blood Pressure Monitor
User Manual
Prepared on June 30, 2020
Version A/3

Shenzhen Hingmed Medical instrument Co.,Ltd. (Enterprise Edition) 2020-11-18
Shenzhen Hingmed Medical instrument Co.,Ltd.
About this Manual
This manual mainly introduces the installation and use method of medical full-
automatic upper arm electronic sphygmomanometer. Before using the product, please
read this manual completely (including warnings, contraindications and precautions)
to avoid unnecessary troubles due to improper use.
Product information
Product name: Medical full-automatic upper arm electronic sphygmomanometer
Specification model: DBP-01H, DBP-01HP, DBP-01, DBP-01P
Product Technical Requirement No.: Y.X.Z.Z. No. 20202071769
Medical Device Registration Certificate No.: Y.X.Z.Z. No. 20202071769
Production License No.: Y.S.Y.J.X.S.C.X. No. 20142561
Production date: seen in label;
Service life: five years, Software Release Version: V1
Product manufacturer
Registrant/manufacturer name: Shenzhen Hingmed Medical instrument Co.,Ltd.
Registrant's address/production address: 4/F, Zhonghang Flying Industrial Park, #371,
Guangshen Road, Xixiang, Bao’an Shenzhen
Contact: +86 755 23730600
Postcode: 518102
After-sales Service Unit
Company name: Shenzhen Hingmed Medical instrument Co.,Ltd.
Company address: 4/F, Zhonghang Flying Industrial Park, #371, Guangshen Road,
Xixiang, Bao’an Shenzhen
Contact: +86 755 23730600
Postcode: 518102
Version Information
Prepared on June 2020 Version A/3

Shenzhen Hingmed Medical instrument Co.,Ltd. (Enterprise Edition) 2020-11-18
Shenzhen Hingmed Medical instrument Co.,Ltd.
Table of Contents
1. Generals......................................................................................................................4
1.1 Features................................................................................................................4
1.2 Application scope................................................................................................ 4
1.3 Structure & Components:....................................................................................4
2. Precautions for safety use...........................................................................................5
2.1 Contraindications.................................................................................................5
2.2 Warning............................................................................................................... 5
2.3 Precautions.......................................................................................................... 5
3. Structure and operating principle...............................................................................6
3.1 Product's components.......................................................................................... 6
3.2 Name and description of components................................................................. 6
3.3 Explanation of setting screen...............................................................................7
3.4 Contents and meanings of labels......................................................................... 8
4. Installation of product................................................................................................ 9
4.1 Installation of wrist pad.......................................................................................9
4.2 Installation of printing paper (model: DBP-01HP, DBP-01P applicable).......... 9
5. Measuring blood pressure.......................................................................................... 9
6. Calibration................................................................................................................10
7. Replacement of parts................................................................................................10
7.1 Replacement of cuff.......................................................................................... 10
7.2 Replacement of protective tube.........................................................................11
7.3 Replacement of lithium battery......................................................................... 11
8 Common failures.......................................................................................................11
9. Maintenance............................................................................................................. 13
9.1 Cleaning.............................................................................................................13
9.2 Disinfection....................................................................................................... 13
9.3 Maintenance of print head.................................................................................13
9.4 Scheduled maintenance..................................................................................... 14
10. Disposal..................................................................................................................15
11. Instructions for replacement of accessories........................................................... 15
12. Warranty card.........................................................................................................17
Appendix I: Guidelines and Statement of Manufacturer............................................. 17

Shenzhen Hingmed Medical instrument Co.,Ltd. (Enterprise Edition) 2020-11-18
Shenzhen Hingmed Medical instrument Co.,Ltd.
1. Generals
1.1 Features
Automatic sphygmomanometers are widely used for blood pressure measurement in
various departments of hospitals, medical examinations in community health services,
and customer service in pharmacies. The instrument is designed for adult use only.
*The electronic sphygmomanometer can be used for both left and right arms.
*The printer is provided with an automatic paper cutter for automatically cutting
printing papers.
*The electronic sphygmomanometer is provided with voice broadcast function
1.2 Application scope
The electronic sphygmomanometer is used to measure the diastolic pressure, systolic
pressure and pulse of adults with oscillometry for providing measured values as
diagnosis reference.
1.3 Structure & Components:
DBP-01P, DBP-01HP, DBP-01, DBP-01H are composed of host (including wrist pad),
cuff and power cable.
1.3.1 Model configuration
Model
Function partition
Color screen
Digital screen
Print function
DBP-01
×
√
×
DBP-01P
×
√
√
DBP-01H
√
×
×
DBP-01HP
√
×
√
1.3.2 Performance
Items
Specification
Measuring Method
Oscillometry
Measuring range
Measuring range: 0mmHg (0kPa) - 289mmHg (38.53kPa);
Pulse rate measuring range: 40bpm - 200bpm.
Resolution
Pressure: 1mmHg; Pulse rate reading resolution: 1bpm.
Accuracy
Pressure: ±3mmHg; pulse rate: ±3bpm or ±3%, subject to the
greater value.
Power supply
110-240V AC,50/60Hz
Power
65VA
Printer
Thermal printing paper size 58mm
Arm circumference
17cm-42cm
Voice broadcast
Broadcast of measurement results

Shenzhen Hingmed Medical instrument Co.,Ltd. (Enterprise Edition) 2020-11-18
Shenzhen Hingmed Medical instrument Co.,Ltd.
External dimension
Width: 310mm Length: 476mm, Height: 300mm
Weight
About 6.5kg
Protection against
electric shock
Class I
Service life
5 years after installation
Working
environment
Temperature: +5℃~+40℃, relative humidity: 10%-95%
Storage
environment:
Temperature -20℃~+55℃, relative humidity not more than 95%
Recommendations
of calibration
Once a year
*********************************************************************
**The blood pressure values obtained by this instrument are equivalent to that fr
om the auscultatory method, with their error consistent with the requirement spe
cified in YY0667-2008. **
*********************************************************************
2. Precautions for safety use
2.1 Contraindications
No
2.2 Warning
*Be sure to use AC for the power supply voltage.
*Please connect to 3P socket, be sure to use by grounding, otherwise it will be easy to
get an electric shock.
*Please do not measure the arm that is getting intravenous drip or blood transfusion,
otherwise it may cause an accident.
2.3 Precautions
Please use this instrument in the following working environment and storage site, if it
is stored or used out of the specified temperature and humidity range (storage
environment: temperature -20℃ ~+55℃, relative humidity not more than 95%;
working environment: temperature +5℃~+40℃, relative humidity 10%-95%), the
system may not reach the claimed performance specifications.
*Use the instrument in places without water.
*Don't put it in places with high temperature, moisture, direct sunlight and dust, and
don't put in places with salt and sulfur.
*Put it in stable places without tilt, vibration, impact (including during transportation)
*Don't put it in places where chemicals are stored, and don't put it in places where gas
is easy to generate.
*Patients with anticoagulant disease or blood coagulation disorders may have blood
congestion in the place where the cuff is worn even if the cuff is worn in the correct
position during blood pressure measurement.
*If the cuff fails to inflate within 2.5 minutes, instruct the patient to remove the cuff
manually. Prolonged over-inflation may cause blood blockage and make the patient
feel uncomfortable.

Shenzhen Hingmed Medical instrument Co.,Ltd. (Enterprise Edition) 2020-11-18
Shenzhen Hingmed Medical instrument Co.,Ltd.
*In case of common arrhythmia, the instrument cannot meet the claimed performance
requirements.
*Any blood pressure measurement can be affected by the posture of the patient and
his/her physical condition.
*Blood pressure measurement may be affected by motion or speaking, incorrect
position of the arm, rough surface on which the instrument is placed or instrument
vibration, etc., during measurement.
*For accurate measurement, please keep your back straight and sit in the correct
posture. Please relax and keep quiet.
*In case of instrument failure, an error code will be displayed in the format "EC XX".
See the "Common Failures" Section for details.
*Note: The measured blood pressure should be interpreted by professionals.
The product is not suitable for newborns.
The blood pressure values obtained by this instrument are equivalent to that from the
auscultatory method, with their error consistent with the requirement specified in
YY0667-2008.
3. Structure and operating principle
3.1 Product's components
No.
Name
Quantity
Remarks
1
Host of medical full-automatic upper
arm electronic sphygmomanometer
1pcs
With wrist pad
2
Power cable
1pcs
3
Printing paper
1pcs
Options: device with
printing function
4
Manual
1pcs
5
Certificate
1pcs
3.2 Name and description of components
Name
Description
Wrist pad
Used to place the arm during measurement
Elbow pad button
Press your elbows against it during measurement to
prevent measurement failure
Display Screen
Display measurements
RS-232
Used to connect to a computer port when the
Display Screen
Emergency Stop
button
Authentication
Module
Start/Stop button
Printer cover plate button
Wrist pad
Elbow pad button
Sleeve
Printer cover plate
Upstream air hole
USB A port
Setting button
SD
card
Ground points
USB B port
Power socket
Power switch
Shenzhen Hingmed Medical instrument Co.,Ltd. (Enterprise Edition) 2020-11-18
Shenzhen Hingmed Medical instrument Co.,Ltd.
instrument is verified
Power supply terminal
Connect power cable
[Start/Stop] button
In the standby mode, press the button to start
measurement;
In the measurement state, press the button to stop the
measurement.
[Emergency Stop] button
When an abnormality occurs, press the button to
restart the power supply and stop
measurement
Sleeve
Used to fix the arm during measurement
Printer cover plate button
Open the cover plate of the printer
Power switch
Switch on or off power supply
Setting button-○
Tap and hold on for 5S and then release to enter the
setting screen, press to switch setting items
Setting button-△
Ascending
Setting button-▽
Descending
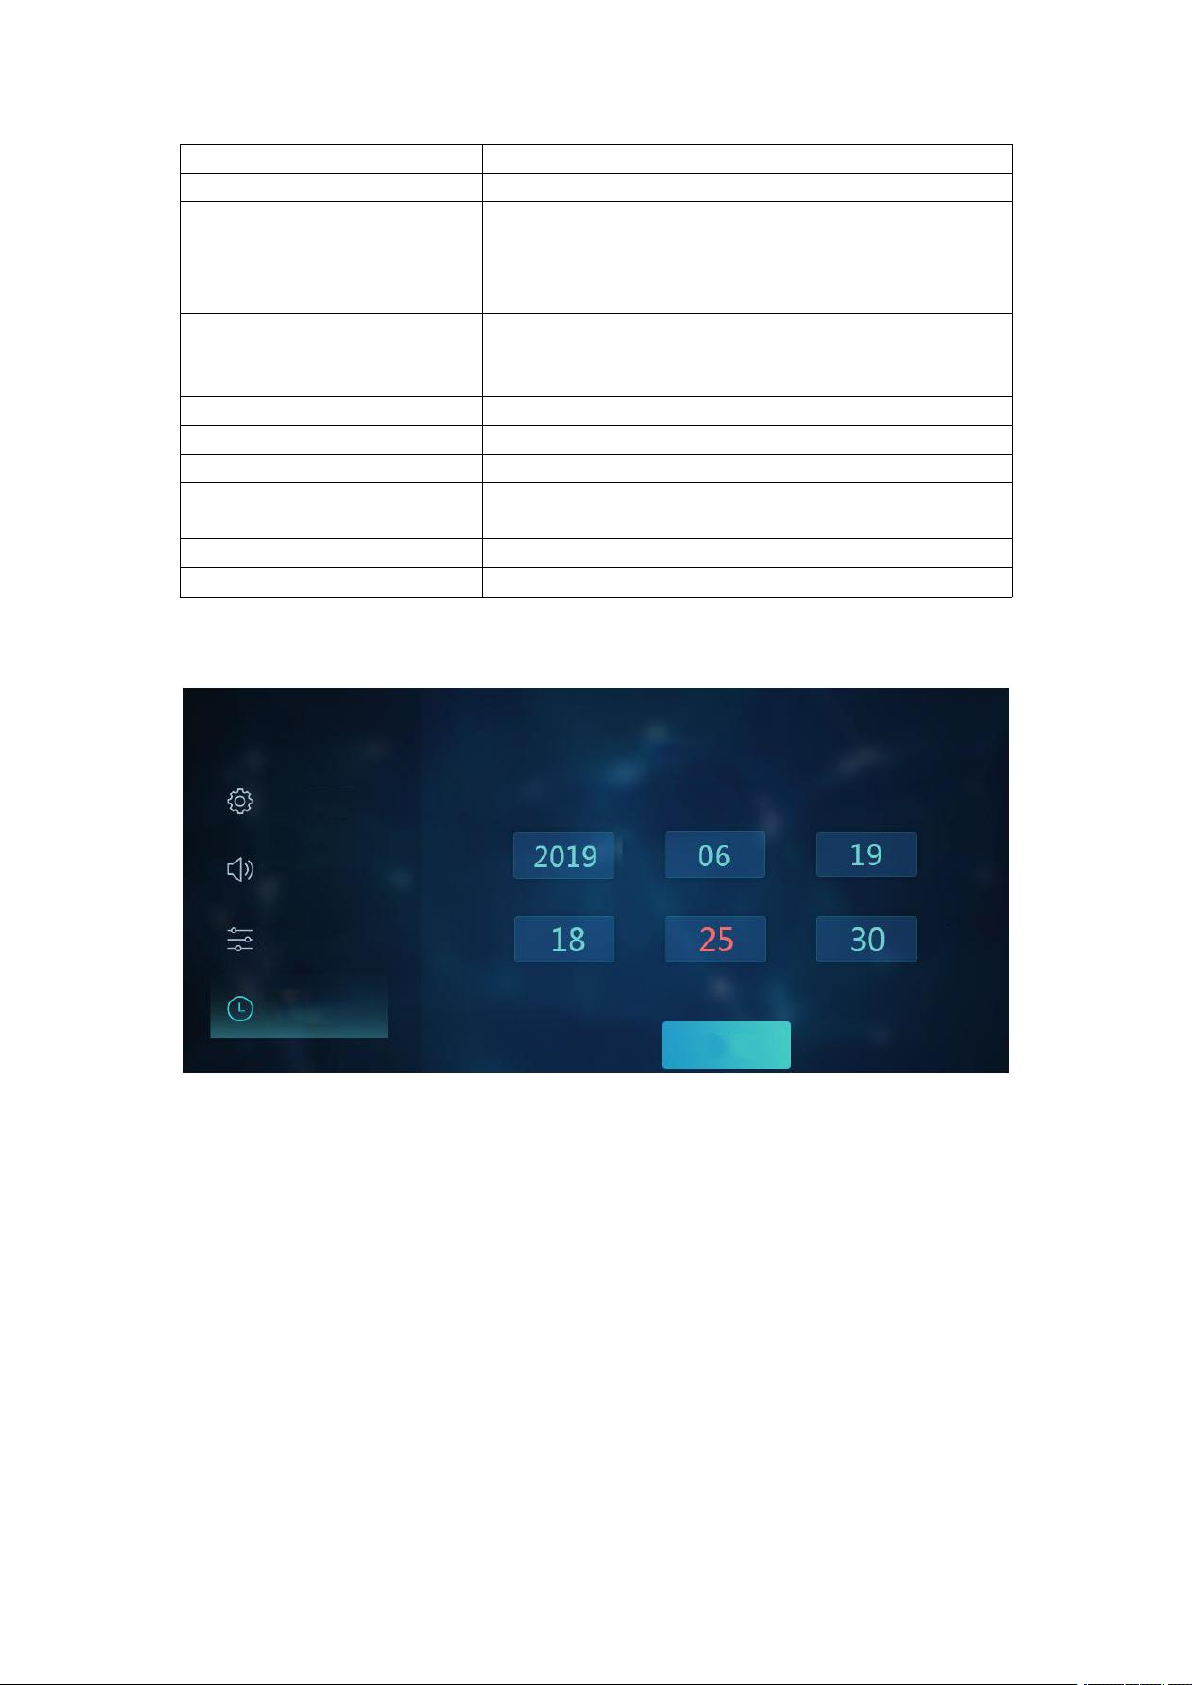
3.3 Explanation of setting screen
3.3.1 LCD setting screen
-In the standby screen, tap and hold on the setting button "O" on the back of the
instrument for 5S, so as to enter the setting screen as shown in the figure above
-Press button "O" to move the cursor to switch items, press "△" or "▽" to numerical
addition and subtraction.
-Tap and hold on "O" again to exit the setting screen.
*In the non-setting screen, tap and hold on the setting button -△to switch on or off
printer. (Applicable to printer function)
3.3.2 LED setting screen
Local setting
Volume setting
Display setting
Date setting
Date setting
Year
Month
Day
Hour
Minute
Second
Enter
Shenzhen Hingmed Medical instrument Co.,Ltd. (Enterprise Edition) 2020-11-18
Shenzhen Hingmed Medical instrument Co.,Ltd.
-In the standby screen, tap and hold on the setting button "O" on the back of the
instrument for 5S, so as to enter the setting screen as shown in the figure above
-Press the button "O" to move the cursor to switch items;
If the area corresponding to the time is flickering, the time can be set at present; if the
area corresponding to the systolic pressure is flickering, the volume can be set at
present, and the volume can be adjusted by △▽;
The area corresponding to the diastolic pressure is flickering, the printer can be set to
ON or OFF at present by △▽; (applicable to printer function)
3.4 Contents and meanings of labels
Labels
Description
Labels
Description
Type B application part
Serial number
Note to check
accompanying documents
Piled layer limit
Moisture-proof storage
and transportation logo
Upward storage and
transportation identifier
Fragile storage and
transportation identifier
WEEE compliance
Time
Systolic pressure
Severe
Moderate
Mild
Critical
Normal
Diastolic pressure
Pulse rate
beats/min
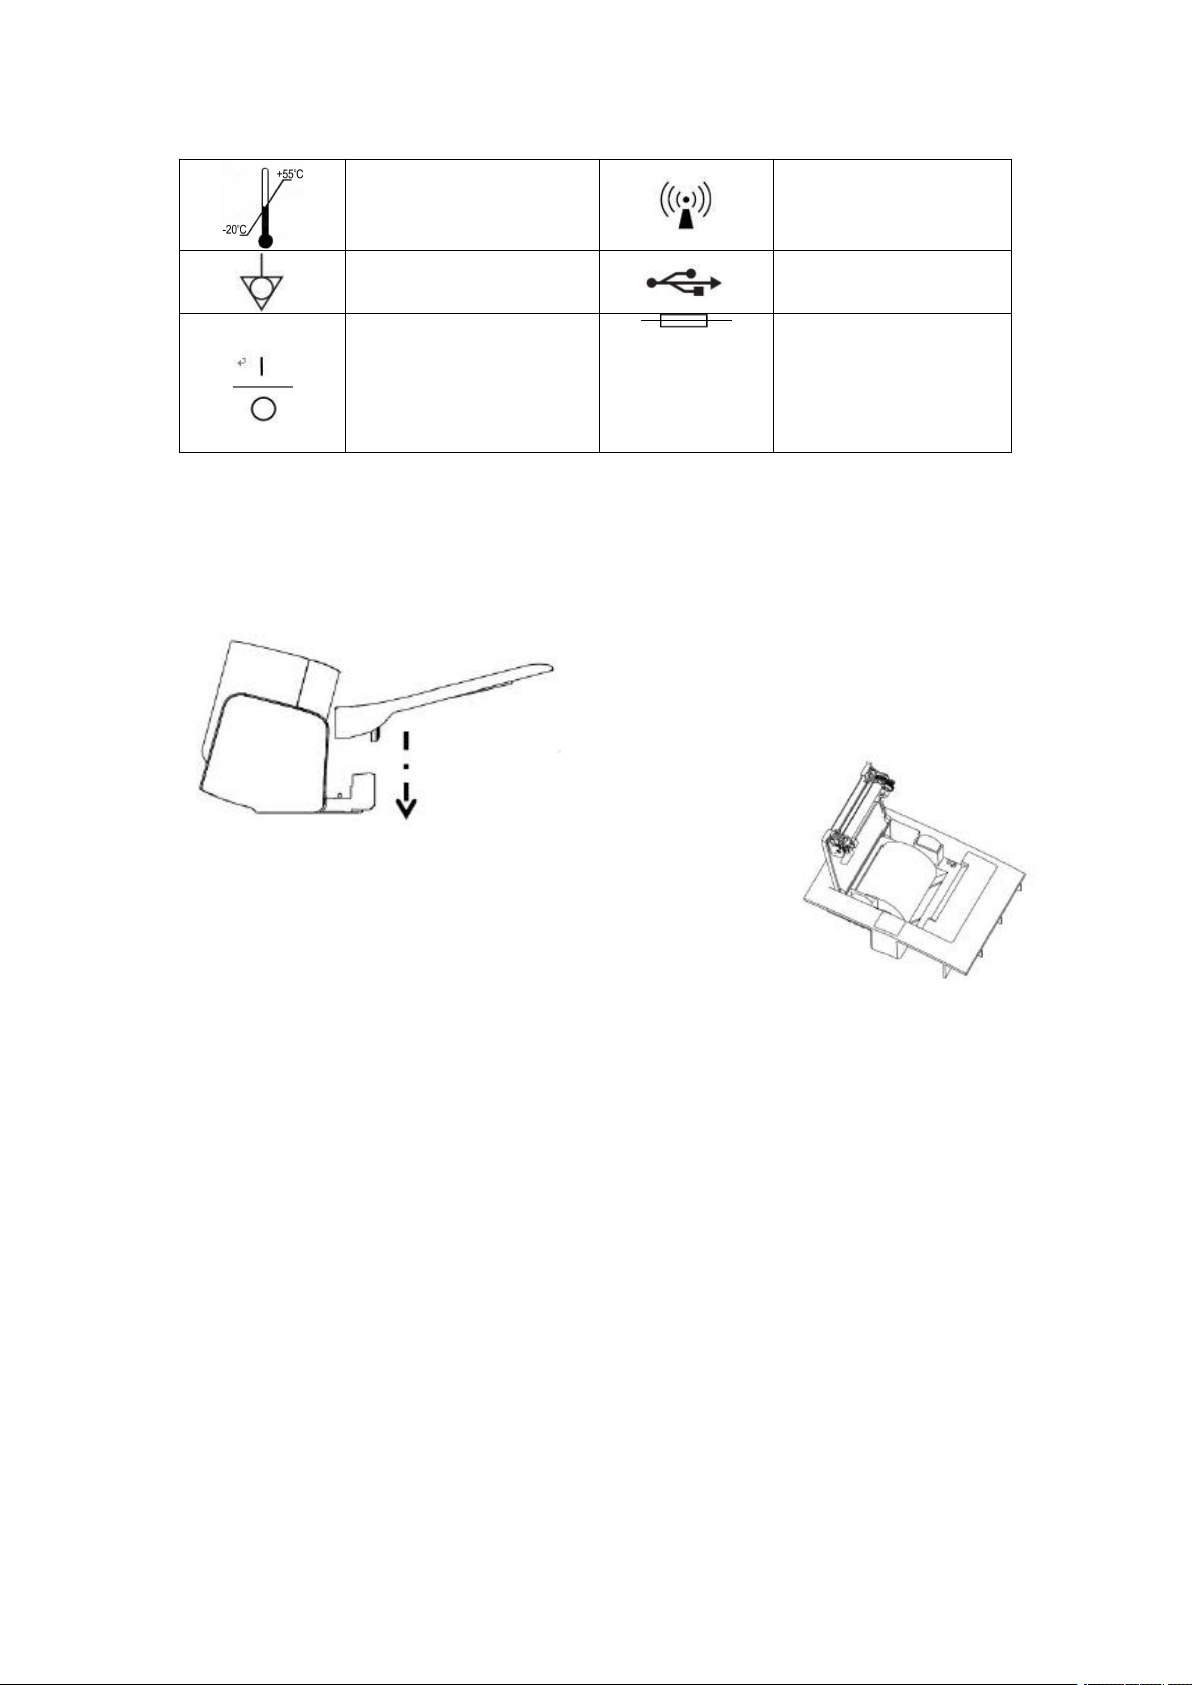
Shenzhen Hingmed Medical instrument Co.,Ltd. (Enterprise Edition) 2020-11-18
Shenzhen Hingmed Medical instrument Co.,Ltd.
Temperature limit storage
and transportation
identifier
Nonionizing radiation
Equipotential grounding
USB port
"1" on the power switch
of the instrument
indicates power-on, while
the "0" indicates power-
off.
Protective tube
4. Installation of product
4.1 Installation of wrist pad
As shown in the right figure, press the wrist pad down
vertically with reference to the arrow direction to
complete the installation of the wrist pad.
4.2 Installation of printing paper (model: DBP-01HP, DBP-01P applicable)
(1) Press printer cover plate button down to open the printer cover.
(2) Put the printing paper in the paper slot (as shown on the right figure).
(3) Lift up the edge of the paper, pass it through the paper exit hole, close the printer cover, and
make sure that the printing paper is exposed.
5. Measuring blood pressure
*********************************************************************
Warning: When you need to stop the measurement, please press the [Start/Stop]
button. Exhaust quickly to allow the cuff back to the original state.
*********************************************************************

Shenzhen Hingmed Medical instrument Co.,Ltd. (Enterprise Edition) 2020-11-18
Shenzhen Hingmed Medical instrument Co.,Ltd.
The left and right arms can be measured by the instrument, preferably right arm.
Please note: There must be 2-3 minutes intervals between two measurements
①Please be shirtless or wear thin clothes, and insert your arm into your shoulder. If
the clothing on the arm is too thick, it may cause measurement errors. Please take off
your clothes to measure.
②Please press the [Start/Stop] button. Start to measure blood pressure.
③The instrument will automatically roll up the cuff and pressurize it.
④After the measurement is over, the instrument will deflate automatically and the
cuff will return to its original state.
⑤The measurement results are reported by voice broadcast.
⑥The measurement results can also be printed on printing paper.
6. Calibration
1. Connect the medical full-automatic upper arm electronic sphygmomanometer to a
computer equipped with blood pressure calibration software specially produced by the
Shenzhen Hingmed Medical instrument Co.,Ltd. through a USB data cable;
2. Put a rigid cylindrical straight tube equivalent to
30cm arm circumference into the cuff as an arm
prosthesis;
3. Connect the digital pressure meter within expiry
date and the inflatable airbag to the upstream air hole
on the back of the instrument;
4. Click to calibration 250mmHg, allow the
instrument to automatically enter the static pressure
mode for automatic inflation and pressurization;
5. Enter the value from the digital pressure meter into
the corresponding text box of "Actual pressure" and
click the "Calibration" button.
Note: When entering the calibration mode, you need to
connect an inflatable airbag for manual pressurization
and a digital pressure meter to the upstream air hole. In
manual static pressure calibration mode, the pressure is
manually applied up to 290mmHg.
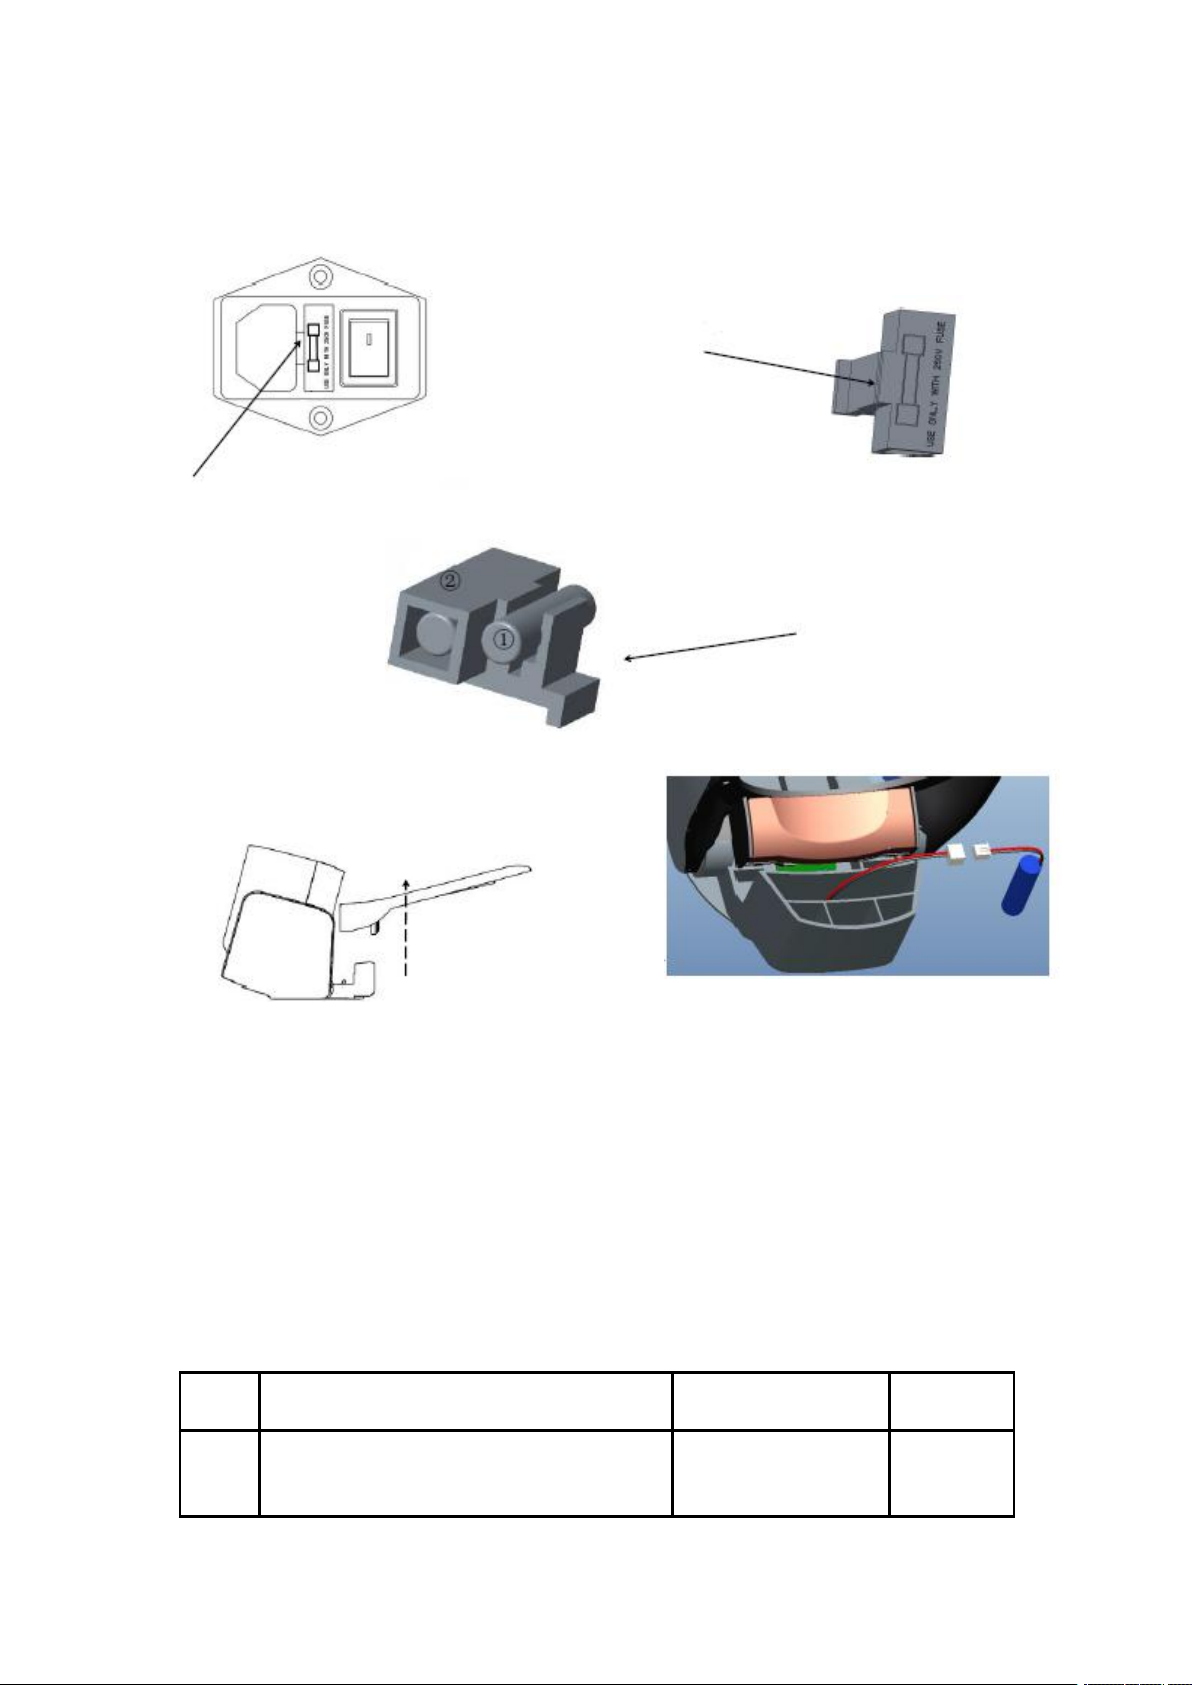
7. Replacement of parts
7.1 Replacement of cuff
Plastic ring fixing groove (inner side of ring)
Hold cuff with your hand and pull down in a direction of
allow in the figure, take the cuff out of the plastic ring
fixing groove.
Shenzhen Hingmed Medical instrument Co.,Ltd.
Pass the new cuff through the arm sleeve and press into the
plastic ring fixing groove respectively
Calibration
verification
Verification 0mmHg
Verification 100mmHg
Verification 150mmHg
Verification 200mmHg
Calibration
Actual pressure
Primary pressure
Secondary pressure
Pump & Valve
maintenance
Air pump
Quick-opening valve
Slow-opening valve
Attraction
Attraction
Stop
Device
model
Bluetooth
Connection
Shenzhen Hingmed Medical instrument Co.,Ltd. (Enterprise Edition) 2020-11-18
Shenzhen Hingmed Medical instrument Co.,Ltd.
Note: If the original parts are replaced with parts not provided by the manufacturer, it
may cause measurement errors.
7.2 Replacement of protective tube
7.3 Replacement of lithium battery
1. Take the wrist pad out vertically in the direction
of the arrow to expose the lithium battery.
2. Take out the lithium battery and replace the original lithium battery with the
backup lithium battery (850mAh, 3.7V). Note to confirm the positive and negative
direction of the lithium battery before inserting the battery (the red line is the positive
electrode, and the black line is the negative electrode).
3. Note that the disposal of waste lithium batteries should follow local environmental
protection regulations to avoid pollution to the environment.
4. The replacement of the lithium battery must be done by professionals from the
manufacturer.
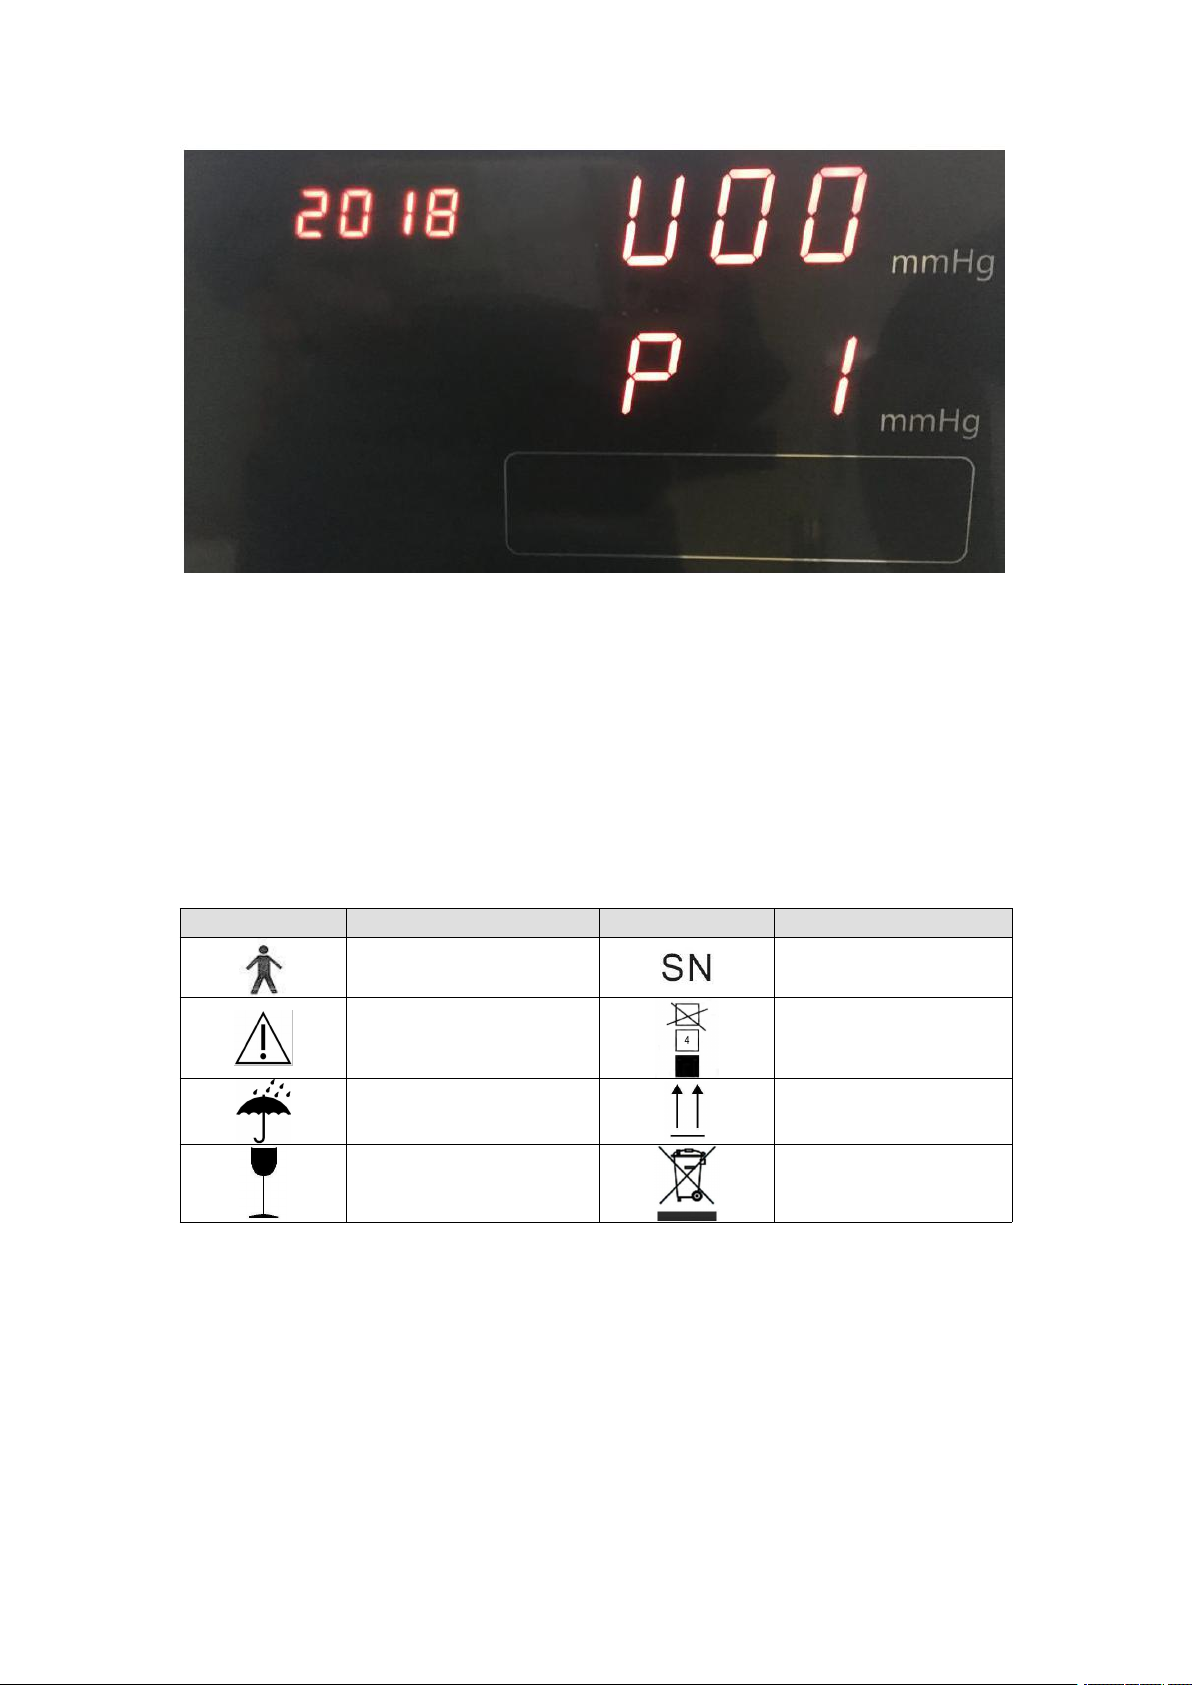
8 Common failures
If a malfunction occurs, an error code appears in the display screen:
Error
codes
Contents
Troubleshooting
procedures
Remarks
EC01
Cuff loose, which may be a result of
loose winding of cuff or disconnection of
cuff.
Check whether the
arm circumference is
within the measuring
1. Take out with fingers
along the direction as
indicated by the arrow
Schematic diagram
of protective tube
groove
2. Take out the protective
tube as shown in left figure
②, replace the protective
tube (250v 1A) as shown in
①, and reinstall it in the
instrument.

Shenzhen Hingmed Medical instrument Co.,Ltd. (Enterprise Edition) 2020-11-18
Shenzhen Hingmed Medical instrument Co.,Ltd.
range of the
instrument.
EC02
Air circuit leakage, which may be a
result of leakage of valve or air circuit.
Return to the factory
EC03
Wrong air pressure, which may be a
result of normal open failure of valve.
Return to the factory
EC04
Weak signal, which may be a result of
too weak pulse of the measured object or
loosen cuff.
Confirm that the
measurement part is
in good contact with
the cuff and whether
the arm
circumference is
within the measuring
range
EC05
Out-of-range, which may be a result of
blood pressure of the measured object
exceeding measurement range
Remeasurement
EC06
Excessive motion, which may be a result
of motion artifacts or more interferences
contained in signals during measurement
Note to avoid
speaking and
disturbance during
the measurement
process and measure
again
EC07
Overpressure in measurement, namely
cuff pressure in adult mode exceeding
290mmHg
EC09
Timeout in measurement, namely
measurement time in adult mode
exceeding 120 seconds
remeasurement
EC10
Manual stop
1. Touch the
start/stop button
2. Detect whether the
button is insensitive
or stuck
EC11
System error
remeasurement
EC16
Overpressure protection, which is caused
by cuff pressure exceeding the set
maximum value (290)
EC17
Sleeve failure, motor failure
remeasurement
EC19
The arm posture is not correct and the
elbow switch is not pressed
Adjust the arm
posture, make sure
the elbow switch is
pressed
EC32
Communication failure, handshake
communication failure
remeasurement
EC35
Failed to start, no response after sending
measurement, unable to start
measurement
remeasurement

Shenzhen Hingmed Medical instrument Co.,Ltd. (Enterprise Edition) 2020-11-18
Shenzhen Hingmed Medical instrument Co.,Ltd.
EC36
No measurements. The instrument cannot
get measurement results.
remeasurement
EC37
180S timeout
remeasurement
EC64
Out of paper in printer
Follow the manual to
replace the printing
paper
EC65
The printer is not closed, and the printer
cover is not closed.
Check whether the
printer cover is
closed.
9. Maintenance
************************************************************
Note: *The sphygmomanometer and accessories do not need to be sterilized, but
should be kept clean. If there is contamination, it should be cleaned and disinfected in
time. In order to avoid long-term damage to the products, we suggest you sterilize
them only if necessary according to regulations of your hospital.
*After use for infected people or people with suspected infection, the contact parts
with the patients should be disinfected
*When cleaning and disinfecting, do not soak the product and accessories in liquid.
Do not allow liquid to flow into the connection socket or case of the
sphygmomanometer to prevent damage to the sphygmomanometer.
************************************************************
9.1 Cleaning
(1) Before cleaning the sphygmomanometer, turn off the power supply of the host and
disconnect the AC power supply.
(2) Wet the soft and clean lint-free cloth with mild soapy water or non-corrosive
diluted detergent.
(3) Wipe the contact surface between the instrument and the patients.
(4) Dry with a clean and dry soft cloth.
(5) Blood pressure cuff: After soaking in soapy water, rinse and dry
9.2 Disinfection
It is recommended that users use 70%~80% (volume ratio) ethanol disinfectant to
soak a piece of clean dry gauze, and then wipe the surface of the object to be
disinfected with the gauze twice for 3 minutes. Air dry or wipe off the residual
disinfectant with a clean and dry cloth.
*******************************************************
Note: Clean before disinfection. Please keep away from fire during the disinfection
process because ethanol is flammable. People who are allergic to alcohol should use
ethanol disinfectant with caution.
*******************************************************
9.3 Maintenance of print head
(1) Turn off power supply of the instrument.
(2) Press the printer cover plate button to open the cover plate.
(3) Use a cotton swab dipped in alcohol or a soft cotton cloth to wipe the print head
from the head to the tail in the same direction.
(4) Please wipe off rubbish, dust, paper scraps and other foreign objects in the printing
paper storage box.

Shenzhen Hingmed Medical instrument Co.,Ltd. (Enterprise Edition) 2020-11-18
Shenzhen Hingmed Medical instrument Co.,Ltd.
(5) Please place the printing paper after the alcohol has dried up.
(6) Lift up the edge of the paper, close the printer cover, and make sure that the
printing paper is exposed.
Note: When cleaning the print head, static electricity will cause damage to the print
head. Please note the static electricity.
9.4 Scheduled maintenance
To use the instrument correctly, perform regular inspection. Regular inspection
mainly comprises the following items:
Before power on
Items
Contents
Appearance
Is there any deformation or damage caused by falling,
etc.?
Are parts dirty, rusted or scratched
Is screen dirty or damaged
Is it wet?
Operation parts
Are switches and buttons damaged or crashed?
Measurement parts
Is the cuff installed correctly?
Is there any damage, obviously dirt or blood stains on
the cuff?
Power cable
Is the power cable properly connected or damaged or
provided with grounded 3P socket?

Shenzhen Hingmed Medical instrument Co.,Ltd. (Enterprise Edition) 2020-11-18
Shenzhen Hingmed Medical instrument Co.,Ltd.
After power on
Items
Contents
Appearance
Does the display screen open?
Is there any smoke or pungent smell or abnormal
sound?
Operation parts
Is there any abnormality during "start/stop"
operation?
Press the [Emergency Stop] button to quickly deflate
during measurement
Display part
Check whether the blood pressure and pulse rate
display are missing
Display error code
Confirm whether the measured value is close to the
normal value
Printing part
Check whether there is printing paper and whether
the paper is placed correctly
Is printing paper fed correctly?
Is the printed result clear?
Recommendation: The product should be calibrated once a year by a qualified
organization. Please contact the manufacturer for verification/calibration during later
use, otherwise accurate measurement may not be possible.
10. Disposal
In order to protect environment, please follow the relevant local environmental
protection regulations for disposal in term of disposal and reuse of the instrument, so
as to avoid environmental pollution.
Oversleeve
Items that may cause infection as medical wastes for disposal.
Internal battery
Please follow local environmental protection regulations for proper disposal.
11. Instructions for replacement of accessories

Shenzhen Hingmed Medical instrument Co.,Ltd. (Enterprise Edition) 2020-11-18
Shenzhen Hingmed Medical instrument Co.,Ltd.
Be sure to use the accessories provided by our company for replacement,
otherwise it may affect the normal operation of the product and may even be
dangerous.
No.
Name
Specification
1
Cuff
270*145mm
2
Lithium battery
570mAh,3.7V
3
Protective tube
250V,1A
4
Printing paper
Thermal paper 58mm

Shenzhen Hingmed Medical instrument Co.,Ltd. (Enterprise Edition) 2020-11-18
Shenzhen Hingmed Medical instrument Co.,Ltd.
12. Warranty card
Warranty card
Product model and SN code:
Name:
Date of purchase:
Address:
Seller:
Tel:
Address:
Sealed by seller:
Postcode:
Limited guarantee
Shenzhen Hingmed Medical instrument Co.,Ltd. provides the following limited
guarantee to the initial purchaser from the date of invoice.
Host of Hingmed medical full-automatic upper arm electronic
sphygmomanometer……………………………24 months
Shenzhen Hingmed Medical instrument Co.,Ltd. is not responsible for defects in
materials and workmanship of instruments. The responsibilities under this guarantee
cover the service for the instrument upon return from the customer organization that
was paid in advance to the desired factory (depending on the location).Shenzhen
Hingmed Medical instrument Co.,Ltd. will repair any components or parts that are
defective during this limited guarantee period.
Once a defect appears, the initial purchaser should notify Shenzhen Hingmed Medical
instrument Co.,Ltd. of the suspected defect. The instrument should be carefully
packaged and shipped to:
Shenzhen Hingmed Medical instrument Co.,Ltd. under prepayment.
Address: 4/F, Zhonghang Flying Industrial Park, #371, Guangshen Road, Xixiang,
Bao’an Shenzhen
Contact: +86 755 23730600
Postcode: 518102
The instrument should be repaired in the shortest possible time and sent back with the
same shipping method as received by the factory under prepayment.
If the instrument is damaged due to accident, misuse, negligence, or repair by anyone
not authorized by Shenzhen Hingmed Medical instrument Co.,Ltd., the limited
guarantee is invalid.
This limited guarantee includes all the obligations of Shenzhen Hingmed Medical
instrument Co.,Ltd., and does not include other expressed, implied or prescribed
guarantees. The representatives or employees of Shenzhen Hingmed Medical
instrument Co.,Ltd. are not authorized to assume any additional responsibilities or any
additional guarantees other than those set here.
Appendix I: Guidelines and Statement of Manufacturer

Shenzhen Hingmed Medical instrument Co.,Ltd. (Enterprise Edition) 2020-11-18
Shenzhen Hingmed Medical instrument Co.,Ltd.
Guidelines and Statement of Manufacturer -Electromagnetic Emission
The instrument is expected to be used in following specific electromagnetic environments, and
the purchaser or the user should ensure that it is used in these electromagnetic environments.
Emission tests
Conformance
Electromagnetic Environment
- Guidelines
Radio-frequency (RF)
emission GB4824
1 group
The instrument use RF energy
only for the internal
functions. Therefore, it has
low RF emission, and low
possibility to generate
electromagnetic interference
with the surrounding
electronic products.
Radio-frequency (RF)
emission GB4824
Class B
The instrument is suitable for
use in all facilities, including
domestic use and direct
connection to residential
public low-voltage power
supply network for domestic
use.
Harmonic emission
GB17625.1
N/A
Voltage fluctuation/flicker
emission GB17625.2
N/A
Guidelines and Statement of Manufacturer - Electromagnetic Immunity
The instrument is expected to be used in following specific electromagnetic environments, and
the purchaser or the user should ensure that it is used in these electromagnetic environments:
Immunity test
IEC 60601 Test level
Conforming level
Electromagnetic
Environment -
Guidelines
Electrostatic
discharge GB/T
17626.2
±6kV contact
discharge
±6kV contact discharge
The floor should be
made of wood,
concrete, or ceramic
tiles. If the floor is
covered with synthetic
materials, the relative
humidity should be at
least 30%.
± 8kV air discharge
± 8kV air discharge
Electrical fast
transient GB/T
17626.4
±2kV for power cable
±2kV for power cable
The facility power
supply should meet the
quality requirements
for typical commercial
or hospital
environments.
±1kV for input/output
cable
±1kV for input/output
cable
Surge GB/T
17626.5
±1kV wire to wire
±1kV wire to wire
The facility power
supply should meet the
quality requirements
for typical commercial
or hospital
environments.
±2kV wire to ground
±2kV wire to ground
Voltage sag,
short interruption
and voltage
change on power
input line GB/T
17626.11
<5%UT, lasting for
0.5 periods
<5%UT
The facility power
supply should meet the
quality requirements
for typical commercial
or hospital
environments. If the
instrument needs to
operate continuously
during the interruptions
of the power supply,
(>95% sag at UT)
(>95% sag, UT)
0.5 periods
40%UT, lasting for 5
periods
40% UT
(60% sag at UT)
(60% sag, UT)
70 % UT, lasting for
25 periods
5 periods
(30% sag at UT)
70%UT

Shenzhen Hingmed Medical instrument Co.,Ltd. (Enterprise Edition) 2020-11-18
Shenzhen Hingmed Medical instrument Co.,Ltd.
we recommend to use
UPS or battery for
power supply.
< 5 % UT, lasting for
5s
(30% sag, UT)
(>95% sag at UT)
25 periods
<5%UT
(>95% sag, UT)
5S
Power frequency
magnetic field
(PFMF)
(50Hz/60Hz)G
B/T 17626.8
3A/m
3A/m
PFMF should possess
the horizontal
characteristics of
power frequency
magnetic fields in
typical places in typical
commercial or hospital
environments.
Note: UT means AC network voltage before applying test voltage.
Guidelines and Statement of Manufacturer - Electromagnetic Immunity
The instrument is expected to be used in following specific electromagnetic environments, and
the purchaser or the user should ensure that it is used in these electromagnetic environments:
Immunity test
IEC 60601 Test
level
Conforming level
Electromagnetic
Environment - Guidelines
Conducted RF
GB/T 17626.6
3V (effective value)
150kHz~80MHz
3V
The distance between
portable or mobile RF
communication device and
any used part (including
cable) of DBP-01H should
not less than the
recommended isolation
distance. The distance
should be calculated by the
formula corresponding to
the transmitter frequency.
Recommended isolation
distance
RF radiation
GB/T 17626.3
3V/m
80MHz~2.5GHz
3V/m
d = 1.2 �
d= 1.2 �
80MHz~800MHZ
d=2.3 �
800MHz~2.5GHZ
Where,
P - the maximum rated
output power of transmitter
provided by the transmitter
manufacturer, in watt (W);
d - the recommended
isolation distance in meters
(m)
The field intensity of
stationary RF transmitter is
determined by the
electromagnetic field
survey a, which should be
lower than the conforming
level at each frequency

Shenzhen Hingmed Medical instrument Co.,Ltd. (Enterprise Edition) 2020-11-18
Shenzhen Hingmed Medical instrument Co.,Ltd.
range b.
Interference may occur
near the devices marked
with the following
symbols.
Note 1: The formula for higher frequency should be used for frequencies between 80MHz and
800MHz.
Note 2: The guidelines may not be suitable for all cases and electromagnetic transmission is
affected by absorption and reflection of buildings, objects and human bodies.
a Field intensity of stationary transmitter cannot be foreseen theoretically, such as: base station
of radio telephone (cellular/wireless) and ground mobile radio, amateur radio, amplitude-
modulation and frequency-modulation radio broadcast, etc. To estimate the electromagnetic
environment of stationary RF transmitters, it is required to conduct the survey of
electromagnetic field. If measured field intensity of site where the instrument is placed is higher
than the above applicable RF conforming level, the instrument should be observed to verify that
it can be operated normally. If abnormal performance is found, supplemental measures may be
necessary, for example, orientation or position of the instrument should be re-adjusted.
b The field intensity should be less than 3 V/m in frequency range of 150kHz~80MHz.
Recommended isolation distance between portable and mobile RF communication device and
the instrument.
The instrument is intended to use in an electromagnetic environment where the radiation RF
disturbance is controlled. According to maximum rated output power of communication device,
the purchaser and the user can prevent electromagnetic interference through the following
recommended minimum distance between portable and mobile RF communication device
(transmitter) and the instrument.
Maximum rated
output power W of
transmitter
Isolation distance/m corresponding to transmitter in different
frequency
150kHz~80MHz
d=1.2 �
80MHz~800MHz
d=1.2 �
800MHz~2.5GHz
d=2.3 �
0.01
0.12
0.12
0.23
0.1
0.38
0.38
0.73
1
1.2
1.2
2.3
10
3.8
3.8
7.3
100
12
12
23
For the maximum rated output power of transmitters not listed in the above table, the
recommended isolated distance d in meter (m) can be determined by the formula in the column
of corresponding transmitter frequency. Wherein, P refers to the maximum rated output power
of transmitters provided by the transmitter manufacturer in watt (W).
Note 1: Formula for higher frequency should be used on frequency between 80MHz and
800MHz.
Note 2: The guidelines may not be suitable for all cases and electromagnetic transmission is
affected by absorption and reflection of buildings, objects and human bodies.
This manual suits for next models
3
Table of contents
Other HINGMED Blood Pressure Monitor manuals


