HISTREAM HD IP Speed Dome Camera User manual

HD IP Speed
Dome Camera
IE Browser User's Manual
(for WindowsXP/2003/Win7/Vista)
Document edition:V4.3
The manual or: V2(5).3.1.2 and above editions
Editions suit or IPC: HD IP Speed Dome Camera

IP Camera IE Browser User’s Manual
2/66
Pre ace
Thank you or using our HD IP Speed Dome Camera. The product is developed by using
Megapixel Progressive Scan CCD or CMOS sensors and high per ormance multimedia
processor, choosing the embedded Linux Operating System, supporting several kinds o video
coding protocols, such as H.264 Main Pro ile、Baseline Pro ile、MJPEG and so on. This product
also support the audio coding protocol o G.726, has advanced megapixel technology. It used
SD card or storing pictures and records, and support snap, can communicate with standard
IPTV system .The HD IP speed dome camera can record, deal with image, transport 、store
and manage record, its designed idea is based on All in one and Ready to go, which is
convenience or users to install, use, and maintain it.
The product is designed or high-end surveillance markets that require high image
de inition, including: highways, banks, telemedicine, security checkpoints, etc.

IP Camera IE Browser User’s Manual
3/66
Statement:
Contents in this manual may be di erent rom the edition that you are using. Should any
unsolved problem occur given that the product is used according to this manual, please
contact our technical support department or your product suppliers.
The content o this manual may be updated at irregular intervals without prior notice.
Readship:
This manual is suitable or engineers as ollow:
System planning person
Support and maintenance person
Administrator
User
otes:
“IP Camera” mentioned in this manual re ers to network camera, including box IP
camera, dome IP camera, in rared box IP camera, speed dome IP camera,ect.
Click: Press the le t mouse button once.
Double-click: Press the le t mouse button twice.
“[ ]”:Window name, menu name and datasheet.

IP Camera IE Browser User’s Manual
4/66
Modify record:
::
:
Recording the corresponding update, the latest document include all o the content in previous
editions.
Modi y date Edition Explanation
2010-12-1 V4.0
According to the write standards
o our company, typesetting the
document again.
2011-3-11 V4.1 Modi y the user manual.
2011-9-28 V4.2
Update version, modify the user
manual.
2012-3-6 V4.3
Update version, modify the user
manual.

IP Camera IE Browser User’s Manual
5/66
Table of Contents
Set the IE browser .............................................................................................................................................. 6
1 Download and install ActiveX......................................................................................................................... 7
2 Login .................................................................................................................................................................. 8
3 Live Preview ..................................................................................................................................................... 8
4 Record Playback............................................................................................................................................ 11
5 Set System Parameters ................................................................................................................................ 14
5.1 Local con ig ............................................................................................................................. 14
5.2 Remote con ig ......................................................................................................................... 15
5.2.1 Audio Setting ............................................................................................................................ 15
5.2.2 Video Settings ......................................................................................................................... 15
5.2.2.1 Text Overlay .................................................................................................................. 15
5.2.2.2 Video Coding ................................................................................................................ 16
5.2.2.3 Video Mask ................................................................................................................... 18
5.2.2.4 Picture Parameter ........................................................................................................ 19
5.2.3 Network Settings ..................................................................................................................... 20
5.2.3.1 Basic Setting................................................................................................................. 20
5.2.3.2 LAN Setting................................................................................................................... 20
5.2.3.3 PPPOE Setting ............................................................................................................. 21
5.2.3.4 UPNP setting ................................................................................................................ 22
5.2.3.5 Email setting ................................................................................................................. 23
5.2.3.6 FTP setting ................................................................................................................... 24
5.2.3.7 DDNS setting ................................................................................................................ 25
5.2.3.8 VPN setting ................................................................................................................... 26
5.2.3.9 RTSP setting ................................................................................................................ 26
5.2.3.10 Public IP noticed by email ........................................................................................ 27
5.2.3.11 Connect setting .......................................................................................................... 28
5.2.3.12 Mobile setting ............................................................................................................. 28
5.2.4 Storage Settings ...................................................................................................................... 30
5.2.4.1 Device Setting .............................................................................................................. 30
5.2.4.2 Record Setting ............................................................................................................. 31
5.2.4.3 Snap Setting ................................................................................................................. 32
5.2.5 Alarm Settings ......................................................................................................................... 33
5.2.5.1 Motion detection ........................................................................................................... 33
5.2.5.2 Sensor Setting .............................................................................................................. 35
5.2.5.3 Failure Setting .............................................................................................................. 36
5.2.6 Dome Camera ......................................................................................................................... 37
5.2.6.1 Camera Setting ..................................................................................................... 37
5.2.6.2 PTZ Setting ................................................................................................................ 47
5.2.7 System Setting ........................................................................................................................ 49
5.2.7.1 System In o ................................................................................................................... 49
5.2.7.2 System Time ................................................................................................................. 49
5.2.7.3 User Manage ................................................................................................................ 50
5.2.7.4 Upgrade ........................................................................................................................ 51
5.2.7.5 Restore .......................................................................................................................... 52
5.2.7.6 Reboot ........................................................................................................................... 52
Appendix 1 Network Inter ace o IP Camera ................................................................................................ 53
Appendix 2 De ault Network Parameters ...................................................................................................... 53
Appendix 3 Apply or DDNS domain name service ..................................................................................... 54
Appendix 4 Visit IP camera under di erent network environments ........................................................... 56
Appendix 5 HD IP camera Special Preset points Function ........................................................................ 63
Appendix 6 FAQs .............................................................................................................................................. 64

IP Camera User’s Manual
6/66
Set the IE browser
I you visit IP camera or the irst time,
Please set the IE browser rist.
Setting method:Open the IE browser, click Ineternet Option into the "Security" page, click the
"Custom Level",then ollow steps to set the IE browser.(See Figure a b c)
a b
c
IP Camera User’s Manual
7/66
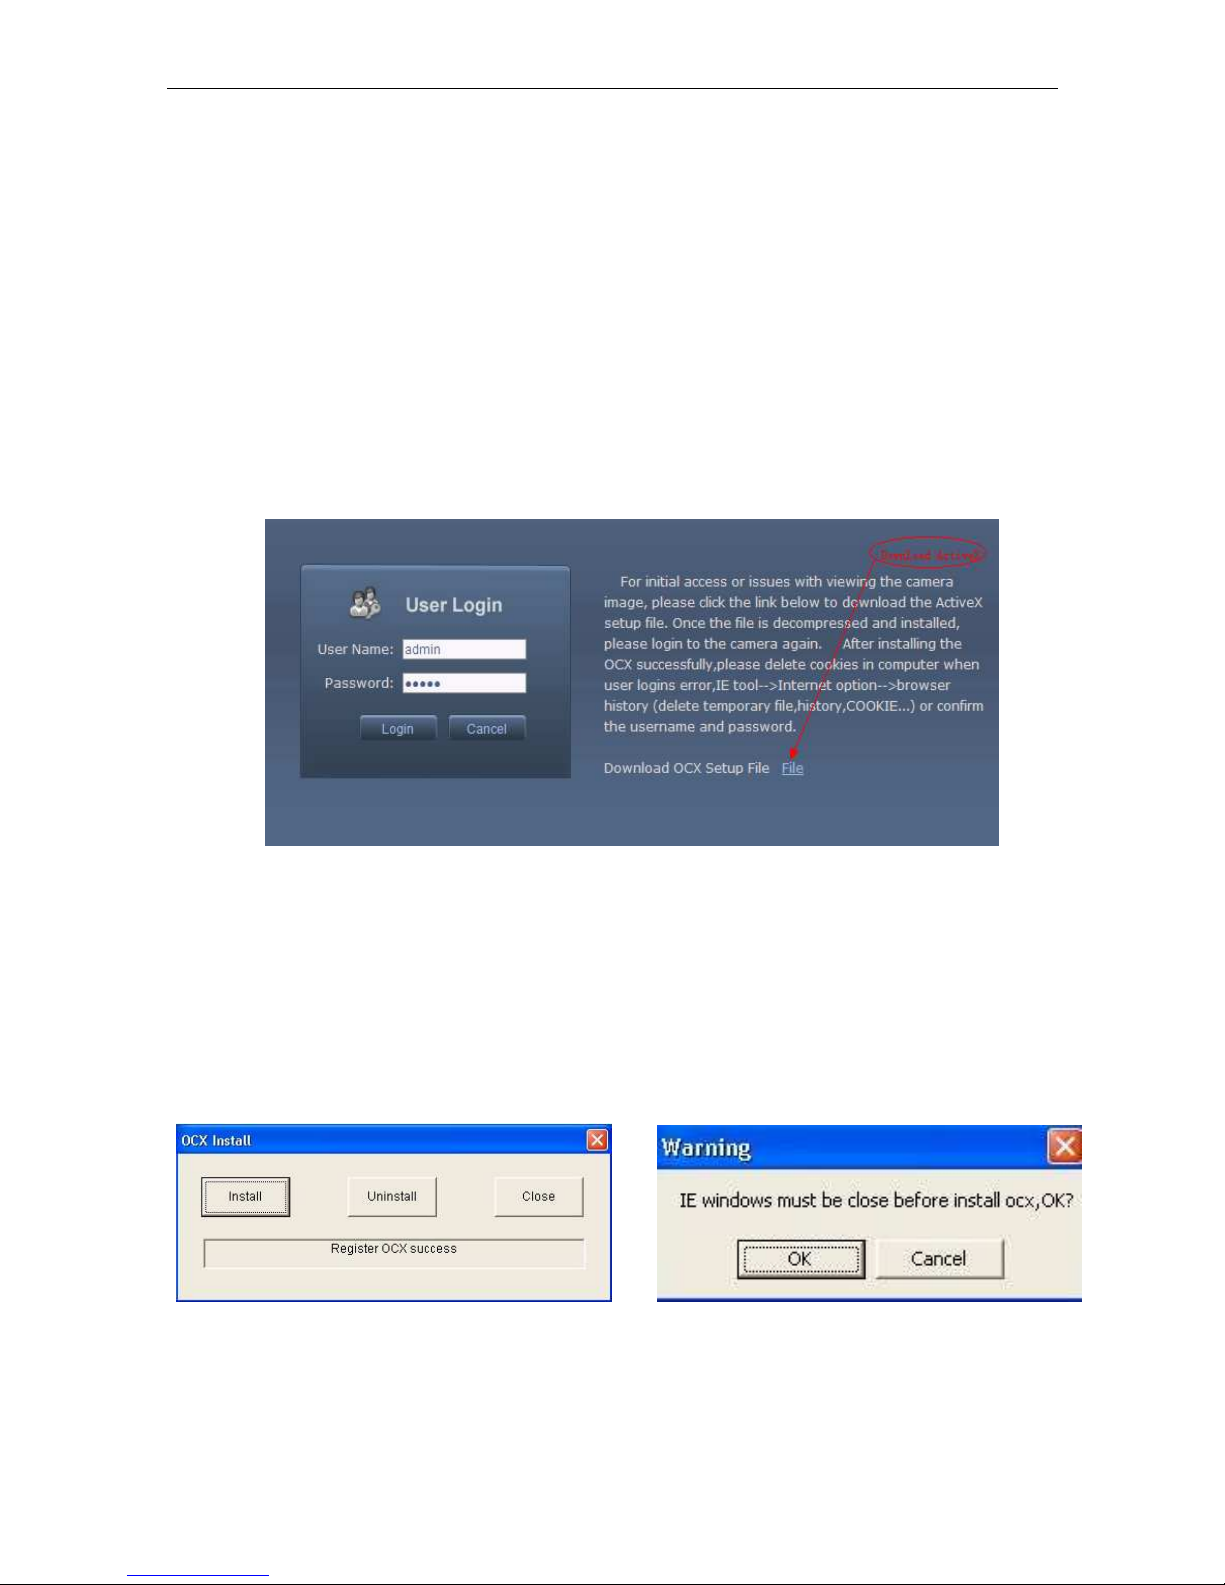
1
Download and install ActiveX
You need to install ActiveX Control when you visit IP camera or the irst time through IE
browser.
ActiveX installing method:
Download installation
Input the IP address o IP camera in Internet Explore to enter into login page(see Figure
1),
Click [File] to download the ActiveX:
Figure 1
File download dialogue box pops up, click [Run] or [Save] to download ActiveX, a ter
download it , double-click the downloaded ile “xdview.exe” to install it. A ter installation
completes, a message “Register OCX success!” will appear(see Figure 2 ).
I the IE was opened ,there will pop up a dialogue box (see Figure 3),click [ok] then all o
the opened IE will be closed.
Figure 2 Figure 3
IP Camera User’s Manual
8/66
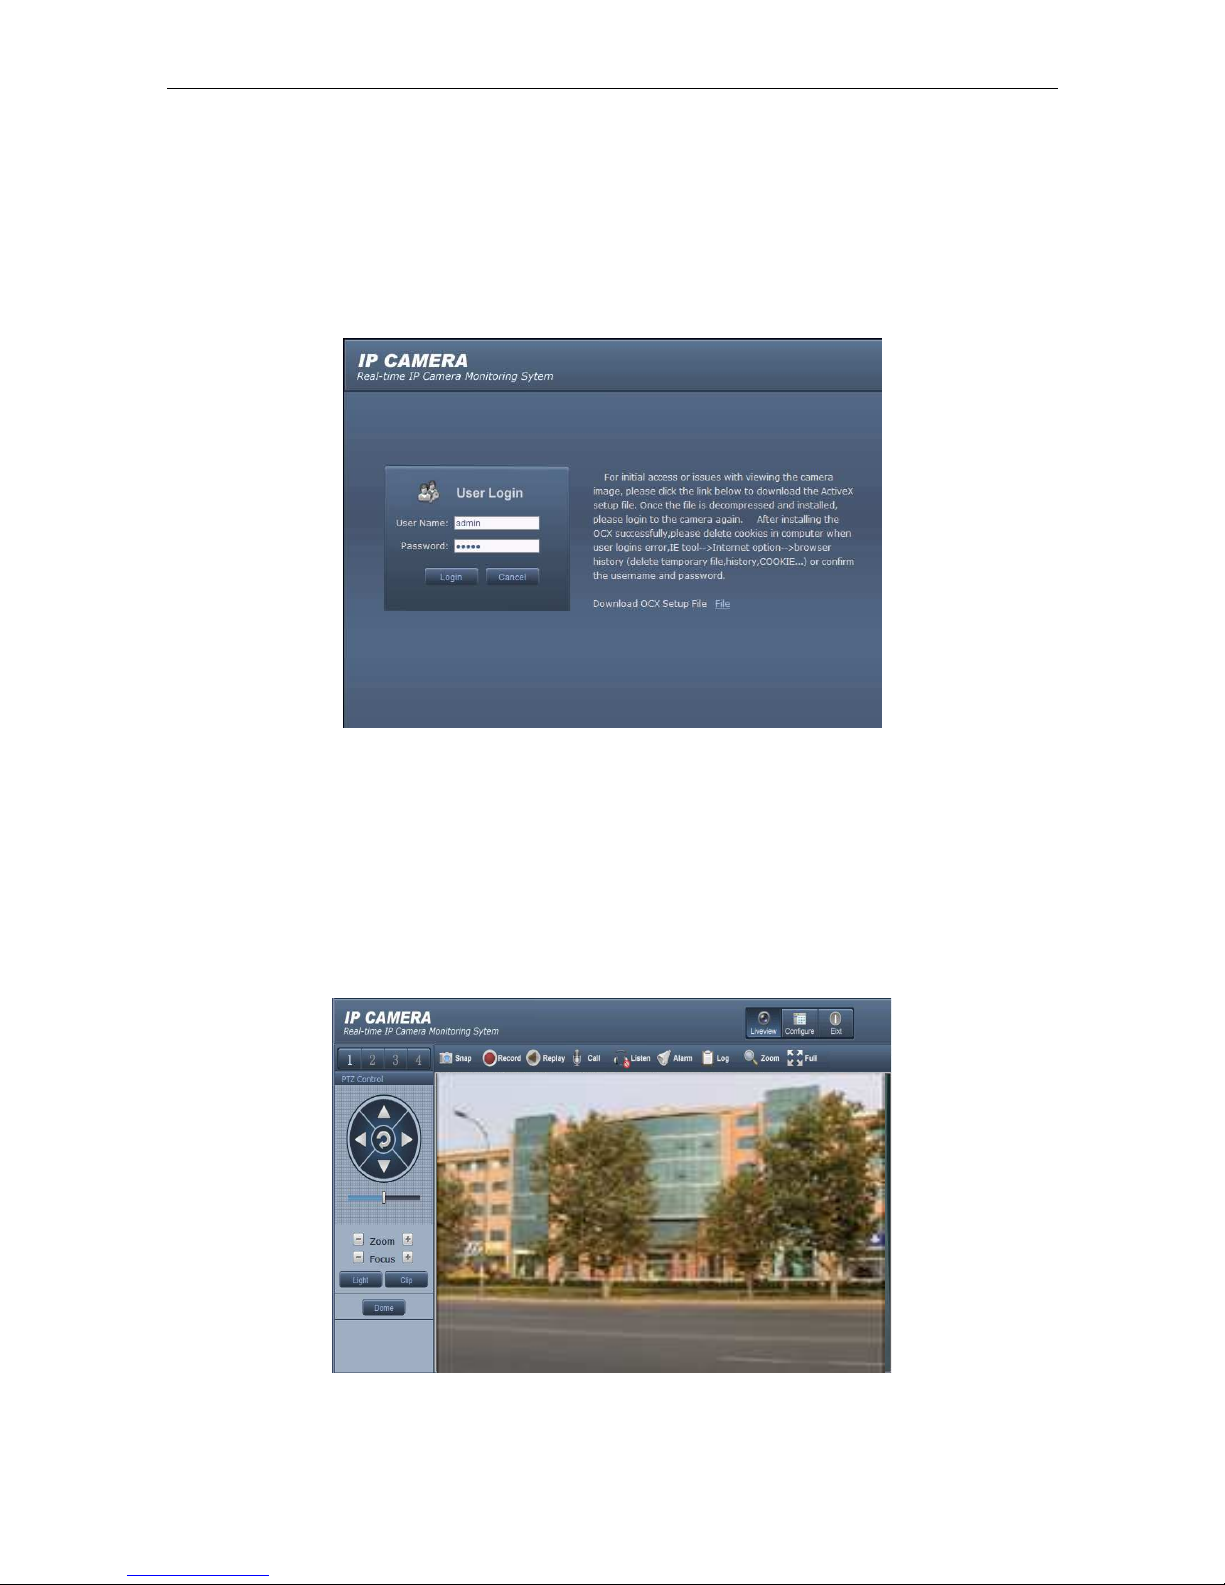
2
Login
Reopen Internet Explorer a ter ActiveX installation completes, input IP address o the IP
camera to turn to login page, enter username (de ault setting is admin) and password (de ault
setting is admin), click login to enter into main inter ace(see Figure 4):
Figure 4
3
Live Preview
See Figure 5 or the inter ace o “Live Preview”
Figure 5
In the Liveview inter ace, users can do operations like Snapping, Recording, Playback,
Call, Listen, Clear Alarm, Log Search, Local Zoom o Image, Full-screen Viewing, PTZ and

IP Camera User’s Manual
9/66
Lens Control.
[Snap]: click “Snap”, snap the current image and save it in .JPG ormat automatically to the
storage directory o snapped images.
[Record]: Manual image recording, automatically record current images and save them in .264
ormat to the storage directory o recorded images a ter the recording unction turned on.
Displayed status a ter recording starts:
[Playback]: Click “Playback”, the playback page will pop up or searching and playback o
recorded iles or snapped pictures.
[Call]: A ter turn on the audio talkback switch, the talkback between PC and IP camera can be
per ormed given that audio talkback device is installed to the IP camera. The displayed status
a ter audio turns on:
[Listen]: A ter switch on the monitoring switch, PC can monitor the sound at the device end.
The displayed status a ter monitoring starts :
[Alarm]: When there is an alarm, double-click [Alarm] to cancel the alarm manually.
[Log]: Allow users to search or operations and alarm log. The maximum capacity is 512
entries o message, when the number o entries exceeds 512, system will delete records o
the earliest date automatically.
[Zoom In]: This eature allows the manual drag and drop o video display area to realize
partial zoom in.
[Full Screen]: Display images in ull-screen, right click to exit ull screen mode.
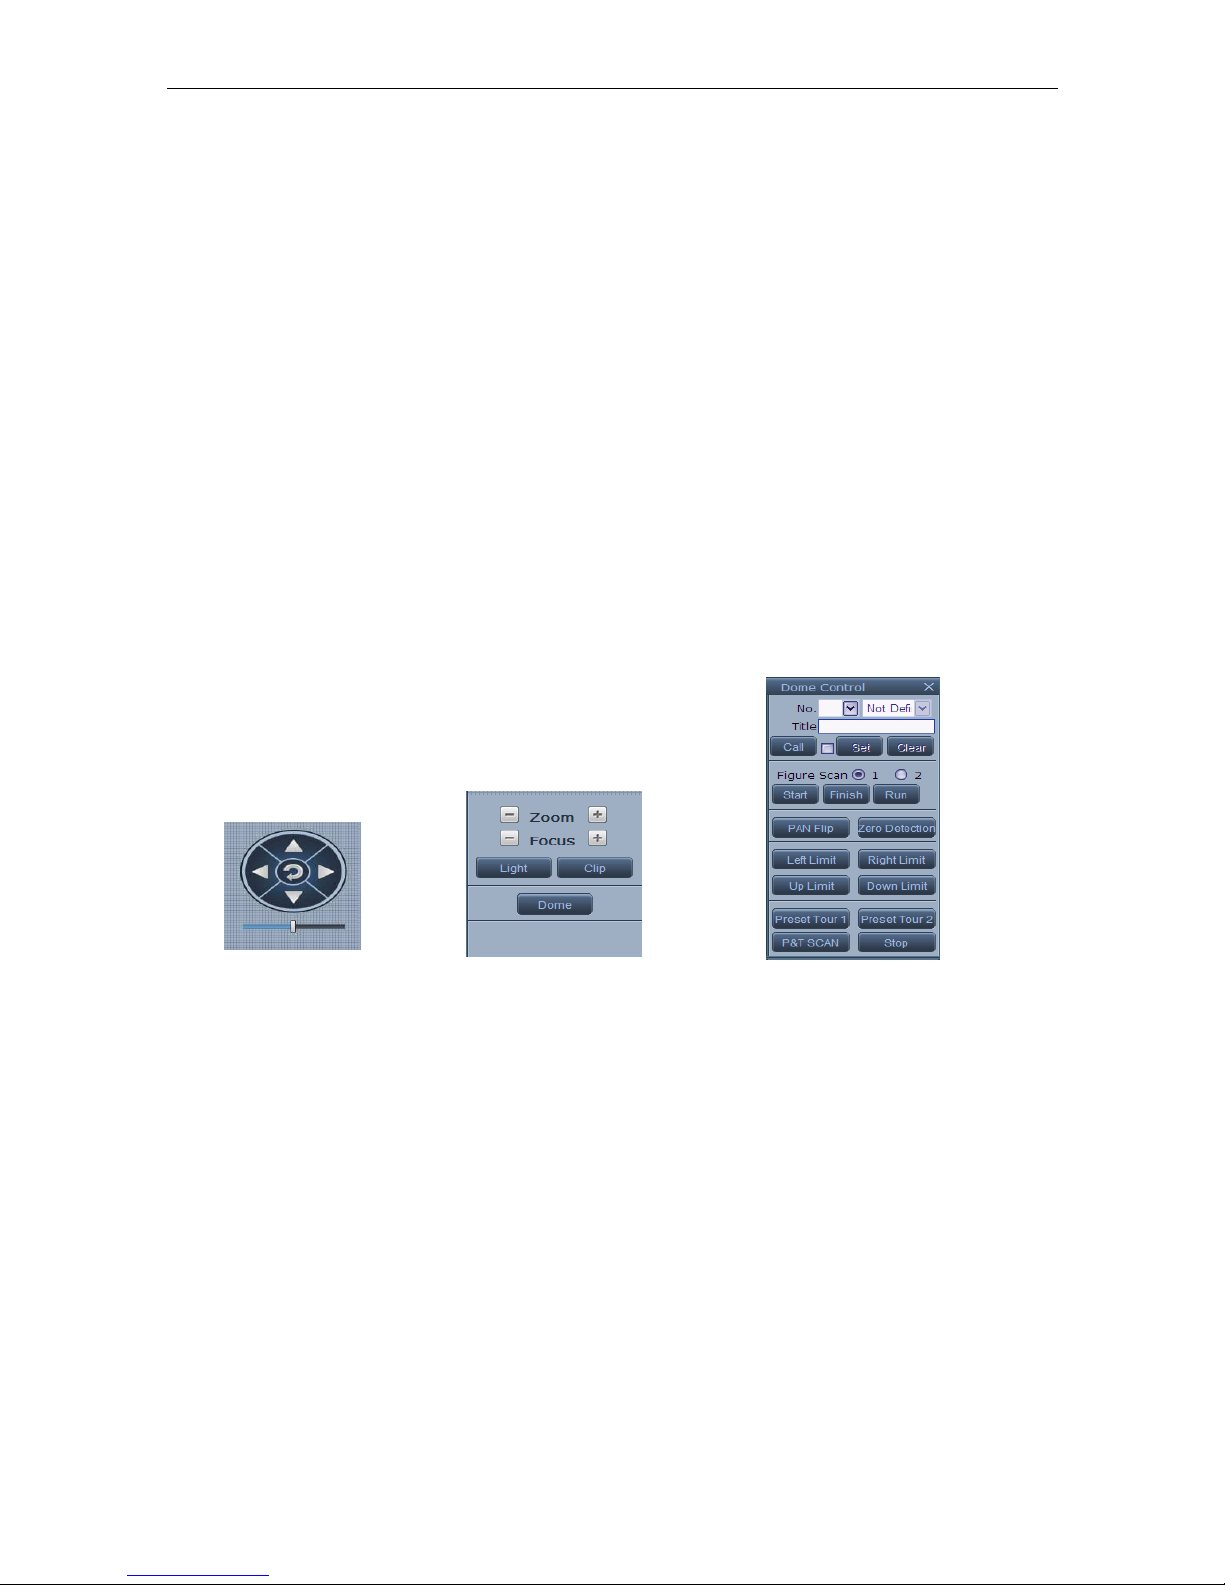
[PTZ Control]: Allows our-directional rotation, automatic adjustment o PTZ rotation speed.
When the time o the scanning motion, PTZ speed not a ected by this restriction
(see Figure 6).
[Lens Control]: Allows PTZ operations like Zoom, Focus, Aperture, Light, Clip, Preset set,
and Preset Call(see Figure 7).
[Dome]:See Figure 8 or the inter ace o “Dome”
Preset No.: You can set, delete and call presets.
ote:
::
:Preset No.: 1 ~
~~
~ 255,
,,
, Some o the preset number as a special unction
using(see appendix).
IP Camera User’s Manual
10/66
Figure Scan: Support two groups o igure scan. I you enable this unction, it can record the
operations o PTZ, but the operations don’t include PTZ rotate automatically, preset tour, P&Z
scan, PTZ reset, mostly special presets or call by menu.
PAN Flip: Rotate horizontally 180
0
.
Zero Detection: I you set azimuth zero, the device will be rotated to there a ter power on and
tests by itsel when click this button. I you delete the azimuth zero, it will be rotated to the
machine zero. You can set it in [Dome Camera]->[PTZ Setting].
Le t/Right/Up/Down Limit: The dome can be only rotated in the range as you set when it is
scanning.
Preset Tour 1/2: Call preset tour 1 or 2, you can set preset tour in [Dome Camera]->[PTZ
Setting].
P&T SCAN: Call P&T scan, you can set preset tour in [Dome Camera]->[PTZ Setting].
Stop: Stop the PTZ’s operation.
Figure 6 Figure 7 Figures 8
IP Camera User’s Manual
11/66
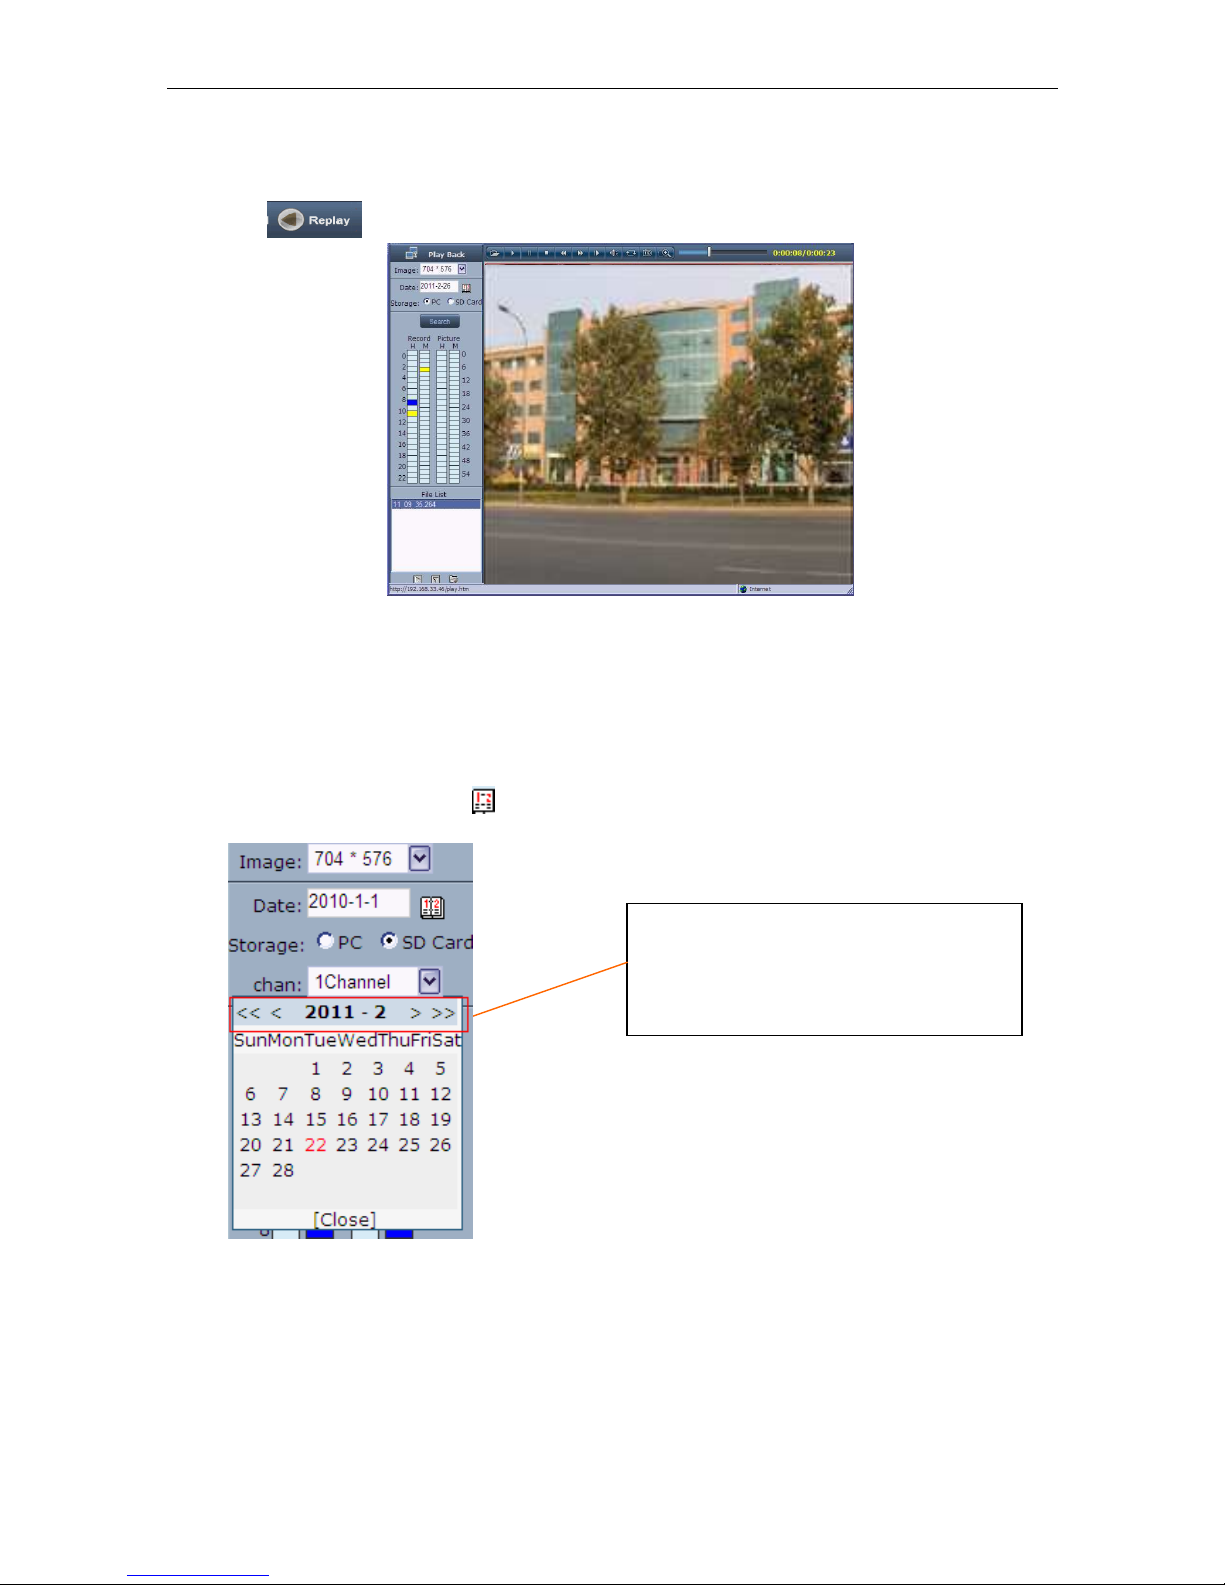
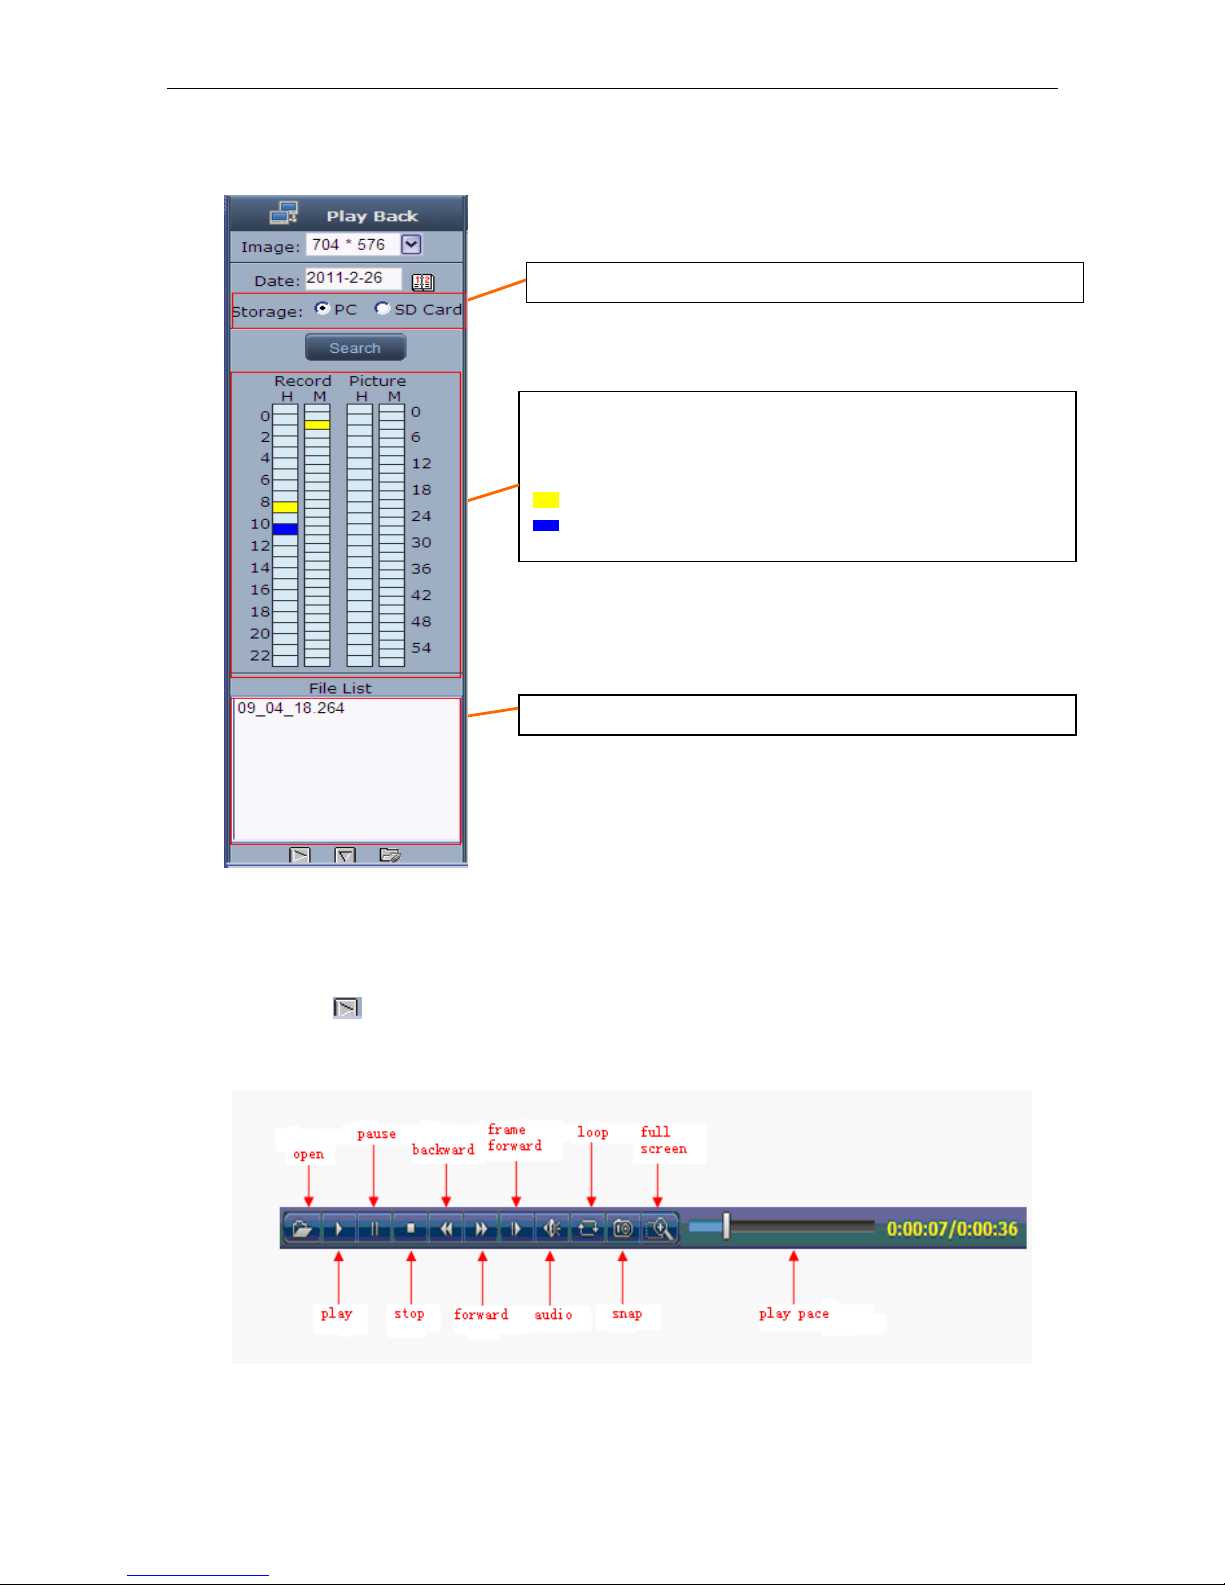
4
Record Playback
Click enter into video playback page (see Figure 9).
Figure 9
Users can search or recorded image iles or snapped pictures in local PC or storage
device according to date.
[Date]: Users can select certain date to per orm recorded image ile or snapped picture
searching, click “date” button ,data selection page will pop up(see Figure 10):
Figure 10
[PC]: Users can select certain date to per orm recorded image ile or snapped picture (stored
in local PC) searching.
[SD Card]: Users can select certain date to per orm recorded image ile or snapped picture
(stored in device SD card) searching.
[File List]: Shows the recorded image iles or snapped pictures searched in the File List.
Click “《”icon to turn to previous year
Click “ 》”icon to turn to next year
Click “〈 ”icon to turn to previous month
Click “ 〉”icon to turn to next month
IP Camera User’s Manual
12/66
The way to search or recorded image iles or snapped pictures o a speci ic period(see
Figure 11):
Figure 11
[Play]: Choose the recorded image or snapped picture in ile list, right click the ile or picture or
click “play” button to play. The contents will be displayed in the right window, users can view the
playing in ormation and control the process(see Figure 12):
Figure 12
[Download]: Select the recorded iles or snapped pictures searched rom SD card in the
The record ile list searched is displayed on the le t
The picture list searched is displayed on the right
The le t side stands or hour, each grid means one hour
The right side stands or minute, each grid means 2 minutes
Yellow indicates the selected search period
Blue indicates there are iles and pictures searched o the selected
period
Display the iles and pictures searched o the selected period
Select to search or record iles or snapped pictures in PC or device SD card

IP Camera User’s Manual
13/66
ile list, click “download” button to download the iles to PC.
[Download in ormation]: Users can view the in ormation downloaded a ter clicking
“Download”(see Figure 13):
Figure 13
Click [Pause] to pause download manually,click [Start] to continue to download the
un inished iles,click [Delete] to delete the downloaded iles,click [Close] to close the
download in ormation inter ace.I you close the Download In ormation window and click
,you can continue to view the in ormation about download.

IP Camera User’s Manual
14/66
5
Set System Parameters
5.1 Local config
See Figure 14 or the inter ace o “Local con ig”:
Figure 14
[PC live view parameter setting]
Code stream: set video stream or PC live preview, pre erred stream and alternate
stream are selectable. The parameters o pre erred and alternate stream can be set up in
[Video Settings].
Preview mode: users can choose Real time priority or Fluency priority mode according to
their needs.
Reset Mosaic: select this option to make image quality better, but CPU usage rate will be
higher at the same time.
[PC storage Parameter]
Record ile packing time: set packing time o record iles or local PC when it is
recording.
Record ile path: set the storage directory or local records and snapped iles, the de ault
path is C:\XDNVS.
A ter you set these parameters, please click to make them valid.

IP Camera User’s Manual
15/66
5.2 Remote config
5.2.1 Audio Setting
See Figure 15 or the inter ace o “Audio Setting”.
Figure 15
[Enable audio]: turn on or turn o the audio o IP camera, When there is no need or audio,
close audio input to save DSP resource and network resource. Audio is disabled by de ault.
[Input type]:You can choose MIC or Line In input.
[Type]:Support three types o audio compressed ormat:G.726,G.711A,G.711U,AAC.
[Sampling]:Support audio sample rates o 8k ,16k and 32k. When you select AAC ormat, sample
rate is ixed at 32K
[Input Volume]:Adjust the device’s input volume to control the volume o Listen.
[Output Volume]:Adjust the device’s output volume to control the volume o Call.
A ter you set these parameters, please click to make them valid.
5.2.2 Video Settings
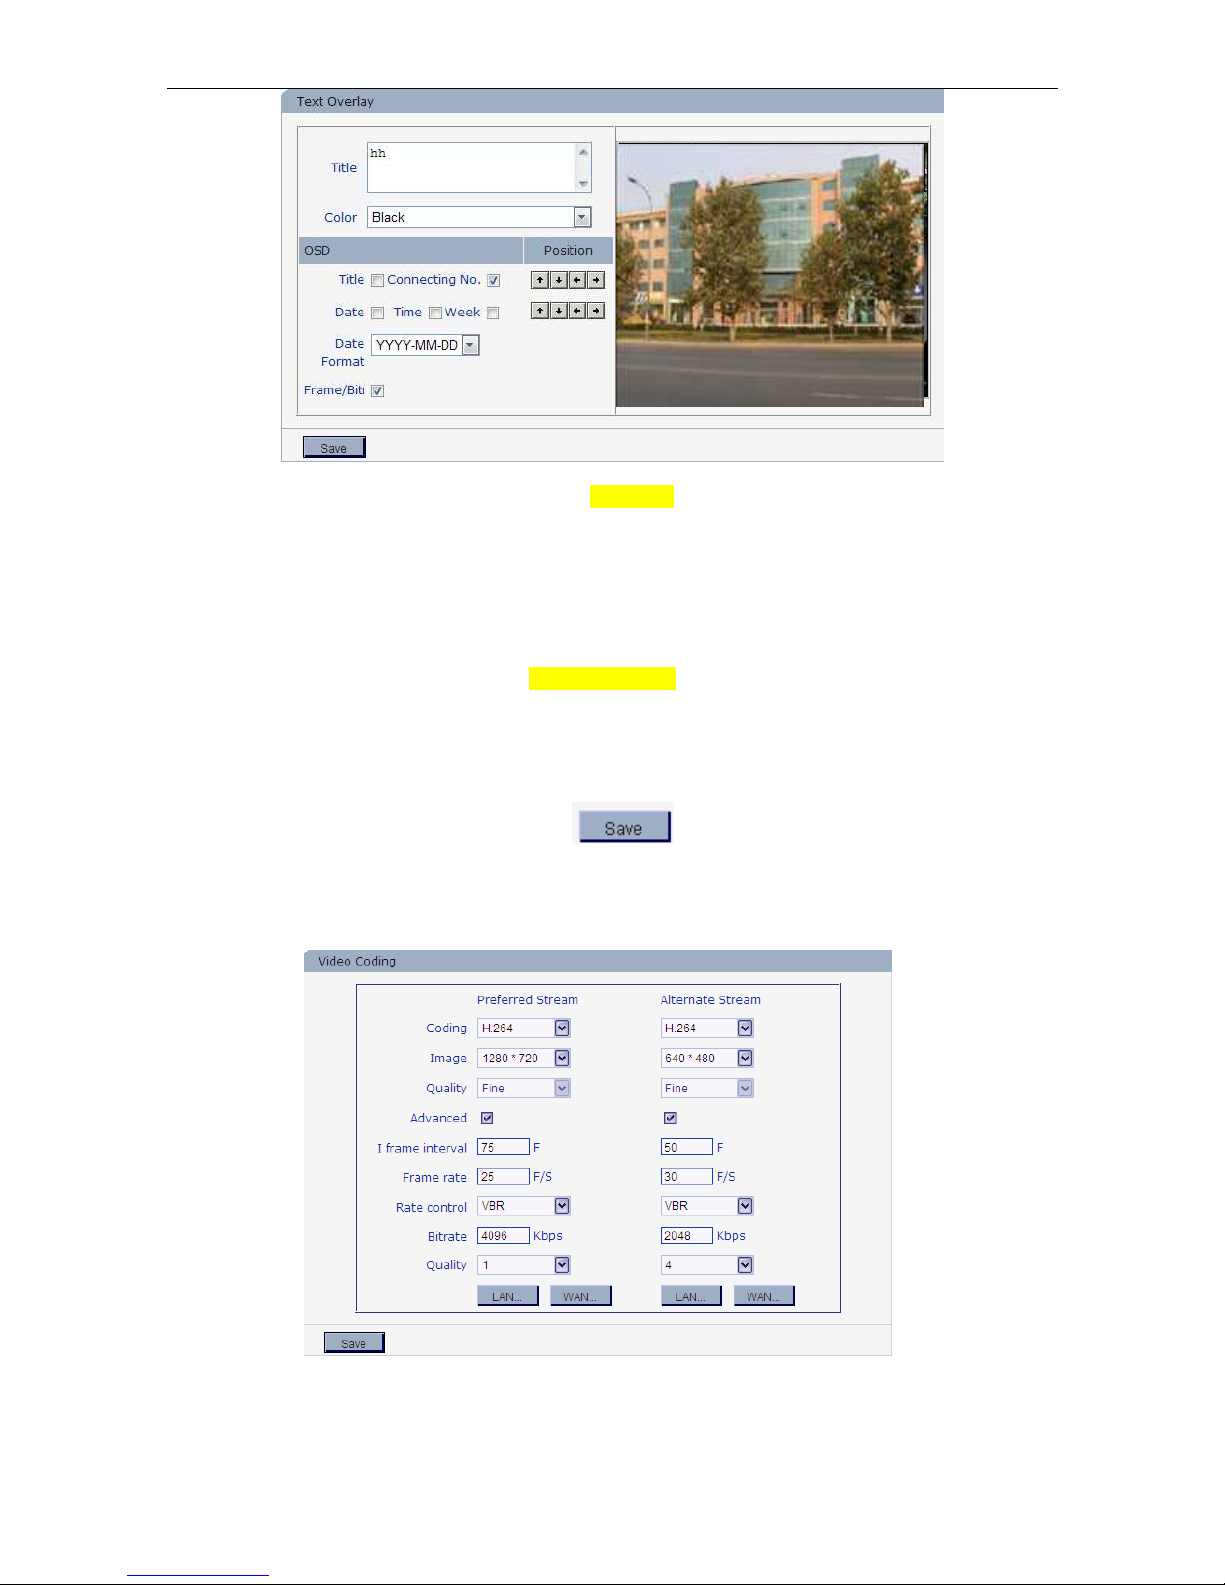
5.2.2.1 Text Overlay
See Figure 16 or the inter ace o “
Text Overlay
”:
IP Camera User’s Manual
16/66
Figure 16
[Title]: the name o video channel, displayed at the bottom le t o image(movable), maximum
characters allowed: 32.
[Color]:You can choose di erent colors or the text.
[OSD]: Display or not to display Title, Connecting No.,Date, Time, Week, Date Format and
Frame/Bitrate o channels.
[Position]: Can adjust the display position o video title and Date,Time,Week.
A ter you set these parameters, please click to make them valid.
5.2.2.2 Video Coding
See Figure 17 or the inter ace o “Video Coding”:
Figure 17
[Coding]: H.264 and MJPEG.
[Image]: set de inition o images.

IP Camera User’s Manual
17/66
Hitachi camera (130W CCD )
Pre erred Stream:1280*960/1280*720;
Alternate Stream:640*480/320*240/160*112
Hitachi camera (200W CMOS )
Pre erred Stream:1920*1080/1280*720;
Alternate Stream:640*480/320*240/160*112
720P camera (130W CMOS)
Pre erred Stream: 1280*720;
Alternate Stream:640*480/320*240/160*112
Sony camera (200W CMOS)
Pre erred Stream:1920*1080/1280*720;
Alternate Stream:640*480/320*240/160*112
CMOS support:
Pre erred Stream:640*480/320*240/160*112;
Alternate Stream:640*480/320*240/160*112
CCD support:
PAL mode---D1(704*576)/Hal -D1(704*288)/CIF(352*288)/QCIF(176*144)
NTSC mode---D1(704*480)/Hal -D1(704*240)/CIF(352*240)/QCIF(176*120)
[Quality]:You can choose the right quality according to your need: Fine, Normal, Basic,and the
parameters can also be user-de ined by choosing [advanced].
[I frame interval]: Adjustable between 1~200(Pre erred Stream), 1~120(Alternate
Stream).Smaller I rame interval means higher image bitrate and better image quality. It is
recommended to set the I rame interval as above 25.
[Frame rate]: Set encoding rame rate per second. Under poor network condition, rame rate
can be reduced to control encoding bitrate to make motion images low more smoothly.
[Rate control]: CBR and VBR are optional. CBR adopts constant encoding bitrate, VBR
adopts variable encoding bitrate.
[Bitrate]:The range o pre erred and alternate stream is 30~16384Kbps.Higher bitrate setting
can generate better image quality, but it occupies more bandwidth, please adjust the setting
according to your actual bandwidth.

IP Camera User’s Manual
18/66
Under CBR setting, [Bitrate] is the constant bitrate o encoding.
Under VBR setting, [Bitrate] is the variable bitrate o encoding.
[Quality]: Under CBR setting: set the bitrate range via “Image Quality”, 1 means it is
controlled by the so tware, 2~6 means corresponding bitrate range is ±10%~±50%
Under VBR setting: set image quality via “Image Quality”, smaller value o image quality
means better quality and higher bitrate, but the bitrate will not exceed its set value.
[LA default value]:
Pre erred Stream:
H.264 Coding: I rame interval: 75, rame rate: 25, bitrate: VBR, 720P: 4096 kbps,
1080P:8192kbps .image quality:2;
MJPGE Coding: I rame interval: 75, rame rate: 25, bitrate: VBR, 720P: 9216 kbps,
1080P:10240kbps .image quality:2;
Alternate Stream:
H.264 Coding: I rame interval: 50, rame rate: 25, bitrate: VBR: 512 kbps,.image quality:4;
MJPGE Coding: I rame interval: 50, rame rate: 25, bitrate: VBR: 4096 kbps.image quality:4;
[WA default value]:
H.264 Coding: I rame interval: 25, rame rate: 5, bitrate: VBR: 384kbps, image quality:4
MJPGE Coding: I rame interval: 25, rame rate: 5, bitrate: VBR: 4096kbps, image quality:4
A ter you set these parameters, please click to make them valid(Sometimes i you
modi y the [image],the device will be reboot).
ote: on-professional users please use “Advanced Settings” with
caution
.
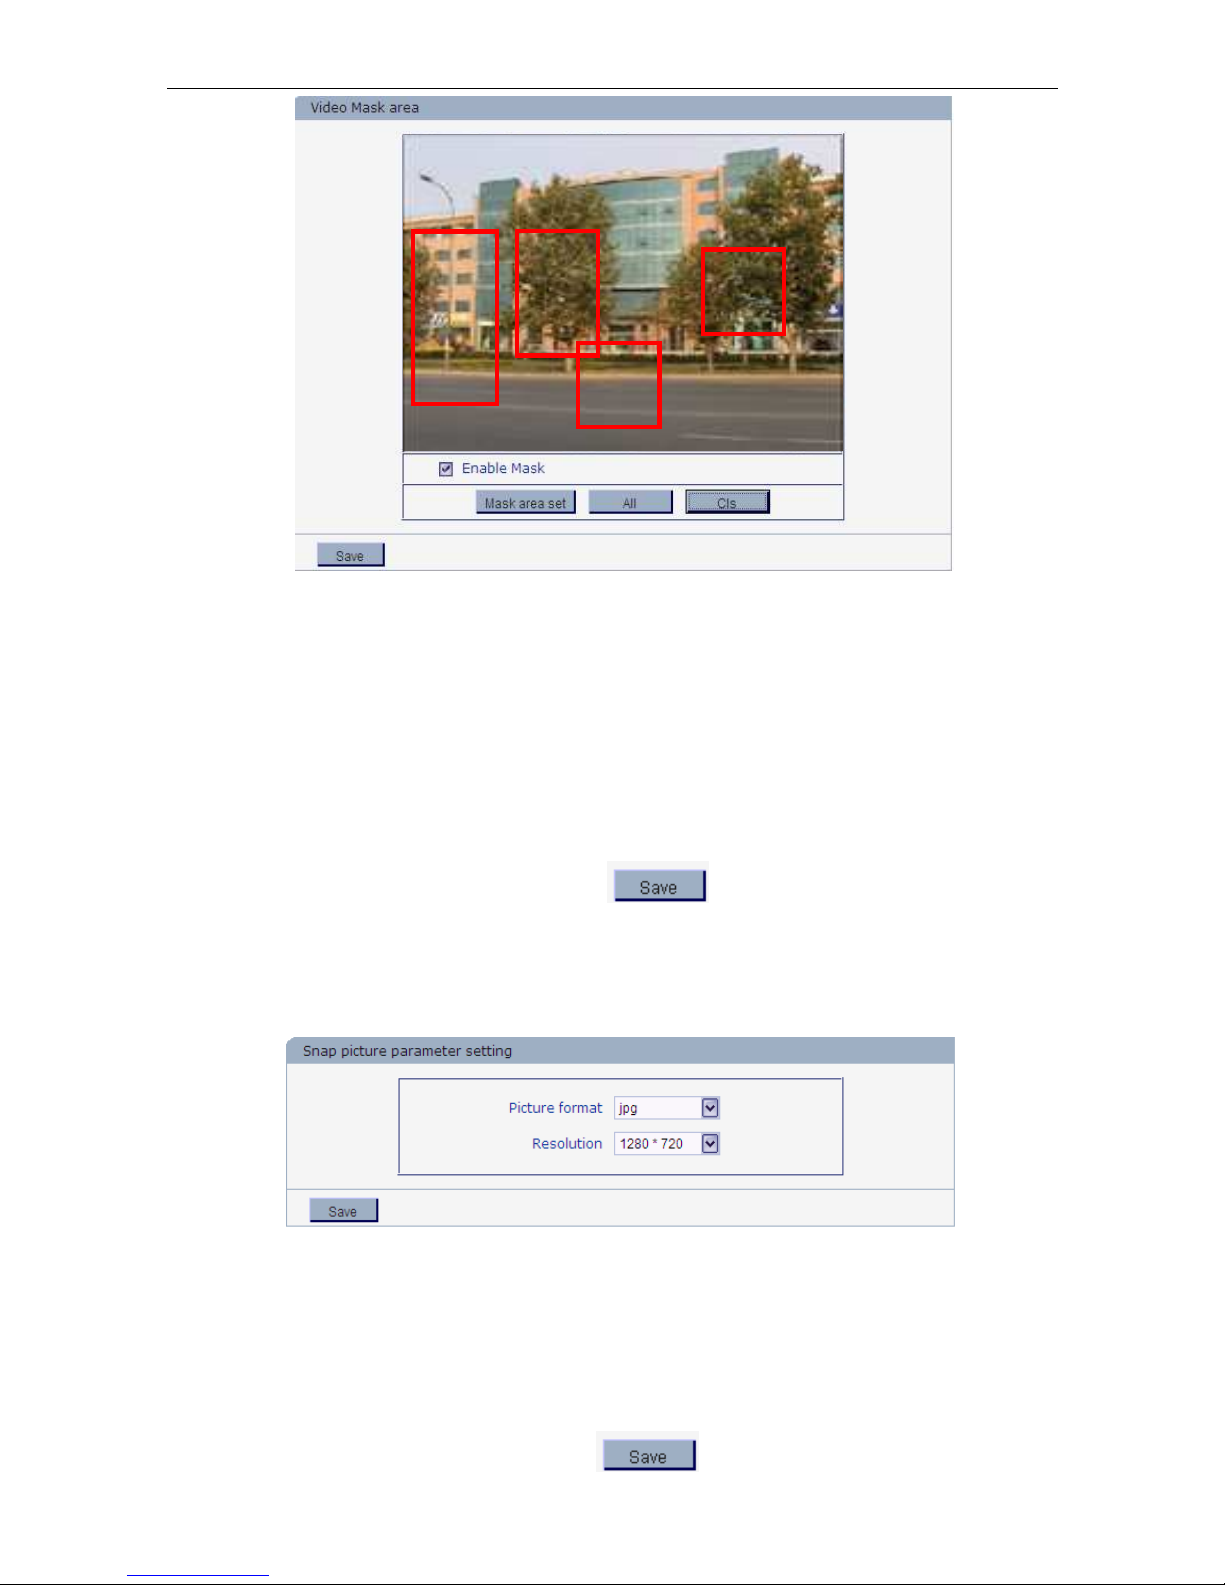
5.2.2.3 Video Mask
See Figure 18 or the inter ace o “Video Mask area”:
IP Camera User’s Manual
19/66
Figure 18
[Enable Mask]: Enable or disable video masking.
[Mask area set]: Click and move cursor to set image masking area, an image can be entirely or
partially masked, maximum 4 areas supported.
[All]: Mask the whole image.
[Cls]: Clear masked areas.
A ter you set these parameters, please click to make them valid.
5.2.2.4 Picture Parameter
See Figure 19 or the inter ace o “Snap picture Parameter Setting”:
Figure 19
[Snap picture parameter setting]: Supports only images o JPG ormat currently, megapixel
camera de inition is the same as set in [video de inition],other cameras can choose di erent pixel by
yoursel .
A ter you set these parameters, please click to make them valid.

IP Camera User’s Manual
20/66
5.2.3 etwork Settings
5.2.3.1 Basic Setting
See Figure 20 or the inter ace o “Basic setting”:
Figure 20
[Data port]: De ault value is 5000 (users are recommended not to change it).
[Web port]: De ault value is 80 (users are recommended not to change it).
A ter you set these parameters, please click and the device will reboot to make
the parameters valid.
5.2.3.2 LA Setting
See Figure 21 or the inter ace o “LAN setting”:
Figure 21
[DHCP]: I DHCP unction o the router is enabled, IP camera will automatically etch IP
address rom the router.
[IP address]: Set the camera’s IP address.
[Subnet mask]: De ault value is 255.255.255.0 (users are recommended not to change it).
[Gateway]: Set the gateway IP o IP camera, or example when the device is connected to
public network via a router, the gateway IP is the router IP.
Table of contents
Other HISTREAM Security Camera manuals


