manuals.online logo
Brands
  1. Home
  2. •
  3. Brands
  4. •
  5. Hitachi
  6. •
  7. Micro Music System
  8. •
  9. Hitachi AXM209UK User manual

Hitachi AXM209UK User manual

Other Hitachi Micro Music System manuals

Hitachi AXM209UKR User manual

Hitachi

Hitachi AXM209UKR User manual

Hitachi AX-M717 s Manual

Hitachi

Hitachi AX-M717 s Manual

Hitachi AXM239UK User manual

Hitachi

Hitachi AXM239UK User manual

Hitachi AXM89MP3UK User manual

Hitachi

Hitachi AXM89MP3UK User manual

Hitachi AX-M84 User manual

Hitachi

Hitachi AX-M84 User manual

Hitachi AXM898U User manual

Hitachi

Hitachi AXM898U User manual

Hitachi AXM10E User manual

Hitachi

Hitachi AXM10E User manual

Hitachi AX-M136i User manual

Hitachi

Hitachi AX-M136i User manual

Hitachi AX-M76 User manual

Hitachi

Hitachi AX-M76 User manual

Hitachi AXM628E User manual

Hitachi

Hitachi AXM628E User manual

Hitachi AX-M3E User manual

Hitachi

Hitachi AX-M3E User manual

Popular Micro Music System manuals by other brands

Philips MCD120/79 user manual

Philips

Philips MCD120/79 user manual

Rautz MC-5100DU Service manual

Rautz

Rautz MC-5100DU Service manual

Philips DCM1075/96 user manual

Philips

Philips DCM1075/96 user manual

Philips BTB2570 user manual

Philips

Philips BTB2570 user manual

Philips 8000 Series user manual

Philips

Philips 8000 Series user manual

Sanyo DC-D9 Service manual

Sanyo

Sanyo DC-D9 Service manual

Samsung MM-UC8 instruction manual

Samsung

Samsung MM-UC8 instruction manual

Philips BTD2180 user manual

Philips

Philips BTD2180 user manual

Philips MCD2010/12 user manual

Philips

Philips MCD2010/12 user manual

Philips DCM3100 Service manual

Philips

Philips DCM3100 Service manual

Philips MCM302/05 user manual

Philips

Philips MCM302/05 user manual

Philips MCM239D/79 quick start guide

Philips

Philips MCM239D/79 quick start guide

Philips MCM1120 user manual

Philips

Philips MCM1120 user manual

Philips DCM2260W user manual

Philips

Philips DCM2260W user manual

Philips MCD 190 quick start guide

Philips

Philips MCD 190 quick start guide

Philips BTM2335 Short user manual

Philips

Philips BTM2335 Short user manual

Philips MC-200 Service manual

Philips

Philips MC-200 Service manual

Philips DCM109/37 user manual

Philips

Philips DCM109/37 user manual

manuals.online logo
manuals.online logoBrands
  • About & Mission
  • Contact us
  • Privacy Policy
  • Terms and Conditions

Copyright 2025 Manuals.Online. All Rights Reserved.

Model No: AXM209UK
Slim DAB Micro System with docking for iPod
UK-1
SOME DOS AND DON'TS ON THE SAFE USE OF EQUIPMENT
This equipment has been designed and manufactured to meet international safety standards
but, like any electrical equipment, care must be taken if you are to obtain the best results and
safety is to be assured.
***************
DO read the operating instructions before you attempt to use the equipment.
DO ensure that all electrical connections (including the mains plug, extension leads and
inter-connections between the pieces of equipment) are properly made and in
accordance with the manufacturer's instructions. Switch off and withdraw the mains
plug before making or changing connections.
DO consult your dealer if you are ever in doubt about the installation, operation or safety
of your equipment.
DO be careful with glass panels or doors on equipment.
DO route the mains lead so that it is not likely to be walked on, crushed, chafed, or
subjected to excessive wear and tear or heat.
***************
DON'T remove any fixed cover as this may expose dangerous voltages.
DON'T obstruct the ventilation openings of the equipment with items such as newspapers,
tablecloths, curtains, etc. Overheating will cause damage and shorten the life of the
equipment.
DON'T allow electrical equipment to be exposed to dripping or splashing, or objects filled
with liquids, such as vases, to be placed on the equipment.
DON'T place hot objects or naked flame sources such as lighted candles or nightlights on,
or close to equipment. High temperatures can melt plastic and lead to fires.
DON'T use makeshift stands and NEVER fix legs with wood screws - to ensure complete
safety always fit the manufacturer’s approved stand or legs with the fixings provided
according to the instructions.
DON'T use equipment such as personal stereos or radios so that you are distracted from
the requirements of traffic safety.
DON'T listen to headphones at high volume, as such use can permanently damage your
hearing.
DON'T leave equipment switched on when it is unattended unless it is specifically stated
that it is designed for unattended operation or has a stand-by mode. Switch off
using the switch on the equipment and make sure that your family knows how to do
this. Special arrangements may need to be made for infirm or handicapped people.
DON'T continue to operate the equipment if you are in any doubt about it working normally,
or if it is damaged in any way - switch off, withdraw the mains plug and consult your
dealer.
ABOVE ALL
− NEVER let anyone especially children push anything into holes, slots or any other
opening in the case - this could result in a fatal electric shock;
− NEVER guess or take chances with electrical equipment of any kind
− it is better to be safe than sorry!
***************
UK-2
The above mark is in compliance with the Waste Electrical and Electronic Equipment Directive
2002/96/EC (WEEE).
The mark indicates the requirement NOT to dispose the equipment including any spent or
discarded batteries as unsorted municipal waste, but use the return and collection systems
available. If the batteries or accumulators included with this equipment display the chemical
symbol Hg, Cd, or Pb, then it means that the battery has a heavy metal content of more than
0.0005% Mercury, or more than 0.002% Cadmium or more than, 0.004% Lead.
UK-3
SAFETY PRECAUTIONS
To achieve the utmost in enjoyment and performance, please read this manual carefully before attempting to
operate the unit in order to became familiar with its features, and assure you years of faithful, trouble free
performance and listening pleasure.
Important Notes
* Keep these instructions: the safety and operating instructions should be retained for future
reference.
* Avoid installing the unit in locations described below:
* Places exposed to direct sunlight or close to heat radiating appliances such as electric heaters; on
top of other stereo equipment that radiates too much heat; places lacking ventilation or dusty
places; places subject to constant vibration; humid or moist places.
* Make sure not to obstruct the ventilation holes. Ventilation should not be impeded by covering the
ventilation holes with items such as newspapers, table-clothes, curtains etc.
* Before turning on the power for the first time, make sure the power cord is properly installed. The
mains plug is used as the disconnect device and it must always remain readily operable. To
completely disconnect the equipment from the mains supply, the mains plug of apparatus must be
disconnected from the mains socket.
* The product must not be exposed to dripping or splashing and no objects filled with liquids, such
As Vases, should be placed on the equipment.
* Keep a minimum distance of 10 cm around the apparatus to allow adequate ventilation.
* Please dispose of spent batteries in an environmentally friendly manner by using a local recycling
scheme.
* Only use this equipment in moderate climates.
* No naked flame sources such as lighted candles should be placed on the apparatus.
* Do not expose batteries to excessive heat such as sunshine, fire or the like.
For safety reasons, do not remove any covers or attempt to gain access to the inside of the product.
Refer any servicing to qualified personnel.
Do not attempt to remove any screws, or open the casing of the unit; there are no user serviceable parts
inside, refer all servicing to qualified service personnel.
CAUTION: TO REDUCE THE RISK OF ELECTRIC SHOCK DO NOT REMOVE COVER (OR BACK), NO
USER SERVICEABLE PARTS INSIDE, REFER SERVICING TO QUALIFIED SERVICE
PERSONNEL.
DANGEROUS VOLTAGE
There is high voltage within this product's enclosure that may be of sufficient magnitude to
constitute a risk of electric shock.
ATTENTION
The owner's manual contains important operating and maintenance instructions, for your safety,
it is necessary to refer to the manual.
Note:
- This unit will become warm when used for a long period of time. This is normal and does not indicate
a problem with the unit.
- Excessive sound pressure from earphones and headphones can cause hearing loss.
- If an unusual condition occurs in the display window or with an operating button, switch the unit off and then
on again.
Assembly Drawing of Unit and speaker
84 mm
2. Speakers connection
4. Adjust the adjusting pad knob
Adjust the pad Knob to level 3
1. Made for iPod nano
(1st generation)1GB, 2GB, 4GB
only
2. iPod touch 8GB/16GB/32GB
3. iPod touch 2nd generation
8GB/16GB/32GB
3. Docking bracket and iPod Adjusting pad panel
Universal Dock adapter (Using the Dock Adapters to support all type of the iPod players.)
Connector
dock
1. IPod Adjusting Pad Panel(Press the iPod Adjusting pad panel lightly out from the lock holder.)
2. IPod Adjusting Pad Panel (Let theiPod Players easy to insert into the connector fixedly, and then press and push
them toward the lock holder until it snaps on.)
Adjust the pad knob to level 1
1. Made for iPod with color display
(4th generation)40GB, 60GB only
2. iPod(4th generation)40GB only
iPod with vide (5th generation)
30GB only
3. iPod classic 80GB
4. IPod classic 2nd generation 120GB
Adjust the pad knob to level 2
1. Made for iPod mini (1st generation)
40GB, 60GB only
2. iPod (4th generation)20GB only
3. iPod (4th generation)20 & 30 GB
Color (U2 Special Edition)
4. iPod with video (5th generation)
60 & 80 GB
5. iPod classic 160GB
UK-4
1. Fixing the whole set of the unit on the wall
300 mm
Note: Nails size:3.5*25BA(screws are not included)
Note: When wall-mounting the set of product in line, suggest keeping at least 50mm distance from the main
unit to the speakers to achieve better stereo effect and to ensure the slide CD door with prefect movement.
50 mm 50 mm
The unit supports the listed iPods
***iPods shown are not included***
Made for iPod touch
(2nd generation)
(8GB, 16GB, 32GB only)
Made for iPod classic
(2nd generation)
(120GB only)
Made for iPod nano
(2nd generation)(aluminum)
(2GB, 4GB, 8GB only)
Made for iPod with video
(5th generation)
(60GB, 80GB only)
Made for iPod mini
(4GB, 6GB only)
Made for iPod
(4th generation)
(20GB only)
Made for iPod
(4th generation)
(40GB only)
Made for iPod with
color display
(4th generation)
(20GB, 30GB only)
Made for iPod with
color display
(4th generation)
(40GB, 60GB only)
Made for iPod nano
(1st generation)
(1GB, 2GB, 4GB only)
Made for iPod with video
(5th generation)
(30GB only)
Made for iPod classic
(80GB, 160GB only)
Made for iPod nano
(3rd generation)(video)
(4GB, 8GB only)
Made for iPod touch
(8GB, 16GB, 32GB only)
Made for iPod nano
(4th generation)
(8GB, 16GB only)
UK-5
UK-6
REMOTE CONTROL
1. STANDBY BUTTON
2. MUTE BUTTON
3. CD OPEN/CLOSE BUTTON
4. iPod OPEN/CLOSE BUTTON
5. SKIP/TUNE SEARCH DOWN BUTTON
6. RANDOM BUTTON
7. SLEEP BUTTON
8. CLOCK/DISPLAY BUTTON
9. EQ BUTTON
10.VOLUME UP BUTTON
11.CD/iPod BUTTON
12.USB/CARD/AUX BUTTON
13.VOLUME DOWN BUTTON
14.FM/DAB BUTTON
15.PLAY/PAUSE BUTTON
16.SELECT/REPEAT BUTTON
17.SKIP/TUNE SEARCH UP BUTTON
18.STOP/MENU/MONO/ST. BUTTON
19.PRESET/FOLDER UP BUTTON
20.MEMORY BUTTON
21.PRESET/FOLDER DOWN BUTTON
22.NUMBER SEARCH BUTTON
**BATTERIES NOT
INCLUDED**
PUTTING THE BATTERIES INTO
THE REMOTE CONTROL UNIT
Press down the compartment cover, and
slide the cover off to open the compartment.
Place the two (UM4), (AAA), (R03) batteries
in the remote control according to the
polarity markings ("+" and " - ") inside the
compartment and on the batteries. Place
the cover over the compartment, press down
lightly, and push it upward until it snaps on.
Note: Remove the batteries from the remote
control if not in use for long period of
the time. Do not mix normal batteries with
rechargeable batteries, when the batteries
become weak, remote control will not
function and replace with new batteries.
0. M NTE
3 F A NNA
1. EA R “3 SP KE OUT L”
2. A N UNI AND3 MI T ST
3. K BRA3 DOC ING CKET
4. o A ING A B3 iP d DJUST PD KNO
5. o CO CT3 iP d NNE OR
6. EA R “3 SP KE OUT R”
7. UT JCK3 VIDEO OA
8. A3 DC JCK
9. HOL3 HITCHING E
0. PLA ER DO4 iPod Y OR
1 I / UNE S RCH 4. SK P T EA UP
TA
T OUCH PL E
2INE IN C4. LJA
K
3
4
5
6
879 15
16
17
18
1
2
20
21
10
11
121314
22
23
24
25
19
27 29
2826
33
35
34
39 30
40
41
31
32
42
38
37
36
1
2
3
4
5
6
7
8
9
10
12
11
13
14
15
16
17
18
19
20
21
22
FEATURES AND CONTROLS
1. SPEAKER
2. SPEAKER STAND
3. STANDBY LED INDICATOR
4. SD/MMC CARD IN SLOT
5. HEADPHONES JACK
6. USB DEVICE IN PORT
7. CD OPEN/CLOSE BUTTON
8. STANDBY/ON BUTTON
9. iPod OPEN/CLOSE BUTTON
10. MEMORY BUTTON
11. CLOCK BUTTON
12. INTRO BUTTON
13. TIMER BUTTON
14. RANDOM BUTTON
15. EQ BUTTON
16. PRESET/FOLDER DOWN BUTTON
17. PRESET/FOLDER UP BUTTON
18. SELECT/REPEAT TOUCH PLATE
19. STOP/MENU TOUCH PLATE
20. VOLUME DOWN TOUCH PLATE
21. SKIP/TUNE SEARCH DOWN TOUCH
PLATE
22. VOLUME UP TOUCH PLATE
23. CD/iPod TOUCH PLATE
24. IR SENSOR
25. LCD DISPLAY WINDOW
26. CD DOOR
27. USB/CARD/AUX TOUCH PLATE
28. FM/DAB TOUCH PLATE
29. PLAY/PAUSE/ENTER TOUCH PLATE
POWER CORD CONNECTION
Power Cord Connection
1. Connect the AC/DC Adaptor Tip to the DC jack on the right
side of the unit firstly.
2. Connect the AC/DC Adaptor Plug to the AC outlet socket
secondly.
Note: In any time, the iPod PLAYERS must be fixed well
under in the standby mode to avoid them were damaged.
DC Adapter Tip
OPERATING THE UNIT
When you first plug the unit into the AC outlet, the unit will be in standby mode, the black light of standby is red.
You can now press the STANDBY/ON button on the unit or remote control to switch the unit ON. The black light of
the standby and multi function touch plate will light on blue. Pull the AC plug out of the wall socket if you want to
switch off completely.
POWER/STANDBY
1. Press the STANDBY/ON button on the unit or or press the STANDBY button on remote control to switch the
unit on.
2. Select the sound source (CD, iPod), (USB, CARD, AUX) and (DAB or TUNER) by touch the (CD, iPod),
(USB, CARD, AUX) and (DAB or TUNER) touch plate separately or press the (CD, iPod), (USB, CARD,
AUX) and (DAB or TUNER) button separately on remote control. The corresponding display will light up.
3. Adjust the volume with the VOLUME (UP or DOWN) touch plate on the unit or press the VOLUME buttons
on the remote control.
4. Press the STANDBY/ON button on the unit or press the STANDBY button on the remote control again to
turn off the unit.
Note: 1. If there is no signal under the CD/USB DEVICES/ SD & MMC CARD/iPod mode, the main unit will be
switched off within 15 minutes automatically.
2. During in the iPod mode, there is not insert the iPod Player on the iPod docking bracket. The main unit
will also turn off within15 minute automatically. Please turn the main switch off to save energy, when
you do not use it.
CLOCK SETTING
The clock will be automatically synchronized to the DAB clock if you can receive DAB signals in your location.
If you can only receive FM, then you have to set the clock manually. The manual clock setting must be done in
standby mode.
1. When the unit is first connected to the AC mains outlet, it will be in standby mode, and the display will show
“00:00” and flash.
2. During standby, press and hold the CLOCK/DISPLAY button on the remote control/unit the hour digits flash
in the display, t
to set to the correct hour, then press the
CLOCK/DISPLAY button on the remote control/unit again to confirm.(F1)
3. After the hour is set, the minute digits will then flash, T
to set to the correct
minute.(F2)
4. When the display shows the correct time, press the CLOCK/DISPLAY button on the remote control/unit
again to confirm, the manual clock setting is now completed.
1. Press the POWER button on the unit or press the STANDBY button on the remote control once to switch
the unit on.
2. TPress the FM/DAB button to select DAB mode.
3. Tune to a DAB station and the clock will be automatically synchronized to the DAB local time.
TIMER SETTING
This function allows you to switch on and off the system at your desired time and mode:
1. Press the TIMER button to toggle the timer function between on and off, the display will show “Timer On” or
“Timer Off”. The display will show “ ” to indicate timer function on.(F3)
2. To set the on timer clock, press and hold the TIMER button until the display shows “On Timer” and the “hour”
digit of the timer clock will flash.(F4)
3. Touch the SKIP/TUNE SEARCH (UP or DOWN) touch plate or press the SKIP/TUNE SEARCH(UP or DOWN)
button on the remote control to set to the desired hour, then press the TIMER button to confirm, first set the
hour and finally the minute, the on timer clock is set.
4. T hen you will enter into the off timer clock setting, the display will show “Off Timer” and the “hour” digit will
flash. Touch the SKIP/TUNE SEARCH (UP or DOWN) touch plate or press the SKIP/TUNE SEARCH (UP or
DOWN) button on the remote control to set to the desired hour, then press the TIMER button to confirm, first
set the hour and finally the minute, the off timer clock is set.
5. Finally touch the SKIP/TUNE SEARCH (UP or DOWN) touch plate or press the SKIP/TUNE SEARCH(UP or
DOWN) button on the remote control to select the timer on mode - CD, DAB, FM, USB, SD CARD or iPod,
then press the TIMER button to confirm. The timer setting is now completed.
6. To check the timer setting, repeatedly press the CLOCK button until the display shows the on timer and the
off timer setting.
TO SET SLEEP FUNCTION (on the remote control)
This function allows you to program the system to switch off itself after a set period of time. You can set your
sleep time in power on mode:
1. T o activate the sleep function, press the SLEEP button on the remote, the display will show “SLEEP-90”
and flash.
2. R epeatedly press the SLEEP button to select the sleep time, it will change in sequence on every press:
Manual clock setting
ouch the SKIP/TUNE SEARCH (UP or DOWN) touch plate or press the
SKIP/TUNE SEARCH(UP or DOWN) button on the remote control
ouch the SKIP/TUNE SEARCH (UP or DOWN) touch
plate or press the SKIP/TUNE SEARCH(UP or DOWN) button on the remote control
Synchronise the clock to DAB local time
ouch the FM/DAB touch plate or on the remote control
UK-7
UK-8
F1 F2 F3
F4 F5
LISTENING TO YOUR RADIO
Hints for better reception
This unit carries a single lead wire DAB/FM antenna, to obtain the best performance, you should fully extend
the wire antenna and adjust the position as well as the direction until you find the best reception.
For ideal DAB reception, always maintain the lead wire antenna in a vertical position (holding it upward or
downward behind the unit) is highly recommended.
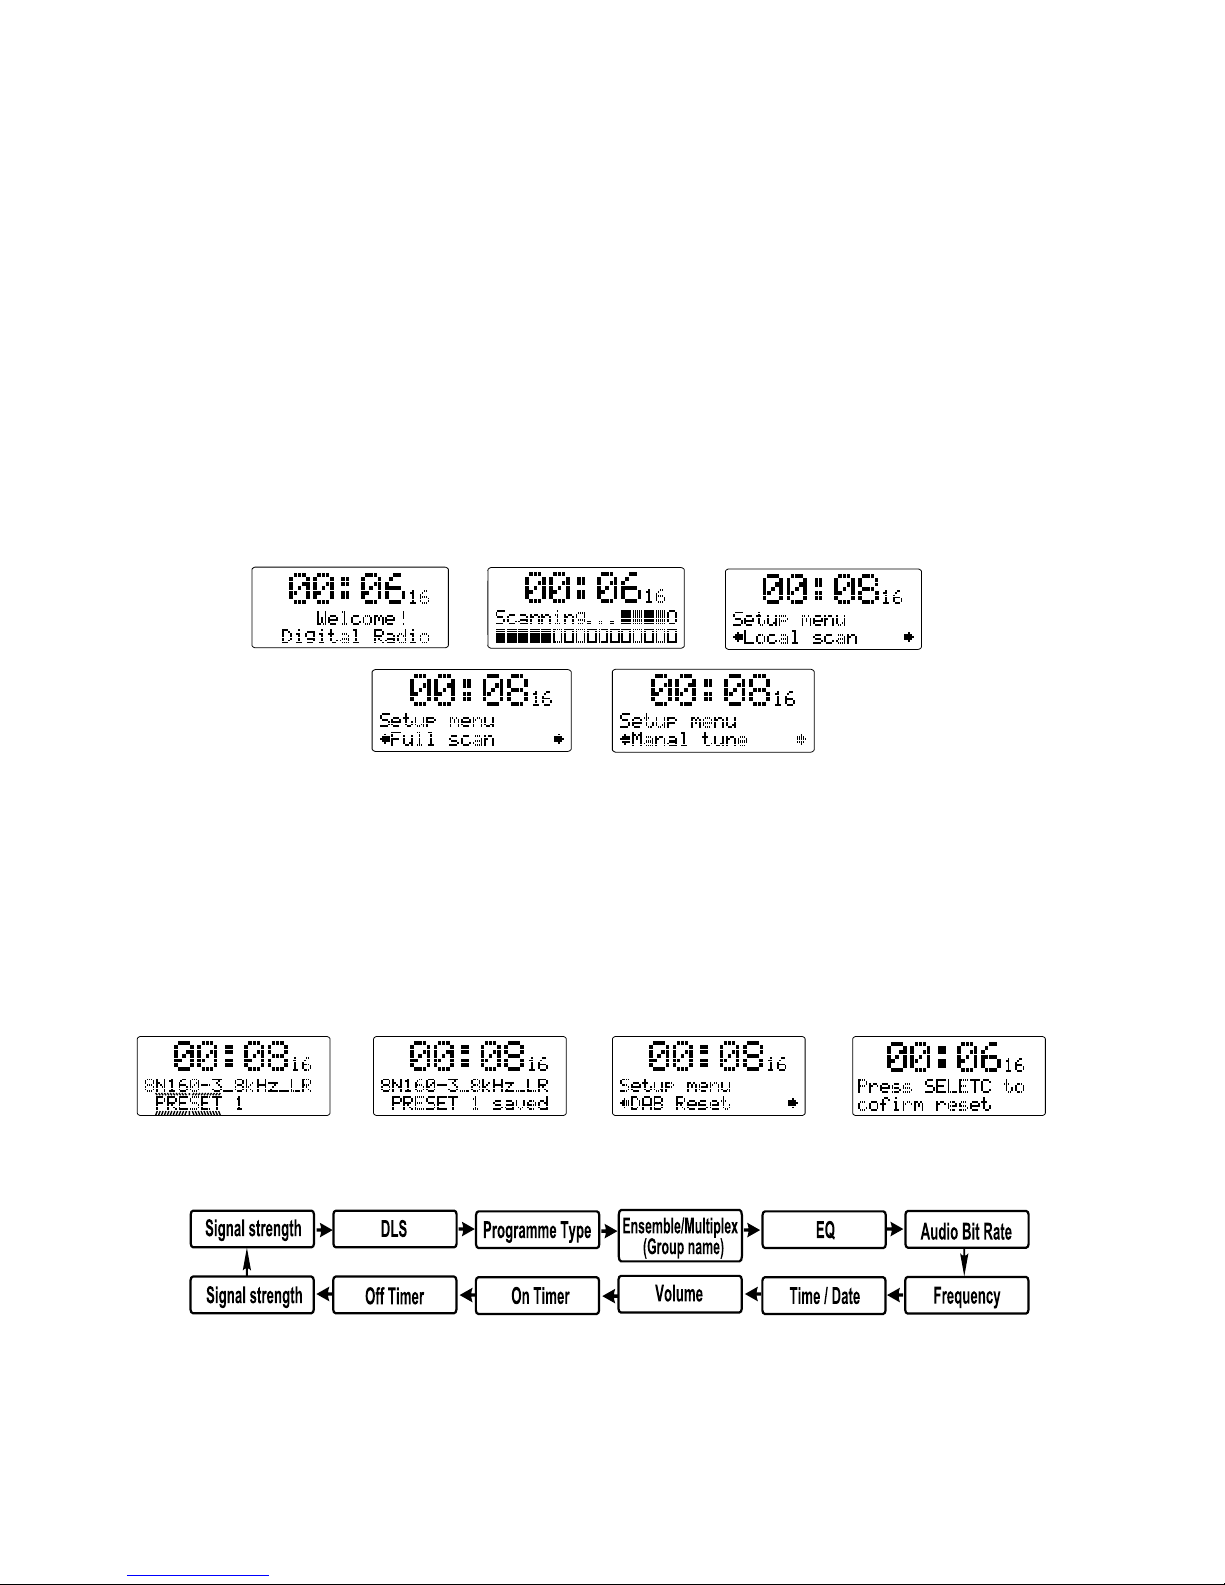
DAB mode
When the unit is powered up for the first time, it will be in standby mode. Press the POWER button on the unit
or press the STANDBY button on the remote control once to turn the radio on, it will then automatically enter
into the DAB mode and perform full scan function. During scan, the display will show “Scanning …” together
with a slide bar that indicates the progress of the scan and the amount of stations that have been found so
far.(F6)(F7)
Once the scan has finished, the radio will select the first alphanumerically found station. To explore the found
stations, first Touch the REPEAT/SELECT touch plate or press the REPEAT/SELECT button on the remote
control and then select the REPEAT/SELECT mode for selection, when your desired station appears on the
display, touch the REPEAT/SELECT touch plate or press the REPEAT/SELECT button on the remote control
again to confirm your selection.
There are two types of DAB auto scan modes, one is local scan and the other is full scan. Local scan will only
search for the UK DAB Band III channels and full scan will search for all DAB Band III channels.
After the scan has finished, the first alphanumerically found station will be automatically selected.
1. To activate local scan, t STOP/MENU ress the STOP/MENU/MONO/ST. button on
the remote once to enter into the “Setup menu”, then select the REPEAT/SELECT mode for
selection, when the display shows “Local scan”, t REPEAT/SELECT ress the
REPEAT/SELECT button on the remote to confirm, the display will show “Scanning …” and a quick
progressing slide bar.(F8)
2. To activate full scan, t STOP/MENU ress the STOP/MENU/MONO/ST. button on the
remote once to enter into the “Setup menu”, then select the REPEAT/SELECT mode for selection,
when the display shows “Full scan”, t REPEAT/SELECT ress the REPEAT/SELECT
button on the remote to confirm, the display will show “Scanning …” and a slower progressing slide
bar.(F9)
3. All the stations that have been found will be stored automatically, to explore the stations that have been
found, first t REPEAT/SELECT ress the REPEAT/SELECT button on the remote
once, then select the REPEAT/SELECT mode for selection, when you find a station that you would
like to listen to, t REPEAT/SELECT ress the REPEAT/SELECT button on the
remote .
1. To select manual tune, t STOP/MENU ress the STOP/MENU/MONO/ST. button on
the remote to enter into the “Setup menu”, when the display shows “Manual tune”, t
REPEAT/SELECT ress the REPEAT/SELECT button on the remote once to
confirm.(F10)
2. Select the REPEAT/SELECT mode to scroll through the DAB channels, the display will show “5A to 13F”
and their associated frequencies.
3. W hen your desired frequency appears in the display, select the REPEAT/SELECT mode to confirm.
The name of the station group (ensemble/multiplex) will be displayed.
4. To see what stations are present on the found ensemble/multiplex, first t REPEAT/SELECT
ress the REPEAT/SELECT button on the remote once, and then select the
REPEAT/SELECTmode, when your desired station appears in the display, REPEAT/SELECT
ress the REPEAT/SELECT button on the remote again to select.
On some occasions you will see a “>” symbol appeared after the name of the station, this indicates that there
are secondary services available to that station. These secondary services contain extra services that relate
to the primary station. E.g. a sports station may want to add extra commentaries. The secondary services are
inserted directly after the primary station. To select the secondary station, t REPE/SELE
ress the REPEAT/SELECT button on the remote when the “>” appears in the display.
DAB auto scan modes
ouch the touch plate or p
control
ouch the touch plate or p
control
ouch the touch plate or p
control
ouch the touch plate or p
control
ouch the touch plate or p
control
ouch the touch plate or p
control
DAB manual tune
ouch the touch plate or p
control ouch the
touch plate or p control
ouch the touch
plate or p control
touch the
touch plate or p control
Secondary Services
ouch the touch plate
or p control
3. When the display shows your desired sleep time, release the button, the sleep timer is now activated. The
display will show “S#” in which “S1” is to indicate “10 minutes” sleep time and so on. When the sleep time
counts to zero, the unit will go off.(F5)
4. To cancel sleep, press the SLEEP button once again, the display will show “SLEEP-OFF”
and the “S#” will disappear.
UK-9
1. To select FM, T Press the DAB/FM button on the remote , the display
will how FM and the frequency.
2. To activate frequency auto search, tand hold
and hold control until it starts to scan
down or up the frequency band; it will stop automatically once a station has been found.
3. You can also t
to select your desired frequency.
4. T STOP/MENU ress the STOP/MENU/MONO/ST. button on the remote to
toggle select between the FM “STEREO” and “MONO” reception.
In either DAB or FM mode, you can store up to 20 stations to the favourite presets; this will enable you to
get direct access to your favourite stations.
1. To store a preset, first tune to your desired station, then press the MEMORY button on the remote control
once, the display will show “PRESET#” and flash.(F11)
2. Press the PRESET/FOLDER (UP or DOWN) button on the remote controlto select your desired station
preset number, then press the MEMORY button on the remote control to confirm your selection; the display
will show
“Preset # saved” in DAB mode.(F12)
3. To recall a preset station, press the PRESET/FOLDER (UP or DOWN) button on the remote control to select
the stations that you have stored; the display will show “Preset # loaded” in DAB mode.
4. If you press a preset that hasn’t been allocated a station; In DAB mode, the display will show “Preset # free”.
Note: The stored stations will be saved into its memory and power off will not erase it. Storing a new
station into a preset location will erase the previously stored station in that location.
FM mode
ouch the FM/DAB touch plate or control
ouch the SKIP/TUNE SEARCH (UP or DOWN) touch plate or
press the SKIP/TUNE SEARCH (UP or DOWN) button on the remote
ouch the SKIP/TUNE SEARCH (UP or DOWN) touch plate or press the SKIP/TUNE SEARCH
(UP or DOWN) button on the remote control
ouch the touch plate or p control
STORING AND RECALLING STORED PRESET STATIONS
F6 F7 F8
F9 F10
F11 F12 F13 F14
DAB RESET
When you move the radio to another part of the country, your pre-tuned and stored DAB stations may no
longer be available. If this is the case then you will need to reset your radio back to its original factory
settings; to perform a DAB reset, please do the following:
1. Tress the DAB/FM button on the remote to select DAB mode.
2. T STOP/MENU ress the STOP/MENU/MONO/ST. button on the remote
once to enter into the “Setup menu”, then select the REPEAT/SELECT mode for selection.
3. When the display shows the “DAB Reset”, REPEAT/SELECT ress the
REPEAT/SELECT button on the remote once, the display will show“Press SELECT to confirm
reset …”.(F13)(F14)
4. T REPEAT/SELECT ress the REPEAT/SELECT button on the remote
again to confirm, the display will show “Scanning …” and it will perform DAB full scan function.
5. After the scan has finished, the radio will select and display the first alphanumerically found station.
Note: All of your stored DAB presets will be lost once the reset has taken place.
DAB DISPLAY MODES
During DAB mode, repeatedly press the CLOCK/DISPLAY button will cycle through the following display
modes:
ouch the FM/DAB touch plate or p control
ouch the touch plate or p control
touch the touch plate or p
control
ouch the touch plate or p control
Signal strength
DLS
The display will show a slide bar to indicate the signal strength, the stronger the signal, the longer the bar
will be from left to right.
DLS stands for Dynamic Label Segment which is a scrolling message that the broadcaster may include in
their transmissions. The message usually includes information such as programme details …etc.
This describes the style of the programme that is being broadcast.
Programme type