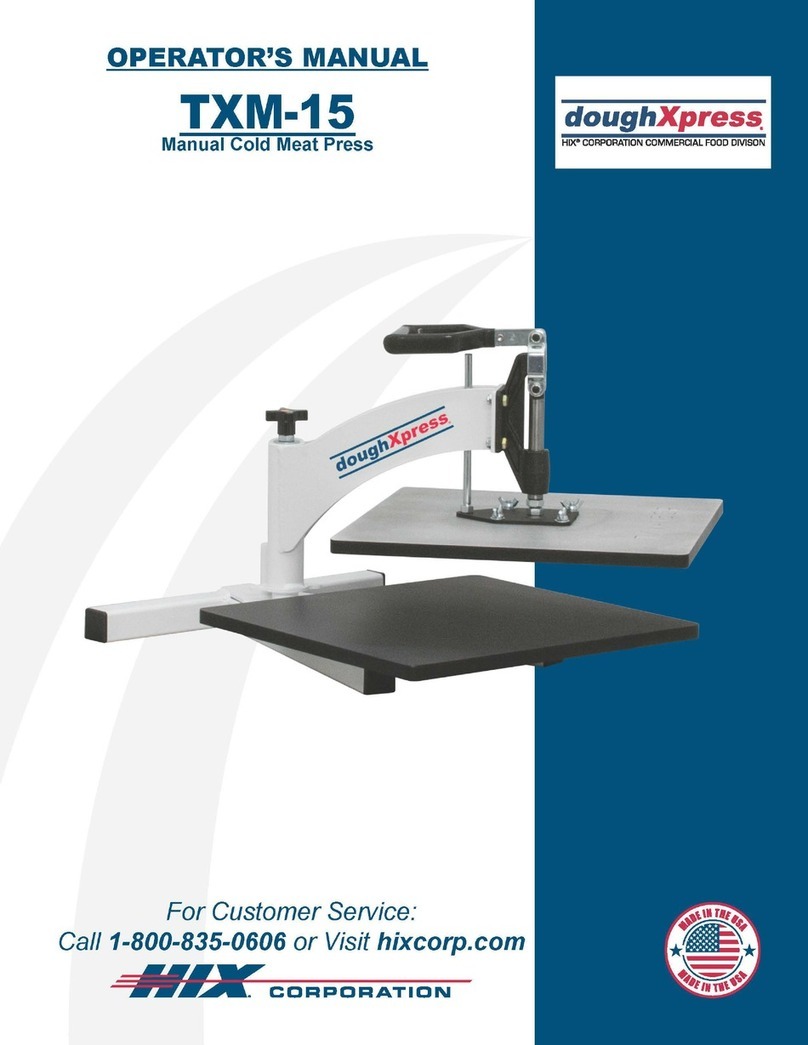
Hix DOUGHXPRESS TXM-15 User manual

OPERATOR'S
MANUAL
TXM-15
dough
Xpress.
15"x
15" Swing Away Manual Tortilla Press
HIX®
CORPORATION
COMMERCIAL
FOOO
OIVISON
■
dough
Xprou
For
Customer Service:
Call 1-800-835-0606
or
Visit
hixcorp.com
#11--
~CORPORATION

Receiving & Setup
........................
3
Operation
...............................
4
Dough Ball Weights.
......................
5
Cleaning & Maintenance.
..................
6
Dough Shrinkage.
........................
7
FrequentlyAsked Questions
...............
7
Troubleshooting
.........................
8
Parts
List
. . . . . . . . . . . . . . . . . . . . . . . . . . . . . . 1O
Warranty.
..............................
12
#II-~
CORPORATION
lntertek lntertek

UNPACKING
Remember to save all packing materials -including box, liner, and board.
You
may need these for shipping
your machine or if a repair
is
necessary
in
the future.
INSPECTION
Inspect your machine for hidden shipping damage. Contact the delivery company immediately, should you find
damage.
PLATEN SURFACE
Slight surface imperfections are a normal part ofthe aluminum casting process for the platens
on
your press.
These are not considered a defect and do not affect the functionality of the machine
in
any
way.
SHIPPING OR RETURNS
NOTE: Save
all
ofyour shipping/packing materials.
DO NOT RISK COSTLY SHIPPING DAMAGE. SHIP ONLY
IN
ORIGINAL BOX
1.
Fasten machine to plywood shipping base with bolts provided.
2.
Make sure the handle is pressed down so that the heat platen will not swing around during shipment.
3.
Place
in
original box, and put side liner and top liner
in
place. Fold
in
flaps and seal the box.
*Additional bottom boards, box,
and
liners
may
be obtained from
your
supplierfor a nominal cost.
INSTALLATION
1.
Remove tie down straps from press
2.
Lift press from box and place
on
counter top.
CAUTION: Heavy lifting can cause injury. We recommend two person lifting or use of a mechanical aid
when handling this press. Remember to always maintain natural curves of the back and bend knees to lift.
3.
Plug the cord of the press into a correctly grounded electrical outlet. The correct voltage
is
indicated
on
the
identification tag of the press.
4.
Remove wrap from handle and press.
NOTE: Upon receiving your new equipment, some debris or residue may be present
on
the aluminum
platen(s). Clean the platens per the instructions prior
to
first use.
WARNING:
Do
not use
an
extension cord to supply power to your press.
This machine
is
designed
in
accordance with the NSF/ANSI standard for sanitation to
be
sealed to the counter-
top to prevent the harborage of vermin and the accumulation of dirt and debris.
To
comply with this standard,
the end customer must seal around the perimeter of the base ofthe machine to the countertop with a food
grade RTV silicone sealant that
is
certified to the NSF/ANSI
51
standard such
as
Dow Corning #732 Multipur-
pose Sealant. A
NOTE: This symbol represents "Hot
Surfaces"~
3

SETTING UP YOUR PRESS
Move the on/off switch
to
"ON". *Up
is
"ON" and down
is
"OFF"
THICKNESS ADJUSTMENT
With the press
in
the open position, adjust the press to the desired thickness by turning
the thickness control knob located at the top/rear ofthe press. Thickness is reduced
by
turning the knob clockwise and increased by turning the knob counterclockwise as
indicated. Thickness setting should
be
set so that the heat head will lock down firmly
with your dough
in
place.
NOTE: Adjustments may be required from one product to another and will vary to
achieve the desired results,
~
THINNER
"'
THICKER
CAUTION: Excessive pressure can cause structural damage, voiding the machine warranty.
ADJUST TEMPERATURE
Temperature settings vary for different types and recipes of dough. As a general rule, pressing either corn
or flour tortillas, start at 325°F then raise or lower the temperature as needed until the desired results are
achieved.
1.
Turn the temperature control dial to the desired set temperature.
200°F
150°F 93°c 250°F
66°c
I
121
°c
100°F \ \
//
300°F
Js 0c
ON/I "
/14
9°C
\
-3
50°F
111°c
I
-------
r
'400
°F
204°c
OFF/0
TEMPERATURE CONTROL DIAL
2.
The heat indicating lamp will illuminate anytime the platens are heating and will cycle
on
and off after the
set temperature
is
reached to maintain set temperature.
HEAT INDICATING LIGHT
3.
A temperature indicating alarm will sound once the set temperature has been reached.
4

PRESSING TORTILLAS
Your tortilla press
is
designed for easy use and will reliably press your dough balls into tortillas. Thickness,
shape, and size
is
directly related to your dough balls, its shape the temperature of the dough, the recipe of
your dough, the type of lubricating food oil, as well as the settings of your machine.
You
should experiment with
the following to determine your desired results.
1.
Lightly lubricate the lower platen with olive
oil,
food/cooking
oil,
or other food release lubricant when
pressing wheat flour dough. Place corn tortilla dough balls between sheets of parchment paper to prevent
sticking.
TIP: Dough balls at room temperature give you the best results.
WARNING: Never attempt to press frozen dough. Personal injury and damage to your press could result.
2.
Place your preformed dough ball
on
the lower platen.
FLOUR TORTILLAS: Dough should be oiled sufficiently
in
storage trays.
CORN TORTILLAS: Place dough balls between sheets of parchment paper.
3.
Pull the handle down all the
way,
applying pressure, until it stops.
4.
After the designated time has elapsed, raise the handle
all
the way
up
and swing the upper platen away
from the lower platen.
5.
Remove your flatened dough. Tortillas can
be
moved to a tortilla warmer or skillet for finishing.
6.
Move on/off switch to "OFF" when you are finished using the press for the
day.
this will turn the power off to
the entire machine.
7.
Allow time for the press to cool. Clean press for preparation of next use
in
accordance with the instructions
in
this manual.
NOTE: Final size
is
determined by a combination of weight of dough ball and thickness setting.
DOUGH BALL WEIGHTS
TORTILLA SIZE WEIGHT OF THE DOUGH BALL
6"
1-1.5
oz.
8" 1.5-2.5
oz.
10" 2.5-3.25
oz.
12" 3.25-3.75
oz.
14" 4-4.5
oz.
16" 4.5-5
oz.
5

WARNING: Before cleaning, performing maintenance, or repairs make sure the machine is turned off and
unplugged.
*This appliance is
not
waterproof. Neverspray
or
pour
water
or
any
other cleaning solution onto this
appliance.*
CLEANING ALUMINUM UNCOATED PLATENS
1.
Unplug the machine and allow it to cool.
2.
Open the heat platen for easier access.
3.
Dampen a nonmetallic scrubbing sponge with a mild soap or detergent to remove any excess material from
the heat platen(s).
4.
Wipe clean with a dry cloth.
CLEANING PTFE (XYLAN) COATED PLATENS
1.
Unplug the machine and allow it to cool.
2.
Open the heat platen for easier access.
3.
Clean the PTFE coated platens with a mild soap and warm water applied with a soft cloth or sponge.
Do
not use steel wool, scrub sponges, kitchen or oven cleaners, or any other kind of abrasive materail. This
will damage the coating.
4.
Wipe clean with a dry cloth.
CLEANING THE OUTSIDE SURFACES OF THE MACHINE
Use a mild soap and warm water applied with a soft cloth or sponge.
Do
not use steel wool, scrub sponges,
kitchen or oven cleaners, or other abrasives that will damage the painted surface.
LUBRICATION
Your press requires lubrication every 15,000 cycles or every 6 months. Lubricate weekly
in
a heavy use pro-
duction environment. Use NSF/NLG12 rated food grade grease (such as Bel-Ray No-Tox #2 or equivalent). A
general purpose food grade machine
oil
spray
is
also acceptable such
as
CRC 03055 lubricant. Lubricate all
moving or hinged points.
CIRCUIT BREAKER RESETTING
Should the circuit breaker trip, simply allow the machine
to
cool for 2 minutes and then reset the circuit breaker
by
pressing the button back
in
to
allow the machine to come back
on.
If the circuit breaker continues to trip,
have an electrician diagnose the cause ofthe fault.
6

WAYS
OF
OVERCOMING THIS PROBLEM
1.
RECIPE: What is the percentage of water content
in
the dough? What
is
the percentage
of
oil content
in
the dough?
2.
MIXING: Mixing procedure, such as water temperature and mixing speed.
3.
DOUGH PREPARATION: What
is
the time between mixing and pressing? How is the dough being stored.
4.
PRESSING: What
is
the temperature of the dough when pressing? What
is
the temperature of the press
when pressing? How long is the dough being pressed?
FAQS
Q:
Why
won't
my
dough
press
to
size?
• Weight
of
the dough ball -not enough dough
• Set to thick -change thickness setting
• Dirty or unclean platens
Q:
Why
won't
my
dough
press
out
even?
• Dough ball placement
• Unlevel platens
Q:
Why
is
my
dough
coming
apart
when
I
press
it?
• Pressing too long with too much heat
• Not enough oil on dough ball
• Build up on platens
Q:
What
temperature
should
I
be
pressing
at?
• 275° -325°F
Q:
How
long
should
I
be
pressing
the
dough?
• 2 -3 seconds
Q:
Can
I
press
corn
tortillas?
• Yes -but you need to use either parchment or baking paper
...
a.
Place paper down
on
the platen
b.
Place dough ball(s)
on
paper
c.
Place another sheet of paper
on
top of dough ball(s)
d.
Press
Q:
Can
I
cook
the
tortillas
on
the
press?
• Yes -cooking the tortillas on the press can be done in the following manner
a.
Set press temperature 275° -325°
b.
Press dough ball(s) 2-3 second press
c.
Lift handle and leave tortillas
on
lower platen for 1 - 1:30 min.
d.
Turn tortillas over and leave
on
lower platen for 1 - 1:30 min.
on
second side.
e.
Remove
NOTE:
For faster production and a better finished product, it
is
recommend to use a two step process using a
tortilla press and tortilla warmer. 7

8
YES
i---------i
Has
the
breaker
been
tripped?
Reset
the
breaker.
Does
the
press
turn
on?
YES
NO
PRESS
WON'T
TURN
ON
Is
the
press
plugged
in?
NO
Plug
in
the
press.
Does
the
press
turn
on
now?
NO
Problem
Solved
YES
PRESS
IS
NOT
PRESSING
DOUGH
ENOUGH
Are
you
pressing
the
dough
YES
...------1
into
the
area(s)
as
outlined
i-------1
NO
in
the
owner's
manual?
With
no
dough
in
the
machine,
adjust
the
thickness
adjustment
so
that
with
the
handle
closed
the
platens
are
just
touching
each
other.
Does
the
alignment
between
the
upper
and
lower
platens
look
even?
NO
Take
a
folded
rag
or
towel
and
place
between
the
upper
and
lower
platens
where
they
are
touching
each
other
first.
Lower
the
upper
platen
and
apply
some
handle
pressure
Review
the
instructions
on
how
to
properly
press
dough
in
the
owner's
manual
for
your
machine.
to
attempt
to
bend
the
platens
back
into
alignment.
Remove
the
towel,
close
the
handle
i---
■
-j
and
see
if
the
alignment
has
improved.
Repeat
as
necessary
until
proper
alignment
is
restored.

PRESS
IS
OVERHEATING
YES
...,_
__
.....
Does
the
heat
light
stay
on
when
the
press
is
overheating?
Replace
the
thermostat
Problem
Solved
NO
Replace
the
relay
Problem
Solved
9

10

ITEM#I
PART#
TITLE
ITEM#I
PART#
TITLE
10349 CIRCUIT BKR 1-POLE PTR 25AST
2 10550 DECAL THICK THIN
3 10664 DECAL MADE
IN
USA
4 10793 BOLT 5/16-18x1.750
5 10963 DECAL, QR CODE DXP
6*
11431
DECAL, DOUGHXPRESS DOMED 3 X 1
7 11434 DECAL, FOR SERVICE 2 X
.5
8 13250 CORD GRIP HEYCO 1557 RDD201
9 14241 LAMP
ID
RED 220V 1/2" HOLE
10 14524 SCREW MCH 4-40X0.250 PHPH
11
14571 NUT 3/8-16 ZPS
12 14621 NUT 6-32 ZPS
13 14696
LOCKNUT1~"APPLBL50
14 14910 DECAL HOT SURFACE SYMBOL
15 15339 SCREW MACHINE 10-24 X .500 PHPH
16 16683 WASHER FLT .375x0.875x.078 ZPS
17 21482 SCREWTAP 8x0.500 PHPH
18 24732 WASHER FLT .344X0.688X.063 ZPS
19 30910 WASHER LOCK HEL SPR 5/16 ZP
20 33605 DECAL, UNPLUG MACHINE
21
37842 SWITCH ROCKER DPST POWER
22 40980 PLUG HOLE 3/4" STL
NI
PLATED
23 62898 KNOB PHENOLIC SWINGMAN
24 63320 BEARING WSHR .500x0.937x.031
25 63622 BEARING THRUST .500x0.937x.078
26* 69086 WIRE KIT TXM-15 220V
27 70128 WASHER FLT .125x0.313x.025 ZPS
28 70268 DECAL HIX I.D.
3"
X
3"
SILVER
29 70283 PLUG TUBE 1.5x1.5x.120 BLK
30 70426 CLAMP TOGGLE TXM15 SHOVEL DIP
31
7051035 TXM15 MAIN ARM STOP SLEEVE
32*
70611
MANUAL OWNERS TXM-15
33 70965 CONDUIT LTIGHT 1/4 LT-140
34 70966 CON CABLE GLAND MCG-1/2
35 70974 DECAL THERMOSTAT FOOD 400F
36
71011
M-DECAL DOUGHXPRESS
37 71057 RELAY SPST 40A220V
38 71498 BOLT 5/16-18x0.750
GS
39 71662 NUT 5/16-18 JAM NYLON INSERT ZPS
40 72231 TERM
BO
601-3-KT37,38,39
41
72495 CORDSET 220V 14/3 SJTOW6-20P
42 84368 RELAY SS 50A 90-280VAC INPUT
43 87056 NUT 1/2-13 JAM
44 9140020 SWG15 PLATEN
MNTWELDMENT
45 9141010 SWG15 PRESSURE ADJ ROD
46 9150030 TXM15 PIVOT ARM WELDMENT CURVED
47 9150050 TXM-15 CONTROL BOXASSEMBLY
48 9151053 FRAME WELDMENT TXM-15 / DXM-PB
49 9152500 M-TXM15ANTI ROTATION BOLT
50 9153002 ASSEMBLY, TXM15 UPPER PLATEN
51
9153003 ASSEMBLY, TXM15D LOWER PLATEN
52 9154042 TXM-15 CONTROL BOX COVER ANGLED
53 94854 KNOB SSAC TIMER (19800)
54* 9861175 PACKAGING TXM-15
11

BEFORE warranty repair you MUST get PriorAuthorization: Call 1-800-835-0606 Warranty will be voided otherwise.
doughXpress® will automatically register the equipment
on
the date
it
was shipped to you or your distributor. Ifthe
equipment was not purchased directly from HIX, but through a distributor (either domestic or foreign), please keep a copy
of
their sales invoice showing the serial number and date
it
was sold/shipped to you with this warranty.
In
this case, we will use the distributor's invoice date
as
the beginning warranty date. STAPLE A COPY OF YOUR
RECEIPT
TO
THIS WARRANTY and keep
in
a safe place to provide verification
of
your warranty should a problem occur.
Thank you.
Please fill
in
the following information and attach a copy
of
your receipt for your records.
Date Purchased:
________________
From:
___________________
_
Model#:
__________________
Serial#:
_________________
_
This warranty applies to equipment manufactured by the HIX Corporation (HIX), Pittsburg, Kansas, U.S.A. HIX warrants
to the original purchaser, the full line
of
doughXpress® product against defects
in
workmanship and material, except for
wear and tear for a period
of
one year parts and labor limited warranty
on
most items, there are selected items which may
carry a two year warranty (refer to owners manual.) All dough press carts, compressors, and accessories are warranted
for
90
days from the date
of
purchase. Repairs include parts and labor only, excluding
is
the following:
1.
Overtime Labor Rates
2.
Expedited Freight for Parts
3.
doughXpress® assumes
no
responsibility for down time or loss
of
product. All defective parts must
be
returned to
doughXpress® for credit. Repairs must
be
pre-authorized by doughXpress® prior to work commencing.
4.
Travel time
is
not covered by doughXpress®, unless pre-authorized by doughXpress®.
In
the event
of
a defect,
doughXpress®, at its option, will repair, replace or substitute the defective item at
no
cost during this period subject
to the limitations
of
insurance and shipping costs stated below.
This warranty does not cover normal wear and tear, damages due to accident, misuse/abuse, alterations or damage
due to neglect, or lack
of
proper lubrication or maintenance. doughXpress® shall not
be
responsible for repairs or alter-
ations made by any person without the prior written authorization by doughXpress®. This warranty
is
the sole and exclu-
sive warranty
of
doughXpress® and
no
person, agent, distributor, or dealer
of
doughXpress®
is
authorized to change,
amend or modify the terms set forth herein,
in
whole or
in
part.
In
the case
of
a problem with the equipment identified herein, doughXpress® should
be
contacted during regular busi-
ness hours to discuss the problem and verify
an
existing warranty. doughXpress® personnel will assist the customer to
correct any problems which can
be
corrected through operation or maintenance instructions, simple mechanical adjust-
ments, or replacement
of
parts.
In
the event the problem cannot
be
corrected by phone, and upon the issuance
of
a return
authorization by doughXpress®, the equipment shall
be
returned to doughXpress® or
an
authorized service representa-
tive. All insurance, packaging and shipment/freight costs are solely the responsibility
of
the customer, and doughXpress®
shall not
be
responsible for improper handling or damage
in
transit.
doughXpress® customer service personnel may
be
contacted for complete return authorization and reconditioning infor-
mation. This expressed warranty
is
given
in
lieu
of
any and all other warranties, whether expressed or implied, including
but not limited to those
of
merchantability and fitness for a particular purpose, and constitutes the only warranty made by
doughXpress®.
In
no
event shall doughXpress®' liability for breach
of
warranty extend beyond the obligation to repair or
replace the nonconforming goods. doughXpress® shall not
be
liable for any other damages, either incidental or conse-
quential, or the action
as
brought
in
contract, negligence or otherwise.
This warranty gives you specific legal rights and you may also have other rights which vary from state to state.
©2021
CORPORATION
1201
E.
27th Terrace• Pittsburg,
KS
66762 • U.S.A.
Phone: (800) 835-0606 • Fax: 620-231-1598
Web site: hixcorp.com • E-Mail: [email protected]
70611
rev H
Other manuals for DOUGHXPRESS TXM-15
1
Table of contents
Other Hix Power Tools manuals
