HKBN Unified Communications T61P User manual
HKBN Unified Communications
T61P SIP Phone User Guide

1
Contents
Getting Start of Phone ..........................................................................................2
Phone Package.................................................................................................2
Assembling the phone.......................................................................................2
SIP Phone Button .................................................................................................4
SIP Phone Screen Display....................................................................................5
Icon Instruction..................................................................................................5
Basic Call Features...............................................................................................9
Placing a Call ....................................................................................................9
Answering a Call ...............................................................................................9
Ending a Call...................................................................................................10
Volume Adjustment.........................................................................................10
Redial..............................................................................................................10
Call Mute and Un-mute ...................................................................................10
Call Hold and Resume ....................................................................................10
Call Transfer....................................................................................................11
Call Conference...............................................................................................11
Local Call History ............................................................................................12
Call Forwarding...................................................................................................12
Forward to Specific Number............................................................................12
Forward to Voice Mail......................................................................................12
Remote Call Forward ......................................................................................13
Voice Mail Service ..............................................................................................14
Voice Mail Indicator.........................................................................................14
Access Voice Mail...........................................................................................14
Voice Mailbox Main Menu...............................................................................14
Reply Message................................................................................................15
Advanced Call Features......................................................................................16
Call Waiting.....................................................................................................16
Speed Dialing..................................................................................................16
Do-not-disturb..................................................................................................17
Call pick up......................................................................................................17
Support...............................................................................................................18
Contact Us ......................................................................................................18

2
Getting Start of Phone
Phone Package
The following items are included in your package:
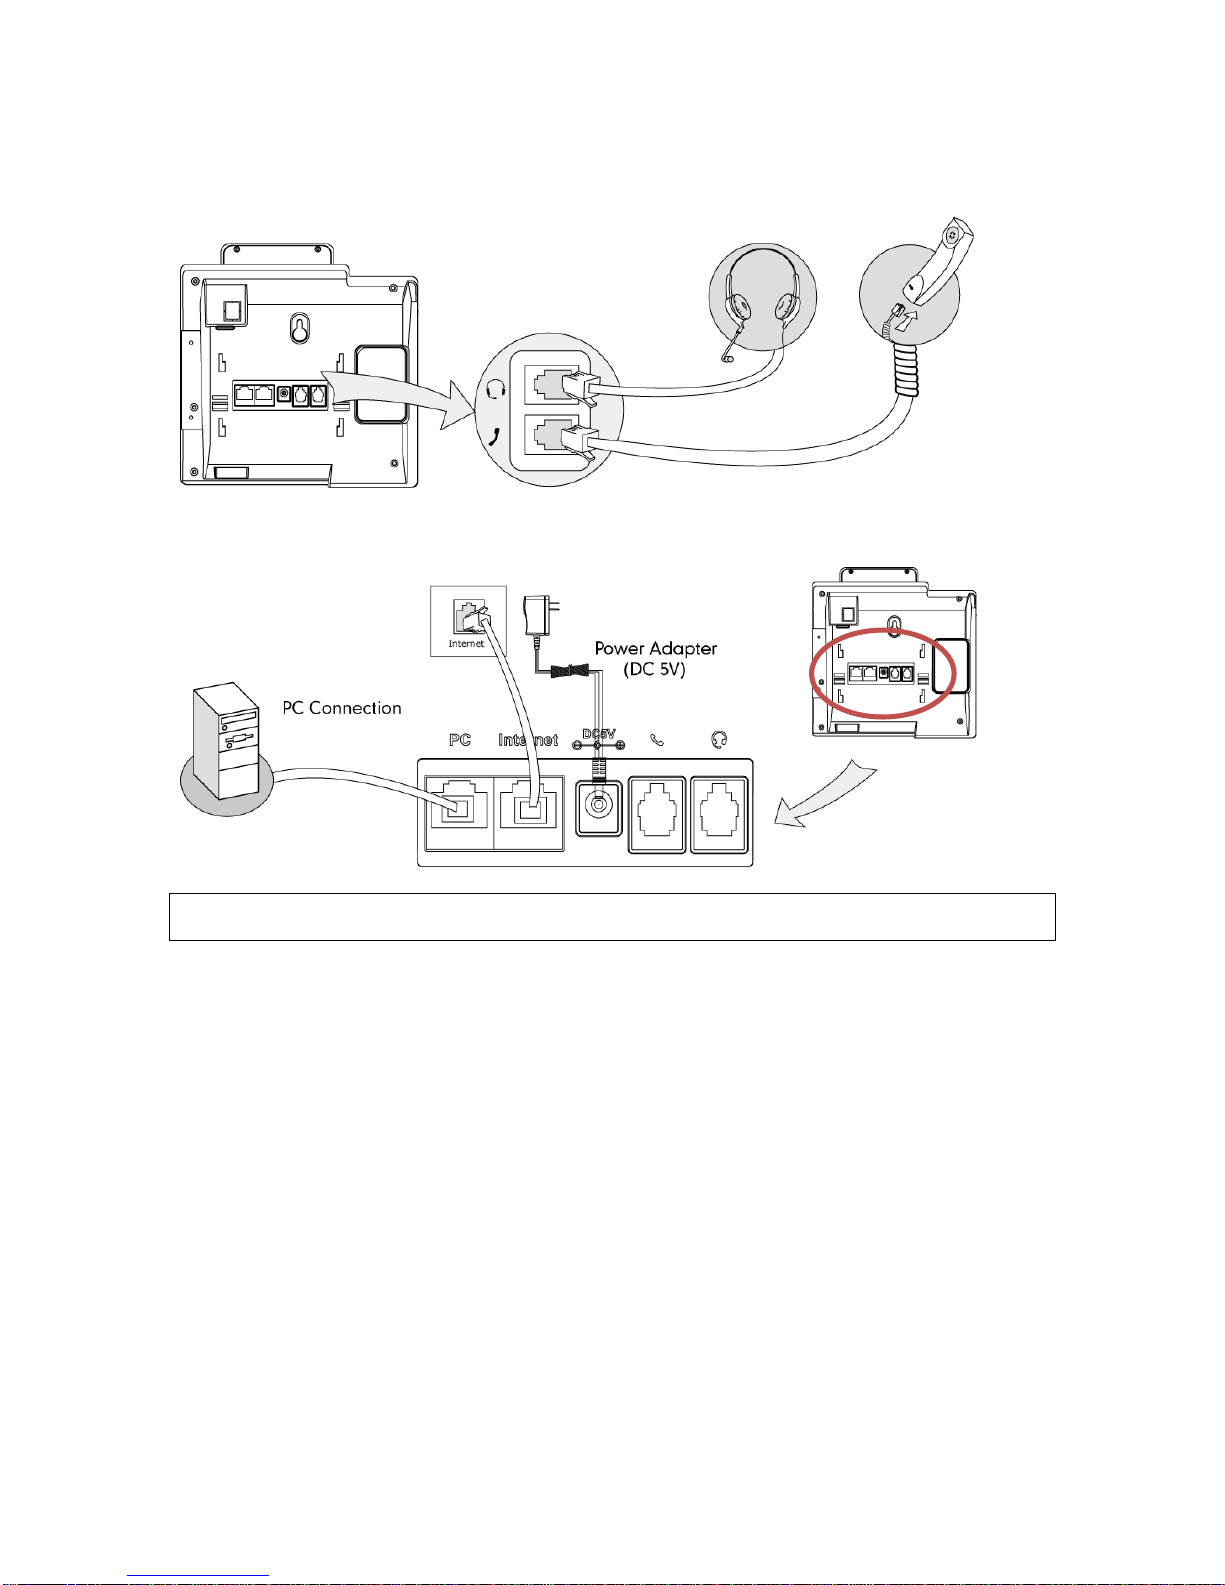
Assembling the phone
Attach the stand:
3
Connect the handset and optional headset:
Connect the network and power:
Notes: SIP Phone cannot function properly when there is a failure in power supply and internet
network outage
4
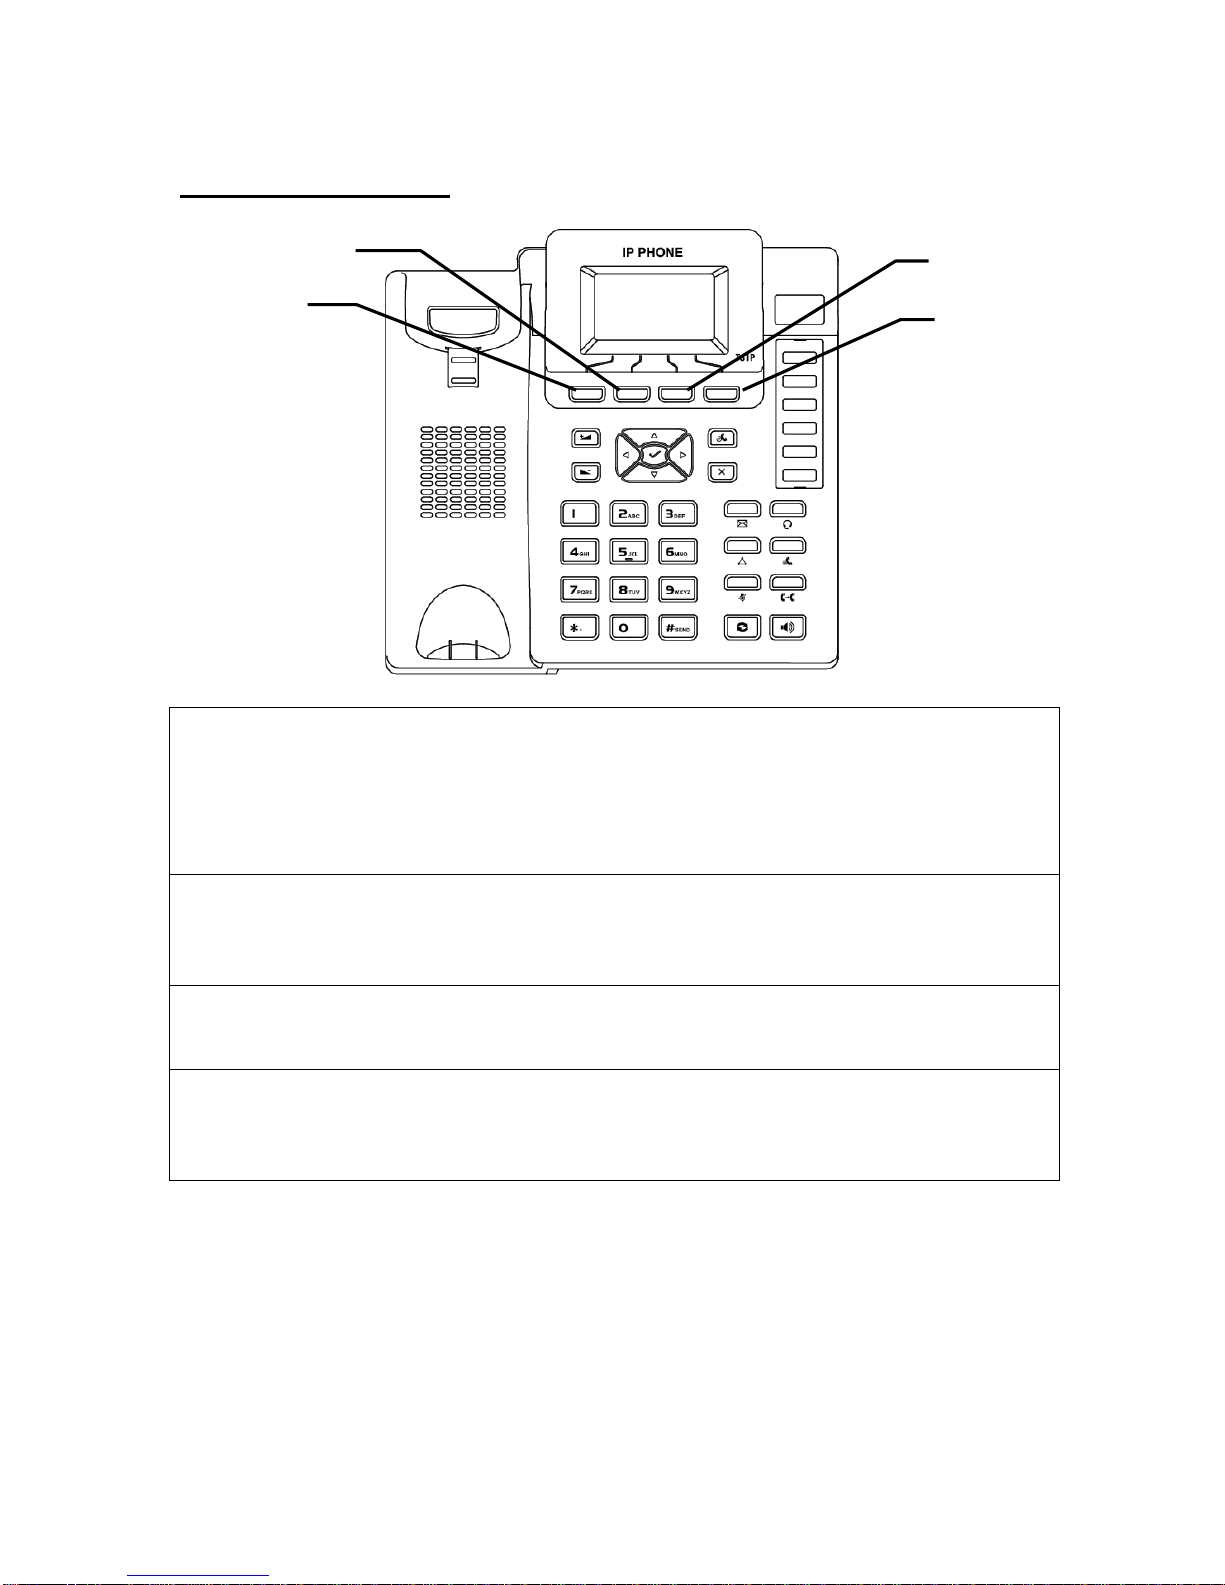
SIP Phone Button
Menu button :
-Press this button to open the menu.
-In menu, press this button to go to upper level / quite.
-Press this button to end call.
-Press this button to stop dialing.
Do not Disturb button :
-Press this button to enable DND mode, then the phone rejects all calls.
-Press careful to use this feature, in order to avoid missing the incoming call.
Call History button :
-Press this button to open the local call history menu.
Phonebook button :
-Press this button to open the phonebook.
P.S. This is the SIP phone’s local phonebook which will not synchronize
from/to UC Communication Manager.
Menu button
Do not Disturb button
Call History button
Phonebook button

5
SIP Phone Screen Display
Icon Instruction
The IP Phone displays different kinds of icons on its LCD. You can refer to the
following table for their meanings:
Icon
Description
Flashes when the Internet is disconnected / Network is
unavailable
Note: You can check the LAN cable connecting to the Internet port on the
phone
Account register failed
Note: Please contact HKBN for support
Account registering
Note: Please contact HKBN for support
Account register successful
You have Missed call(s)
Call in
Note: it will be displayed while checking the call history
Call out
Note: it will be displayed while checking the call history
You have enabled Call Mute function
Note: The other side will fail to hear any voice
You are holding a Call
You have new voice mail(s)
You have enabled the phoneset’s DND(Do not Disturb) functions
Note: All incoming calls will be rejected
You have enabled the phoneset’s Auto answer setting
Note: All incoming call will be auto answered. General users are not
recommended to activate this function
The phoneset is in handset mode
The phoneset is in headset mode
The phoneset is In Speakerphone mode
Ringer volume is 0
6
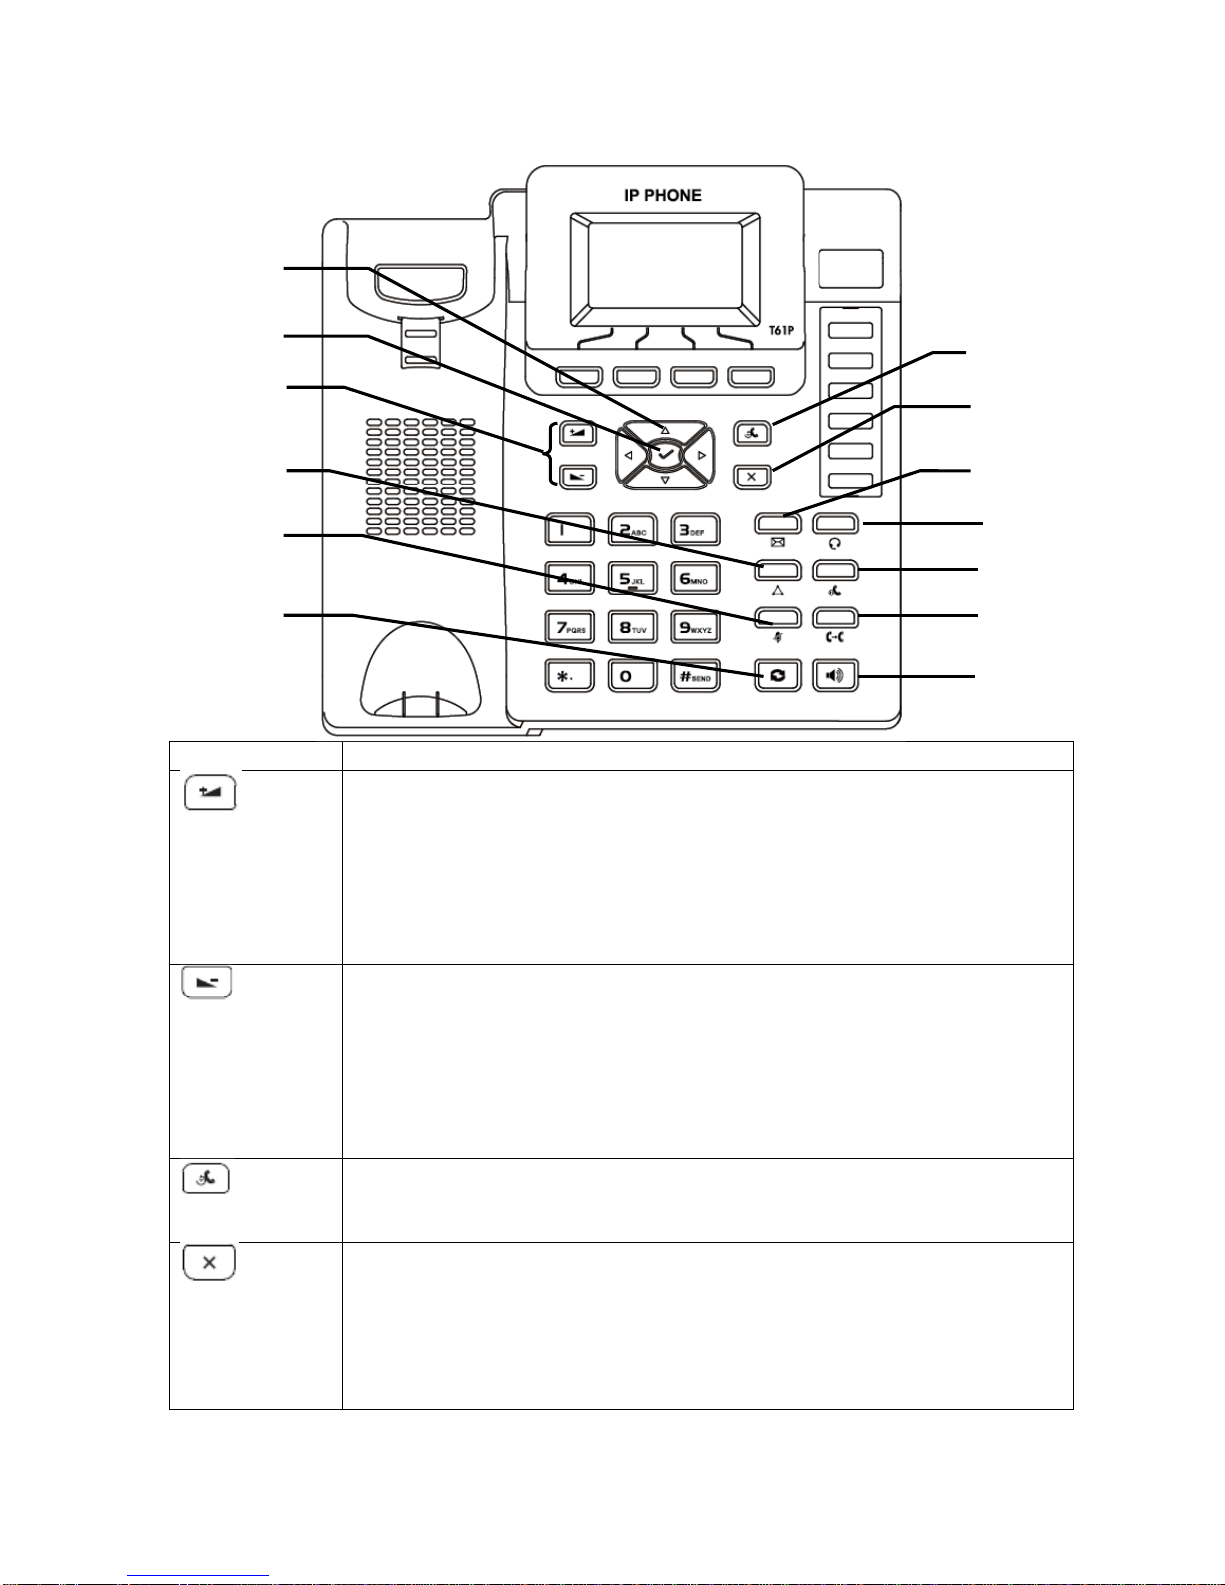
Button
Description
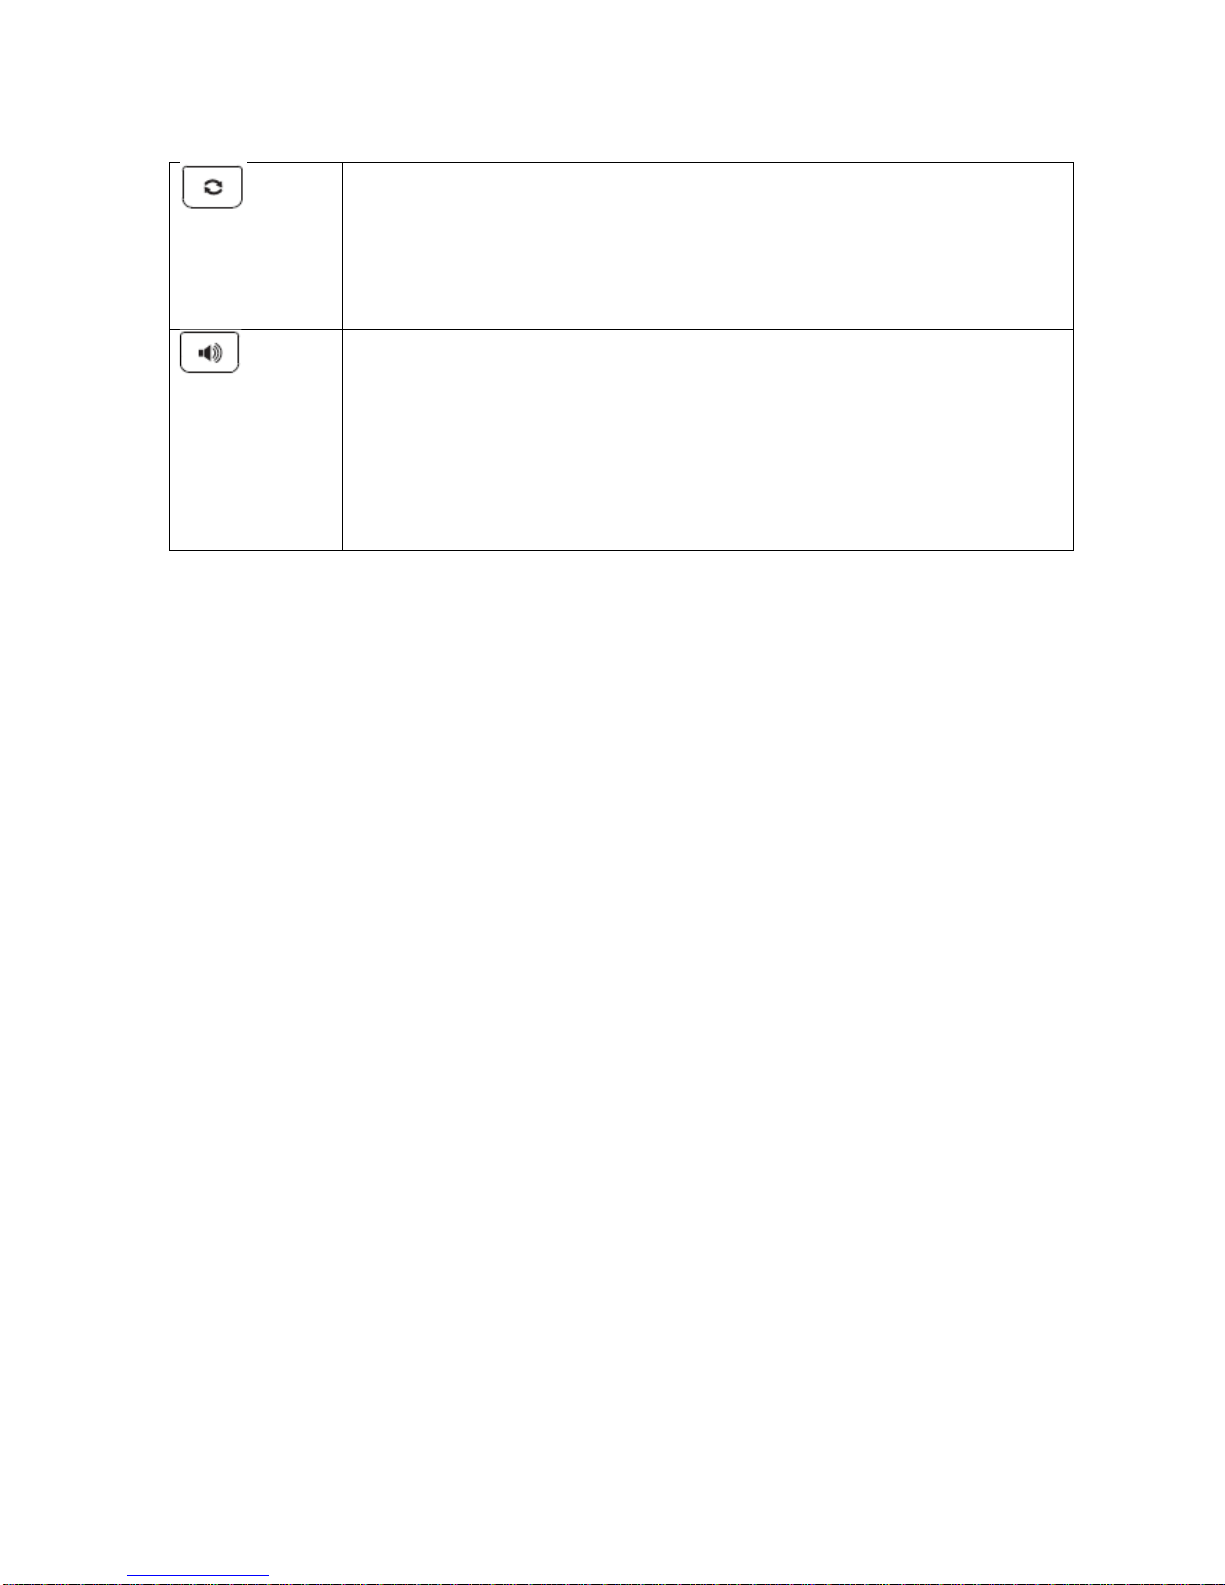
Volume button (Gain) :
-When the phone is idle, press this button to make the phone
ring louder, and increase button pressing sound.
-When the phone is pickup, press this button to gain handset
volume.
-When the speaker is active, press this button to gain speaker
volume.
Volume button (loss) :
-When the phone is idle, press this button to make the phone
ring quiet, and decrease button pressing sound.
-When the phone is pickup, press this button to lower handset
volume.
-When the speaker is active, press this button to lower speaker
volume.
Call History button :
-When the phone is idle, press this button to open all call
history.
Cross button :
-In call history, press this button to delete record.
-During number dialing, press this button to backspace.
-During user input, press this button to backspace.
-In function menu, press this button to cancel
Volume button
Call History button
Cross button
Direction button
Confirm button
Voice Mail button
Headset button
Call Hold button
Transfer button
Speaker button
Conference button
Mute button
Redial button
7
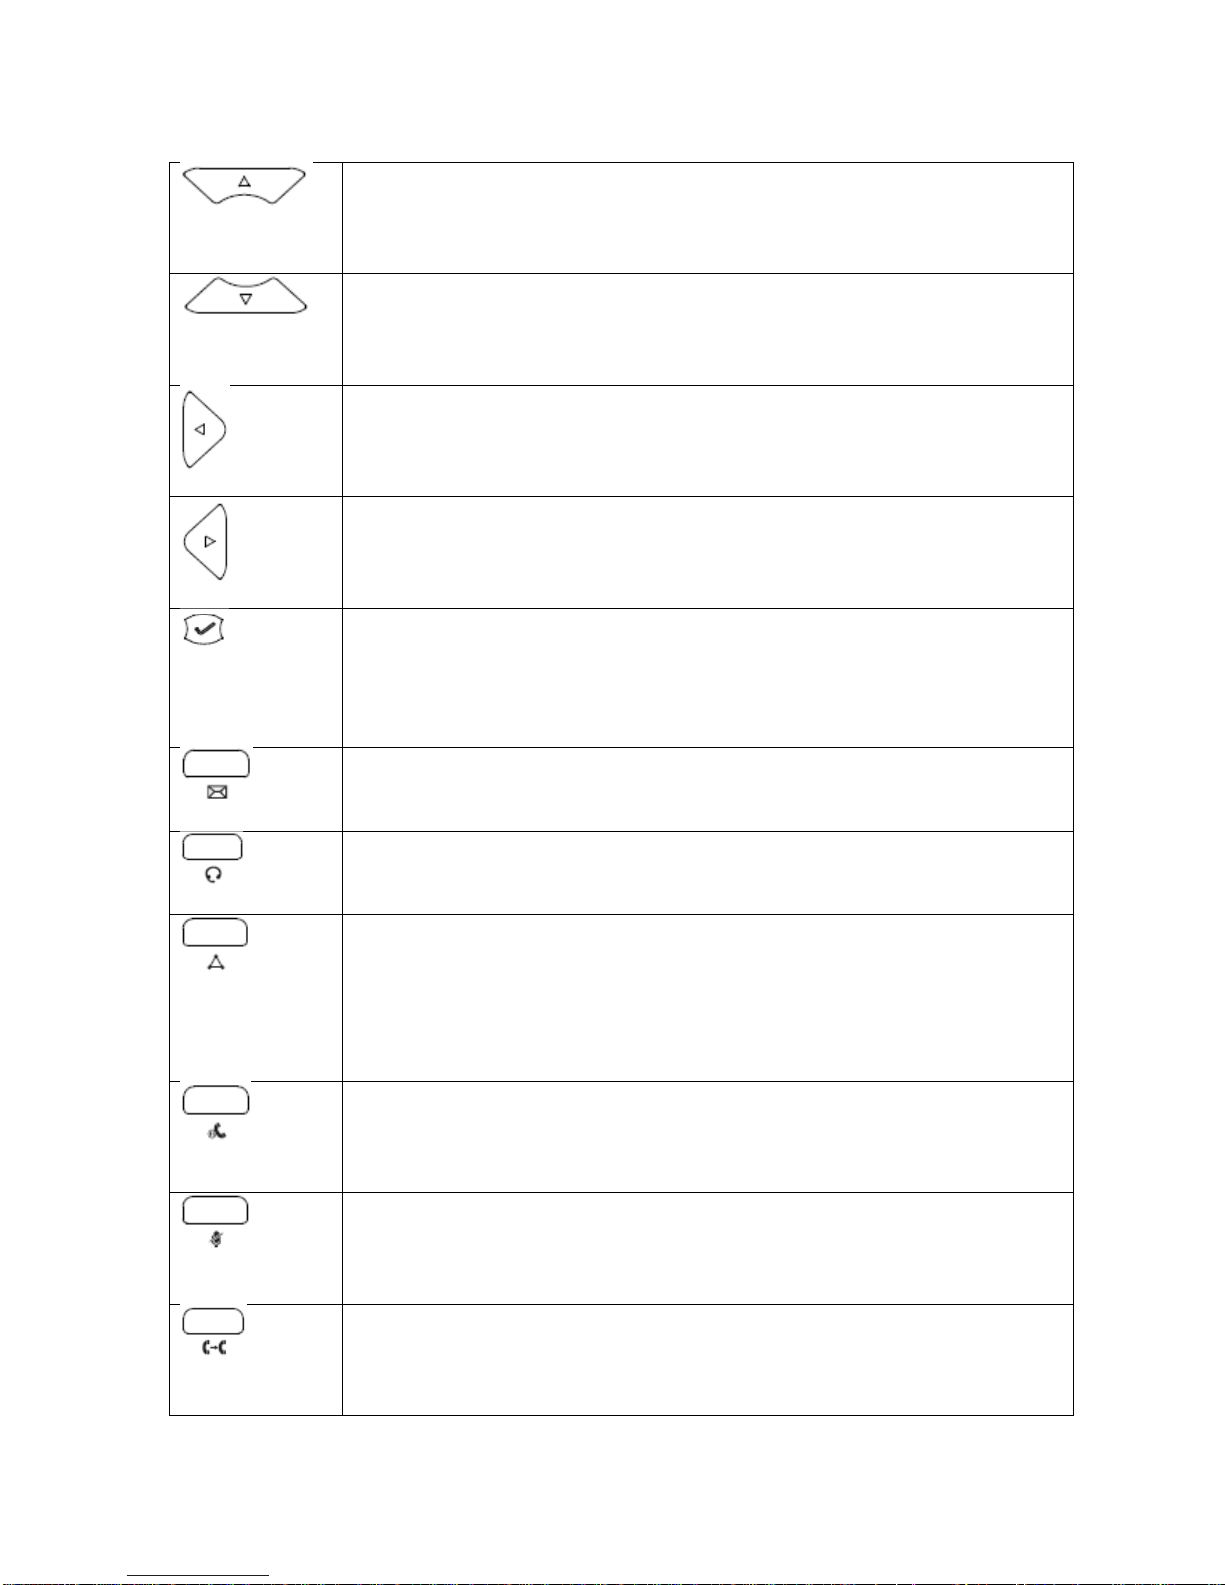
Direction Upward button :
-Select upper item in menu.
-Select waiting call.
Direction Downward button :
-Select lower item in menu.
-Select waiting call.
Direction Leftward button :
-Select left hand side item in menu.
-Move backward in user input.
Direction Rightward button :
-Select right hand side item in menu.
-Move forward in user input.
Confirm button :
-Press this button to confirm the selected item.
-Pick up the waiting call.
-Send the dialed number.
Voice Mail button :
-Press this button to listen the voice mail.
Headset button :
-Press this button to use the headset to make / receive call.
Conference button :
-Press this button to hold existing call, and start to dial 3rd party
number
-After 3rd party is dialed, press this button again to connect all 3
parties.
Call Hold button :
-Press this button to hold existing call.
-Press this button again to resume held call.
Mute button :
-Press this button to mute the microphone to stop other side to
listen the voice.
Transfer button :
-Press this button to hold existing call, and transfer to 3rd party.
-Dial 3rd party number after press this button once.
-Press this button again to transfer the call away the phone.
8
Redial button :
-When the phone is idle, press this button to check the dialed
number.
-When the phone is picked / speaker is open, press this button
to redial last number.
Speaker button :
-When the phone is idle, press this button to open / close
speaker.
-When the phone is ringing, press this button to answer call
with speaker.
-When the phone is taking, press this button to swap between
speaker and handset.
9
Basic Call Features
Placing a Call
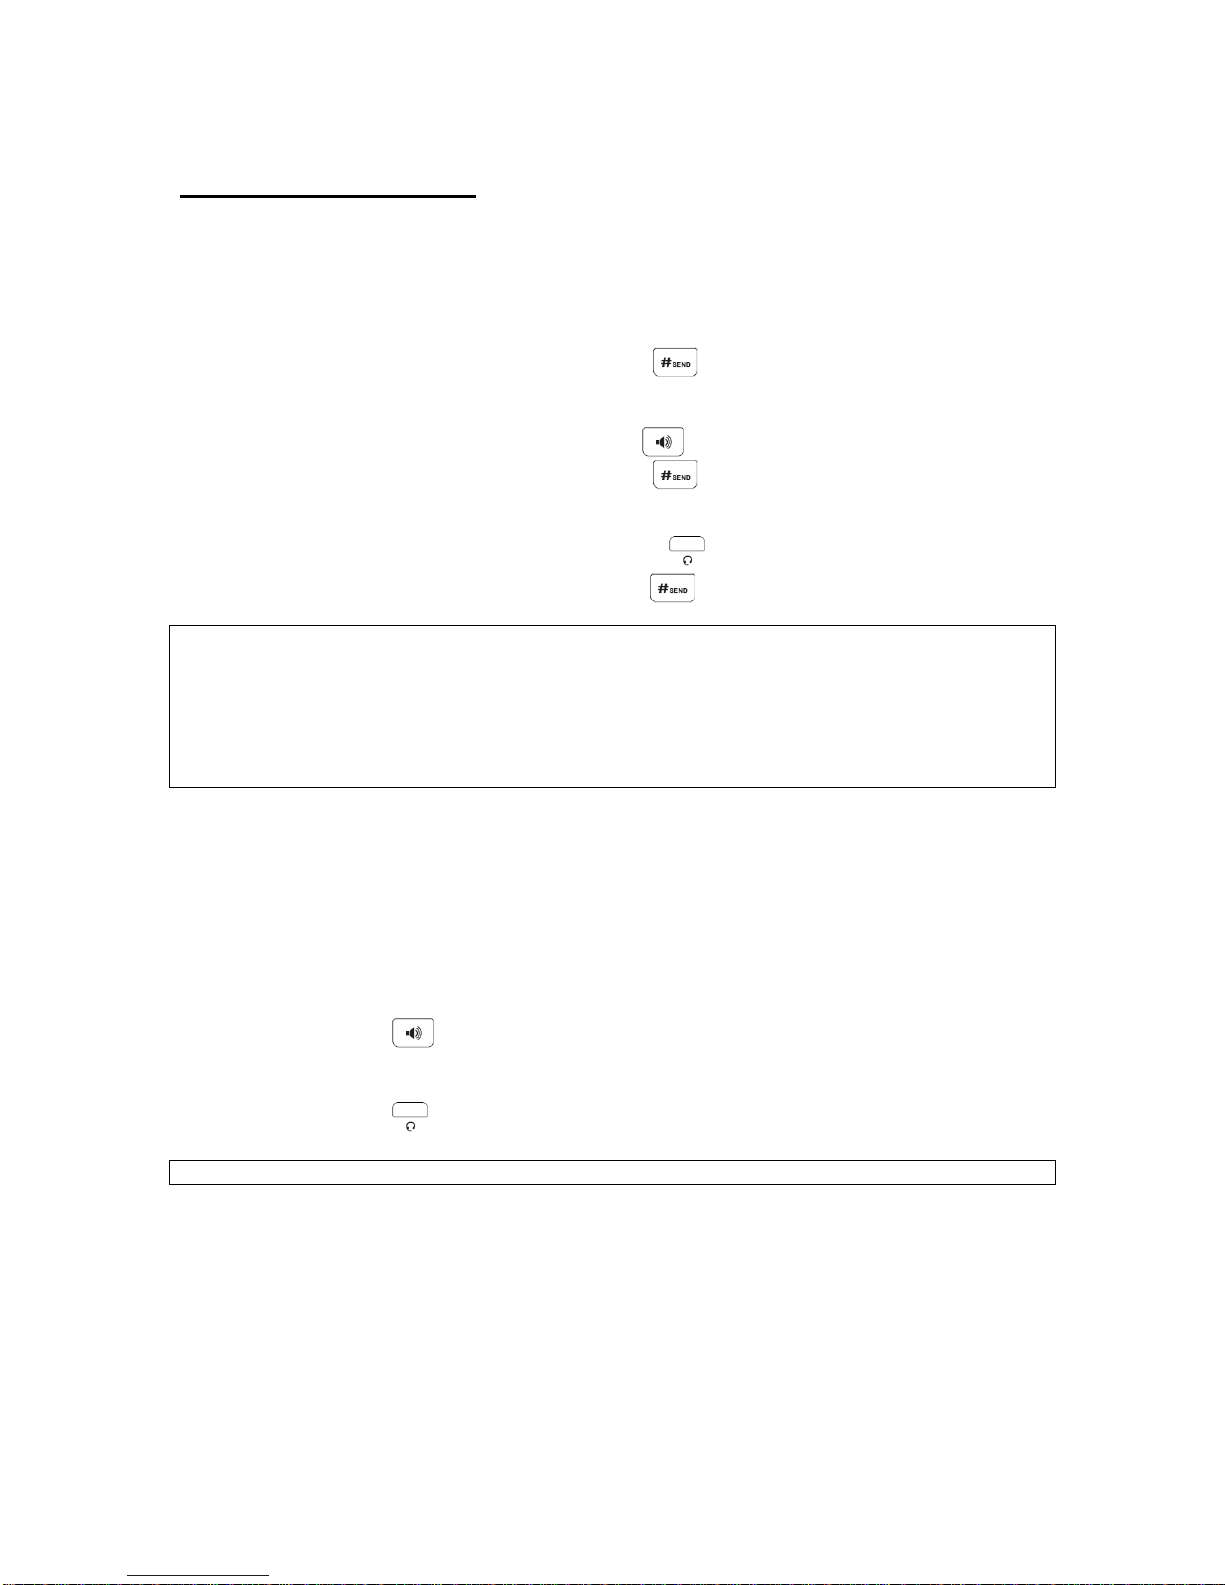
There are 3 ways for placing a new call:
Using the handset:
1. Pick up the handset.
2. Enter the number, and then press
Using the speakerphone:
1. With the handset on-hook, press
2. Enter the number, and then press
Using the headset:
1. With the headset connected, press to activate the headset mode.
2. Enter the number, and then press
Note:
For Centrex user (with Extension setting), to call an extension number, you are just need to enter
the target extension number. To call non-extension number, you need to add “9”before
telephone number, for example, 9+61234567.
During a call, you can alternate between headset, hands-free speakerphone and handset modes
by pressing the Headset key or the Speakerphone key or picking up the handset. Headset mode
requires a headset connected.
Answering a Call
There are 3 ways for answering a call:
Using the handset:
Pick up the handset.
Using the speakerphone:
Press
Using the headset:
Press
Note: You can reject an incoming call by pressing the X button.

10
Ending a Call
There are 3 ways for ending a call:
Using the handset:
Hang up the handset or press.
Using the speakerphone:
Press or
Using the headset:
Press
Volume Adjustment
You can also change the speaker / handset volume to suit your talking
environment:
1. Press or during a call to adjust the receiver volume of handset /
speakerphone / headset.
2. Press or when the phone is idle to adjust the ringer volume.
Redial
To redial the most recently dialed number:
1. Press to enter the Dialed Calls list, press or to select
the desired call, and then press or .
2. Press twice when the phone is idle to call the last dialed number.
Call Mute and Un-mute
1. Press to mute the microphone during a call.
2. Press again to un-mute the call.
Call Hold and Resume
To place a call on hold:
Press during an active call.
To resume the call, do one of the following:
If there is only a call on hold, press .
If there is more than one call on hold, press or to select
the desired call, and then press .
11
Call Transfer
You can transfer a call in the following ways:
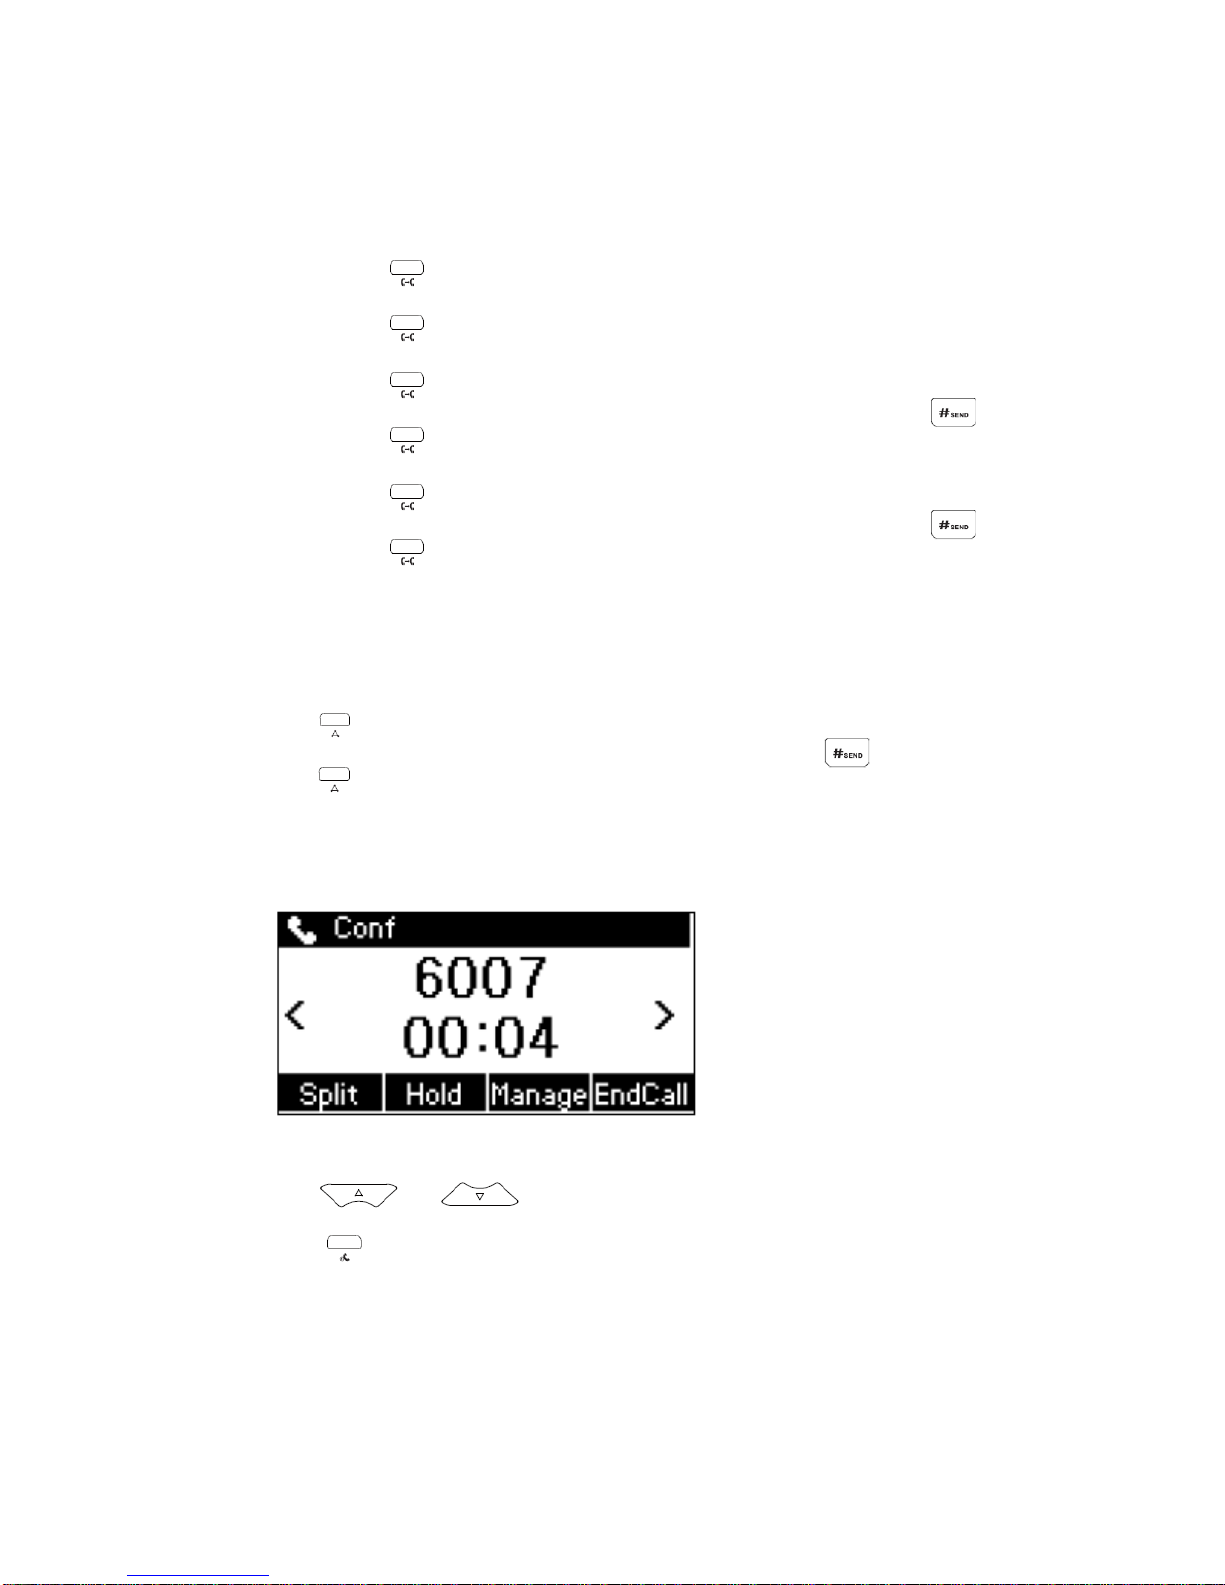
Blind Transfer
1. Press during an active call. The call is placed on hold.
2. Enter the number you want to transfer to.
3. Press
Semi-Attended Transfer
1. Press during an active call. The call is placed on hold.
2. Enter the number you want to transfer to, and then press
3. Press when you hear the ring-back tone.
Attended Transfer
1. Press during an active call. The call is placed on hold.
2. Enter the number you want to transfer to, and then press
3. Press when the second party answers.
Call Conference
Conference calling facilitates the communication between various parties.
Choose to add third party to an existing conversation anytime you wish.
1. Press during an active call. The call is placed on hold.
2. Enter the number of the second party, and then press
3. Press again when the second party answered. All parties are now
joined in the conference.
4. Hang up the handset to disconnect all parties.
You can split the conference by,
1. Press “Split” to split the conference call into 2 individual calls (both calls
will put on hold)
2. Press or to select the call you want to end
3. Press “End Call” to end the selected call
4. Press or “Resume” resuming the remaining call.

12
Local Call History
Your SIP Phone will store your missed, placed and received call log in the
internal call log memory.
1. Press when the phone is idle, press or to scroll
through the list.
2. Select an entry from the list, you can do the following:
Press to place a call.
Press to delete the entry from the list.
Call Forwarding
Forward to Specific Number
Use Call Forward to direct your calls to any local phone numbers of your choice:
P.S. Forwarding to a oversea phone number is not permitted
1. All Calls Forward
Activate: Press *81 + telephone number
Cancel: Press #81
2. Busy Calls Forward
Activate: Press *82 + telephone number
Cancel: Press #82
3. No Answer Calls Forward
Activate: Press *83 + telephone number
Cancel: Press #83
Note: You may need to add “9”before telephone number as similar to make outgoing call for
Centrex user. For example, *81+9+61234567.
Forward to Voice Mail
Use Call Forward to direct your calls to your voice mail on your phoneset:
1. All Calls Forward
Activate: Press *77
Cancel: Press #77
2. Busy Calls Forward
Activate: Press *78
Cancel: Press #78
3. No Answer Calls Forward
Activate: Press *79
Cancel: Press #79

13
Remote Call Forward
This feature allows users to activate and de-activate Call Forward via a remote
telephone.
1. Dial 21368282
2. Enter your telephone number
3. Enter your password
P.S. The default password is “0000”, and we strongly suggested customer to
change the password once the first attempt by calling to 21331238.
In the Remote Call Forward main menu, there are 2 options:
Press 1 to Set / Cancel All Call Forward
Press 2 to set Presence
Under Set / Cancel All Call Forward Menu:
Press 1 to set All Call Forward to specific number
Press 2 to set All Call Forward to voice mail
Press 3 to cancel All Call Forward
Under Set Presence Menu:
Press 1 to set Presence to Office
Press 2 to set Presence to Meeting
Press 3 to set Presence to Outside
Press 4 to set Presence to Scheduled
Note: For the detail of Presence, please refer to Communication Manager Portal Manual.
Note: It is highly recommended to use the access code to perform call forwarding rather than SIP
phone menu configuration.

14
Voice Mail Service
Voice Mail Indicator
The Message Waiting Indicator on the idle screen indicates that you have new
voice messages waiting. The Message key LED lights up.
Access Voice Mail
You can access Voice Mail by following 2 ways:
Press *90
Press
Then:
Enter your password + #;
P.S. The default password is “0000”, and we strongly suggested customer to
change the password once the first attempt by calling to 21331238.
Voice Mailbox Main Menu
Press "1" to listen to message;
Then,
Press "1" to rewind to the beginning of message;
Press "3" to go to the end of message;
Press "4" to replay message;
Press "5" to listen message information;
Press "6" to record message to reply;
Press "7" to delete message;
Press "8" to forward message to other mailbox;
Press "9" to save message;
Press "*" to go back to main menu;
Press “2”to change mailbox feature;
Then,
Press "1" to change password;
Press "2" to select greeting;
Then,
Press “1”to select system greeting;
Press “2”to select name announcement
greeting;
Press “3”to select personalized greeting;
Press "9" to activate / cancel password;
Then,
Press “1”to skip password feature;
Press “2”to activate password feature
Press "*" to go back to main menu;
Press “5”to retrieve message(s) from other voice mailbox;

15
Press “8”to change mailbox language;
Then,
Press "1" to select Cantonese;
Press "2" to select English;
Press “3”to select Mandarin;
Press "*" to go back to main menu;
Press “9”to change system greeting language for caller;
Then,
Press "1" to establish / change 1st language;
Press "2" to establish / change 2nd language;
Press "3" to establish / change 3rd language;
Press "*" to go back to main menu;
Press “*”to end;
Reply Message
Follow instruction to record the reply message;
Then,
Press "*" to erase message and record again;
Press any key to confirm the record;
After recorded message is confirmed:
Then,
Press "1" to send message;
Press "2" to replay recorded message;
Press “3”to erase and record message again;
Forward Message
Enter voice mailbox number you forward;
After number is entered:
Then,
Press "1" to send message;
Press “2”to forward message to other number;

16
Advanced Call Features
Call Waiting
Whenever you detect a Call Waiting Tone during a telephone conversation, an
incoming call is waiting to be answered.
To enable Call Waiting:
Press *68.
To pick the call:
Press .
To reject the call:
Press .
To disable Call Waiting:
Press #68.
You can disregard the new incoming caller per call basis:
Cancel Call Waiting before making a call,
1. Dial *87, and hear confirmation tone
2. When you hear dial tone again, dial outgoing call
Cancel Call Waiting during call
1. Press during an active call. The call is placed on hold.
2. Dial *87
3. After confirmation tone, press and to resume conversation
Note: It is highly recommended to use the access code to set call waiting rather than SIP phone
menu configuration.
Speed Dialing
Speed dialing allows you to store up your most frequently called numbers in
memory. Calls can be connected more quickly by dialing codes with either one or
two digits.
For one digit:
Press *92
Enter 1-digit code (2-9)
Dial a telephone number + #
For two digits:
Press *91
Enter 2-digit code (20-39)
Dial a telephone number + #
Note: It is highly recommended to use the access code to set speed dial rather than SIP phone
menu configuration.

17
Do-not-disturb
There are times when you just do not want to be interrupted. With Do-not-disturb,
you are still able to make outgoing calls.
Activate: Press *96
Cancel: Press #96
Note: It is highly recommended to use the access code rather than SIP phone DND button .
Call pick up
Give your colleagues a hand by picking their phones at your own telephone.
Press *84 to pickup a call within same pickup group
Press *85 + ringing extension number to pickup a call out of the pickup
group
Note: Pickup group need to be created first. Please contact HKBN for feature amendment.

18
Support
Contact Us
Business Customer Service Hotline:
128 180
Technical Support Hotline:
2131 2131
Email address:
Website:
http://hkbnes.net
Table of contents
Popular IP Phone manuals by other brands


Ubiquiti
Ubiquiti UniFi VoIP Phone Touch quick start guide

Dynamix
Dynamix 530 user manual

ZyXEL Communications
ZyXEL Communications Prestige P-2000W user guide

Alcatel-Lucent
Alcatel-Lucent Alcatel 8 Series IPTouch 4068 instruction manual

Panasonic
Panasonic KX-UT123 user manual

Polycom
Polycom VVX 300 user guide


