HKBN Cisco 9971 User manual

Cloud Voice S Service
Remote Extension S (Video)
Cisco 9971 IP Phone User Guide
(Version 5.0)
HKBN Enterprise Solutions is the brand / trading name of HKBN Enterprise Solutions Limited
and/or HKBN Enterprise Solutions HK Limited

CLOUD VOCIE S Serivce Remote Extension S (Video) –Cisco 9971 IP Phone
Version 5.0
2
Table of Content
1Phone Set Features and Functions......................................................................3
1.1 Operation for IP Phone 9971 ......................................................................................... 3
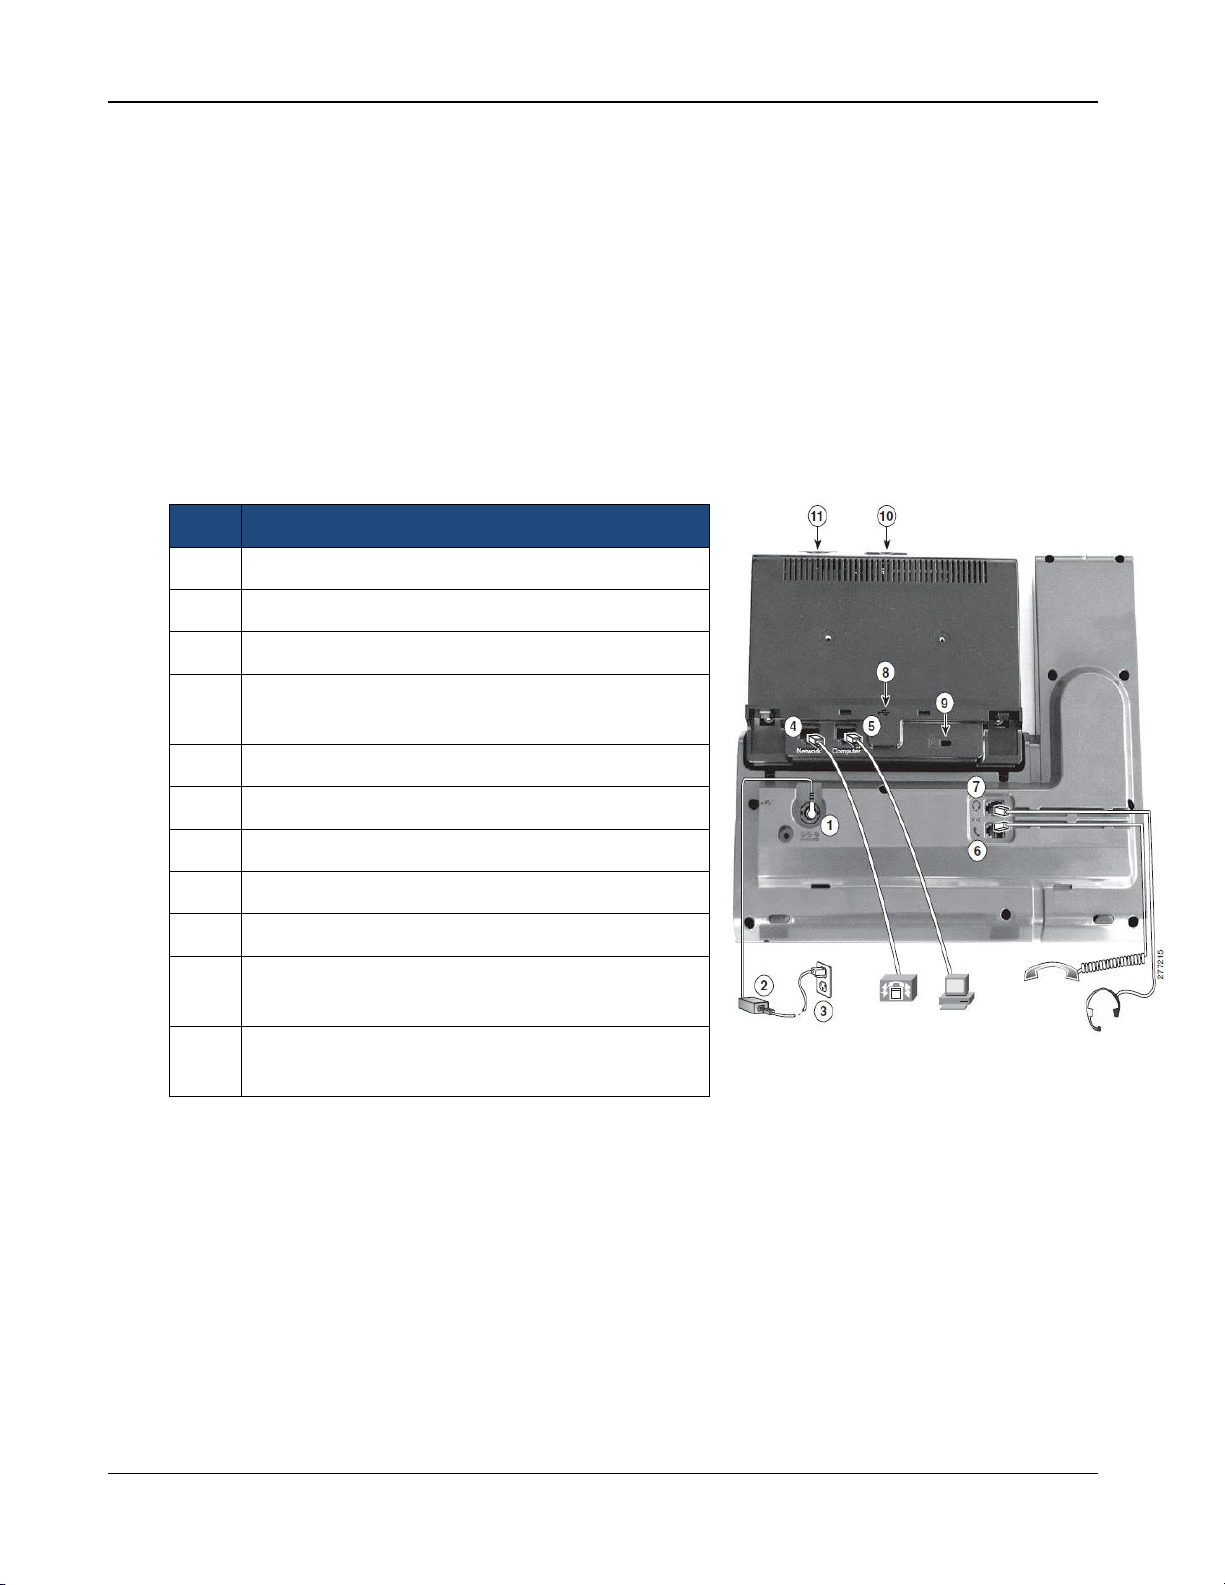
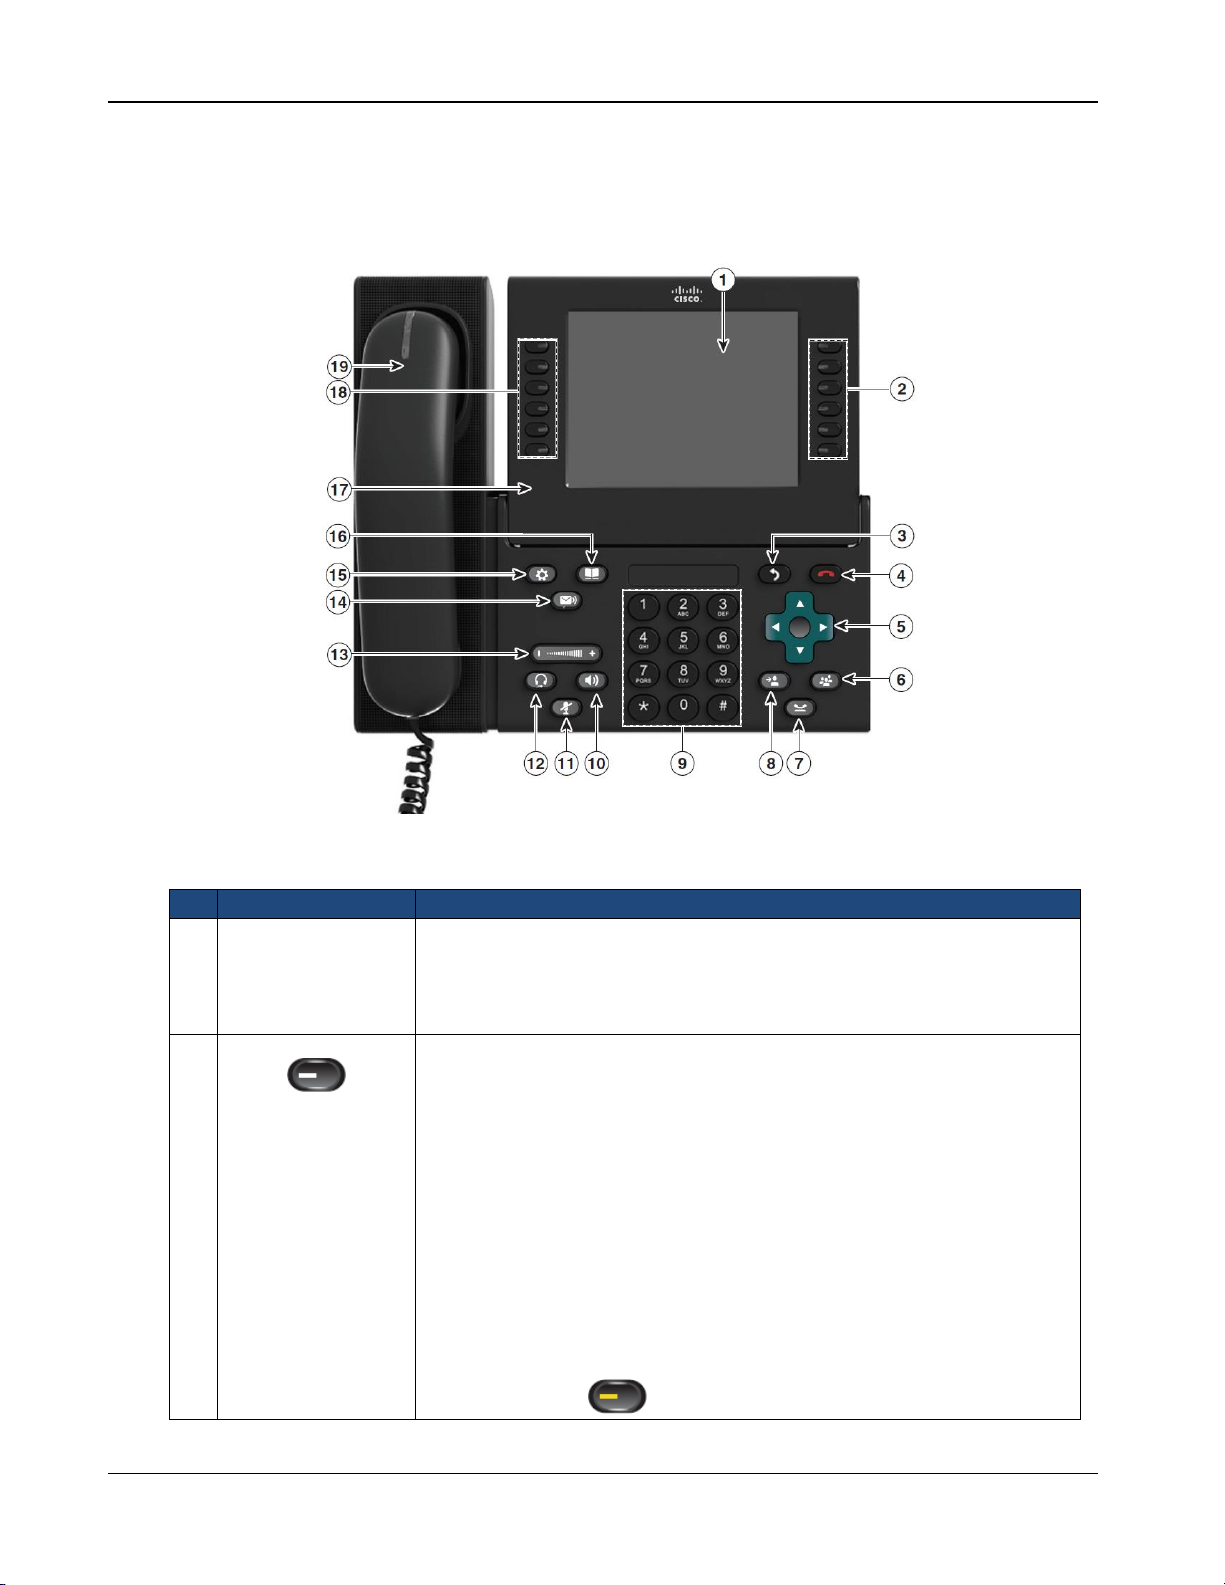
1.2 Location of Control........................................................................................................ 4
2Quick Installation Procedures ..............................................................................7
3Preference Setup.................................................................................................10
3.1 Adjust Brightness......................................................................................................... 10
3.2 Adjust Ringtone ........................................................................................................... 10
3.2.1 Change Volume .................................................................................................... 10
3.2.2 Change Ringtone .................................................................................................. 10
3.3 Adjust Wallpaper ......................................................................................................... 11
4Basic Features.....................................................................................................12
4.1 Placing a Call............................................................................................................... 12
4.2 Answering a Call.......................................................................................................... 12
4.3 Ending a Call................................................................................................................ 12
4.4 Muting a Call ............................................................................................................... 13
5Call Management Features .................................................................................13
5.1 Putting a Call on Hold.................................................................................................. 13
5.2 Using Call Waiting....................................................................................................... 13
5.3 Transferring a Call to another Party............................................................................. 13
5.4 Redialing the Last Number Dialed............................................................................... 14
5.5 Forwarding Calls to another Phone.............................................................................. 14
5.5.1 Setting up Call Forwarding from your IP Phone .................................................. 14
5.5.2 Setting up Call Forwarding from your mobile...................................................... 14
5.5.3 Setting up Call Forwarding via Internet ............................................................... 15
5.6 Placing a Conference Call............................................................................................ 15
5.7 Call Pickup................................................................................................................... 16
5.7.1 Call Pickup within your Group............................................................................. 16
5.7.2 Directed Call Pickup (Specific Group Member) .................................................. 16
6. VoiceMail Service (iVoiceMail Plus).....................................................................17
6.1 Activating VoiceMail....................................................................................................... 17
6.1.1 Activating VoiceMail on your IP Phone................................................................ 17
6.1.2 Remote Activation of VoiceMail........................................................................... 17
6.2 Accessing VoiceMail...................................................................................................... 17
6.3 Remote Access to VoiceMail.......................................................................................... 18
6.4 Retrieval of VoiceMail via Outlook 2000/ 2003/ 2007/ 2010/ 2013.............................. 18
7VoiceMail Service (eVoiceMail)...........................................................................19
7.1 Activating VoiceMail................................................................................................... 19
7.11 Activating VoiceMail on your IP Phone................................................................. 19
7.12 Remote Activation of VoiceMail............................................................................ 19
7.2 Accessing VoiceMail...................................................................................................... 19
7.3 Remote Access to VoiceMail.......................................................................................... 20
8Using Phone Log.................................................................................................22
8.1 Viewing and Dialing from the Phone Log................................................................... 22
8.2 Deleting Call Record from Phone Log......................................................................... 22
9Password Management.......................................................................................23
9.1 Change The Cloud Voice S Password ......................................................................... 23
9.2 Change The IP Phone PIN........................................................................................... 24

CLOUD VOCIE S Serivce Remote Extension S (Video) –Cisco 9971 IP Phone
Version 5.0
3
The Remote Extension service enabled by Cisco Unified IP Phone 9971 include a
higher-resolution, fully backlit (VGA) color and touch-screen display, a USB port for
peripherals, Gigabit Ethernet network and pc switch ports, and High-definition (HD) voice
support, creating a more productive user experience for multimedia application
engagement.
1 Phone Set Features and Functions
1.1 Operation for IP Phone 9971
Item
Description
1
DC adaptor port (DC48V).
2
AC-to-DC power supply.
3
AC power wall plug.
4
Network port (10/100/1000 SW) with IEEE 802.3af
and 802.3at power enabled.
5
Computer port (10/100/1000 PC) connection
6
Headset connection (optional).
7
Analog headset connection
8
USB port
9
Anti-theft security lock connector
10
Camera pin holes (for Cisco Unified Video
Camera)
11
Secure Digital I/O (SDIO) slot (not used for this
release)
Notes: IP Phone 9971 cannot function properly when there is a failure in power supply.

CLOUD VOCIE S Serivce Remote Extension S (Video) –Cisco 9971 IP Phone
Version 5.0
4
1.2 Location of Control
Item
Description
1
Phone screen
Shows information about your phone, including directory number, call
information (for example caller ID, icons for an active call or call on hold)
and available softkeys.
Phone screen items, such as menu options and softkeys, are touch-
sensitive.
2
Session buttons
Each corresponds with an active call or a call function. Pressing the
button takes the default action:
• Active calls—Pressing the button takes the default action for an active
call. For example, pressing the session button for a ringing call
answers the call and pressing the button on a held call resumes the
call. Session information, such as caller ID and call duration, appears
on the phone screen next to the session button.
• Call functions—When a session button is not being used for an active
call, it can be used to initiate functions on the phone, as indicated by
the adjacent phone screen icons. For example, pressing the session
button can display missed calls, take the phone off hook, or dial your
voice-messaging system (with a Voicemail icon). Color LEDs reflect
the call state. LEDs can flash (blink on and off rapidly), pulse
(alternately dim and brighten), or appear solid (glow without
interruption).
• Flashing amber —Ringing call. Pressing this button answers

CLOUD VOCIE S Serivce Remote Extension S (Video) –Cisco 9971 IP Phone
Version 5.0
5
the call.
• Solid green —May be a connected call or an outgoing call that
is not yet connected. If the call is connected, pressing this button
displays the call details or the participants of a conference call. If the
call is not yet connected, pressing this button ends the call.
• Pulsing green —Held call. Pressing this button resumes the
held call.
• Solid red —Shared line in-use remotely. Pressing this button
allows you to barge in on the call (if Barge is enabled).
• Pulsing red —Shared line call put on hold remotely. Pressing
this button resumes the held call. (The positions of the session
buttons and feature buttons can be reversed on phones that use a
locale with a right-to-left reading orientation, such as Hebrew and
Arabic.)
3
Back button
Returns to the previous screen or menu.
4
Release button
Ends a connected call or session.
5
Navigation pad and
Select button
The four-way Navigation pad allows you to scroll through menus,
highlight items, and move within a text input field. The Select button
(center of the Navigation pad) allows you to select a highlighted item.
The Select button is lit (white) when the phone is in power-save mode.
6
Conference button
Creates a conference call.
7
Hold button
Places a connected call on hold.
8
Transfer button
Transfers a call.
9
Keypad
Allows you to dial phone numbers, enter letters, and choose menu items
(by entering the item number).
10
Speakerphone
button
Selects the speakerphone as the default audio path and initiates a new
call, picks up an incoming call, or ends a call. During a call, the button is
lit green. The speakerphone audio path does not change until a new
default audio path is selected (for example, by picking up the handset). If
external speakers are connected, the Speakerphone button selects
them as the default audio path.
11
Mute button
Toggles the microphone on or off during a call. When the microphone is
muted, the button is lit red.
12
Headset button
Selects the headset as the default audio path and initiates a new call,
picks up an incoming call, or ends a call. During a call, the button is lit
green. A headset icon in the phone screen header line indicates the
headset is the default audio path. This audio path does not change until
a new default audio path is selected (for example, by picking up the
handset).
13
Volume button
Controls the handset, headset, and speakerphone volume (off hook) and
the ringer volume (on hook). Silences the ringer on the phone if an

CLOUD VOCIE S Serivce Remote Extension S (Video) –Cisco 9971 IP Phone
Version 5.0
6
incoming call is ringing.
14
Messages button
Dials to retrieve your Voicemail messages.
15
Applications button
Opens/closes the Applications menu. Depending on how your system
administrator sets up the phone, use it to access applications such as
call history, preferences, and phone information.
16
Contacts button
Opens/closes the Contacts menu. Depending on how your system
administrator sets up the phone, use it to access personal directory,
corporate directory, or call history.
17
Phone display
Can be positioned to your preferred viewing angle.
18
Programmable
feature buttons
(also called feature
buttons)
Each corresponds with a phone line, speed dial, and calling feature.
Pressing a button for a phone line displays the active calls for that line. If
you have multiple lines, you may have an All Calls button that displays a
consolidated list of all calls from all lines (oldest at the top). Then it is
recommended that you keep your phone in the All Calls view. Color
LEDs indicate the line state:
• Amber —Ringing call on this line
• Green —Active or held call on this line
• Red —Shared line in-use remotely
(The positions of the session buttons and feature buttons can be
reversed on phones that use a locale with a right-to-left reading
orientation, such as Hebrew and Arabic.)
19
Handset with light
strip
The handset light strip lights up to indicate a ringing call (flashing red) or
a new voice message (steady red).

CLOUD VOCIE S Serivce Remote Extension S (Video) –Cisco 9971 IP Phone
Version 5.0
7
2 Quick Installation Procedures
Remote Extension offers an IP Phone for you to setting up in non-coverage
remote offices or homes. Follow below steps to connect the IP Phone to a
DHCP (Dynamic Host Configuration Protocol) broadband.
A. Footstand Installation
1. Insert the curved connectors into the lower slots.
2. Lift the footstand until the connectors snap into the upper slots.
B. Physical Network Connection Setup
1. Connect the IP Phone to Power Adaptor with the power supply.
2. Connect the LAN Cable to the Network port of the IP Phone and the
Internet router.
3. Connect the Handset to the IP Phone.
4. Remove the protective plastic from the camera lens and body.

CLOUD VOCIE S Serivce Remote Extension S (Video) –Cisco 9971 IP Phone
Version 5.0
8
5. Remove the small plastic cover located on the topside of the phone
display.
6. With your phone idle, slide the camera‟s USB connector into the phone‟s
USB port (back of phone display).
7. After the phone confirms installation.
Note: IP Phone 9971 cannot be functioned when there is a failure in power supply
C. VPN Setup
1. Press the Application button
2. Select the VPN application
3. Turn on the VPN

CLOUD VOCIE S Serivce Remote Extension S (Video) –Cisco 9971 IP Phone
Version 5.0
9
4. Enter your User ID (cv + your Cloud Voice S Number, e.g. your Cloud
Voice S Number is 31234567, your User ID is cv31234567)
5. Enter your Password (your Cloud Voice S Number)
6. Press Sign In soft key

CLOUD VOCIE S Serivce Remote Extension S (Video) –Cisco 9971 IP Phone
Version 5.0
10
3 Preference Setup
3.1 Adjust Brightness
1. Press the Applications button .
2. Select Preferences. (Use the Navigation bar and button to scroll and
select.)
3. Select Brightness.
To increase brightness, press the Right arrow on the Navigation bar
To decrease brightness, press the Left arrow on Navigation bar
4. Press the Save soft key to confirm the brightness level, or just press the
Cancel soft key to exit without changing the setting.
3.2 Adjust Ringtone
3.2.1 Change Volume
1. Press the Volume button to adjust the loudness of the
ringtone.
3.2.2 Change Ringtone
1. Press the Applications button .
2. Select Preferences. (Use the Navigation bar and button to scroll and
select.)
3. Select Ringtone and different types of ringing tone are displayed.
4. Press the Play soft key to play a sample.
5. Press the Set soft key to select the ringtone.
6. Press the Apply soft key to confirm your selection, or press the Cancel
soft key to go back to the Ringtone screen.

CLOUD VOCIE S Serivce Remote Extension S (Video) –Cisco 9971 IP Phone
Version 5.0
11
3.3 Adjust Wallpaper
1. Press the Applications button .
2. Select Preferences. (Use the Navigation pad and Select button to scroll
and select.)
3. Select Wallpaper and it will display different wallpaper in your IP phone.
Select the wallpaper you preferred.
4. Press the Preview soft key to preview the wallpaper.
5. Press the Set soft key to apply the wallpaper to your IP phone.

CLOUD VOCIE S Serivce Remote Extension S (Video) –Cisco 9971 IP Phone
Version 5.0
12
4 Basic Features
4.1 Placing a Call
There are 4 options for placing a new call:
1. When using the handset, lift the handset and dial the number.
2. To make a new call on the current line, press the NewCall soft key and
dial the number.
3. To dial with the phone on hook, from the main screen, perform either of
these actions:
Dial the number and lift handset or press the Dial soft key. The phone
will not produce the dial tone until after you lift the handset or press the
Dial soft key.
Press the NewCall soft key and dial the number.
4. To dial the last dialed number, press the Redial soft key.
4.2 Answering a Call
There are 3 options for answering a call:
1. Lift the handset.
2. Press the Answer soft key
3. Press the Speakerphone button
4.3 Ending a Call
There are 3 options for ending a call:
1. Hang up the handset.
2. Press the EndCall soft key
3. Press the Speakerphone button , when using hand-free
conversation mode

CLOUD VOCIE S Serivce Remote Extension S (Video) –Cisco 9971 IP Phone
Version 5.0
13
4.4 Muting a Call
1. Press the Mute button.
2. To disengage mute, press the Mute again.
5 Call Management Features
5.1 Putting a Call on Hold
1. To put a call on hold,
Press the Hold button .
The Hold icon will be displayed and the Line button will be pulsed to
green colour.
2. To resume the highlighted call, you can press the Resume soft key.
5.2 Using Call Waiting
1. To answer the new call, press the Answer soft key. When you do so, the
original call will be put on hold.
2. To return to the original call, press the Resume soft key.
3. If the second call is still active, the call will be put on hold when you return
to the original call.
4. You can continue to use the Hold button to switch between the calls.
5.3 Transferring a Call to another Party
1. Press the Transfer button .
2. Enter 8-digits local number * / 4-digits extension number of the recipient
3. Press the Transfer button again or the Transfer soft key.
* If you wish to transfer the call to external partner, please remember to add ”9”
before the 8-digits telephone number

CLOUD VOCIE S Serivce Remote Extension S (Video) –Cisco 9971 IP Phone
Version 5.0
14
5.4 Redialing the Last Number Dialed
Press the Redial soft key
5.5 Forwarding Calls to another Phone
5.5.1 Setting up Call Forwarding from your IP Phone
1. Activate - Press the Forward All soft key + destination number
2. Cancel - Press the Forward Off soft key.
Note: If you wish to forward the call to external partner, please remember to add ”9”
before the 8-digits telephone number
Tips: To forward all incoming calls to your voicemail, just simply press Forward All
and Message button.
5.5.2 Setting up Call Forwarding from your mobile
1. Dial 2112 1113 to access Remote Call Forwarding hotline.
2. Follow the voice prompts and select the language by pressing „1‟ for
Cantonese/ „2‟ for English.
3. Enter your Cloud Voice S number and Cloud Voice S password
accordingly.
4. Enter the destination of number to which you want to forward all of your
calls (e.g. your mobile).
5. Similarly, to cancel all call forwarding, please dial 2112 1113 to deactivate
the call forwarding setting accordingly.
Note: Starter Cloud Voice S Password is your Cloud Voice S number. For security
reason, please change your password in a regular basis.

CLOUD VOCIE S Serivce Remote Extension S (Video) –Cisco 9971 IP Phone
Version 5.0
15
5.5.3 Setting up Call Forwarding via Internet
1. Browse to website https://adp.cloudvoice.hkbnes.net/pc/en/index.jsp
2. Click „Cloud Voice S User Portal‟ button.
3. Enter your Cloud Voice S number and Cloud Voice S Password to login
Cloud Voice S User Portal.
4. Click „Call Management‟ to activate the Call Forwarding.
5. Enter the destination of number to which you want to forward all of your
calls (e.g. your mobile).
6. Similarly, to cancel all call forwarding, please login to „Cloud Voice S User
Portal‟ again to deactivate the call forwarding accordingly.
Note: Starter Cloud Voice S Password is your Cloud Voice S number. For security
reason, please change your password in a regular basis.
5.6 Placing a Conference Call
1. During an active call conversation, press the Conference button
2. Enter 8-digits local number / 4-digits extension number of the other
invited party.
3. Press the Call soft key and wait for the invited party to answer.
4. Press the Conference button again or the Conference soft key.
5. The conference call with 3 parties will be begun.
6. Repeat these steps to add more parties, if desired.
Note: If you wish to make a conference with external partner, please remember to
add ”9” before the 8-digits telephone number
Tips: To view and remove conference participants, you can press Details button and
press Remove to remove a conference participant.

CLOUD VOCIE S Serivce Remote Extension S (Video) –Cisco 9971 IP Phone
Version 5.0
16
5.7 Call Pickup
5.7.1 Call Pickup within your Group
1. Press the PickUp button to transfer a ringing call within your pickup group
to your phone.
2. When your phone rings, press the Answer soft key to pickup and connect
to the call.
5.7.2 Directed Call Pickup (Specific Group Member)
1. Press Group Pickup.
2. Enter the extension number of the phone line with the call that you want
to pick up.
(For example, if the call is ringing on line extension number „1234‟, please
enter „1234‟.)
3. When your phone rings, press the Answer soft key to pickup and connect
to the call.

CLOUD VOCIE S Serivce Remote Extension S (Video) –Cisco 9971 IP Phone
Version 5.0
17
6. VoiceMail Service (iVoiceMail Plus)
6.1 Activating VoiceMail
6.1.1 Activating VoiceMail on your IP Phone
i. Press the Message button on your IP Phone
ii. Enter your VoiceMail PIN followed by “#”
iii. Follow the voice instructions to change the VoiceMail PIN to activate the
VoiceMail service.
6.1.2 Remote Activation of VoiceMail
1. Dial the access number 2112-2345. [Please dial (852) 2112-2345 when
you are accessing VoiceMail service from overseas.]
2. A welcome greeting message will be announced and please select the
language by pressing „1‟ for Cantonese and „2‟ for English.
3. Enter your User ID (your Cloud Voice Number) followed by “#”
4. Enter your VoiceMail PIN followed by “#”
5. Follow the voice instructions to change the VoiceMail PIN to activate the
VoiceMail service
Note: Starter VoiceMail PIN is your Cloud Voice Number. For security reason, please
change your VoiceMail PIN regularly.
6.2 Accessing VoiceMail
1. The red light on your Handset will light up when you have a voicemail
message.
2. To access the voice messaging system, press the Message button
and follow the voice instructions.

CLOUD VOCIE S Serivce Remote Extension S (Video) –Cisco 9971 IP Phone
Version 5.0
18
6.3 Remote Access to VoiceMail
1. Dial the access number 2112-2345. [Please dial (852) 2112-2345 when
you are accessing VoiceMail service from overseas.]
2. A welcome greeting message will be announced and please select the
language by pressing „1‟ for Cantonese and „2‟ for English.
3. Enter your User ID (your Cloud Voice Number) followed by “#”
4. Enter your VoiceMail PIN followed by “#”
5. Follow the voice instructions for voice mail service.
Note: Starter VoiceMail PIN is your Cloud Voice Number. For security reason, please
change your VoiceMail PIN regularly.
6.4 Retrieval of VoiceMail via Outlook 2000/ 2003/ 2007/ 2010/ 2013
1. Open your Microsoft Outlook.
2. Click Tools.
3. Select Accounts.
4. Click New.
5. Select Microsoft Exchange, POP3, IMAP, or HTTP” and click Next.
6. Enter Account Information * and click Next.
7. Select Internet E-mail and click Next.
8. Enter Server Information ** and click Next.
9. Click Finish.
* When entering the Account Information, please input the following
Your Name: Name wish to be displayed in email
E-mail Address: 3[email protected]m.hk ; „3xxxxxxx‟ is your
Cloud Voice Number
Username: Your Cloud Voice Number (e.g. 3xxxxxxx)
Password: Your Cloud Voice Password
** When entering Server Information, please input the following:
Account Type: IMAP
Incoming mail server: imaps12.cloudvoice.hkbnes.net;
Outgoing mail server: (Your ISP smtp or Google smtp)
Note: Starter Cloud Voice PIN is your Cloud Voice Number. For security reason,
please change your Cloud Voice Password regularly.

CLOUD VOCIE S Serivce Remote Extension S (Video) –Cisco 9971 IP Phone
Version 5.0
19
7 VoiceMail Service (eVoiceMail)
7.1 Activating VoiceMail
7.11 Activating VoiceMail on your IP Phone
1. Press the Message button on your IP Phone
2. Enter your VoiceMail PIN followed by “#”
3. Follow the voice instructions to change the VoiceMail PIN to activate the
VoiceMail service.
7.12 Remote Activation of VoiceMail
1. Dial the access number 2112-1288. [Please dial (852) 2112-1288 when
you are accessing VoiceMail service from overseas.]
2. A welcome greeting message will be announced.
3. Enter your User ID (your Cloud Voice Number) followed by “#”
4. Enter your VoiceMail PIN followed by “#”
5. Follow the voice instructions to change the VoiceMail PIN to activate the
VoiceMail service
Note: Starter VoiceMail PIN is your Cloud Voice Number. For security reason, please
change your VoiceMail PIN regularly.
7.2 Accessing VoiceMail
1. The red light on your Handset will light up when you have a voicemail
message.
2. To access the voice messaging system, press the Message button
and follow the voice instructions.

CLOUD VOCIE S Serivce Remote Extension S (Video) –Cisco 9971 IP Phone
Version 5.0
20
7.3 Remote Access to VoiceMail
1. Dial the access number 2112-1288. [Please dial (852) 2112-1288 when
you are accessing VoiceMail service from overseas.]
2. A welcome greeting message will be announced.
3. Enter your User ID (your Cloud Voice Number) followed by “#”
4. Enter your VoiceMail PIN followed by “#”
5. Follow the voice instructions for voice mail service.
Note: Starter VoiceMail PIN is your Cloud Voice Number. For security reason, please
change your VoiceMail PIN regularly.
Table of contents
Popular IP Phone manuals by other brands

Cisco
Cisco 7945 Series Quick reference guide

TransTel Communications
TransTel Communications DK1 user guide

Grandstream Networks
Grandstream Networks GXV3275 Phonebook user guide

Cisco
Cisco IP 7940 Administration guide

Allworx
Allworx Verge Series Function card

Aastra
Aastra Clearspan 6757i installation guide